
Instruction manual
Инструкция по эксплуатации
Fan BR4971
Вентилятор BR4971
brayer.ru

СОДЕРЖАНИЕ
EN ......................................................................................................................................3
DE ....................................................................................................................................12
RU ...................................................................................................................................22
KZ ....................................................................................................................................32

3EN
FAN BR4971
The fan is intended for articial ventilation of the
room.
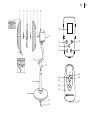
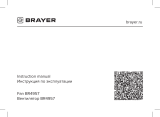
DESCRIPTION
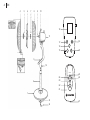
1. Base
2. Pole
3. Control panel
4. Front grid
5. Blade lock
6. Blades
7. Rear grid fastening nut
8. Rear grid
9. Motor axis
10. Carrying handle
11. Body
12. Fan clamp on the stand
13. Flat washer
14. Base lock
Control panel (3)
15. Body oscillation mode on/o button « »
16. On/o button « »
17. Air ow type selection button « »
18. Display
19. Airow speed selection button « »
EN
20. Timer On/O button « »
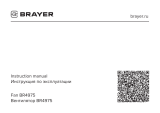
Remote control (21)
21. Remote control
22. Fan on/o button «ON.OFF»
23. Air ow speed selection button «SPEED»
24. Air ow type selection button «AIR FLOW»
25. Body oscillation on/o button «OSC»
26. Timer on/o button «TIMER»
27. Battery compartment lid

4EN
4 5 6 7 8 9 10
2
1
3
14
13
12
11
18
17
16
15
24
23
22
21
ВКЛ/ВЫКЛ
СКОРОСТЬ
ОБДУВ ТАЙМЕР
ПОВОРОТ
19
20
25
26
27

5EN
pic. 4pic. 3
pic. 2
pic. 1
pic. 5 pic. 6 pic. 7 pic. 8
pic. 9
pic. 10
pic. 11 pic. 12
pic. 13

6EN
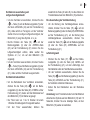
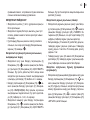
SAFETY MEASURES AND OPERATION
RECOMMENDATIONS
Read the operation manual carefully before using the
fan; after reading, keep it for future reference.
• Use the unit for its intended purpose only, as it is
stated in this manual.
• Mishandling the unit can lead to its breakage and
cause harm to the user or damage to the user’s
property, which is not covered by warranty.
• Make sure that the operating voltage of the unit
indicated on the label corresponds to your home
mains voltage.
• Place the fan vertically on a at dry moisture- and
heat-resistant surface, do not place it horizontally and
do not turn it over.
• Do not place the fan on soft surfaces, such as carpets
with high pile, sofas or beds.
• Do not place the fan near curtains and do not direct it
to house plants.
• Do not use the fan in a limited space, for example, in
built-in cabinets or wall niches.
• It is not recommended to stay in the zone of the air
ow from the fan for a long period of time, especially
for children and the elderly.
• Do not use the power cord as a carrying handle for
the fan.
• Do not wind the power cord around the fan body.
• Provide that the power cord does not contact with hot
surfaces and sharp furniture edges.
• Protect the unit from impacts, falling, vibrations and
other mechanical stress.
• Avoid blocking the air inlet grid of the fan with foreign
objects, do not cover the unit during the operation.
• Do not use the unit in places where inammable
liquids are used or aerosols are sprayed, do not use
the unit in the places where such liquids are stored.
• Do not use the unit near heating appliances, heat
sources or open ame.
• Do not use the unit outdoors, in bathrooms or in
places with high humidity.
• Do not use the unit in proximity to the kitchen sink,
near swimming pools or other containers lled with
water.
• If the unit is dropped into water, unplug it immediately,
and only then you can take the unit out of water. Apply
to the authorized service center for testing or repairing
the unit.
• Do not touch the unit body, the power cord and the
power plug with wet hands.
• It is not recommended to use the unit during lightning
storms.
• Do not block the airow channel and do not insert
any foreign objects into the channel.
• Never leave the unit connected to the mains
unattended.
• Unplug the unit after usage or before cleaning.
• Switch the fan o and unplug the power cord plug from
the mains socket.

7EN
• When unplugging the unit, hold the power plug and
carefully remove it from the mains socket, do not pull
the power cord, as this can lead to its damage or
cause a short circuit.
• Do not immerse the unit into water or any other liquids.
• If water droplets fall on the fan body, switch it o and
disconnect the power plug from the mains before
touching the unit, then wipe the fan body with a dry
cloth.
• For child safety reasons do not leave polyethylene
bags used as packaging unattended.
ATTENTION!
Do not allow children to play with polyethylene bags or
packaging lm. Danger of suocation!
not under supervision of a person who is responsible
for their safety or if they are not instructed by this
person on the usage of the unit.
• From time to time check the power cord integrity.
• If the power cord is damaged, it should be replaced
by the manufacturer, a maintenance service or similar
qualied personnel to avoid danger.
• Do not repair the unit by yourself. Do not disassemble
the unit by yourself, if any malfunction is detected, and
after the unit was dropped, unplug it and apply to the
service center.
• To avoid damages, transport the unit in the original
package.
• Keep the unit in a dry cool place out of reach of
children and disabled persons.
THE UNIT IS INTENDED FOR HOUSEHOLD USE
ONLY, DO NOT USE THE UNIT FOR COMMERCIAL
OR LABORATORY PURPOSES.
BEFORE THE FIRST USE
After the unit’s transportation or storage at negative
temperature, unpack it and wait for at least 3 hours
before using it.
• Unpack the unit and remove all the packaging
materials.
• Keep the original package.
• Read the safety measures and operating recom-
mendations.
• The unit is not intended for usage by children.
• Do not leave children unattended to prevent using the
unit as a toy.
• Do not allow children to touch the operating surface,
the unit body, the power cord or the power plug during
operation of the unit.
• Be especially careful if children or disabled persons
are near the operating unit.
• During the unit operation and breaks between
operation cycles, place the unit out of reach of
children.
• The unit is not intended for usage by physically or
mentally disabled persons (including children) or by
persons lacking experience or knowledge if they are

8EN
• Check the delivery set.
• Examine the unit for damages, in case of damage do
not plug it into the mains.
• Make sure that specied specications of power supply
voltage of the unit correspond to the specications of
your mains. When using the unit in the mains with 60
Hz frequency, the unit does not need any additional
settings.
• Wipe the fan body with a slightly damp cloth and then
wipe it dry.
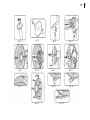
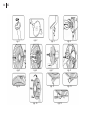
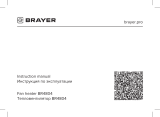
FAN ASSEMBLY
• Unscrew the base lock (14) from the stand (2) by
rotating it counterclockwise (pic. 1).
• nstall the base (1) on the stand (2), install the at
washer (13), screw the base lock (14) along the
thread, rotating it clockwise (pic. 2).
• Unscrew the fan clamp (12) not completely by rotating
it counterclockwise (pic. 3).
• Mount the fan body (11) onto the stand (2), screw
in the fan clamp (12) by rotating it clockwise. When
screwing the clamp (12) do not apply too much eort
(pic. 3).
• Unscrew the blade lock (5) by turning it clockwise.
Unscrew the rear grid fastening nut (7) by turning it
counterclockwise (pic. 4)
• Match the guides on the motor unit with the
corresponding openings on the grid (8) and install the
rear grid (8) on the motor unit, x it with the nut (7),
turning it clockwise along the thread (pic. 5, 6).
• Install the blades (6) on the electric motor axis (9), and
x them with the lock (5), turning it counterclockwise
along the thread, hold the blades (6) with your free
hand (pic. 7, 8).
• Open the grid clamps, match the front (4) and rear (8)
grids, close the clamps, make sure that the grids (4
and 8) are properly xed (pic. 9, 10).
• Unscrew the xing screw at the bottom part of the grid
(pic. 11), set the clamp to the correct position (pic. 12),
tighten the xing screw (pic. 13).
Remote control (21)
• Before using the remote control (RC) (21) open
the battery compartment lid (27) and insert 2 «AA»
batteries (supplied with the unit) into the battery
compartment strictly following the polarity, close the
battery compartment lid (27).
Note: if there is an isolating insert in the battery
compartment, remove it.
• If you are not going to use the remote control for a long
time, open the lid (27) and remove the batteries from
the remote control (21) battery compartment.
• Battery leakage may cause injury or damage to the
remote control (21), to prevent damage to the remote
control (21), follow the instructions below:
- use only the «AA» batteries;
- do not use old and new batteries at the same time;
- do not recharge the batteries;

9EN
- strictly observe the polarity while installing the
batteries;
- take the batteries out if you are not going to use the
remote control (21) for a long time;
- apply to specialized centers for recycling of the
batteries.
• When you use the remote control, direct it to the front
part of the fan body.
• The distance between the remote control and the fan
should not exceed 5 m, the coverage angle should be
up to 30 degrees.
• Avoid exposing the receiver to direct sunlight,
otherwise false activation of control commands is
possible.
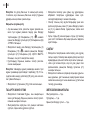
USING THE FAN
• Place the fan base (1) on a at, dry and steady
surface.
• Do not place the fanon soft surfaces, such as carpets
with high pile, sofas or beds.
• Plug the power cord into the mains socket, the on/o
button indicator (16) will light up « ».
Switching the fan on/o and selecting the airow
speed
• To switch the fan on, press the button (16) « » on
the control panel (3) or the button (22) «ON/OFF» on
the remote control (21), you will hear a sound signal,
and the fan will switch on at low airow speed, the
symbol «L1» will light up on the display (18).
• Pressing the button (19) « » on the control panel
(3) or the button (23) «SPEED» on the remote control
(21) you can select the air ow speed, the symbols
(12) «L1, L2, L3» will appear on the display (18).
• To switch the fan o, press the button (16) « » on
the control panel or the button (3) «ON/OFF» on the
remote control (22). The fan will be switched o.
Fan operation time timer
• To set the fan operation time, press the button (20)
« » on the control panel (3) or the button (26)
«TIMER» on the remote control (21), the display (18)
will show the operation time in digital symbols.
• Timer setting time from 1 hour to 12 hours, setting
step 1 hour.
• To switch the timer o, press the button (20 or 26)
repeatedly until the timer operation time digital
symbols go out on the display (18).
Switching the fan body oscillation on/o
• To switch the fan body oscillation function on, press
the button (15) « » on the control panel (3) or the
button (25) «OSC» on the remote control (21), to
switch the oscillation function o, press again the
button (15) « » on the control panel (3) or the button
(25) «OSC» on the remote control (21).

10 EN
Note: you can change the direction of the airow in the
vertical plane, the angle of change in the airow direction
is and is set manually.
Selecting the airow type
• Press the button (17) « » on the control panel (3)
or the button (24) «AIR FLOW» on the remote control
(21) to select the type of air ow, normal operation
mode or night mode.
• To switch the fan o, press the button (16) « » on
the control panel (3) or the button (22) «ON/OFF» on
the remote control (21). The fan will be switched o.
• Remove the power plug from the mains socket.
Note: in the timer mode or the night mode, the symbols
on the display (18) will go out after 10 seconds, to switch
the display (18) on press any button.
• Carry the fan by the handle (10).
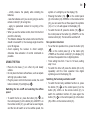
CLEANING AND MAINTENANCE
• Before cleaning the fan, switch it o and unplug it.
• Wipe the fan body with a slightly damp cloth and then
wipe it dry.
• Do not use liquid detergents, abrasive cleaners and
any solvents to clean the fan.
• To avoid the risk of electric shock, do not allow water
or any other liquid to get inside the fan body (11) and
the control panel (3).
• You can use the vacuum cleaner with a corresponding
attachment to clean the rear (8) and front (4) grids.
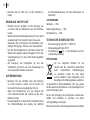
STORAGE
• After cleaning put the fan away for storage in a dry
cool place away from children and disabled persons.
• Remove the battery from the remote control (21) if you
are not going to use it for a long time.
• Before using the fan next time, it is recommended to
check the unit operability and integrity of the power
cord isolation and the power cord plug.
DELIVERY SET
Fan — 1 pc.
Instruction manual — 1 pc.
Remote control — 1 pc.
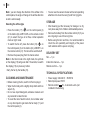
TECHNICAL SPECIFICATIONS
• Power supply: 220-240 V, ~ 50/60 Hz
• Rated input power: 50 W
• Remote control: 3V - 2 elements «AA» (not
included in the delivery)

11EN
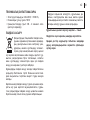
RECYCLING
To prevent possible damage to the
environment or harm to the health of people
by uncontrolled waste disposal, after service
life expiration of the unit or the batteries (if
included), do not discard them with usual
household waste, deliver the unit and the
batteries to specialized centers for further recycling.
The waste generated during the disposal of the unit is
subject to mandatory collection and consequent disposal
in the prescribed manner.
For further information about recycling of this product
apply to a local municipal administration, a disposal
service or to the shop where you purchased this product.
The manufacturer reserves the right to change the
appearance, design and specications not aecting
general operation principles of the unit, without prior
notice.
The unit operating life is 3 years
The manufacturing date is specied in the serial
number.
In case of any malfunctions promptly apply to the
authorized service center.

12 DE
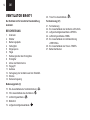
VENTILATOR BR4971
Der Ventilator ist für künstliche Raumbelüftung
bestimmt.
BESCHREIBUNG
1. Untersatz
2. Ständer
3. Bedienungsplatte
4. Vordergitter
5. Klingensperre
6. Flügel
7. Halterungsmutter des Hintergitters
8. Hintergitter
9. Achse des Elektromotors
10. Tragegri
11. Gehäuse
12. Verriegelung des Ventilators auf dem Standfuß
13. Scheibe
14. Sockelverriegelung
Bedienungsplatte (3)
15. Ein-/Ausschalttaste der Ventilatordrehung « »
16. 1Ein-/Ausschalttaste des Ventilators « »
17. Luftstromtypwahltaste « »
18. Bildschirm
19. Luftgeschwindigkeitswahltaste « »
DE
20. Timer Ein-/Ausschalttaste « »
Fernbedienung (21)
21. Fernbedienung
22. Ein-/Ausschalttaste des Ventilators «EIN.AUS»
23. Luftgeschwindigkeitswahltaste «SPEED»
24. Luftstromtypwahltaste «WIND»
25. Ein-/Ausschalttaste der Ventilatordrehung
«DREHUNG»
26. Ein-/Ausschalttaste des Timers «TIMER»
27. Batteriefachdeckel

13DE
4 5 6 7 8 9 10
2
1
3
14
13
12
11
18
17
16
15
24
23
22
21
ВКЛ/ВЫКЛ
СКОРОСТЬ
ОБДУВ ТАЙМЕР
ПОВОРОТ
19
20
25
26
27

14 DE
Bild. 4Bild. 3
Bild. 2
Bild. 1
Bild. 5 Bild. 6 Bild. 7 Bild. 8
Bild. 9
Bild. 10
Bild. 11 Bild. 12
Bild. 13

15DE
SICHERHEITSHINWEISE UND
BEDIENUNGSANLEITUNG
Bevor Sie den Ventilator benutzen, lesen Sie die
Bedienungsanleitung aufmerksam durch und
bewahren Sie sie zum späteren Gebrauch auf.
• Benutzen Sie das Gerät nur bestimmungsmäßig und
laut dieser Bedienungsanleitung.
• Missbrauch des Geräts kann zu seiner Störung führen,
den Benutzer oder sein Eigentum beschädigen und ist
kein Garantiefall.
• Vergewissern Sie sich, dass die auf dem Bezeich-
nungszettel angegebene Betriebsspannung und die
Netzspannung übereinstimmen.
• Stellen Sie den Ventilator senkrecht auf einer ebenen,
trockenen, feuchtigkeits- und hitzebeständigen
Oberäche auf, legen Sie ihn horizontal nicht und
kippen Sie ihn nicht um.
• Stellen Sie den Ventilator auf keinen weichen
Oberächen wie langorige Teppiche, sowie auf
keinen Sofas oder Betten auf.
• Stellen Sie den Ventilator in keiner Nähe von
Vorhängen oder Gardinen auf und richten Sie den
Ventilator auf keine Zimmerpanzen.
• Es ist nicht gestattet, den Ventilator während
des Betriebs im begrenzten Raum (z.B. in
Einbauschränken oder Wandnischen) zu benutzen.
• Es ist nicht empfohlen, sich längere Zeit im
Ventilatorluftstrombereich aufzuhalten, insbesondere
für Kinder und älteren Menschen.
• Verwenden Sie das Netzkabel als Gri zum Tragen
des Ventilators nicht.
• Wickeln Sie das Netzkabel aufs Ventilatorgehäuse
nicht auf.
• Vermeiden Sie die Berührung des Netzkabels mit
heißen Oberächen und scharfen Möbelkanten.
• Schützen Sie das Gerät vor Stößen, Stürzen,
Vibrationen und anderen mechanischen Einwirkungen.
• Vermeiden Sie die Verstopfung des Lufteinlaßgitters
des Ventilators mit Fremdkörpern; es ist verboten, das
Gerät während seines Betriebs abzudecken.
• Verwenden Sie das Gerät an keinen Orten, an denen
Aerosole oder leichtentzündbare Flüssigkeiten benutzt oder
versprüht werden; verwenden Sie das Gerät an keinen
Orten, an denen solche Flüssigkeiten aufbewahrt werden.
• Benutzen Sie das Gerät in direkter Nähe von
Heizgeräten, Wärmequellen oder oenem Feuer nicht.
• Verwenden Sie das Gerät im Freien, im Badezimmer
oder in Räumen mit erhöhter Luftfeuchtigkeit nicht.
• Benutzen Sie das Gerät in der Nähe von Spülbecken,
neben Wasserbecken oder anderen mit Wasser
gefüllten Behältern nicht.
• Falls das Gerät ins Wasser gefallen ist, ziehen Sie
den Netzstecker aus der Steckdose sofort heraus,
erst danach holen Sie das Gerät aus dem Wasser
heraus. Wenden Sie sich an einen autorisierten
Kundendienst, um das Gerät prüfen oder reparieren
zu lassen.

16 DE
• Berühren Sie das Gerätegehäuse, das Netzkabel und
den Netzstecker mit nassen Händen nicht.
• Es ist nicht empfohlen, das Gerät bei Gewitter zu
benutzen.
• Lassen Sie das ans Stromnetz angeschlossene Gerät
nie unbeaufsichtigt.
• Trennen Sie das Gerät nach dem Gebrauch oder vor
der Reinigung vom Stromnetz unbedingt ab.
• Schalten Sie den Ventilator aus und ziehen Sie den
Netzstecker aus der Steckdose heraus.
• Wenn Sie das Gerät vom Stromnetz abtrennen,
halten Sie den Netzstecker fest und ziehen Sie ihn
aus der Steckdose vorsichtig heraus; ziehen Sie das
Netzkabel nicht, da es zu seiner Beschädigung und
einem Kurzschluss führen kann.
• Es ist nicht gestattet, das Gerät in Wasser oder
jegliche andere Flüssigkeiten einzutauchen.
• Wenn Wassertropfen aufs Ventilatorgehäuse
gelangen, bevor Sie es berühren, schalten Sie
den Ventilator aus und ziehen Sie das Netzkabel
aus der Steckdose heraus, wischen Sie dann das
Ventilatorgehäuse mit einem trockenen Tuch ab.
• Aus Kindersicherheitsgründen lassen die als
Verpackung verwendeten Plastiktüten nie ohne
Aufsicht.
ACHTUNG!
Lassen Sie Kinder mit Plastiktüten oder Verpa-
ckungsfolien nicht spielen. Erstickungsgefahr!
• Das Gerät ist nicht für Kinder bestimmt.
• Beaufsichtigen Sie Kinder, damit sie das Gerät als
Spielzeug nicht benutzen.
• Lassen Sie Kinder die Arbeitsäche, das Gerä-
tegehäuse, das Netzkabel oder den Netzstecker
während des Gerätebetriebs nicht berühren.
• Besondere Vorsichtsmaßnahmen sind in den Fällen
angesagt, wenn sich Kinder oder behinderte Personen
während des Gerätebetriebs in der Nähe aufhalten.
• Während des Betriebs und der Pausen zwischen
den Betriebszyklen stellen Sie das Gerät an einen für
Kinder unzugänglichen Ort auf.
• Das Gerät ist für Personen (darunter Kinder) mit
Körper-, Nerven- und Geistesstörungen oder Personen
ohne ausreichende Erfahrung und Kenntnisse nicht
geeignet, wenn sie sich unter Aufsicht der Person, die
für ihre Sicherheit verantwortlich ist, nicht benden
oder entsprechende Anweisungen über die Nutzung
des Geräts nicht bekommen haben.
• Prüfen Sie die Unversehrtheit des Netzkabels
periodisch.
• Wenn das Netzkabel beschädigt ist, soll es vom
Hersteller, vom Kundendienst oder von ähnlich
qualiziertem Personal ersetzt werden, um Gefahren
zu vermeiden.
• Es ist nicht gestattet, das Gerät selbständig zu
reparieren. Es ist nicht gestattet, das Gerät selbständig
auseinanderzunehmen; bei der Feststellung jeglicher
Beschädigungen, sowie im Sturzfall, trennen Sie das

17DE
Gerät vom Stromnetz ab und wenden Sie sich an
einen Kundendienst.
• Um Beschädigungen zu vermeiden, transportieren
Sie das Gerät nur in der Fabrikverpackung.
• Bewahren Sie das Gerät an einem trockenen,
kühlen und für Kinder und behinderte Personen
unzugänglichen Ort auf.
DAS GERÄT IST NUR FÜR DEN GEBRAUCH IM
HAUSHALT GEEIGNET, ES IST VERBOTEN, DAS
GERÄT ZU GESCHÄFTS- ODER LABORZWECKEN
ZU BENUTZEN.
VOR DER ERSTEN VERWENDUNG
Packen Sie das Gerät aus und warten Sie mindestens
3 Stunden, bevor Sie es bei einer negativen Tem-
peratur transportieren oder bewahren.
• Packen Sie das Gerät aus und entfernen Sie alle
Verpackungsmaterialien.
• Bewahren Sie die Originalverpackung auf.
• Lesen Sie die Sicherheitsmaßnahmen und Bedienun-
gsempfehlungen.
• Prüfen Sie die Komplettheit.
• Prüfen Sie das Gerät auf Beschädigungen; wenn es
beschädigt ist, schließen Sie es ans Stromnetz nicht an.
• Vergewissern Sie sich, dass die angegebenen
Parameter der Geräteversorgungsspannung und die
Stromnetzparameter übereinstimmen. Beim 60-Hz-
Stromnetz-Gerätebetrieb sind keine zusätzlichen
Maßnahmen erforderlich.
• Wischen Sie das Ventilatorgehäuse mit einem leicht
angefeuchteten Tuch, danach trocknen Sie es ab.
VENTILATORMONTAGE
• Drehen Sie die Sockelverriegelung (14) gegen
Uhrzeigersinn, um sie aus dem Standfuß (2)
herauszuschrauben (Bild 1).
• Setzen Sie den Sockel (1) auf den Standfuß (2) auf,
bringen Sie die Scheibe (13) an, drehen Sie die
Sockelverriegelung (14) im Uhrzeigersinn, um sie
festzuschrauben (Bild 2).
• Drehen Sie die Ventilatorverriegelung (12) gegen
Uhrzeigersinn, um sie etwas zu lösen (Bild 3).
• Setzen Sie das Ventilatorgehäuse (11) auf den
Standfuß (2) auf, drehen Sie die Ventilatorverriegelung
(12) im Uhrzeigersinn, um sie festzuschrauben.
Wenden Sie nicht zu viel Kraft auf, wenn Sie die
Verriegelung (12) festschrauben (Bild 3).
• Drehen Sie die Flügelverriegelung (5) im
Uhrzeigersinn, um sie auszuschrauben. Drehen Sie
die Halterungsmutter des Hintergitters (7) gegen
Uhrzeigersinn, um sie auszuschrauben (Bild 4)
• Positionieren Sie die Führungen auf dem Motorblock
so, dass sie mit entsprechenden Önungen des Gitters
(8) zusammenfallen, setzen Sie das Hintergitter (8)
auf den Motorblock auf, drehen Sie die Mutter (7)
entsprechend dem Gewinde im Uhrzeigersinn, um
das Hintergitter zu verriegeln (Bild 5, 6).

18 DE
• Setzen Sie die Flügel (6) auf die Achse des
Elektromotors (9) auf und drehen Sie die Verriegelung
(5) entsprechend dem Gewinde gegen Uhrzeigersinn,
um die Flügel zu verriegeln, halten Sie die Flügel (6)
mit der freien Hand (Bild 7, 8).
• Önen Sie die Gitterverriegelungen, positionieren
Sie das Vordergitter (4) und das Hintergitter (8)
so, dass sie zusammenfallen, schließen Sie die
Verriegelungen, achten Sie darauf, dass die Gitter (4
und 8) sicher verriegelt sind (Bild 9, 10).
• Schrauben Sie die Halteschraube im unteren Teil des
Gitters heraus (Bild 11), bringen Sie die Verriegelung
in die richtige Lage (Bild 12), schrauben Sie die
Halteschraube wieder fest (Bild 13).
Fernbedienung (21)
• Vor der Benutzung der Fernbedienung (21) önen
Sie den Batteriefachdeckel (27), setzen Sie 2 (Nicht
enthalten) «AA» Batterien unter Beachtung der
Polarität in das Batteriefach ein, schließen Sie den
Batteriefachdeckel (27).
Anmerkung: wenn das Batteriefach eine Isoliereinlage
enthält, nehmen sie diese heraus.
• Wenn die Fernbedienung eine längere Zeit nicht
verwendet werden soll, dann önen Sie den
Deckel (27) und nehmen sie die Batterien aus dem
Batteriefach der Fernbedienung (21) heraus.
• Leckende Batterien können zu Verletzungen oder zur
Beschädigung der Fernbedienung (21) führen, um die
Beschädigung der Fernbedienung (21) zu verhindern,
befolgen Sie die nachfolgenden Anweisungen:
- Benutzen Sie nur Batterien vom Typenmaß «АА»;
- es ist verboten, zugleich eine gebrauchte und eine
neue Batterie zu verwenden;
- es ist verboten, die Batterien umzuladen;
- beachten Sie streng die Polarität, wenn sie die
Batterien einsetzen;
- wenn die Fernbedienung (21) eine längere Zeit nicht
verwendet werden soll, nehmen sie die Batterien heraus;
- geben Sie die Batterien bei speziellen Sammelstellen
zur Verwertung auf.
• Wenn Sie die Fernbedienung verwenden, richten Sie
sie auf den Vorderteil des Ventilatorgehäuses.
• Der Abstand von der Fernbedienung zum
Ventilator soll 5 Meter nicht überschreiten, der
Fernbedienungswinkel beträgt bis zu 30 Grad.
• Vermeiden Sie direktes Sonnenlicht aufs
Empfangelement, da sonst die Steuerbefehle falsch
aktiviert werden können.
VERWENDUNG DES VENTILATORS
• Stellen Sie den Ventilatoruntersatz (1) auf eine ebene,
trockene und standfeste Oberäche auf.
• Stellen Sie den Ventilator auf keinen weichen
Oberächen wie langorige Teppiche, Sofas oder
Betten, auf.
• Stecken Sie den Netzstecker in eine Steckdose
ein, dabei leuchtet die Beleuchtung der Ein-/
Ausschalttaste (16) « ».

19DE
Ventilatorein-/ausschaltung und
Luftgeschwindigkeitswahl
• Um den Ventilator einzuschalten, drücken Sie die
«» – Taste (3) auf der Bedienungsplatte (5) oder
die Taste «EIN/AUS» (22) auf der Fernbedienung
(23), dabei ertönt ein Tonsignal, und der Ventilator
startet mit einer niedrigen Luftgeschwindigkeit, der
Bildschirm (3) zeigt das Symbol «L1» an.
• Durchs Drücken der Taste (19) « » auf der
Bedienungsplatte (3) oder der «SPEED»-Taste
(23) auf der Fernbedienung (21) können Sie die
Luftgeschwindigkeit wählen, dabei werden die
Symbole «L1, L2, L3» auf dem Bildschirm (18)
angezeigt.
• Um den Ventilator auszuschalten, drücken Sie die
«» – Taste (16) auf der Bedienungsplatte (3) oder
die Taste «EIN/AUS» (22) auf der Fernbedienung
(21), dabei wird der Ventilator ausgeschaltet.
Ventilatorbetriebszeittimer
• Um die Betriebszeit des Ventilators einzustellen,
drücken Sie die Taste (20) « » auf der Bedie-
nungsplatte (3) oder die Taste (26) «TIMER» auf der
Fernbedienung (21), dabei wird die Betriebszeit auf
dem Bildschirm (18) mit Zahlen angezeigt
• Der Timer kann von 1 bis 12 Stunden mit einem
1-Stunden-Einstellungsschritt eingestellt werden.
• Um den Timer auszuschalten, drücken Sie
wiederholt die Taste (20 oder 26), bis die Zahlen der
Timerbetriebszeit auf dem Bildschirm (18) erlöschen.
Ein-/Ausschaltung der Ventilatordrehung
• Um die Drehung des Ventilatorgehäuses einzus-
chalten, drücken Sie die Taste (15) « » auf der
Bedienungsplatte (3) oder die Taste (25) «DREHUNG»
auf der Fernbedienung (21), um die Drehung des
Ventilatorgehäuses auszuschalten, drücken Sie
wieder die Taste (15) « » auf der Bedienungsplatte
(3) oder die Taste (25) «DREHUNG» auf der
Fernbedienung (21)
Luftstromtypwahl
• Drücken Sie die Taste (17) « » auf der Bedie-
nungsplatte (3) oder die Taste (24) «WIND» auf
der Fernbedienung (21), um den Luftstromtyp, den
Normalbetrieb oder den Nachtbetrieb auszuwählen.
• Um den Ventilator auszuschalten, drücken Sie die
Taste (16) « » auf der Bedienungsplatte (3) oder die
Taste (22) «EIN/AUS» auf der Fernbedienung (21),
der Ventilator schaltet sich dabei aus.
• Ziehen Sie den Netzstecker aus der Steckdose
heraus.
Anmerkung: beim Timerbetrieb oder beim Nachtbetrieb
erlöschen die Symbole auf dem Bildschirm (18) nach 10
Sekunden, drücken Sie eine beliebige Taste, um den
Bildschirm (18) wieder einzuschalten.

20 DE
• Benutzen Sie den Gri (10), um den Ventilator zu
tragen.
REINIGUNG UND PFLEGE
• Schalten Sie den Ventilator vor dem Reinigen aus
und ziehen Sie den Netzstecker aus der Steckdose
heraus.
• Wischen Sie das Ventilatorgehäuse (2) mit einem leicht
angefeuchteten Tuch, danach trocknen Sie es ab.
• Verwenden Sie zum Reinigen des Ventilators keine
üssigen Reinigungs-, Scheuer- oder Lösungsmittel.
• Um das Stromschlagrisiko zu verhindern, lassen Sie
Wasser oder jegliche andere Flüssigkeit nicht in das
Ventilatorgehäuse (11) und auf die Bedienungsplatte
(3) geraten.
• Zur Reinigung des Hintergitters (8) und des
Vordergitters (4) können sie einen Staubsauger mit
einem passenden Aufsatz verwenden.
AUFBEWAHRUNG
• Bewahren Sie den Ventilator nach dem Reinigen
an einem trockenen, kühlen und für Kinder und
behinderte Personen unzugänglichen Ort auf.
• Wenn die Fernbedienung (21) eine längere Zeit
nicht verwendet werden soll, nehmen sie die «АА»
Batterien heraus.
• Es wird empfohlen, vor der nächsten Ventilatornutzung
die Funktionsfähigkeit des Geräts, die Intaktheit
der Stromkabelisolierung und des Netzsteckers zu
überprüfen.
LIEFERUMFANG
Ventilator — 1 Stk.
Bedienungsanleitung — 1 Stk.
Fernbedienung — 1 Stk.
TECHNISCHE EIGENSCHAFTEN
• Stromversorgung: 220-240 V, ~ 50/60 Hz
• Nennleistungsaufnahme: 50 W
• Fernbedienung: 3V - 2 «AA»-Elemente (nicht im
Lieferumfang enthalten)
ENTSORGUNG
Um ein mögliches Schaden für die
Umwelt oder die menschliche Gesundheit
durch unkontrollierte Abfallentsorgung
zu vermeiden, werfen Sie das Gerät
und die Batterien (falls mitgeliefert) nach
Beendigung ihrer Nutzungsdauer zusammen
mit gewöhnlichen Haushaltsabfällen nicht weg, geben
Sie das Gerät und die Batterien in die Spezialpunkte für
weitere Entsorgung über.
Die bei der Entsorgung der Erzeugnisse entstehenden
Abfälle sind unbedingt zu sammeln und weiter
ordnungsmäßig zu entsorgen.
Mehrere Information zur Entsorgung dieses Lebensmittels
Seite wird geladen ...
Seite wird geladen ...
Seite wird geladen ...
Seite wird geladen ...
Seite wird geladen ...
Seite wird geladen ...
Seite wird geladen ...
Seite wird geladen ...
Seite wird geladen ...
Seite wird geladen ...
Seite wird geladen ...
Seite wird geladen ...
Seite wird geladen ...
Seite wird geladen ...
Seite wird geladen ...
Seite wird geladen ...
Seite wird geladen ...
Seite wird geladen ...
Seite wird geladen ...
Seite wird geladen ...
Seite wird geladen ...
Seite wird geladen ...
Seite wird geladen ...
Seite wird geladen ...
-
 1
1
-
 2
2
-
 3
3
-
 4
4
-
 5
5
-
 6
6
-
 7
7
-
 8
8
-
 9
9
-
 10
10
-
 11
11
-
 12
12
-
 13
13
-
 14
14
-
 15
15
-
 16
16
-
 17
17
-
 18
18
-
 19
19
-
 20
20
-
 21
21
-
 22
22
-
 23
23
-
 24
24
-
 25
25
-
 26
26
-
 27
27
-
 28
28
-
 29
29
-
 30
30
-
 31
31
-
 32
32
-
 33
33
-
 34
34
-
 35
35
-
 36
36
-
 37
37
-
 38
38
-
 39
39
-
 40
40
-
 41
41
-
 42
42
-
 43
43
-
 44
44


Verwandte Artikel
-
 Brayer BR4974 Portable Column Fan Benutzerhandbuch
-
 Brayer BR4954 Bedienungsanleitung
-
 Brayer BR4955 Bedienungsanleitung
-
 Brayer BR4953 Bedienungsanleitung
-
 Brayer BR4950 Bedienungsanleitung
-
 Brayer BR4957 Benutzerhandbuch
-
 Brayer BR4951 Bedienungsanleitung
-
 Brayer BR4975 Column Fan Benutzerhandbuch
-
 Brayer BR4804 Bedienungsanleitung
-
 Brayer BR4805 Bedienungsanleitung


