
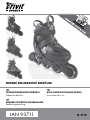
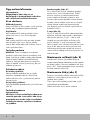
IAN 93711
DETSKÉ KOLIESKOVÉ KORČULE
KIDS SOFTBOOT INLINE SKATES
Instructions for use
KINDER-SOFTBOOT-INLINESKATES
Bedienungsanleitung
DETSKÉ KOLIESKOVÉ KORČULE
Návod na obsluhu

2
A
7
1
2
89
4
5
3
6
E
89
B C D

3
F G
I J
M
3
1
2
L
3
1
2
3
H
K
N
1
2
3

4
Obsah balenia/označenie častí .......................... 5
Technické údaje .................................................... 5
Použitie podľa určenia .........................................5
HeiQ
®
Pure dynamic ............................................. 5
Bezpečnostné pokyny ..........................................5
Tipy na korčuľovanie ............................................ 6
Nastavenie veľkosti .............................................. 6
Nastavenie šírky ................................................... 6
Zobutie ................................................................... 7
Obutie ................................................................... 7
Údržba .............................................................7 - 8
Údržba, skladovanie ........................................... 8
Odstránenie porúch .........................................8 - 9
Pokyny k likvidácii ............................................... 9
3 roky záruka ....................................................... 9
Lieferumfang/Teilebezeichnung ........................ 15
Technische Daten ................................................ 15
Bestimmungsgemäße Verwendung ...................15
HeiQ
®
Pure dynamic ...........................................15
Sicherheitshinweise .............................................15
Tipps zum Skaten ............................................... 16
Einstellen der Größe ..........................................16
Einstellen der Weite ............................................16
Ausziehen .............................................................17
Anziehen .............................................................. 17
Wartung ........................................................17 - 18
Pflege, Lagerung .................................................18
Fehlerbeseitigung ......................................... 18 - 19
Hinweise zur Entsorgung ...................................19
3 Jahre Garantie ................................................19
Obsah/Contents/Inhaltsverzeichnis
Scope of delivery/names of parts ....................10
Technical Data .....................................................10
Correct use ...........................................................10
HeiQ
®
Pure dynamic
..........................................10
Safety notes ........................................................10
Skating tips .......................................................... 11
Setting the sizes .................................................. 11
Setting the width ................................................. 11
Removing the skates ...........................................12
Putting the skates on ........................................... 12
Maintenance ............................................... 12 - 13
Care, Storage ......................................................13
Trouble-shooting .......................................... 13 - 14
Disposal Information ...........................................14
3 Years Warranty ................................................14

5
Srdečne Vám blahoželáme!
Vašou kúpou ste sa rozhodli pre vysokokvalitný
produkt. Skôr než začnete produkt používať,
dôkladne sa s ním oboznámte. K tomu si
prečítajte tento návod na obsluhu. Produkt
používajte v súlade s pokynmi uvedenými v
návode a na účely, na ktoré je produkt určený.
Tento návod si odložte. Ak produkt odovzdáte
tretej osobe, priložte jej tiež všetky podklady.
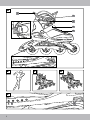
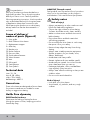
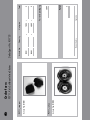
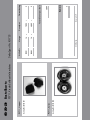
Obsah balenia/označenie
častí (obr. A)
1 x Návod k obsluhe
1 x Detské kolieskové korčule
1 x Náhradná brzda
2 x Imbusový kľúč
(1) Pásik so západkou
(2) Pracka
(3) Západka
(4) Rýchloupínací uzáver
(5) Suchý zips
(6) Šnúrky
(7) Pomôcky pri obúvaní
(8) Nastavovacia hlavica
(9) Symboly pre veľkosť
Technické údaje
veľkosti: 32 - 36
trieda B, 20 - 60 kg
kolieska: 70 x 24 mm
ložiská: ABEC 5
Použitie podľa určenia
Tieto inline korčule boli vyrobené pre súkromné
fitnes korčuľovanie a nie sú vhodné pre street
hokej alebo agresívne korčuľovanie.
HeiQ
®
Pure dynamiq
PURE sviežosť textilu
Vďaka sile striebra, ktoré po celý deň zabraňuje
vzniku zápachu, zažite pocit prítomnej sviežosti.
ADAPTIVE tepelná regulácia
Cíťte sa zo všetkých strán príjemne Keď Vám je
teplo, textília Vás schladí a počas chladu vám
poskytne dlhšie sucho Chladí a minimalizuje
vznik potu.
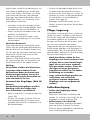
Bezpečnostné pokyny
Nebezpečenstvo poranenia!
• Neustále dávajte pozor na ostatných
účastníkov cestnej premávky a dodržujte
cestné predpisy.
• Na inline korčuľovanie si vyberte správny
povrch. Povrch by mal byť hladký, čistý a
suchý.
• Pred korčuľovaním skontrolujte, či sú všetky
skrutky a matice pevne utiahnuté.
• Uistite sa, či skrutky a matice nestratili samo
blokovaciu schopnosť .
• Nemeňte na svojich inline korčuliach nič, kvôli
čomu by ste za určitých okolností ohrozili svoju
bezpečnosť.
• Odstráňte ostré hrany, na ktoré by ste počas
korčuľovania mohli naraziť.
• Vždy noste vhodné ochranné pomôcky
(prilba, chrániče rúk, zápästí, lakťov a kolien).
• Vyhýbajte sa oblastiam v vysokou hustotou
dopravy.
• Dávajte vždy pozor a buďte opatrní.
• Vyvarujte sa privysokej rýchlosti. Základné
pravidlo: Nikdy sa nekorčuľujte rýchlejšie ako
viete bežať.
• Pravidelne vymieňajte brzdu, kolieska a
ložiská, ak sú opotrebované.
• Vždy noste reflexné oblečenie, aby Vás bolo
lepšie vidieť.
• Výrobok nepoužívajte naboso.
Nebezpečenstvo poranenia!
• Ošetrujte si svoje inline korčule.
• Vyhýbajte sa vode, oleju, výtlkom a veľmi
drsným povrchom.
SK

6
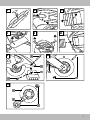
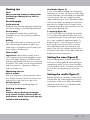
Brzda na päte (obr. C):
Ak sú Vaše inline korčule vybavené brzdami,
myslite na to, že ich máte používať. Špičku
korčule, na ktorej je namontovaná brzda,
trochu nadvihnite a brzdu pritlačte o zem.
Preneste váhu jemne dopredu a ohnite kolená.
Brzdiaci účinok môžete zvýšiť tak, že silnejšie
ohnete kolená a váhu tela prenesiete ešte
viac dopredu, pričom súčasne zvýšite tlak na
brzdiacu korčuľu.
T-stop (obr. D):
Ak nie sú Vaše inline korčule vybavené brzdou
alebo ak ste brzdu odmontovali, odporúčame
Vám použiť techniku „T-stop“ – táto je však
vhodná len pre pokročilých korčuliarov! Pri
použití techniky „T-stop“ preneste celú Vašu
váhu na jednu nohu. Potom posuňte druhú nohu
za prvú tak, aby za ňou bola v pravom uhle.
Nakoniec preneste váhu spredu na vnútornú
stranu koliesok zadnej korčule a zvyšujúcim sa
tlakom brzdite.
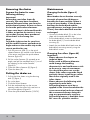
Nastavenie veľkosti (obr. E)
Nastavovaciu hlavicu (8) zatlačte a kým je
nastavovacia hlavica zatlačená posuňte topánku
na želanú veľkosť. Táto musí zapadnúť tak, že je
počuť „klik“. Šípka na topánke pritom vyznačuje
na ráme správnu veľkosť (9).
Nastavenie šírky (obr. F)
Pomocou priloženého dlhého imbusového kľúča
otáčaním v smere šípky uvoľnite skrutku na
spodnej časti výrobku.
Šírku si posunutím topánky prispôsobte svojím
individuálnym požiadavkám.
Nakoniec skrutku znovu pevne utiahnite.
Tipy na korčuľovanie
Upozornenie:
Odporúčame Vám, aby ste sa
korčuľovali v skateparkoch a absolvo-
vali s učiteľom kurz korčuľovania.
Prvé skúšanie
Základný postoj:
Nohy rozkročte na šírku ramien, trochu pokrčte
kolená, aby ste zabránili pádom dozadu.
Zrýchlenie:
Ak ste začiatočník, začnite malými krokmi,
špičky nôh smerujú von, šikmo dopredu.
Kĺzanie:
Keď urobíte niekoľko krokov po sebe, budete
mať dostatok švihu na to, aby ste obidve
korčule dali vedľa sebe a tak sa kĺzali. Pritom
trochu pokrčte kolená.
Technika padania
Dôležité! Cvičte si padanie na ochrannú
pomôcku najskôr bez korčulí na mäkkom pod-
klade. Pokúste sa zvládnuť pády vždy dopredu,
nikdy dozadu! Padajte na chrániče kolien.
Nakoniec zachyťte pád pomocou chráničov
lakťov a zápästí. Pritom vystrite prsty, aby ste
zabránili poraneniu.
Zvládnutie zákrut
Pri nízkej rýchlosti:
Váhu prenášajte podobne ako pri jazde
bicyklom. Prenášajte váhu pri ľavotočivej
zákrute na ľavú nohu, v pravotočivej zákrute
na pravú nohu.
Pri vysokej rýchlosti:
Nohy prekladajte podobne ako pri korčuľovaní
(obr. B).
Techniky brzdenia
Upozornenie:
Skúšajte si rôzne techniky brzdenia na
rovnom povrchu v miestach, kde nie je
premávka ani chodci. Kým neovládate
techniky brzdenia, vyhnite sa úsekom
so spádom.
SK

7
Zobutie
Pripraviť zo stavu po dodaní až po
obutie
Dôležité!
Dbajte na to, aby Vám inline korčule
správne sedeli. Vonkajšia topánka
by sa pri zatvorení rýchloupínacie-
ho uzáveru nemala zdeformovať.
Rýchloupínací uzáver nezatvárajte
násilne.
Keď sa vonkajšia topánka zdeformuje,
buď to je znak nesprávneho napätia
alebo ste si kúpili nesprávnu veľkosť
inline korčuli.
Upozornenie!
Aby ste zistili správne napätie pre svoju
nohu, potiahnite pracku šikmo nahor a
posúvajte pásik so západkou do
polohy, ktorá je pre Vás vhodná.
1. Zatlačte západku (3) rýchloupínacieho
uzáveru (4) v smere šípky a rýchloupínací
uzáver otvorte (obr. G).
2. Potiahnite pracku (2) šikmo nahor a
vytiahnite pásik so západkou (1) z otvoru
pracky (obr. H).
3. Otvorte suchý zips (5) (obr. I).
4. Rozviažte šnúrky (6).
Obutie
1. Obujte si in-line topánky pomôckami pri
obúvaní (7) (obr. J).
2. Zaviažte si šnúrky.
3. Zatvorte suchý zips.
4. Vsuňte pásik so západkou do pripraveného
otvoru pod prackou a nastavte potrebné
napätie (obr. K).
5. Zatvorte rýchloupínací uzáver (“klik“).
Údržba
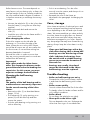
Výmena brzdy (obr. L)
Upozornenie: opotrebované brzdy
riadne nefungujú.
Keď je uhol medzi rámom a po-
vrchom väčší ako 40 stupňov,
znamená to, že brzdy sú opotre-
bované. Ak je vzdialenosť medzi
brzdovým segmentom a podkla-
dom príliš veľký (>17 mm), musí sa
vymeniť brzdový segment.
• Odskrutkujte skrutku brzdového segmentu
(3) inline korčule pomocou priložených
imbusových kľúčov.
• Vyberte skrutky brzdového segmentu a
odoberte brzdový segment (1) z držadla
(2).
• Nový brzdový segment pripevnite
pomocou skrutiek brzdového segmentu do
držadla brzdového segmentu.
Výmena koliesok (obr. M)
Dôležité!
• Sledujte kapitolu Technické údaje:
Kolieska, ktoré majú iný priemer,
môžu zmeniť jazdné vlastnosti a
za určitých okolností môžu viesť k
ohrozeniu užívateľa. Preto výrobok
nepoužívajte, ak sa kolieska nedajú
bez problémov namontovať. Nikdy
nenamontujte kolieska, ktoré sú
väčšie ako pôvodne kolieska inline
korčulí.
• Pre osové skrutky dodržujte
nasledovné:
Po uvoľnení skrutkového spoja
musíte znovu naniesť samoistiaci
lak na závit skrutiek! Odporúčame
to urobiť vždy ako bezpečnostné
opatrenie. Samoistiaci lak možno
dostať vo veľkopredajniach
stavebnín alebo v špecializovanej
predajni.
SK

8
• Tlakom pomocou imbusového kľúča vytlačte
ďalšie ložisko.
• Vtlačte nové ložisko. Koliesko otočte,
nasaďte dištančný držiak a potom vtlačte
druhé nové ložisko.
• Koliesko znovu upevnite na rám, ako je
popísané v odseku „výmena koliesok“.
Údržba, skladovanie
Inline korčule sú technickým športovým a
voľnočasovým náradím a preto sa opotrebujú
podľa schopností a štýlu korčuľovania. Po
použití inline korčulí Vám odporúčame, aby ste
ich dôkladne očistili a vysušili. Odstráňte drob-
né kamienky alebo iné predmety, ktoré sa za-
chytili do koliesok. Odstráňte ostré hrany, ktoré
sa pri korčuľovaní mohli prípadne vytvoriť.
Inline korčule skladujte vždy na suchom mieste.
• Po korčuľovaní by ste ložiská mali
vyčistiť suchou handrou. Mokré
alebo vlhké ložiská musíte vysušiť
čistou handrou. Ložiská namažte
zvonku vhodným mazivom na
ložiská, aby ste zabránili tvorbe
vonkajšej hrdze.
• Ložiská sú pravidla zatvorené a
nedajú sa namazať zvnútra.
Opotrebované ložiská sa musia
vymeniť.
Odstránenie porúch
• Kolieska alebo ložiská bežia hlučne
Kolieska odmontujte z rámu, vyberte ich a
ložiská vyčistite suchou handrou.
• Kolieska sa rýchlo opotrebujú
Hladké povrchy predlžujú životnosť koliesok.
Vyskúšajte tvrdšie kolieska pre tvrdšie
povrchy a použitie za sťažených podmienok.
Kolieska sa opotrebúvajú. Toto opotrebenie
závisí od mnohých faktorov, ako napr. od štýlu
korčuľovania, od povrchu, od veľkosti a váhy
užívateľa, od poveternostných podmienok, ma-
teriálu koliesok a od ich tvrdosti. Preto je občas
potrebné vymeniť ich.
• Osové skrutky (2) inline korčulí
vyskrutkujte pomocou dvoch priložených
imbusových kľúčov z rámu (1).
• Osové skrutky vytiahnite s vyberte
kolieska (3).
• Nové kolieska namontujte do rámu s
upevnite ich osovými skrutkami.
Po výmene:
Ak sa kolieska po výmene na boku odierajú
alebo sa po obvode dotýkajú rámu, kolieska
prosím nepoužívajte! Presvedčte sa, či všetky
skrutky po prvých minútach jazdy ešte pevne
sedia a či sa neuvoľnili.
Kolieska po jednom ešte raz napnite, aby ste
sa presvedčili, že sa pohybujú voľne a že z
ložísk nevychádza žiaden zvuk.
Dôležité!
Nové kolieska celkove zvyšujú inline
korčule. Tým sa mení vzdialenosť k
povrchu a tým aj brzdné vlastnosti.
Z tohto dôvodu prispôsobte brzdový
segment alebo ho vymeňte.
Výmena ložísk (obr. N)
Upozornenie:
Pre kľudný chod Vašich inline korčuli
je rozhodujúca kvalita ložísk a ich
údržba.
• Koliesko (1) vymontuje podľa popisu
(strany 7-8).
• Vytlačte ložisko (3) tlakom na dištančnú
vložku (2) pomocou imbusového kľúča a
odstráňte dištančnú vložku.
SK

9
• Kolieska blokujú
Osové skrutky neuťahujte príliš pevne.
• Korčule ťahajú doľava alebo
doprava
Môže to závisieť od samotného užívateľa.
Vymeňte kolieska, ktoré vykazujú
jednostranné opotrebenie.
• Brzda nefunguje správne
Vymeňte brzdu, ak je uhol medzi brzdou
a povrchom väčší ako 40 stupňov, t. z. ak
je vzdialenosť medzi brzdovým segmentom
a povrchom príliš veľký (>17 mm).
Opotrebované brzdy sa musia vymeniť za
nové.
• Problém s brzdením
Vždy dodržujte dostatočný odstup. Čím
rýchlejšie korčuľujete, tým dlhšia je Vaša
brzdná dráha. Uistite sa, že technikám
brzdenia rozumiete a precvičujte ich na
rovnom teréne.
• Členky sa často pretáčajú
Šnúrky utiahnite dostatočne pevne.
• Problémy s vložkou do topánok
Pravdepodobne nie ste zvyknutí na tento
druh pohybu. Skontrolujte si oblasti, ktoré
Vám spôsobujú ťažkosti a inline korčule
si nanovo prispôsobte. Skúste nosiť hrubé
ponožky.
Pokyny k likvidácii
Výrobok a všetky k nemu patriace
komponenty zlikvidujte prostredníctvom
schváleného likvidačného podniku alebo
komunálnej likvidačnej firmy. Dodržiavajte
aktuálne platné predpisy. V prípade
pochybností sa informujte u svojej príslušnej
likvidačnej firmy o vhodnom spôsobe
likvidácie.
3 roky záruka
Produkt bol vyrobený s maximálnou
zodpovednosťou a v priebehu výroby bol
neustále kontrolovaný. Na tento produkt máte
tri roky záruku od dátumu kúpy produktu.
Pokladničný lístok si odložte.
Záruka sa vzťahuje len na chyby materiálu
a výrobné chyby a zaniká pri neodbornej
manipulácii s produktom. Záruka nemá vplyv na
Vaše zákonné práva, predovšetkým na práva
vyplývajúce zo záruky.
V prípade reklamácie sa obráťte na nižšie
uvedenú servisnú linku, alebo nám napíšte
e-mail. Naši servisní zamestnanci sa s Vami
dohodnú na ďalšom postupe a urýchlene
vykonajú všetky potrebné kroky. V každom
prípade Vám poradíme osobne.
Záručná lehota sa nepredlžuje v dôsledku
eventuálnych opráv na základe záruky,
zákonného plnenia záruky alebo v dôsledku
prejavu ochoty. To platí tiež pre vymenené
alebo opravené diely.
Opravy vykonané po uplynutí záručnej lehoty sú
spoplatnené.
IAN: 93711
Servis Slovensko
Tel.: 0850 232001
E-Mail: deltaspor[email protected]
Náhradné diely na Váš produkt nájdete aj na:
www.delta-sport.com, servisná rubrika – servis náhradných
dielov Lidl
SK

10 GB
Congratulations!
With your purchase you have decided on a
high-quality product. Get to know the product
before you start to use it. Carefully read the
following operating instructions. Use the product
only as described and only for the given areas
of application. Keep these instructions safe.
When passing the product on to a third party,
always make sure that the documentation is
included.
Scope of delivery/
names of parts (figure A)
1 x User guide
1 x Kids Softboot inline skates
1 x Replacement stopper
2 x Allen key
(1) Ratchet strip
(2) Rocker fastener
(3) Pressure slider
(4) Quick-release fastener
(5) Velcro fastener
(6) Lace
(7) Pulling aid
(8) Setting button
(9) Size symbols
Technical data
sizes: 32 - 36
class B, 20 - 60kg
rollers: 70 x 24mm
ball bearings: ABEC 5
Correct use
These inline skates are designed as fitness skates
for private use and are not suitable for street
hockey or aggressive skating.
HeiQ
®
Pure dynamiq
PURE Textile freshness
Experience the feeling of lasting freshness
through the power of silver, keeping you odour-
free all day lang.
ADAPTIVE Thermal control
Feel good all over The textile will cool you down
when you’re hot, and keep you dry longer in
cold weather Cools and minimises perspiration.
Safety notes
Risk of injury!
• Always pay attention to other road users and
follow the road traffic regulations.
• Choose the right surface for inline skating.
Surfaces should be smooth, clean, and dry.
• Make sure that screws and bolts are secure
before skating.
• Ensure that screws and bolts retain their
self-locking properties.
• Do not modify the inline skates in such a way
that poses risk to your safety.
• Remove sharp edges that may form during
skating.
• Always wear suitable protective equipment
(helmet, protectors for your hands, wrists,
elbows, and knees).
• Avoid areas with heavy traffic.
• Remain vigilant at all times and be careful.
• Avoid excessive speeds. As a rule of thumb:
never skate faster than you can run.
• Exchange the brakes, rollers, and ball bea-
rings regularly if they are worn.
• Always wear reflective clothing so that you are
visible to others.
• Do not use this article barefoot.
Risk of injury!
• Look after your inline skates.
• Avoid water, oil, potholes, and very rough
surfaces.

11GB
Heel brake (figure C):
If your inline skates are fitted with brakes then
remember to use them. Lift the point of the skate
where the brake is mounted and push the brake
into the ground. Shift your weight forwards
slightly and bend your knee. The braking effect
can be intensified if you bend your knee more
and shift your weight further forwards, while
increasing at the same time the pressure on the
skate you are braking with.
T-stopping (figure D):
If your inline skates are not fitted with a brake
or if you have removed the brake, then we re-
commend using the ‘T-stop’ technique. However
this is only suitable for advanced skaters! To
brake using the ‘T-stop’ technique, shift your
entire weight onto one foot. Now move the
other skate behind the front skate at a right
angle. Then shift your weight from the front to
the inside of the rollers of your back skate and
brake with increasing pressure.
Setting the sizes (figure E)
Press the setting button (8) down and adjust
the shoes to the desired size while holding the
setting button down. This must snap into place
with an audible ‘CLICK’. The arrow on the show
points to the corresponding size (9) on the
frame.
Setting the width (figure F)
Release the screw on the bottom of the article
with the Allen key of any length by turning it in
the direction of the arrow. Adjust the width by
sliding the shoe size to your individual needs.
Then tighten the screw again.
Skating tips
Note:
We recommend skating in skate parks
and taking a skating course with an
instructor.
First attempts
Initial position:
Keep your feet shoulder-width apart and bend
your knees slightly to avoid falling backwards.
Accelerating:
As a beginner, start by taking small steps
forwards with your toes pointing outwards at
an angle.
Rolling:
If you take a few steps in succession you will
then have enough momentum to place your
skates next to one another and roll. Bend your
knees slightly while doing this.
How to fall
Important! Practise falling initially onto a
soft surface using protective equipment without
your inline skates. Always try to fall forwards,
and never backwards! Fall onto your protective
knee pads. Then catch yourself using the elbow
and wrist protectors. Spread your fingers in
order to avoid injury.
Mastering curves
At low speeds:
Shift your weight as in riding a bicycle. Move
your weight onto your left foot for a left curve
and onto your right foot for a right curve.
At high speeds:
Cross your feet as in ice-skating (figure B).
Braking techniques
Note:
Practise various braking techniques
on a smooth surface without traffic or
pedestrians. Avoid slopes until you are
confident about braking.

12 GB
Removing the skates
Prepare the skates for wear
following delivery
Important!
Ensure that your inline skates fit
correctly. The outer boot should not
become deformed when you close the
quick-release fastener. Do not use force
to close the quick-release fastener.
If your outer boot is deformed then this
is either a sign that the tension is incor-
rect or that you may have purchased
inline skates in the wrong size.
Note!
To find the right tension for your foot,
pull the rocker fastener upwards at an
angle and move the ratchet strip to the
correct position for you.
1. Push the pressure slide (3) on the quick-
release fastener (4) inwards in the direction
of the arrow, and open the quick-release
fastener (figure G).
2. Pull the rocker fastener (2) upwards at an
angle, and pull the ratcheted strip (1) out of
the opening on the rocker fastener
(figure H).
3. Open the Velcro fastener (5) (figure I).
4. Open the laces (6).
Putting the skates on
1. Pull on the inline skates using the donning
aids (7) (figure J).
2. Do up the laces.
3. Close the Velcro fastener.
4. Push the ratcheted strip into the correct
opening under the rocker lock, and set it to
the correct tightness (figure K).
5. Close the quick-release fastener (‘CLICK’).
Maintenance
Changing the brake (figure L)
Note:
Worn brakes do not function correctly.
An angle of more than 40 degrees
between the frame and the surface is
a sign of worn brakes. If the distance
between the brake block and the
ground becomes too large (more than
17mm), then the brake block must be
exchanged.
• Unscrew the brake block (3) on the inline
skate with the enclosed Allen key.
• Pull the brake block screws out and remove
the brake block (1) from the brake block
mounting (2).
• Attach the new brake block back onto the
brake block mounting securely using the
brake block screws.
Changing the rollers (figure M)
Important!
• Please observe the chapter on
technical data:
Rollers with a different diameter
could change the handling
characteristics and could mean a risk
to the user in some circumstances.
You should therefore not use the
skates if the rollers cannot be fitted
perfectly. Never install larger rollers
then those originally used in the
inline skates.
• Please observe the following with
regard to the axle bolts:
Self-sealing lacquer must be re-
applied to the screw thread after the
screw connection has been released.
We recommend always doing this
step as a precautionary measure.
Self-sealing lacquer is available from
DIY stores or specialist retailers.

13GB
• Push in a new bearing. Turn the roller
around, insert the spacer, and then push in a
second new bearing.
• Re-attach the roller to the frame, as
described in the paragraph ‘exchanging the
rollers’.
Care, storage
Inline skates are pieces of technical sports and
leisure equipment and they therefore become
worn depending on the skill and style of each
skater. We recommend that you clean and dry
the inline skates thoroughly after use. Remove
any small stones and other objects that may
have become trapped in your rollers. Remove
any sharp edges that may have formed during
skating. Always keep the inline skates in a dry
place.
• Clean your ball bearings with a dry
cloth after skating. Wet or damp ball
bearings must be dried using a clean
cloth. Lubricate the bearings from
the outside with a suitable bearing
grease to prevent the formation of
external rust.
• Bearings are usually closed and
cannot be lubricated inside. Worn
ball bearings must be replaced.
Trouble-shooting
• Rollers or ball bearings are noisy
Dismantle the roller from the frame, remove
it, and clean the ball bearing with a clean
cloth.
• Rollers wear quickly
Smooth surfaces extend the life of the rollers.
Try harder rollers for harder surfaces and for
use in difficult conditions.
• Rollers block
Do not fasten the axle bolts too tightly.
• Skate pulls to the left or right
This can depend on the user. Exchange the
rollers that show signs of one-sided wear.
Rollers become worn. The wear depends on
many factors such as skating style, surfaces, the
size and weight of the user, weather conditions,
the roller material and its degree of hardness. It
is therefore necessary to exchange them every
so often.
• Unscrew the axle bolts (2) on the inline skate
from the frame (1) using the two Allen keys
supplied.
• Remove the axle bolts and remove the
roller (3).
• Install the new roller into the frame and fix it
with the axle bolts.
After changing the rollers:
If the roller scrapes on the side after the
exchange, or if it touches the edge of the
frame, please do not use the roller! Please
ensure that all screws are still secure after the
first few minutes of use and that nothing has
become detached or loosened.
Re-install the rollers in order to ensure that
they are running smoothly and no sounds are
emitted from the bearings.
Important!
New rollers make the inline skates
taller. This changes the distance to the
ground therefore also the braking cha-
racteristics. For this reason, you must
adjust or exchange the brake block.
Changing the ball bearing
(figure N)
Note:
The quality of the ball bearing and its
maintenance are extremely important
for the smooth running of the inline
skates.
• Remove the roller (1) as described above
(pages 13-14).
• Push a bearing (3) out by pressing on a
spacer (2) with an Allen key and then
remove the spacer.
• Push the other bearing out by pressing on it
with an Allen key.

14 GB
3-year warranty
The product was produced with great care and
under constant supervision. You receive a three-
year warranty for this product from the date of
purchase. Please retain your receipt.
The warranty applies only to material and
workmanship and does not apply to misuse or
improper handling. Your statutory rights, espe-
cially the warranty rights, are not affected by this
warranty.
With regard to complaints, please contact the
following service hotline or contact us by e-mail.
Our service employees will advise as to the
subsequent procedure as quickly as possible.
We will be personally available to discuss the
situation with you.
Any repairs under the warranty, statutory
guarantees or through goodwill do not extend
the warranty period. This also applies to
replaced and repaired parts. Repairs after the
warranty are subject to a charge.
IAN: 93711
Service Great Britain
Tel.: 0871 5000 720
(£ 0.10/Min.)
You can also find spare parts for your product at:
www.delta-sport.com, category Service - Lidl Spare Parts
Service
• The brake is not working properly
Change the brake if the angle between
the brake and the ground is greater than 40
degrees, i.e. if the distance between the
brake block and the ground becomes too
great (more than 17mm). Rounded brakes
need to be changes for new blocks.
• Brake problems
Always keep sufficient distance. The faster
you skate the longer your braking distance.
Ensure that you understand the braking
techniques and practise them on a level
ground.
• Ankles get twisted frequently
Make sure the laces are tight enough.
• Problems with the foot bed
You may not be accustomed this kind of
movement. Check the areas that are causing
you problems and re-adjust the inline skates.
Try wearing thick socks.
Disposal information
Please dispose of the product and packaging in
an environmentally friendly manner, separating
different materials for recycling as required!
Dispose of this item through an authorised
disposal company or through your local waste
disposal facilities - ask your local authority
for information if further guidance is required.
Ensure that you comply with all regulations
currently in force.

15DE
Herzlichen Glückwunsch!
Mit Ihrem Kauf haben Sie sich für ein hochwer-
tiges Produkt entschieden. Machen Sie sich vor
der ersten Verwendung mit dem Produkt vertraut.
Lesen Sie hierzu aufmerksam die nachfolgende
Bedienungsanleitung. Benutzen Sie das Produkt
nur wie beschrieben und für die angegebenen
Einsatzbereiche.
Bewahren Sie diese Anleitung gut auf. Händigen
Sie alle Unterlagen bei Weitergabe des Produkts
an Dritte ebenfalls mit aus.
Lieferumfang/
Teilebezeichnung (Abb. A)
1 x Bedienungsanleitung
1 x Kinder-Softboot-Inlineskates
1 x Ersatzstopper
2 x Innensechskantschlüssel
(1) Ratschenband
(2) Wippverschluss
(3) Druckschieber
(4) Schnellverschluss
(5) Klettverschluss
(6) Schnürsenkel
(7) Anziehhilfen
(8) Einstellknopf
(9) Größensymbole
Technische Daten
Größen: 32 - 36
Klasse B, 20 - 60 kg
Rollen: 70 x 24 mm
Kugellager: ABEC 5
Bestimmungsgemäße
Verwendung
Diese Inlineskates sind als Fitness-Skates für
den privaten Gebrauch hergestellt und nicht für
Streethockey oder aggressives Skaten geeignet.
HeiQ
®
Pure dynamiq
PURE Textile Frische
Erleben Sie das Gefühl anhaltender Frische,
dank der Kraft des Silbers, das Sie den ganzen
Tag über geruchsfrei hält.
ADAPTIVE Thermoregulation
Fühlen Sie sich rundum wohl Die Textilie kühlt Sie
ab, wenn Ihnen heiß ist, und hält Sie bei Kälte
länger trocken Kühlt und mindert die Entstehung
von Schweiß.
Sicherheitshinweise
Verletzungsgefahr!
• Achten Sie stets auf andere Verkehrsteilnehmer
und halten Sie die Straßenverkehrsordnung
ein.
• Wählen Sie zum Inline-Skating den richtigen
Boden. Oberflächen sollten glatt, sauber
und trocken sein.
• Überprüfen Sie vor dem Skaten alle Schrau-
ben und Muttern auf sichere Befestigung.
• Vergewissern Sie sich, dass Schrauben und
Muttern ihre Selbstsperreigenschaft bewahren.
• Ändern Sie Ihre Inlineskates nicht so ab, dass
sie unter Umständen Ihre Sicherheit gefährden.
• Entfernen Sie scharfe Kanten, die während des
Skatens auftreten können.
• Tragen Sie stets geeignete Schutzvorrichtun-
gen (Helm, Handflächen-, Ellenbogen-
und Knieschützer).
• Vermeiden Sie Bereiche mit hoher Verkehrs-
dichte.
• Bleiben Sie stets aufmerksam und seien Sie
vorsichtig.
• Vermeiden Sie eine zu hohe Geschwindigkeit.
Faustregel: Skaten Sie niemals schneller, als
Sie laufen können.
• Tauschen Sie Bremse, Rollen und Kugellager
regelmäßig aus, wenn diese abgenutzt sind.
• Tragen Sie stets reflektierende Kleidung, um
besser gesehen zu werden.
• Verwenden Sie den Artikel nicht barfuß.
Verletzungsgefahr!
• Pflegen Sie Ihre Inlineskates.
• Meiden Sie Wasser, Öl, Schlaglöcher und
sehr raue Oberflächen.

16 DE
Fersenbremse (Abb. C):
Wenn Ihre Inlineskates mit Bremsen ausgestattet
sind, denken Sie daran, diese zu benutzen.
Heben Sie die Spitze des Skates, an dem
die Bremse montiert ist, leicht an und drücken
Sie die Bremse auf den Boden. Verschieben Sie
Ihr Gewicht leicht nach vorn und beugen Sie
die Knie. Die Bremswirkung kann verstärkt wer-
den, wenn Sie die Knie stärker beugen und Ihr
Gewicht weiter nach vorn verlegen, während
Sie gleichzeitig den Druck auf Ihren bremsen-
den Skate verstärken.
T-Bremse (Abb. D):
Falls Ihre Inlineskates nicht mit einer Bremse
ausgestattet sind oder Sie die Bremse abmon-
tiert haben, empfehlen wir Ihnen den Einsatz
der „T-Stop-Technik“– diese ist jedoch nur für
fortgeschrittene Skater geeignet! Beim Einsatz
der „T-Stop-Technik“ verlagern Sie Ihr gesamtes
Gewicht auf einen Fuß. Bewegen Sie jetzt den
anderen Fuß hinter den ersten und setzen Sie
ihn im rechten Winkel hinter den anderen.
Verlagern Sie anschließend Ihr Gewicht von
vorn auf die Innenseite der Rollen Ihres hinteren
Skates und bremsen Sie mit zunehmendem
Druck.
Einstellen der Größe (Abb. E)
Drücken Sie den Einstellknopf (8) hinunter und
verschieben Sie den Schuh bei gedrücktem
Einstellknopf auf die gewünschte Größe. Diese
muss durch einen hörbaren „KLICK“ einrasten.
Der Pfeil am Schuh zeigt dabei auf die passende
Größe (9) auf dem Rahmen.
Einstellen der Weite (Abb. F)
Lösen Sie die Schraube an der Unterseite des
Artikels mit dem beiliegenden langen Innen-
sechskantschlüssel durch Drehen in Pfeilrichtung.
Passen Sie die Weite durch Verschieben des
Schuhs auf Ihre individuellen Bedürfnisse an.
Ziehen Sie die Schraube anschließend wieder
fest.
Tipps zum Skaten
Hinweis:
Wir empfehlen das Skaten in Skate-
Parks sowie einen Skate-Kurs mit
Lehrer.
Erstes Üben
Ausgangsstellung:
Füße schulterbreit auseinander stellen, leicht in
die Knie gehen, um Rückwärtsstürze zu
verhindern.
Beschleunigen:
Beginnen Sie als Anfänger mit kleinen Schritten
mit nach außen gerichteten Fußspitzen schräg
nach vorn.
Rollen:
Wenn Sie ein paar Schritte hintereinander ma-
chen, haben Sie anschließend genug Schwung,
um beide Skates nebeneinander zu stellen und
zu rollen. Gehen Sie dabei leicht in die Knie.
Falltechnik
Wichtig! Üben Sie das Fallen auf die
Schutzausrüstung zuerst ohne Inlineskates auf
weicher Unterlage. Versuchen Sie Stürze immer
vorwärts abzufangen, nie rückwärts! Lassen Sie
sich auf die Knieschoner fallen. Fangen Sie den
Sturz anschließend mit Ellbogen- und Hand-
flächenschützern ab. Spreizen Sie dabei die
Finger, um Verletzungen zu vermeiden.
Beherrschen von Kurven
Bei geringem Tempo:
Gewicht verlagern wie beim Fahrrad fahren.
Verlagern Sie Ihr Gewicht für eine Linkskurve
auf den linken Fuß, für eine Rechtskurve auf
den rechten Fuß.
Bei hohem Tempo:
Übersetzen wie beim Schlittschuh laufen
(Abb. B).
Bremstechniken
Hinweis:
Üben Sie die unterschiedlichen Brems-
techniken auf einer ebenen Oberfläche
ohne Verkehr und ohne Fußgänger.
Vermeiden Sie Gefälle, bis Sie die
Bremstechniken beherrschen.

17DE
Ausziehen
Vom Auslieferungszustand zum
Anziehen vorbereiten
Wichtig!
Achten Sie auf einen/den korrekten
Sitz Ihrer Inlineskates. Der Außenstiefel
sollte sich beim Schließen des Schnell-
verschlusses nicht verformen. Schließen
Sie den Schnellverschluss nicht mit
Gewalt.
Wenn Ihr Außenstiefel verformt ist,
ist das entweder ein Zeichen für nicht
korrekte Spannung, oder Sie haben die
Inlineskates unter Umständen in einer
falschen Größe gekauft.
Hinweis!
Um die richtige Spannung für Ihren Fuß
zu finden, ziehen Sie den Wipp-
verschluss schräg nach oben und bewe-
gen Sie das Ratschenband in die für Sie
richtige Position.
1. Drücken Sie den Druckschieber (3) des
Schnellverschlusses (4) in Pfeilrichtung
hinein und öffnen Sie den Schnellverschluss
(Abb. G).
2. Ziehen Sie den Wippverschluss (2) schräg
nach oben und ziehen Sie das Ratschen-
band (1) aus der Öffnung des Wipp-
verschlusses (Abb. H).
3. Öffnen Sie den Klettverschluss (5)
(Abb. I).
4. Öffnen Sie die Schnürsenkel (6).
Anziehen
1. Ziehen Sie die Inlineskates mit Hilfe der
Anziehhilfen (7) an (Abb. J).
2. Schließen Sie die Schnürsenkel.
3. Schließen Sie den Klettverschluss.
4. Schieben Sie das Ratschenband in die
vorgesehene Öffnung unter den Wipp-
verschluss und stellen Sie die für Sie richtige
Spannung ein (Abb. K).
5. Schließen Sie den Schnellverschluss
(„KLICK“).
Wartung
Austausch der Bremse (Abb. L)
Hinweis:
Abgenutzte Bremsen funktionieren nicht
ordnungsgemäß.
Ein Winkel von mehr als 40 Grad zwi-
schen Rahmen und Oberfläche ist ein
Hinweis auf abgenutzte Bremsen. Wenn
der Abstand zwischen Bremsklotz und
Boden zu groß wird (>17 mm), muss der
Bremsklotz ausgetauscht werden.
• Schrauben Sie die Bremsklotzschraube (3)
des Inlineskates mit den beigelegten Innen-
sechskantschlüsseln ab.
• Ziehen Sie die Bremsklotzschrauben heraus
und entfernen Sie den Bremsklotz (1) vom
Bremsklotzhalter (2).
• Befestigen Sie den neuen Bremsklotz mit den
Bremsklotzschrauben wieder fest am
Bremsklotzhalter.
Austausch der Rollen (Abb. M)
Wichtig!
• Beachten Sie das Kapitel Technische
Daten:
Rollen, die einen anderen Durch-
messer haben, können die
Fahreigenschaften verändern und
unter Umständen zu einer Gefähr-
dung des Nutzers führen. Bitte daher
nicht verwenden, wenn sich die
Rollen nicht einwandfrei einbauen
lassen. Bauen Sie niemals größere
Rollen ein als die ursprünglichen
Rollen der Inlineskates.
• Bitte beachten Sie Folgendes für die
Achsschrauben:
Nach Lösen der Schraubverbindung
müssen Sie wieder Selbstsicherungs-
lack auf das Gewinde der Schrauben
auftragen!
Wir empfehlen, dieses als Vorsichts-
maßnahme immer zu befolgen.
Selbstsicherungslack ist in Bau-
märkten oder im Fachhandel
erhältlich.

18 DE
• Drücken Sie das andere Lager durch Druck
mit einem Innensechskantschlüssel heraus.
• Drücken Sie ein neues Lager ein. Drehen Sie
die Rolle um, setzen Sie den Abstandshalter
ein und drücken Sie anschließend ein
zweites neues Lager ein.
• Befestigen Sie die Rolle wieder, wie im
Absatz „Austausch der Rollen“ beschrieben,
am Rahmen.
Pflege, Lagerung
Inlineskates sind technische Sport- und Freizeit-
geräte und nutzen sich daher je nach Können
und Stil des Skatens ab. Nach Gebrauch Ihrer
Inlineskates empfehlen wir gründliches
Reinigen und Trocknen der Inlineskates. Entfer-
nen Sie kleine Steinchen oder andere
Gegenstände, die unter Umständen an Ihren
Rollen hängen geblieben sind. Beseitigen Sie
scharfe Kanten, die sich eventuell beim Skaten
gebildet haben. Bewahren Sie Ihre Inlineskates
stets an einem trockenen Ort auf.
• Nach dem Skaten sollten Sie Ihre
Kugellager mit einem trockenen Tuch
reinigen. Nasse oder feuchte Kugel-
lager müssen mit einem sauberen
Tuch getrocknet werden. Fetten Sie
die Lager mit einem geeigneten
Lagerfett von außen ein, um äußere
Rostbildung zu vermeiden.
• Lager sind in der Regel geschlossen
und können von innen nicht
geschmiert werden. Abgenutzte
Kugellager müssen ausgetauscht
werden.
Fehlerbeseitigung
• Rollen oder Kugellager laufen
geräuschvoll
Montieren Sie die Rolle vom Rahmen ab,
nehmen Sie sie heraus und reinigen Sie die
Kugellager mit einem trockenen Tuch.
• Rollen nutzen sich schnell ab
Glatte Oberflächen verlängern die Lebens-
dauer der Rollen. Probieren Sie härtere
Rollen für härtere Oberflächen und Nutzung
unter erschwerten Bedingungen.
Rollen nutzen sich ab. Diese Abnutzung ist von
vielen Faktoren abhängig, wie zum Beispiel
vom Stil des Skatens, vom Boden, von Größe
und Gewicht des Benutzers, den Wetterbe-
dingungen, dem Material der Rollen und von
deren Härte. Daher ist es notwendig, sie hin
und wieder auszutauschen.
• Schrauben Sie die Achsschrauben (2) des
Inlineskates mit den zwei beigelegten Innen-
sechskantschlüsseln aus dem Rahmen (1).
• Ziehen Sie die Achsschrauben heraus und
entfernen Sie die Rolle (3).
• Bauen Sie die neue Rolle wieder in den
Rahmen ein und befestigen Sie sie mit den
Achsschrauben.
Nach dem Austausch:
Wenn nach dem Austausch die Rolle seitlich
schleift oder am Umfang den Rahmen berührt,
bitte die Rolle nicht verwenden! Vergewissern
Sie sich, dass alle Schrauben nach den ersten
Fahrminuten noch fest sind und sich nichts
gelöst oder gelockert hat.
Spannen Sie die Rollen einzeln noch einmal,
um sicherzustellen, dass sie ruhig laufen und
keine Geräusche von den Lagern kommen.
Wichtig!
Neue Rollen erhöhen die Inlineskates
insgesamt. Damit ändert sich der
Abstand zum Boden und somit auch
die Bremseigenschaften. Passen Sie
aus diesem Grund den Bremsklotz an
oder tauschen Sie ihn aus.
Austausch der Kugellager (Abb. N)
Hinweis:
Die Qualität der Kugellager und ihre
Wartung ist für den ruhigen Lauf
Ihrer Inlineskates entscheidend.
• Bauen Sie die Rolle (1) wie beschrieben aus
(Seiten 8-9).
• Drücken Sie ein Lager (3) durch Druck auf
einen Abstandshalter (2) mit einem Innen-
sechskantschlüssel heraus und entfernen Sie
den Abstandshalter.

19DE
• Rollen blockieren
Ziehen Sie die Achsschrauben nicht zu fest
an.
• Skate zieht nach links oder rechts
Dies kann vom Benutzer selbst abhängig
sein. Tauschen Sie Rollen aus, die einseitige
Abnutzung aufweisen.
• Die Bremse funktioniert nicht richtig
Tauschen Sie die Bremse aus, wenn der
Winkel zwischen Bremse und Boden mehr
als 40 Grad beträgt, d.h., wenn der Abstand
zwischen Bremsklotz und Boden zu groß
wird (>17 mm). Abgerundete Bremsen
müssen gegen neue ausgetauscht werden.
• Bremsprobleme
Halten Sie stets reichlich Abstand. Je
schneller Sie skaten, umso länger wird Ihr
Bremsweg. Vergewissern Sie sich, dass Sie
die Bremstechniken verstehen und üben Sie
sie auf ebenem Gelände.
• Die Knöchel verdrehen sich häufig
Ziehen Sie die Schnürsenkel fest genug an.
• Probleme mit dem Fußbett
Sie sind diese Art von Bewegung unter
Umständen nicht gewöhnt. Kontrollieren Sie
Bereiche, die Beschwerden verursachen, und
passen Sie die Inlineskates neu an.
Versuchen Sie, dicke Socken zu tragen.
Hinweise zur Entsorgung
Entsorgen Sie das Produkt und alle dazugehö-
rigen Komponenten über einen zugelassenen
Entsorgungsbetrieb oder über Ihre kommunale
Entsorgungseinrichtung. Beachten Sie die aktu-
ell geltenden Vorschriften. Erkundigen Sie sich
im Zweifelsfall bei Ihrer Entsorgungseinrichtung
über eine umweltgerechte Entsorgung.
3 Jahre Garantie
Das Produkt wurde mit großer Sorgfalt und unter
ständiger Kontrolle produziert. Sie erhalten
auf dieses Produkt drei Jahre Garantie ab
Kaufdatum. Bitte bewahren Sie den Kassenbon
auf.
Die Garantie gilt nur für Material- und
Fabrikationsfehler und entfällt bei
missbräuchlicher oder unsachgemäßer
Behandlung. Ihre gesetzlichen Rechte,
insbesondere die Gewährleistungsrechte,
werden durch diese Garantie nicht
eingeschränkt. Im Garantiefall setzen Sie sich
bitte über unsere kostenlose Service-Hotline
oder per E-Mail mit uns in Verbindung. Wir
werden Sie in jedem Fall persönlich beraten. Im
Garantiefall können in Absprache mit unseren
Service-Mitarbeitern defekte Teile unfrei an die
aufgeführte Service-Adresse geschickt werden.
Sie erhalten dann unverzüglich ein neues oder
repariertes Teil kostenlos zurück.
Die Garantiezeit wird durch etwaige
Reparaturen aufgrund der Garantie, gesetzlicher
Gewährleistung oder Kulanz nicht verlängert.
Dies gilt auch für ersetzte und reparierte
Teile. Nach Ablauf der Garantie anfallende
Reparaturen sind kostenpflichtig.
IAN: 93711
Service Deutschland
Tel.: 0800 5435 111
E-Mail: deltaspor[email protected]
Ersatzteile zu Ihrem Produkt finden Sie auch unter:
www.delta-sport.com, Rubrik Service - Ersatzteilservice Lidl

Seite wird geladen ...
Seite wird geladen ...
Seite wird geladen ...
Seite wird geladen ...
Seite wird geladen ...
Seite wird geladen ...
Seite wird geladen ...
Seite wird geladen ...
-
 1
1
-
 2
2
-
 3
3
-
 4
4
-
 5
5
-
 6
6
-
 7
7
-
 8
8
-
 9
9
-
 10
10
-
 11
11
-
 12
12
-
 13
13
-
 14
14
-
 15
15
-
 16
16
-
 17
17
-
 18
18
-
 19
19
-
 20
20
-
 21
21
-
 22
22
-
 23
23
-
 24
24
-
 25
25
-
 26
26
-
 27
27
-
 28
28


Crivit 93711 Instructions For Use Manual
- Typ
- Instructions For Use Manual
in anderen Sprachen
- English: Crivit 93711
- slovenčina: Crivit 93711
Verwandte Artikel
-
Crivit 306978 Instructions For Use Manual
-
-
-
-
-
-
-
-
-

