Seite wird geladen ...

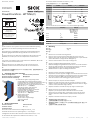
L
0
85
(3.35)
30
(1.18)
125
(4.92)
0 200
(7.87)
400
(15.75)
600
(23.62)
800
(31.5)
Distance in mm (inch)
Min. distance from object to background in mm (inch)
2
1
6%/90%
90%/90%
1
Schaltabstand auf weiß,
90% Remission
2
Tastgut mit 6 % ... 90 %
Remission (bezogen auf
Standard-Weiß DIN
5033)
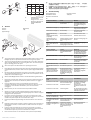
4 Teach-in
Teach-In Aprendizaje
Teach-in 示教
Apprentissage
L
x +~15 %
y
x
en
1 The sensing range is adjusted by pressing the single teach-in button (orange
LED lights up). Do not operate the teach-in button using sharp objects.
2 The sensor automatically places the switching point in the object. Exception:
when manually adjusting a mm value using an IO-Link, we recommend plac‐
ing the switching point in the object.
3 Other teach options are described in the operating instructions.
de
1 Durch Drücken der Einfach-Teach-in-Taste wird der Schaltabstand eingestellt
(orange LED leuchtet). Teach-in-Taste nicht mit spitzen Gegenständen betäti‐
gen.
2 Der Sensor legt den Schaltpunkt automatisch in das Objekt. Ausnahme: Bei
der manuellen Einstellung einen mm-Wertes über IO-Link empfehlen wir den
Schaltpunkt in das Objekt zu legen.
3 Weitere Teach-Möglichkeiten werden in der Betriebsanleitung beschrieben.
it
1 Premendo il semplice tasto Teach-in viene impostata la distanza di lavoro (il
LED arancione si illumina). Non azionare il pulsante teach-in con oggetti
appuntiti.
2 Il sensore determina il punto di commutazione automaticamente
sull’oggetto. Eccezione: nell’impostazione manuale di un valore in mm tra‐
mite IO-Link, raccomandiamo di stabilire il punto di commutazione
sull’oggetto.
3 Nelle istruzioni per l'uso sono descritte altre possibilità di teach.
fr
1 Appuyer sur le bouton simple d'apprentissage pour régler la distance de
commutation (LED orange s’allume). Ne pas appuyer sur le bouton d’appren‐
tissage avec des objets pointus.
2 Le capteur pose automatiquement le point de commutation dans l’objet.
Exception : lors du réglage manuel d’une valeur mm via IO-Link, nous recom‐
mandons de placer le point de commutation dans l’objet.
3 D'autres possibilités d'apprentissage sont décrites dans la notice d'instruc‐
tion.
es
1 Pulsando la tecla teach-in sencilla, se ajusta la distancia de conmutación (el
LED naranja se ilumina). La tecla teach-in no debe accionarse con objetos
puntiagudos.
2 El sensor pone automáticamente el punto de conmutación en el objeto.
Excepción: al ajustar manualmente un valor milimétrico a través de IO-Link,
recomendamos poner el punto de conmutación en el objeto.
3 En las instrucciones de uso se describen otras opciones de aprendizaje.
zh
1 通过按下简单示教键可设置触发感应距离(橙色 LED 亮起)。不得使用
尖锐物操作示教键。
2 传感器将开关点自动储存在目标中。例如:当通过 IO-Link 手动设置 mm
数值时,我们建议将该开关点储存在目标中。
3 其他示教选项在操作指南中有所描述。
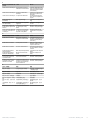
5 Troubleshooting
Störungsbehebung Solución de fallos
Eliminazione difetti 故障排除
Élimination des défauts
en
Display, error situation Cause Measure
Green LED does not light up No voltage or voltage below
the limit values
Check the power supply,
check all electrical connec‐
tions (cables and plug con‐
nections)
Green LED does not light up Voltage interruptions Ensure there is a stable power
supply without interruptions
Green LED does not light up Sensor is faulty If the power supply is OK,
replace the sensor
Yellow LED flashes (only
briefly)
Teach-in mode Check the teach-in mode
Yellow LED flashes quickly
(only briefly)
Teach-in button lock active Deactivate the button lock
Yellow LED lights up, no
object in the path of the
beam
Distance between the sensor
and the background is too
short
Reduce the sensing range, see
teach-in
Object is in the path of the
beam, yellow LED does not
light up
Distance between the sensor
and the object is too long or
sensing range is set too short
Increase the sensing range,
see teach-in
de
Anzeige, Fehlerbild Ursache Maßnahme
grüne LED leuchtet nicht keine Spannung oder Span‐
nung unterhalb der Grenz‐
werte
Spannungsversorgung prüfen,
den gesamten elektrischen
Anschluss prüfen (Leitungen
und Steckerverbindungen)
grüne LED leuchtet nicht Spannungsunterbrechungen Sicherstellen einer stabilen
Spannungsversorgung ohne
Unterbrechungen
grüne LED leuchtet nicht Sensor ist defekt Wenn Spannungsversorgung
in Ordnung ist, dann Sensor
austauschen
gelbe LED blinkt (nur kurz) Teach-Modus Teach-Modus überprüfen
gelbe LED blinkt schnell (nur
kurz)
Teach-Button-Sperre aktiv Tastensperre deaktivieren
gelbe LED leuchtet, kein
Objekt im Strahlengang
Abstand zwischen Sensor
und Hintergrund ist zu gering
Schaltabstand verringern,
siehe Teach-In.
Objekt ist im Strahlengang,
gelbe LED leuchtet nicht
Abstand zwischen Sensor
und Objekt ist zu groß oder
Schaltabstand ist zu gering
eingestellt
Schaltabstand vergrößern,
siehe Teach-In
it
Indicatore, schermata di
errore
Causa Provvedimento
Il LED verde non si accende nessuna tensione o tensione
al di sotto del valore soglia
Verificare la tensione di ali‐
mentazione e/o il collega‐
mento elettrico
Il LED verde non si accende Interruzioni di tensione Assicurarsi che ci sia un'ali‐
mentazione di tensione sta‐
bile
Il LED verde non si accende Il sensore è guasto Se l'alimentazione di tensione
è regolare, allora chiedere una
sostituzione del sensore
il LED giallo lampeggia (solo
brevemente)
Modalità Teach Verificare la modalità Teach
il LED giallo lampeggia rapi‐
damente (solo brevemente)
Blocco del pulsante teach
attivo
Disattivazione blocco tasti
il LED giallo si accende, nes‐
sun oggetto nella traiettoria
del raggio
La distanza tra sensore e
sfondo è inferiori alle capa‐
cità di funzionamento
Diminuire la distanza di
lavoro, vedi teach-in.
L'oggetto è nella traiettoria
del raggio, il LED giallo non si
accende
La distanza tra sensore e
oggetto è troppo grande o la
distanza di commutazione ha
un'impostazione troppo
bassa
Aumentare la distanza di
lavoro, vedi Teach-in
8021878.ZZG2 / 19.02.2019/de PowerProx Micro - WTT2SL(C) | SICK 2
Seite wird geladen ...
-
 1
1
-
 2
2
-
 3
3


in anderen Sprachen
- English: SICK WTT2SL(C)
- français: SICK WTT2SL(C)
- español: SICK WTT2SL(C)
- italiano: SICK WTT2SL(C)
Verwandte Artikel
-
SICK PowerProx WTT4SL Quickstart
-
-
-
-
-
-
-
-
-