
Lighting Control Engine mx
Setup Manual

2
Setup Manual - Lighting Control Engine mx
Published by
Traxon Technologies Europe GmbH
Karl Schurz-Strasse 38
Paderborn, Germany
An OSRAM company
Lighting Control Engine mx
Setup Manual – Edition 18.04.12
©2012, Traxon Technologies Europe GmbH
All rights reserved
Comments and corrections:
For a most recent version of this manual please visit:
http://www.ecue.com/download

3
Setup Manual - Lighting Control Engine mx
Table of Contents
English ..........................................................................5
Security instructions ..............................................................................6
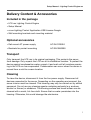
Delivery Content & Accessories............................................................ 7
Included in the package ........................................................................... 7
Optional accessories ................................................................................ 7
Transport ..................................................................................................7
Cleaning ...................................................................................................7
Commissioning ....................................................................................... 8
Inspect the delivery content ..................................................................... 8
In case of returning the LCE-mx .............................................................. 8
Mounting the LCE-mx ..............................................................................8
Supplying power to the LCE-mx .........................................................10
Initial start up ........................................................................................ 10
System Configuration .............................................................................10
Setting the network address .................................................................. 11
Technical data ....................................................................................... 15
General data ........................................................................................... 15
Engine ..................................................................................................... 15
LCE-mx connections .............................................................................. 16
Deutsch.......................................................................17
Sicherheitshinweise ............................................................................. 18
Lieferumfang und Zubehör .................................................................. 19
Im Lieferumfang .....................................................................................19
Optionales Zubehör ................................................................................ 19
Transport ................................................................................................19
Reinigung ...............................................................................................19
Überprüfen des Lieferumfanges .........................................................20

4
Setup Manual - Lighting Control Engine mx
Rücksendung der LCE-mx ..................................................................... 20
Montage der LCE-mx ............................................................................. 20
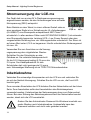
Stromversorgung der LCE-mx ............................................................22
Inbetriebnahme ..................................................................................... 22
System-Konfiguration ............................................................................. 23
Programmer-Netzwerk-Adresse ............................................................. 26
Technische Daten ................................................................................. 27
Allgemeine Daten ................................................................................... 27
System ...................................................................................................27
LCE-mx-Anschlüsse ............................................................................... 28
Appendix .....................................................................29
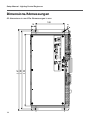
Dimensions/Abmessungen.................................................................. 30

5
Setup Manual - Lighting Control Engine mx
English

6
Setup Manual - Lighting Control Engine mx
Security instructions
!
To reduce the risk of personal injury, electric shock, or damage to
the equipment, remove the power cord to remove power from the
server. Portions of the power supply and some internal circuitry
remain active until power is removed.
i
To prevent the device from overheating, only operate it in well-
ventilated environment. Ventilation slots may not be obstructed.
Do not install next to heat emitting sources or in a place subject to
direct sunlight or excessive dust.
Device components inside the system can reach high tempera-
tures! Do not open the system while in operation. Repairs may only
be carried out by authorized, specially trained personnel. When in
doubt, contact e:cue service.
i
Installation and maintenance of this product must be performed by
individuals who are knowledgeable about the procedures, precau-
tions and hazards associated with the product.

7
Setup Manual - Lighting Control Engine mx
Delivery Content & Accessories
Included in the package
yLCE-mx Lighting Control Engine
ySetup Manual
ye:cue Lighting Control Application USB License Dongle
yWall mounting brackets and mounting material
Optional accessories
yRail-mount AC power supply AC.IN.0120024
yBrackets for portrait mounting AC.EN.3000000
Transport
Only transport the LCE-mx in its original packaging. This protects the server
from damage. Only unpack the LCE-mx at its installation location. To protect the
device against condensation water, unpack it and wait until all moisture remain-
ing in the LCE-mx has evaporated. Condensation can occur when the device is
moved from a cold to a warm location.
Cleaning
To clean the device, disconnect it from the line power supply. Disconnect all
devices connected to the server. Depending on the operating environment, the
server interior must be cleaned. This cleaning may only be carried out by skilled
personnel. Do not use any cleaning agents containing solvents (e.g. acetone,
alcohol or thinner) or abrasives. The housing surface and touch-screen can be
cleaned with a moist, lint-free cloth. Ensure that no water penetrates into the
housing. Otherwise, this could damage the electronics.

8
Setup Manual - Lighting Control Engine mx
Commissioning
Inspect the delivery content
Unpack the LCE-mx and inspect all parts for completeness. Keep the packaging
for use in case of further transport. If there is apparent damage to the device or
parts are missing from the delivery scope, please contact e:cue service.
In case of returning the LCE-mx
When returning the LCE-mx for any reason, e. g. for exchange, be sure to watch
the following notes:
yAlways care for proper backup of all user data like shows, images and media
les. Data backup is responsibility of the user, e:cue cannot guarantee that
user data are kept.
yRemove the USB license dongle and keep it at a save place. The dongle stores
the credits for the Lighting Application Suite and may be upgraded.
Mounting the LCE-mx
You can mount the LCE-mx in racks as well as on walls or on DIN rails. As
delivered, the LCE-mx is congured as a DIN rail device. The hardware for other
mounting methods is included in the delivery scope. If mounting the LCE-mx in
a rack, ensure that the server rack is sufciently ventilated.
The new portrait assembly kit facilitates installation of the LCE-mx in the control
cabinet using the smallest side, thus saving on valuable installation space.
Use the various mounting brackets to fasten the LCE-mx at a secure and well
ventilated place. Use the cabinet holes to ensure proper strain relief for the con-
nected cables.

9
Setup Manual - Lighting Control Engine mx
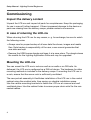
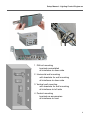
1 DIN rail mounting
brackets preinstalled
all interfaces to down side
2 Horizontal wall mounting
with brackets for wall mounting
all interfaces to down side
3 Vertical wall mounting
with brackets for wall mounting
all interfaces to left side
4 Portrait mounting
brackets as accessories
all interfaces to front

10
Setup Manual - Lighting Control Engine mx
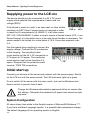
Supplying power to the LCE-mx
The device should only be connected to a 24 V DC power
supply which satises the requirements of safe extra low
voltage (SELV).
If the device is used on a wall, in an open rack or other similar
locations, an NEC Class 2 current source is required in order
to meet the UL requirements (UL 60950-1). In all other cases
(IEC / EN / DIN EN 60950-1) either a current source of limited output (LPS = Low
Power Source), or a line-side fuse or a line-side circuit breaker is necessary. The
power needs to be limited to a value below 4.16 A. Fuse value required: max.
4 A.
Use the special plug supplied to connect the
supply voltage. Connect the PE conductors
to the housing. The permitted cable
cross-section for the 24 V DC connection is
0.75 sqmm to 2.5 sqmm. The conductor
cross-section must not be less than 2.5
sqmm. Required tool for protective earth
terminal: TORX T20 screwdriver
Initial start up
Connect your devices to the server and connect with the power supply. Switch
on the LCE-mx with the power switch. The LED indicators light up in green.
Do not switch off the server with the main switch, but use the Windows shut-
down function to prevent loss of data.
i
Change the Windows administrator password within six weeks after
rst startup. Otherwise the password will expire and cannot be reset
anymore!
System Conguration
All steps shown here relate to the English version of Microsoft® Windows 7™.
If you have a different language version, it is possible that expressions change.
The default language of the operating system is English.

11
Setup Manual - Lighting Control Engine mx
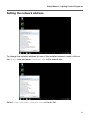
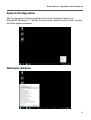
Setting the network address
To change the network address of one of the installed network cards, click on
the Start icon and enter Connections in the search box.
Select View network connections in the hit list.

12
Setup Manual - Lighting Control Engine mx
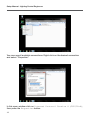
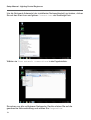
You now see all available connections. Right-click on the desired connection
and select “Properties”.
In this open window click on Internet Protocol Version 4 (TCP/IPv4),
then press the Properties button.

13
Setup Manual - Lighting Control Engine mx
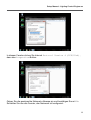
Enter the appropriate address for the network. Conrm your input by clicking on
the OK button. You can close all windows now. The network connection is now
congured.
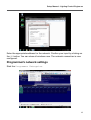
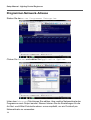
Programmer’s network settings
Start the Programmer Enterprise.

14
Setup Manual - Lighting Control Engine mx
Click on “Extras” and select “Application Options”.
Under the Advanced tab, you can specify which network card the programmer
software e:net outputs to. You can specify this setting for the Art-Net and
KiNet protocols. e:cue recommends only outputting one protocol per network.

15
Setup Manual - Lighting Control Engine mx
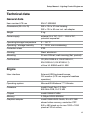
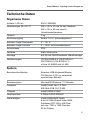
Technical data
General data
Item number LCE-mx EN.LC 9200000
Dimensions (W x H x D) 262 x 134 x 47 mm housing
262 x 134 x 50 mm incl. rail adapter
Weight 2 kg
Power supply external 24 V DC; 19.2 ... 28.8 V DC,
potential separated
Operating/storage temperature 0 … 50 °C
Operating / storage humidity 0 … 95%, non-condensing
Protection class IP20
Housing Steel, aluminum
Mounting 35 mm DIN rail, wall mouning (at, portrait)
Certications CE (EN 61000-6-4, EN 61000-6-2,
EN 61000-6-3, EN 61000-6-1)
cULus UL 60950 and UL 508
Engine
User interface External USB keyboard/mouse,
DVI monitor (LCE-mx supports headless
operation)
Operating system Microsoft® Windows 7™ Ultimate
Processor Intel® Core2 Duo 1.2 GHz,
800 MHz FSB, SLC 3 MB
Chipset Intel® GM45/ICH9M
Memory 2 GByte DDR3-SDRAM
Graphics adapter Intel® GMAX4500-Grak, 8 to 512 MB
shared video memory, resolution CRT:
640 x 480 pixels up to max 1920 x 1200
pixels at 32 bit colors;

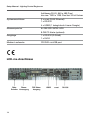
16
Setup Manual - Lighting Control Engine mx
resolution DVI-D: 640 x 480 pixels up to
max 1920 x 1200 pixels at 32 bit colors
System connection ports 2 x e:net (RJ45 Ethernet)
1 x RS-232
4 x USB2 (1 used for licence dongle)
Data storage 64 GB SSD SATA2 HDD
8 GB CF card, optional
Outputs 1 x RS-232 (D-Sub9)
1 x DVI-D
Media drives CD/DVD via USB port
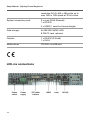
C
LCE-mx connections

17
Setup Manual - Lighting Control Engine mx
Deutsch

18
Setup Manual - Lighting Control Engine mx
Sicherheitshinweise
!
Zur Vermeidung elektrischer Schocks oder von Geräteschäden
Netzstecker vor dem Öffnen des Systems entfernen. Teile des
Gerätes können auch nach Ausschalten stromführend sein.
i
Um Überhitzung zu vermeiden, nur in gut belüfteten Umgebungen
betreiben. Die Lüftungsschlitze dürfen nicht verdeckt werden.
Nicht in der Nähe von Hitzequellen oder in direktem Sonnenlicht
betreiben.
Komponenten im System können im Betrieb heiß werden. Gerät
nicht während des Betriebes öffnen. Reparaturen dürfen nur von
geschultem Personal durchgeführt werden. Wenden Sie sich im
Zweifel an den e:cue-Service.
i
Installation und Wartung dürfen nur von Personen durchgeführt
werden, die die Verfahren, Vorsichtsmaßnahmen und Gefahren
kennen.

19
Setup Manual - Lighting Control Engine mx
Lieferumfang und Zubehör
Im Lieferumfang
yLCE-mx Lighting Control Engine
ySetup Manual
ye:cue Lighting Control Application USB-Licenz-Dongle
yWandmontagewinkel und -materialien
Optionales Zubehör
yHutschienen-Netzteil AC.IN.0120024
yWinkel für Buchmontage AC.EN.3000000
Transport
Transportieren Sie die LCE-mx nur in ihrer originalen Verpackung um Schäden
zu vermeiden. Entpacken Sie die LCE-mx nur am Installationsort. Um Schäden
bei Wechsel von Kälte zu Wärme durch Kondensationswasser zu verhindern,
warten Sie nach dem Auspacken, bis das System die Temperatur am Installa-
tionsort angenommen hat.
Reinigung
Bevor Sie das Gerät reinigen, trennen Sie es vom Netz. Trennen Sie alle weiteren
Geräte, die mit dem System verbunden sind. Je nach Umgebungsbedingungen
empehlt sich ein Reinigung des Geräteinneren. Diese Reinigung darf nur von
geschultem Personal durchgeführt werden. Verwenden Sie keine Reinigungsmit-
tel mit Lösemitteln wie Azeton, Alkohol oder Verdünner oder mit Schleifmitteln.
Das Gehäuse und der Touchscreen können mit einem feuchten, fusselfreien
Tuch gereinigt werden. Stellen Sie sicher, dass kein Wasser in das Gehäuse
gelangt. Dieses kann die Elektronik beschädigen.

20
Setup Manual - Lighting Control Engine mx
Überprüfen des Lieferumfanges
Entpacken Sie die LCE-mx und überprüfen Sie die Vollständigkeit des Liefer-
umfanges. Bewahren Sie die Verpackung für einen späteren Transport auf.
Sollten Komponenten beschädigt sein oder fehlen, wenden Sie sich an Ihrem
e:cue-Service.
Rücksendung der LCE-mx
Falls die LCE-mx zurück gesendet muss, z. B. zum Austausch, berücksichtigen
Sie bitte Folgendes:
ySorgen Sie für eine regelmäßige Datensicherung, diese liegt in der Verantwor-
tung des Benutzers. e:cue kann nicht garantieren, dass Benutzerdaten bei der
Reparatur erhalten bleiben.
yEntfernen Sie den USB Lizenz-Dongle und bewahren Sie ihn an einem
sicheren Platz auf. Auf dem Dongle benden sich die Credits für die Lighting
Application Suite, diese können erweitert worden sein.
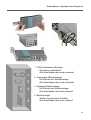
Montage der LCE-mx
Die LCE-mx kann sowohl an Wänden als auch in Racks installiert werden. Im
Auslieferungszustand sind die Klammern für Montage auf DIN-Hutschienen
montiert. Für Wandmontage sind Winkel im Lieferumfang. Falls die LCE-mx in
einem Rack installiert wird, muss für ausreichende Luftzufuhr gesorgt werden.
Die neue Buchmontage erlaubt die Installation der LCE-mx an der schmalsten
Seite, wodurch erhebliche Platzeinsparungen möglich sind. Benutzen sie die
entsprechenden Winkel für eine sichere und belastbare Montage. Die Schlitze
des Gehäuses der LCE-mx können zur Zugentlastung der angeschlossenen
Kabel genutzt werden.
Seite wird geladen ...
Seite wird geladen ...
Seite wird geladen ...
Seite wird geladen ...
Seite wird geladen ...
Seite wird geladen ...
Seite wird geladen ...
Seite wird geladen ...
Seite wird geladen ...
Seite wird geladen ...
Seite wird geladen ...
Seite wird geladen ...
-
 1
1
-
 2
2
-
 3
3
-
 4
4
-
 5
5
-
 6
6
-
 7
7
-
 8
8
-
 9
9
-
 10
10
-
 11
11
-
 12
12
-
 13
13
-
 14
14
-
 15
15
-
 16
16
-
 17
17
-
 18
18
-
 19
19
-
 20
20
-
 21
21
-
 22
22
-
 23
23
-
 24
24
-
 25
25
-
 26
26
-
 27
27
-
 28
28
-
 29
29
-
 30
30
-
 31
31
-
 32
32


iGuzzini MN19 Installationsanleitung
- Typ
- Installationsanleitung
- Dieses Handbuch eignet sich auch für
in anderen Sprachen
- English: iGuzzini MN19 Installation guide