
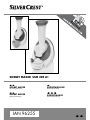
IAN 96255
SORBET MAKER SSM 200 A1
SORBET MAKER
Operating instructions
SORBETMASKINE
Betjeningsvejledning
SORBET-MAKER
Bedienungsanleitung
SORBET MAKER
Gebruiksaanwijzing

GB / IE Operating instructions Page 1
DK Betjeningsvejledning Side 11
NL / BE Gebruiksaanwijzing Pagina 21
DE / AT / CH Bedienungsanleitung Seite 31
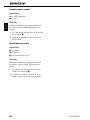
Before reading, unfold the page containing the illustrations and familiarise yourself with all functions of
the device.
Før du læser, vend siden med billeder frem og bliv bekendt med alle apparatets funktioner.
Vouw vóór het lezen de pagina met de afbeeldingen open en maak u vertrouwd met alle functies van het
apparaat.
Klappen Sie vor dem Lesen die Seite mit den Abbildungen aus und machen Sie sich anschließend mit allen
Funktionen des Gerätes vertraut.

A
B C

1
SSM 200 A1
GB
IE
Contents
Introduction . . . . . . . . . . . . . . . . . . . . . . . . . . . . . . . . . . . . . . . . . . . . . . . . . . . . . . 2
Intended use . . . . . . . . . . . . . . . . . . . . . . . . . . . . . . . . . . . . . . . . . . . . . . . . . . . . . 2
Package contents . . . . . . . . . . . . . . . . . . . . . . . . . . . . . . . . . . . . . . . . . . . . . . . . . 2
Description of the appliance . . . . . . . . . . . . . . . . . . . . . . . . . . . . . . . . . . . . . . . . 2
Technical data . . . . . . . . . . . . . . . . . . . . . . . . . . . . . . . . . . . . . . . . . . . . . . . . . . . . 2
Safety guidelines . . . . . . . . . . . . . . . . . . . . . . . . . . . . . . . . . . . . . . . . . . . . . . . . . 3
Assembly . . . . . . . . . . . . . . . . . . . . . . . . . . . . . . . . . . . . . . . . . . . . . . . . . . . . . . . . 5
Preparing ingredients . . . . . . . . . . . . . . . . . . . . . . . . . . . . . . . . . . . . . . . . . . . . . 5
Using the appliance . . . . . . . . . . . . . . . . . . . . . . . . . . . . . . . . . . . . . . . . . . . . . . . 5
Cleaning and care . . . . . . . . . . . . . . . . . . . . . . . . . . . . . . . . . . . . . . . . . . . . . . . . . 6
Storage . . . . . . . . . . . . . . . . . . . . . . . . . . . . . . . . . . . . . . . . . . . . . . . . . . . . . . . . . 7
Warranty and service . . . . . . . . . . . . . . . . . . . . . . . . . . . . . . . . . . . . . . . . . . . . . 7
Disposal . . . . . . . . . . . . . . . . . . . . . . . . . . . . . . . . . . . . . . . . . . . . . . . . . . . . . . . . . 7
Importer . . . . . . . . . . . . . . . . . . . . . . . . . . . . . . . . . . . . . . . . . . . . . . . . . . . . . . . . 7
Recipes . . . . . . . . . . . . . . . . . . . . . . . . . . . . . . . . . . . . . . . . . . . . . . . . . . . . . . . . . . 8
Tropicana sorbet . . . . . . . . . . . . . . . . . . . . . . . . . . . . . . . . . . . . . . . . . . . . . . . . . . . . . . . . . . . . . 8
Melon & berry sorbet . . . . . . . . . . . . . . . . . . . . . . . . . . . . . . . . . . . . . . . . . . . . . . . . . . . . . . . . . 8
Banana & pineapple sorbet . . . . . . . . . . . . . . . . . . . . . . . . . . . . . . . . . . . . . . . . . . . . . . . . . . . . 8
Banana sorbet . . . . . . . . . . . . . . . . . . . . . . . . . . . . . . . . . . . . . . . . . . . . . . . . . . . . . . . . . . . . . . . 8
Kiwi-Mango Sorbet . . . . . . . . . . . . . . . . . . . . . . . . . . . . . . . . . . . . . . . . . . . . . . . . . . . . . . . . . . . 9
Strawberry and pineapple sorbet . . . . . . . . . . . . . . . . . . . . . . . . . . . . . . . . . . . . . . . . . . . . . . . . 9
Pistachio & berry sorbet . . . . . . . . . . . . . . . . . . . . . . . . . . . . . . . . . . . . . . . . . . . . . . . . . . . . . . . . 9
Chocolate kiwi sorbet . . . . . . . . . . . . . . . . . . . . . . . . . . . . . . . . . . . . . . . . . . . . . . . . . . . . . . . . . 9
Raspberry & pear sorbet . . . . . . . . . . . . . . . . . . . . . . . . . . . . . . . . . . . . . . . . . . . . . . . . . . . . . . 10
Peach & banana sorbet . . . . . . . . . . . . . . . . . . . . . . . . . . . . . . . . . . . . . . . . . . . . . . . . . . . . . . . 10

2
SSM 200 A1
GB
IE
Introduction
Congratulations on the purchase of your new
appliance.
You have selected a high-quality product.
The operating instructions are part of this product.
They contain important information on safety, usage
and disposal. Before using the product, familiarise
yourself with all handling and safety guidelines.
Use the product only as described and for the range
of applications specifi ed. Please also pass these
operating instructions on to any future owner(s).
Intended use
This appliance is intended exclusively for making
sorbet from frozen fruit. This appliance is intended
solely for use in private households. Do not use it
for commercial purposes.
Package contents
Sorbet Maker
Operating instructions
Description of the appliance
1 On/Off switch
2 Feeding tube
3 Roller housing
4 Drive shaft
5 Blade roller
6 Pusher
7 Pusher lid
8 End cap
9 Outlet
0 Motor unit
q Cable storage compartment
Technical data
Rated voltage: 220 - 240 V ∼, 50 Hz
Rated input: 200 W
Protection class: II
CO time: 2 minutes
CO time
The CO time (continuous operation time) is the
amount of time an appliance can be operated
without the motor overheating and becoming dam-
aged. After the appliance has run for this length of
time, it must be switched off for about 1 minute to
allow the motor to cool down.

3
SSM 200 A1
GB
IE
Safety guidelines
RISK OF ELECTRIC SHOCK
► Connect the appliance only to mains power sockets supplying a mains
power voltage of 220 - 240 V
~
, 50 Hz.
► To prevent accidents, have defective plugs and/or power cables replaced
immediately by an authorised specialist technician or our Customer Service
department.
► In event of operating malfunctions and before cleaning the appliance,
remove the power plug from the mains power socket.
► Always remove the power cable from the socket by pulling on the plug, not
on the power cable itself.
► Do not kink or crush the power cable, and route the cable so that it cannot
be stepped on or tripped over.
► Do not expose the appliance to humidity and do not use it outdoors.
If liquid gets into the housing, disconnect the appliance from the mains
power socket immediately and have it repaired by a qualifi ed technician.
► NEVER take hold the motor unit, the power cable or the power plug with
wet hands.
► If the power cable or the motor unit are damaged, you must have the appli-
ance repaired by qualifi ed technicians before using it again.
► Do not open the housing of the appliance motor unit. Doing so can lead
to risks and also invalidates the warranty.
► Disconnect the appliance from the mains power source immediately after
use. The appliance is completely free of electrical power ONLY when
unplugged.
Never immerse the motor unit of the appliance in liquid and do not allow
any liquids to enter the housing of the motor unit.

4
SSM 200 A1
GB
IE
WARNING! RISK OF INJURY!
► This appliance should not be used by children.
► Keep the appliance and its cord out of reach of children.
► This appliance may be used by persons with limited physical, sensory or
mental capabilities or lack of experience and knowledge, provided that
they are under supervision or have been told how to use the appliance
safely and are aware of the potential risks.
► Children must not use the appliance as a plaything.
► Handle the sharp blades with caution as they could cause injuries.
Reassemble the appliance after using and/or cleaning it so that you do not
injure yourself with the exposed blades. Keep the blades out of the reach
of children.
► The appliance and its connecting cable must be kept away from children.
► The appliance should always be disconnected from the mains when un-
attended and before assembly, disassembly or cleaning.
► Never put your hand into the openings of the appliance. Do not insert any
objects of any kind into the openings – except for the pusher and the food-
stuff s to be processed. If you do, there will be a serious risk of accidents!
► Before changing accessories or additional parts that are in motion dur-
ing operation, the appliance must be switched off and disconnected from
mains power.
CAUTION! MATERIAL DAMAGE!
► Do not try to use the appliance to crush ice cubes! This will irreparably
damage the appliance!

5
SSM 200 A1
GB
IE
Assembly
1) Remove all packaging materials and any stickers
from the appliance.
2) Clean the appliance as described in the section
“Cleaning and Care”.
3) Place the motor unit 0 on a fl at surface.
4) Push the knife roller 5 into the roller housing 3.
The drive shaft 4 must project into the opening
of the roller housing 3.
5) Screw the end cap 8 onto the roller housing 3,
until the outlet 9 is pointing downwards and
the end cap 8 no longer turns. In doing so,
turn the end cap 8 in clockwise direction.
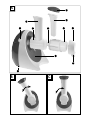
6) Push the assembled roller housing 3 into the
motor unit 0, so that the feed tube 2 is slightly
off set (see Figure B on the fold-out page). The
locking mechanisms on the roller housing 3
must reach into the slots on the motor unit 0.
Turn the roller housing 3, so that the feed tube 2
is facing upwards and the roller housing 3
snaps into place (see Figure C on the fold-out
page).
7) Place the pusher 6 into the feed tube 2.
NOTE
► The pusher lid 7 can be remo
ved.
For removal:
– Turn the pusher lid 7 anticlockwise until it
allo
w
s itself to be removed.
For set up:
– Place the pusher lid 7 on the pusher 6,
so that both locking mechanisms on the
pusher lid 7 slide thr
ough the slots on the
pusher 6 and then turn the pusher lid 7
in clockwise direction so that it is fi rmly
held in place.
8) Insert the plug into a mains power socket.
The appliance is now ready for use.
Preparing ingredients
CAUTION! MATERIAL DAMAGE!
► Do not process fruits with stones or cores.
► Do not process whole nuts.
► Do not process ice cubes.
♦ Peel fruits such as bananas or kiwis.
♦ Remove cores, stones or stems from the fruit.
♦ Cut the fruit into small pieces so that it will easily
fi
t through the feed tube 2.
♦ Ingredients such as such as cooking chocolate
must be crushed into small pieces.
♦ Put the prepared fruit in freezer bags or plastic
tubs and place them into the fr
eez
er for approxi-
mately 24 hours (-18°C).
NOTE
► Instead of freezing fresh fruit, you can use fruit
that has alr
eady frozen from the deep-freezer.
Using the appliance
1) Take the fruits out of the freezer about 10–
20 minutes before use.
2) Place a suitable bowl under the outlet 9.
3) Remove the pusher 6 from the feed tube 2.
4) Add the prepared fruits into the feed tube 2.
5) Switch on the appliance using the on/off
switch 1 (position I).

6
SSM 200 A1
GB
IE
6) Applying light pressure, use the pusher 6 to
push the fruit into the appliance. The chopped
fruit will come out of the outlet 9 after a short
time. If the pusher 6 cannot be pressed further
down, remove it and add a little more fruit or
ingredients.
NOTE
► If you want to make a sorbet from several
diff
erent fruits/ingredients, add the diff erent
fruits alternately into the feed tube 2. In this
way, the fruits will be mixed directly.
7) Once all the fruits are chopped, stop the appli-
ance by moving the on/off switch 1 to the O
position.
8) Remove the power plug from the socket.
9) Unscrew the end cap 8 and pull the blade
roller 5 carefully out of the roller housing 3.
10) Use a knife to scrape any remaining fruit
residue from between the blades on the blade
roller 5 and add this to the bowl.
11) Mix the fruit in the bowl.
You can now serve the sorbet.
Cleaning and care
RISK OF ELECTRIC SHOCK
► Always remove the plug from the mains power
socke
t before you clean the appliance.
Ensure you never submerse the motor unit 0
in liquid, and never allow liquid to enter the
motor unit housing 0.
WARNING! RISK OF INJURY!
► Take great care when handling the blade
roller
5.
♦ Clean the motor unit 0 with a moist cloth after
every use . If there is heavy soiling, add mild
detergent to the cloth. Rinse detergent residues
off with clear water. Ensure that there are no
detergent residues on the appliance, and that the
appliance is completely dry before renewed use.
♦ Remove the pusher lid 7 from the pusher
6 for
cleaning purposes.
♦ Wash the pusher 6, the pusher lid 7, the
blade roller
5, the end cap 8 and the roller
housing 3 in lukewarm water with a little
detergent.
♦ Ensure that all parts are completely dry before
re-use.
NOTE
► You can also wash the pusher 6, the pusher
lid 7, the end cap 8 and the roller housing 3
in the dishw
asher.
Place the parts, where possible, in the upper
basket and ensure that none of the parts can
get stuck. Otherwise they could get bent or
otherwise deformed.

7
SSM 200 A1
GB
IE
Storage
♦ Always clean the appliance thoroughly before
storing.
♦ Push the power cable and plug into the cable
storage compar
tment q on the underside of the
appliance.
♦ Store the appliance in a clean and dry location.
Warranty and service
You are provided a 3-year warranty on this
appliance, valid from the date of purchase.
This appliance has been manufactured with care
and inspected meticulously prior to delivery.
Please retain your receipt as proof of purchase. In
the event of a warranty claim, please contact your
Customer Service unit by telephone. This is the
only way to guarantee free return of your goods.
The warranty only covers claims for material and
manufacturing defects, not for damage sustained
during carriage, components subject to wear and
tear or damage to fragile components such as
switches or rechargeable batteries. This appliance
is intended solely for private use and not for com-
mercial purposes.
The warranty shall be deemed void in cases of
misuse or improper handling, use of force and
interventions which have not been carried out by
one of our authorised Service centres.
Your statutory rights are not restricted by this
warranty.
The warranty period is not prolonged by repairs
eff ected under the warranty. This also applies to
replaced and repaired components. Any damage
and defects present at the time of purchase must be
reported immediately after unpacking, but no later
than two days after the date of purchase. Repairs
carried out after expiry of the warranty period shall
be subject to charge.
Service Great Britain
Tel.: 0871 5000 720 (£ 0.10/Min.)
E-Mail: k[email protected]
IAN 96255
Service Ireland
Tel.: 1890 930 034
(0,08 EUR/Min., (peak))
(0,06 EUR/Min., (off peak))
E-Mail: k[email protected]
IAN 96255
Hotline availability:
Monday to Friday 08:00 - 20:00 (CET)
Disposal
Never dispose of the appli-
ance in the normal domestic
waste. This product is subject
to the provisions of European
Directive 2012/19/EU.
Dispose of the appliance via an approved waste
disposal company or your municipal waste disposal
facility. Please observe applicable regulations.
Please contact your waste disposal facility if you
are in any doubt.
The packaging is made from environ-
mentally friendly material and can be
disposed of at your local recycling plant.
Importer
KOMPERNASS HANDELS GMBH
BURGSTRASSE 21
44867 BOCHUM
GERMANY
www.kompernass.com

8
SSM 200 A1
GB
IE
Recipes
NOTE
These recipes are provided without guarantee.
All information on ingredients and pr
eparation
is indicative only. Modify the suggested recipes
to taste.
Tropicana sorbet
Ingredients
■ approx. 160 g pineapple
■ 1 orange
■ 1/2 mango (approx. 100 - 150 g)
Preparation
After the ingr
edients have been prepared as de-
scribed in the section “Preparing ingredients”:
1) Fill the feed tube 2 alternately with pieces
of pineapple, orange and mango.
2) Mix the sorbet produced once again with
a spoon.
Melon & berry sorbet
Ingredients
■ approx. 200 g honeydew melon
■ approx. 100 g berry mixture
(e.g. wild berr
y mixture from the deep-freezer)
■ 2 tbsp. of coconut or chocolate shavings
Preparation
After the ingr
edients have been prepared as de-
scribed in the section “Preparing ingredients”:
1) Fill the feed tube 2 alternately with pieces
of honeydew melon and berries.
2) Add the coconut or chocolate shavings to the
sorbet and mix everything with a spoon.
Banana & pineapple sorbet
Ingredients
■ 1 banana
■ approx. 160 g pineapple
■ 1 tsp. of shaved coconut
Preparation
After the ingr
edients have been prepared as de-
scribed in the section “Preparing ingredients”:
1) Add the banana to the feed tube 2 and push
it into the appliance using the pusher 6.
Then add the pineapple pieces.
2) Add the coconut shavings to the sorbet and
mix everything with a spoon.
Banana sorbet
Ingredients
■ 2 bananas
■ 60 g plain chocolate
Preparation
After the ingr
edients have been prepared as de-
scribed in the section “Preparing ingredients”:
1) Add the banana into the feed tube 2.
2) Add the plain chocolate into the feed tube 2.
3) Add the second banana into the feed tube 2.

9
SSM 200 A1
GB
IE
Kiwi-Mango Sorbet
Ingredients
■ 3 kiwis
■ 1/2 mango (approx. 100 - 150 g)
Preparation
After the ingr
edients have been prepared as de-
scribed in the section “Preparing ingredients”:
1) Add the prepared fruits alternately into the
feed tube 2.
2) Mix the sorbet produced once again with a
spoon.
Strawberry and pineapple sorbet
Ingredients
■ 7 strawberries
■ approx. 160 g pineapple
■ 1 tsp. of shaved coconut
Preparation
After the ingr
edients have been prepared as de-
scribed in the section “Preparing ingredients”:
1) Add the prepared fruits alternately into the
feed tube 2.
2) Add the coconut shavings to the sorbet and
mix everything with a spoon.
Pistachio & berry sorbet
Ingredients
■ approx. 100 g berry mixture
(e.g. wild berr
y mixture from the deep-freezer)
■ 1 banana
■ approx. 15 g shelled and chopped pistachios
■ 1 vanilla pod
Preparation
After the ingr
edients have been prepared as de-
scribed in the section “Preparing ingredients”:
1) Scrape the vanilla pulp out of the vanilla pod
and paint this on the banana.
2) Add the banana and berries into the feed
tube 2.
3) Add the pistachio nuts to the sorbet and mix
everything with a spoon.
Chocolate kiwi sorbet
Ingredients
■ 4 kiwis
■ 60 g plain chocolate
Preparation
After the ingr
edients have been prepared as de-
scribed in the section “Preparing ingredients”:
1) Add the kiwis and chopped chocolate alter-
nately into the feed tube 2.
2) Mix the sorbet produced once again with
a spoon.

10
SSM 200 A1
GB
IE
Raspberry & pear sorbet
Ingredients
■ approx. 100 g raspberries
■ 2 pears
Preparation
After the ingr
edients have been prepared as de-
scribed in the section “Preparing ingredients”:
1) Add the raspberries and the pears alternately
into the feed tube 2.
2) Mix the sorbet produced once again with
a spoon.
Peach & banana sorbet
Ingredients
■ 2 peaches
■ 2 bananas
■ Juice of half a lemon
Preparation
After the ingr
edients have been prepared as de-
scribed in the section “Preparing ingredients”:
1) Add the bananas and peach pieces alternately
into the feed tube 2.
2) Add the lemon juice and then mix the sorbet
produced with a spoon.

11
SSM 200 A1
DK
Indholdsfortegnelse
Indledning . . . . . . . . . . . . . . . . . . . . . . . . . . . . . . . . . . . . . . . . . . . . . . . . . . . . . . 12
Anvendelsesområde . . . . . . . . . . . . . . . . . . . . . . . . . . . . . . . . . . . . . . . . . . . . . 12
Pakkens indhold . . . . . . . . . . . . . . . . . . . . . . . . . . . . . . . . . . . . . . . . . . . . . . . . . 12
Beskrivelse af produktet . . . . . . . . . . . . . . . . . . . . . . . . . . . . . . . . . . . . . . . . . . 12
Tekniske data . . . . . . . . . . . . . . . . . . . . . . . . . . . . . . . . . . . . . . . . . . . . . . . . . . . 12
Sikkerhedsanvisninger . . . . . . . . . . . . . . . . . . . . . . . . . . . . . . . . . . . . . . . . . . . 13
Samling . . . . . . . . . . . . . . . . . . . . . . . . . . . . . . . . . . . . . . . . . . . . . . . . . . . . . . . . 15
Forberedelse af ingredienserne . . . . . . . . . . . . . . . . . . . . . . . . . . . . . . . . . . . . 15
Anvendelse af produktet . . . . . . . . . . . . . . . . . . . . . . . . . . . . . . . . . . . . . . . . . . 15
Rengøring og vedligeholdelse. . . . . . . . . . . . . . . . . . . . . . . . . . . . . . . . . . . . . . 16
Opbevaring . . . . . . . . . . . . . . . . . . . . . . . . . . . . . . . . . . . . . . . . . . . . . . . . . . . . . 17
Garanti og service . . . . . . . . . . . . . . . . . . . . . . . . . . . . . . . . . . . . . . . . . . . . . . . 17
Bortskaff else . . . . . . . . . . . . . . . . . . . . . . . . . . . . . . . . . . . . . . . . . . . . . . . . . . . . 17
Importør . . . . . . . . . . . . . . . . . . . . . . . . . . . . . . . . . . . . . . . . . . . . . . . . . . . . . . . 17
Opskrifter . . . . . . . . . . . . . . . . . . . . . . . . . . . . . . . . . . . . . . . . . . . . . . . . . . . . . . 18
Tropicana-sorbet . . . . . . . . . . . . . . . . . . . . . . . . . . . . . . . . . . . . . . . . . . . . . . . . . . . . . . . . . . . . 18
Melon-bær-sorbet . . . . . . . . . . . . . . . . . . . . . . . . . . . . . . . . . . . . . . . . . . . . . . . . . . . . . . . . . . . 18
Banan-ananas-sorbet . . . . . . . . . . . . . . . . . . . . . . . . . . . . . . . . . . . . . . . . . . . . . . . . . . . . . . . . . 18
Banan-sorbet . . . . . . . . . . . . . . . . . . . . . . . . . . . . . . . . . . . . . . . . . . . . . . . . . . . . . . . . . . . . . . . 18
Kiwi-mango-sorbet . . . . . . . . . . . . . . . . . . . . . . . . . . . . . . . . . . . . . . . . . . . . . . . . . . . . . . . . . . . 19
Jordbær-ananas-sorbet . . . . . . . . . . . . . . . . . . . . . . . . . . . . . . . . . . . . . . . . . . . . . . . . . . . . . . . 19
Pistacie-bær-sorbet . . . . . . . . . . . . . . . . . . . . . . . . . . . . . . . . . . . . . . . . . . . . . . . . . . . . . . . . . . . 19
Chokolade-kiwi-sorbet . . . . . . . . . . . . . . . . . . . . . . . . . . . . . . . . . . . . . . . . . . . . . . . . . . . . . . . . 19
Hindbær-pære-sorbet . . . . . . . . . . . . . . . . . . . . . . . . . . . . . . . . . . . . . . . . . . . . . . . . . . . . . . . . . 20
Fersken-banan-sorbet . . . . . . . . . . . . . . . . . . . . . . . . . . . . . . . . . . . . . . . . . . . . . . . . . . . . . . . . . 20

12
SSM 200 A1
DK
Indledning
Tillykke med købet af dit nye produkt.
Du har valgt et produkt af høj kvalitet. Betjenings-
vejledningen er en del af dette produkt.
Den indeholder vigtige informationer om sikkerhed,
anvendelse og bortskaff else. Du bedes sætte dig
ind i alle produktets betjenings- og sikkerhedsanvis-
ninger før brug. Brug kun produktet som beskrevet
og kun til de angivne anvendelsesområder. Lad
vejledningen følge med produktet, hvis du giver
det videre til andre.
Anvendelsesområde
Dette produkt er udelukkende beregnet til tilbe-
redning af sorbet af frosne frugter. Dette produkt
er udelukkende beregnet til anvendelse i private
husholdninger. Det må ikke anvendes i erhvervs-
mæssig sammenhæng.
Pakkens indhold
Sorbetmaskine
Betjeningsvejledning
Beskrivelse af produktet
1 Tænd-/slukknap
2 Påfyldningsåbning
3 Valsehus
4 Drivaksel
5 Knivvalse
6 Stopper
7 Stopperlåg
8 Endekappe
9 Udkast
0 Motordel
q Ledningsrum
Tekniske data
Mærkespænding: 220 - 240 V ∼ 50 Hz
Strømforbrug: 200 W
Beskyttelsesklasse: II
Tid for korttidsdrift: 2 minutter
Tid for korttidsdrift
Tiden for korttidsdrift angiver, hvor længe man kan
bruge produktet, uden at motoren bliver for varm
og tager skade. Efter den angivne korttidsdrift skal
produktet slukkes ca. 1 minut, så motoren kan køle af.

13
SSM 200 A1
DK
Sikkerhedsanvisninger
FARE FOR ELEKTRISK STØD
► Slut kun produktet til en forskriftsmæssigt installeret stikkontakt med en
spænding på 220 - 240 V
~
, 50 Hz.
► Lad beskadigede stik eller ledninger udskifte omgående af en autoriseret
reparatør eller kundeservice, så farlige situationer undgås.
► Træk stikket ud af stikkontakten ved driftsfejl, og før du rengør produktet.
► Træk altid stikket ud af stikkontakten ved at trække i selve stikket og ikke i
ledningen.
► Ledningen må aldrig knækkes eller mases og heller ikke lægges, så man
kan træde på den eller snuble over den.
► Produktet må ikke udsættes for fugt og ikke bruges udendørs. Hvis der
kommer væske ind i huset, skal du straks trække stikket ud af stikkontakten,
og få produktet repareret af en autoriseret reparatør.
► Hold aldrig på motordelen, ledningen eller stikket med våde hænder.
► Hvis ledningen eller motordelen er beskadiget, skal du lade fagfolk reparere
produktet, før du bruger det igen.
► Huset til motordelen må ikke åbnes. Hvis du gør det, kan sikkerheden ikke
garanteres, og garantien bortfalder.
► Afbryd straks produktet fra strømnettet efter brug. Produktet er kun fuldstændigt
strømfrit, når stikket er trukket ud af stikkontakten.
Produktets motordel må aldrig lægges ned i væske, og der må ikke
komme væske ind i motordelens hus.

14
SSM 200 A1
DK
ADVARSEL! FARE FOR PERSONSKADER!
► Dette produkt må ikke anvendes af børn.
► Opbevar produktet og dets ledning utilgængeligt for børn.
► Dette produkt kan bruges af personer med reducerede fysiske, sensoriske
eller mentale evner eller manglende erfaring og/eller viden, hvis de er
under opsyn eller er blevet oplært i brugen af produktet og de farer, som
kan være forbundet med det.
► Børn må ikke lege med produktet.
► Ved arbejde med de skarpe knive er der fare for at komme til skade. Saml
produktet igen efter brug og rengøring, så du ikke kommer til skade på de
fritliggende knive. Sørg for, at børn ikke kan komme i kontakt med knivene.
► Produktet og dets tilslutningsledning skal holdes uden for børns rækkevidde.
► Produktet skal altid afbrydes fra strømforsyningen, hvis det ikke er under
opsyn samt inden montering, afmontering eller rengøring.
► Hold aldrig fi ngrene ind i produktets åbninger. Stik aldrig genstande af
nogen art ind i åbningerne – med undtagelse af stopperen og fødevarerne,
der skal forarbejdes. Ellers er der fare for alvorlige ulykker!
► Før udskiftning af tilbehør eller dele, som bevæger sig under drift, skal
produktet slukkes og kobles fra strømnettet.
OBS! MATERIELLE SKADER!
► Brug ikke produktet til at knuse is! Det beskadiger produktet!

15
SSM 200 A1
DK
Samling
1) Fjern alle emballagematerialer og eventuelle
mærkater fra produktet.
2) Rengør produktet som beskrevet i kapitlet
"Rengøring og vedligeholdelse".
3) Stil motordelen 0 på et plant underlag.
4) Sæt knivvalsen 5 ind i valsehuset 3. Driv-
akslen 4 skal gå gennem den bageste åbning
i valsehuset 3.
5) Skru endekappen 8 på valsehuset 3, så ud-
kastet 9 vender nedad, og endekappen 8
ikke længere kan drejes. Skru endekappen 8
i urets retning.
6) Sæt det monterede valsehus 3 ind i motorde-
len 0, så påfyldningsåbningen 2 er forskudt
en smule (se fi gur B på klap-ud-siden). Låsene
på valsehuset 3 skal gå ind i udskæringerne
på motordelen 0. Drej valsehuset 3, så på-
fyldningsåbningen 2 vender opad, og valse-
huset 3 klikker på plads (se fi gur C på klap-
ud-siden).
7) Sæt stopperen 6 ind i påfyldningsåbningen 2.
BEMÆRK
► Stopperlåget 7 kan tages af.
Af
tagning:
– Drej stopperlåget 7 mod ur
ets r
etning,
indtil det kan tages af.
Påsætning:
– Sæt stopperlåget 7 på stopper
en 6, så
begge låse på stopperlåget 7 går gen-
nem udskæringerne på stopperen 6, og
drej så stopperlåget 7 i urets retning, så
det sidder fast.
8) Sæt stikket i en stikkontakt.
Nu er produktet klar til brug.
Forberedelse af ingredienserne
OBS! MATERIELLE SKADER!
► Brug ikke frugter med sten eller kerner.
► Brug ikke hele nødder.
► Brug ikke isterninger.
♦ Skræl frugter som bananer eller kiwier.
♦ Fjern kerner, sten eller stilke fra frugterne.
♦ Skær frugterne i små stykker, så de nemt kan
k
omme gennem i påfyldningsåbningen 2
.
♦ Ingredienser som blokchokolade skal knækkes
i små stykk
er.
♦ Fyld de forberedte frugter i fryseposer eller -dåser,
og læg dem i fry
seren (-18°C) i ca. 24 timer.
BEMÆRK
► I stedet for at fryse friske frugter ned, kan du
bruge dybfrosne frugter fr
a frysedisken.
Anvendelse af produktet
1) Tag frugterne ud af fryseren ca. 10 - 20 minut-
ter, før de skal anvendes.
2) Stil en velegnet skål under udkastet 9.
3) Tag stopperen 6 ud af påfyldningsåbningen 2.
4) Hæld de forberedte frugter i påfyldningsåbnin-
gen 2.
5) Indstil produktet med tænd-/slukknappen 1
(position I).

16
SSM 200 A1
DK
6) Pres frugterne ind i produktet med et let tryk
med stopperen 6. Efter et stykke tid kommer
de fi ndelte frugter ud af udkastet 9.
Når stopperen 6 ikke kan presses længere ned,
skal du tage den op og fylde fl ere frugter eller
ingredienser i, hvis du ønsker det.
BEMÆRK
► Hvis du vil lave sorbet af forskellige frugter/
ingredienser
, skal du hælde de forskellige
frugter skiftevist i påfyldningsåbningen 2.
Så blandes frugterne direkte.
7) Når alle frugterne er fi ndelte, stoppes produk-
tet, ved at tænd-/slukknappen 1 stilles på
position O.
8) Træk stikket ud.
9) Skru endekappen 8 af, og tag forsigtigt kniv-
valsen 5 ud af valsehuset 3.
10) Skrab frugtresterne, som sidder mellem knivene
på knivvalsen 5 af med en kniv eller lign., og
hæld dem i skålen.
11) Bland massen i skålen.
Nu kan du servere sorbeten.
Rengøring og vedligeholdelse
FARE FOR ELEKTRISK STØD
► Træk altid stikket ud af stikkontakten, før du
rengør pr
oduktet.
Motordelen 0 må aldrig lægges ned i
væske, og der må ikke komme væske ind
i motordelens hus 0.
ADVARSEL!
FARE FOR PERSONSKADER!
► Vær forsigtig ved arbejde med knivvalsen 5.
♦ Rengør motordelen 0 efter h
ver anvendelse
med en fugtig klud. Kom et par dråber mildt
opvaskemiddel på den fugtige klud, hvis snavset
sidder fast. Tør efter med rent vand. Sørg for, at
der ikke er rester af opvaskemiddel på produktet,
og at produktet er helt tørt, før det bruges igen.
♦ Tag låget 7 af
stopperen 6 for at rengøre det.
♦ Skyl stopperen 6, stopperlåget 7, knivvalsen
5,
endekappen 8 og valsehuset 3 i lunkent vand
med lidt opvaskemiddel.
♦ Sørg for, at alle dele er helt tørre, før de bruges
igen.
BEMÆRK
► Du kan også rengøre stopperen 6, stopper-
låget
7, endekappen 8 og valsekabinettet 3
i opvaskemaskinen.
Læg så vidt muligt delene i den øverste kurv i
opvaskemaskinen, og sørg for at delene ikke
kommer i klemme. Ellers kan delene miste
formen.

17
SSM 200 A1
DK
Opbevaring
♦ Rengør produktet grundigt, før du stiller det væk
efter brug.
♦
Sæt ledningen og stikket ind i ledningsrummet q
på undersiden af pr
oduktet.
♦ Opbevar produktet et rent og tørt sted.
Garanti og service
På dette produkt får du 3 års garanti fra købs-
datoen. Produktet er produceret omhyggeligt
og inden levering afprøvet samvittighedsfuldt.
Opbevar kassebonen som bevis for købet. Kon-
takt venligst serviceafdelingen telefonisk, hvis du
ønsker at gøre brug af garantien. Derved garan-
teres det, at forsendelsen af varen er gratis.
Garantien gælder kun for materiale- og fabrikati-
onsfejl og ikke for transportskader, sliddele eller be-
skadigelser på skrøbelige dele som f.eks. kontakter
eller batterier. Produktet er kun beregnet til privat
og ikke til erhvervsmæssig brug.
Ved misbrug og uhensigtsmæssig brug, anvendelse
af vold og ved indgreb, som ikke er foretaget af
vores autoriserede serviceafdeling, bortfalder
garantien.
Dine juridiske rettigheder forringes ikke af denne
garanti.
Garantiperioden forlænges ikke, hvis der gøres
brug af garantien. Det gælder også for udskiftede
og reparerede dele. Skader og mangler, som
eventuelt forefi ndes allerede ved køb, skal straks
anmeldes efter udpakning og senest to dage efter
købsdatoen. Når garantiperioden er udløbet, er
reparation af skader betalingspligtig.
Service Danmark
Tel.: 32 710005
E-Mail: k[email protected]
IAN 96255
Åbningstid for hotline:
Mandag til fredag fra kl. 8:00 – 20:00 (MET)
Bortskaff else
Bortskaf ikke produktet
sammen med det alminde-
lige husholdningsaff ald.
Dette produkt er underlagt
det europæiske direktiv
2012/19/EU.
Bortskaf produktet via en godkendt bortskaff elses-
virksomhed eller den kommunale genbrugsplads.
Følg de aktuelt gældende regler. Henvend dig i
tvivlstilfælde til den lokale genbrugsplads.
Emballagen består af miljøvenlige mate-
rialer, som kan bortskaff es på de lokale
genbrugspladser.
Importør
KOMPERNASS HANDELS GMBH
BURGSTRASSE 21
44867 BOCHUM
GERMANY
www.kompernass.com
Seite laden ...
Seite laden ...
Seite laden ...
Seite laden ...
Seite laden ...
Seite laden ...
Seite laden ...
Seite laden ...
Seite laden ...
Seite laden ...
Seite laden ...
Seite laden ...
Seite laden ...
Seite laden ...
Seite laden ...
Seite laden ...
Seite laden ...
Seite laden ...
Seite laden ...
Seite laden ...
Seite laden ...
Seite laden ...
Seite laden ...
Seite laden ...
-
 1
1
-
 2
2
-
 3
3
-
 4
4
-
 5
5
-
 6
6
-
 7
7
-
 8
8
-
 9
9
-
 10
10
-
 11
11
-
 12
12
-
 13
13
-
 14
14
-
 15
15
-
 16
16
-
 17
17
-
 18
18
-
 19
19
-
 20
20
-
 21
21
-
 22
22
-
 23
23
-
 24
24
-
 25
25
-
 26
26
-
 27
27
-
 28
28
-
 29
29
-
 30
30
-
 31
31
-
 32
32
-
 33
33
-
 34
34
-
 35
35
-
 36
36
-
 37
37
-
 38
38
-
 39
39
-
 40
40
-
 41
41
-
 42
42
-
 43
43
-
 44
44


Silvercrest SSM 200 A1 - IAN 96255 SORBET MAKER Bedienungsanleitung
- Typ
- Bedienungsanleitung
- Dieses Handbuch ist auch geeignet für
in anderen Sprachen
Verwandte Papiere
-
Silvercrest 273405 Operating Instructions Manual
-
Silvercrest SSM 200 A1 Operating Instructions Manual
-
-
Silvercrest SSJ 150 A2 Operating Instructions Manual
-
Silvercrest 96255 Operating Instructions Manual
-
Silvercrest 290452 2001 Operating Instructions Manual
-