
EN
V2.5 Supplemental Manual

CONTENTS
2 RIVAGE PM series V2.5 Supplemental Manual
Theatre mode...................................................................................................3
Improved labeling of the USER DEFINED keys and USER DEFINED knobs .....7
Dante Domain Manager (DDM)......................................................................8
Improved screen encoder operation .............................................................10
Improved channel name display ...................................................................10
Improved HY SLOT4 feature..........................................................................10
Addition input patch setting .........................................................................10
Expanded MIDI transmission/reception on/off function .............................11
Additional option in the GAINS SHOWN ON OVERVIEW SCREEN section
....12
Additional library function.............................................................................13
Contents

CONTENTS
Theatre mode
3 RIVAGE PM series V2.5 Supplemental Manual
This mode is suitable for use in theatres. It enables you to store EQ and dynamics settings in four
banks and assign one of those banks to each actor on stage.
In Theatre mode, EQ or dynamics parameter settings are not stored in each scene. Only information
regarding which bank is used will be stored. Therefore, fine adjustments made while using Theatre
mode will be applied to the appropriate settings in scenes that use the same bank. You don’t need to
use the Global Paste function to update the settings.
You can view and manage these four banks for each actor in the actor library, which makes it easy to
switch double-cast actors or accommodate a sudden cast substitution.
Channel libraries in Theatre mode include all four bank settings. Channel EQ and dynamics settings
configured in Default mode cannot be used in Theatre mode. Similarly, settings configured in
Theatre mode cannot be used in Default mode.
NOTE
In Preview mode, EQ and dynamics parameter settings are not applicable.
■ To switch to Theatre mode:
1. Press the SETUP button to access the SETUP screen.
2. Press the MAINTENANCE button to access the MAINTENANCE popup window.
3. Press the UNIT MODE tab.
4. Press the THEATRE button to change the mode.
A popup confirmation window appears, informing you that the control surface will be
rebooted after the mode is switched.
5. Press the OK button.
Theatre mode

CONTENTS
Theatre mode
4 RIVAGE PM series V2.5 Supplemental Manual
■ To switch to Theatre mode on the DSP engine:
1. Press the [MENU] key on the front panel of the DSP engine.
2. Use the []/[] keys to select “Unit Mode”.
3. Press the [ENTER] key.
4. Use the []/[] keys to select “Theatre”.
5. Press the [ENTER] key.
6. The word “DONE” appears, and then the DSP engine restarts.
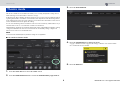
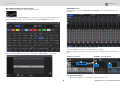
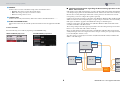
SELECTED CHANNEL VIEW screen
If you select Theatre mode for the UNIT MODE and press the BANK display button, the
SELECTED CHANNEL VIEW screen for an input channel will display the following information.
BANK display button
If this button is turned on, the EQ and Dynamics 1 & 2 graphs, and the bank switching buttons
will appear.
EQ graph
This field graphically indicates the approximate EQ and filter response.
Bank switching buttons
These buttons enable you to switch banks for EQ and Dynamics 1 & 2. Press the selected
button to access the NAME EDIT popup window. The corresponding bank and bank name
will appear in the EQ and dynamics fields.
If the EQ and Dynamics 1 & 2 are linked to a bank, the same bank name will appear in these
EQ and dynamics fields.
Bank LINK button
If this button is turned on, you can link and switch banks (A–D) for the EQ and Dynamics 1 &
2 all together as a group.
Dynamics graph
This field graphically indicates the input/output responses of the dynamics processors 1 and 2.
Unit Mode
Theatre

CONTENTS
Theatre mode
5 RIVAGE PM series V2.5 Supplemental Manual
■ Additional display in Theatre mode
The actor library name appears on the NAME popup button.
In Theatre mode, the NAME/ICON EDIT popup window (accessed by pressing the NAME popup
button) will display the name of the actor library on the ACTOR LIBRARY popup button.
Press the ACTOR LIBRARY popup button to display the ACTOR LIBRARY popup window.
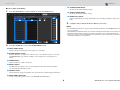
OVERVIEW screen
If Theatre mode is selected for UNIT MODE, the OVERVIEW screen will contain the following
information.
The actor library name appears in the channel name area.
(Press the [SHIFT] key to return to the normal CUE status display.)
If the EQ or dynamics parameters are modified, an asterisk (*) will be added to the actor library
name.
Bank select buttons
These buttons enable you to switch banks for EQ and Dynamics 1 & 2.
HPF/EQ popup window DYNAMICS 1/2 popup window

CONTENTS
Theatre mode
6 RIVAGE PM series V2.5 Supplemental Manual
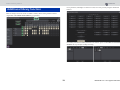
■ To set up a actor library:
1. Press the PATCH button on the menu bar to access the PATCH screen.
2. Press the ACTOR tab to access the ACTOR LIBRARY screen.
INPUT NAME column
Indicates the input channels that can be assigned to a actor library.
ACTOR LIBRARY column
Indicates the names of configured actor libraries. Press one of the library names to access the
ACTOR LIBRARY popup window, in which you can configure the corresponding actor
library.
UPDATE button
Updates the library to reflect current data.
RECALL button
Recalls the library assigned to the corresponding channel. The edited current data will be
overwritten by the recalled library data.
DEFAULT button
Cancels the library settings and initializes the current data in four banks for EQ and dynamics.
INPUT NAME select knob
Use the corresponding screen encoder or the [TOUCH AND TURN] knob.
UPDATE EDITED button
Updates all edited channel library settings.
RECALL EDITED button
Recalls all edited channel library settings.
DEFAULT ALL button
Cancels all channel library settings and initializes the current EQ and dynamics data in four
banks.
3. Configure and/or edit a desired actor library as necessary.
NOTE
• The CH COPY function will not copy any channel-related actor libraries. The CH MOVE function will
move a actor library.
• Input EQ library and dynamics library are shared by Default mode and Theatre mode. However, the
EQ and dynamics parameter settings for the input channel library are not shared by both modes.
Therefore, in Theatre mode, the EQ and dynamics parameters for input channels will be excluded
from being the target of a recall operation.

CONTENTS
Improved labeling of the USER DEFINED keys and USER DEFINED knobs
7 RIVAGE PM series V2.5 Supplemental Manual
You can now edit the labels for USER DEFINED keys and USER DEFINED knobs.
■ To edit the labels:
1. Press the SETUP button to access the SETUP screen.
2. Press a USER DEFINED KEYS (or USER DEFINED KNOBS) button to open the
USER DEFINED KEYS (or USER DEFINED KNOBS) popup window. The following
example uses a USER DEFINED key.
3. Press the LABEL tab.
Improved labeling of the USER DEFINED
keys and USER DEFINED knobs

CONTENTS
Dante Domain Manager (DDM)
8 RIVAGE PM series V2.5 Supplemental Manual
4.
Press the desired USER DEFINED KEYS (or USER DEFINED KNOBS) button to open
the USER DEFINED KEYS LABEL (or USER DEFINED KNOBS LABEL) popup window.
USER DEFINED KEYS (or USER DEFINED KNOBS) display
Indicates the function assigned to the corresponding USER DEFINED key (or USER
DEFINED knob).
Press the + button to select the next option, and the - button to select the previous option.
USER DEFINED key (or USER DEFINED knob) labeling fields
You can use the keyboard to edit the names of the function (TITLE) and parameters (LINE 1-3)
that have been assigned to the corresponding USER DEFINED key (or USER DEFINED knob).
If the LINE1 or LINE2 field is filled with five or fewer characters, those
characters will be displayed in a larger font.
Some parameters (such as the TAP TEMPO’s BPM value) cannot be
changed.
LED color select buttons
Enable you to select the LED color.
DEFAULT button
Press this button to return the assigned function, parameter and channel color to their default
settings.
NOTE
If you modified the settings for a function that was assigned to the USER DEFINED key, the
settings will revert to their default values.
5. Edit the label as necessary.
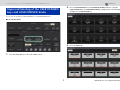
You can now view the configuration status of the Dante Domain Manager (DDM).
If the DDM server exists on a network or if the unit is joined to a domain, the DANTE SETUP
popup window will display the DANTE DOMAIN MANAGER section.
DANTE SETUP popup window
STATE
Indicates the status of the domain join.
• Domain: The unit is joined to a domain.
• Disconnected: The unit is joined to a domain, but not connected to the DDM server.
• Unmanaged: The unit is not joined to a domain.
LOCAL
Indicates the access status of the Dante settings (including DANTE PATCH) of the currently-
operated unit.
• Read Write: You can modify the settings.
• Read Only: You cannot modify the settings.
Dante Domain Manager (DDM)

CONTENTS
Dante Domain Manager (DDM)
9 RIVAGE PM series V2.5 Supplemental Manual
REMOTE
Indicates the access status of the Dante settings of the external Dante device.
• Operator: The settings can be both read and written.
• Guest: The settings can only be read, but not written.
• None: The settings cannot be read.
LATENCY field
Indicates the currently-selected latency. If the unit is off-line, the field will indicate “----”.
SYNC TO EXTERNAL button
If this button is turned on, the unit will synchronize with the word clock supplied from the HY
slot.
Screen variation
Part of the following screens will vary depending on the REMOTE setting.
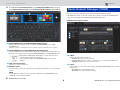
■ Supplemental information regarding the DSP mirroring operation on the
Dante audio network
If the primary (active) DSP engine fails, the secondary (standby) DSP engine will automatically take
over all input/output patches for the TWINLANe network, and the audio will continue seamlessly.
However, the secondary DSP engine will not take over the patches for the Dante audio network.
Consequently, you need to configure these patches separately.
Configure input patches in advance to the Dante cards (HY144-D, HY144-D-SRC) installed in HY
SLOT3 on both active and standby DSP engines. Assign a unique control ID to active and standby
DSP engines. In addition, apply the same With Recall settings to both DSP engines.
Configure output patches from the Dante cards (HY144-D, HY144-D-SRC, Dante MY16-AUD
card) that are installed on the RPio622/222.
These settings will prevent audio input/output and HA control from being interrupted even when a
failover occurs, and the audio will continue seamlessly.
Please note that the Dante patches for the Dante card (HY144-D, HY144-D-SRC) inserted in the
standby DSP engine cannot be configured in advance. Prepare a Dante preset separately and switch
it over manually after a failover occurs.
Also, HA control is possible only from a Dante card (HY144-D, HY144-D-SRC) installed in HY
SLOT 3 on the DSP engine.
DANTE I/O DEVICE [I/O] screen SYSTEM CONFIG popup window
RPio M1
HY-256TL
HY144-D/
HY144-D-SRC
Dante
MY16-AUD2
Dante
MY16-AUD2
Rio
ID 001
Rio
ID 002
Rio
ID 003
DSP 1BDSP 1A
HY-256TL
ID # 1
HY144-D/
HY144-D-SRC
HY-256TL
ID # 2
HY144-D/
HY144-D-SRC
Network
Switch

CONTENTS
Improved screen encoder operation
10 RIVAGE PM series V2.5 Supplemental Manual
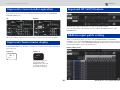
You can now use the screen encoders to edit EQ and dynamics parameters on the SELECTED
CHANNEL VIEW screen.
The encoder numbers displayed on the screen correspond to the actual screen encoder numbers.
In SENDS ON FADER mode, the channel on/off status is now indicated in the channel name display
area on the panel.
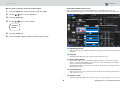
HY SLOT4 (HY SLOT3 on the CSD-R7) now supports input/output patches.
Due to this improvement, output channels are now patched via the OUTPUT tab, not on the
RECORDING tab.
When you modify input patches, you can now select TAKE FROM PORT or TAKE FROM
CHANNEL. If you select TAKE FROM PORT, the HA parameter settings retained by the patched
port will be used as is. If you select TAKE FROM CHANNEL, the HA parameter settings retained by
the input channel will be copied to the destination port.
INPUT patch screen
Improved screen encoder operation
Improved channel name display
EQ Dynamics
ch 1
CH 1 -∞
ch 1
CH 1 -∞
Channel on Channel off
During channel mute, the
channel name will be
highlighted in the same way
as when the channel is off,
but it will also be flashing.
Improved HY SLOT4 feature
Addition input patch setting

CONTENTS
Expanded MIDI transmission/reception on/off function
11 RIVAGE PM series V2.5 Supplemental Manual
If the TAKE FROM CHANNEL button is turned on, the following HA parameter settings will be
copied to the destination port. If you make an input patch from an input that does not retain the HA
settings, the initial settings will be used.
•HA parameters and initial values
HA gain (−6 dB)
HPF ON/OFF (OFF)
+48V ON/OFF (OFF)
GC ON/OFF (OFF)
Ø ON/OFF (OFF)
HPF Frequency (80 Hz)
SILK ON/OFF (OFF)
SILK RED/BLUE (RED)
SILK (0.0)
M/S ON/OFF (OFF)
M/S S-GAIN (STEREO)
These buttons (TAKE FROM PORT and TAKE FROM CHANNEL) have also been added to the
INPUT PATCH popup window.
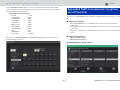
You can now use USER DEFINED keys and GPI to turn MIDI transmission and reception on and
off.
■ Supported operations
• Using USER DEFINED keys to turn MIDI transmission and reception on and off for the
control surface
• Using GPI on the control surface to turn MIDI transmission and reception on and off for the
control surface
• Using GPI on the ESP engine to turn MIDI transmission and reception on and off for the DSP
engine
■ Supported parameters
• MIDI PROGRAM CHANGE
• MIDI CONTROL CHANGE
USER DEFINED KEYS popup window
Expanded MIDI transmission/reception
on/off function

CONTENTS
Additional option in the GAINS SHOWN ON OVERVIEW SCREEN section
12 RIVAGE PM series V2.5 Supplemental Manual
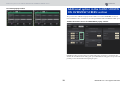
GPI SETUP popup window
The options for the GAIN knob displayed in the GAIN section of the OVERVIEW screen now
include AUTO A.G./D.G., in addition to the existing ANALOG GAIN and DIGITAL GAIN options.
SCREEN SETTINGS tab on the PREFERENCE popup window
If AUTO A.G./D.G. was selected for a bay, and if analog gain is present at a port patched to the
channel, this tab will indicate the analog gain option. Meanwhile, if analog gain is not present at the
patched port, the tab will indicate the digital gain option.
Additional option in the GAINS SHOWN
ON OVERVIEW SCREEN section

CONTENTS
Additional library function
13 RIVAGE PM series V2.5 Supplemental Manual
All Focus settings can now be stored or recalled as a library. These are the parameters that are
cofigureable on the SCENE SETUP (FOCUS) popup window.
Focus parameters (including Focus function on/off) can now be pasted by using the Global Paste
function.
Focus library data and actor library data have been added as options on the SCENE tab and INPUT/
OUTPUT tab respectively for loading and saving.
Additional library function

Published 09/2018 IP-A0
© 2018 Yamaha Corporation
Manual Development Group
Yamaha Downloads
https://download.yamaha.com/
Yamaha Pro Audio global website
https://www.yamaha.com/proaudio/
-
 1
1
-
 2
2
-
 3
3
-
 4
4
-
 5
5
-
 6
6
-
 7
7
-
 8
8
-
 9
9
-
 10
10
-
 11
11
-
 12
12
-
 13
13
-
 14
14


in anderen Sprachen
- English: Yamaha V2 User manual
- français: Yamaha V2 Manuel utilisateur
- español: Yamaha V2 Manual de usuario
- italiano: Yamaha V2 Manuale utente
- русский: Yamaha V2 Руководство пользователя
- Nederlands: Yamaha V2 Handleiding
- português: Yamaha V2 Manual do usuário
- dansk: Yamaha V2 Brugermanual
- polski: Yamaha V2 Instrukcja obsługi
- čeština: Yamaha V2 Uživatelský manuál
- svenska: Yamaha V2 Användarmanual
- 日本語: Yamaha V2 ユーザーマニュアル
- Türkçe: Yamaha V2 Kullanım kılavuzu
- suomi: Yamaha V2 Ohjekirja
- română: Yamaha V2 Manual de utilizare