Tesla Głowica Smart Style Thermostatic Head Benutzerhandbuch
- Typ
- Benutzerhandbuch

1
EN
SK
DE
PL
HU
SL
CZ
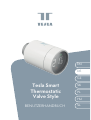
Tesla Smart
Thermostatic
Valve Style
User Manual

2
Table of Contents
1. Overview 3
2. Features 3
3. Device Description 4
4. Installation Instructions 5
4.1 Battery Insertion 5
4.2 Start to Use 6
4.3 Automatic Detection 8
4.4 Valve Information 8
5. Instructions for Use 9
5.1 Manual Mode Setting 9
5.2 Manual Temperature Setting 9
5.3 Manual Child Lock Setting 10
6. Preparation for Use 11
6.1 Installation of Tesla Smart App 11
6.2 Gateway Setup 11
6.3 Thermostatic Valve Setup 11
7. App Settings 12
7.1 Mode Selection 12
7.2 Temperature Setting 12
7.3 Child Lock Setting 12
7.4 Open Window Detection Setting 13
7.5 Valve Detection Setting 14
7.6 Automatic Mode Setting 14
8. Technical Specifications 15

3
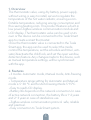
1. Overview
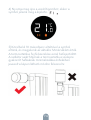
The thermostatic valve, using dry battery power supply,
without wiring, is easy to install, serves to regulate the
temperature of the hot water radiator, ensuring a com-
fortable temperature, reducing energy consumption and
thus saving heating costs. This product features a built-in
low power ZigBee wireless communication module and
LCD display. The thermostatic valve can be used on its
own or the device can be connected to the Tesla Smart
app to create a smart thermostat.
Once the thermostatic valve is connected to the Tesla
Smart app, the app can be used to select the mode,
control the temperature, set the schedule and timer, acti-
vate/deactivate the child lock, and set the open window
detection feature. Any changes made to the device, such
as manual temperature settings, will be synchronised
with the app.
2. Features
• 3 modes Automatic mode, Manual mode, Anti-freezing
mode.
• Temperature range setting for Automatic and Manual
mode is 5~30 °C and for Anti-freezing Mode 5~15°C.
• Easy to read LCD display.
• Battery life depends on the network connection. In case
of active network connection, the battery life is 1~2 years
and 2~3 years in case of standalone use.
• ZigBee wireless communication protocol safe, reliable
and practical.
• Easy connection to Tesla Smart system.

4
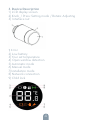
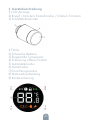
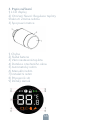
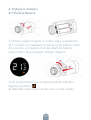
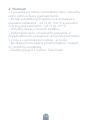
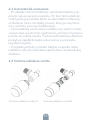
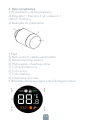
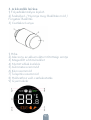
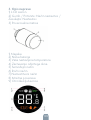
3. Device Description
1 ) LCD display screen
2) Knob / Press: Setting mode / Rotate: Adjusting
3) Interface nut
1) Error
2) Low battery
3) Your set temperature
4) Open window detection
5) Automatic mode
6) Manual mode
7) Installation mode
8) Network connection
9) Child lock

5
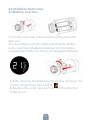
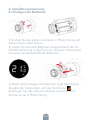
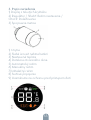
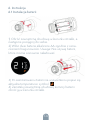
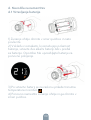
4 Installation Instruction
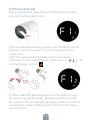
4.1 Battery insertion
1) Turn the outer case in the direction of the arrow and
then pull.
2) In accordance with the marks indicating the battery
poles, insert two AA alkaline batteries into the battery
compartment. Note: Do not use rechargeable batteries.
3) After inserting the batteries, the display will show the
current temperature and symbol.
4) Replace the outer case and turn it in the direction
of the arrow.

6
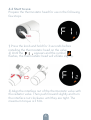
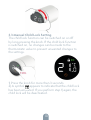
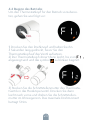
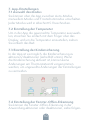
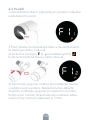
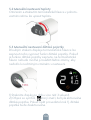
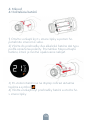
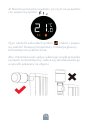
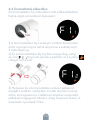
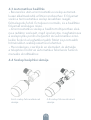
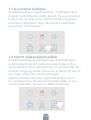
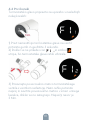
1) Press the knob and hold for 3 seconds before
installing the thermostatic head on the valve.
2) Until the appears and the symbol
flashes, the thermostatic head will vibrate slightly.
3) Align the interface nut of the thermostatic valve with
the radiator valve. Then push forward slightly and turn
the interface nut clockwise until they are tight. The
maximum torque is 5 Nm.
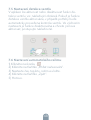
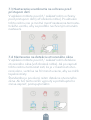
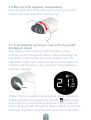
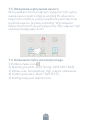
4.2 Start to use
Prepare the thermostatic head for use in the following
few steps.

7
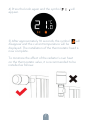
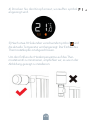
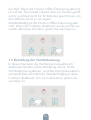
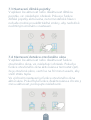
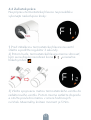
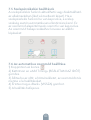
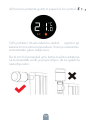
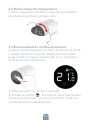
To minimize the effect of the radiator‘s own heat
on the thermostatic valve, it is recommended to be
installed as follows:
4) Press the knob again and the symbol will
appear.
5) After approximately 10 seconds, the symbol will
disappear and the current temperature will be
displayed. The installation of the thermostatic head is
now complete.

8
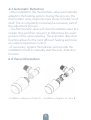
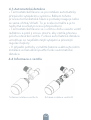
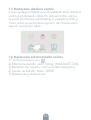
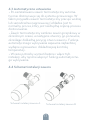
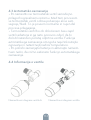
4.4 Valve Information
Installation diagram of valve A.
Installation diagram of valve B.
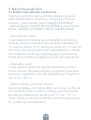
4.3 Automatic Detection
• After installation, the thermostatic valve automatically
adapts to the heating system. During this process, the
thermostatic valve responds more slowly or heats/cools
itself. This is completely normal and a necessary part of
the adjustment process.
• The thermostatic valve will close the radiator valve at a
certain time and then reopen it to determine the exact
position of the valve opening. The automatic detection
function allows for the most efficient heating and more
accurate temperature control.
• If necessary, replace the batteries and activate the
installation mode to manually start the auto-detection
function.

9
• Anti-freezing Mode
If you are away from home for an extended period of
time, set the thermostatic head to anti-freezing mode.
The temperature range is 5~15 °C. This mode is mainly
designed to protect the water pipes from freezing at
low temperatures.
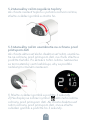
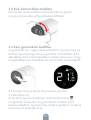
5.2 Manual Temperature Setting
In standby mode, the temperature can be adjusted by
turning the knob after pressing it.
5. Instructions for Use
5.1 Manual Mode Setting
In standby mode, you can switch between three
modes at the touch of a button: Auto Mode, Manual
Mode and Anti-freezing Mode.
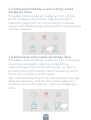
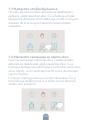
• Automatic mode
In automatic mode, the thermostatic valve auto-
matically switches to the desired temperature, e.g.
21 °C when you are at home, 17 °C when you are
sleeping, or 15 °C when you are away. For Auto mode,
the thermostatic valve must be connected to an
access gateway (ZigBee hub) and requires a network
connection.
• Manual mode
In manual mode, the temperature you set will not
change. The temperature can be adjusted manually
using the knob. The temperature range is 5~30 °C.

10
5.3 Manual Child Lock Setting
The child lock function can be switched on or off
by long pressing the knob. If the child lock function
is switched on, no changes can be made to the
thermostatic valve to prevent unwanted changes to
the settings.
1) Press the knob for more than 3 seconds.
2) A symbol appears to indicate that the child lock
has been activated. If you perform step 1) again, the
child lock will be deactivated.

11
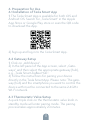
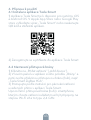
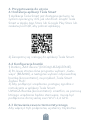
2) Sign up and log in to the Tesla Smart App.
6.2 Gateway Setup
1) Click on „Add device“.
2) In the left panel of the App screen, select „Gate-
ways“ and then select the appropriate gateway (hub),
e.g. „Tesla Smart ZigBee Hub“.
3) Follow the instructions for pairing your device
directly in the Tesla Smart App. Please note: The gate-
way (hub) and the smartphone you want to control the
device with must be connected to the same 2.4GHz
Wi-Fi network.
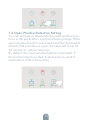
6.3 Thermostatic Valve Setup
A quick triple click on the thermostatic valve knob in
standby mode will enter pairing mode. The pairing
process takes approximately 2 minutes.
6. Preparation for Use
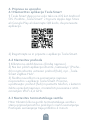
6.1 Installation of Tesla Smart App
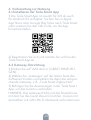
1) The Tesla Smart App is available for both iOS and
Android OS. Search for „Tesla Smart“ in the Apple
App Store or Google Play store or scan the QR code
to download the App.

12
7. App Settings
7.1 Mode Selection
You can switch between Auto Mode, Manual Mode
and Anti-freezing Mode using the app. See section 5.1
for a description of each mode.
7.2 Temperature Setting
The App supports setting different temperature modes
by simply swiping your finger to the desired tempera-
ture (drag the wheel to set the temperature).
7.3 Child Lock Setting
The child lock can be activated or deactivated in
the App, see the following image. If the child lock
function is activated, no changes can be made to the
thermostatic valve to avoid unwanted changes to
the settings.
1) Click on „Add device“.
2) In the left panel of the App, select „Thermostatic
Valves“ and then click on „Tesla Smart TRV Style“.
3) Select the gateway (hub).
4) Activate the pairing mode on the thermostatic valve.
5) Wait for the device pairing process to complete.
6) Now you can fully control the thermostatic valve
with your smartphone.

13
7.4 Open Window Detection Setting
You can activate or deactivate the open window func-
tions in the application, see the following image. If the
open window function is activated and the thermostat
detects that a window is open, the valve will close for
30 minutes to reduce heat loss.
By default, the open window feature is activated. If
the function has been deactivated and you want to
reactivate it, follow these steps.

14
7.5 Valve Detection Setting
The valve detection function can be activated or
deactivated in the App, see the following image. If the
valve detection function is activated, the valve will be
automatically checked if necessary. By default, the
function is deactivated and you want to reactivate it,
proceed as follows.
7.6 Automatic Mode Setting
1) Click on the icon.
2) Click on the „Add Timing“ button.
3) Set the time, temperature, mode and save.
4) Click the „Back“ button.
5) Done.

15
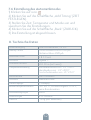
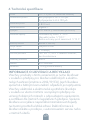
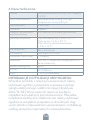
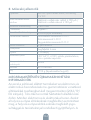
Power input DC3V (AA x2, alkaline batteries)
Standby current Without network ≤ 100 μ A
Networking ≤120 μ A
Maximum current ≤ 800 mA
Connection ZigBee ®
Wireless distance ≥30meters @in an open air
Temperature Setting Automatic mode 5~30 C˚
Manual mode 5~30 C˚
Anti freezing mode 5~15 C˚
Measurement intervals Every 2 minutes
Valve stroke No more than 6 mm
Noise level < 30dB(A)
Working environment -20 65 C˚, ≤95%RH Non condensate
Environmental standards RoHS
Dimensions Φ 57×89mm
Weight ~192 g (including batteries)
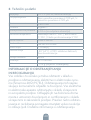
8. Technical Specifications
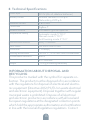
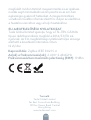
INFORMATION ABOUT DISPOSAL AND
RECYCLING
This product is marked with the symbol for separate co-
llection. The product must be disposed of in accordance
with the regulations for disposal of electrical and electro-
nic equipment (Directive 2012/19/EU on waste electrical
and electronic equipment). Disposal together with regular
municipal waste is prohibited. Dispose of all electrical
and electronic products in accordance with all local and
European regulations at the designated collection points
which hold the appropriate authorisation and certification
in line with the local and legislative regulations. Correct

16
disposal and recycling help to minimise impacts on the
environment and human health. Further information
regarding disposal can be obtained from the vendor,
authorised service centre or local authorities.
EU DECLARATION OF CONFORMITY
Hereby, Tesla Global Limited declares that the radio
equipment type TSL-TRV-GS361A is in compliance with
2014/53/UE directives. The full text of the EU declaration
of conformity is available at the following internet address:
tsl.sh/doc
Connectivity: ZigBee IEEE 802.15.4
Frequency band: 2.400~2.484 GHz ZigBee
Max. radio-frequency power (EIRP): 19dBm
Manufacturer
Tesla Global Limited
Far East Consortium Building,
121 Des Voeux Road Central
Hong Kong
www.teslasmart.com

17
EN
SK
DE
PL
HU
SL
CZ
Tesla Smart
Thermostatic
Valve Style
BENUTZERHANDBUCH

18
Inhaltsverzeichnis
1. Übersicht 19
2. Features 19
3. Gerätebeschreibung 21
4. Installationsanweisung 22
4.1 Einlegen der Batterien 22
4.2 Beginn des Betriebs 23
4.3 Automatische Erkennung 25
4.4 Schema der Ventilinstallation 25
5. Gebrauchsanweisung 26
5.1 Manuelle Einstellung des Modus 26
5.2 Manuelle Temperatureinstellung 27
5.3 Manuelle Kindersicherung 27
6. Vorbereitung zur Nutzung 28
6.1 Installieren der Tesla Smart App 28
6.2 Gateway-Einrichtung 28
6.3 Einrichtung des Thermostatventils 29
7.1 Auswahl des Modus 30
7.2 Einstellung der Temperatur 30
7.3 Einstellung der Kindersicherung 30
7.4 Einstellung der Fenster-Offen-Erkennung 30
7.5 Einstellung der Ventilerkennung 31
7.6 Einstellung des Automatikmodus 32
8. Technische Daten 32

19
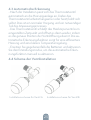
1. Übersicht
Das Thermostatventil dient zur Regelung der
Temperatur des Warmwasserheizkörpers und sorgt für
eine angenehme Raumtemperatur. Dadurch wird der
Energieverbrauch reduziert, was wiederum Heizkosten
spart. Das Gerät ist einfach zu installieren. Das
Thermostatventil kann über eine drahtlose Verbindung
eingestellt werden. Das Thermostatventil ist mit einem
drahtlosen ZigBee-Kommunikationsmodul mit gerin-
gem Stromverbrauch und einem LCD ausgestattet.
Das Thermostatventil kann allein oder mit der Tesla
Smart App verwendet werden, um eine intelligente
Steuerung des Geräts zu ermöglichen.
Sobald das Thermostatventil mit der Tesla Smart
App verbunden ist, ist es möglich, den Betrieb-
smodus auszuwählen, die Temperatur einzustellen,
den Timer zu aktivieren, das Intervall einzustellen,
den Kindersicherungsmodus und den Modus zur
Erkennung offener Fenster zu aktivieren/deaktivieren.
Änderungen an den Einstellungen (z. B. manuelle
Temperatureinstellung) werden automatisch mit der
App synchronisiert.
2. Features
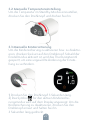
- 3 Modi - Automatikmodus, Handmodus, Frostschutz-
modus.
- Der Arbeitstemperaturbereich für Automatikmodus und
Handmodus beträgt +5 bis +30 °C, für den Frostschutz-
modus +5 bis +15 °C.
- Leicht ablesbare LCD-Anzeige.

20
- Die Batterielebensdauer hängt von der Netzwerkver-
bindung ab. Bei aktiver Netzwerkverbindung beträgt
die Batterielebensdauer 1-2 Jahre und 2-3 Jahre bei
Standalone-Betrieb.
- ZigBee ist ein sicheres, zuverlässiges und praktisches
drahtloses Kommunikationsprotokoll.
- Einfacher Anschluss an das Tesla Smart System.
Seite wird geladen ...
Seite wird geladen ...
Seite wird geladen ...
Seite wird geladen ...
Seite wird geladen ...
Seite wird geladen ...
Seite wird geladen ...
Seite wird geladen ...
Seite wird geladen ...
Seite wird geladen ...
Seite wird geladen ...
Seite wird geladen ...
Seite wird geladen ...
Seite wird geladen ...
Seite wird geladen ...
Seite wird geladen ...
Seite wird geladen ...
Seite wird geladen ...
Seite wird geladen ...
Seite wird geladen ...
Seite wird geladen ...
Seite wird geladen ...
Seite wird geladen ...
Seite wird geladen ...
Seite wird geladen ...
Seite wird geladen ...
Seite wird geladen ...
Seite wird geladen ...
Seite wird geladen ...
Seite wird geladen ...
Seite wird geladen ...
Seite wird geladen ...
Seite wird geladen ...
Seite wird geladen ...
Seite wird geladen ...
Seite wird geladen ...
Seite wird geladen ...
Seite wird geladen ...
Seite wird geladen ...
Seite wird geladen ...
Seite wird geladen ...
Seite wird geladen ...
Seite wird geladen ...
Seite wird geladen ...
Seite wird geladen ...
Seite wird geladen ...
Seite wird geladen ...
Seite wird geladen ...
Seite wird geladen ...
Seite wird geladen ...
Seite wird geladen ...
Seite wird geladen ...
Seite wird geladen ...
Seite wird geladen ...
Seite wird geladen ...
Seite wird geladen ...
Seite wird geladen ...
Seite wird geladen ...
Seite wird geladen ...
Seite wird geladen ...
Seite wird geladen ...
Seite wird geladen ...
Seite wird geladen ...
Seite wird geladen ...
Seite wird geladen ...
Seite wird geladen ...
Seite wird geladen ...
Seite wird geladen ...
Seite wird geladen ...
Seite wird geladen ...
Seite wird geladen ...
Seite wird geladen ...
Seite wird geladen ...
Seite wird geladen ...
Seite wird geladen ...
Seite wird geladen ...
Seite wird geladen ...
Seite wird geladen ...
Seite wird geladen ...
Seite wird geladen ...
Seite wird geladen ...
Seite wird geladen ...
Seite wird geladen ...
Seite wird geladen ...
Seite wird geladen ...
Seite wird geladen ...
Seite wird geladen ...
Seite wird geladen ...
Seite wird geladen ...
Seite wird geladen ...
Seite wird geladen ...
Seite wird geladen ...
Seite wird geladen ...
Seite wird geladen ...
Seite wird geladen ...
Seite wird geladen ...
Seite wird geladen ...
Seite wird geladen ...
Seite wird geladen ...
Seite wird geladen ...
Seite wird geladen ...
Seite wird geladen ...
-
 1
1
-
 2
2
-
 3
3
-
 4
4
-
 5
5
-
 6
6
-
 7
7
-
 8
8
-
 9
9
-
 10
10
-
 11
11
-
 12
12
-
 13
13
-
 14
14
-
 15
15
-
 16
16
-
 17
17
-
 18
18
-
 19
19
-
 20
20
-
 21
21
-
 22
22
-
 23
23
-
 24
24
-
 25
25
-
 26
26
-
 27
27
-
 28
28
-
 29
29
-
 30
30
-
 31
31
-
 32
32
-
 33
33
-
 34
34
-
 35
35
-
 36
36
-
 37
37
-
 38
38
-
 39
39
-
 40
40
-
 41
41
-
 42
42
-
 43
43
-
 44
44
-
 45
45
-
 46
46
-
 47
47
-
 48
48
-
 49
49
-
 50
50
-
 51
51
-
 52
52
-
 53
53
-
 54
54
-
 55
55
-
 56
56
-
 57
57
-
 58
58
-
 59
59
-
 60
60
-
 61
61
-
 62
62
-
 63
63
-
 64
64
-
 65
65
-
 66
66
-
 67
67
-
 68
68
-
 69
69
-
 70
70
-
 71
71
-
 72
72
-
 73
73
-
 74
74
-
 75
75
-
 76
76
-
 77
77
-
 78
78
-
 79
79
-
 80
80
-
 81
81
-
 82
82
-
 83
83
-
 84
84
-
 85
85
-
 86
86
-
 87
87
-
 88
88
-
 89
89
-
 90
90
-
 91
91
-
 92
92
-
 93
93
-
 94
94
-
 95
95
-
 96
96
-
 97
97
-
 98
98
-
 99
99
-
 100
100
-
 101
101
-
 102
102
-
 103
103
-
 104
104
-
 105
105
-
 106
106
-
 107
107
-
 108
108
-
 109
109
-
 110
110
-
 111
111
-
 112
112
-
 113
113
-
 114
114
-
 115
115
-
 116
116
-
 117
117
-
 118
118
-
 119
119
-
 120
120
-
 121
121
-
 122
122


Tesla Głowica Smart Style Thermostatic Head Benutzerhandbuch
- Typ
- Benutzerhandbuch
in anderen Sprachen
Verwandte Artikel
-
Tesla TSL-TRV-GS361A Benutzerhandbuch
-
Tesla 3052601 Benutzerhandbuch
-
Tesla TSL-SEN-MOTION Benutzerhandbuch
-
Tesla TSL-SWI-SCENEZG4 Benutzerhandbuch
-
-
Tesla PS300 Benutzerhandbuch
-
Tesla TSL-SEN-WATER Benutzerhandbuch
-
Tesla RJ45 Benutzerhandbuch
-
Tesla Smart Heating Pillow Benutzerhandbuch
-
Tesla TSL-CAM-SOL5W Benutzerhandbuch


