Tesla Smart Heating Pillow Benutzerhandbuch
- Typ
- Benutzerhandbuch

1
USER MANUAL
TESLA SMART
HEATING PILLOW
EN
CZ
SK
PL
HU
SL
DE

2
1. OPERATING INSTRUCTIONS
1.1 Turn on and Turn off
Turn on-Connect device to the power to turn on.
Turn off: Click the button until the LED light goes out to turn off (Mainly used to turn off the heating function).
1.2 Temperature Control
This product is designed with four gears, which are displayed as below:
1st gear-green light (37~41°C);
2nd gear- orange light (42°C~46°C);
3rd gear-purple light (47°C~51°C);
4th gear-red light (52°C~57°C);
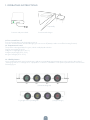
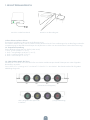
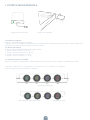
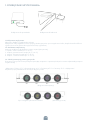
1.2.1 Shift by Button
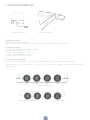
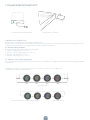
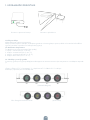
Users can directly switch gears by the button, and set corresponding target temperature cycle control in the order of
“starting->green 37°C->orange 42°C ->purple47°C->red 52°C->shutdown ” The specific operation flow is shown in the
following figure:
Connect with power bank Connect with charger
(Schematic diagram)
(Original image)Fig.1 Light color cycle diagram
repeatedly

3
Every time the gear is adjusted, the device will be heated at full power. When the target temperature is reached, the
breathing light will be turned on and kept at a constant temperature.
Note: It can be turned on by plugging to the power supply. By default, it will be heated at the 1st gear. When the tempe-
rature reaches 37°C, the green breathing light will be turned on.
1.2.2 Temperature Memory
During the normal operation of the device, in case of unexpected power off (e.g., the mobile power bank is out of power
or the AC-DC adaptor is pulled out, etc.), the controller will store the gear information before power failure, and then
switch directly to the gear to continue heating after power-up again.
1.2.3 Smart Heating Mode
In any gear, press the button for more than 4 seconds until the LED light turns red, and then enter the Smart Heating
Mode. During this mode, the four light colors are turned off and on cyclically, with a time interval of 1second.
In the smart heating mode, first heat for 5 minutes in the 4th gear, then heat for 10 minutes in the 3rd gear, 15 minutes in
the 2nd gear and 20 minutes in the 1st gear. Enter the standby mode after the above cycle ends. During this progress,
any key operation will immediately exit the Smart heating mode.
1.3 Lighting Control
1.3.1 Night Mode
This device has a night mode, and if there is no operation within 30 seconds from 17:00 on the same day to 08:00 on
the next day, the lights will be automatically turned off in order to reduce the impact on the user’s sleep.
After entering the night mode, any key operation or APP operation will cause the machine to exit the night mode imme-
diately.
1.4 Bluetooth Music Playing
See 1.6.6 Bluetooth music playing for more details.
1.5 Sleep Monitoring
Sleep monitoring is conducted from 18:00 on the same day to 12:00 on the next day. During this period, sleep data
(Mainly related parameters of shallow sleep, deep sleep and rapid eye rotation) are recorded every half hour.
In order to ensure the accuracy of sleep monitoring data, please try to:
1.Connect the Tesla Smart App with the device before going to sleep at night and enter the “sleep” page-
2.After getting up the next day, please connect to the APP again and enter the “Sleep” page to synchronize the sleep
data.
Note: Sleep data can only be kept on the device side for 3 days, so if the device is not used to connect to APP for 3
consecutive days, the data of the earliest day may become inaccurate or lost. The acquired sleep data will be displayed
on the “Sleeping” page of APP.
1.6 APP operation
Please search for “Tesla Smart App” in Android application market (If it is an Apple phone, please go to Apple Store),
download and then install it.
1.6.1 Arrangements
1. Log in to the Tesla Smart APP.
2.Press and hold the device for 2s, wait for the blue light to flash, and then enter bluetooth pairing mode.
1.6.2 Search and Connection
1.Manual adding method : click“+” in the upper right corner --select “add manually ”--find the device to be added (the
device name is “Smart Sleep-assistance Pillow” ) , “add it” --Click “+” --wait for connection -- after completion, the sys-
tem will automatically enter the device page.

4
2.Automatic adding method: click “+ ”in the upper right corner -- select “ automatic adding” -- search for the device (
the device name is “ Tesla Smart Heating Pillow”-“Next” --wait for connection -- the system will automatically enter the
device page after completion.
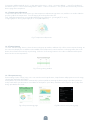
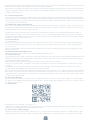
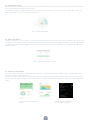
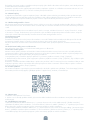
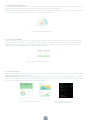
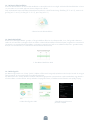
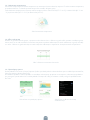
1.6.3 Temperature Adjustment
Temperature adjustment: The annular area is the temperature adjustment operation area, and the user need to slide the
pointer to adjust the temperature. Turn off heating when the pointer sides off.
Stall : Different temperatures correspond to different gears and colors : green light(37°C~41°C),
orange light(42°C~46°C),purple light (47°C~51°C)and red(≥52°C).
1.6.4 Timing Heating
Click the “timed heating” button, select the time in the pop-up window, and then click “OK”to start automatic heating. At
the same time, display the countdown in the middle of the temperature control interface on this page. After the count-
down, the machine automatically stops heating. Click the “close timing” button to close the countdown and keep the
device at the current temperature.
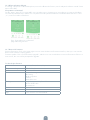
1.6.5 Sleep Monitoring
Data viewing: On the “Sleep” page, users can view the total sleep duration, sleep duration and proportion in each stage,
sleep quality and other information.
Data update: The local data will be automatically synchronized when entering the device page or the data can be ma-
nually switched for synchronization. Local data can be kept for up to 3days, and data can be kept for up to 7 days after
being uploaded to the cloud.
Fig.2 Temperature adjustment
Fig.3 Timing setting window
Fig.4 Sleep monitoring page Fig.5 Bluetooth search pairing page

5
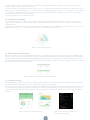
1.6.6 Bluetooth Music Playing
In “Setting --Bluetooth” of the mobile phone, turn on the Bluetooth function, search and pair the device named “Smart
Music Pillow BLE”.
Sleep Music on Demand
On the “Music” page of Tuya smart APP, users can order various sleeping music according to your personal hobbies.
Click the drop-down button, and the user can perform timed operation and start countdown. When the time is set to
„∞“, it can be closed at a fixed time.
1.6.7 Device Information
Device information: Click in the upper right corner to enter the device information interface, where you can view the
device status and more setting options.
Firmware update: Click “Check Firmware Upgrade”, and the users can view the device version information. If there is a
new version, the users will be prompted to upgrade.
Fig.6 Sleep-aid music on-demand
page and timing function
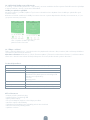
Material Memory Foam, Cotton, Polyester
Temperature Range 37 ºC - 52 ºC
Power 500mA, USB
Functions Sleep monitoring
IR Heating
Build in Speakers
Timmer
Washable cover
Package content High-Quality Memory Foam Pillow
Built-In USB Cable
User Manual
Connection Bluetooth
Dimensions 57 x 38 x 8-11cm
App Tesla Smart for iOS and Android
Technical Specification

6
This product is marked with the symbol for separate collection. The product must be disposed of in accordan-
ce with the regulations for disposal of electrical and electronic equipment (Directive 2012/19/EU on waste
electrical and electronic equipment). Disposal together with regular municipal waste is prohibited. Dispose of
all electrical and electronic products in accordance with all local and European regulations at the designated
collection points which hold the appropriate authorisation and certification in line with the local and legislative
regulations. Correct disposal and recycling help to minimise impacts on the environment and human health.
Further information regarding disposal can be obtained from the vendor, authorised service centre or local
authorities.
Hereby, Tesla Global Limited declares that the radio equipment type TSL-HC-HL60 is in compliance with EU di-
rectives. The full text of the EU declaration of conformity is available at the following internet address: tsl.sh/doc
Connectivity: Bluetooth
Frequency band: 2.402 - 2.480 GHz
Max. radio-frequency power (EIRP): < 20 dBm
INFORMATION ABOUT DISPOSAL AND RECYCLING
EU DECLARATION OF CONFORMITY
Manufacturer
Tesla Global Limited
Far East Consortium Building,
121 Des Voeux Road Central
Hong Kong
www.teslasmart.com

BENUTZERHANDBUCH
EN
CZ
SK
PL
HU
SL
DE
TESLA SMART
HEATING PILLOW

8
1. BENUTZERHANDBUCH
1.1 Einschalten und Ausschalten
Einschalten: Schließen Sie das Gerät an die Einspeisung an.
Ausschalten: Wenn Sie das Gerät ausschalten wollen, berühren Sie die Taste und bewegen Sie mit dem Finger in der Pla-
netenbewegung, bis die LED-Kontrolllampe erlischt (benutzt vor allem zum Ausschalten der Funktion der Erwärmung).
1.2 Temperatureinstellung
Dieses Produkt verfügt über vier Stufen (siehe unten).
1. Stufe - grünes Licht (37 °C~41 °C);
2. Stufe - orangefarbiges Licht (42 °C~46 °C);
3. Stufe - violettes Licht (47 °C~51 °C);
4. Stufe - rotes Licht (52 °C~57 °C);
1.2.1 Umschalten mittels der Taste
Mit Hilfe der Taste kann man unter den Stufen umschalten und die entsprechende Zieltemperatur in der folgenden
Reihenfolge einstellen:
Start > Grün 37 °C > Orange 42 °C > Violett 47 °C > Rot 52 °C > Ausschalten“. Der Betrieb wird auf der folgenden
Abbildung dargestellt:
Anschluss an die Powerbank Anschluss an das Ladegerät
(Schematisches Diagramm)
(Originalabbildung)Abb. 1 Diagramm des Zyklus der
Lichtfarbe

9
Bei jeder Einstellung der Stufe wird das Gerät auf die volle Leistung aufgewärmt. Sobald die Zieltemperatur erreicht wird,
wird das Licht pulsieren und es wird die konstante Temperatur erhalten.
Anmerkung: Das Produkt kann durch den Anschluss an die Einspeisungsquelle eingeschaltet werden. Das Produkt wird
in der Ausgangseinstellung auf die 1. Stufe aufgewärmt. Sobald die Temperatur 37 °C erreicht, leuchtet die grüne pulsie-
rende Kontrollleuchte auf.
1.2.2 Temperaturspeicher
Im Falle eines unerwarteten Ausschaltens der Einspeisung (z. B. infolge der Ausladung der mobilen Powerbank oder des
Herausziehens des Speiseadapters) während des laufenden Betriebs des Geräts speichert die Steuereinheit die Informa-
tionen über die letzte eingestellte Stufe. Nach dem erneuten Einschalten schaltet das Gerät auf diese Stufe um und wird
so in dem Aufwärmen fortsetzen.
1.2.3 Modus des smarten Aufwärmens
Wenn Sie in den Modus des smarten Aufwärmens umschalten wollen, drücken Sie und halten Sie die Taste für mehr als
4 Sekunden, bis die LED-Kontrollleuchte rot aufleuchtet. Während dieses Modus werden vier farbige Lichter immer für 1
Sekunde abwechselnd aufleuchten und erlöschen.
Im Modus des smarten Aufwärmens erwärmt das Gerät 5 Minuten in der 4. Stufe, nachfolgend 10 Minuten in der 3.
Stufe, 15 Minuten in der 2. Stufe und 20 Minuten in der 1. Stufe. Nach der Beendigung des obigen Zyklus schaltet das
Gerät in den Bereitschaftsmodus um. Wenn Sie während dieses Zyklus irgendwelche Taste drücken, beendigen Sie den
Modus des smarten Aufwärmens sofort.
1.3 Lichteinstellung
1.3.1 Nachtmodus
Das Gerät verfügt über den Nachtmodus. Wenn das Gerät in der Zeit von 17:00 bis 8:00 des Folgetags innerhalb von
30 Sekunden keine Aktivität aufzeichnet, erlöschen die Kontrollleuchten automatisch, damit sie den Schlaf des Benut-
zers nicht stören.
Wenn Sie während des aktiven Nachtmodus irgendwelche Taste drücken oder die App benutzen, beendigen Sie den
Nachtmodus sofort.
1.4 Musikabspielen mittels Bluetooth
Mehr Informationen siehe Sektion 1.6.6 Musikabspielen mittels Bluetooth.
1.5 Schlafmonitoring
Das Schlafmonitoring erfolgt von 18:00 bis 12:00 des Folgetages. In diesem Zeitabschnitt werden die Angaben über den
Schlaf (vor allem Parameter bezüglich des oberflächlichen Schlafs, des tiefen Schlafs und der schnellen Augenbewegu-
ng) jede halbe Stunde aufgezeichnet.
Wenn Sie die möglichst genauen Angaben feststellen wollen, gehen Sie wie folgt vor:
1. Bevor Sie schlafen gehen, schließen Sie das Gerät an die App Tuya Smart an und wechseln Sie auf die Seite „Sleep“
(„Schlaf“).
2. Nachdem Sie am Folgetag aufstehen, schließen Sie sich zur App erneut an und wechseln Sie auf die Seite „Sleep“
(„Schlaf“), damit die Angaben über den Schlaf harmonisiert werden.
Anmerkung: Das Gerät ist fähig, die Angaben über den Schlaf nur für die Dauer von 3 Tagen zu speichern. Das bedeutet,
dass im Fall, wenn das Gerät an die App 3 Tage nacheinander nicht angeschlossen wird, die Angaben von dem ältesten
Tag ungenau oder schon verloren sein können. Die erworbenen Daten über den Schlaf können Sie sich auf Seite „Sleep“
(„Schlaf“) in der App ansehen.
1.6 Benutzung der App
Wenn Sie ein Gerät mit dem Operationssystem Android besitzen, suchen Sie im Geschäft mit Apps „Tesla Smart App“
aus (wenn Sie ein Mobiltelefon der Marke Apple besitzen, suchen Sie die App in Apple Store aus), laden Sie diese herun-
ter und installieren Sie sie.
1.6.1 Einstellung
1. Melden Sie sich in die App „Tesla Smart“ an.
2. Drücken Sie und halten Sie die Taste für die Dauer von 2 Sekunden, bis die blaue Kontrollleuchte beginnt zu blinken
und das Gerät in den Modus Bluetooth-Paaring wechselt.
1.6.2 Aussuchen und Anschließen
1. Manuelle Hinzufügung des Geräts: Klicken Sie auf „+“ in der rechten oberen Ecke, wählen Sie „Add manually“ („Ma-
nuell hinzufügen“) aus, suchen Sie das Gerät (Bezeichnung des Geräts: „Tesla Smart Pillow“) aus, klicken Sie auf „Add

10
it“ („Hinzufügen“) und „+“ und warten Sie, bis das Gerät anschließt. Nach dem erfolgreichen Anschluss wechselt das
System auf die Seite des Geräts automatisch.
2. Automatische Hinzufügung des Geräts: Klicken Sie auf „+“ in der rechten oberen Ecke, wählen Sie „Automatic manu-
ally“ („Automatische Hinzufügung“) aus, suchen Sie das Gerät (Bezeichnung des Geräts: „Tesla Smart Pillow“) aus, klicken
Sie auf „Next“ („Nächste“) und warten Sie, bis das Gerät anschließt. Nach dem erfolgreichen Anschluss wechselt das
System auf die Seite des Geräts automatisch.
tem will automatically enter the device page.
1.6.3 Temperatureinstellung
Temperatureinstellung: Zur Temperatureinstellung dient der Kreisbereich des Geräts. Wenn Sie die Temperatur ein-
stellen wollen, schieben Sie den Anzeiger. Wenn Sie den Anzeiger vollständig nach unten schieben, schalten Sie das
Aufwärmen aus.
Stall: Den verschiedenen Temperaturen entsprechen verschiedene Stufen und Farben: Grünes Licht (37 °C~41 °C), oran-
gefarbiges Licht (42 °C~46 °C), violettes Licht (47 °C~51 °C) und rotes Licht (≥52 °C).
1.6.4 Zeitschalter des Aufwärmens
Klicken Sie auf die Taste „Zeitschalter des Aufwärmens“, in dem Pop-Up-Fenster stellen Sie die Zeit ein und durch das
Klicken auf die Taste „OK“ starten Sie das automatische Aufwärmen. Auf dieser Seite wird inmitten der Schnittstelle der
Temperatureinstellung der Countdown abgebildet. Nach dem Ablauf des Countdowns wird das Aufwärmen automa-
tisch gestoppt. Durch das Klicken auf die Taste „Zeitschalter beenden“ beenden Sie den Countdown und das Gerät wird
die aktuelle Temperatur aufrechterhalten.
1.6.5 Schlafmonitoring
Datenabbildung: Auf der Seite „Sleep“ („Schlaf“) können die Benutzer die Gesamtdauer des Schlafs und den Anteil der
einzelnen Phasen, die Qualität des Schlafs und andere Informationen abbilden.
Datenaktualisierung: Die Lokalangaben werden bei der Abbildung der Seite des Geräts automatisch synchronisiert, oder
es ist möglich, die Datensynchronisierung manuell zu starten. Die Lokalangaben können für die Dauer bis zu 3 Tagen
aufbewahrt werden und nach dem Einspielen in die Cloud können die Daten für die Dauer bis zu 7 Tagen aufbewahrt
werden.
Abb. 2 Temperatureinstellung
Abb. 3 Fenster für die Einstellung des Zeitschalters
Abb. 4 Seite des Schlafmonitorings Abb. 5 Seite des Aussuchens von
Bluetooth für Paaring

11
1.6.6 Musikabspielen mittels Bluetooth
In „Setting“ > „Bluetooth“ („Einstellung“ > „Bluetooth“) auf Ihrem Mobiltelefon schalten Sie die Funktion Bluetooth ein
und suchen Sie und paaren Sie das Gerät mit der Bezeichnung „Smart Music Pillow BLE“.
Musik zum Schlafen auf Wunsch
Auf der Seite „Music“ („Musik“) der App Tuya Smart können die Benutzer verschiedene Musik zum Schlafen nach ihren
persönlichen Interessen bestellen.
Durch das Klicken auf die Taste des Ausrollmenüs kann man den Zeitschalter einstellen und den Countdown starten.
Wenn die Zeit auf „∞“ eingestellt ist, kann man sie in dem fix festgelegten Moment schließen.
1.6.7 Angaben über das Gerät
Angaben über das Gerät: Durch das Klicken auf in der rechten oberen Ecke wechseln Sie in die Schnittstelle mit den
Angaben über das Gerät, wo Sie sich den Zustand des Geräts und andere Einstellmöglichkeiten ansehen können.
Aktualisierung der Firmware: Durch das Klicken auf „Check Firmware Update“ („Aktualisierung der Firmware kontrollie-
ren“) können Sie die Informationen über die aktuelle Version des Geräts abbilden. Wenn eine neue Version zur Verfügu-
ng steht, wird der Benutzer zur Aktualisierung aufgefordert.
Abb. 6 Seite mit der Musik für das
gute Schlafen und Funktion des
Zeitschalters
Producent
Tesla Global Limited
Far East Consortium Building,
121 Des Voeux Road Central
Hong Kong
www.teslasmart.com
INFORMATIONEN ÜBER DIE ENTSORGUNG UND WIEDERVERWERTUNG
Dieses Produkt ist mit einem Symbol für die getrennte Sammlung gekennzeichnet. Das Produkt muss im Einklang
mit den Vorschriften für die Entsorgung von elektrischen und elektronischen Geräten (Richtlinie 2012/19/EU über
elektrische und elektronische Geräteabfälle) entsorgt werden. Eine Entsorgung über den normalen Hausmüll
ist unzulässig. Alle elektrischen und elektronischen Produkte müssen im Einklang mit allen örtlichen
und europäischen Vorschriften an dafür vorgesehenen Sammelstellen, die über eine entsprechende Genehmigung
und Zertifizierung gemäß den örtlichen und legislativen Vorschriften verfügen entsorgt werden. Die richtige
Entsorgung und Wiederverwertung hilft dabei die Auswirkungen auf die Umwelt und die menschliche Gesundheit
zu minimieren. Weitere Informationen zur Entsorgung erhalten Sie von Ihrem Verkäufer, der autorisierten
Servicestelle oder bei den örtlichen Ämtern.
EU-KONFORMITÄTSERKLÄRUNG
Hiermit erklärt Tesla Global Limited, dass der Funkanlagentyp TSL-HC-HL60 der Richtlinie 2014/53/EU entspricht.
Der vollständige Text der EU-Konformitätserklärung ist unter der folgenden Internetadresse verfügbar: tsl.sh/doc
Konnektivität: Bluetooth
Frequenzband: 2.400 - 2.480 GHz
Max. Sendeleistung. (EIRP): < 20 dBm

12

1. UŽIVATELSKÁ PŘÍRUČKA
EN
CZ
SK
PL
HU
SL
DE
TESLA SMART
HEATING PILLOW

14
1. UŽIVATELSKÁ PŘÍRUČKA
1.1 Zapnutí a vypnutí
Zapnutí: Připojte zařízení k napájení.
Vypnutí: Chcete-li zařízení vypnout, opakovaně stikněte tlačítko, dokud LED kontrolka nezhasne.
1.2 Nastavení teploty
Tento produkt má k dispozici čtyři stupně (viz níže).
1. stupeň - zelené světlo (37 °C~41 °C);
2. stupeň - oranžové světlo (42 °C~46 °C);
3. stupeň - fialové světlo (47 °C~51 °C);
4. stupeň - červené světlo (52 °C~57 °C);
1.2.1 Přepnutí pomocí tlačítka
Pomocí tlačítka je možné přepínat mezi stupni a nastavit odpovídající cílovou teplotu v následujícím pořadí:
„Spuštění > Zelená 37 °C > Oranžová 42 °C > Fialová 47 °C > Červená 52 °C > Vypnutí“. Provoz je znázorněn v násle-
dujícím obrázku:
ipojení k powerbance Připojení k nabíječce
(Schématický diagram)
(Původní obrázek)Obr. 1 Diagram cyklu barvy světla

15
Při každém nastavení stupně se zařízení zahřívá na plný výkon. Jakmile je dosažena cílová teplota, světlo bude pulzovat a
bude udržována konstantní teplota.
Poznámka: Produkt lze zapnout připojením ke zdroji napájení. Produkt se ve výchozím nastavení zahřívá na 1. stupeň.
Jakmile teplota dosáhne 37 °C, rozsvítí se zelená pulzující kontrolka.
1.2.2 Paměť teploty
V případě neočekávaného vypnutí napájení (např. v důsledku vybití mobilní powerbanky nebo vytažení napájecího adap-
téru) během běžného provozu zařízení uloží řídicí jednotka informace o posledním nastaveném stupni. Po opětovném
zapnutí přepne zařízení na tento stupeň a bude tak pokračovat v ohřevu.
1.2.3 Režim chytrého ohřevu
Chcete-li přepnout do režimu chytrého ohřevu, stiskněte a po dobu více než 4 sekund podržte tlačítko, dokud se LED
kontrolka nerozsvítí červeně. Během tohoto režimu se budou vždy na 1 sekundu střídavě rozsvěcet a zhasínat čtyři barev-
ná světla.
V režimu chytrého ohřevu zařízení hřeje 5 minut ve 4. stupni, následně 10 minut v 3. stupni, 15 minut v 2. stupni a 20
minut v 1. stupni. Po dokončení výše popsaného cyklu zařízení přepne do pohotovostního režimu. Pokud během tohoto
cyklu stisknete jakékoli tlačítko, okamžitě ukončíte režim chytrého ohřevu.
1.3 Nastavení světla
1.3.1 Noční režim
Zařízení má k dispozici noční režim. Pokud zařízení v době od 17:00 do 8:00 následujícího dne během 30 sekund neza-
znamená žádnou aktivitu, kontrolky automaticky zhasnou, aby nerušily spánek uživatele.
Pokud během aktivního nočního režimu stisknete jakékoli tlačítko nebo použijete aplikaci, okamžitě ukončíte noční
režim.
1.4 Přehrávání hudby pomocí Bluetooth
Více informací viz sekce 1.6.6 Přehrávání hudby pomocí Bluetooth.
1.5 Monitorování spánku
Monitorování spánku probíhá od 18:00 do 12:00 následujícího dne. V tomto časovém úseku jsou každou půlhodinu za-
znamenávány údaje o spánku (především parametry týkající se povrchního spánku, hlubokého spánku a rychlého pohybu
očí).
Chcete-li zajistit co nejpřesnější údaje, postupujte následovně:
1. Než půjdete spát, připojte k zařízení aplikaci Tuya Smart a přejděte na stránku „Sleep“ („Spánek“).
2. Poté, co následující den vstanete, se opět připojte k aplikaci a přejděte na stránku „Sleep“ („Spánek“), aby se údaje o
spánku synchronizovaly.
Poznámka: Zařízení je schopno ukládat údaje o spánku pouze po dobu 3 dnů. To znamená, že pokud se zařízení 3 dny
po sobě nepřipojí k aplikaci, mohou být údaje z nejstaršího dne nepřesné, nebo již ztracené. Získané údaje o spánku si
můžete prohlédnout na stránce „Sleep“ („Spánek“) v aplikaci.
1.6 Použití aplikace
Pokud vlastníte zařízení s operačním systémem Android, v obchodě s aplikacemi vyhledejte „Tesla Smart App“ (pokud
vlastníte mobilní telefon značky Apple, vyhledejte aplikaci v Apple Store), stáhněte ji a nainstalujte.
1.6.1 Nastavení
1. Přihlaste se do aplikace Tesla Smart.
2. Stiskněte a po dobu 2 sekund podržte tlačítko, dokud nezačne blikat modrá kontrolka a zařízení nevstoupí do režimu
párování Bluetooth.
1.6.2 Vyhledání a připojení
1. Manuální přidání zařízení: Klikněte na „+“ v pravém horním rohu, zvolte „Add manually“ („Přidat manuálně“), vyhledejte
zařízení (název zařízení: „Tesla Smart Pillow“), klikněte na „Add it“ („Přidat“) a „+“ a počkejte, než se zařízení připojí. Po
úspěšném připojení systém automaticky přejde na stránku zařízení.
2. Automatické přidání zařízení: Klikněte na „+“ v pravém horním rohu, zvolte „Automatic adding“ („Automatické při-
dání“), vyhledejte zařízení (název zařízení: „Tesla Smart Pillow“), klikněte na „Next“ („Další“) a počkejte, než se zařízení
připojí. Po úspěšném připojení systém automaticky přejde na stránku zařízení.

16
1.6.3 Nastavení teploty
Nastavení teploty: K nastavení teploty slouží kruhová oblast zařízení. Chcete-li nastavit teplotu, posuňte ukazatel. Pokud
posunete ukazatel zcela dolů, vypnete ohřev.
Stall: Různým teplotám odpovídají různé stupně a barvy: Zelené světlo (37 °C~41 °C), oranžové světlo (42 °C~46 °C),
fialové světlo (47 °C~51 °C) a červené světlo (≥52 °C).
1.6.4 Časovač ohřevu
Klikněte na tlačítko „Časovač ohřevu“, ve vyskakovacím okně nastavte zvolte čas a kliknutím na tlačítko „OK“ spusťte au-
tomatický ohřev. Na této stránce se uprostřed rozhraní nastavení teploty zobrazí odpočítávání. Po uplynutí odpočítávání
se ohřev automaticky zastaví. Kliknutím na tlačítko „Ukončit časovač“ ukončíte odpočítávání a zařízení bude udržovat
aktuální teplotu.
1.6.5 Monitorování spánku
Zobrazení údajů: Na stránce „Sleep“ („Spánek“) mohou uživatelé zobrazit celkovou délku spánku a podíl jednotlivých
fází, kvalitu spánku a další informace.
Aktualizace údajů: Místní údaje se automaticky synchronizují při zobrazení stránky zařízení, nebo lze synchronizaci dat
spustit manuálně. Místní údaje lze uchovávat po dobu až 3 dnů a po nahrání do cloudu lze údaje uchovávat po dobu až
7 dnů.
Obr. 2 Nastavení teploty
Obr. 3 Okénko nastavení časovače
Obr. 4 Stránka monitorování
spánku Obr. 5 Stránka vyhledávání
Bluetooth pro párování

17
1.6.6 Přehrávání hudby pomocí Bluetooth
V „Setting“ > „Bluetooth“ („Nastavení“ > „Bluetooth“) na vašem mobilním telefonu zapněte funkci Bluetooth a vyhledejte
a spárujte zařízení s názvem „Smart Music Pillow BLE“.
Hudba pro spánek na vyžádání
Na stránce „Music“ („Hudba“) aplikace Tuya Smart si uživatelé mohou objednat různou hudbu pro spánek dle svých
osobních zájmů.
Kliknutím na tlačítko rozbalovací nabídky lze nastavit časovač a spustit odpočítávání. Pokud je čas nastaven na „∞“, lze
jej v pevně stanovený čas zavřít.
1.6.7 Údaje o zařízení
Údaje o zařízení: Kliknutím na v pravém horním rohu přejdete do rozhraní s údaji o zařízení, kde si můžete prohlédnout
stav zařízení a další možnosti nastavení.
Aktualizace firmwaru: Kliknutím na „Check Firmware Update“ („Zkontrolovat aktualizace firmwaru“) si můžete zobrazit
informace o aktuální verzi zařízení. Pokud je k dispozici nová verze, bude uživatel vyzván k aktualizaci.
Materiál: Paměťová pěna, bavlna, polyester (potah)
Nastavitelný rozsah teplot: 37 ºC - 52 ºC
Napájení: 500mA, USB
Funkce:
Monitoring spánku
Prohřívání krční páteře pomocí technologie FIR
Zabudované reproduktory
Časovač
Pratelný potah
Připojení: Bluetooth
Rozměry: 57 x 38 x 8-11cm
Aplikace: Tesla Smart , kompatibilní s platformou Tuya
Klíčové vlastnosti
• Kvalitní polštář z paměťové pěny
• Vyhřívací těleso s technologií FIR
• Rychlý náběh teploty
• Pro vysoké bezpečí napájeno velmi slabým proudem
• Možnost napájet z Powerbanky
• Zabudované reproduktory pro pohodlný poslech bez sluchátek
• Monitorování kvality a délky spánku
• Aplikace v češtině
Obr. 6 Stránka s hudbou pro dobrý
spánek a funkce časovače
Technická Specifikace

18
Výrobce
Tesla Global Limited
Far East Consortium Building,
121 Des Voeux Road Central
Hong Kong
www.teslasmart.com
INFORMACE O LIKVIDACI A RECYKLACI
Všechny produkty s tímto označením je nutno likvidovat v souladu s předpisy pro likvidaci elektrických
a elektronických zařízení (směrnice 2012/19/EU). Jejich likvidace společně s běžným komunálním
odpadem je nepřípustná. Všechny elektrické a elektronické spotřebiče likvidujte v souladu se všemi místními
i evropskými předpisy na určených sběrných místech s odpovídajícím oprávněním a certifikací dle místních
i legislativních předpisů. Správná likvidace a recyklace napomáhá minimalizovat dopady na životní prostředí
a lidské zdraví. Další informace k likvidaci získáte u prodejce, v autorizovaném servisu nebo u místních úřadů.
EU PROHLÁŠENÍ O SHODĚ
Tímto společnost Tesla Global Limited prohlašuje, že typ rádiového zařízení TSL-HC-HL60 je v souladu se směrnicí
2014/53/EU. Úplné znění EU prohlášení o shodě je k dispozici na této internetové adrese: tsl.sh/doc
Konektivita: Bluetooth
Kmitočtové pásmo: 2.400 - 2.480 GHz
Max. radiofrekvenční výkon (EIRP): < 20 dBm

POUŽÍVATEĽSKÁ
PRÍRUČKA
EN
CZ
SK
PL
HU
SL
DE
TESLA SMART
HEATING PILLOW

20
1. POUŽÍVATEĽSKÁ PRÍRUČKA
1.1 Zapnutie a vypnutie
Zapnutie: Zariadenie pripojte k napájaniu.
Vypnutie: Ak chcete zariadenie vypnúť, dotknite sa tlačidla a prstom pohybujte krúživým pohybom, dokým LED kontrol-
ka nezhasne (používa sa hlavne na vypnutie funkcie ohrevu).
1.2 Nastavenie teploty
Tento výrobok má k dispozícii štyri stupne (pozri nižšie).
1. stupeň - zelené svetlo (37 °C~41 °C);
2. stupeň - oranžové svetlo (42 °C~46 °C);
3. stupeň - fialové svetlo (47 °C~51 °C);
4. stupeň - červené svetlo (52 °C~57 °C);
1.2.1 Prepnutie pomocou tlačidla
Pomocou tlačidla je možné prepínať medzi stupňami a nastaviť príslušnú cieľovú teplotu v nasledujúcom poradí:
„Spustenie > Zelená 37 °C > Oranžová 42 °C > Fialová 47 °C > Červená 52 °C > Vypnutie“.
Činnosť je znázornená na nasledujúcom obrázku:
Pripojenie k powerbanke Pripojenie k nabíjačke
(Schematický diagram)
(Pôvodný obrázok)Obr. 1 Diagram cyklu farby svetla
Seite wird geladen ...
Seite wird geladen ...
Seite wird geladen ...
Seite wird geladen ...
Seite wird geladen ...
Seite wird geladen ...
Seite wird geladen ...
Seite wird geladen ...
Seite wird geladen ...
Seite wird geladen ...
Seite wird geladen ...
Seite wird geladen ...
Seite wird geladen ...
Seite wird geladen ...
Seite wird geladen ...
Seite wird geladen ...
Seite wird geladen ...
Seite wird geladen ...
Seite wird geladen ...
Seite wird geladen ...
Seite wird geladen ...
Seite wird geladen ...
-
 1
1
-
 2
2
-
 3
3
-
 4
4
-
 5
5
-
 6
6
-
 7
7
-
 8
8
-
 9
9
-
 10
10
-
 11
11
-
 12
12
-
 13
13
-
 14
14
-
 15
15
-
 16
16
-
 17
17
-
 18
18
-
 19
19
-
 20
20
-
 21
21
-
 22
22
-
 23
23
-
 24
24
-
 25
25
-
 26
26
-
 27
27
-
 28
28
-
 29
29
-
 30
30
-
 31
31
-
 32
32
-
 33
33
-
 34
34
-
 35
35
-
 36
36
-
 37
37
-
 38
38
-
 39
39
-
 40
40
-
 41
41
-
 42
42


Tesla Smart Heating Pillow Benutzerhandbuch
- Typ
- Benutzerhandbuch
in anderen Sprachen
Verwandte Artikel
-
Tesla Smart Laser Dot Cat Benutzerhandbuch
-
Tesla TSL-SEN-WATER Benutzerhandbuch
-
Tesla TSL-DREAM-SIREN Benutzerhandbuch
-
Tesla TSL-TRV-GS361A Benutzerhandbuch
-
Tesla Głowica Smart Style Thermostatic Head Benutzerhandbuch
-
Tesla TELA 410028 Benutzerhandbuch
-
Tesla TSL-CAM-BULLET3Q Benutzerhandbuch
-
-
Tesla TSL-PC-BL4 Benutzerhandbuch
