
1. WARNINGS AND SAFETY INSTRUCTIONS
▪Never open the power supply case. The electronic components inside the case generate a high
voltage that is dangerous to humans.
▪A power supply must only be opened by an authorised technician!
▪Caution! Only use the supplied cable set. Using cables that were not included (e.g. cables of older
power supply unit series) may lead to defects!
▪The warranty shall be void if the power supply is opened by an unauthorised technician and/
or the warranty seal is broken. Never handle the power supply with wet or damp hands when
in operation. Never insert objects into the openings/fans of the power supply. Operation is only
permitted indoors! Outdoor use may lead to severe damage.
▪Do not carry out work on the power supply if it is connected to the mains. Always turn the mains
switch to off and pull out the mains plug.
▪In the event of a short circuit in the device, remove the mains cable and do not use the device.
▪If there are traces of smoke, damaged cables and exposure to liquids, the power supply must
immediately be disconnected from the mains and must not be used.
▪Do not operate the PC directly next to a heater or another source of heat, as this reduces the
lifespan of all components and may lead to failures.
▪Ensure that there is sufficient ventilation in the PC case, for example by adding additional fans.
▪Should you want to clean your power supply, disconnect it completely from the mains and do not
use damp cloths or cleaning detergent. Clean the power supply from the outside using a dry cloth.
▪Allow one hour before using the power supply after it has been in an ambient air environment as
otherwise condensation water could accumulate in the power supply.
2. COMPATIBILITY
be quiet! System Power 9 power supplies are compatible with current power supply and mother-
board specification, such as: Intel ATX12V Power Supply Design Guide Version 2.4 (and downward
compatible to V2.31 /V2.3 / V 2.01 / V 2.0), ATX System Design Guide Version 2.2 and Version 2.1,
BTX Version 1.0a, EPS 12V V2.92 (550-700W), Intel C6/C7, Energy Star 6.1, ErP ready.
3. INSTALLING YOUR NEW POWER SUPPLY
You must read the item “Warnings/safety instructions” before beginning installation. You will need a
screwdriver to fit the power supply in your PC. Only use the screws supplied with the power supply,
as these have the suitable thread.
First remove your old power supply. To do this, proceed as follows:
1. Carefully disconnect your PC from any power sources and pull out all cables connected to the PC.
2. Open the PC case also following the manufacturer’s instructions.
3. Disconnect all plugs from the motherboard and all other components, such as a HDD or optical drive.
Ensure that there are no plugs from the old power supply connected to any of the components.
4. Now remove the screws on the rear of the power supply and take it out carefully. Make especially sure
that no cables get caught in the components and damage them.
Installing your be quiet! System Power 9 power supply:
5. Place the power supply in the space provided in the case and mount it to the rear with the four
screws provided. Do not use excessive force.
6. Plug the 20/24 pin connector into the socket provided on the motherboard. If you have a 24 pin
connector, put the remaining 4 pins in the right position before plugging the connector into the socket.
If using a 20 pin connector, simply leave the additional 4 pins on the side.
7. Now connect the 4 pin connector, also called the P4 connector, into the socket provided on the mother-
board. This connector is going to supply your PC with additional power.
4. DIMENSIONS & INCLUDED ACCESSORIES
Dimensions of Power Supply: 140mm x 150mm x 86mm
This item is delivered with: mains lead, operating manual, screws for installing the power supply.
5. MANUFACTURER’S DATA & WARRANTY
Our warranty conditions apply, which can be viewed on the internet on www.bequiet.com.
Your original purchase receipt and serial number will be required before warranty
performance is rendered. Please keep it in a safe place.
Listan GmbH . Wilhelm-Bergner-Straße 11c . 21509 Glinde . Germany
For further information, you can contact us via e-mail: [email protected].
6. LEGAL NOTICE, COPYRIGHT
Copyright © Listan GmbH 2020. All rights reserved.
Please note the following:
▪The content of this documentation may not be copied, transmitted, distributed or stored in any
form, whether in whole or in part, without the prior written approval of Listan.
▪be quiet! is a registered trademark of Listan GmbH. Other product and company names men-
tioned in this documentation may be trademarks or trade names of their respective owners.
▪In accordance with its policy, Listan continually develops its products further. Listan therefore
reserves the right to make changes and improvements to any of the products described in this
documentation without prior notice.
▪Listan is under no circumstances responsible for the loss of data and income or for any specific,
incidental, indirect or direct damage, however this may be incurred.
The content of this documentation is presented in its most updated form. Listan neither expressly nor
implicitly assumes any liability for the accuracy or completeness of the content of this documentati-
on, including, but not limited to the implicit guarantee of market suitability and the appropriateness
for a certain purpose, unless applicable laws or case law prescribe such liability.
Listan reserves the right to make changes to this documentation or to withdraw the documentation
at any time without prior notice.
1. WARNUNGEN UND SICHERHEITSHINWEISE
▪Öffnen Sie niemals die Abdeckung des Netzteils, die dort verbauten elektronischen Bauteile
erzeugen gefährliche Hochspannungen.
▪Ein Netzteil darf nur von autorisiertem Fachpersonal geöffnet werden!
▪Achtung: Verwenden Sie nur den mitgelieferten Kabelsatz! Das Verwenden von nicht
mitgelieferten Kabeln (z.B. Kabel älterer Netzteilserien) kann zu einem Defekt führen!
▪Durch das Öffnen des Netzteils ohne Fachpersonal oder durch ein beschädigtes Garantiesiegel
erlischt die Garantie. Nehmen Sie niemals das Gerät mit feuchten Händen in Betrieb. Stecken
Sie keine Gegenstände in die Öffnungen/Gebläse des Netzteiles. Das Netzteil ist für die Inbe-
triebnahme in Innenräumen vorgesehen. Der Außeneinsatz kann zu schweren Beschädigungen
des Netzteils führen.
▪Führen Sie keine Arbeiten am Netzteil durch, wenn sich dieses unter Netzspannung befindet.
Netzschalter auf „0“ stellen und/oder den Netzstecker herausziehen.
▪Bei einem Kurzschluss im Gerät, entfernen Sie das Netzkabel und nehmen Sie das Netzteil nicht
erneut in Betrieb.
▪Bei Rauchspuren, beschädigten Kabeln und Einwirkung von Flüssigkeiten ist das Netzteil sofort
vom Stromnetz zu trennen und danach nicht mehr in Betrieb zu nehmen.
▪Stellen Sie sicher, dass Ihr PC nicht direkt neben einer Heizung oder einer anderen Wärmequelle
betrieben wird. Dies führt zu Betriebsfehlern oder einer Beeinträchtigung der Lebensdauer des
Netzteils.
▪Sorgen Sie für eine ausreichende Belüftung Ihres Computergehäuses, z.B. durch zusätzliche Lüfter
▪Wenn Sie Ihr Netzteil reinigen, trennen Sie das Netzteil komplett vom Stromnetz und benutzen
Sie keine feuchten Tücher oder Reinigungsmittel. Reinigen Sie das Netzteil nur von außen mit
Hilfe eines trockenen Tuches.
▪Nehmen Sie das Netzteil erst nach einer Stunde in Raumluftumgebung in Betrieb, da sich
anderenfalls Kondenswasser im Netzteil bilden könnte.
2. KOMPATIBILITÄT
Die be quiet! Netzteile der System Power 9 Serie sind mit allen aktuell gängigen Netzteil- sowie
Mainboard-Spezifikationen kompatibel wie u.a.: Intel ATX 12V Power Supply Design Guide Version
2.4 (sowie abwärtskompatibel zu V2.31, V2.3, V2.2, V2.01, V2.0), ATX System Design Guide Version
2.2 und Version 2.1, BTX Version 1.0a, EPS 12V V2.92 (550-700W), Intel C6/C7, Energy Star 6.1, ErP ready.
3. INSTALLATION IHRES NEUEN NETZTEILS
Lesen Sie bitte den Punkt „Warnungen und Sicherheitshinweise“ bevor Sie mit der Installation
beginnen. Zum Einbau des Netzteils in Ihren PC benötigen Sie einen Schraubendreher. Benutzen Sie nur
die mitgelieferten Schrauben aus dem Lieferumfang, da diese über das richtige Gewinde verfügen.
Bauen Sie Ihr altes Netzteil zunächst aus. Verfahren Sie hierfür wie folgt:
1. Trennen Sie Ihren PC von allen vorhandenen Stromquellen und ziehen Sie alle am PC angeschlossenen
Kabel vorsichtig ab.
2. Öffnen Sie das PC-Gehäuse und achten Sie dabei auf die Anleitung des Herstellers.
3. Trennen Sie alle Stecker vom Mainboard sowie allen weiteren Komponenten wie HDD oder optischen
Laufwerken. Achten Sie bitte darauf, dass kein Stecker des alten Netzteiles mit einer Komponente
verbunden ist.
4. Entfernen Sie die Schrauben an der Rückseite des Netzteiles und entnehmen Sie das Netzteil vor-
sichtig aus dem PC-Gehäuse. Achten Sie besonders darauf, dass sich keine Kabel an Komponenten
verfangen und diese beschädigen.
Der Einbau Ihres be quiet! System Power 9 Netzteiles:
5. Setzen Sie das Netzteil nun an den vorgesehenen Platz im PC-Gehäuse und schrauben Sie es an der
Rückseite mit den vier mitgelieferten Schrauben fest. Verwenden Sie keine übermäßige Kraft.
6. Stecken Sie den 20/24-Pin Stecker in die vorgesehene Buchse am Mainboard. Wenn Sie über einen
24-Pin Anschluss verfügen, dann bringen Sie die zusätzlichen vier Pins in die richtige Position, bevor
Sie den Stecker in die Buchse am Mainboard stecken. Beim Einsatz eines Mainboards mit einem
20-Pin Stecker klappen Sie die zusätzlichen vier Pins einfach zur Seite.
7. Nun stecken Sie den 12V-P4 oder P8-Stecker für die CPU in die vorgesehene Buchse auf dem
Mainboard.
4. ABMESSUNGEN & ZUBEHÖR
Abmessungen des Netzteils: 140mm x 150mm x 86mm
Im Lieferumfang des Netzteils ist enthalten: Kabelsatz für Kabelmanagement, Kaltgerätekabel, Bedie-
nungsanleitung, Kabelbinder, Schrauben zur Netzteilbefestigung.
5. HERSTELLERANGABEN & GARANTIE
Ausführliche Garantiebedingungen finden Sie im Internet unter bequiet.com.
Um Garantieleistungen in Anspruch nehmen zu können, benötigen Sie Ihren Originalkaufbeleg und die
Seriennummer.
Listan GmbH . Wilhelm-Bergner-Straße 11c . 21509 Glinde . Deutschland
Für weitere Informationen, wenden Sie sich per E-Mail an: [email protected]
6. COPYRIGHT
Copyright © Listan GmbH 2020. Alle Rechte vorbehalten.
Bitte beachten Sie folgendes:
▪Der Inhalt dieser Dokumentation darf ohne vorherige schriftliche Genehmigung durch Listan in keiner
Form, weder ganz noch teilweise, vervielfältigt, weitergegeben, verbreitet oder gespeichert werden.
▪be quiet! ist eine eingetragene Marke der Firma Listan GmbH. Andere in dieser Dokumentation er-
wähnten Produkte- und Firmennamen können Marken oder Handelsnamen ihrer jeweiligen Eigen-
tümer sein.
▪Listan entwickelt entsprechend ihrer Politik die Produkte ständig weiter. Listan behält sich deshalb das
Recht vor, ohne vorherige Ankündigungen jedem der in dieser Dokumentation beschriebenen Produkte
Änderungen und Verbesserungen vorzunehmen.
▪Listan ist unter keinen Umständen verantwortlich für den Verlust von Daten und Einkünften
oder für jedweder besonderen, beiläufigen, mittelbaren oder unmittelbaren Schäden, wie immer
diese auch zustande gekommen sind.
▪Der Inhalt dieser Dokumentation wird so präsentiert, wie er aktuell vorliegt. Listan übernimmt weder
ausdrücklich noch stillschweigend irgendeine Gewährleistung für die Richtigkeit oder Vollständigkeit
des Inhalts dieser Dokumentation, einschließlich, aber nicht beschränkt auf die stillschweigende Ga-
rantie der Markttauglichkeit und der Eignung für einen bestimmten Zweck, es sei denn, anwendbare
Gesetze oder Rechtssprechung schreiben zwingend eine Haftung vor.
Listan behält sich das Recht vor, jederzeit ohne vorherige Ankündigung Änderungen an dieser Dokumen-
tation vorzunehmen oder die Dokumentation zurückzuziehen.
1. CONSIGNES DE SÉCURITÉ
▪Veillez à ne jamais ouvrir votre bloc d’alimentation. Les composants électroniques qui se trouvent
à l’intérieur peuvent être soumis à de hautes tensions et mettre en danger votre sécurité.
▪Seul du personnel habilité et qualifié est autorisé à ouvrir un bloc d’alimentation.
▪Utilisez uniquement les câbles fournis avec votre alimentation. L’usage de tout autre câble peut
s‘avérer dangereux pour votre alimentation.
▪L’ouverture du bloc d’alimentation entraîne l’annulation de la garantie. Ne jamais manipuler un
bloc d’alimentation avec les mains humides ou mouillées. Ne pas insérer d’objet dans les orifices
ou dans le ventilateur de l’alimentation. Votre bloc d’alimentation a été conçu pour fonctionner en
intérieur uniquement. L’utilisation en extérieur peut conduire à de sérieuses défaillances.
▪Ne manipulez pas votre bloc d’alimentation lorsqu’il est branché sur secteur. Veillez à mettre
l’interrupteur du bloc en position «O» et/ou débranchez la prise secteur.
▪En cas de court-circuit, veuillez débrancher votre bloc d’alimentation et ne pas la remettre en
marche.
▪En cas de fumée, de câbles défectueux ou d‘exposition à des liquides, veuillez débrancher l‘ali-
mentation immédiatement.
▪Veuillez ne pas placer votre PC à proximité d‘une source de chaleur, cela réduirait considérable-
ment la durée de vie de vos composants et de votre alimentation.
▪Veuillez vous assurer que votre PC est suffisamment ventilé en utilisant, si nécessaire, des ven-
tilateurs additionnels.
▪Si vous souhaitez nettoyer votre bloc d’alimentation, veuillez le débrancher. Il est fortement dé-
conseillé d’utiliser un chiffon humide ou des produits de nettoyage. Nettoyez uniquement l’exté-
rieur du bloc d’alimentation à l’aide d’un chiffon sec.
▪Avant la première utilisation de votre bloc d’alimentation, il est recommandé de le laisser à
température ambiante une heure avant de le mettre en marche. Cela permettra d’éviter toute
condensation à l’intérieur de votre bloc.
2. COMPATIBILITÉ
Les blocs d’alimentation System Power 9 sont compatibles avec la plupart des spécifications des
cartes mères et des alimentations : Intel ATX 12V Power Supply Design Guide Version 2.4 (et rétro
compatibles avec V2.31, V2.3, V2.01, V2.0), ATX System Design Guide Version 2.2 et Version 2.1,
BTX Version 1.0a, EPS 12V V2.92 (550-700W), Intel C6/C7 Status pour les nouvelles générations de
processeurs, Programme Energy Star 6.1 & Directive ErP ready.
3. INSTALLATION DE VOTRE NOUVEAU BLOC D’ALIMENTATION
Nous vous invitons à lire le paragraphe « Consignes de sécurité» en préambule à l’installation de
votre bloc d’alimentation. Vous aurez besoin d’un tournevis pour effectuer l’installation de votre bloc
d’alimentation. Utilisez exclusivement les vis livrées avec votre bloc car elles présentent le filetage
requis.
Veuillez commencer par démonter votre ancien bloc d’alimentation, en suivant les re-
commandations ci-dessous :
1. Débranchez le PC et déconnectez avec précaution tous les câbles reliés au PC.
2. Ouvrez le boîtier du PC en respectant les instructions du fabricant.
3. Débranchez les connecteurs de la carte mère et des autres composants tels que les disques durs.
Veillez à ce qu’aucun connecteur de l’ancienne alimentation ne soit relié à un composant.
4. Retirez les vis se trouvant à l’arrière de l’alimentation et sortez-la avec précaution du boîtier PC. Veillez
à ce qu’aucun câble ne se prenne dans les composants et ne les endommage.
Montage de votre bloc d’alimentation System Power 9 :
5. Placez le bloc d’alimentation à l’emplacement prévu dans le boîtier et fixez-le sur la face arrière, à
l’aide des quatre vis fournies. Veillez à n’exercer aucune pression excessive.
6. Branchez le connecteur 20/24 broches dans la fiche correspondant à la carte mère. Si la
carte mère est équipée en 24 broches, mettez les quatre broches additionnelles dans la position cor-
recte et branchez. En cas d’utilisation d’une carte mère à connecteur 20 broches, rabattez simplement
les 4 broches surnuméraires sur le côté.
7. Branchez ensuite le connecteur P4 dans le connecteur prévu à cet effet sur la carte mère. Ce connec-
teur permet de donner de la puissance additionnelle à votre PC.
4. DIMENSIONS ET ACCESSOIRES
Dimensions du bloc d‘alimentation : 140 x 150 x 86 mm
Votre bloc d’alimentation est livré avec les accessoires suivants : un cordon secteur, un manuel
d’utilisation et des vis pour la fixation du bloc d’alimentation.
5. INFORMATIONS CONSTRUCTEUR & GARANTIE
Pour consulter les conditions de garantie, nous vous invitons à vous rendre sur notre site
www.bequiet.com
Pour la prise en charge de la garantie, merci de nous fournir une copie du justificatif d’achat et le
numéro de série de l‘alimentation concernée.
Listan GmbH – Wilhelm-Bergner-Straße 11c – 21509 Glinde – Allemagne
Pour plus d‘informations : ser[email protected]
6. DROITS D’AUTEUR
Copyright © Listan GmbH 2020. Tous droits réservés.
▪Le contenu de la présente documentation ne peut être reproduit, distribué, diffusé ou enregistré
d’aucune manière que ce soit, ni en tout ni en partie, sans l’autorisation préalable écrite de
Listan GmbH.
▪be quiet! est une marque déposée de la société Listan GmbH. Les autres noms de produits et de
sociétés mentionnés dans la présente documentation peuvent être des marques ou des noms
commerciaux appartenant à leurs propriétaires respectifs.
▪Listan procède au développement continu de ses produits conformément à sa politique. Par
conséquent, Listan se réserve le droit de procéder à des modifications et améliorations de
chacun des produits décrits dans la présente documentation, sans aucun préavis.
▪Listan décline toute responsabilité en cas de pertes de données et de revenus, de dommages
particuliers, accessoires, directs ou indirects, quels qu’ils soient, et quelle qu’en soit l’origine.
▪La présente documentation décrit le produit sous sa forme actuelle. Listan décline toute
responsabilité expresse ou tacite pour l’exactitude et l’intégralité du contenu de la présente
documentation, y compris, sans s’y limiter, de la garantie tacite de l’aptitude à la commer-
cialisation et à un usage défini, sauf dans les cas où la législation applicable ou la jurisprudence
exigent une telle responsabilité.
Listan se réserve le droit de procéder à tout moment et sans avis préalable à des modifications de
la présente documentation, ou à son retrait.
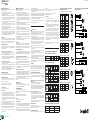
SYSTEM POWER 9
USER MANUAL | |
400W
500W
24 pin ATX power connector | 24 Pin ATX Anschluss | Connecteur ATX 24 pin
DISTRIBUTION AND PIN ASSIGNMENT | AUFTEILUNG UND STECKERBELEGUNG
RÉPARTITION ET ATTRIBUTION DES BROCHES
Pin Signal Pin Signal
1 +3.3VDC 13
+3.3VDC
+3.3Vdef.
sense
2 +3.3VDC 14 -12VDC
3 COM 15 COM
4 +5VDC 16 PS_ON/OFF
5 COM 17 COM
6 +5VDC 18 COM
7 COM 19 COM
8 PWR_OK 20
9 +5VSB 21 +5VDC
10 +12VDC 22 +5VDC
11 +12VDC 23 +5VDC
12 +3.3VDC 24 COM
PCI express VGA connector | PCI Express VGA Anschluss | Connecteur VGA PCIe
+12V power connector | 12V-Anschluss | Connecteur 12 V
Pin Signal Pin Signal
1 +12VDC 4 COM
2 +12VDC 5 COM
3 +12VDC 6 COM
7 COM 8 COM
Pin Signal Pin Signal
1 COM 3 +12VDC
2 COM 4 +12VDC
5 COM 7 +12VDC
6 COM 8 +12VDC
20-pin
4-pin
PCIe (6+2-pin)
PCIe (6+2-pin)
12V P4-connector
12V P4-connector
450 mm
350mm
120mm 120mm 120mm 120mm 120mm
HDD
S-ATA S-ATA S-ATA
550mm
500mm
150mm
600mm
HDD
S-ATA S-ATA
12V P8-connector
24-pin
20-pin
4-pin
PCIe (6+2-pin)
PCIe (6+2-pin)
12V P4-connector
12V P4-connector
120mm 120mm 120mm 120mm 120mm
HDD
S-ATA S-ATA S-ATA
550mm
HDD
S-ATA S-ATA S-ATA
12V P8-connector
24-pin
500mm
150mm
350mm
600mm
550mm
20-pin
4-pin
PCIe (6+2-pin)
PCIe (6+2-pin)
PCIe (6+2-pin)
PCIe (6+2-pin)
12V P4-connector
12V P4-connector
600 mm
550 mm
500 mm
150 mm
150 mm
500 mm
350mm
120mm 120mm 120mm 120mm 120mm
HDD
S-ATA S-ATA S-ATA
550mm
HDD
S-ATA S-ATA S-ATA
12V P8-connector
24-pin
600W
700W
Peripheral Devices | Peripheriegeräte | Connecteurs périphérique
SATA power connector | SATA-Anschluss | Connecteur SATA
Pin Signal Pin Signal
1 3.3V 4 COM
2 COM 5 +12VDC
3 +5VDC
Pin Signal Pin Signal
1 +5VDC 3 COM
2 COM 4 +12VDC
7. TECHNICAL DATA TECHNISCHE DATEN DONNÉES TECHNIQUES
MINIMAL LOAD | MINIMALER VERBRAUCH | CHARGES MINIMALES
DC OUTPUT 3.3V 5V 12V1 12V2 -12V 5VSB
400W - 700W 0A 0A 0A 0A 0A 0A
POWERLABEL | POWERLABEL | TABLEAU RÉCAPITULATIF
OPERATING CONDITIONS | BETRIEBSBEDINGUNGEN | CONDITIONS DE FONCTIONNEMENT
Environment Temperature Rel. Humidity
Operation 0 ~ 40°C up to 85% (non-condensing)
Storage -40 ~ 70°C up to 98% (non-condensing)
CONNECTIVITY AND CABLE LENGTH | ANSCHLUSSMÖGLICHKEITEN UND KABELLÄNGEN
CONNECTIQUE ET LONGUEUR DES CÂBLES
Glinde, November 2020
https://tm.by
Интернет-магазин TM.by

1. OSTRZEŻENIA I ZASADY BEZPIECZEŃSTWA
▪Nigdy nie należy otwierać obudowy zasilacza, gdyż wbudowane części elektroniczne wytwarzają
niebezpieczne wysokie napięcia.
▪Zasilacz może zostać otworzony jedynie przez autoryzowany personel fachowy!
▪Ostrzeżenie! Używaj wyłącznie kabli dołączonych w zestawie. Korzystanie z kabli, które nie były
dołączne do zasilacza (np. kable pochodzące ze starszych serii zasilaczy) może prowadzić do
uszkodzeń produktu!
▪Gwaranacja zostanie uznana za nieważną, jeśli zasilacz został otwarty przez nieautoryzowany
personel oraz/lub jeśli plomba gwarancyjna została złamana. Nigdy nie wolno trzymać urucho-
mionego zasilacza mokrymi lub wilgotnymi rękoma. Nie należy wtykać żadnych przedmiotów
w otwory ani w wentylator zasilacza. Korzystanie z zasilacza powinno odbywać się wyłącznie
w pomieszczeniach! Praca zasilacza na zewnątrz może prowadzić do poważnych uszkodzeń.
▪Nie należy manipulować przy zasilaczu, gdy jest on podłączony do sieci. Należy ustawić włącznik
na pozycji „0” oraz/lub wyjąć wtyczkę z gniazdka.
▪W razie zwarcia w urządzeniu należy zdemontować kabel sieciowy i nie uruchamiać ponownie
zasilacza.
▪W razie pojawienia się dymu, uszkodzenia kabli lub zalania należy natychmiast odłączyć zasilacz
od źródła zasilania i zaprzestać jego używania.
▪Komputer nie może być używany bezpośrednio obok grzejnika lub innego źródła ciepła, gdyż
skraca to żywotność wszystkich komponentów i może prowadzić do uszkodzeń.
▪Należy zadbać o wystarczającą wentylację komputera, np. przez zamontowanie dodatkowych
wentylatorów.
▪W celu oczyszczenia zasilacza należy go całkowicie odłączyć z sieci. Nie należy stosować
wilgotnych ściereczek ani środków czyszczących. Należy wyczyścić zasilacz jedynie z zewnątrz
suchą ściereczką.
▪Przed uruchomieniem zasilacz powinien leżeć godzinę w temperaturze pokojowej, aby zapobiec
utworzeniu się w nim skroplin.
2. KOMPATYBILNOŚĆ
Zasilacze be quiet! z serii System Power 9 są kompatybilne ze wszystkimi aktualnie stosowanymi
specyfikacjami zasilaczy oraz płyt głównych, jak m.in: Intel ATX12V Power Supply Design Guide
wersja 2.4 (oraz kompatybilne wstecznie z V2.31, V2.3, V2.01, V2.0), ATX System Design Guide
wersja 2.2 i wersja 2.1, BTX wersja 1.0a, EPS 12V V2.92 (550-700W), Intel C6/C7, wytyczne Energy
Star 6.1, dyrektywa ErP ready.
3. INSTALACJA NOWEGO ZASILACZA
Przed rozpoczęciem instalacji należy przeczytać punkt „Ostrzeżenia i zasady bezpieczeństwa”.
Do montażu zasilacza w obudowie jest potrzebny wkrętak. Należy używać wyłącznie śrubek
załączonych razem z zasilaczem, gdyż posiadają one odpowiednie gwinty.
Najpierw należy wymontować stary zasilacz. W tym celu należy postępować następująco:
1. Odłączyć komputer od wszystkich źródeł prądu, a następnie ostrożnie wyciągnąć wszystkie kable
podłączone do komputera.
2. Następnie otworzyć obudowę komputera, stosując się do instrukcji producenta.
3. Odłączyć wszystkie wtyczki od płyty głównej i wszystkich innych komponentów, jak dysk twardy
oraz napędy optyczne. Upewnić się, iż żadna wtyczka starego zasilacza nie jest połączona z żadnym
komponentem systemu.
4. Teraz należy wyciągnąć śruby z tyłu zasilacza i ostrożnie go wyjąć z obudowy komputera. Zwrócić przy
tym szczególną uwagę na to, aby kable nie wplątały się w komponenty systemu i nie uszkodziły ich.
Montaż zasilacza be quiet! System Power 9:
5. Umieścić zasilacz w odpowiednim miejscu wnętrza obudowy i przymocować jego tylną stronę cz-
terema dostarczonymi śrubami. Nie należy stosować nadmiernej siły.
6. Włożyć 20/24-pinową wtyczkę w odpowiednie gniazdo na płycie głównej. Jeżeli dostępne jest pr-
zyłącze 24-pinowe, przed włożeniem wtyczki do gniazda na płycie głównej ustawić 4 dodatkowe
piny we właściwej pozycji. W przypadku użycia płyty głównej z wtyczką 20-pinową należy odchylić
4 dodatkowe piny na bok.
7. Teraz włożyć wtyczkę 4-pinową, zwaną także P4 do w odpowiednie gniazdo na płycie głównej.
Wtyczka będzie zasilać komputer dodatkową mocą.
4. WYMIARY I AKCESORIA W ZESTAWIE
Wymiary zasilacza: 140mm x 150mm x 86mm
W skład zestawu zasilacza wchodzą następujące akcesoria: kabel zasilający, instrukcja obsługi,
śruby do zamocowania zasilacza.
5. DANE PRODUCENTA I GWARANCJA
Szczegółowe warunki gwarancji dostępne są w zakładce Serwis/Warunki gwarancji na stronie
głównej www.bequiet.com.
Roszczenia gwarancyjne mogą być rozpatrywane tylko i wyłącznie po dołączeniu dowodu zakupu
(faktura/paragon) od autoryzowanego dystrybutora be quiet! Przechowuj paragon w bezpiecznym
miejscu.
Listan GmbH - Wilhelm-Bergner-Straße 11c - 21509 Glinde - Niemcy
Międzynarodowa infolinia:
Poniedziałek - Piątek 9:00 - 17:30
Tel. 0049 40 736 7686 - 44, Fax 0049 40-7367686- 69
e-mail: [email protected]
Kontakt w jęz. polskim:
Poniedziałek – Piątek 9:00 – 17:00
Listan Poland Sp. z o.o. - ul. Drzeworytników 66 - 01-385 Warszawa
e-mail: [email protected]
tel. 22 664 20 58
6. INFORMACJE PRAWNE, PRAWA AUTORSKIE
Copyright © Listan GmbH 2020. All rights reserved.
Należy pamiętać, że:
▪Zabronione jest powielanie, przekazywanie,rozpowszechnianie lub zapis treści tej dokumentacji
w dowolnej formie w całości lub częściowo, bez uprzedniego pisemnego zezwolenia frmy Listan.
▪be quiet! jest zarejestrowaną marką frmy Listan GmbH. Inne wymienione w niniejszej dokumen-
tacji produkty oraz nazwy firm mogą stanowić marki lub nazwy handlowe konkretnych właści-
cieli.
▪Listan stale rozwija produkty zgodnie z polityką firmy. Z tego powodu Listan zastrzega sobie
prawo do dokonywania zmian i udoskonaleń każdego z opisanych w niniejszej dokumentacji
produktów, bez wcześniejszego uprzedzenia.
▪Listan nie ponosi w żaden sposób odpowiedzialności za stratę danych i dochodów, a także za
szczególne, przypadkowe, pośrednie lub bezpośrednie szkody, niezależnie od drogi ich powstania.
▪Treść niniejszej dokumentacji jest zaprezentowana zgodnie z aktualnym stanem. Listan nie pono-
si wyraźnej ani domniemanej odpowiedzialności za prawidłowość i kompletność treści niniejszej
dokumentacji, włącznie, jednak bez ograniczenia do domniemanej gwarancji wartości handlowej
oraz przydatności do konkretnego celu, chyba że stosowne ustawodawstwo lub sądownictwo
nakazują przymusową odpowiedzialność.
Listan zastrzega sobie prawo do dokonania zmian w niniejszej dokumentacji lub jej wycofania bez
uprzedniego zawiadomienia.
1. ADVERTENCIAS E INSTRUCCIONES DE SEGURIDAD
▪No abra nunca la caja de la fuente de alimentación. Los componentes electrónicos en el interior
de la caja producen un voltaje elevado peligroso para las personas.
▪La fuente de alimentación solo debe ser abierta por personal técnico autorizado.
▪¡Cuidado! Utilice únicamente el juego de cables suministrado. La utilización de otros cables (p. ej.
cables de unidades de alimentación de series anteriores) puede producir fallos.
▪La garantía quedará anulada en caso de que la fuente de alimentación se abierta por personal
técnico no autorizado o de que el sello de garantía se rompa. No manipule nunca la fuente de
alimentación en funcionamiento con las manos mojadas o húmedas. No introduzca nunca objetos
por las aberturas o en los ventiladores de la fuente de alimentación. ¡Se debe utilizar siempre en
espacios interiores! El uso en el exterior puede causar daños graves.
▪No realice trabajos en la fuente de alimentación mientras esté conectada a la red de alimenta-
ción. Desconecte siempre el interruptor de red y desenchufe el conector de alimentación de red.
▪En caso de cortocircuito en el dispositivo, retire el cable de alimentación de red y no utilice el
dispositivo.
▪Si observa señales de humo, daños en los cables o presencia de líquidos, se debe desconectar
inmediatamente la fuente de alimentación de la red y no se debe volver a utilizar.
▪No utilice el ordenador junto a calefactores u otras fuentes de calor, ya que esto podría reducir la
vida útil de todos los componentes y provocar fallos.
▪Asegúrese de que la caja del ordenador cuenta con suficiente ventilación, por ejemplo, mediante
ventiladores adicionales.
▪Si desea limpiar la fuente de alimentación desconéctela completamente de la red y no utilice
paños húmedos ni detergentes. Limpie la fuente de alimentación desde el exterior con un paño seco.
▪Espere una hora antes de volver a utilizar la fuente de alimentación si ha permanecido expuesta
al aire ambiental ya que podría acumularse agua de condensación en ella.
2. COMPATIBILIDAD
be quiet! Las fuentes de alimentación System Power 9 son compatibles con fuentes de alimentación
y placas base actuales con especificaciones como las de la versión 2.4 de la guía de diseño de la
fuente de alimentación Intel ATX12V (y compatible con las versiones anteriores 2.31/2.3/2.01/2.0),
las versiones 2.2 y 2.1 de la guía de diseño del sistema ATX, la versión 1.0a de BTX, EPS 12V V2.92
(550-700W), Intel C6/C7, Energy Star 6.1 y ErP ready.
3. INSTALACIÓN DE SU NUEVA FUENTE DE ALIMENTACIÓN
Antes de comenzar la instalación se debe leer la sección «Advertencias e instrucciones de
seguridad». Para la colocación de la fuente de alimentación en el ordenador se necesita un
destornillador. Utilice únicamente los tornillos suministrados con la fuente de alimentación ya que
poseen la rosca adecuada.
En primer lugar retire la fuente de alimentación actual. Para ello, proceda de la siguiente
manera:
1. Desconecte el ordenador con cuidado de toda fuente de alimentación y retire todos los cables
conectados la ordenador.
2. Abra la caja del ordenador siguiendo las instrucciones del fabricante.
3. Desconecte todos los conectores de la placa base y de cualquier otro componente, como unidades de
disco duro o unidades ópticas. Asegúrese de que no haya ningún conector de la fuente de alimentación
actual conectado a ningún componente.
4. A continuación, retire los tornillos de la parte trasera de la fuente de alimentación y sáquela
cuidadosamente. Asegúrese especialmente de que ningún cable quede atascado entre los
componentes y los dañe.
Instalación de su fuente de alimentación System Power 9 be quiet!:
5. Coloque la fuente de alimentación en el espacio previsto para ello dentro de la caja y fíjela a la parte
posterior con los cuatro tornillos proporcionados. No aplique una fuerza excesiva.
6. Conecte el conector de 20/24 pines a la toma prevista para ello en la placa base. Si el conector es
de veinticuatro pines, coloque los restantes cuatro pines en la posición correcta antes de enchufar el
conector a la toma. Si el conector es de veinte pines, simplemente deje los cuatro pines adicionales
sin conectar.
7. A continuación, conecte el conector de cuatro pines, también llamado conector P4, a la toma prevista
para ello en la placa base. Este conector sirve para proporcionar energía adicional a su ordenador.
4. DIMENSIONES Y ACCESORIOS INCLUIDOS
Dimensiones de la fuente de alimentación: 140 mm x 150 mm x 86 mm
Este artículo se suministra con cable de alimentación de red, manual de funcionamiento y tornillos de
instalación para la fuente de alimentación.
5. INFORMACIÓN DEL FABRICANTE Y GARANTÍA
Son válidas nuestras condiciones de garantía, que se pueden consultar en Internet, en www.bequiet.com.
Para recibir cualquier prestación asociada a la garantía es necesario el recibo de compra original y el
número de serie. Consérvelo en un lugar seguro.
Listan GmbH . Wilhelm-Bergner-Straße 11c . 21509 Glinde . Alemania
Si desea más información, puede escribirnos a la dirección de correo electrónico: [email protected].
6. COPYRIGHT
Copyright © Listan GmbH 2020. Todos los derechos reservados.
Tenga en cuenta lo siguiente:
▪Está prohibida la copia, transmisión, distribución o almacenamiento del contenido de esta docu-
mentación de cualquier forma, parcial o íntegra, sin la autorización previa por escrito de Listan.
▪be quiet! es una marca comercial registrada de Listan GmbH. Otros productos y nombres de
empresas mencionados en esta documentación son marcas comerciales o nombres comerciales
de sus respectivos propietarios.
▪Listan desarrolla sus productos de forma continua y conforme con estos términos. Por ello, Listan
se reserva el derecho a realizar cambios y mejoras en cualquiera de los productos descritos en
esta documentación sin previo aviso.
▪Bajo ninguna circunstancia Listan será responsable de la pérdida de datos o ingresos o de cual-
quier daño específico, accidental, directo o indirecto, que se produzca de cualquier forma.
▪El contenido actual de esta documentación se corresponde con la versión más reciente. Listan
no asume de forma expresa ni implícita ninguna responsabilidad por la precisión o integridad
del contenido de esta documentación, incluyendo, pero sin limitarse a, la garantía implícita de
idoneidad para el mercado para determinados propósitos, a menos que la legislación aplicable o
la jurisprudencia establezcan dicha responsabilidad.
Listan se reserva el derecho a realizar modificaciones en esta documentación o a retirar la docu-
mentación en cualquier momento sin previo aviso.
1. ПРЕДУПРЕЖДЕНИЯ И ПРАВИЛА ТЕХНИКИ БЕЗОПАСНОСТИ
▪Никогда не открывайте корпус блока питания. Электронные компоненты
внутрикорпусагенерируютвысокоенапряжение,чтоопаснодлячеловека.
▪Блокпитанияможетбытьвскрыттолькоуполномоченныминженером!
▪Внимание! Используйте только поставляемый комплект кабелей. Ис-
пользование других кабелей питания (например, кабелей из предыдущих
серийблоковпитания)можетпривестикповреждениям!
▪Вскрытие блока питания неуполномоченным лицом и/или повреждение
гарантийнойпломбыприводиткутерегарантии.Неприкасайтеськблоку
питания мокрыми или влажными руками во время работы. Никогда не
вставляйтепосторонниепредметывотверстия/вентиляторблокапитания.
Допускается только работа в помещении. Использование блока питания
наоткрытомвоздухеможетпривестиксерьезнымповреждениям.
▪Никогда не производите манипуляции с блоком питания, когда он
подсоединенкэлектросети.Всегдаустанавливайтевыключательпитания
вположение„ВЫКЛ“иотсоединитевилкушнурапитания.
▪Вслучаекороткогозамыканияустройства,отсоединитесетевойкабельи
непользуйтесьустройством.
▪В случае обнаружения следов дыма, поврежденных кабелей или воз-
действия жидкостей, немедленно отсоедините питание от сети и не ис-
пользуйтеблокпитанияснова.
▪Не размещайте ПК в непосредственной близости с отопительной сис-
темой или любым другим источником тепла, поскольку это уменьшает
продолжительностьжизнивсехкомпонентовиможетпривестиксбоям.
▪Убедитесьвтом,чтовашПКоснащендостаточнойсистемойвентиляции,
например,сприменениемдополнительныхвентиляторов.
▪Есливыхотитеочиститьблокпитания,отсоединитеегоотсетииникогда
неиспользуйтевлажнуютканьиличистящиесредства.Очиститевнешнюю
частьблокапитанияспомощьюсухойткани.
▪Перед использованием блока питания, дайте ему прогреться до комнатной
температурывтечениечаса,чтобыпредотвратитьконденсатвлагивнутриБП.
2. СОВМЕСТИМОСТЬ
Блоки питания be quiet! System Power 9 совместимы со всеми последними
требованиямикблокампитанияисистемнымплатам,такимикак:IntelATX12V
PowerSupplyDesignGuideVersion2.4(такжесовместимысболеестарыми
V2.31/V2.3/V2.01/V2.0),ATXSystemDesignGuideVersion2.2иVersion2.1,
EPS12VV2.92(550-700W),BTXVersion1.0a,IntelC6/C7,EnergyStar6.1,ErP
ready.
3. УСТАНОВКА НОВОГО БЛОКА ПИТАНИЯ
Пожалуйста, прочитайте раздел «Предупреждения и правила техники
безопасности» перед началом установки. Вам потребуется отвертка, чтобы
установить блок питания в компьютер. Используйте только винты из ком-
плектапоставкиблокапитания,посколькуониимеютподходящуюрезьбу.
Сначала демонтируйте старый блок питания. Для этого выполните
следующие действия:
1. Осторожно отсоедините компьютер от любых источников питания и от-
ключитевсекабели,подключенныеккомпьютеру.
2. ОткройтекорпусПК,следуяинструкциипроизводителя.
3. Отсоединитевсе разъемыот системнойплаты идругих компонентов,таких
как жесткие диски или оптические приводы. Убедитесь, что все кабели от
старогоблокапитанияотсоединеныоткомпонентовсистемы.
4. Теперь открутите винты сзади блока питания и аккуратно извлеките его.
Убедитесь,чтокабелинезацепилисьзакакие-либокомпонентыинесмогут
ихповредить.
Установка вашего блока питания be quiet! System Power 9:
5. Установите блок питания в корпус ПК и прикрутите его к задней панели
с помощью четырех прилагаемых винтов. Не прикладывайте чрезмерных
усилий.
6. Подключите разъем 20/24pin в соответствующий разъем системной платы.
Если используется 24-контактный разъем подключения, разместите ос-
тавшиеся 4 контакта в правильном положении перед установкой. Если
используется плата с 20-контактным разъемом, отведите дополнительный
4-контактныйразъемвсторону.
7. Теперь подключите 4-pin разъем (так называемый P4 разъем) в соот-
ветствующеегнездонасистемнойплате.
4. РАЗМЕРЫ И КОМПЛЕКТАЦИЯ
Размерыблокапитания:140ммx150ммx86мм
Устройство поставляется в комплекте с сетевым шнуром, руководством по
эксплуатацииивинтамидляустановкиблокапитания.
5. ИНФОРМАЦИЯ О ПРОИЗВОДИТЕЛЕ И ГАРАНТИЯ
Ознакомьтесьснашимигарантийнымиусловияминасайтеwww.bequiet.com
Длягарантийногообращениявампотребуетсяоригинальнаяквитанцияо
покупке и серийный номер устройства. Пожалуйста, храните их в надежном
месте. Дата изготовления указана в серийном номере устройства в формате:
XXXSYWWXXXXXXгдеY–цифраот0до9указываетгодпроизводства(0-2020,
1-2021,2-2022,…,9-2029),
WW-указываетнеделюпроизводства(от01до53)
ListanGmbH.Wilhelm-Bergner-Straße11c.21509Glinde.Germany
УполномоченнаяорганизациянатерриторииРФ:
ООО„БИКВАЭТРУС“
Адрес:109316,Россия,городМосква,проездОстаповский,дом5,строение12,
этаж1,офис113
ПродуктпроизведенвКНР
Email:[email protected]
Дляполучениярусскоязычнойподдержкивыможетепозвонитьпотелефонным
номерам,указаннымвразделе«Контакты»нанашемсайте.
6. АВТОРСКИЕ ПРАВА
Copyright©ListanGmbH2020.Всеправазащищены.
Пожалуйста, обратите внимание:
▪Не разрешается воспроизводить, раскрывать, публиковать или хранить
содержимое этого документа или выдержки из него без предварительного
письменногосогласияListan.
▪bequiet!являетсязарегистрированнойторговоймаркойListanGmbH&Co.KG.
Другие продукты и названия компаний, упомянутые в данном руководстве,
могут быть марками или зарегистрированными торговыми марками
соответствующихвладельцев.
▪В соответствии с политикой компании, вся продукция Listan подвергается
постоянному совершенствованию и развитию. Listan оставляет за собой
правовноситьлюбыеизмененияиулучшениявлюбойпродукт,описанныйв
этомдокументе,безпредварительногоуведомления.
▪Ни при каких обстоятельствах Listan не несет ответственности за потери
данных,прибылиилизалюбойконкретный,случайный,прямойиликосвенный
ущерб,когдаонвозникает.
▪Содержание этой документации представлено в наиболее обновленном
виде. Listan не несет никакой ответственности за ошибки или упущения
информации, предоставленной в данном документе, и не предоставляет
никаких заверений или гарантий относительно пригодности содержащейся
здесь информации для какой-либо цели, если такая ответственность не
предусмотренадействующимизаконамиилипрецедентнымправом.
Listanоставляетзасобойправовноситьизменениявдокументациюилиизъять
еевлюбоевремябезпредварительногоуведомления.
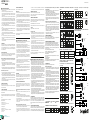
7. DANE TECHNICZNE DATOS TÉCNICOS ТЕХНИЧЕСКИЕ
ХАРАКТЕРИСТИКИ
OBCIĄŻENIE MINIMALNE | CARGA MÍNIMA | МИНИМАЛЬНАЯ НАГРУЗКА
DC OUTPUT 3.3V 5V 12V1 12V2 -12V 5VSB
400W - 600W 0A 0A 0A 0A 0A 0A
SYSTEM POWER 9
USER MANUAL | |
Złącze zasilania 24 pin ATX | Conector de alimentación ATX de 24 pines | Разъем
питания 24-pin ATX
Pin Signal Pin Signal
1 +3.3VDC 13
+3.3VDC
+3.3Vdef.
sense
2 +3.3VDC 14 -12VDC
3 COM 15 COM
4 +5VDC 16 PS_ON/OFF
5 COM 17 COM
6 +5VDC 18 COM
7 COM 19 COM
8 PWR_OK 20
9 +5VSB 21 +5VDC
10 +12VDC 22 +5VDC
11 +12VDC 23 +5VDC
12 +3.3VDC 24 COM
Złącze PCI express VGA | Conector VGA PCI Express | Разъем PCI express VGA
Złącze zasilania +12V | Conector de alimentación de +12 V | Разъем питания +12 V
Pin Signal Pin Signal
1 +12VDC 4 COM
2 +12VDC 5 COM
3 +12VDC 6 COM
7 COM 8 COM
Pin Signal Pin Signal
1 COM 3 +12VDC
2 COM 4 +12VDC
5 COM 7 +12VDC
6 COM 8 +12VDC
20-pin
4-pin
PCIe (6+2-pin)
PCIe (6+2-pin)
12V P4-connector
12V P4-connector
450 mm
350mm
120mm 120mm 120mm 120mm 120mm
HDD
S-ATA S-ATA S-ATA
550mm
500mm
150mm
600mm
HDD
S-ATA S-ATA
12V P8-connector
24-pin
20-pin
4-pin
PCIe (6+2-pin)
PCIe (6+2-pin)
12V P4-connector
12V P4-connector
120mm 120mm 120mm 120mm 120mm
HDD
S-ATA S-ATA S-ATA
550mm
HDD
S-ATA S-ATA S-ATA
12V P8-connector
24-pin
500mm
150mm
350mm
600mm
550mm
20-pin
4-pin
PCIe (6+2-pin)
PCIe (6+2-pin)
PCIe (6+2-pin)
PCIe (6+2-pin)
12V P4-connector
12V P4-connector
600 mm
550 mm
500 mm
150 mm
150 mm
500 mm
350mm
120mm 120mm 120mm 120mm 120mm
HDD
S-ATA S-ATA S-ATA
550mm
HDD
S-ATA S-ATA S-ATA
12V P8-connector
24-pin
400W
500W
Złącze zasilania SATA | Conector de alimentación SATA | Разъем питания SATA
Pin Signal Pin Signal
1 3.3V 4 COM
2 COM 5 +12VDC
3 +5VDC
ETYKIETA ELEKTRONICZNA | PLACA DE CARACTERÍSTICAS | ТАБЛИЦА ХАРАКТЕ-
РИСТИК
WARUNKI PRACY | ONDICIONES DE FUNCIONAMIENTO | УСЛОВИЯ РАБОТЫ
Environment Temperature Rel. Humidity
Operation 0 ~ 40°C up to 85% (non-condensing)
Storage -40 ~ 70°C up to 98% (non-condensing)
DYSTRYBUCJA I ROZŁOŻENIE ZŁĄCZ | DISTRIBUCIÓN Y ASIGNACIÓN DE PINES |
ОПИСАНИЕ И РАСПОЛОЖЕНИЕ КОНТАКТОВ
ZDOLNOŚĆ PRZYŁĄCZENIOWA I DŁUGOŚĆ KABLI | CONECTIVIDAD Y LONGITUD DEL CABLE
ПОДКЛЮЧЕНИЕ И ДЛИНА КАБЕЛЕЙ
Glinde, November 2020
Urządzenia peryferyjne | Dispositivos periféricos | Разъем питания перифе-
рийных устройств
Pin Signal Pin Signal
1 +5VDC 3 COM
2 COM 4 +12VDC
600W
700W
https://tm.by
Интернет-магазин TM.by
-
 1
1
-
 2
2


in anderen Sprachen
Verwandte Artikel
Andere Dokumente
-
BE QUIET! 750W Power Zone Benutzerhandbuch
-
BE QUIET! BQ L8-600W Benutzerhandbuch
-
BE QUIET! Pure Power L8-350W Datenblatt
-
BE QUIET! Dark Power PRO 450W Benutzerhandbuch
-
BE QUIET! Dark Power Pro 10 750W Benutzerhandbuch
-
BE QUIET! Straight Power E9 600W Benutzerhandbuch
-
BE QUIET! BQT P10- 850W Benutzerhandbuch
-