
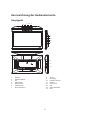
US
E
USER
M
HAND
L
BENUTZERHA
N
MODE D'
E
MANUAL DEL U
S
E
R'S MAN
TFT-103
8
M
ANUAL PORT
A
L
EIDING PORT
A
N
DBUCH TRAG
E
MPLOI TV P
O
SUARIO TV P
O
UAL
8
A
BLE DVB-T2 TV
A
BLE DVB-T2 TV
BARER DVB-T2
T
O
RTATIVE DVB-T
2
O
RTÁTIL CON DV
T
V
2
B-T2
GB 132*185mm

2
Index
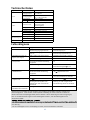
English........................................................................................................................................................................3
Nederlands...............................................................................................................................................................16
Deutsch....................................................................................................................................................................30
Français....................................................................................................................................................................44
Español.....................................................................................................................................................................58

English
3
TFT-1038
CAUTION:
Usage of controls or adjustments or performance of procedures other than those specified herein may result in
This unit should not be adjusted or repaired by anyone except qualified service personnel.
PRECAUTIONS BEFORE USE
KEEP THESE INSTRUCTIONS IN MIND:
1. Do not use this device near water.
2. Clean only with a slightly damp cloth.
free space around the whole device.
4. Install in accordance with the supplied user manual.
device out of children’s reach! When playing with the power cable, they can seriously injure themselves.
6. * Unplug this device during lightning storms or when unused for a long period.
7. Keep the device away from heat sources such as radiators, heaters, stoves, candles and other
10. Warning! Never insert an object into the product through the vents or openings. High voltage flows
hock and/or short circuit internal parts. For the
same reason, do not spill water or liquid on the product.
11. Do not use in wet or moist areas such as bathrooms, steamy kitchens or near swimming pools.
excessive build-up of heat or any other unexpected phenomena, you should disconnect the plug from the main
power socket immediately.
sure of the type of power supply used in your home, consult your dealer or local power company.
15. * The socket outlet must be installed near the equipment and must be easily accessible.
16. * Do not overload ac outlets or extension cords. Overloading can cause fire or electric shock.
20. * Always hold the plug when pulling it out of the main supply socket. Do not pull the power cord.
This can cause a short circuit.
stains, you may use a damp cloth with dilute detergent.
may be corrupted or lost.
26. The apparatus shall not be exposed to dripping or splashing and make sure that no objects filled with
liquids, such as vases, are placed on or near the apparatus.
27. * To completely disconnect the power input, the mains plug of the apparatus shall be disconnected
from the mains, as the disconnect device is the mains plug of apparatus.

4
Warning:
Use only the power supply listed in the user instrucons.
Power supply adaptor
Manufacturer: Shenzhen Mass Power Electronics Limited
Model number:
Adapter type: VDE
Use only original AC adaptor
EFF0900150E1BA
28. If the unit works with baery, Baery shall not be exposed to excessive heat such as sunshine, fire or
the like.
29. Aenon should be drawn to the environmental aspects of baery disposal.
30. The apparatus can only be used in moderate extremely cold or climates warm environments should
be avoided.
31. The rang label has been marked on the boom or back panel of the apparatus.
32. This device is not intended for use by people (including children) with physical, sensory or mental
disabilies, or a lack of experience and knowledge, unless they’re under supervision or have received
instrucons about the correct use of the device by the person who is responsible for their safety.
33. This product is intended for non professional use only and not for commercial or industrial use.
34. Make sure the unit is adjusted to a stable posion. Damage caused by using this product in an
unstable posion or by failure to follow any other warning or precauon contained within this user manual will
not be covered by warranty.
35. Never remove the casing of this apparatus.
36. Never place this apparatus on other electrical equipment.
37. Do not use or store this product in a place where it is subject to direct sunlight, heat, excessive dust
or vibraon.
38. Do not allow children access to plasc bags.
39. Only use aachments/accessories specified by the manufacturer.
40. Refer all servicing to qualified service personnel. Servicing is required when the apparatus has been
damaged in any way, such as the power supply cord or the plug, when liquid has been spilled or objects have
fallen into the apparatus, when the apparatus has been exposed to rain or moisture, does not operate
normally, or has been dropped.
41. *Do not use a damaged power cord or plug or a loose outlet. Doing so may result in fire or electric
shock.
42. Prolonged exposure to loud sounds from personal music players may lead to temporary or
permanent hearing loss.
INSTALLATION
• Unpack all parts and remove protecve material.
• *Do not connect the unit to the mains before checking the mains voltage and before all other
connecons have been made.
*Those instrucon are related only to products using power cable or AC power adaptor.

SOURCE
OK
IN
5
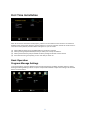
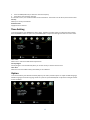
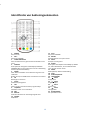
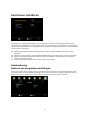
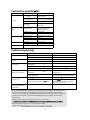
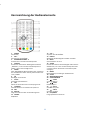
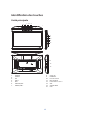
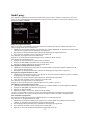
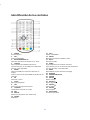
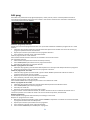
Idenficaon of Controls
Main Unit
1.
2.
3.
4. UP
5. DOWN
6. LEFT/VOL-
7. RIGHT/VOL+
8. AV OUT
9.
10. Earphone Socket
11. ON/OFF
12. DC IN 9-12V
13. ANT.
14. HDMI OUT
15. USB
1
2
3
4
5
6 7
8
9
10
11
12
13
14
15
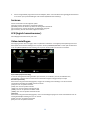
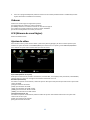
AV SETUP

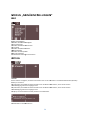
6
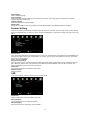
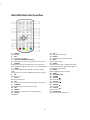
IdentificationofControls
1. POWER
On/Standby
2. VOL‐
AdjustVOLUME.
3. 0‐9NUMBERBUTTON
Selectsnumbereditemsinamenu.
4. SUBTITLE
PressSUBTITLErepeatedlyduringplaybacktoa
differentsubtitlelanguages,ifavailable.
5. ZOOM
JPEG:UseZOOMtoenlargeorshrinkthepicture.
EachpressoftheZOOMbuttonchangetheTVscreen
6. OK
ConfirmandEnter
7. SETUP
MainMenu/Return
8. FAV
OpenFavoriteProgramsListMenu
9. TV/RADIO
SwitchbetweenTVandRadiosource
10. EXIT
11. DISPLAY
Displaytheinformationofthecurrentsignal
12. SOURCE
13. VOL+
AdjustVOLUME.
14. REPEAT
RepeatPlaymp3andvideo
15. MUTE
Mutethesound
16. AUDIO
PressAUDIOrepeatedlyduringplaybacktoheara
differentaudiolanguageoraudiotrack,ifavailable.
17. MODE
Mode:Picturemenusetting
18. STOP
19. PLAY/PAUSE
20. RETURN
21.BUTTON
Previousoption.
22.BUTTON
Nextoption.
23.BUTTON
Fastforward
24.BUTTON
Fastbackward
25. RED/GREEN
Somespecificfunction
DVB/
IN
AV

M
P
B
r
S
e
C
o
S
e
C
o
S
e
E
N
S
e
R
E
R
e
O
S
T
T
h
3
H
a
n
4
H
a
n
O
F
M
M
ODEME
N
P
ICTURE
r
ightness
e
tthebrightnessoft
h
o
ntrast
e
ttheContrastofthe
o
lor
e
tthecoloursofthes
c
N
GLISH
e
ttheOSDLanguage
E
SET
e
settodefaultsettin
g
O
PTION
T
ANDBY
h
isfunctionmakesit
p
H
(3hours):Thedevi
c
n
ybuttonwaspresse
d
H
(4hours):Thedevi
c
n
ybuttonwaspresse
d
F
F(Off):Theautomat
achinemodelandso
f
N
USETTIN
G
h
escreen.
screen.
c
reen.
g
.
p
ossibletoautomatic
a
c
ewillautomatically
g
d
.
c
ewillautomatically
g
d
.
icstandbyfunction
w
f
tversion
7
G
a
llyputthedevicein
t
g
ointostandbymod
e
g
ointostandbymod
e
w
illbedeactivated.
t
ostandbymode3or
e
after3hourshavep
a
e
after4hourshavep
a
4hours.
a
ssedfromthetimet
h
a
ssedfromthetimet
h
h
at
h
at

8
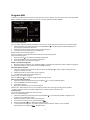
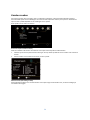
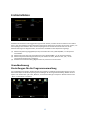
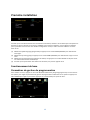
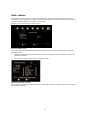
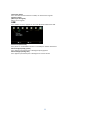
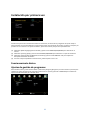
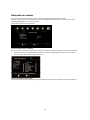
FirstTimeInstallation
Afterallconnectionshavebeenmadeproperly,switchonTVandmakesurethereceiverisconnectedto
theMainPower.PressPowerbuttontoswitchreceiveron.Ifyouareusingthereceiverforthefirsttimeor
restoredtoFactoryDefault,theMainMenuwillappearonyourTVscreen.
(1) Select[OSDLanguage]andpressRIGHT/LEFTkeytoselectalanguage.
(2) Select[Country]andpressRIGHT/LEFTkeytoselectyourcountryofresidence.
(3) Select[ChannelSearch]andpressRIGHTorOKkeytobeginAutomaticchannelsearch.
(4) Oncechanneltuningiscomplete,youarenowreadytowatchTV.
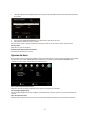
BasicOperation
ProgramManageSettings
ToaccesstheMenu,presstheSETUPbuttonandselect[Program].TheMenuprovidesoptionstoadjust
theProgramManageSettings.SelectanoptionandpressOKorRIGHTtoadjustthatsetting.PresstheEXIT
buttontoexittheMenu.

9
Program Edit
To edit your program preferences (lock, skip, favourite, move or delete), you will need to enter the ProgramEdit
Menu. This Menu requires a password to access. Enter the default password '000000'.
Set Favourite Program/s
You can create a shortlist of favourite programs that you can easily access.Set Favourite TV or Radio program:
1. Select the preferred program then press the FAVOURITE bu
on. A Star-shaped symbol will appear and
the program is marked as a favourite.
2.
Repeat the previous step to select more Favourite programs.
3. To confirm and exit the Menu,press the EXIT key.
Disable Favourite TV or Radio Program:
Press the FAV buton on the Remote Control with the heart-shaped symbol.
View Favourite Programs:
1. Press the Fav bu
on and the Favourite Menu will appear.
2. Press UP/DOWN to select your Favourite Programs.
3. Press OK to select your favourite program.
Delete a TV or Radio Program/s
1. Select the Program and then press the BLUE bu
on. A message will appear.Press
OK to delete the program.
2. Repeat the previous step to select more programs to delete.
Skip TV or Radio Program/s
1. Select the program you would like to skip and press the GREEN bu
on. A skip symbol is displayed. The
program is marked as a skip.
2. Repeat the previous step to select more programs.
3. To confirm and exit themenu,press EXIT key.
Disable a skip TV or Radio Program:
Press the GREEN bu
on on the skip program with the skip symbol.
Move a TV or Radio Program/s
1. Select the preferred program then press th
e RED bu
on. A move symbolwill appear.
2. Press UP/DOWN to move the program.
3. Press OK to confirm.
4.
*Please note : when LCN is set to on, the TV staon number will not change according to the posion
number to have the channel number changed to the posion number, set LCN to off.
Repeat the above steps to move more channels.
Lock Program/s
You can lock selected programs for restricted view.
Lock a TV or Radio Program:
1. Select the preferred program then press the YELLOW bu
on. A lock-shaped symbol is displayed. The
program is now marked as locked.
2. Repeat the previous step to select more programs.
3. To confirm and exit the menu, press the EXIT bu
.
4. Press the YELLOW bu
on to
disable the locked program.
5. To view the locked program, you will be require to enter either the default, or the modified
Password.(refer to system se
“Set Password”)

10
Sort
Sort your channels from the following opons:
[By LCN]
[By ONID]-Sort the channels according to the original network ID.
[By Service Name]
[By Service ID]
- Sort the channels in ascending order.
- Sort the channels in alphabecal order.
- Sort the channels according to the staon.
LCN (Logical channel number)
Set LCN on or off.
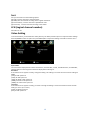
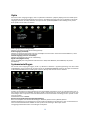
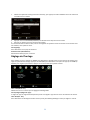
Video Seng
To access the Menu, press SETUP then select [Picture]. The Menu provides opons to adjust the video sengs.
Press UP/DOWN to select an opon and press RIGHT/LEFT to adjust that seng. Press EXIT to exit the menu.
Aspect Rao
You must set the display format to either 4:3 PanScan, 4:3 Leer Box, 4:3 Full, 16:9 Wide Screen, 16:9 PillarBox,
16:9 Pan & Scan or Auto to get the maximum display when watching TV.
Resoluon
If the video does not appear correctly, change the seng. Th
is seng is to match the most common seng for
HDMI.
[576i] for PAL system TV.
[576P]: for PAL system TV.
[720P]: for NTSC or PAL system TV.
[1080I]: for NTSC or PAL system TV.
[1080P]: for NTSC or PAL system TV.
TV format
If the video does not appear correctly, you need to change the sengs. This should match the most common
seng for TVs in your country.
[NTSC]: for NTSC system TV.
[PAL]: for PAL system TV.

11
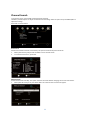
ChannelSearch
Toaccessthemenu,pressSETUPandselect[SearchChannel].
TheMenuprovidesoptionstoadjusttheSearchChannelsettings.SelectanoptionandpressRIGHT/LEFTto
adjustthesettings.
PressEXITtoexittheMenu.
AutoSearch
Searchandinstallallchannelsautomatically.Thisoptionoverwritesallpresetchannels.
1. Select[AutoSearch]andpressOKorRIGHTtostartchannelsearch.
2. Tocancelchannelsearch,pressEXIT.
ManualSearch
Installnewchannelsmanually.Thisoptionaddsnewchannelswithoutchangingthecurrentchannelslist.
1. Select[ManualSearch]thenpressOKorRIGHT.Thechannelsearchscreenwillappear.

12
2. PresstheRIGHT/LEFTkeytoselectthechannelfrequency.
3. PressOKtostartsearchingchannels.
Ifachannelisfound,itissavedandaddedtothechannelslist.Ifchannelscan’tbefound,thenexitthemenu.
Country
Selectyourcountryofresidence.
AntennaPower
SupplyPowertoAntenna.
TimeSetting
ToaccesstheMenu,pressMENUthenselect[Time].TheMenuprovidesoptionstoadjustthetimesettings.
PressUP/DOWNtoselectanoptionandpressRIGHT/LEFTtoadjustthesettings.PressEXITtoexitthemenu.
Timeoffset
SelectautoormanualforGMToffsetadjustments.
CountryRegion
CountryRegionissetautomaticallywhenyousetthecountryatchannelsearchmenu.
TimeZone
SelecttheTimeZoneOffsetwhen[TimeOffset]issettoManual.
Option
ToaccesstheMenu,pressSETUPandselect[Option].ThemenuprovidesoptionstoadjusttheOSDLanguage,
SubtitleLanguageandAudioLanguage.SelectanoptionandpressRIGHT/LEFTtoadjustthesetting.PressEXIT
toexitTheMenu.

13
OSDLanguage
SelectanOSDlanguage.
AudioLanguage
SelectthepreferredaudiolanguageforwatchingTVchannels.Ifthelanguageisnotavailable,thedefault
programlanguagewillbeused.
SubtitleLanguage
Selectthepreferredsubtitlelanguage.
DigitalAudio
SetthedesiredaudioformatattheHDMIslot:PCM,RawHDIMOn,RawHDMIOff,Off(ifavailable).
SystemSetting
ToaccesstheMenu,pressSETUPandselect[System].Themenuprovidesoptionstoadjustthesystemsettings.
PresstheUP/DOWNkeytoselectanoptionandpressRIGHT/LEFTtoadjustthesetting.PressEXITtoexitthe
Menu.
SetPassword
SetorchangethepasswordforLockedprograms.EnteryouroldPasswordorthedefaultpassword'000000'.You
willthenbeaskedtoenteryournewpassword.Toconfirmre‐enteryournewpassword.Onceitisconfirmed,
pressEXITtoexittheMenu.
Masterpassword'888888'
RestoreFactoryDefault
ResetyourSetTopBoxtotheDefaultFactorySettings.InMainMenuselect[RestoreFactoryDefault]andpress
OKorRIGHTtoselect.Enteryourpasswordorthedefaultpassword'000000'andpressOKtoconfirm.This
optionwilldeleteallpresetchannelsandsettings.
Information
Viewmodel,hardwareandsoftwareinformation.
Softwareupdate
Softwareupdate
USB
ToaccesstheMenu,presstheSETUPbuttonandselectUSB.
Multimedia
SwitchtoUSBmodeandpluginUSBtoviewfiles.
PhotoConfigure
Settheparametersforviewingphotographs.
MovieConfigure
Settheparametersfordisplayingmoviesubtitles.

14
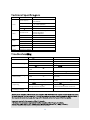
Technical Specifica ons
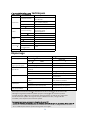
Item Sub Item Parameter
Tuner
Input Frequency
170~230MHz
470~860MHz
RF Input level
-25~-80dBm (64QAM)
-10~-75dBm (256QAM)
IF Bandwidth 7MHz and 8MHz
Modula on QPSK,16QAM,64QAM,256QAM
Video
Decoder Format
MPEG4 AVC/H.264 HP@L4
HEVC/H.265 HT@L4
MPEG2 [email protected]
Output Port
Input Port
CVBS
CVBS
,HDMI
Audio
Decoder Format MPEG-1(layer1&2&3)
Audio output
Audio Input
Stereo
Stereo
P
Baery LI-ION 7.4V, 2800mah
ower
Voltage DC 9V (1.5 A)
Working Power ≤ 10W
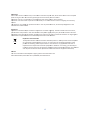
Troublesho
Problem Pote Reasons What to do
No picture Power isn't connected Connect the power
The power switch is not on Switch on the power
Screen shows No Signal DVB-T cable notconnected Plug in the DVB-T cable
Incorrect ng Reset
No sound from speaker No or incorrect connec n with audio
cable
Connect the audio cable correctly
Sound on mute Turn off mute func on
Incorrect sound track Try another sound track
Only sound, no image
on the screen
No or incorrect connec n with AV
cable
Make sure cables are connected
correctly
The program is a radio program Press <TV/RADIO> key to into TV
mode
Remote Controlis not
responding
The b is exhausted Change ery
Remote Control is no acing or close
enough to the Set Top Box
Adjust the posi on of the Remote
Control andmove closer to the unit
The image stopped
suddenly or mosaic
The signal is too weak Strengthen the signal
- The TFT -10 8 can only receive non encrypted free TV channels.3

G
u
Le
(b
I
m
I
m
ex
T
h
m
a
Di
U
p
sp
d
e
e
n
S
e
F
o
Le
u
arantee
e
nco offers service an
d
oth during and aer
t
m
portant note: It is no
m
portant note: If this
u
x
pires.
h
is device is not suita
b
a
nufacturer will be v
o
sclaimer
p
dates to Firmware a
n
p
ecificaons and pict
u
e
scribed in this guide
f
n
tlements may be o
b
Dis
p
Thi
s
of a
pro
d
req
u
con
s
and
e
rvice
o
r more informaon
a
e
nco Benelux BV; The
r
d
warranty in accord
a
t
he warranty period)
y
t possible to send pr
o
u
nit is opened or acc
e
b
le for professional u
s
o
ided.
n
d/or hardware com
p
u
res in this document
a
f
or illustraon purpo
s
b
tained from the des
c
p
osal of the Old Devi
c
s
symbol indicates th
a
s general household
w
d
uct and baery, ple
a
u
irement for disposal
s
erve natural resourc
disposal of electrical
a
nd helpdesk support
,
r
miekstraat 1a, 6361
H
15
a
nce with the Europe
a
you should contact y
o
o
ducts that need rep
a
e
ssed by a non-officia
s
e. In case of professi
o
p
onents are made re
g
a
on may differ sligh
t
s
es only and may not
c
ripon made in this
m
c
e
a
t the relevant electri
c
w
aste in Europe. To e
a
se dispose them in a
of electrical equipm
e
es and improve stan
d
waste (Waste Electri
c
,
please visit www.le
n
H
B, The Netherlands.
a
n law, which means
t
o
ur local dealer.
a
irs to Lenco directly.
l service center in an
y
o
nal use, all warrant
y
g
ularly. Therefore so
m
t
ly from your parcul
a
apply to parcular si
t
m
anual.
c
al product or baer
y
nsure the correct wa
s
ccordance to any ap
p
e
nt or baeries. In so
d
ards of environment
a
c
al and Electronic Eq
u
n
co.com
t
hat in case of repair
s
y
way, the warranty
y
obligaons of the
m
e of the instrucon,
a
r situaon. All items
t
uaon. No legal righ
t
y
should not be dispo
s
s
te treatment of the
p
licable local laws of
doing, you will help t
a
l protecon in treat
m
u
ipment Direcve).
s
t
or
s
ed
o
m
ent

Nederlands
16
LET OP:
Gebruik van bedieningen of afstellingen of uitvoer van procedures anders dan gespecificeerd in deze
documentae kan leiden tot blootstelling aan schadelijke straling.
Dit apparaat dient uitsluitend te worden aangepast of gerepareerd door gekwalificeerd onderhoudspersoneel.
VOORZORGSMAATREGELEN VOOR GEBRUIK
ONTHOUD DE VOLGENDE INSTRUCTIES:
1. Gebruik dit apparaat niet in de buurt van water.
2. Reinig het uitsluitend met een licht vochge doek.
3. Bedek of blokkeer de venlae-openingen niet. Wanneer u het apparaat op een schap plaatst, dient
u 5 cm (2”) vrije ruimte rondom het gehele apparaat te behouden.
4. Installeer het product volgens de meegeleverde gebruikershandleiding.
5. * Nooit op de stroomadapter stappen of deze indrukken. Wees voornamelijk voorzichg in de buurt
van de stekkers en het punt waar de kabel uit het apparaat komt. Plaats geen zware voorwerpen op de
stroomadapter, om beschadiging ervan te voorkomen. Houd het gehele apparaat buiten bereik van kinderen!
Wanneer kinderen met de voedingskabel spelen, kunnen zij ernsg letsel oplopen.
6. * Haal de stekker uit het stopcontact jdens onweer of wanneer u deze langere jd niet gebruikt.
7. Houd het apparaat uit de buurt van hiebronnen, zoals radiatoren, verwarmingen, kachels, kaarsen
en andere hiegenererende producten of naakte vlam.
8. Gebruik dit apparaat niet in de buurt van krachge magnesche velden.
9. Elektrostasche ontlading kan normaal gebruik van dit apparaat verstoren. U hoe het apparaat in
dit geval slechts te reseen en opnieuw op te starten volgens de gebruikershandleiding. Wees voorzichg
jdens bestandsoverdracht en doe dat in een omgeving zonder stasche verstoringen.
10. Waarschuwing! Steek nooit een voorwerp via de venlae- of andere openingen in het product. Er is
hoogspanning in het product aanwezig en als u er een object insteekt, kan dat een elektrische schok
veroorzaken en/of kortsluing in de interne onderdelen. Mors om dezelfde reden geen water of vloeistof op
het product.
11. Gebruik het toestel niet in vochge ruimtes, zoals badkamers, stomende keukens of in de buurt van
zwembaden.
12. Gebruik dit apparaat niet wanneer condensae kan optreden.
13. Alhoewel dit apparaat met grote zorg gefabriceerd en verschillende keren geïnspecteerd is voordat
het de fabriek verlaat, is het nog steeds mogelijk dat er problemen optreden, zoals met alle elektrische
apparaten. Als u rook, een overmage hieontwikkeling of enig ander onverwacht verschijnsel opmerkt, moet
u onmiddellijk de stekker van het netsnoer uit het stopcontact halen.
14. Dit apparaat moet aangedreven worden door een voedingsbron, zoals aangegeven op het
specificaeplaatje. Als u twijfelt over het type voeding dat gebruikt wordt in uw huis, raadpleeg dan a.u.b. uw
dealer of plaatselijk energiebedrijf.
15. * Het stopcontact moet in de buurt van de apparatuur zijn geïnstalleerd en eenvoudig te bereiken
zijn.
16. * Overbelast stopcontacten of verlengsnoeren niet. Overbelasng kan brand of een elektrische schok
veroorzaken.
17. * Apparaten met een Klasse 1 structuur dienen te worden aangesloten op een stopcontact met een
beschermende aardverbinding.
18. * Apparaten met een Klasse 2 structuur vereisen geen aardverbinding.
19. Houd ze uit de buurt van knaagdieren. Knaagdieren knauwen graag aan voedingskabels.
20. * Houd aljd de stekker vast wanneer u deze uit het stopcontact trekt. Trek nooit aan de
voedingskabel. Dit kan tot een kortsluing leiden.
21. Vermijd om het toestel te plaatsen op een ondergrond die blootgesteld kan worden aan trillingen of
schokken.
22. Gebruik een zacht, droog doekje om het apparaat te reinigen. Gebruik geen oplosmiddelen of op
benzine gebaseerde vloeistoffen. U kunt een vochg doekje met verdund schoonmaakmiddel gebruiken om
hardnekkige vlekken te verwijderen.
23. De leverancier is niet verantwoordelijk voor schade of verloren gegevens veroorzaakt door storing,
misbruik, modificae van het apparaat of baerijvervanging.
TFT-1038

17
Waarschuwing:
Gebruik uitsluitend het voedingsapparaat dat in de gebruiksaanwijzingen staat vermeld.
Voedingsadapter
Fabrikant: Shenzhen Mass Power Electronics Limited
Modelnummer:
Adaptertype: VDE
Gebruik alleen de originele wisselstroomadapter
EFF0900150E1BA
24. Onderbreek nooit de verbinding wanneer het apparaat formaeert of bestanden overdraagt. De
gegevens kunnen anders corrupt of verloren raken.
25. Indien het apparaat een USB-afspeelfunce hee, moet de USB-geheugensck rechtstreeks op het
apparaat worden aangesloten. Gebruik geen USB-verlengkabel, omdat die kan leiden tot storingen met
foueve gegevens als gevolg.
26. Het apparaat mag niet worden blootgesteld aan druppels of spaen en zorg ervoor dat er geen met
vloeistof gevulde voorwerpen, zoals vazen, op of nabij het apparaat zijn geplaatst.
27. * Om de verbinding met de stroomaansluing volledig te verbreken, moet de stekker van het
apparaat uit het stopcontact worden gehaald, omdat de stekker van het apparaat de hoofdschakelaar is.
28. Indien het apparaat op baerijen kan werken, dan mogen de baerijen niet aan overmage hie,
zoals zonlicht, open vuur e.d. worden blootgesteld.
29. Aandacht voor het milieu is nodig bij het verwijderen van de baerijen.
30. Het apparaat kan alleen worden gebruikt in gemagde klimaten. Extreem koude of warme
omgevingen moeten worden vermeden.
31. Het nominale specificaelabel is te vinden op het paneel aan de onder- of achterkant van het
apparaat.
32. Dit apparaat is niet bestemd voor gebruik door mensen (inclusief kinderen) met fysieke, zintuiglijke
of geestelijke gebreken of gebrek aan kennis en ervaring, tenzij zij onder toezicht staan of instruces hebben
over het juiste gebruik van het apparaat hebben gekregen van de persoon die verantwoordelijk is voor hun
veiligheid.
33. Dit product is alleen voor niet-professioneel gebruik bedoeld en niet voor commercieel of industrieel
gebruik.
34. Verzeker u ervan dat het apparaat in een stabiele posie staat opgesteld. Schade, veroorzaakt door
het gebruik van dit product in een onstabiele posie, of door het niet naleven van waarschuwingen of
voorzorgsmaatregelen genoemd in deze handleiding, valt niet onder de garane.
35. Verwijder nooit de behuizing van dit apparaat.
36. Plaats dit apparaat nooit op andere elektrische apparatuur.
37. Dit product niet gebruiken of opslaan op plaatsen waar het wordt blootgesteld aan direct zonlicht,
hie, buitensporig veel stof of trillingen.
38. Geef kinderen geen gelegenheid in aanraking met plasc zakken te komen.
39. Gebruik uitsluitend uitbreidingen/accessoires gespecificeerd door de fabrikant.
40. Laat alle reparaes over aan gekwalificeerd onderhoudspersoneel. Onderhoud is vereist als het
toestel hoe dan ook is beschadigd, zoals bijvoorbeeld het netsnoer of de stekker, wanneer er vloeistof of een
voorwerp in het apparaat is terechtgekomen, wanneer het apparaat is blootgesteld aan regen of vocht, als het
niet normaal werkt of is gevallen.
41. * Gebruik nooit een beschadigde voedingskabel of stekker of een los stopcontact. Dit vormt namelijk
een risico op brand of elektrische schokken.
42. Langdurige blootstelling aan luid geluid van persoonlijke muziekspelers kan leiden tot jdelijke of
permanente gehoorbeschadiging.
INSTALLATIE
• Pak alle onderdelen uit en verwijder de beschermende materialen.
• * Sluit het apparaat niet aan op het stopcontact, voordat u de netspanning hebt gecontroleerd en
voordat alle andere aansluingen zijn gemaakt.
*deze instruces zijn enkel van toepassing voor producten met een voedingskabel of een AC
voedingsadapter.

18
Ide fica e van bedieningselementen
Hoofdeenheid
4. OMHOOG
5. OMLAAG
6. LINKS/VOL-
7. RECHTS/VOL+
8. AV UIT
9.
10.
ng oortelefoon
11. AAN/UIT
12. Ingang 9-12 V gelijkspanning
13. ANTENNE
14. HDMI-UITGANG
15. USB
1
2
3
4
5
6 7
8
9
10
11
12
13
14
15
BRON
OK
1.
2.
3.
INSTELLINGEN IN
AV

19
Identificatievanbedienings elementen
1. POWER
Aan/stand‐by.
2. VOL‐
AanpassenVOLUME.
3. CIJFERTOETSEN0‐9
Voorhetselecterenvangenummerdeonderdelenin een
menu.
4. SUBTITLE
DruktijdensdeweergaveherhaaldelijkopSUBTITLE
(ONDERTITELS)omeenanderetaalvoordeondertiteling
tekiezen(indienbeschikbaar).
5. ZOOM
JPEG:Gebruik“ZOOM”omhetbeeldtevergrotenofte
verkleinen.
BijelkedrukopdeZOOM‐toetsveranderthetTV‐scherm.
6. OK
Bevestigeneninvoeren.
7. SETUP
Hoofdmenu/terugkeren.
8. FAV
Openhetmenumetdefavorieteprogrammalijst.
9. TV/RADIO
SchakelentussenTV‐enradiobron.
10. EXIT
11. DISPLAY
Geeftdeinformatievanhethuidigesignaalweer.
12. SOURCE
13. VOL+
AanpassenVOLUME.
14. REPEAT
Herhaalafspelenvanmp3envideo.
15. MUTE
Dempenvanhetgeluid.
16. AUDIO
DruktijdenshetafspelenherhaaldelijkopAUDIO
om,indienbeschikbaar,deverschillendetalen
voorde audiotelatenhoren.
17. MODE
Mode(Modus):Menubeeldinstelling.
18. STOP
19. AFSPELEN/PAUZE
20. TERUGKEREN
21.TOETS
Vorigeoptie.
22.TOETS
Volgendeoptie.
23.TOETS
Snelvooruit.
24.TOETS
Terugspoelen.
25. ROOD/GROEN
Eenspecifiekefunctie.
DVB/
IN
AV

I
N
B
B
r
St
e
C
o
St
e
C
o
St
e
E
N
St
e
R
E
R
e
O
S
T
D
e
3
H
b
y
4
H
b
y
O
F
A
p
N
STELLIN
G
B
EELD
r
ight(Helderheid)
e
ldehelderheidvan
h
o
ntrast
e
lhetcontrastvanh
e
o
lor(Kleur)
e
ldekleurenvanhet
N
GLISH(ENGELS)
e
ldetaalvandesch
e
E
SET
e
settennaardestand
O
PTIE
T
AND‐BY
e
zefunctiemaakthet
H
(3uur):Hetappara
a
y
‐modusgaan.
H
(4uur):Hetappara
a
y
‐modusgaan.
F
F(Uit):Deautomati
s
p
paraatmodelensoft
w
G
EN
h
etschermin.
e
tschermin.
schermin.
e
rmweergavein(OSD
)
aardinstellingen.
mogelijkhetappara
a
a
tzal3uurnahetm
o
a
tzal4uurnahetm
o
s
chestand‐by‐functie
w
areversie.
20
)
.
a
tna3of4uurauto
m
o
mentdateropeen
t
o
mentdateropeen
t
wordtgedeactiveer
d
m
atischindestand‐b
y
t
oetswerdgedrukta
u
t
oetswerdgedrukta
u
d
.
y
‐modustelatengaa
n
u
tomatischindestan
d
u
tomatischindestan
d
n
.
d
‐
d
‐
Seite wird geladen ...
Seite wird geladen ...
Seite wird geladen ...
Seite wird geladen ...
Seite wird geladen ...
Seite wird geladen ...
Seite wird geladen ...
Seite wird geladen ...
Seite wird geladen ...
Seite wird geladen ...
Seite wird geladen ...
Seite wird geladen ...
Seite wird geladen ...
Seite wird geladen ...
Seite wird geladen ...
Seite wird geladen ...
Seite wird geladen ...
Seite wird geladen ...
Seite wird geladen ...
Seite wird geladen ...
Seite wird geladen ...
Seite wird geladen ...
Seite wird geladen ...
Seite wird geladen ...
Seite wird geladen ...
Seite wird geladen ...
Seite wird geladen ...
Seite wird geladen ...
Seite wird geladen ...
Seite wird geladen ...
Seite wird geladen ...
Seite wird geladen ...
Seite wird geladen ...
Seite wird geladen ...
Seite wird geladen ...
Seite wird geladen ...
Seite wird geladen ...
Seite wird geladen ...
Seite wird geladen ...
Seite wird geladen ...
Seite wird geladen ...
Seite wird geladen ...
Seite wird geladen ...
Seite wird geladen ...
Seite wird geladen ...
Seite wird geladen ...
Seite wird geladen ...
Seite wird geladen ...
Seite wird geladen ...
Seite wird geladen ...
Seite wird geladen ...
-
 1
1
-
 2
2
-
 3
3
-
 4
4
-
 5
5
-
 6
6
-
 7
7
-
 8
8
-
 9
9
-
 10
10
-
 11
11
-
 12
12
-
 13
13
-
 14
14
-
 15
15
-
 16
16
-
 17
17
-
 18
18
-
 19
19
-
 20
20
-
 21
21
-
 22
22
-
 23
23
-
 24
24
-
 25
25
-
 26
26
-
 27
27
-
 28
28
-
 29
29
-
 30
30
-
 31
31
-
 32
32
-
 33
33
-
 34
34
-
 35
35
-
 36
36
-
 37
37
-
 38
38
-
 39
39
-
 40
40
-
 41
41
-
 42
42
-
 43
43
-
 44
44
-
 45
45
-
 46
46
-
 47
47
-
 48
48
-
 49
49
-
 50
50
-
 51
51
-
 52
52
-
 53
53
-
 54
54
-
 55
55
-
 56
56
-
 57
57
-
 58
58
-
 59
59
-
 60
60
-
 61
61
-
 62
62
-
 63
63
-
 64
64
-
 65
65
-
 66
66
-
 67
67
-
 68
68
-
 69
69
-
 70
70
-
 71
71


in anderen Sprachen
- français: Lenco TFT-1038 Le manuel du propriétaire
- español: Lenco TFT-1038 El manual del propietario
- Nederlands: Lenco TFT-1038 de handleiding
Verwandte Artikel
-
Lenco TFT-1028BK Bedienungsanleitung
-
Lenco TFT-1028 Benutzerhandbuch
-
Lenco EPB-460BK Bedienungsanleitung
-
Lenco EPB-460 Benutzerhandbuch
-
-
Lenco DVP-1273 Benutzerhandbuch
-
-
-
Lenco DVP-9413 Benutzerhandbuch
-