Axing SSD 6-10 Programmable single cable loop-through outlet 10 dB Stripping Instructions

Typ
Stripping Instructions
Hersteller
AXING AG
Gewerbehaus Moskau
8262 Ramsen
EWR-Kontaktadresse
Bechler GmbH
Am Rebberg 44
78239 Rielasingen
Stand 2020-08-05
Technische Verbesserungen, Änderungen im Design, Druckfehler und Irrtümer
vorbehalten.
Typen:
Diese Abisolieranweisung ist gültig für folgende AXING premium-line
Antennensteckdosen:
9 BSD 21-xx Hyperbreitbandsteckdosen | CATV
9 BSD 963-xxN Multimediasteckdosen | CATV | DATA
9 BSD 961-xxK Multimediasteckdosen | CATV | 2 × DATA
9 BSD 960-xxN Multimediasteckdosen
CATV | DATA | SAT | EN 50494/EN 50607
9 SSD 5-xx SAT-Antennensteckdosen
CATV | SAT | EN 50494/EN 50607
9 SSD 5-15 SAT-Multimediasteckdose
CATV | DATA | SAT | EN 50494/EN 50607
9 SSD 6-xx Programmierbare Unicable-Antennensteckdosen
CATV | SAT | EN 50494/EN 50607
9 SSD 7-00 SAT-Twin-Antennensteckdose
CATV | 2 × SAT
Abisolieranweisung
premium-line
Antennensteckdosen
BSD 21-xx
BSD 960-xxN
BSD 961-xxK
SSD 5-15
SSD 7-00
BSD 963-xxN
SSD 5-xx
SSD 6-xx
Hiermit erklärt die AXING AG, dass die gekennzeichneten Produkte den
geltenden Richtlinien entsprechen.
WEEE Nr. DE26869279 | Elektrische und elektronische Komponenten nicht
mit dem Restmüll, sondern separat entsorgen.
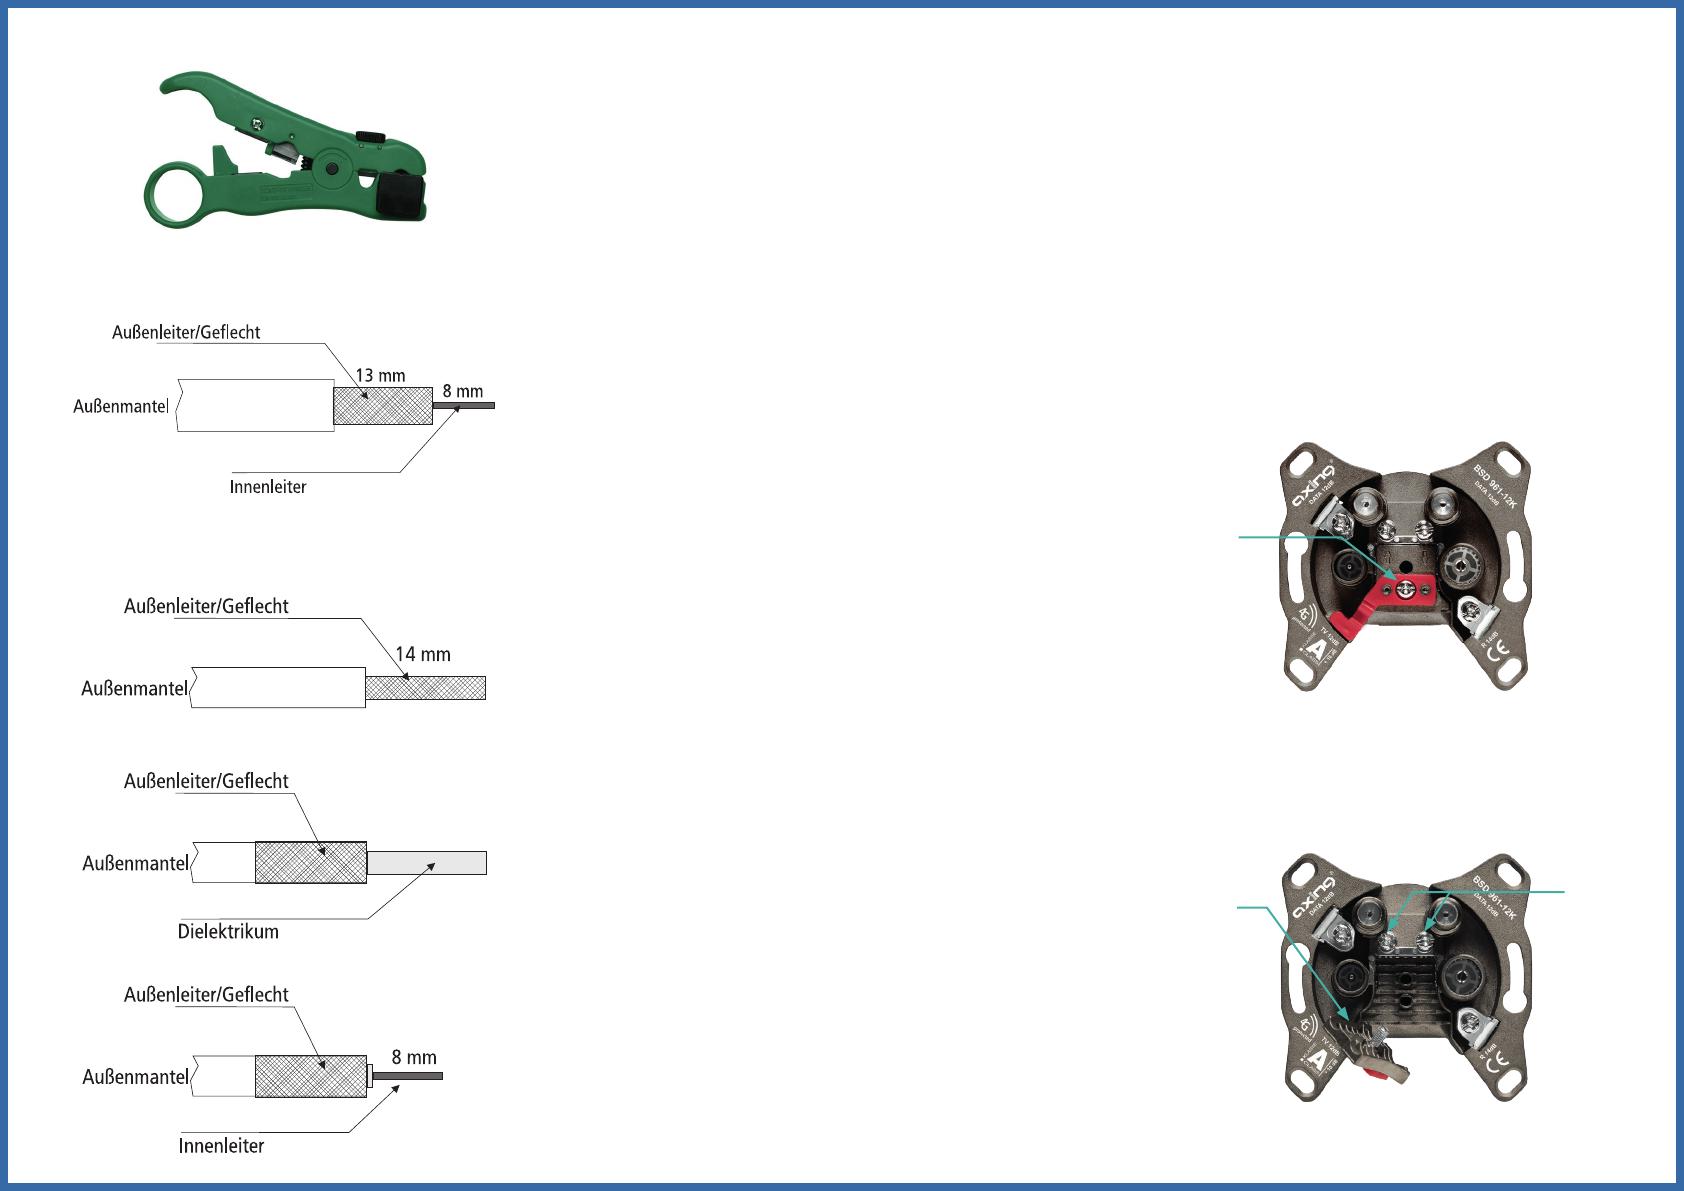
Abisolieren der Kabel: Anschluss an den Antennensteckdosen:
Anschlussdeckel (1) aufschrauben und aufklappen (2).
Kontaktschrauben (3) für die Innenleiter soweit lösen, dass sich der
Innenleiter ohne Widerstand einstecken lässt.
Abisoliertes Kabel soweit einführen, bis das Dielektrikum gegen die
Sockelkante anstößt.
Innenleiter mit Kontaktschrauben (3) befestigen.
Anschlussdeckel zuklappen und festschrauben (1).
Auf guten Kontakt der Schirmung achten!
Die Befestigungsschraube (1) soweit festziehen, dass die
Kabelklemmhalterung einen vollständigen Kontakt zum Geflecht
sicherstellt und dass der Kabelmantel durch die eingebaute
Zugentlastung sicher fixiert wird.
Isolieren Sie das Kabel wie folgt ab:
Isolieren Sie den Aussenmantel 14 mm ab.
Stülpen Sie das Geflecht nach hinten über den Außenmantel.
Entfernen Sie das Dielektrikum
Kürzen Sie den Innenleiter auf 8 mm ab.
Koaxialkabel mit Außenleiterdurchmesser von 4 bis 5 mm:
Mini-Koaxialkabel mit Außenleiterdurchmesser < 4 mm:
Verwenden Sie zum Abisolieren das AXING -Abisolierwerkzeug
BWZ 5-02. Das Abisolierwerkzeug BWZ 5-02 ist einsetzbar für einen
Dielektrikumsdurchmesser von 4,7 ±0,1 mm.
Achten Sie darauf, dass beim Abisolieren des Kabels weder das Geflecht
oder die Folie eingeschnitten oder der Innenleiter beschädigt wird!
Es dürfen sich keine Rückstände des Dielektrikums am Innenleiter befinden.
Isolieren Sie das Kabel wie folgt ab:
Aussenleiter 13 mm
Innenleiter 8 mm
Das AXING-Werkzeug BWZ 5-02 hat auf diese Werte fest eingestellte
Messer!
Das Geflecht verbleibt auf dem Dielektrikum und darf nicht
zurückgeschlagen bzw. entfernt werden!
1
2
3
Manufacturer
AXING AG
Gewerbehaus Moskau
8262 Ramsen
EEA contact address
Bechler GmbH
Am Rebberg 44
78239 Rielasingen
State of the art 2020-08-05
Technical improvements, changes in design, printing- and other errors expected.
Typen:
These stripping instructions are valid for the following AXING premium-line
antenna wall outlets:
9 BSD 21-xx Extended wideband wall outlets | CATV
9 BSD 963-xxN Multimedia antenna wall outlets | CATV | DATA
9 BSD 961-xxK Multimedia antenna wall outlets | CATV | 2 × DATA
9 BSD 960-xxN Multimedia antenna wall outlets
CATV | DATA | SAT | EN 50494/EN 50607
9 SSD 5-xx SAT antenna wall outlets
CATV | SAT | EN 50494/EN 50607
9 SSD 5-15 SAT antenna wall outlet
CATV | DATA | SAT | EN 50494/EN 50607
9 SSD 6-xx Programmable Unicable antenna wall outlets
CATV | SAT | EN 50494/EN 50607
9 SSD 7-00 SAT twin antenna wall outlet
CATV | 2 × SAT
Stripping instructions
premium-line
Antenna wall outlets
BSD 21-xx
BSD 960-xxN
BSD 961-xxK
SSD 5-15
SSD 7-00
BSD 963-xxN
SSD 5-xx
SSD 6-xx
Hereby AXING AG declares that the marked products comply with the valid
guidelines.
WEEE Nr. DE26869279 | Electrical and electronic components must not be
disposed of as residual waste, it must be disposed of separately.
Stripping of the cables: Connection to the antenna wall outlets:
Screw on the connection cover (1) and open it (2).
Loosen the contact screws (3) for the inner conductor until the inner
conductor can be inserted without resistance.
Insert the stripped cable until the dielectric touches the edge of the base.
Fasten the inner conductor with contact screws (3).
Close the connection cover and screw it tight (1).
Ensure good contact of the shielding!
Fasten the fastening screw (1) until the cable clamp bracket ensures
complete contact with the braiding and that the cable sheath is securely
fixed by the built-in strain relief.
Strip the cable as follows:
Strip 14 mm of insulation from the outer sheath.
Push the braid back over the outer sheath.
Remove the dielectric
Shorten the inner conductor to 8 mm.
Coaxial cable with outer conductor diameter
from 4 to 5 mm:
Mini Coaxial cable with outer conductor diameter < 4 mm:
Use the AXING stripping tool BWZ 5-02 for stripping. The BWZ 5-02
stripping tool can be used for a dielectric diameter of 4.7 ±0.1 mm.
When stripping the cable, make sure that neither the braiding nor the foil is
cut or the inner conductor damaged! There must be no remaining dielectric
on the inner conductor.
Strip the cable as follows:
Outer conductor 13 mm
Inner conductor 8 mm
The AXING tool BWZ 5-02 has knives permanently set to these values!
The braid remains on the dielectric and must not be folded back or
removed!
1
2
3
  • Page 1 1
  • Page 2 2
  • Page 3 3
  • Page 4 4

Axing SSD 6-10 Programmable single cable loop-through outlet 10 dB Stripping Instructions

Typ
Stripping Instructions