Parkside PDFS 1300 A1 Original Instructions Manual
- Kategorie
- Elektrowerkzeuge
- Typ
- Original Instructions Manual

DIAMOND STONE CUTTER PDFS 1300 A1
DIAMOND STONE CUTTER
Translation of the original instructions
DIAMANTSCHNEIDER
Originalbetriebsanleitung
IAN 312517

GB / IE / NI Translation of the original instructions Page 1
DE / AT / CH Originalbetriebsanleitung Seite 15
Before reading, unfold both pages containing illustrations and familiarise yourself with all functions of the
device.
Klappen Sie vor dem Lesen die beiden Seiten mit den Abbildungen aus und machen Sie sich anschließend
mit allen Funktionen des Gerätes vertraut.

A
B C

E
D
F

GB
│
IE
│
NI
│
1 ■
PDFS 1300 A1
Contents
Introduction ......................................................2
Intended use ................................................................ 2
Features ................................................................... 2
Package contents ............................................................ 2
Technical data .............................................................. 2
General power tool safety warnings .................................3
1. Work area safety .......................................................... 3
2. Electrical safety ........................................................... 3
3. Personal safety ............................................................ 4
4. Power tool use and care .................................................... 4
5. Service .................................................................. 4
Safety instructions for abrasive saws ............................................. 5
Further safety instructions for abrasive cutting applications ............................ 7
Supplementary notes ......................................................... 8
Residual risks ............................................................... 8
Working procedures .......................................................... 8
Assembly ........................................................9
Fitting/changing the cutting disc ................................................ 9
Fitting/setting the rip fence ..................................................... 9
Fitting the water inlet hose ..................................................... 9
Installing the dust extraction system ............................................. 10
Operation ......................................................10
Residual current circuit breaker .................................................10
Switching on and off ........................................................10
Setting the cutting angle ......................................................10
Setting the cutting depth ......................................................10
Handling the appliance ...................................................... 11
Maintenance and cleaning .........................................11
Disposal ........................................................11
Kompernass Handels GmbH warranty ..............................12
Service ...................................................................13
Importer ..................................................................13
Translation of the original Conformity Declaration .....................14

■ 2
│
GB
│
IE
│
NI
PDFS 1300 A1
DIAMOND STONE CUTTER
PDFS 1300 A1
Introduction
Congratulations on the purchase of your new appli-
ance. You have chosen a high-quality product. The
operating instructions are part of this product. They
contain important information about safety, usage
and disposal. Before using the product, please
familiarise yourself with all operating and safety
instructions. Use the product only as described and
for the range of applications specified. Please also
pass these operating instructions on to any future
owner.
Intended use
The appliance is designed to make cuts or slits in
mineral materials on a stable support (with or with-
out the use of water). The appliance is not suitable
for cutting wood, plastic, metal or reinforced con-
crete.
Any other usage or modification of the appliance
is deemed to be improper and carries a significant
risk of accidents. Not for commercial use.
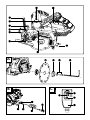
Features
ON/OFF switch
Locking screw
Dust outlet
Rip fence slot
Wing screw for cutting angle preselector
Cutting angle scale
Wing screw for rip fence slot
Screws
Rip fence
Vacuum adapter for dust extraction
Cutting disc
Clamping flange
Clamping screw/washer
Hex key
Water inlet
Accessory screw
Valve
Water inlet hose
Water connection adapter
RESET button
Indicator
Test button
Residual current circuit breaker
Spindle lock
Protective cover
Base plate
Package contents
1 diamond stone cutter
1 rip fence
1 vacuum adapter for dust extraction
1 hex key
1 cutting disc (pre-assembled)
1 water inlet hose
1 water connection adapter
1 water inlet
1 residual current circuit breaker
1 set of operating instructions
Technical data
Nominal power input: 1300 W
Nominal voltage: 230 V ∼ 50 Hz
(AC)
Thread size: M6
Rated speed: n 12000 rpm
Cutting discs: 1x Ø 125 mm x 2 mm x
Ø 22.23 mm, 9 teeth
Max. cutting depth: At 0°:
40 mm
At 45°:
26.5 mm
Protection class: II /
(double insulation)
Noise and vibration data:
Noise measurement value determined in accord-
ance with EN 60745. The A-rated noise level of
the power tool is typically:
125mm
max.40 mm
125mm
max.40 mm

GB
│
IE
│
NI
│
3 ■
PDFS 1300 A1
Noise emission value:
Sound pressure level: L
pA
= 92.3 dB (A)
Uncertainty: K
PA
= 3 dB
Sound power level: L
WA
= 103.3 dB (A)
Uncertainty: K
WA
= 3 dB
Wear ear muffs!
Total vibration value:
Cutting of concrete slabs a
h
= 5.262 m/s
2
Uncertainty K = 1.5 m/s
2
WARNING!
► The vibration level specified in these instruc-
tions has been measured in accordance
with the standardised measuring procedure
specified in EN 60745 and can be used to
make equipment comparisons. The specified
vibration emission value can also be used to
make an initial exposure estimate. The vibra-
tion level varies in accordance with the use of
the power tool and may be higher than the
value specified in these instructions in some
cases. Regular use of the power tool in such
a way may cause the user to underestimate
the vibration.
NOTE
► Try to keep the vibration loads as low as
possible. Measures to reduce the vibration
load are, e.g. wearing gloves and limiting the
working time. Wherein all states of operation
must be included (e.g. times when the power
tool is switched off and times where the
power tool is switched on but running without
load).
General power tool
safety warnings
WARNING!
► Read all safety warnings and all instructions.
Failure to follow the warnings and instructions
may result in electric shock, fire and/or serious
injury.
Save all warnings and instructions for future
reference.
The term "power tool" in the warnings refers to your
mains-operated (corded) power tool or battery-
operated (cordless) power tool.
1. Work area safety
a) Keep work area clean and well lit.
Cluttered or dark areas invite accidents.
b) Do not operate power tools in explosive atmos-
pheres, such as in the presence of flammable
liquids, gases or dust. Power tools create sparks
which may ignite the dust or fumes.
c) Keep children and bystanders away while
operating a power tool. Distractions can cause
you to lose control.
2. Electrical safety
a) Power tool plugs must match the outlet.
Never modify the plug in any way.
Do not use any adapter plugs with earthed
(grounded) power tools. Unmodified plugs and
matching outlets will reduce risk of electric shock.
b) Avoid body contact with earthed or grounded
surfaces, such as pipes, radiators, ranges and
refrigerators. There is an increased risk of elec-
tric shock if your body is earthed or grounded.
c) Do not expose power tools to rain or wet
conditions. Water entering a power tool will
increase the risk of electric shock.
d) Do not abuse the cord. Never use the cord
for carrying, pulling or unplugging the power
tool. Keep cord away from heat, oil, sharp
edges or moving parts. Damaged or entangled
cords increase the risk of electric shock.

■ 4
│
GB
│
IE
│
NI
PDFS 1300 A1
e) When operating a power tool outdoors, use
an extension cord suitable for outdoor use.
Use of a cord suitable for outdoor use reduces
the risk of electric shock.
f) If operating a power tool in a damp location
is unavoidable, use a residual current device
(RCD) protected supply. Use of an RCD reduces
the risk of electric shock.
3. Personal safety
a) Stay alert, watch what you are doing and
use common sense when operating a power
tool. Do not use a power tool while you are
tired or under the influence of drugs, alcohol
or medication. A moment of inattention while
operating power tools may result in serious
personal injury.
b) Use personal protective equipment. Always
wear eye protection. Protective equipment
such as dust mask, non-skid safety shoes, hard
hat, or hearing protection used for appropriate
conditions will reduce personal injuries.
c) Prevent unintentional starting. Ensure the
switch is in the off-position before connecting
to power source and/or battery pack, picking
up or carrying the tool. Carrying power tools
with your finger on the switch or energising power
tools that have the switch on invites accidents.
d) Remove any adjusting key or wrench before
turning the power tool on. A wrench or a key
left attached to a rotating part of the power tool
may result in personal injury.
e) Do not overreach. Keep proper footing and
balance at all times. This enables better control
of the power tool in unexpected situations.
f) Dress properly. Do not wear loose clothing or
jewellery. Keep your hair, clothing and gloves
away from moving parts. Loose clothes, jewel-
lery or long hair can be caught in moving parts.
g) If devices are provided for the connection of
dust extraction and collection facilities, ensure
these are connected and properly used. Use
of dust collection can reduce dust-related haz-
ards.
4. Power tool use and care
a) Do not force the power tool. Use the correct
power tool for your application. The correct
power tool will do the job better and safer at
the rate for which it was designed.
b) Do not use the power tool if the switch does
not turn it on and off. Any power tool that can-
not be controlled with the switch is dangerous
and must be repaired.
c) Disconnect the plug from the power source
and/or the battery pack from the power tool
before making any adjustments, changing
accessories, or storing power tools. Such
preventive safety measures reduce the risk of
starting the power tool accidentally.
d) Store idle power tools out of the reach of
children and do not allow persons unfamiliar
with the power tool or these instructions to
operate the power tool. Power tools are
dangerous in the hands of untrained users.
e) Maintain power tools. Check for misalignment
or binding of moving parts, breakage of parts
and any other condition that may affect the
power tool’s operation. If damaged, have the
power tool repaired before use. Many acci-
dents are caused by poorly maintained power
tools.
f) Keep cutting tools sharp and clean. Properly
maintained cutting tools with sharp cutting
edges are less likely to bind and are easier to
control.
g) Use the power tool, accessories and tool bits
etc. in accordance with these instructions,
taking into account the working conditions
and the work to be performed. Use of the
power tool for operations different from those
intended could result in a hazardous situation.
5. Service
a) Have your power tool serviced by a qualified
repair person using only identical replacement
parts. This will ensure that the safety of the
power tool is maintained.

GB
│
IE
│
NI
│
5 ■
PDFS 1300 A1
Safety instructions for abrasive saws
a) The blade guard, which is a part of the power
tool, must be attached securely and set in a
way that ensures maximum safety, i.e. the
smallest possible amount of the grinding tool
is exposed to the operator. Ensure that you
and anyone else in the vicinity remain outside
of the range of the rotating grinding disc. The
blade guard is designed to protect the operator
from fragments and accidental contact with the
grinding tool.
b) Use only diamond-coated cutting discs for
your power tool. Just because you can attach
the accessories to your power tool does not
guarantee they are safe to use.
c) The permissible speed of the accessory tool
used must be at least as high as the maximum
speed specified for the power tool. Accessories
that rotate faster than the permissible rate can
break and throw pieces into the air.
d) Grinding tools should only be used for the
recommended applications. For example:
Never grind with the side surface of a cutting
disc. Cutting discs are designed to remove
material with the edge of the disc. Any lateral
application of force on these grinding tools can
lead to a breakage.
e) Always use an undamaged clamping flange
of the correct size and shape for the selected
grinding disc. Suitable flanges support the
grinding disc and reduce the risk of a disc
breakage.
f) The external diameter and thickness of the
attachment part used must comply with the
dimensions of the power tool. Incorrectly
dimensioned accessory tools cannot be suffi-
ciently shielded or controlled.
g) Grinding discs and flanges must fit precisely
onto the grinding spindle of your power tool.
Accessory tools which do not fit precisely on
the grinding spindle of the power tool will rotate
unevenly, vibrate severely and can lead to a
loss of control.
h) Do not use damaged grinding discs. Check
the grinding discs for chips and cracks before
each use. If the power tool or grinding disc is
dropped, check to see if either is damaged,
or use an undamaged grinding disc. After
checking and inserting the grinding disc,
ensure that you and any other people in the
vicinity remain outside of the range of the
rotating grinding disc and allow the tool to
rotate at maximum speed for one minute.
Damaged grinding discs usually break during
this test period.
i) Wear personal protective equipment.
Depending on the application, ensure that
you use full face protection, eye protection
or goggles. If required, use a dust mask, ear
muffs, protective gloves or a special apron to
protect you from grindings and material par-
ticles. Protect your eyes from flying debris that
may be created during certain applications.
Dust or filter masks must be used to filter any
dust created by the application. Long-term expo-
sure to loud noise can cause a hearing loss.
j) Ensure that other people remain at a safe dis-
tance to your workspace. Anyone who enters
the workspace must wear personal protective
equipment. Fragments of the workpiece or bro-
ken accessory tools can fly off and cause injury
– even outside the immediate working area.
k) Hold the appliance only by its insulated grip-
ping surfaces when you are performing work
during which the power tool may hit hidden
power lines or its own power cord. Contact
with a live cable can also make metal parts of
the appliance live and could result in an electric
shock.
l) Keep the power cord away from rotating
tools. If you lose control of the appliance, the
cord may get cut or caught and your hand or
arm could get caught in the rotating accessory
tool.
m) Never remove the power tool before the
accessory tool has come to a complete stop.
The rotating accessory tool could come into
contact with the surface and cause you to lose
control of the power tool.

■ 6
│
GB
│
IE
│
NI
PDFS 1300 A1
n) Do not leave the power tool running whilst
carrying it. Accidental contact between your
clothing and the rotating accessory tool could
cause your clothing to get caught and the ac-
cessory tool to penetrate a part of your body.
o) Clean the ventilation slots of your power tool
regularly. The engine fan draws dust into the
housing and a strong accumulation of metal
dust can cause electrical hazards.
p) Do not use the power tool in the vicinity of
flammable materials. Sparks can ignite such
materials.
q) It may be necessary to use water or some
other coolant when operating this appliance.
It may therefore only be connected to circuits
protected by residual current circuit breakers.
Check that the residual current circuit breaker
is functioning correctly on a regular basis.
Working with equipment that uses water or
other coolants may result in an electric shock
or fatal electrocution if no residual current
circuit breaker is used.
r) Keep your hands away from the cutting area
and the cutting disc. Keep your other hand on
the additional handle or the motor housing.
If you hold the machine with both hands, the
cutting disc cannot cause injuries to your hands.
s) Never reach under the workpiece. The guard
cannot protect you from the cutting wheel be-
low the workpiece.
t) Never hold the workpiece you are cutting in
your hands or on your leg. Secure the work-
piece on a stable platform. It is important to
properly support the workpiece to protect your
body, prevent the cutting disc from jamming and
to maintain control of the tool.
u) Never use damaged or incorrect washers or
a damaged or incorrect bolt for the cutting
disc. The washers and bolts for the cutting disc
are specially designed for your machine to
achieve optimum performance and reliability.
v) Do not unplug the power cord if it or the outlet
has become wet. First switch off the power by
removing the fuse or via the circuit breaker of
the circuit in question. Afterwards, you can pull
out the plug and check the connections for any
traces of water.
WARNING!
► To avoid the risk of electric shock, keep all
connections dry and away from the ground.
Do not touch the power plug with wet hands.
► The cable set is equipped with a portable
residual current device. For additional safety,
sockets with integrated portable residual
current devices are available. When using an
extension cord, always plug it into an outlet
protected by a portable residual current
device.
► Always plug an extension cord into an outlet
protected by a portable residual current
device.
► Never use the appliance with salt water or
conductive liquids.
► Grooves and slots in load-bearing walls are
subject to DIN 1053-1 and/or country-spe-
cific regulations. These regulations must be
observed under all circumstances. Before
starting work, contact the responsible structur-
al engineer, architect or site manager.
► Approved cutting disc designs:
segmented diamond discs with maximum
slots between the segments of 10 mm, only
with negative cutting angle.

GB
│
IE
│
NI
│
7 ■
PDFS 1300 A1
Further safety instructions for
abrasive cutting applications
Kickback and corresponding safety instruc-
tions
Kickback – causes and corresponding safety
instructions
▯ Kickback is a sudden reaction caused when a
rotating grinding disc catches or jams. Catching
or jamming causes the rotating accessory tool
to stop abruptly. If this happens, an uncontrolled
power tool turns rapidly against the direction
of rotation of the accessory tool caught in the
blockage.
▯ If, for example, a grinding disc catches or jams,
the edge of the grinding disc that is projecting
into the workpiece can get caught and break
off the grinding disc or cause a kickback. The
grinding disc can then fly in the direction of the
operator or away from him, depending on the
direction of rotation of the disc at the blockage.
This can also break grinding discs.
A kickback is caused by improper or incorrect use
of the power tool. This can be avoided by taking
proper precautions as described below.
a) Hold the power tool firmly in both hands
and position your body and arms so they
can absorb the force of a kickback. Always
use the auxiliary handle, if available, so that
you have the maximum possible control over
the kickback force or reaction forces at full
speed. By taking adequate precautions, the
operator can stay in control of the kickback and
reaction forces.
b) Never hold your hand close to a rotating
accessory tool. The accessory tool can jump
out of your hand if there is a kickback.
c) Avoid the area in front of and behind the
rotating cutting disc. The kickback will force
the electrical tool in the opposite direction to the
direction of rotation of the grinding disc at the
blockage.
d) Take special care when working near corners,
sharp edges, etc. Avoid allowing the accessory
tool to bounce back from the workpiece or
jam. The rotating accessory tool is more likely to
jam in corners or sharp edges or if it bounces.
This can cause a loss of control or kickback.
e) Do not use chained or toothed cutting discs
or segmented diamond discs with slots more
than 10 mm wide. Such accessories often
cause a kickback or loss of control over the
power tool.
f) Avoid cutting disc jams or excessive contact
pressure. Do not make any excessively deep
cuts. Overloading the cutting disc increases the
stress and likelihood of tilting or blocking and
thus the possibility of a kickback or a breakage
of the grinding tool.
g) If the cutting disc jams or you stop working,
switch the tool off and hold it steady until the
disc has completely stopped turning. Never
attempt to pull a rotating cutting disc out of a
cut. This could lead to kickback. Identify and
remove the cause of the jam.
h) Do not switch the power tool back on as long
as it is in the workpiece. Allow the cutting disc
to reach its full speed before you carefully
continue the cut. Otherwise, the disc may jam,
jump out of the workpiece or cause kickback.
i) Support panels or large workpieces to re-
duce the risk of the cutting disc jamming and
causing a kickback. Large workpieces can
bend under their own weight. The workpiece
must be supported on both sides, namely in the
vicinity of the cut and also at the edge.

■ 8
│
GB
│
IE
│
NI
PDFS 1300 A1
j) Be particularly careful when making pocket
cuts into existing walls or other obscured areas.
The inserted cutting disc may cut into gas or
water pipes, electrical wiring or other objects
that can cause a kickback.
k) Position your body on one of the two sides of
the cutting disc, but not in line with the cutting
disc.
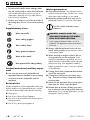
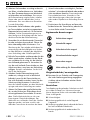
Supplementary notes
Wear ear muffs!
Wear safety goggles!
Wear safety shoes!
Wear protective gloves!
Wear a dust mask!
Not approved for side grinding
Original accessories/auxiliary equip-
ment
■ Use only the accessories and additional
equipment that are specified in the operating
instructions and are compatible with the
appliance.
Residual risks
Despite compliance with the applicable safety reg-
ulations and the use of protective devices, certain
risks cannot be avoided. These are the following:
■ Hearing loss
■ Risk of injury due to flying fragments
■ Risk of burns due to accessories becoming hot
during operation
■ Risk of injury due to prolonged use.
Working procedures
■ Secure the workpiece. Use clamps/a vice to
hold the workpiece firmly in place. This is much
safer than simply holding it in your hand.
■ Materials containing asbestos may not be
processed. Asbestos is a known carcinogen.
Tip! This symbol indicates proper
behaviour.
DANGER! ALWAYS GUIDE THE
APPLIANCE THROUGH THE WORK-
PIECE IN REVERSE ROTATION.
► In the opposite direction there is a risk of
kickback. The appliance can be pushed out
of the cut.
■ Always hold the appliance firmly with two
hands while working. Ensure that your stance
is secure and stable.
■ When working on angled surfaces, do not
exert great force on the workpiece. If the
rotational speed drops significantly, you must
reduce the pressure exerted to allow safe and
effective working. If the appliance suddenly
brakes completely or jams, it must be switched
off immediately.
■ Cutting: Work with a moderate feed and do
not tilt the cutting disc.
■ Cutting discs become very hot when work-
ing – let them cool down completely before
touching them.
■ Never use the appliance for purposes other
than those for which it was designed.
■ Remain alert at all times! Always pay atten-
tion to what you are doing and act with com-
mon sense. Do not use the appliance if you are
distracted or feeling unwell.

GB
│
IE
│
NI
│
9 ■
PDFS 1300 A1
Assembly
Fitting/changing the cutting disc
WARNING! RISK OF INJURY!
■ Switch the appliance off and remove the
power plug before starting any work on the
appliance.
NOTE
■ Only use diamond cutting discs with diame-
ters corresponding to the inscriptions on the
appliance.
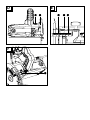
♦ Set the cutting depth (using the locking screw
) to the minimum position.
♦ Actuate the spindle lock
and turn the clamping
screw until the spindle lock clicks into
place. Loosen the clamping screw / washer
with the hex key . Now remove the clamping
screw / washer
and the clamping flange
(see also fold-out page, fig. A).
♦ Remove the cutting disc
.
♦ Fitting a cutting disc
is carried out in the
reverse order.
♦ Actuate the spindle lock
and turn the clamping
screw until the spindle lock clicks into
place. Use the hex key
to firmly tighten the
clamping screw
.
WARNING!
► The arrow on the cutting disc
must match
the direction of rotation arrow (running direc-
tion, marked on the appliance).
■ Make sure that the cutting disc
is suitable for
the speed of the tool.
Fitting/setting the rip fence
♦ Undo the wing screw and insert the rip fence
into the rip fence slot .
♦ Set the desired cutting width using the scale on
the rip fence
and the rip fence slot . The
rip fence slot serves as an orientation mark
(see also fold-out page, fig. E).
♦ Retighten the wing screw
.
Fitting the water inlet hose
WARNING!
► Check the correct function of the residual
current circuit breaker
before each use!
► Work with the appliance in a horizontal
position and not overhead to prevent water
from entering the machine.
► Before each use, check the water supply
system for leaks.
CAUTION!
► Do not connect the appliance to a water
supply system with more than 6 bar!
► Only use water as coolant.
♦ Set the cutting depth (using the locking screw
)
to the minimum position.
♦ Using a Phillips screwdriver and the accessory
screw supplied
, fit the water inlet to the
housing (see also fold-out page, fig. B). Please
note that the water inlet
must be guided
around the cutting depth adjustment. The two
water outlets of the water inlet
must be locat-
ed on the side of the cutting disc
(see also
fold-out page, fig. F).
♦ Push the water inlet hose
into the water
inlet
.
♦ Insert the other end of the water inlet hose
into the water connection adapter
.
♦ Connect the water connection adapter
to a
water hose with a suitable diameter of approx.
19 mm. Check for a tight fit by pulling on the
water hose.
♦ Open the valve
on the water inlet
.
♦ Carefully
adjust the amount of water at the water
source so that there is always enough water on
the cutting disc
and the cutting area.
♦ Disconnect the water supply after completion
of the work.

■ 10
│
GB
│
IE
│
NI
PDFS 1300 A1
Installing the dust extraction system
On delivery, the connection point of the adapter
for dust extraction is closed off. To install the
dust extractor, proceed as follows:
♦ Remove the screws
from the housing and
remove the protective cover
.
♦ Using the screws provided, fasten the adapter
for dust extraction onto the dust outlet .
♦ Connect an approved dust and chip extraction
device.
Operation
WARNING!
► Prevent dripping water from dripping along
the power cord into the power outlet or plug.
To do this, form a loop from the mains cable
underneath the mains socket. This prevents
any dripping water from getting into the
mains socket.
Residual current circuit breaker
WARNING!
► Check the correct function of the residual
current circuit breaker before each use
!
♦ Connect the residual current circuit breaker
to the power grid.
♦ Press the reset button
until the indicator
is red.
♦ Press the Test button
until the indicator
is
black. This shows that the test was successful.
If the indicator
continues to indicate red, the
residual current circuit breaker
is defective
and must be repaired by qualified personnel!
WARNING!
► Do not operate a appliance with faulty circuit
breakers!
♦ After a successful test, press the reset button
again
to switch the appliance back on.
Switching on and off
WARNING!
► To avoid the risk of electric shock, make sure
that no water gets into the appliance. Do not
touch the power plug with wet hands.
CAUTION!
► Wait until the appliance has reached the
maximum speed and use a low feed rate to
achieve clean cuts.
Switching on:
♦ Press the ON/OFF switch
.
Switching off:
♦ Release the ON/OFF switch
.
Setting the cutting angle
You can change the cutting angle using the cutting
angle scale .
■ Undo the wing screw of the cutting angle pre-
selector
. Set the desired angle on the cutting
angle scale
and retighten the wing screw .
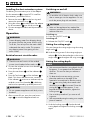
Setting the cutting depth
NOTE
► We recommend that the cutting depth should
be approx. 3 mm greater than the material
thickness. This ensures that you achieve a
clean cut.
► To determine the correct setting, you can
place the machine on the edge of the
material to be machined so that the cutting
disc
can swing freely downwards when
the locking screw
is loosened. Once the
cutting disc protrudes approx. 3 mm
beyond the material thickness, tighten the
locking screw .
► Use a similar procedure if you want to mill
a groove.
► We recommend testing the setting on a sample
piece of material.
♦ Undo the locking screw
. Set the desired
cutting depth and tighten the locking screw
again.

GB
│
IE
│
NI
│
11 ■
PDFS 1300 A1
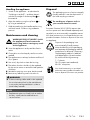
Handling the appliance
1. Switch on the appliance – as described in
"Switching on and off" – and then place it
with the front edge of the base plate on
the material.
2. Align the machine using the rip fence
or
by using a marked line.
3. Hold the machine by the handle and housing
with both hands. Guide it using moderate
pressure.
Maintenance and cleaning
WARNING! RISK OF INJURY! Switch
the appliance off and remove the
power plug before starting any work
on the appliance.
■ Store the appliance in a dry and dust-free lo-
cation.
■ Cutting discs must be kept dry and must not be
stacked.
■ The appliance must always be clean and free of
oil or grease.
■ Use a soft, dry cloth to clean the housing.
■ The carbon brushes should only be replaced
by the service centre or an authorised specialist
workshop.
■ Ventilation openings must never be obstructed.
■ Remove any adhering swarf with a brush.
WARNING!
■ If the connecting cable needs to be replaced,
this must be carried out by the manufacturer
or an authorised representative in order to
avoid safety hazards.
NOTE
► Replacement parts not listed (such as carbon
brushes, switch) can be ordered via our
service hotline.
Disposal
The packaging consists of environmentally
friendly material. It can be disposed of in
the local recycling containers.
Do not dispose of power tools in
your normal domestic waste!
European Directive 2012/19/EU requires that
worn-out power tools be collected separately and
recycled in an environmentally compatible manner.
Your local community or municipal authorities can
provide information on how to dispose of the worn-
out appliance.
Dispose of the packaging in an
environmentally friendly manner.
Note the labelling on the packaging
and separate the packaging material
components for disposal if necessary.
The packaging material is labelled
with abbreviations (a) and numbers
(b) with the following meanings:
1–7: plastics,
20–22: paper and cardboard,
80–98: composites
Your local community or municipal
authorities can provide information on
how to dispose of the worn-out product.

■ 12
│
GB
│
IE
│
NI
PDFS 1300 A1
Kompernass Handels GmbH
warranty
Dear Customer,
This appliance has a 3-year warranty valid from
the date of purchase. If this product has any faults,
you, the buyer, have certain statutory rights. Your
statutory rights are not restricted in any way by the
warranty described below.
Warranty conditions
The warranty period starts on the date of purchase.
Please keep your receipt in a safe place. This will
be required as proof of purchase.
If any material or manufacturing fault occurs within
three years of the date of purchase of the product,
we will either repair or replace the product for you
or refund the purchase price (at our discretion).
This warranty service requires that you present the
defective appliance and the proof of purchase (re-
ceipt) within the three-year warranty period, along
with a brief written description of the fault and of
when it occurred.
If the defect is covered by the warranty, your prod-
uct will either be repaired or replaced by us. The
repair or replacement of a product does not signify
the beginning of a new warranty period.
Warranty period and statutory claims for
defects
The warranty period is not prolonged by repairs
effected under the warranty. This also applies to
replaced and repaired components. Any damage
and defects present at the time of purchase must
be reported immediately after unpacking. Repairs
carried out after expiry of the warranty period shall
be subject to a fee.
Scope of the warranty
This appliance has been manufactured in accord-
ance with strict quality guidelines and inspected
meticulously prior to delivery.
The warranty covers material faults or production
faults. The warranty does not extend to product
parts subject to normal wear and tear or to fragile
parts which could be considered as consumable
parts such as switches, batteries or parts made of
glass.
The warranty does not apply if the product has
been damaged, improperly used or improper-
ly maintained. The directions in the operating
instructions for the product regarding proper use
of the product are to be strictly followed. Uses
and actions that are discouraged in the operating
instructions or which are warned against must be
avoided.
This product is intended solely for private use and
not for commercial purposes. The warranty shall
be deemed void in cases of misuse or improper
handling, use of force and modifications / repairs
which have not been carried out by one of our
authorised Service centres.

GB
│
IE
│
NI
│
13 ■
PDFS 1300 A1
Warranty claim procedure
To ensure quick processing of your case, please
observe the following instructions:
■ Please have the till receipt and the item number
(e.g.IAN12345) available as proof of purchase.
■ You will find the item number on the type plate
on the product, an engraving on the product,
on the front page of the operating instructions
(below left) or on the sticker on the rear or
bottom of the product.
■ If functional or other defects occur, please
contact the service department listed either by
telephone or by e-mail.
■ You can return a defective product to us free of
charge to the service address that will be pro-
vided to you. Ensure that you enclose the proof
of purchase (till receipt) and information about
what the defect is and when it occurred.
You can download these instructions
along with many other manuals,
product videos and installation
software at www.lidl-service.com.
This QR code will take you directly
to the Lidl service page (www.lidl-service.com)
where you can open your operating instructions by
entering the item number (IAN) 123456.
Service
Service Great Britain
Tel.: 0800 404 7657
E-Mail: kom[email protected]
Service Ireland
Tel.: 1890 930 034
(0,08 EUR/Min., (peak))
(0,06 EUR/Min., (off peak))
E-Mail: kom[email protected]
IAN 312517
Importer
Please note that the following address is not the
service address. Please use the service address
provided in the operating instructions.
KOMPERNASS HANDELS GMBH
BURGSTRASSE 21
DE - 44867 BOCHUM
GERMANY
www.kompernass.com

■ 14
│
GB
│
IE
│
NI
PDFS 1300 A1
Translation of the original Conformity Declaration
We, KOMPERNASS HANDELS GMBH, document officer: Mr Semi Uguzlu, BURGSTR. 21,
DE - 44867 BOCHUM, GERMANY, hereby declare that this product complies with the
following standards, normative documents and EC directives:
Machinery Directive
(2006/42/EC)
Electromagnetic Compatibility
(2014/30/EU)
RoHS Directive
(2011/65/EU)*
* The manufacturer bears the full responsibility for compliance with this conformity declaration. The object
of the declaration described above complies with the requirements of the Directive 2011/65/EU of
the European Parliament and Council of 8 June 2011 on the limitations of use of certain dangerous
substances in electrical and electronic appliances.
Applied harmonised standards:
EN 60745-1:2009/A11:2010
EN 60745-2-22:2011/A11:2013
EN 55014-1:2017
EN 55014-2:2015
EN 61000-3-2:2014
EN 61000-3-3:2013
Type designation of machine: Diamond stone cutter PDFS 1300 A1
Year of manufacture: 01 - 2019
Serial number: IAN 312517
Bochum, 23/01/2019
Semi Uguzlu
- Quality Manager -
We reserve the right to make technical changes in the context of further product development.

DE
│
AT
│
CH
│
15 ■
PDFS 1300 A1
Inhaltsverzeichnis
Einleitung .......................................................16
Bestimmungsgemäßer Gebrauch ...............................................16
Ausstattung ................................................................16
Lieferumfang ............................................................... 16
Technische Daten ...........................................................16
Allgemeine Sicherheitshinweise für Elektrowerkzeuge .................17
1. Arbeitsplatz-Sicherheit ..................................................... 17
2. Elektrische Sicherheit ...................................................... 17
3. Sicherheit von Personen ....................................................18
4. Verwendung und Behandlung des Elektrowerkzeugs ............................. 18
5. Service ................................................................. 19
Sicherheitshinweise für Trennschleifmaschinen .....................................19
Weitere Sicherheitshinweise für Trennschleifanwendungen ........................... 21
Ergänzende Anweisungen ....................................................22
Restrisiken ................................................................. 22
Arbeitshinweise. . . . . . . . . . . . . . . . . . . . . . . . . . . . . . . . . . . . . . . . . . . . . . . . . . . . . . . . . . . . . 23
Montage .......................................................23
Trennscheibe montieren / wechseln ............................................. 23
Parallelanschlag montieren / einstellen ...........................................23
Wasser-Zulaufschlauch montieren .............................................. 24
Staubabsaugung montieren ...................................................24
Bedienung ......................................................24
Fehlerstromschutzschalter ..................................................... 24
Ein- und ausschalten ......................................................... 25
Schnittwinkel einstellen .......................................................25
Schnitttiefe einstellen ........................................................ 25
Handhabung des Gerätes ....................................................25
Wartung und Reinigung ...........................................25
Entsorgung .....................................................26
Garantie der Kompernaß Handels GmbH ............................26
Service .........................................................27
Importeur ......................................................27
Original-Konformitätserklärung ....................................28

■ 16
│
DE
│
AT
│
CH
PDFS 1300 A1
DIAMANTSCHNEIDER
PDFS 1300 A1
Einleitung
Wir beglückwünschen Sie zum Kauf Ihres neuen
Gerätes. Sie haben sich damit für ein hochwertiges
Produkt entschieden. Die Bedienungsanleitung ist
Teil dieses Produkts. Sie enthält wichtige Hinweise
für Sicherheit, Gebrauch und Entsorgung. Machen
Sie sich vor der Benutzung des Produkts mit allen
Bedien- und Sicherheitshinweisen vertraut. Benut-
zen Sie das Produkt nur wie beschrieben und für
die angegebenen Einsatzbereiche. Händigen Sie
alle Unterlagen bei Weitergabe des Produkts an
Dritte mit aus.
Bestimmungsgemäßer Gebrauch
Das Gerät ist dafür bestimmt bei stabiler Auflage
Schnitte oder Schlitze in mineralischen Materialien
mit oder ohne Verwendung von Wasser auszu-
führen. Das Gerät ist nicht geeignet für Schnitte in
Holz, Kunstoff, Metall oder Stahlbeton.
Jede andere Verwendung oder Veränderung des
Gerätes gilt als nicht bestimmungsgemäß und birgt
erhebliche Unfallgefahren. Nicht zum gewerbli-
chen Gebrauch.
Ausstattung
EIN-/AUS-Schalter
Feststellschraube
Staubauswurf
Parallelanschlagaufnahme
Flügelschraube für Schnittwinkelvorwahl
Schnittwinkelskala
Flügelschraube für Parallelanschlagaufnahme
Schrauben
Parallelanschlag
Adapter für Staubabsaugung
Trennscheibe
Spannflansch
Spannschraube / Unterlegscheibe
Innensechskantschlüssel
Wasserzulauf
Zubehörschraube
Ventil
Wasser-Zulaufschlauch
Wasseranschlussadapter
Reset-Taste
Indikator
Test-Taste
Fehlerstromschutzschalter
Spindelarretierung
Schutzabdeckung
Grundplatte
Lieferumfang
1 Diamantschneider
1 Parallelanschlag
1 Adapter zur Staubabsaugung
1 Innensechskantschlüssel
1 Trennscheibe (vormontiert)
1 Wasser-Zulaufschlauch
1 Wasseranschlussadapter
1 Wasserzulauf
1 Fehlerstromschutzschalter
1 Betriebsanleitung
Technische Daten
Nennaufnahme: 1300 W
Nennspannung: 230 V ∼ 50 Hz
(Wechselstrom)
Gewindemaß: M6
Bemessungsdrehzahl: n 12000 min
-1
Trennscheiben: 1x Ø 125 mm x 2 mm x
Ø 22,23 mm, 9 Zähne
Max. Schnitttiefe: Bei 0°:
40 mm
Bei 45°:
26,5 mm
Schutzklasse: II /
(Doppelisolierung)
Geräusch- und Vibrationsinformationen:
Messwert für Geräusch ermittelt entsprechend
EN 60745. Der A-bewertete Geräuschpegel des
Elektrowerkzeugs beträgt typischerweise:
125mm
max.40 mm
125mm
max.40 mm
Seite wird geladen ...
Seite wird geladen ...
Seite wird geladen ...
Seite wird geladen ...
Seite wird geladen ...
Seite wird geladen ...
Seite wird geladen ...
Seite wird geladen ...
Seite wird geladen ...
Seite wird geladen ...
Seite wird geladen ...
Seite wird geladen ...
Seite wird geladen ...
-
 1
1
-
 2
2
-
 3
3
-
 4
4
-
 5
5
-
 6
6
-
 7
7
-
 8
8
-
 9
9
-
 10
10
-
 11
11
-
 12
12
-
 13
13
-
 14
14
-
 15
15
-
 16
16
-
 17
17
-
 18
18
-
 19
19
-
 20
20
-
 21
21
-
 22
22
-
 23
23
-
 24
24
-
 25
25
-
 26
26
-
 27
27
-
 28
28
-
 29
29
-
 30
30
-
 31
31
-
 32
32
-
 33
33


Parkside PDFS 1300 A1 Original Instructions Manual
- Kategorie
- Elektrowerkzeuge
- Typ
- Original Instructions Manual
in anderen Sprachen
- English: Parkside PDFS 1300 A1
Verwandte Artikel
-
Parkside PTS 500 A1 Bedienungsanleitung
-
Parkside PTS 20-Li A1 Translation Of The Original Instructions
-
Parkside PTS 710 A2 Translation Of The Original Instructions
-
-
-
-
-
-
Parkside PWSA 20-Li A1 Bedienungsanleitung
-
Parkside PWS 125 F5 Translation Of The Original Instructions
Andere Dokumente
-
Rothenberger Angle grinder RO AG 8000 Benutzerhandbuch
-
Ferm AGM1029 Benutzerhandbuch
-
Ferm WCM1001P Wall Chaser Benutzerhandbuch
-
Metabo CS 23-355 Bedienungsanleitung
-
Vonroc WC503AC Wall Chaser Benutzerhandbuch
-
BLACK+DECKER CS355 Benutzerhandbuch
-
Milwaukee WCE 65 Original Instructions Manual
-
Husqvarna BMG 444 Benutzerhandbuch
-
Husqvarna PG 400 Bedienungsanleitung
-