Parkside PMTS 180 A1 Translation Of The Original Instructions
- Typ
- Translation Of The Original Instructions

IAN 292200
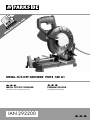
METAL CUT-OFF GRINDER PMTS 180 A1
METAL CUT-OFF GRINDER
Translation of the original instructions
TRENNSCHLEIFER
Originalbetriebsanleitung

GB / IE / NI Translation of the original instructions Page 1
DE / AT / CH Originalbetriebsanleitung Seite 15
Before reading, unfold the page containing the illustrations and familiarise yourself with all functions of
the device.
Klappen Sie vor dem Lesen die Seite mit den Abbildungen aus und machen Sie sich anschließend mit allen
Funktionen des Gerätes vertraut.

A
C
B
14a

PMTS 180 A1
GB
│
IE
│
NI
│
1 ■
Contents
Introduction ......................................................2
Intended use ................................................................ 2
Features ................................................................... 2
Package contents ............................................................ 2
Technical data .............................................................. 2
General Power Tool Safety Warnings ................................3
1. Work area safety .......................................................... 3
2. Electrical safety ........................................................... 4
3. Personal safety ............................................................ 4
4. Power tool use and care .................................................... 5
5. Service .................................................................. 5
Safety instructions for abrasive cutting appliances ......................5
1) Safety instructions for abrasive cutting appliances ................................ 5
2) Kickback and corresponding safety instructions .................................. 6
Further safety instructions for abrasive cutters .........................7
Original accessories/auxiliary equipment ......................................... 9
Before use .......................................................9
Setting up the appliance ...................................................... 9
Removing / inserting transport safety devices ..................................... 10
Operation ......................................................10
Switching on and off ........................................................10
Setting the cutting depth ......................................................10
Changing the cutting disc .....................................................10
Clamping the workpiece .....................................................11
Cleaning and maintenance ........................................11
Disposal ........................................................11
Kompernass Handels GmbH warranty ..............................11
Service .........................................................13
Importer .......................................................13
Translation of the original Conformity Declaration .....................13

PMTS 180 A1
■ 2
│
GB
│
IE
│
NI
METAL CUT-OFF GRINDER
PMTS 180 A1
Introduction
Congratulations on the purchase of your new appli-
ance. You have chosen a high-quality product. The
operating instructions are part of this product. They
contain important information about safety, usage
and disposal. Before using the product, please
familiarise yourself with all operating and safety
instructions. Use the product only as described and
for the range of applications specified. Please also
pass these operating instructions on to any future
owner.
Intended use
The cut-off grinder is intended as a floor-mounted
appliance for making straight longitudinal cuts at
up to 45° using cutting discs in steel, nonferrous
metals, cast iron and iron profiles without the use
of water.
Any other uses of or modifications to the machine
are deemed to be improper usage and may result
in serious physical injury.
Not for commercial use.
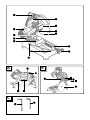
Features
ON/OFF switch
Clamping flange (inside)
Locking pin
Cutting disc
Rapid adjustment
Vice
Drillholes
Cutting angle adjustment
Transport safety device
Cutting depth adjustment
Motor unit
Handle
Figure A:
Pendulum cover
Protective cover
14a
Integrated carrying handle
Mounting screws
Figure B:
Clamping flange (outside)
Plain washer
Fixing nut
Figure C:
Hex key (large)
Hex key (small)
Package contents
1 metal cut-off grinder PMTS 180 A1
1 cutting disc Ø 180 mm (pre-fitted)
2 Hex keys
1 set of operating instructions
Technical data
Rated voltage: 230 V ∼, 50 Hz
(alternating current)
Rated power consumption: 1280 W
Rated idle speed: n
0
7700 rpm
Cutting disc mounting: ø 22.23 mm
Thread size: M8
Maximum speed
of the cutting disc:
8500 rpm

PMTS 180 A1
GB
│
IE
│
NI
│
3 ■
Working speed
of the cutting disc: max. 80 m / s
Cutting disc diameter: Ø 180 mm
Cutting disc thickness: 1.6 mm
Inclined cuts: 0° – 45°
max. cut depth: 50 mm at 0°
mitre angle
Protection class: II /
(double insulation)
Noise emission value:
Noise measurement value determined in accor-
dance with EN 62841. The A-rated noise level of
the power tool is typically as follows:
Sound pressure level: L
PA
= 92.7 dB(A)
Uncertainty: K
PA
= 3 dB
Sound power level: L
WA
= 105.7 dB (A)
Uncertainty: K
WA
= 3 dB
Wear hearing protection!
WARNING!
► Depending on the manner in which the
power tool is being used and, in particular,
the kind of workpiece that is being worked,
the vibration and noise emission values can
deviate and may sometimes exceed the val-
ues given in these instructions. Regular use of
the power tool in this way may cause the user
to underestimate the vibration. Try to keep the
vibration loads as low as possible. Measures
to reduce the vibration load are, e.g. wearing
gloves and limiting the working time. Wherein
all states of operation must be included (e.g.
times when the power tool is switched off and
times where the power tool is switched on but
running without load).
General Power Tool
Safety Warnings
WARNING!
► Read all safety warnings, instructions, illust-
rations and specifications provided with this
power tool. Failure to follow all instructions
listed below may result in electric shock, fire
and/or serious injury.
Save all warnings and instructions for future
reference.
The term „power tool“ in the warnings refers to
your mains-operated (corded) power tool or bat-
tery-operated (cordless) power tool.
1. Work area safety
a) Keep work area clean and well lit. Cluttered
or dark areas invite accidents.
b) Do not operate power tools in explosive
atmospheres, such as in the presence of
flammable liquids, gases or dust. Power tools
create sparks which may ignite the dust or
fumes.
c) Keep children and bystanders away while
operating a power tool. Distractions can cause
you to lose control.
50mm

PMTS 180 A1
■ 4
│
GB
│
IE
│
NI
2. Electrical safety
a) Power tool plugs must match the outlet. Never
modify the plug in any way. Do not use any
adapter plugs with earthed (grounded)
power tools. Unmodified plugs and matching
outlets will reduce risk of electric shock.
b) Avoid body contact with earthed or ground-
ed surfaces, such as pipes, radiators, ranges
and refrigerators. There is an increased risk of
electric shock if your body is earthed or grounded.
c) Do not expose power tools to rain or wet
conditions. Water entering a power tool will
increase the risk of electric shock.
d) Do not abuse the cord. Never use the cord
for carrying, pulling or unplugging the power
tool. Keep cord away from heat, oil, sharp
edges or moving parts. Damaged or entangled
cords increase the risk of electric shock.
e) When operating a power tool outdoors, use
an extension cord suitable for outdoor use.
Use of a cord suitable for outdoor use reduces
the risk of electric shock.
f) If operating a power tool in a damp location
is unavoidable, use a residual current device
(RCD) protected supply. Use of an RCD reduc-
es the risk of electric shock.
3. Personal safety
a) Stay alert, watch what you are doing and
use common sense when operating a power
tool. Do not use a power tool while you are
tired or under the influence of drugs, alcohol
or medication. A moment of inattention while
operating power tools may result in serious
personal injury.
b) Use personal protective equipment. Always
wear eye protection.
Protective equipment such
as a dust mask, non-skid safety shoes, hard hat or
hearing protection used for appropriate conditions
will reduce personal injuries.
c) Prevent unintentional starting. Ensure the
switch is in the off-position before connecting
to power source and/or battery pack, picking
up or carrying the tool. Carrying power tools
with your finger on the switch or energising
power tools that have the switch on invites
accidents.
d) Remove any adjusting key or wrench before
turning the power tool on. A wrench or a key
left attached to a rotating part of the power tool
may result in personal injury.
e) Do not overreach. Keep proper footing and
balance at all times. This enables better control
of the power tool in unexpected situations.
f) Dress properly. Do not wear loose clothing or
jewellery. Keep your hair and clothing away
from moving parts. Loose clothes, jewellery or
long hair can be caught in moving parts.
g) If devices are provided for the connection of
dust extraction and collection facilities, ensure
these are connected and properly used.
Use of dust collection can reduce dust-related
hazards.
h) Do not let familiarity gained from frequent
use of tools allow you to become complacent
and ignore tool safety principles. A careless
action can cause severe injury within a fraction
of a second.
4. Power tool use and care
a) Do not force the power tool. Use the correct
power tool for your application. The correct
power tool will do the job better and safer at
the rate for which it was designed.
b) Do not use the power tool if the switch does
not turn it on and off. Any power tool that can-
not be controlled with the switch is dangerous
and must be repaired.
c) Disconnect the plug from the power source
and/or remove the battery pack, if detacha-
ble, from the power tool before making any
adjustments, changing accessories, or storing
power tools. Such preventive safety measures
reduce the risk of starting the power tool acci-
dentally.

PMTS 180 A1
GB
│
IE
│
NI
│
5 ■
d) Store idle power tools out of the reach of
children and do not allow persons unfamiliar
with the power tool or these instructions to
operate the power tool. Power tools are
dangerous in the hands of untrained users.
e) Maintain power tools and accessories. Check
for misalignment or binding of moving parts,
breakage of parts and any other condition
that may affect the power tool’s operation. If
damaged, have the power tool repaired be-
fore use. Many accidents are caused by poorly
maintained power tools.
f) Keep cutting tools sharp and clean. Properly
maintained cutting tools with sharp cutting
edges are less likely to bind and are easier to
control.
g) Use the power tool, accessories and tool bits
etc. in accordance with these instructions, tak-
ing into account the working conditions and
the work to be performed. Use of the power
tool for operations different from those intended
could result in a hazardous situation.
h) Keep handles and grasping surfaces dry,
clean and free from oil and grease. Slippery
handles and grasping surfaces do not allow
for safe handling and control of the tool in unex-
pected situations.
5. Service
a) Have your power tool serviced by a qualified
repair person using only identical replace-
ment parts. This will ensure that the safety of
the power tool is maintained.
Safety instructions for abra-
sive cutting appliances
1) Safety instructions for abrasive
cutting appliances
a) Ensure that you and everyone else in the
vicinity remain outside of the range of the
rotating grinding disc. The blade guard is
designed to protect the operator from fragments
and accidental contact with the grinding tool.
b) Use only reinforced bonded or diamond-
coated cutting discs for your power tool. Just
because you can attach the accessories to your
power tool does not guarantee they are safe to
use.
c) The permissible speed of the accessory tool
used must be at least as high as the maximum
speed specified for the power tool. Acces-
sories that rotate faster than the permissible rate
can break and throw pieces into the air.
d) Grinding tools should only be used for the
recommended applications. For example:
Never grind with the side surface of a cut-
ting disc. Cutting discs are designed to remove
material with the edge of the disc. Any lateral
application of force on these grinding tools can
lead to a breakage.
e) Always use an undamaged clamping flange
of the correct size and shape for the selected
grinding disc. Suitable flanges support the
grinding disc and reduce the risk of disc break-
age.
f) The external diameter and thickness of the
attachment part used must comply with the
dimensions of the power tool. Incorrectly
dimensioned accessory tools cannot be suffi-
ciently shielded or controlled.
g) Grinding discs and flanges must fit precisely
onto the grinding spindle of your power tool.
Accessory tools which do not fit precisely on
the grinding spindle of the power tool will rotate
unevenly, vibrate severely and can lead to a
loss of control.
h) Do not use damaged grinding discs. Check
the grinding discs before each use for chips
and cracks. If the power tool or grinding disc
is dropped, check to see if either are dam-
aged or use an undamaged grinding disc.
After checking and inserting the grinding
disc, ensure that you and any other people
in the vicinity remain outside of the range of
the rotating grinding disc and allow the tool
to rotate at maximum speed for one minute.
Damaged grinding discs usually break during
this test period.

PMTS 180 A1
■ 6
│
GB
│
IE
│
NI
i) Wear personal protective equipment. De-
pending on the application, ensure that you
use full face protection, eye protection or
goggles. If required, use a dust mask, ear
protectors, protective gloves or special apron
to protect you from grindings and material
particles. The eye protection must be worn to
protect you against flying debris, which may be
caused by the various applications. Dust or filter
masks must be used to filter any dust created
by the application. If you are exposed to loud
noise for any length of time, you can suffer a
hearing loss.
j) Ensure that other people remain at a safe dis-
tance to your workspace. Anyone who enters
the workspace must wear personal protective
equipment. Fragments of the workpiece or bro-
ken accessory tools can fly off and cause injury
– even outside the immediate working area.
k) Keep the power cable away from any rotat-
ing accessories. If you lose control of the ap-
pliance, the connecting cable may get cut or
caught and your hand or arm could get caught
in the rotating accessory tool.
l) Clean the ventilation slits in your power tool
regularly. The engine fan draws dust into the
housing and a strong accumulation can cause
electrical hazards.
m) Do not use the power tool near flammable
materials. Do not use the electrical appliance
if it is placed on a flammable surface such as
wood. Sparks can ignite such materials.
n) Do not use any attachment parts that require
liquid coolant. The use of water or other liquid
coolants may lead to an electric shock.
2) Kickback and corresponding
safety instructions
Kickback is a sudden reaction caused when a
rotating cutting disc catches or jams. Catching or
jamming causes the rotating accessory tool to stop
abruptly. This results in an uncontrolled cutting
grinding tool being accelerated upwards towards
the operator.
If, for example, a cutting disc catches or jams, the
edge of the cutting disc that is projecting into the
workpiece can get caught and break off the cutting
disc or cause a kickback. This can also break cut-
ting discs.
A kickback is caused by improper or incorrect use
of the power tool. This can be avoided by taking
proper precautions as given below.
a) Hold the power tool firmly in both hands and
position your body and arms so that they
can absorb the kickback forces. By taking
adequate precautions, the operator can stay in
control of the kickback and reaction torques.
b) Avoid the area in front of and behind the
rotating cutting disc. In cases of kickback, an
uncontrolled cutting grinding tool is driven up-
wards towards the operator.
c) Do not use a toothed, wood-cutting or chain
saw blade or segmented diamond-coated
disc with more than 10 mm wide gaps. Such
accessories often cause a kickback or loss of
control over the power tool.
d) Avoid cutting disc jams or excessive contact
pressure. Do not make any excessively deep
cuts. Overloading the cutting disc increases the
stress and likelihood of tilting or blocking and
thus the possibility of a setback or a breakage
of the grinding tool.
e) If the cutting disc jams or you stop working,
switch the tool off and hold the cutting ap-
pliance steady until the disc has completely
stopped turning. Never attempt to pull a ro-
tating cutting disc out of a cut. This could lead
to a kickback. Identify and remove the cause of
the jam.
f) Do not switch the power tool back on for as
long as it is in the workpiece. Allow the cut-
ting disc to reach its full speed before you
carefully continue the cut. Otherwise, the disc
can jam, jump out of the workpiece or cause
kickback.

PMTS 180 A1
GB
│
IE
│
NI
│
7 ■
g) Support large workpieces to reduce the risk
of the cutting disc jamming and causing a
kickback. Large workpieces can bend under
their own weight. The workpiece must be sup-
ported on both sides, namely in the vicinity of
the cut, and also at the edge.
Further safety instructions for
abrasive cutters
■ Never stand on an electrical appliance.
Serious injuries can occur if the electrical appli-
ance tips over or if you inadvertently come into
contact with the cutting disc.
■ Always use the protective cover. A protective
cover protects the user against parts of the
cutting disc which have broken off and also
against unintentional contact with the cutting
disc.
■ Ensure that the protective cover is working
properly and that it can move freely. Never
clamp the protective cover when it is in the open
position.
■ Use the appliance only for dry cutting.
Water entering a power tool will increase the
risk of electric shock.
■ Keep the power cable away from any rotat-
ing accessories. The power cable can be cut
through or caught up.
■ Keep handles dry, clean and free from oil
and grease. Greasy, oily handles are slippery
and result in loss of control.
■ Never remove cutting leftovers, metal swarf
etc. from the cutting area while the power
tool is running. Always place the tool arm in
the idling position and switch the power tool off.
■ Always switch on the power tool before ap-
plying it to the workpiece. Otherwise, there
is a danger of kickback if the cutting disc be-
comes caught up in the workpiece.
■ Only use the power tool if the working surface
is free of all adjusting tools, metal swarf etc.
except for the workpiece to be processed.
Small pieces of metal or other objects which
come into contact with the rotating cutting disc
can hit the operator at high speed.
■ Always clamp the workpiece to be processed
firmly. Never use workpieces which are too
small to clamped firmly. The distance between
your hand and the rotating cutting disc is other-
wise too small.
■ If the cutting disc jams, switch the power tool
off and wait until the cutting disc has com-
pletely stopped turning. Never attempt to pull
a rotating cutting disc out of a cut. This could
lead to a kickback. Identify and remove the
cause of the jam.
■ Do not apply lateral pressure to try and slow
the cutting disc down after switching off the
appliance. The cutting disc might be damaged,
break or cause a kickback.
■ Never ram the cutting disc into the workpiece
forcefully, and never apply too much force
when using a power tool. You should espe-
cially avoid jamming the cutting disc when
working on corners, sharp edges etc. If the
cutting disc is damaged by misuse, it can form
cracks that result in sudden breakage.
■ Wear a safety apron. Ensure that nobody
can be endangered by flying sparks. Remove
all flammable material from the vicinity.
Grinding metal creates flying sparks.
■ Only use the abrasive cutter for materials
specified in the instructions for proper use.
Otherwise, the abrasive cutter can be over-
loaded.
■ Never use any damaged, non-circular or
vibrating cutting discs. Damaged cutting discs
cause increased friction, jamming of the cutting
disc and kickback.
■ Always use cutting disks of the correct size
and with an appropriate central fixing bore
(e.g. diamond-shaped or circular). Cutting
disks which do not match the fitting parts on the
abrasive cutter will run eccentrically and cause
loss of control.
■ Do not use chains or toothed saw blades.
Such accessories often cause a kickback or loss
of control over the power tool.

PMTS 180 A1
■ 8
│
GB
│
IE
│
NI
■ Observe the operating manual published by
the cutting disc manufacturer when fitting and
using the cutting disc. Unsuitable cutting disks
can lead to personal injury and may cause
snagging, tearing of the disc or kickback.
■ Do not use any accessories that have not been
specifically provided or recommended by the
manufacturer for this power tool. Just because
you can attach the accessories to your power
tool does not guarantee they are safe to use.
■ Do not touch the cutting disks after work until
they have cooled down. Cutting discs become
very hot while they are working.
■ Check the cable regularly. Damaged cables
may only be repaired by an authorised
customer service location for power tools.
Replace any damaged extension cables. This
will ensure that the safety of the power tool is
maintained.
■ Store unused power tools safely. The storage
location must be dry and lockable. This pre-
vents the power tool being damaged by stor-
age or being used by inexperienced persons.
■ Secure the workpiece! A workpiece securely
held by a clamping device or vice is much safer
than one held in your hand.
■ Never leave the tool until it has come to a
complete standstill. Power tools which continue
to run on can cause injuries.
■ Do not use the power tool with a damaged
cable. Never touch a damaged cable and
remove the plug from the mains socket if the
cable becomes damaged during work. Dam-
aged cables increase the risk of electric shock.
Supplementary notes:
■ Always wear eye and ear protectors. Use other
protective equipment such as dust masks, pro-
tective gloves, protective goggles if necessary.
■ Never use any cutting discs with spalling, cracks
or other damage.
■ Always visually inspect cutting discs before
each use.
■ Do not use any saw blades.
■ Never use the appliance without the disc guard.
WARNING! DANGER DUE TO DUST
EXPOSURE!
► When working for extended periods of time
on wood and, in particular, materials that
produce dust which is hazardous to health,
connect the appliance to an appropriate
external dust extraction appliance.
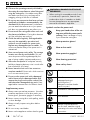
Symbols used on the power tool:
Keep your hands clear of the cut-
ting area while the power tool is
running. There is a danger of injury
if you contact the cutting disc.
Wear protective gloves!
Wear a dust mask!
Wear protective goggles!
Wear hearing protection!
Wear safety shoes!
Not designed for wet grinding
Use of
damaged cutting or
polishing discs is
dangerous and can lead to
serious injuries!
Intended for metal grinding
80
Disc diameter
Before using the device for
the first time, read the original
operating instructions and safety
instructions.

PMTS 180 A1
GB
│
IE
│
NI
│
9 ■
Metal cut-off grinder
IAN 292200
WARNING! TOXIC FUMES!
► Working with the tool can produce harmful/
toxic dusts that represent a health hazard for
the person operating the appliance and for
any other people in the area.
Original accessories/auxiliary
equipment
■ Use only the additional equipment and acces-
sories specified in the operating instructions.
Using attachments or accessory tools other than
those recommended in the operating instruc-
tions can lead to a risk of injury.
Before use
Setting up the appliance
Fix the appliance using suitable bolts (not included
in delivery) to a flat, stable base. Use the drill holes
for this purpose. Ensure that a mains socket is
within easy reach.
NOTE
► In exceptional cases you can position the
baseplate for this process on a solid support.
Removing / inserting transport
safety devices
Removing transport safety devices
♦ Apply a little pressure to the handle
and pull
the transport safety device out. The motor
unit can now be moved upwards.
Inserting transport safety devices
♦ Press the handle
downwards and push the
transport safety device
into the appliance.
The motor unit
is now fixed.
NOTE
► Use the transport safety device for transport-
ing the appliance. Carry the appliance by its
integrated carrying handle
14a
.
Operation
Switching on and off
■ Direction of rotation of the tool!
■ Insert the plug into a mains power socket.
Switching on:
♦ Press the ON/OFF switch
and keep it
pressed.
Switching off:
♦ Release the ON/OFF switch
.
Setting the cutting depth
WARNING! RISK OF INJURY!
► Always remove the power plug from the
wall socket before carrying out any work on
the appliance.
♦ Adjust the screw on the cutting depth adjust-
ment
with the aid of the supplied hex key
(large)
.
♦ Test the cutting depth by lowering the motor
unit.
Changing the cutting disc
WARNING! RISK OF INJURY!
► Always remove the power plug from the
wall socket before carrying out any work on
the appliance.
► Allow the cutting disc to cool down
before you touch it
► Check the cutting disc
. It should not be
damaged or damp, and it should have no
cracks. Otherwise, it could break during
use and cause injuries.
NOTE
► Only use cutting disks which comply with the
performance data stated in this manual.
♦ Undo the mounting screws
using the sup-
plied hex key (small) , in order to remove the
protective cover .
♦ Swing the pendulum cover
back completely
until it engages.

PMTS 180 A1
■ 10
│
GB
│
IE
│
NI
♦ Push the detent pin
into the U-shaped recess
in the clamping flange (inside)
and hold the
detent pin
in this position. If necessary, rotate
the cutting disc
by hand until this is possible.
♦ Use the hex key supplied (large)
to unscrew
the fixing nut out in an anticlockwise direc-
tion.
♦ Remove the plane washer
, the clamping
flange (outside)
and the cutting disc
.
♦ Insert a new cutting disc.
♦ Proceed in reverse order in order to reassemble
the appliance to a usable condition.
♦ Check whether all the fastening elements are
correctly fitted.
NOTE
► Ensure that the cutting disc
can be rotated
freely.
► Switch the appliance on for around 60
seconds to check that there are no unusual
vibrations. If this is not the case, you should
check that the cutting disc is installed
correctly
.
Clamping the workpiece
You can clamp the workpiece and adjust the mitre
angle with the aid of the fitted vice.
Using the vice
♦ Turn the handle on the vice
clockwise to
clamp the workpiece.
♦ Turn the handle on the vice
anticlockwise to
unclamp the workpiece.
NOTE
► You can also fold the rapid adjustment
upwards in order to make a quick adjustment
to the vice
. Fold the rapid adjustment
down again in order to fix the vice . After
this, use the vice handle to make fine
adjustments.
Setting the cutting angle (mitre angle)
♦ Loosen the cutting angle adjustment
by
turning it anticlockwise.
♦ Set the required cutting angle using the angle
given.
♦ Retighten the cutting angle adjustment
by
turning it clockwise.
Cleaning and maintenance
WARNING! RISK OF INJURY!
► Always remove the power plug from the
wall socket before carrying out any work on
the appliance.
■ The appliance must always be kept clean, dry
and free from oil or grease.
■ Use a soft, dry cloth to clean the housing.
■ Clean the ventilation slits in your power tool
with a soft brush regularly.
NOTE
► Replacement parts not listed (such as carbon
brushes, switch) can be ordered via our
service hotline.
► Required maintenance work should only be
replaced by qualified service personnel.

PMTS 180 A1
GB
│
IE
│
NI
│
11 ■
Disposal
The packaging is made of environmentally
friendly materials which you can dispose
of at your local recycling centre.
Do not dispose of power tools in
your normal domestic waste!
European Directive 2012/19/EU requires that
worn-out power tools be collected separately and
recycled in an environmentally compatible manner.
Kompernass Handels GmbH
warranty
Dear Customer,
This appliance has a 3-year warranty valid from
the date of purchase. If this product has any faults,
you, the buyer, have certain statutory rights. Your
statutory rights are not restricted in any way by the
warranty described below.
Warranty conditions
The validity period of the warranty starts from the
date of purchase. Please keep your original receipt
in a safe place. This document will be required as
proof of purchase.
If any material or production fault occurs within
three years of the date of purchase of the product,
we will either repair or replace the product for you
at our discretion. This warranty service is dependent
on you presenting the defective appliance and
the proof of purchase (receipt) and a short written
description of the fault and its time of occurrence.
If the defect is covered by the warranty, your product
will either be repaired or replaced by us. The repair
or replacement of a product does not signify the
beginning of a new warranty period.
Warranty period and statutory claims for
defects
The warranty period is not prolonged by repairs
effected under the warranty. This also applies to
replaced and repaired components. Any damage
and defects present at the time of purchase must
be reported immediately after unpacking. Repairs
carried out after expiry of the warranty period shall
be subject to a fee.
Scope of the warranty
This appliance has been manufactured in accordance
with strict quality guidelines and inspected meticu-
lously prior to delivery.
The warranty covers material faults or production
faults. The warranty does not extend to product parts
subject to normal wear and tear or fragile parts such
as switches, batteries, baking moulds or parts made
of glass.
The warranty does not apply if the product has been
damaged, improperly used or improperly maintained.
The directions in the operating instructions for the
product regarding proper use of the product are
to be strictly followed. Uses and actions that are
discouraged in the operating instructions or which
are warned against must be avoided.
This product is intended solely for private use and
not for commercial purposes. The warranty shall be
deemed void in cases of misuse or improper handling,
use of force and modifications/repairs which have
not been carried out by one of our authorised
Service centres.

PMTS 180 A1
■ 12
│
GB
│
IE
│
NI
Warranty claim procedure
To ensure quick processing of your case, please
observe the following instructions:
■ Please have the till receipt and the item number
(e.g. IAN 12345) available as proof of purchase.
■ You will find the item number on the type plate,
an engraving on the front page of the instructions
(bottom left), or as a sticker on the rear or
bottom of the appliance.
■ If functional or other defects occur, please
contact the service department listed either by
telephone or by e-mail.
■ You can return a defective product to us free of
charge to the service address that will be provided
to you. Ensure that you enclose the proof of
purchase (till receipt) and information about
what the defect is and when it occurred.
NOTE
► For Parkside and Florabest tools, please send
us only the defective item without the acces-
sories (e.g. battery, storage case, assembly
tools, etc.).
You can download these instructions
along with many other manuals,
product videos and software on
www.lidl-service.com.
Service
WARNING!
► Have the power tool repaired by the service
centre or a qualified electrician and only us-
ing genuine replacement parts. This ensures
that the safety of the tool is maintained.
► Always ensure that the power plug or the
mains cable is replaced only by the manu-
facturer of the appliance or its customer
service. This ensures that the safety of the
tool is maintained.
Service Great Britain
Tel.: 0871 5000 720 (£ 0.10/Min.)
E-Mail: kom[email protected]
Service Ireland
Tel.: 1890 930 034
(0,08 EUR/Min., (peak))
(0,06 EUR/Min., (off peak))
E-Mail: kom[email protected]
IAN 292200
Importer
Please note that the following address is not the
service address. Please use the service address
provided in the operating instructions.
KOMPERNASS HANDELS GMBH
BURGSTRASSE 21
DE - 44867 BOCHUM
GERMANY
www.kompernass.com

PMTS 180 A1
GB
│
IE
│
NI
│
13 ■
Translation of the original
Conformity Declaration
We, KOMPERNASS HANDELS GMBH, docu-
ment officer: Mr Semi Uguzlu, BURGSTR. 21,
DE - 44867 BOCHUM, GERMANY, hereby declare
that this product complies with the following stan-
dards, normative documents and EC directives:
Machinery Directive
(2006/42/EC)
Electromagnetic Compatibility
(2014/30/EU)
RoHS Directive
(2011/65/EU)*
* The manufacturer bears the full responsibility for compli-
ance with this conformity declaration. The object of the
declaration described above complies with the require-
ments of the Directive 2011/65/EU of the European
Parliament and Council of 8 June 2011 on the limita-
tions of use of certain dangerous substances in electrical
and electronic appliances.
Applied harmonised standards:
EN 62841-1:2015
EN ISO 12100:2010
EN 55014-1:2006/A2:2011
EN 55014-2:2015
EN 61000-3-2:2014
EN 61000-3-3:2013
Type/appliance designation:
Metal cut-off grinder PMTS 180 A1
Year of manufacture: 09 - 2017
Serial number: IAN 292200
Bochum, 01.10.2017
Semi Uguzlu
- Quality Manager -
The right to effect technical changes in the context
of further development is reserved.

PMTS 180 A1
■ 14
│
GB
│
IE
│
NI

PMTS 180 A1
DE
│
AT
│
CH
│
15 ■
Inhaltsverzeichnis
Einleitung .......................................................16
Bestimmungsgemäßer Gebrauch ...............................................16
Ausstattung ................................................................16
Lieferumfang ............................................................... 16
Technische Daten ........................................................... 16
Allgemeine Sicherheitshinweise für Elektrowerkzeuge .................17
1. Arbeitsplatzsicherheit ...................................................... 17
2. Elektrische Sicherheit ...................................................... 18
3. Sicherheit von Personen .................................................... 18
4. Verwendung und Behandlung des Elektrowerkzeugs .............................19
5. Service ................................................................. 19
Sicherheitshinweise für Trennschleifmaschinen ........................19
1) Sicherheitshinweise für Trennschleifmaschinen ...................................19
2) Rückschlag und entsprechende Sicherheitshinweise ..............................21
Weitere Sicherheitshinweise für Trennschleifer ........................21
Originalzubehör / -zusatzgeräte ............................................... 24
Vor der Inbetriebnahme ..........................................24
Gerät aufstellen ............................................................24
Transportsicherung entfernen / einsetzen ........................................24
Inbetriebnahme .................................................24
Ein- / ausschalten ........................................................... 24
Schnitttiefe einstellen ........................................................ 24
Trennscheibe wechseln .......................................................24
Werkstück einspannen ....................................................... 25
Reinigung und Wartung ...........................................25
Entsorgung .....................................................26
Garantie der Kompernaß Handels GmbH ............................26
Service .........................................................27
Importeur ......................................................27
Original-Konformitätserklärung ....................................28

PMTS 180 A1
■ 16
│
DE
│
AT
│
CH
TRENNSCHLEIFER PMTS 180 A1
Einleitung
Wir beglückwünschen Sie zum Kauf Ihres neuen
Gerätes. Sie haben sich damit für ein hochwertiges
Produkt entschieden. Die Bedienungsanleitung ist
Teil dieses Produkts. Sie enthält wichtige Hinweise für
Sicherheit, Gebrauch und Entsorgung. Machen Sie
sich vor der Benutzung des Produkts mit allen Bedien-
und Sicherheitshinweisen vertraut. Benutzen Sie das
Produkt nur wie beschrieben und für die angegebe-
nen Einsatzbereiche. Händigen Sie alle Unterlagen
bei Weitergabe des Produkts an Dritte mit aus.
Bestimmungsgemäßer Gebrauch
Der Trennschleifer ist dazu bestimmt, als Standgerät
mithilfe von Trennscheiben Längsschnitte mit gera-
dem Schnittverlauf und Gehrungswinkel bis 45° in
Stahl, NE-Metallen, Guss- und Eisenprofilen ohne
Verwendung von Wasser auszuführen.
Jede andere Verwendung oder Veränderung der
Maschine gilt als nicht bestimmungsgemäß und
birgt erhebliche Unfallgefahren.
Verwenden Sie das Gerät nicht zu gewerblichen
Zwecken.
Ausstattung
EIN- / AUS-Schalter
Spannflansch (innen)
Arretierungsstift
Trennscheibe
Schnellverstellung
Schraubstock
Bohrungen
Schnittwinkelverstellung
Transportsicherung
Schnitttiefenverstellung
Motoreinheit
Handgriff
Abbildung A:
Pendelschutzhaube
Schutzabdeckung
14a
Integrierter Tragegriff
Befestigungsschrauben
Abbildung B:
Spannflansch (außen)
Unterlegscheibe
Befestigungsmutter
Abbildung C:
Innensechskantschlüssel (groß)
Innensechskantschlüssel (klein)
Lieferumfang
1 Trennschleifer PMTS 180 A1
1 Trennscheibe Ø 180 mm (vormontiert)
2 Innensechskantschlüssel
1 Bedienungsanleitung
Technische Daten
Bemessungsspannung: 230 V ∼, 50 Hz
(Wechselstrom)
Bemessungsaufnahme: 1280 W
Bemessungs-
leerlaufdrehzahl: n
0
7700 min
-1
Trennscheiben-
aufnahme: ø 22,23 mm
Gewindemaß: M8

PMTS 180 A1
DE
│
AT
│
CH
│
17 ■
Maximale
Geschwindigkeit
der Trennscheibe: 8500 min
-1
Arbeits-
geschwindigkeit
der Trennscheibe:
: max. 80 m / s
Trennscheiben-
durchmesser: Ø 180 mm
Trennscheibendicke: 1,6 mm
Neigungsschnitte: 0° – 45°
max. Schnitttiefe: 50 mm bei 0 °
Gehrungswinkel
Schutzklasse: II /
(Doppelisolierung)
Geräuschemissionswert:
Messwert für Geräusch ermittelt entsprechend
EN 62841. Der A-bewertete Geräuschpegel des
Elektrowerkzeugs beträgt typischerweise:
Schalldruckpegel: L
PA
= 92,7 dB (A)
Unsicherheit: K
PA
= 3 dB
Schallleistungspegel: L
WA
= 105,7 dB (A)
Unsicherheit: K
WA
= 3 dB
Gehörschutz tragen!
WARNUNG!
► Die Schwingungs- und Geräuschemissionen
können entsprechend der Art und Weise in der
das Elektrowerkzeug verwendet wird, insbe-
sondere, welche Art von Werkstück bearbeitet
wird, abweichen und können in manchen Fällen
über dem in diesen Anweisungen angegebe-
nen Werten liegen. Die Schwingungsbelas-
tung könnte unterschätzt werden, wenn das
Elektrowerkzeug regelmäßig in solcher Weise
verwendet wird. Versuchen Sie, die Belastung
durch Vibrationen so gering wie möglich
zu halten. Beispielhafte Maßnahmen zur
Verringerung der Vibrationsbelastung sind das
Tragen von Handschuhen beim Gebrauch des
Werkzeugs und die Begrenzung der Arbeitszeit.
Dabei sind alle Anteile des Betriebszyklus zu
berücksichtigen (beispielweise Zeiten, in denen
das Elektrowerkzeug abgeschaltet ist, und
solche, in denen es zwar eingeschaltet ist, aber
ohne Belastung läuft).
Allgemeine
Sicherheitshinweise
für Elektrowerkzeuge
WARNUNG!
► Lesen Sie alle Sicherheitshinweise, Anwei-
sungen, Bebilderungen und technischen
Daten, mit denen dieses Elektrowerkzeug
versehen ist. Versäumnisse bei der Einhaltung
der nachfolgenden Anweisungen können
elektrischen Schlag, Brand und/oder schwere
Verletzungen verursachen.
Bewahren Sie alle Sicherheitshinweise und
Anweisungen für die Zukunft auf.
Der in den Sicherheitshinweisen verwendete Begriff
„Elektrowerkzeug“ bezieht sich auf netzbetriebene
Elektrowerkzeuge (mit Netzleitung) und auf akku-
betriebene Elektrowerkzeuge (ohne Netzleitung).
1. Arbeitsplatzsicherheit
a) Halten Sie Ihren Arbeitsbereich sauber und
gut beleuchtet. Unordnung und unbeleuchtete
Arbeitsbereiche können zu Unfällen führen.
50mm
Seite wird geladen ...
Seite wird geladen ...
Seite wird geladen ...
Seite wird geladen ...
Seite wird geladen ...
Seite wird geladen ...
Seite wird geladen ...
Seite wird geladen ...
Seite wird geladen ...
Seite wird geladen ...
Seite wird geladen ...
Seite wird geladen ...
-
 1
1
-
 2
2
-
 3
3
-
 4
4
-
 5
5
-
 6
6
-
 7
7
-
 8
8
-
 9
9
-
 10
10
-
 11
11
-
 12
12
-
 13
13
-
 14
14
-
 15
15
-
 16
16
-
 17
17
-
 18
18
-
 19
19
-
 20
20
-
 21
21
-
 22
22
-
 23
23
-
 24
24
-
 25
25
-
 26
26
-
 27
27
-
 28
28
-
 29
29
-
 30
30
-
 31
31
-
 32
32


Parkside PMTS 180 A1 Translation Of The Original Instructions
- Typ
- Translation Of The Original Instructions
in anderen Sprachen
- English: Parkside PMTS 180 A1
Verwandte Artikel
-
Parkside PMTS 180 A1 Translation Of The Original Instructions
-
-
-
Parkside PWS 125 F5 Translation Of The Original Instructions
-
Parkside PWSA 20-Li A1 Bedienungsanleitung
-
Parkside PWS 230 SE - MANUEL 2 Benutzerhandbuch
-
-
Parkside PWS 125 A1 Benutzerhandbuch
-
Parkside PWS 1010 Operation and Safety Notes
-
Andere Dokumente
-
Meister MWS2400-230 Translation Of The Original Instructions
-
Metabo CS 23-355 Bedienungsanleitung
-
Ferm WCM1001P Wall Chaser Benutzerhandbuch
-
 alzaTools AT-CAG20V Cordless Angle Grinder Benutzerhandbuch
-
 TECMIX TMX EPO 720 Bedienungsanleitung
-
Defort DMS-1200-C Bedienungsanleitung
-
Defort DMS-1900 Bedienungsanleitung
-

