

ENGLISH
2
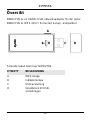
Overview
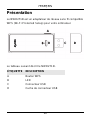
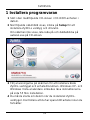
The NWD271N is a USB wireless network adapter for your
computer. The NWD271N is compatible with WPS (Wi-Fi
Protected Setup).
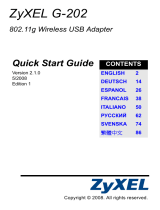
The following table describes the NWD271N.
LABEL DESCRIPTION
A WPS button
BLED
C USB connector
D USB connector cap
A
BCD
ENGLISH

3
ENGLISH
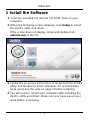
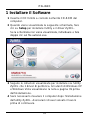
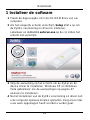
1 Install the Software
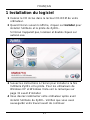
1 Insert the included CD into the CD-ROM drive on your
computer.
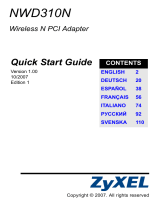
2 When the following screen displays, click Setup to install
the ZyXEL utility and driver.
If the screen does not display, locate and double-click
autorun.exe on the CD.
3 Follow the on-screen instructions to install both the ZyXEL
utility and the device driver. Windows XP and Windows
Vista users see the note on page 7 before installing.
4 You will need to restart your computer after installing the
ZyXEL utility and driver. Make sure you have saved your
work before continuing.

ENGLISH
4
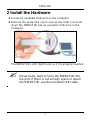
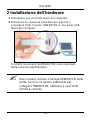
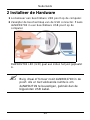
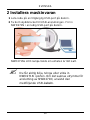
2 Install the Hardware
1 Locate an available USB port on the computer.
2 Remove the protective cap to expose the USB connector.
Insert the NWD271N into an available USB port on the
computer.
The NWD271N’s LED (light) turns on if it is properly inserted.
" Never bend, twist or force the NWD271N into
the port. If there is not enough space to attach
the NWD271N, use the included USB cable.

5
ENGLISH
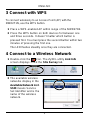
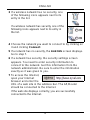
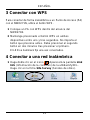
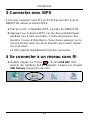
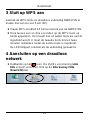
3 Connect with WPS
To connect wirelessly to an Access Point (AP) with the
NWD271N, use the WPS button.
1 Place a WPS-enabled AP within range of the NWD271N.
2 Press the WPS button on both devices for between one
and three seconds. It doesn’t matter which button is
pressed first. You must press the second button within two
minutes of pressing the first one.
The LED flashes steadily once they are connected.
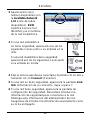
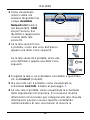
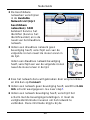
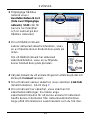
4 Connect to a Wireless Network
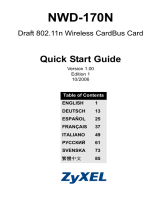
1 Double-click the icon. The ZyXEL utility Link Info
screen displays. Click the Site Survey tab.
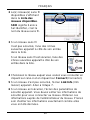
2 The available wireless
networks display in the
Available Network List.
SSID means Service
Set Identifier and is the
name of the wireless
network.

ENGLISH
6
3 If a wireless network has no security, one
of the following icons appears next to its
entry in the list.
If a wireless network has security, one of the
following icons appears next to its entry in
the list.
4 Choose the network you want to connect to by clicking on
it and clicking Connect.
5 If a network has no security, the Link Info screen displays.
Go to step 7.
6 If a network has security, the security settings screen
appears. You need to enter security information to
connect to the network. Get this information from the
network administrator. Be sure to enter the information
exactly as it was given to you.
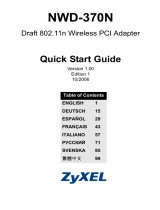
7 To access the Internet,
open your Internet
browser and enter the
URL of a web site in the address bar. The AP/Router
should be connected to the Internet.
If the web site displays correctly, you are successfully
connected to the Internet.

7
ENGLISH
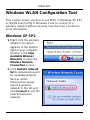
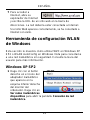
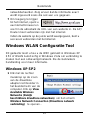
Windows WLAN Configuration Tool
This section shows you how to use WZC in Windows XP SP2
or WLAN AutoConfig in Windows Vista to connect to a
wireless network without security. See the User’s Guide for
more information.
Windows XP SP2
1 Right-click the wireless
adapter icon which
appears in the bottom
right of your computer
monitor. Click View
Available Wireless
Networks to open the
Wireless Network
Connection screen.
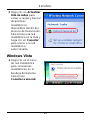
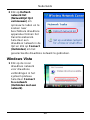
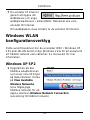
2 Click Refresh network
list to reload and search
for available wireless
devices within
transmission range.
Select a wireless
network in the list and
click Connect to join the
selected wireless
network.

ENGLISH
8
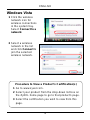
Windows Vista
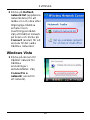
1 Click the wireless
network icon for
wireless connections
in the system tray.
Select Connect to a
network.
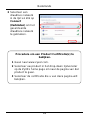
2 Select a wireless
network in the list
and click Connect to
join the selected
wireless network.
Procedure to View a Product’s Certification(s)
1 Go to www.zyxel.com.
2 Select your product from the drop-down list box on
the ZyXEL home page to go to that product's page.
3 Select the certification you wish to view from this
page.

9
ENGLISH

DEUTSCH
10
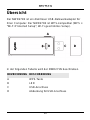
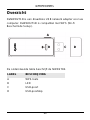
Übersicht
Der NWD271N ist ein drahtloser USB-Netzwerkadapter für
Ihren Computer. Der NWD271N ist WPS-kompatibel (WPS =
“Wi-Fi Protected Setup”; Wi-Fi-geschütztes Setup).
In der folgenden Tabelle wird der NWD271N beschrieben.
BEZEICHNUNG BESCHREIBUNG
A WPS-Taste
BLED
C USB-Anschluss
D Abdeckung für USB-Anschluss
A
BCD
D
EUTSC
H

11
DEUTSCH
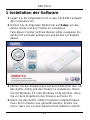
1 Installation der Software
1 Legen Sie die mitgelieferte CD in das CD-ROM-Laufwerk
des Computers ein.
2 Klicken Sie im folgenden Bildschirm auf Setup, um das
ZyXEL-Utility und den Treiber zu installieren.
Falls dieses Fenster nicht erscheinen sollte, navigieren Sie
auf der CD zur Datei autorun.exe und klicken Sie doppelt
darauf.
3 Führen Sie die Anweisungen auf dem Bildschirm aus, um
das ZyXEL-Utility und den Treiber zu installieren. Wenn
Sie mit Windows XP oder Windows Vista arbeiten, lesen
Sie vor dem Installieren den Hinweis auf Seite 15.
4 Wenn Sie das ZyXEL Utility Programm installiert haben,
muss der Computer neu gestartet werden. Stellen Sie
sicher, dass Sie vor dem Neustart Ihre Arbeiten sichern!

DEUTSCH
12
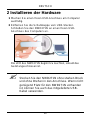
2 Installieren der Hardware
1 Machen Sie einen freien USB-Anschluss am Computer
ausfindig.
2 Entfernen Sie die Schutzkappe vom USB-Stecker.
Schließen Sie den NWD271N an einen freien USB-
Anschluss des Computers an.
Die LED des NWD271N beginnt zu leuchten, sobald das
Gerät angeschlossen ist.
" Stecken Sie den NWD271N ohne starken Druck
und ohne Drehen in den Anschluss. Wenn nicht
genügend Platz für den NWD271N vorhanden
ist, können Sie auch das mitgelieferte USB-
Kabel verwenden.

13
DEUTSCH
3 Verbinden mit WPS
Um mit dem NWD271N eine drahtlose Verbindung zu einem AP
(Access Point) herzustellen, verwenden Sie die WPS-Taste.
1 Setzen Sie einen WPS-aktivierten AP in die Reichweite
des NWD271N.
2 Drücken Sie an beiden Geräten zwischen einer und drei
Sekunden auf die WPS-Taste. Dabei ist es egal, welche
Taste Sie zuerst drücken. Jedoch muss die zweite Taste
spätestens zwei Minuten nach dem Drücken der ersten
Taste gedrückt werden.
Sobald die Verbindung besteht, leuchtet die LED ohne zu
blinken.
4 Herstellen einer Verbindung zu
einem Drahtlosnetzwerk
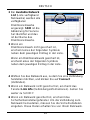
1 Klicken Sie doppelt auf das -Symbol. Das Fenster Link
Info (Verbindungsinformationen) des ZyXEL-Utility-
Programms erscheint. Klicken Sie auf die Registerkarte
Site Survey (Site-Abfrage)

DEUTSCH
14
2 Bei Available Network
List (Liste verfügbarer
Netzwerke) werden alle
verfügbaren
Drahtlosnetzwerke
angezeigt. SSID ist die
Abkürzung für Service
Set Identifier und das
ist der Name des
Drahtlosnetzwerks.
3 Wenn ein
Drahtlosnetzwerk nicht gesichert ist,
erscheint eines der folgenden Symbole
neben dem jeweiligen Eintrag in der Liste.
Wenn ein Drahtlosnetzwerk gesichert ist,
erscheint eines der folgenden Symbole
neben dem jeweiligen Eintrag in der Liste.
4 Wählen Sie das Netzwerk aus, zu dem Sie eine Verbindung
herstellen möchten, und klicken Sie auf Connect
(Verbinden).
5 Wenn ein Netzwerk nicht gesichert ist, erscheint das
Fenster Link Info (Verbindungsinformationen). Gehen Sie
weiter zu Schritt 7.
6 Wenn ein Netzwerk gesichert ist, erscheint das
Sicherheitseinstellungsfenster. Um die Verbindung zum
Netzwerk herzustellen, müssen Sie die Sicherheitsdaten
eingeben. Diese Daten erhalten Sie von Ihrem Netzwerk-

15
DEUTSCH
Administrator. Geben Sie diese Daten genau wie
vorgegeben ein.
7 Um auf das Internet
zuzugreifen, öffnen Sie
Ihren Internet-Browser
und geben Sie in die Adressleiste die URL einer Website
ein. Das Netzwerk ist jetzt mit dem Internet verbunden.
Wenn die Website richtig angezeigt wird, wurde die
Verbindung zum Internet erfolgreich hergestellt.
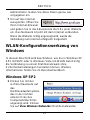
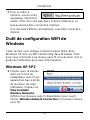
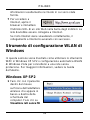
WLAN-Konfigurationswerkzeug von
Windows
In diesem Abschnitt wird beschrieben, wie Sie in Windows XP
SP2 mit WZC oder in Windows Vista mit WLAN AutoConfig
die Verbindung zu einem Drahtlosnetzwerk ohne
Sicherheitseinstellungen herstellen können. Weitere
Informationen finden Sie im Benutzerhandbuch.
Windows XP SP2
1 Klicken Sie mit der
rechten Maustaste auf
das
Drahtlosadaptersymbol,
das in der rechten
unteren Ecke des
Computerbildschirms
angezeigt wird. Klicken
Sie auf View Wireless Networks (Drahtlosnetzwerke

DEUTSCH
16
anzeigen), um das Fenster Wireless Network Connection
(Drahtlose Netzwerkverbindung) aufzurufen.
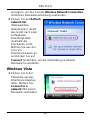
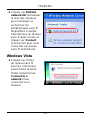
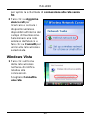
2 Klicken Sie auf Refresh
network list
(Netzwerkliste
aktualisieren), damit
das Gerät nach allen
verfügbaren
Drahtlosgeräten
innerhalb der
Reichweite sucht.
Wählen Sie aus der
Liste ein
Drahtlosnetzwerk an,
und klicken Sie auf
Connect (Verbinden, um die Verbindung zu diesem
Netzwerk herzustellen.
Windows Vista
1 Klicken Sie in der
Taskleiste auf das
Drahtlosnetzwerksy
mbol. Wählen Sie
Connect to a
network (Mit einem
Netzwerk verbinden)

17
DEUTSCH
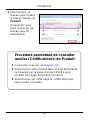
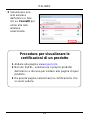
2 Wählen Sie aus der
Liste ein
Drahtlosnetzwerk
an, und klicken Sie
auf Connect
(Verbinden, um die
Verbindung zu
diesem Netzwerk
herzustellen.
Vorgehensweise zum Aufrufen einer
Produktzertifizierung
1 Gehen Sie auf www.zyxel.com.
2 Wählen Sie Ihr Produkt aus der Auswahlliste auf
der ZyXEL Homepage aus, um die Seite des
entsprechenden Produkts aufzurufen.
3 Wählen Sie die Zertifizierung, die Sie von dieser
Seite aus aufrufen möchten.

ESPAÑOL
18
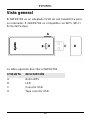
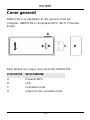
Vista general
El NWD271N es un adaptador USB de red inalámbrica para
su ordenador. El NWD271N es compatible con WPS (Wi-Fi
Protected Setup).
La tabla siguiente describe al NWD271N.
ETIQUETA DESCRIPCIÓN
A Botón WPS
BLED
C Conector USB
D Tapa conector USB
A
BCD
E
SPA
Ñ
O
L

19
ESPAÑOL
1 Instalar el software
1 Inserte el CD incluido en la unidad de CD-ROM de su
ordenador.
2 Cuando aparezca la siguiente pantalla, haga clic en Setup
para instalar la utilidad ZyXEL y el controlador.
Si la pantalla no aparece, busque y haga doble clic en
autorun.exe.
3 Siga las instrucciones en pantalla para instalar la utilidad
ZyXEL y el controlador del dispositivo. Los usuarios de
Windows XP y Windows Vista deben consultar la nota en
página 23 antes de la instalación.
4 Necesitará reiniciar su ordenador tras la instalación de la
utilidad ZyXEL. Asegúrese de haber guardado su trabajo
antes de continuar.

ESPAÑOL
20
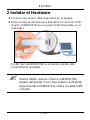
2 Instalar el Hardware
1 Localice una ranura USB disponible en el equipo.
2 Quite la tapa protectora para descubrir el conector USB.
Inserte el NWD271N en un puerto USB disponible en el
ordenador.
El LED (luz) del NWD271N se enciende cuando está
correctamente insertado.
" Nunca doble, tuerza o fuerce el NWD271N
dentro del puerto. Si no hay espacio suficiente
para insertar el NWD271N, utilice el cable USB
incluido.
Seite wird geladen ...
Seite wird geladen ...
Seite wird geladen ...
Seite wird geladen ...
Seite wird geladen ...
Seite wird geladen ...
Seite wird geladen ...
Seite wird geladen ...
Seite wird geladen ...
Seite wird geladen ...
Seite wird geladen ...
Seite wird geladen ...
Seite wird geladen ...
Seite wird geladen ...
Seite wird geladen ...
Seite wird geladen ...
Seite wird geladen ...
Seite wird geladen ...
Seite wird geladen ...
Seite wird geladen ...
Seite wird geladen ...
Seite wird geladen ...
Seite wird geladen ...
Seite wird geladen ...
Seite wird geladen ...
Seite wird geladen ...
Seite wird geladen ...
Seite wird geladen ...
Seite wird geladen ...
Seite wird geladen ...
Seite wird geladen ...
Seite wird geladen ...
Seite wird geladen ...
Seite wird geladen ...
Seite wird geladen ...
Seite wird geladen ...
Seite wird geladen ...
-
 1
1
-
 2
2
-
 3
3
-
 4
4
-
 5
5
-
 6
6
-
 7
7
-
 8
8
-
 9
9
-
 10
10
-
 11
11
-
 12
12
-
 13
13
-
 14
14
-
 15
15
-
 16
16
-
 17
17
-
 18
18
-
 19
19
-
 20
20
-
 21
21
-
 22
22
-
 23
23
-
 24
24
-
 25
25
-
 26
26
-
 27
27
-
 28
28
-
 29
29
-
 30
30
-
 31
31
-
 32
32
-
 33
33
-
 34
34
-
 35
35
-
 36
36
-
 37
37
-
 38
38
-
 39
39
-
 40
40
-
 41
41
-
 42
42
-
 43
43
-
 44
44
-
 45
45
-
 46
46
-
 47
47
-
 48
48
-
 49
49
-
 50
50
-
 51
51
-
 52
52
-
 53
53
-
 54
54
-
 55
55
-
 56
56
-
 57
57


ZyXEL Communications 802.11n Benutzerhandbuch
- Typ
- Benutzerhandbuch
in anderen Sprachen
- français: ZyXEL Communications 802.11n Manuel utilisateur
- español: ZyXEL Communications 802.11n Manual de usuario
- italiano: ZyXEL Communications 802.11n Manuale utente
- Nederlands: ZyXEL Communications 802.11n Handleiding
Verwandte Artikel
-
 ZyXEL Communications NWD-270N Benutzerhandbuch
-
ZyXEL Communications AG-220 Benutzerhandbuch
-
 ZyXEL Communications G-202 Bedienungsanleitung
-
 ZyXEL Communications NWD310N Bedienungsanleitung
-
 ZyXEL Communications G-210H Schnellstartanleitung
-
 ZyXEL Communications NWD-170N Benutzerhandbuch
-
 ZyXEL Communications NWD-370N Benutzerhandbuch


