
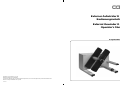
Externer Aufwickler R 220
Bedienungsanleitung
Ausgabe/Edition 3/96
copyright by cab / 9008072 / L31 / 25
Technische Änderungen vorbehalten
In accordance with our policy of continual product improvement, we reserve the right to alter specifications without notice
Données technique modifiables sans prévais
A220BEDDE
External Rewinder R 220
Operator's Manual

1. Technische Daten
Etikettenbreite bis 220 mm
Aufwickeldurchmesser max. 300 mm
Kerndurchmesser 40mm / über Adapter 75mm
Etikettenwicklung Etikett außen-/innenliegend
Netzschalter Gerät "EIN - AUS"
Netzspannung 230 V/50 Hz Sicherung 800 mAT
115 V/60 Hz Sicherung 1,6 AT
Betriebstemperatur 10 bis 35°C
bei Luftfeuchtigkeit 30 bis 85% nicht kond.
Lager- und Transporttemperatur -20 bis 50°C
bei Luftfeuchtigkeit 10 bis 85% nicht kond.
Schutzgüte DIN VDE 0805 Schutzklasse 1
Geräusch <60 dB (A)
Leistungsaufnahme ca. 50 W
Abmessungen
Höhe 340 mm, Breite 390 mm, Tiefe 410 mm
Gewicht 10 kg
1
2
3
4
5
6
7
8
9
10
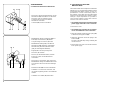
2. Lieferumfang
! Verpackungsmaterial für spätere
Transporte unbedingt aufbewahren !
1 - Aufwickler
2 - Flansch (mit Rändelschraube)
3 - Flansch (mit Kreuzschlitzschraube)
4 - 2 Wickeladapter ø75mm
5 - 8 Schrauben
6 - Klemmbügel
7 - 2 Sicherungen 1,6AT
(für den Einsatz bei 115 V)
8 - Netzkabel
9 - Kreuzschlitzschraubendreher
10 - Bedienungsanleitung
2 15

14
1 Technical Data
Label Width up to 220 mm
Supply Roll External Diameter max. 300 mm
Core Diameter 40 mm / with adapter 75 mm
Label Rewind face in / face out
Power Switch ON / OFF
Operating Voltage 230 V/ 50 Hz Fuse 800 mAT
115 V/ 60 Hz Fuse 1.6 AT
Operating Environment 10 to 35°C
at a humidity of 30 to 85% not condensing
Transport and Storage Temperature -20 to 50°C
at a humidity of 10 to 85% not condensing
Protection DIN VDE 0805 Class 1
Noise Level <60 dB (A)
Power Consumption ca. 50 W
Dimensions 340 mm (H), 390 mm (W), 410 mm (D)
Weight 10 kg
2 Delivery Contents
! Please keep the original packaging
in case the rewinder must be returned !
1 - Rewinder
2 - Flange (with knurled screw)
3 - Flange (with Phillips screw)
4 - 2 x 75 mm diameter rewind adapters
5 - 8 x screws
6 - Clamp
7 - 2 fuses rated 1.6AT
(for use at 115 V)
8 - Power cable
9 - Phillips screwdriver
10 - Operator's Manual
3

3. Sicherheitshinweise
- Überprüfen Sie vor der Inbetriebnahme, ob die
am Aufwickler eingestellte Betriebsspannung
Ihrer Netzspannung entspricht. Korrigieren Sie
ggf. die Einstellung am Netzmodul.
- Eingriffe am Gerät, die über die in dieser
Anleitung beschriebenen Handlungen hinaus-
gehen, sind nur von autorisiertem Personal
vorzunehmen.
- Während des Betriebs ist die rotierende Wickel-
achse mit den darauf befindlichen Flanschen
frei zugänglich.
Schmuckstücke, Haare von Personen u.ä. aus
dem Bereich der rotierenden Teile fernhalten.
- Der Aufwickler läuft sofort nach dem
Einschalten an.
! VORSICHT: Verletzungsgefahr durch
rotierende Teile !
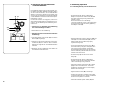
4. Inbetriebnahme
4.1 Netzanschluß herstellen
- Einstellung der Betriebsspannung am
Spannungswähler (13) überprüfen.
Bei notwendiger Änderung der Einstellung
Klappe (14) am Netzmodul öffnen und
Spannungswähler so einsetzen, daß die
aktuelle Betriebsspannung im Fenster der
Klappe ablesbar ist. Bei Änderung der
Einstellung sind die Sicherungen zu wechseln
(800 mAT bei 230V; 1,6AT bei 115 V).
- Mitgeliefertes Netzkabel (8) in die Anschluß-
buchse (11) stecken und Gerät über eine
geerdete Steckdose an das Netz anschließen.
4.2 Auswahl der Wickelrichtung
Stellen Sie den Schalter (15) entsprechend der
gewünschten Wickelrichtung ein:
- Wickeln mit außenliegenden Etiketten
- Wickeln mit innenliegenden Etiketten
14
15
11 12 13
4
Gesellschaft für Computer-
und Automations-
Bausteine mbH
Postfach 1904
D-76007 Karlsruhe
Haid-und-Neu-Straße 7
D-76131 Karlsruhe
Telefon 0721 / 66 26-00
Telefax 0721 / 66 26-249
We declare herewith that as a result of the manner in which the machine designated below
was designed, the type of construction and the machines which, as a result have been
brought on to the general market comply with the relevant fundamental regulations of the
EU Rules for Safety and Health.
In the event of any alteration which has not been approved by us being made to any
machine as designated below, this statement shall thereby be made invalid.
Description : External Rewinder
Type : R 220
Applied EU Regulations - EC Machine Regulations
Appendix II, 89/392/EEC
and Norms : - Machine Safety, EN 292-2: 1991
- EC Low Voltage Regulations, 73/23/EEC
- Data and Office Machine Safety,
EN 60950/A2: 1993, EN 60742: 1989
- EC Regulations EMV, 89/336/EEC
- Threshold values for the Interference of
Data Machines, EN 50082-1: 1992
- Interference Resistance in both Industrial and
Small Plants, EN 55014: 1993
EU - Conformity Declaration
13
Signed for, and on behalf of, the Manufacturer :
cab Produkttechnik Sömmerda
Gesellschaft für Computer-
und Automationsbausteine mbH
Sömmerda, 10.01.96
Erwin Fascher
Geschäftsführer

Gesellschaft für Computer-
und Automations-
Bausteine mbH
Postfach 1904
D-76007 Karlsruhe
Haid-und-Neu-Straße 7
D-76131 Karlsruhe
Telefon 0721 / 66 26-00
Telefax 0721 / 66 26-249
Hiermit erklären wir, daß die nachfolgend bezeichnete Maschine aufgrund ihrer Konzipierung
und Bauart sowie in der von uns in Verkehr gebrachten Ausführung den einschlägigen
grundlegenden Sicherheits- und Gesundheitsanforderungen der betreffenden EG-Richtlinien
entspricht.
Bei einer nicht mit uns abgestimmten Änderung der Maschine oder des Verwendungszwecks
verliert diese Erklärung ihre Gültigkeit.
Bezeichnung der Maschine : Externer Aufwickler
Typ : R 220
Angewandte EG-Richtlinien - EG-Maschinenrichtlinie Anhang II, 89/392/EWG
und Normen : - Sicherheit von Maschinen, EN 292-2:1991
- EG-Niederspannungsrichtlinie, 73/23/EWG
- Sicherheit von Informationsgeräten und
Büromaschinen, EN 60950/A2:1993
- Sicherheitstrafo, EN 60742:1989
- EG-Richtlinie EMV, 89/336/EWG
- Störfestigkeit Gewerbebereich sowie Kleinbetriebe,
EN 50082-1:1992
- Funkentstörung von elektrischen Betriebsmitteln und
Anlagen, EN 55014:1993
EG - Konformitätserklärung
Für den Hersteller zeichnet :
cab Produkttechnik Sömmerda
Gesellschaft für Computer-
und Automationsbausteine mbH
Sömmerda, 10.01.96
Erwin Fascher
Geschäftsführer
12
3 Safety Precautions
- Before putting the rewinder into operation, ensure
that the setting of the voltage selector
corresponds to that of the mains power supply.
If it differs, alter the setting accordingly.
- Any adjustments for further work on the rewinder
which exceed those mentioned in this manual
may only be carried out by authorized personnel.
- During operation, the rotating axle is openly
accessible. Therefore, keep long hair, loose
clothes, and jewelry away from the moving parts
!
- The rewinder starts operating as soon as it is
switched ON !
! CAUTION : Risk of injury from moving parts
!
4 Operation
4.1 Connection to Power Supply
- Check that the setting at the voltage selector on
the power supply module (13) is the same as
your main power supply.
To change the voltage setting, open the cover
(14) at the power module, remove the voltage
selector and replace it so that the correct voltage
setting is visible when the cover is closed. When
the setting is altered, ensure that the fuses are
replaced as well. (800 mAT for 230V; 1.6AT for
115 V)
- Attach the power cable (8) supplied to the
connector (11) and connect it to the grounded
main power supply.
4.2 Selecting the Method of Rewinding
Set the switch (15) to the required method of
rewinding, i.e. :
- Rewind with the labels on the outer
side of the silicon liner
- Rewind with the labels on the inner
side of the silicon liner
5

6 Conversion for Use with
Narrow Labels
The R220 Rewinder was developed to rewind wide
label stock. If you use the R220 Rewinder to rewind
narrow label stock (width < approx. 50 mm), it is
possiblethat as a result of the tractive power of
the rewinder on the label stock the printed label
image becomes distorted in the direction of feed.
Through a simple adjustment it is possible to
overcome this problem, however first of all the
machine cover must be removed.
! The machine must be disconnected from the
power supply before the cover is removed !
1. Remove the cover.
! The machine may not under any circumstan-
ces be used whilst the cover is removed !
2. When the rewinder is delivered, the spring (22)
is attached to the upper bolt (23).
3. Attach the uppermost end of the spring to the
lower bolt (24).
The pull on the label strip during rewinding will
now be reduced.
4. Remount the cover and reconnect the machine
to the power supply.
11
20 6
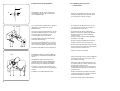
5. Wickelbetrieb
5.1 Aufwickeln direkt auf die Wickelachse
- Flansch (3 / mit Kreuzschlitzschraube) auf die
Wickelachse (16) aufschieben. Der Bund des
Flansches muß zum Gehäuse zeigen.
Aussparungen im Flansch zur Nut der
Wickelachse ausrichten.
Schraube (19) im Flansch anziehen.
- Etikettenband über die Umlenkung (18) und
Rolle (17) zur Wickelachse (16) führen.
Auf gute Anlage am Flansch (3) achten.
- Etikettenband mit Bügel (6) in die Nut der
Wickelachse (16) eindrücken. Eingestellte
Wickelrichtung beachten (Bild links unten
gültig für außenliegende Etiketten)
- Bügel (6) bis in die Aussparungen des
Flansches (3) schieben.
- Flansch (2 / mit Rändelschraube) mit dem
Bund nach außen auf die Wickelachse
aufschieben .
- Flansch (2) so verschieben, daß er leicht am
Etikettenband anliegt.Das Etikettenband muß
sich zwischen den Flanschen leicht bewegen
lassen.
- Rändelschraube (20) am Flansch festziehen.
- Aufwickler so zum Drucker ausrichten, daß
das Papier möglichst gerade in den Aufwickler
einläuft.
- Aufwickler am Schalter (12) einschalten.
16 17 18
19 3 6 20 2
16 18172
6

6. Umrüstung für den Betrieb mit
schmalen Etiketten
Der Aufwickler R220 wurde für das Wickeln gro-
ßer Rollen mit breiten Etiketten konzipiert. Wenn
Sie das Gerät verwenden, um schmale Etiketten
(Breite < ca.50mm) zu wickeln, ist es möglich, daß
es durch die vom Aufwickler ausgehende Zugkraft
auf den Etiketten zu einem Druckversatz in Papier-
laufrichtung kommt.
Um diesem Problem zu begegnen, können Sie
eine einfache Manipulation im Geräteinneren vor-
nehmen, für die allerdings die Verkleidung abzu-
nehmen ist :
! Trennen Sie vor Abnahme der Verkleidung
das Gerät unbedingt vom Netz !
1. Demontieren Sie die Verkleidung.
! Betreiben Sie das Gerät auf keinen Fall ohne
Verkleidung !
2. Im Lieferzustand ist die Feder (22) am oberen
Bolzen (23) eingehängt.
3. Hängen Sie das obere Federende an den unte-
ren Bolzen (24) um. Dadurch wird im Wickel-
betrieb die Zugkraft auf den Etikettenstreifen
reduziert.
4. Montieren Sie die Verkleidung und stellen Sie
den Netzanschluß wieder her.
24 23
(22)
22
10
5 Rewinding Operation
5.1 Rewinding Directly onto the Rewind Axle
- Slide the flange (3 / which is fitted with a
Phillips screw) onto the rewind axle (16) with
the collar of the flange facing towards the
rewinder casing.
Ensure that the recess in the flange
corresponds with the groove in the rewind axle.
Secure the flange onto the axle by tightening
the Phillips screw (19).
- Draw the label strip over the guide bar (18) and
roller (17) on to the rewind axle (16). Ensure
that the label strip is positioned properly
against the flange (3).
- Secure the label strip into the groove (16) in
the rewind axle by using the clamp (6). Take
note of the required method of rewinding.
The illustration left/ below shows the arrange-
ment for rewinding with the label stock on the
outside of the silicon liner.
- Slide the clamp (6) into the recess in the
flange (3).
- Slide the flange (2 / which is fitted with a
knurled screw) onto the rewind axle with the
collar of the flange facing outwards.
- Adjust the position of the flange (2) so that it
lightly touches the label stock. It must be
possible for the label stock to move slightly
between the two flanges.
- Tighten knurled screw (20) in the flange.
- Position the rewinder in relation to the printer
so that the label strip runs cleanly and without
hindrance from printer to rewinder.
- Switch the rewinder power switch (12) ON.
7

5.2 Rewinding onto 3 in (75 mm)
Cardboard Roll
- Attach the two adapters (4) onto each of the
two flanges (
2,3) using the screws (
5
) which
are included in the delivery contents.
- The cardboard roll (
21
) which serves as the
core of the rewound roll should be approx. 1
mm wider than the label strip.
- Slide the flange (3 / which is fitted with a
Phillips screw)
onto the rewind axle (16
) with
the collar of the flange facing towards the
rewinder casing.
Secure the flange onto the axle by tightening
the Phillips screw (19
).
- Slide the cardboard roll (21
) onto the rewind
adapter mounted on the inner flange (3
).
- Slide the flange (
2 / fitted with a knurled screw)
onto the rewind axle so that the rewind adapter
locates inside the cardboard core.
- Tighten the knurled screw (
20
).
- Draw the label strip over the guide bar (
18
) and
the roller (17) until it is long enough to reach
the cardboard core (
21).
- Taking note of the direction of rewinding, use
an adhesive strip (or a label) to affix the end of
the strip to the cardboard core.
The illustration left shows the arrangement for
rewinding with the label stock on the inside of
the silicon liner.
- Position the rewinder in relation to the printer
so that the label strip runs cleanly and without
hindrance from printer to rewinder.
- Switch the rewinder power switch (12) ON.
9
2,3
4
5
5.2 Aufwickeln auf 75-mm-Papphülse
- Wickeladapter (
4
) mit den im Lieferumfang
enthaltenen Schrauben (
5
) an beiden Flan-
schen (
2,3) befestigen.
- Die zum Aufwickeln vorgesehende Papphülse
(
21
) sollte ca. 1mm breiter sein als der
Etikettenstreifen.
- Flansch (3 / mit Kreuzschlitzschraube) auf die
Wickelachse (16) aufschieben. Der Bund des
Flansches muß zum Gehäuse zeigen.
Schraube (19) im Flansch anziehen.
- Papphülse (21) auf den Wickeladapter des
Flansches (
3
) aufstecken.
- Flansch (2
/ mit Rändelschraube) so weit auf
die Wickelachse aufschieben, daß die Papp-
hülse vom Wickeladapter aufgenommen wird .
- Rändelschraube (
20
) am Flansch festziehen.
- Etikettenband über die Umlenkung (
18
) und
Rolle (
17) zur aufgesteckten Papphülse (
21
)
führen.
- Etikettenband unter Berücksichtung der
gewählten Wickelrichtung mit Klebestreifen
(evtl. Etikett) an der Papphülse befestigen.
Bild links gültig für innenliegende Etiketten
- Aufwickler so zum Drucker ausrichten, daß
das Papier möglichst gerade in den Aufwickler
einläuft.
- Aufwickler am Schalter (
12
) einschalten.
20
2 16 17 18
8
19 3 21 20 2
16 17 18
-
 1
1
-
 2
2
-
 3
3
-
 4
4
-
 5
5
-
 6
6
-
 7
7
-
 8
8


CAB Apollo Benutzerhandbuch
- Typ
- Benutzerhandbuch
- Dieses Handbuch eignet sich auch für
in anderen Sprachen
- English: CAB Apollo User manual