Silvercrest SLS 3 A1 Bedienungsanleitung
- Kategorie
- Kaffeezubehör
- Typ
- Bedienungsanleitung

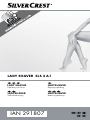
IAN 291807
LADY SHAVER SLS 3 A1
LADY SHAVER
Operating instructions
LADYSHAVER
Betjeningsvejledning
LADYSHAVER
Bedienungsanleitung
LADYSHAVER
Gebruiksaanwijzing

GB / IE / NI Operating instructions Page 1
DK Betjeningsvejledning Side 13
NL / BE Gebruiksaanwijzing Pagina 25
DE / AT / CH Bedienungsanleitung Seite 37
Before reading, unfold the page containing the illustrations and familiarise your-
self with all functions of the device.
Før du læser, vend siden med billeder frem og bliv bekendt med alle apparatets
funktioner.
Vouw vóór het lezen de pagina met de afbeeldingen open en maak u vertrouwd
met alle functies van het apparaat.
Klappen Sie vor dem Lesen die Seite mit den Abbildungen aus und machen Sie
sich anschließend mit allen Funktionen des Gerätes vertraut.


GB
│
IE
│
NI
│
1 ■
SLS 3 A1
Introduction .......................................... 2
Intended use ......................................... 2
Package contents ..................................... 2
Description of the appliance ............................. 3
Technical data ........................................ 3
Safety instructions ..................................... 4
Inserting/replacing the batteries ......................... 6
Shaving ............................................. 6
For longer hair ........................................ 7
Long-hair trimmer attachment ........................... 7
Cleaning, care and maintenance ......................... 8
Cleaning with the cleaning brush ...................................8
Cleaning under running water .....................................9
Storage ............................................. 9
Disposal ............................................. 9
Kompernass Handels GmbH warranty ...................10
Service ......................................................11
Importer .....................................................11
Ordering replacement parts ...........................12
Contents

■ 2
│
GB
│
IE
│
NI
SLS 3 A1
Introduction
Congratulations on the purchase of your new appliance.
You have selected a high-quality product. The operating instructions are part of this
product. They contain important information on safety, usage and disposal. Before
using the product, familiarise yourself with all operating and safety instructions. Use
the product only as described and for the specified areas of application. Please
also pass on these operating instructions to any future owner.
Intended use
This appliance is intended exclusively for shaving and trimming human hair.
This appliance is intended solely for use in private households.
Do not use it for commercial applications.
All other uses are deemed to be improper and may result in property damage or
even in personal injury.
This shave is designed for shaving armpits, legs and the bikini area. The shaver can
be used dry or in the shower.
Package contents
♦ Lady Shaver
♦ 2 batteries
♦ Long-hair trimmer attachment
♦ Storage bag
♦ Cleaning brush
♦ Operating instructions
NOTE
Check contents for completeness and damage immediately after unpacking.
Contact Customer Services if necessary.

GB
│
IE
│
NI
│
3 ■
SLS 3 A1
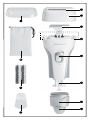
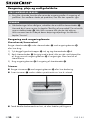
Description of the appliance
Trimmer
Shaver unit
Shaving head
Release buttons
On/off switch with travel lock
Battery compartment
Battery compartment cover
Lock
Cleaning brush
Batteries
-Storage bag
3Long-hair trimmer attachment/protective cap
Technical data
Voltage supply 2 x 1.5 V
Battery type 1.5 V, micro, AAA, LR03
Protection class III
Protection class IP X4
The appliance is suitable for use in a
bath or shower.

■ 4
│
GB
│
IE
│
NI
SLS 3 A1
Safety instructions
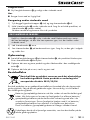
WARNING – RISK OF INJURY!
► This appliance may be used by children aged 8 years
and above and by persons with limited physical, sen-
sory or mental capabilities or lack of experience and
knowledge, provided that they are under supervision
or have been told how to use the appliance safely
and are aware of the potential risks.
► Children must not use the appliance as a plaything.
► Cleaning and user maintenance tasks may not be
carried out by children unless they are supervised.
► Do not throw batteries into a fire. Do not recharge
batteries. There is a risk of explosion and injury!
► Never open batteries and never solder or weld batter-
ies. There is a risk of explosion and injury!
► Check the condition of the batteries at regular intervals.
Leaking batteries can cause damage to the appliance.
► If you do not intend to use the appliance for an ex-
tended period, remove the batteries.
► If the batteries have leaked, use protective gloves.
Clean the battery compartment and the battery
contacts with a dry cloth.

GB
│
IE
│
NI
│
5 ■
SLS 3 A1
WARNING – RISK OF INJURY!
► Keep batteries out of the reach of children. Children
might put batteries into their mouth and swallow them.
If a battery is swallowed, medical assistance must be
sought immediately.
► All repairs must be carried out by authorised specialist
companies or by the Customer Service department.
Improper repairs can pose significant risks to the user.
It will also invalidate any warranty claims.
► Do not use the appliance with a defective shaver unit
or long hair trimmer because these may have sharp
edges. There is a risk of injury!
CAUTION – PROPERTY DAMAGE!
► Never submerse the appliance in water or other liquids.
► Defective components must always be replaced with
original replacement parts. Compliance with safety
requirements can only be guaranteed if original re-
placement parts are used.

■ 6
│
GB
│
IE
│
NI
SLS 3 A1
Inserting/replacing the batteries
NOTE
►
Always use 1.5 V, AAA type batteries.
► Pay attention to the correct polarity when inserting the batteries .
1) Turn the lock a quarter turn.
2) Now pull off the battery compartment cover together with the lock .
3) If inserted: Remove the discharged batteries from the battery compartment .
4) Insert new batteries as shown in the polarity diagram in the battery com-
partment .
5) Push the battery compartment cover back onto the appliance and turn the
lock back.
The battery compartment is now closed.
Shaving
NOTE
►
If your skin is sensitive or prone to allergic skin reactions, try the shaver first
on a small, unobtrusive area.
1) Ensure the shaver unit is attached and locked in place.
2) Press the travel lock, which is located on the on/off switch and push the
on/off switch towards the shaver unit .
The appliance starts.
The travel lock ensures that the appliance does not start up accidentally, for
example, when stowed away.
NOTE
► Before dry shaving, ensure that your skin is free of cream or oil residue.
Your skin should be clean and dry.
3) Hold the shaver perpendicular to the skin and guide the shaver unit in
straight movements against the direction of hair growth. Apply repeatedly.
The small rubber lip in front of the shaving head ensures that the skin is
pulled tight and also causes the hairs to stand upright a little.
4) After you have covered all the areas you want to shave, push the on/off
switch back into its initial position. The appliance stops.
5) Clean the shaver after every use with the supplied cleaning brush .
For a more thorough cleaning, read the section “Cleaning, care and mainte-
nance”.

GB
│
IE
│
NI
│
7 ■
SLS 3 A1
NOTE
►
This shaver is also suitable for use in the shower. Do not, however, immerse
the appliance in water. This will cause irreparable damage to the appliance!
For longer hair
If you have not shaved for some time, for instance, on your legs, you should use
the trimmer before shaving as described in the section “Shaving”.
1) Ensure the shaver unit is attached and locked in place.
2) Press the travel lock and push the on/off switch in the direction of the
shaver unit . The appliance starts.
NOTE
►
Before dry shaving, ensure that your skin is free of cream or oil residue.
Your skin should be clean and dry.
3) Hold the shaver so that the trimmer is pointing towards your leg at a slight
angle (approx. 45°). Move the trimmer slowly against the direction of
hair growth.
4) After you have covered all the areas you want to shave, push the on/off
switch back into its initial position. The appliance stops.
5) Clean the shaver after every use with the supplied cleaning brush .
For a more thorough cleaning, read the section “Cleaning, care and maintenance”.
Long-hair trimmer attachment
If you do not want to completely shave off the hair or merely want to trim your bikini
line, use the long-hair trimmer attachment 3.
1) Push the long-hair trimmer attachment 3 onto the shaver unit .
Ensure that the open grooves lie over the trimmer .
2) Press the travel lock and push the on/off switch in the direction of the
shaver unit . The appliance starts.
3) Move the appliance with straight motions over the skin. Apply repeatedly and
guide the shaver against the direction of hair growth.
4) After you have covered all the areas you want to shave, push the on/off
switch back into its initial position. The appliance stops.
5) Clean the long-hair trimmer attachment 3 with the supplied cleaning brush .
For a more thorough cleaning, read the section “Cleaning, care and maintenance”.

■ 8
│
GB
│
IE
│
NI
SLS 3 A1
Cleaning, care and maintenance
CAUTION! MATERIAL DAMAGE!
►
Do not use abrasive, chemical or caustic cleaning agents to clean this
appliance. This will irreparably damage the appliance.
NOTE
►
As soon as the shave becomes noticeably worse, we recommend replacing
the shaver unit .
To order a new shaver unit , please contact the service department (see
section “Ordering replacement parts”). Have the IAN number of the item to
hand. You will find this on the front page of these operating instructions or
in the section “Service”.
Cleaning with the cleaning brush
Shaving head/shaver unit
Clean the shaving head under the shaver unit with the cleaning brush .
1) Press the two release buttons and pull the shaver unit upwards off the
appliance.
2) Tap the shaver unit on a flat surface and blow off the hair cuttings. Use
the cleaning brush if necessary. Blow loose hair from the shaving foils.
3) Use the cleaning brush to clean the shaving head .
Trimmer
■ Clean the trimmer after every use with the supplied cleaning brush .
■ Oil the trimmer roughly every 6 months with a drop of sewing machine oil:
■ Turn on the shaver for a short while to distribute the oil on the blades.

GB
│
IE
│
NI
│
9 ■
SLS 3 A1
Long-hair trimmer attachment
■ Rinse the long-hair trimmer attachment 3 under running water.
Housing
■ Clean the housing with a moist cloth.
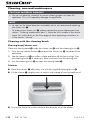
Cleaning under running water
1) Press the two release buttons and pull the shaver unit upwards off the
appliance.
2) Hold the shaving head under running water. Make sure that you hold the
appliance so that the shaving head is angled downwards.
This allows the water to drain off and prevents it from getting into the appliance.
CAUTION! MATERIAL DAMAGE!
Hold only the shaving head under running water. The shaver handset can
be damaged irreparably if it is held under running water.
3) Allow the shaving head to dry.
4) Replace the shaver unit on the shaver. Ensure that it snaps into place and
is seated firmly.
Storage
■ Always replace the long-hair trimmer attachment 3 onto the shaver unit
when you are not using the appliance. This protects the shaver unit .
■ Store the cleaned and dried appliance and its accessories in the supplied
storage bag -.
■ Store everything in a clean, dust-free and dry place.
Disposal
Do not dispose of the appliance in your normal domestic
waste. This product is subject to the provisions of
European Directive 2012/19/EU.
Dispose of the appliance via an approved waste disposal company or your
municipal waste disposal facility. Please comply with all applicable regulations.
Please contact your waste disposal facility if you are in any doubt.
Used batteries may not be disposed of in household waste. Consumers
are legally obliged to dispose of (rechargeable) batteries at a collection
point in their community/city district or at a retail store. The purpose of this
requirement is to ensure that batteries are disposed of in an environmentally
friendly manner. Only dispose of batteries when they are fully discharged.
The packaging is made of environmentally friendly materials which you can
dispose of at your local recycling centre.

■ 10
│
GB
│
IE
│
NI
SLS 3 A1
Kompernass Handels GmbH warranty
Dear Customer,
This appliance has a 3-year warranty valid from the date of purchase. If this product
has any faults, you, the buyer, have certain statutory rights. Your statutory rights
are not restricted in any way by the warranty described below.
Warranty conditions
The validity period of the warranty starts from the date of purchase. Please keep
your original receipt in a safe place. This document will be required as proof of
purchase.
If any material or production fault occurs within three years of the date of purchase
of the product, we will either repair or replace the product for you at our discretion.
This warranty service is dependent on you presenting the defective appliance
and the proof of purchase (receipt) and a short written description of the fault
and its time of occurrence.
If the defect is covered by the warranty, your product will either be repaired or
replaced by us. The repair or replacement of a product does not signify the beginning
of a new warranty period.
Warranty period and statutory claims for defects
The warranty period is not prolonged by repairs effected under the warranty.
This also applies to replaced and repaired components. Any damage and defects
present at the time of purchase must be reported immediately after unpacking.
Repairs carried out after expiry of the warranty period shall be subject to a fee.
Scope of the warranty
This appliance has been manufactured in accordance with strict quality guidelines
and inspected meticulously prior to delivery.
The warranty covers material faults or production faults. The warranty does not
extend to product parts subject to normal wear and tear or fragile parts such as
switches, batteries, baking moulds or parts made of glass.
The warranty does not apply if the product has been damaged, improperly used
or improperly maintained. The directions in the operating instructions for the product
regarding proper use of the product are to be strictly followed. Uses and actions
that are discouraged in the operating instructions or which are warned against
must be avoided.
This product is intended solely for private use and not for commercial purposes.
The warranty shall be deemed void in cases of misuse or improper handling, use
of force and modifications / repairs which have not been carried out by one of
our authorised Service centres.

GB
│
IE
│
NI
│
11 ■
SLS 3 A1
Warranty claim procedure
To ensure quick processing of your case, please observe the following instructions:
■ Please have the till receipt and the item number (e.g. IAN 12345) available
as proof of purchase.
■ You will find the item number on the type plate, an engraving on the front
page of the instructions (bottom left), or as a sticker on the rear or bottom of
the appliance.
■ If functional or other defects occur, please contact the service department
listed either by telephone or by e-mail.
■ You can return a defective product to us free of charge to the service address
that will be provided to you. Ensure that you enclose the proof of purchase (till
receipt) and information about what the defect is and when it occurred.
You can download these instructions along with many other manuals,
product videos and software on www.lidl-service.com.
Service
Service Great Britain
Tel.: 0871 5000 720 (£ 0.10/Min.)
E-Mail: [email protected]
Service Ireland
Tel.: 1890 930 034
(0,08 EUR/Min., (peak))
(0,06 EUR/Min., (off peak))
E-Mail: [email protected]
IAN 291807
Importer
Please note that the following address is not the service address. Please use the
service address provided in the operating instructions.
KOMPERNASS HANDELS GMBH
BURGSTRASSE 21
DE - 44867 BOCHUM
GERMANY
www.kompernass.com

■ 12
│
GB
│
IE
│
NI
SLS 3 A1
Ordering replacement parts
You can order the following replacement parts for the product SLS 3 A1:
► 1 cutting unit
(with 3 shaving heads)
Order the replacement parts via the Service Hotline
(see “Service” section) or simply visit our website at
www.kompernass.com:
NOTE
► Have the IAN number of the appliance ready (can be found on the
cover of these operating instructions) when you place your order.

DK
│
13 ■
SLS 3 A1
Indledning .......................................... 14
Anvendelsesområde .................................. 14
Pakkens indhold ..................................... 14
Beskrivelse af produktet .............................. 15
Tekniske data .......................................15
Sikkerhedsanvisninger ................................ 16
Indsætning/udskiftning af batterier ..................... 18
Barbering ...........................................18
Ved længere hår ..................................... 19
Langhårskam ........................................19
Rengøring, pleje og vedligeholdelse .....................20
Rengøring med rengøringsbørste ..................................20
Rengøring under rindende vand ...................................21
Opbevaring .........................................21
Bortskaffelse ........................................21
Garanti for Kompernass Handels GmbH ................. 22
Service ......................................................23
Importør .....................................................23
Bestilling af reservedele ............................... 24
Indholdsfortegnelse

■ 14
│
DK
SLS 3 A1
Indledning
Tillykke med købet af dit nye produkt.
Du har valgt et produkt af høj kvalitet. Betjeningsvejledningen er en del af dette
produkt. Den indeholder vigtige informationer om sikkerhed, anvendelse og bort-
skaffelse. Du bør sætte dig ind i alle produktets betjenings- og sikkerhedsanvisninger
før brug. Brug kun produktet som beskrevet og kun til de angivne anvendelsesområder.
Lad vejledningen følge med produktet, hvis du giver det videre til andre.
Anvendelsesområde
Dette produkt er udelukkende beregnet til barbering og klipning af menneskehår.
Dette produkt er udelukkende beregnet til anvendelse i private husholdninger.
Det må ikke bruges i erhvervsmæssig sammenhæng.
Al anden anvendelse betragtes som værende uden for anvendelsesområdet og kan
føre til personskader.
Barbermaskinen er egnet til armhuler, ben og bikinilinje. Barbermaskinen kan anvendes
tørt eller i brusebadet.
Pakkens indhold
♦ Ladyshaver
♦ 2 batterier
♦ Langhårskam
♦ Opbevaringstaske
♦ Rengøringsbørste
♦ Betjeningsvejledning
BEMÆRK
Kontrollér umiddelbart efter udpakning, at alle dele er leveret med og ikke er
beskadigede. Henvend dig i modsat fald til service.

DK
│
15 ■
SLS 3 A1
Beskrivelse af produktet
Trimmer
Skæreenhed
Skærehoved
Frigørelsesknapper
Tænd-/sluk-knap med rejsesikring
Batterirum
Låg til batterirummet
Lås
Rengøringsbørste
Batterier
-Opbevaringstaske
3Langhårskam/beskyttelseskappe
Tekniske data
Spændingsforsyning 2 x 1,5 V
Batteritype 1,5 V, Micro, AAA, LR03
Beskyttelsesklasse III
Kapslingsklasse IP X4
Produktet er beregnet til anvendelse
i badekar eller under bruseren.

■ 16
│
DK
SLS 3 A1
Sikkerhedsanvisninger
ADVARSEL – FARE FOR PERSONSKADER!
► Dette produkt kan bruges af børn fra 8år og derover
og af personer med nedsatte fysiske, motoriske eller
mentale evner eller manglende erfaring og/eller viden,
hvis de er under opsyn eller undervises i sikker brug af
produktet og de farer, der kan være forbundet med det.
► Børn må ikke lege med produktet.
► Rengøring og brugervedligeholdelse må ikke udføres
af børn uden opsyn.
► Kast ikke batterier ind i åben ild. Genoplad ikke bat-
terier. Der er fare for eksplosioner og personskader!
► Batterier må aldrig åbnes, loddes eller svejses. Der er
fare for eksplosioner og personskader!
► Kontrollér batterierne regelmæssigt. Lækkende batterier
kan beskadige produktet.
► Tag batterierne ud, hvis du ikke skal bruge produktet i
længere tid.
► Tag beskyttelseshandsker på, hvis batteriets væske er
løbet ud. Rengør batterirummet og batterikontakterne
med en tør klud.

DK
│
17 ■
SLS 3 A1
ADVARSEL – FARE FOR PERSONSKADER!
► Børn må ikke kunne få fat i batterierne. Børn kan putte
batterierne i munden og sluge dem. Søg omgående
lægehjælp, hvis en person er kommet til at sluge et
batteri.
► Lad kun autoriserede specialforretninger eller kunde-
service reparere produktet. Forkert udførte reparationer
kan medføre betydelige farer for brugeren. Desuden
bortfalder alle garantikrav.
► Brug ikke produktet med defekt skæreenhed eller
langhårsskær, da de kan have meget skarpe kanter.
Der er fare for personskader!
OBS – MATERIELLE SKADER!
► Læg aldrig produktet ned i vand eller andre væsker.
► Defekte komponenter må kun udskiftes med originale
reservedele. Kravene til sikkerhed kan kun garanteres,
hvis der anvendes originale dele.
Seite wird geladen ...
Seite wird geladen ...
Seite wird geladen ...
Seite wird geladen ...
Seite wird geladen ...
Seite wird geladen ...
Seite wird geladen ...
Seite wird geladen ...
Seite wird geladen ...
Seite wird geladen ...
Seite wird geladen ...
Seite wird geladen ...
Seite wird geladen ...
Seite wird geladen ...
Seite wird geladen ...
Seite wird geladen ...
Seite wird geladen ...
Seite wird geladen ...
Seite wird geladen ...
Seite wird geladen ...
Seite wird geladen ...
Seite wird geladen ...
Seite wird geladen ...
Seite wird geladen ...
Seite wird geladen ...
Seite wird geladen ...
Seite wird geladen ...
Seite wird geladen ...
Seite wird geladen ...
Seite wird geladen ...
Seite wird geladen ...
Seite wird geladen ...
-
 1
1
-
 2
2
-
 3
3
-
 4
4
-
 5
5
-
 6
6
-
 7
7
-
 8
8
-
 9
9
-
 10
10
-
 11
11
-
 12
12
-
 13
13
-
 14
14
-
 15
15
-
 16
16
-
 17
17
-
 18
18
-
 19
19
-
 20
20
-
 21
21
-
 22
22
-
 23
23
-
 24
24
-
 25
25
-
 26
26
-
 27
27
-
 28
28
-
 29
29
-
 30
30
-
 31
31
-
 32
32
-
 33
33
-
 34
34
-
 35
35
-
 36
36
-
 37
37
-
 38
38
-
 39
39
-
 40
40
-
 41
41
-
 42
42
-
 43
43
-
 44
44
-
 45
45
-
 46
46
-
 47
47
-
 48
48
-
 49
49
-
 50
50
-
 51
51
-
 52
52


Silvercrest SLS 3 A1 Bedienungsanleitung
- Kategorie
- Kaffeezubehör
- Typ
- Bedienungsanleitung
in anderen Sprachen
- English: Silvercrest SLS 3 A1 Operating instructions
- Nederlands: Silvercrest SLS 3 A1 Handleiding
- dansk: Silvercrest SLS 3 A1 Betjeningsvejledning
Verwandte Artikel
-
Silvercrest 277761 Bedienungsanleitung
-
Silvercrest SRR 3.7 C4 - IAN 115785 Bedienungsanleitung
-
Silvercrest SRR 3.7 A1 Bedienungsanleitung
-
-
-
Silvercrest SFR 1200 A1 Operation and Safety Notes
-
Silvercrest SRRP 3.7 A1 Operating Instructions Manual
-
-
-