Seite wird geladen ...

RotoForce-4
Instruction Manual
Manual No.: 15257000
Date of Release 01.04.1997


RotoForce-4
Instruction Manual
Table of Contents Page
User’s Guide............................................................. 1
Reference Guide..................................................... 17
Quick Reference Guide .......................................... 26
A
lways state Serial No and Voltage/frequency if you have technical questions or when ordering spare parts.
You will find the Serial No. and Voltage on the type plate of the machine itself. We may also need the Date
and Article No of the manual. This information is found on the front cover.
The following restrictions should be observed, as violation of the restrictions may cause cancellation of Struers
legal obligations:
Instruction Manuals: Struers Instruction Manual may only be used in connection with Struers equipment
covered by the Instruction Manual.
Service Manuals: Struers Service Manual may only be used by a trained technician authorised by Struers.
The Service Manual may only be used in connection with Struers equipment covered by the Service Manual.
Struers assumes no responsibility for errors in the manual text/illustrations. The information in this manual is
subject to changes without notice. The manual may mention accessories or parts not included in the present
version of the equipment.
The contents of this manual is the property of Struers. Reproduction of any part of this manual without the
written permission of Struers is not allowed.
A
ll rights reserved. © Struers 2001.
Struers A/S
Valhøjs Allé 176
DK-2610 Rødovre/Copenhagen
Denmark
Telephone +45 36 70 35 00
Fax +45 38 27 27 01


RotoForce-4
Instruction Manual
RotoForce-4
Safety Precaution Sheet
To be read carefully
before use
1. The operator should be fully aware of the use of the machine according
to the Instruction Manual. The machine must be placed in an adequate
working position.
2. Be sure that the actual voltage corresponds to the voltage stated on the
back of the machine. The machine must be earthed.
3. The specimen holder disc must be clamped in the quick coupling prior
to starting the machine. RotoForce-4 must be correctly and securely
mounted on the grinding/polishing machine.
4. Keep your hands clear of the supporting column, the specimen holder
or the specimen mover plate when lowering RotoForce-4.
5. Do not touch the rotating parts during operation.
6. If you observe malfunctions or hear unusual noises - stop the machine
and call technical service.
7. Blue lubricant: follow the current safety rules for handling, mixing, filling,
emptying and disposal of the alcohol-based lubricant.
The equipment is designed for use with consumables supplied by Struers. If subjected to misuse, improper
installation, alteration, neglect, accident or improper repair, Struers will accept no responsibility for damage(s)
to the user or the equipment.
Dismantling of any part of the equipment, during service or repair, should always be performed by a qualified
technician (electromechanical, electronic, mechanical, pneumatic, etc.).


RotoForce-4
Instruction Manual
1
User’s Guide
Table of Contents Page
1. Getting Started
Checking the Contents of Packing ................................................. 2
Unpacking of RotoForce-4 .............................................................. 2
Getting Acquainted with RotoForce-4............................................ 2
Installation...................................................................................... 3
RotoForce-4 on RotoPol-31....................................................... 3
RotoForce-4 on RotoPol-21/22/25 or on Rotopol-1/-2/-V .......... 4
Connecting RotoForce-4.................................................................. 5
Electrical Connection............................................................... 5
Connection to Compressed Air ................................................ 5
Connection to the Preparation Equipment ............................. 5
Choosing between Menus ............................................................... 6
Setting the Language...................................................................... 7
Mounting Lupo................................................................................ 8
2. Operation
Using the Controls.......................................................................... 9
Front Panel Controls of RotoForce-4 and Lupo ...................... 9
Front Panel Controls .................................................................... 10
RotoForce-4 ............................................................................ 10
Lupo........................................................................................ 11
Location of Main Switch ............................................................... 12
General Use of Keys ..................................................................... 12
Acoustic Signals ..................................................................... 12
The Handle.................................................................................... 12
Changing to Another Lupo Unit (Accessory) ............................... 12
Changing Lubricant Type / Refilling............................................ 13
Running a Preparation Method.................................................... 14
Inserting a Specimen Holder/ Specimen Mover Plate .......... 14
Adjusting the Position of RotoForce-4................................... 14
Setting Holder Type............................................................... 15
Adjusting the Force....................................................................... 16
Adjusting the Preparation Time................................................... 16
Direction of Rotation.............................................................. 16
Operation of Lupo ......................................................................... 16
Operation of RotoForce-4.............................................................. 16

RotoForce-4
Instruction Manual
2
1. Getting Started
In the packing box you should find the following parts:
1 RotoForce-4
1 Lupo automatic drip lubricator
1 Silicone tube
1 Pressure hose, 3 m
2 Hose clamps
1 Hose clamp
1 Quick coupling
1 Hose nipple
1 Screw M5x10 with washer
1 Socket spanner
1 Allen key
1 Disposable syringe with grease, Kilopoise Rocol 0868
(see section 4. Trouble Shooting)
1 Set of Instruction manuals
Remove RotoForce-4 from the transportation box. Save the nut
and the washer holding RotoForce-4. They are to be re-used when
mounting RotoForce-4 on RotoPol-21/-22/-25 or Rotopol-1/-2/-V.
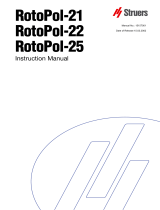
Take a moment to familiarise yourself with the location and
names of the RotoForce-4 components.
RotoForce-4 on RotoPol-22 (optional)
A Control keys and display
B Lupo drip lubricator
C Release knob
D Supporting column and stop ring
E Pressure feet for single samples
Checking the Contents of
Packing
Unpacking of RotoForce-4
Getting Acquainted with
RotoForce-4

RotoForce-4
Instruction Manual
3
Lift off the cap covering the supporting hole placed on the top
of the RotoPol-31 cabinet with a knife.
Likewise remove the two caps covering the fastening screws on
the left-hand side of the RotoPol cabinet.
Remove the black stop ring from the supporting column of
RotoForce-4.
Lead the supporting column of RotoForce-4 down into the
supporting hole in RotoPol-31. Turn the column until the cross
pin in the bottom of the column gets caught by the guiding
slots inside RotoPol-31.
Tighten the two fastening screws on the left-hand side of the
RotoPol-31 cabinet and cover the screws again with the two
caps.
Adjust the height of RotoForce-4 in relation to the preparation
disc:
− Mount a preparation disc on RotoPol-31.
− Mount a specimen mover plate in the coupling of
RotoForce-4.
− Lower RotoForce-4 into working position (see The Handle
in Section Operation).
− Measure the distance between the specimen mover plate
and the preparation disc. The correct distance is 1 -
1.5 mm.
If the distance is not correct, an adjustment has to be made:
− Move RotoForce-4 into upper position and secure it there
(see The Handle in Section Operation)
− Disengage the stop ring by loosening the retaining screw.
− Move the stop ring into correct position and fasten the
retaining screw again.
− Lower RotoForce-4 into working position and measure
the distance again. If it is still not correct, repeat the last
3 steps until the correct distance is obtained.
Installation
RotoForce-4 on RotoPol-31

RotoForce-4
Instruction Manual
4
Place two working tables of equal height at a distance about
half the length of RotoPol. Place RotoPol between the tables,
carefully balancing the machine, until it stands firmly between
the tables.
RotoPol-21/-22/-25: Remove the cap covering the supporting
hole between the two turntables.
Rotopol-1/-2/-V: The transportation case for Rotopol includes
a printed template. Punch out the pre-cast hole in Rotopol
with a round-headed hammer as follows: strike the circle on
the template marked RotoForce-4 with a firm blow. Remove
the template when the hole opens.
Lead the supporting column of RotoForce-4 down into the
supporting hole of RotoPol.
Turn the column until the cross pin in the bottom of the
column gets caught by the guiding slots inside RotoPol.
Fasten the nut and washer from the transportation box tightly
under the column of RotoForce-4 below RotoPol.
Adjust the height of the specimen mover in relation to the
preparation disc:
− Mount a preparation disc on RotoPol.
− Mount a specimen mover plate in the coupling of
RotoForce-4.
− Lower RotoForce-4 into working position (see the handle
procedure in Section Operation).
− Measure the distance between the specimen mover plate
and the preparation disc. The correct distance is 1 -
1.5 mm.
If the distance is not correct, an adjustment has to be made:
− Move RotoForce-4 into upper position and secure it there
(see The Handle in Section Operation)
− Disengage the stop ring by loosening the retaining screw.
− Move the stop ring into correct position and fasten the
retaining screw again.
− Lower RotoForce-4 into working position and measure
the distance again. If it is still not correct, repeat the last
3 steps until the correct distance is obtained.
RotoForce-4 on
RotoPol-21/22/25 or on
Rotopol-1/-2/-V
Take care!
A RotoPol machine equipped with a RotoForce weights over 50 kg!

RotoForce-4
Instruction Manual
5
RotoForce-4 is supplied with electric cable, air hose and
connection cable.
Mount a plug on the cable or connect directly to mains:
Black and brown: phase
Yellow/green: earth
Check that the specimen holder rotates anti-clockwise when
RotoForce-4 is pre-set to run in co-rotation r. If not, switch two
phases.
Mount an air hose on the enclosed quick coupling and secure
with the enclosed hose clamp.
Connect the quick coupling to the factory-mounted air hose of
RotoForce-4.
RotoPol alone: Connect the communication cable to the back of
RotoPol (see the Instruction Manual of RotoPol).
RotoPol with Multidoser and/or RotoCom: Connect the
communication cable to the back of Multidoser (see the
Instruction Manual of Multidoser).
Connecting RotoForce-4
Electrical Connection
IMPORTANT
Check that the mains voltage corresponds to the voltage stated on the type
plate on the back of the machine.
Connection to Compressed Air
IMPORTANT
The air pressure must be between 5 bar (73 psi) and 6.5 bar (95 psi)
The air must not contain water, oil or particles. If necessary, a pressure
regulator/filter unit must be installed between air supply and RotoForce.
Connection to
the Preparation Equipment

RotoForce-4
Instruction Manual
6
Press the MENU m key to move from one screen to another:
LANGUAGE
ENGLISH
m
COMMUNICATION
STANDARD
m
FORCE REDUCTION
NO
Choosing between Menus

RotoForce-4
Instruction Manual
7
>> 150N 01:00
SAMPLE HOLDER
m Press MENU m to activate the set-
up menu.
HOLDER TYPE
SAMPLE HOLDER
m Press MENU m again to proceed to
the next screen.
LANGUAGE
ENGLISH
The LANGUAGE screen appears.
L Press SELECT L to choose English,
German, French or Japanese.
SPRACHE
DEUTSCH
o Press STOP o to accept the choice.
The Operation Menu will appear
again in the language you have
chosen.
>> 150N 01:00
PROBENHALTER
Remember to set the same language on all the connected
RotoSystem modules.
Setting the Language

RotoForce-4
Instruction Manual
8
Remove Lupo from its box
Guide Lupo onto the connector on the supporting arm on
RotoForce-4.
Connect the nipple on Lupo to the nozzle underneath
RotoForce-4 with the enclosed silicone tube.
Remove the top lid of the bottle and fill with lubricant.
Re-mount the top lid, and Lupo is ready for use.
Mounting Lupo

RotoForce-4
Instruction Manual
9
2. Operation
Using the Controls
Front Panel Controls of
RotoForce-4 and Lupo
8
3
12 10
4
6
5 7 211 9
m
r
R
fO
fN
tO
tN
A
uto
s
o
L
Roto ModuleA
RotoForce-4
RotoForce-4

RotoForce-4
Instruction Manual
10
Name Key Function Name Key Function
MAIN
SWITCH
The main switch is located on
the back of RotoForce-4. Turn
clockwise to switch on the
power.
SELECT
L
Changes values in the set-up
menu.
AUTO
Auto
Turns Auto mode on or off
(communication between the
modules in the RotoSystem).
FORCE
fO
Select FORCE:
O
Increases the force
N
Decreases the force
START
s
Starts RotoForce-4.
TIME
tO
Select TIME:
O
Increases the time
N
Decreases the time
STOP
o
Stops RotoForce-4
Exits the set-up menu.
1
CO-
ROTATION r
Sets RotoForce-4 to co-rotation.
MENU
m
Activates the set-up menu or
moves down in the menu
structure.
2
COUNTER-
ROTATION R
Sets RotoForce-4 to counter-
rotation
Front Panel Controls
RotoForce-4

RotoForce-4
Instruction Manual
11
Name Key Function Name Key Function
3
DOSING
SWITCH
Switches between different step
dosing levels.
4
START
s
Manual start of Lupo. When not
in Auto mode Lupo can be used
for manual pre-dosing.
(4, 5, 6)
CONTROL
SWITCH
Switches between Auto, Start
and Stop mode. Lupo is sup-
plied with power direct from
RotoForce-4 and does not need
a separate power switch.
5
STOP
o
Manual stop of Lupo. This mode
does not stop neither
RotoForce-4 nor the
grinding/polishing machine.
6
AUTO
Auto
When Auto mode is active start
and stop of Lupo is controlled
from RotoForce-4. When
RotoForce-4 is started/stopped
Lupo also starts/stops.
Lupo

RotoForce-4
Instruction Manual
12
The main switch is located on the back of RotoForce-4.
MENU m, and SELECT L can only be activated when the
machine has been stopped.
SELECT L can only be activated when MENU m is selected.
Short Beep: When pressing a key, a short beep indicates
that the command has been accepted
Long Beep: a long beep indicates that the key cannot be
activated at the moment.
The handle of RotoForce-4 is used to raise and lower the
specimen mover and to lock it in working position. The
handle has three positions which are indicated with dots.
Handle in Top Position: When the handle is placed at one
dot, RotoForce-4 is moved to its upper position. This position
is used to insert specimen holders/specimen mover plates,
and to allow positioning of RotoForce-4 correctly over the
preparation disc.
Handle in Adjusting Position: When the handle is moved
down to two dots, RotoForce-4 is lowered into its working
position. RotoForce-4 can now be adjusted horizontally in
relation to the turntable.
Handle in Working Position: When the handle is moved
all the way down to three dots, RotoForce-4 is locked into
working position.
Set the mode switch on Lupo to STOP o position.
Remove the current Lupo. Remove the silicon tube from the
nipple underneath Lupo.
Place the other Lupo (accessory) with an alternative lubricant
in the connector on the supporting arm. Connect the silicone
tube to the nipple.
Location of Main Switch
General Use of Keys
A
coustic Signals
The Handle
Be careful not to move the handle too fast from position
to
,
as RotoForce-4 may not have reached the working position.
(A message will blink on the display: LOCKING TOO FAST)
Changing to Another Lupo Unit
(Accessory)

RotoForce-4
Instruction Manual
13
Set the mode switch on Lupo to STOP o position.
Remove Lupo from RotoForce.
Hold the Lupo lubricant bottle firmly and remove the top lid.
Empty the bottle, still mounted on Lupo, of any remaining
lubricant.
− Fill the bottle with mild, soapy water.
− Put Lupo back on the supporting arm.
− Set the mode switch on Lupo to START s.
− Set the dosing control to max. dosing (step 10) and let the
water run through the nozzle for 2-3-min.
Repeat the above points but fill with tap water to rinse out
any soap residue.
Refill with lubricant and remount the top lid.
Changing Lubricant Type /
Refilling
IMPORTANT
Always avoid turning the socket cap while unscrewing the Lupo bottle, as the
turning movement may cause damage to the socket cap gasket.

RotoForce-4
Instruction Manual
14
Place the specimen holder or specimen mover plate under the
quick coupling.
Press and hold the release button on the column of
RotoForce-4, while guiding the pressure tap of the specimen
holder or specimen mover plate into the coupling.
Turn the specimen holder or specimen mover plate until the
three pins engage in the corresponding holes.
Release the button.
Make sure that RotoForce-4 is set to the correct holder type. If
necessary, change to another type, see Section Setting holder
type.
The position of the specimen holder or specimen mover plate
must be adjusted correctly in relation to the preparation disc to
achieve the best possible preparation results. This is done by
moving RotoForce-4 horizontally.
Generally the specimen holder or specimen mover plate should
be positioned so that the specimens run close to the periphery
of the preparation disc. A distance of about 2-4 mm is
appropriate.
There are three exceptions only: Grinding paper with double
adhesive back, disc with magnetic backing and Petrodisc-M. In
all three cases, the specimens should be protruding over the
edge.
NB: In the case of Petrodisc-M, the specimens should
protrude over the centre of the disc as well. This is done to
achieve the best possible planeness of the specimen, and to
maintain the planeness of Petrodisc-M
Running a Preparation Method
Inserting a Specimen Holder/
Specimen Mover Plate
A
djusting the Position of
RotoForce-4
/