
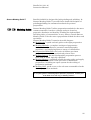
RotoPol-21
RotoPol-22
RotoPol-25
Instruction Manual
Manual No.: 15157001
Date of Release 15.03.2002

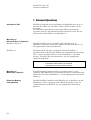
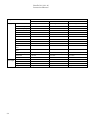
Table of Contents Page
User’s Guide ..............................................................1
Reference Guide.......................................................21
Quick Reference Guide.............................................35
A
lways state Serial No and Voltage/frequency if you have technical questions or when ordering spare parts.
You will find the Serial No. and Voltage on the type plate of the machine itself. We may also need the Date
and Article No of the manual. This information is found on the front cover.
The following restrictions should be observed, as violation of the restrictions may cause cancellation of
Struers legal obligations:
Instruction Manuals: Struers Instruction Manual may only be used in connection with Struers equipment
covered by the Instruction Manual.
Service Manuals: Struers Service Manual may only be used by a trained technician authorised by Struers.
The Service Manual may only be used in connection with Struers equipment covered by the Service Manual.
Struers assumes no responsibility for errors in the manual text/illustrations. The information in this manual is
subject to change without notice. The manual may mention accessories or parts not included in the present
version of the equipment.
The contents of this manual are the property of Struers. Reproduction of any part of this manual without the
written permission of Struers is not allowed.
A
ll rights reserved. © Struers 2002.
Struers A/S
Valhøjs Allé 176
DK-2610 Rødovre/Copenhagen
Denmark
Telephone +45 36 70 35 00
Fax +45 38 27 27 01

RotoPol-21/-22/-25
Instruction Manual
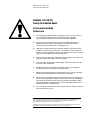
RotoPol -21/-22/-25
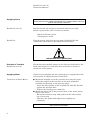
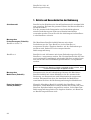
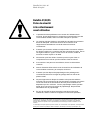
Safety Precaution Sheet
To be read carefully
before use
1. The operator(s) should be fully instructed in the use of the machine,
any connected equipment and accessories and the applied
consumables according to the relevant Instruction Manuals.
2. The machine must be placed on a safe and stable table with an
adequate working height. All functions on the machine and any
connected equipment must be in working order.
3. Operators should ensure that the actual voltage corresponds to the
voltage on the back of the machine. The machine must be earthed.
Follow the local regulations. Always turn the power off and remove the
plug or the cable before opening the machine.
4. Connect only to cold water. Make sure that the water connections are
leak-proof and that the water outlet is working.
5. The connection to the mains water supply should be turned off if the
machine is left unattended.
6. Establish efficient exhaust from the working area if consumables
containing alcohol, for example, are being used.
7. Make sure that the grinding or polishing discs are correctly mounted,
the driving pins engaged with the holes in the turntable.
8. Keep clear of the rotational disc and the specimen mover if these are
mounted during operation. Make sure that any screws for clamping of
specimens in specimen holders protrude as little as possible. While
grinding manually, be careful not to touch the grinding paper. Do not
drop the specimen while grinding.
9. If you observe malfunctions or hear unusual noises - stop the machine
and call technical service.
The equipment is designed for use with consumables supplied by Struers. If subjected to misuse,
improper installation, alteration, neglect, accident or improper repair, Struers will accept no
responsibility for damage(s) to the user or the equipment.
Dismantling of any part of the equipment, during service or repair, should always be performed by a
qualified technician (electromechanical, electronic, mechanical, pneumatic, etc.)


RotoPol-21/-22/-25
Instruction Manual
1
User’s Guide
Table of Contents Page
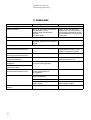
1. Getting Started
Checking Contents of Packing ......................................................... 3
RotoPol-21................................................................................ 3
RotoPol-22................................................................................ 3
RotoPol-25................................................................................ 3
Recirculation Cooling Unit Optional (TRECI) ....................... 4
Recirculation Cooling Unit Connector, Optional (ROPRE)... 4
Getting Acquainted with RotoPol ....................................................5
Unpacking RotoPol ........................................................................... 5
Placing RotoPol................................................................................. 5
Supplying Power............................................................................... 6
Direction of Turntable ...................................................................... 6
Supplying Water ............................................................................... 6
Connection to Water Mains .................................................... 6
Connection to Water Outlet .................................................... 7
Software Settings.............................................................................. 7
Setting the Language ....................................................................... 8
Language Setting for RotoPol-21 and -25 .............................. 8
Language Setting for RotoPol-22............................................ 9

RotoPol-21/-22/-25
Instruction Manual
2
2. Basic Operations
Using the Controls.......................................................................... 10
Front Panel of RotoPol-21..................................................... 10
Front Panel of RotoPol-22..................................................... 12
General Use of Keys ....................................................................... 16
Reading the Display ....................................................................... 16
Routine Operations......................................................................... 16
Mounting a Disc..................................................................... 16
Starting the Disc.................................................................... 16
Stopping the Disc................................................................... 16
User Select on RotoPol-21 and -22.................................................17
Selecting Water and Speed ................................................... 17
Setting to User Select............................................................17
Setting to GRINDING........................................................... 17
Setting to POLISHING ......................................................... 17
User Select on RotoPol-25 .............................................................. 18
Selecting Water ..................................................................... 18
Setting to User Select............................................................18
Setting to GRINDING........................................................... 18
Setting to POLISHING ......................................................... 18
Settings with a RotoCom Memory Unit ............................... 19

RotoPol-21/-22/-25
Instruction Manual
3
1. Getting Started
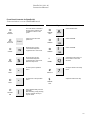
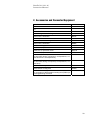
In the packing case you should find the following parts:
1 RotoPol-21
2 Splash rings
1 Inlet hose 3/4" x 2 m
1 Filter gasket
1 Gasket ø11/ø24 x 1.5
1 Reduction ring with gasket
1 Outlet hose ø32 x 3 m
1 Hose clamp
1 Template
1 Set of Instruction Manuals
1 RotoPol-22
2 Splash rings
1 Inlet hose 3/4" x 2 m
1 Filter gasket
1 Gasket ø11/ø24 x 1.5
1 Reduction ring with gasket
1 Outlet hose ø32 x 3 m
1 Hose clamp
1 Template
1 Set of Instruction Manuals
1 RotoPol-25
1 Power cable
2 Splash rings
1 Inlet hose 3/4" x 2 m
1 Filter gasket
1 Gasket ø11/ø24 x 1.5
1 Reduction ring with gasket
1 Outlet hose ø32 x 3 m
1 Hose clamp
1 Template
1 Set of Instruction Manuals
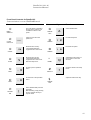
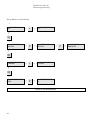
Checking Contents
of Packing
RotoPol-21
RotoPol-22
RotoPol-25

RotoPol-21/-22/-25
Instruction Manual
4
1 TRECI complete
1 Outlet angle
1 Funnel
2 Disposable plastic containers (TREPO)
1 Connection box
1 Elbow 90o
1 Reduction piece, large
1 Reduction piece, small
1 Hose clamp
1 Additive for Cooling Fluid, 1 l (ADDUN)
1 Diagram
Recirculation Cooling Unit
Optional (TRECI)
Recirculation Cooling Unit
Connector, Optional (ROPRE)

RotoPol-21/-22/-25
Instruction Manual
5
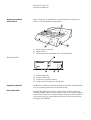
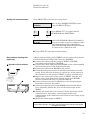
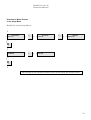
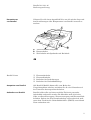
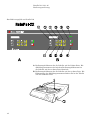
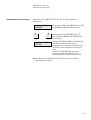
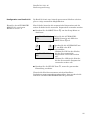
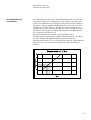
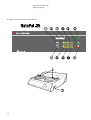
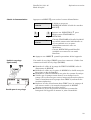
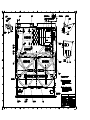
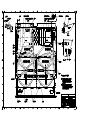
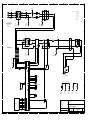
Take a moment to familiarise yourself with the location and
names of all the RotoPol components:
A Front panel control(s)
B Main switch
C Water taps with sprinkler tube and turntables
Water inlet tube
Water outlet tube
Socket for specimen mover
Socket for recirculation cooling unit
All RotoPol models are detached from the bottom of the packing
case by removing the four screws from below.
RotoPol should be placed on a steady table with an adequate
working height. The machine must be close to the power supply,
water mains and water outlet facilities. If water recirculation is
used, there must be room under the table for the Recirculation
Cooling Unit (TRECI).
Getting Acquainted
with RotoPol
Back of RotoPol
Unpacking RotoPol
Placing RotoPol

RotoPol-21/-22/-25
Instruction Manual
6
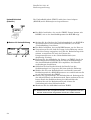
RotoPol-21 and -22 are factory mounted with electric cable.
Mount a plug on the cable or connect to mains:
Black and brown: phase.
Yellow/green: earth.
Plug the power cable into the rear panel of RotoPol-25 and
connect the other end to a grounded electrical outlet.
Check that the turntable rotates in the direction indicated by the
label (anti-clockwise). If the direction of rotation is incorrect,
switch two of the phases.
Water for wet grinding and disc cooling may be supplied from the
water mains or a Recirculation Cooling Unit.
Mount the straight end of the pressure hose onto the water
inlet tube (upper) in the hose box on the back of RotoPol-
21/22/25 (see drawing on the previous page):
- Insert the filter gasket in the coupling nut with the flat side
against the pressure hose.
- Tighten the coupling nut completely.
Mount the other end of the pressure hose on the water mains
tap for cold water:
- Mount the reduction ring with gasket on the water mains
tap, if necessary.
- Introduce the gasket and tighten the coupling nut
completely.
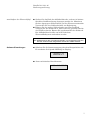
Supplying Power IMPORTANT
Check that the mains voltage corresponds to the voltage stated on the type
plate on the side of the machine.
RotoPol-21 and -22
RotoPol-25
DANGER!
THE MACHINE MUST BE EARTHED
Direction of Turntable
RotoPol-21 and -22
Supplying Water
Connection to Water Mains
IMPORTANT
Only connect to cold water.

RotoPol-21/-22/-25
Instruction Manual
7
Locate the end of the drain hose where a short length of the
steel reinforcement has been stripped away. Mount the
stripped end of the hose onto the water outlet tube. Use hose
clamp for fastening.
Lead the other end of the drain hose to the water outlet.
Arrange the tube so that it slopes throughout its length.
Shorten the hose, if necessary. The drain hose should be
attached to the water outlet system if possible.
Switch on the power at the main switch. The following display
will appear briefly:
- RotoPol-2X -
VERSION X.Y
The operation menu will then appear:
WATER OFF 150RPM
Connection to Water Outlet
REMEMBER
Avoid sharp bends in the drain hose and make sure that the hose slopes
throughout its length.
Software Settings

RotoPol-21/-22/-25
Instruction Manual
8
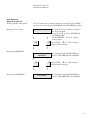
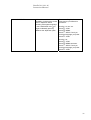
WATER OFF 150RPM Example screen (operation menu).
m The MENU m key activates the
setup menu.
LANGUAGE
ENGLISH
L Press SELECT L to choose English
,
German, French or Japanese.
SPRACHE
DEUTSCH
L Press SELECT L until you reach
the language you prefer.
LANGUE
FRANCAISE
o
EAU OFF 150 T/M
Press STOP o to accept the choice.
The Operation Menu will appear
again in the language you have
chosen.
Remember to set the same language on all connected RotoSystem
modules.
Setting the Communication: see Advanced Operation Section.
Setting the Language
Language Setting for
RotoPol-21 and -25

RotoPol-21/-22/-25
Instruction Manual
9
WATER OFF 150RPM Example screen
m
The MENU m key activates the
setup menu.
AUTO MODE
ON
m Press m again. The language
screen appears.
LANGUAGE
ENGLISH
L Press SELECT L to choose English
,
German, French or Japanese.
SPRACHE
DEUTSCH
L Press SELECT L until you reach
the language you prefer.
LANGUAGE
FRANCAISE
o
EAU OFF 150 T/M
Press STOP o to accept the choice.
The Operation Menu will appear
again in the language you have
chosen.
Repeat the above procedure for the next disc.
Remember to set the same language on all connected RotoSystem
modules. Setting the Communication: see Advanced Operation
Section.
Language Setting for
RotoPol-22

RotoPol-21/-22/-25
Instruction Manual
10
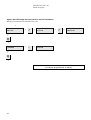
2. Basic Operations
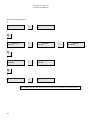
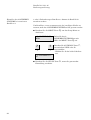
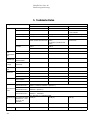
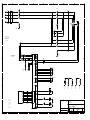
Using the Controls
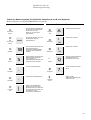
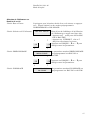
Front Panel of RotoPol-21
3

RotoPol-21/-22/-25
Instruction Manual
11
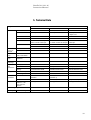
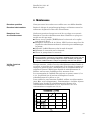
Name Function Name Key Function
MAIN
SWITCH
The main switch is located to
the right of the cabinet. Turn
clockwise to switch on the
power.
WATER
OFF
W
Select WATER OFF.
POWER
INDICATOR
Power
Lights up when the main
power is on.
SPEED
d
300
Select 300 RPM.
START
s Starts the disc and any
connected RotoSystem
equipment set in Auto mode.
SPEED
d
150
Select 150 RPM.
STOP
o Stops the disc and any
connected RotoSystem
equipment set in Auto mode.
Exits the setup menu.
1
MENU
m
Activates the setup menu or
moves down in the menu
structure.
DISC
A Scrolls up in the operation
menu
2
SELECT
L
Changes values in the setup
menu.
DISC
A Scrolls down in the operation
menu. 3
WATER
TAP
Adjust the water at the tap.
WATER
ON
w Select WATER ON: press the
key briefly.
Manual Dosing: keep pressing
the key. Release the key to
sto
p
the water.
Front Panel Controls for RotoPol-21
Communication is set to STANDARD mode

RotoPol-21/-22/-25
Instruction Manual
12
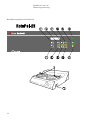
A Front panel controls for the disc on the left-hand side. The
figure numbers are identical to the front panel controls for the
right-hand disc.
B Front panel controls for the disc on the right-hand side.
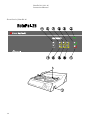
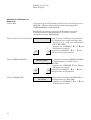
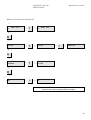
Front Panel of RotoPol-22
3

RotoPol-21/-22/-25
Instruction Manual
13
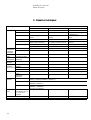
Name Function Name Key Function
MAIN
SWITCH
The main switch is located to
the right of the cabinet. Turn
clockwise to switch on the
power.
WATER
OFF
W Select WATER OFF.
POWER
INDICATOR
Power
Lights up when the main
power is on.
SPEED
d
300
Select 300 RPM.
START
s Starts the disc and any
connected RotoSystem
equipment set in Auto mode.
SPEED
d
150
Select 150 RPM.
STOP
o Stops the disc and any
connected RotoSystem
equipment set in Auto mode.
Exits the setup menu.
1
MENU
m Activates the setup menu or
moves down in the menu
structure.
DISC
A Scrolls up in the operation
menu
2
SELECT
L Changes values in the setup
menu.
DISC
A Scrolls down in the operation
menu. 3
WATER
TAP
Adjust the water at the tap.
WATER
ON
w Select WATER ON: press the
key briefly.
Manual Dosing: keep pressing
the key. Release the key to
sto
p
the water.
Front Panel Controls for RotoPol-22 (Identical for side A and B)
Communication is set to STANDARD mode

RotoPol-21/-22/-25
Instruction Manual
14
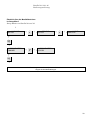
Front Panel of RotoPol-25
3

RotoPol-21/-22/-25
Instruction Manual
15
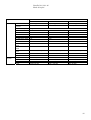
Name Function Name Key Function
MAIN
SWITCH
The main switch is located to
the right of the cabinet. Turn
clockwise to switch on the
power.
WATER
OFF
W
Select WATER OFF.
POWER
INDICATOR
Power
Lights up when the main
power is on.
SPEED dO
Increase the speed
START s Starts the disc and any
connected RotoSystem
equipment set in Auto mode.
SPEED dN
Decrease the speed
STOP o Stops the disc and any
connected RotoSystem
equipment set in Auto mode.
Exits the setup menu.
1
MENU m
Activates the setup menu or
moves down in the menu
structure.
DISC AO Scrolls up in the operation
menu
2
SELECT L
Changes values in the setup
menu.
DISC AN Scrolls down in the operation
menu. 3
WATER
TAP
Adjust the water at the tap.
WATER
ON
w Select WATER ON: press the
key briefly.
Manual Dosing: keep pressing
the key. Release the key to
stop the water.
Front Panel Controls for RotoPol-25
Communication is set to STANDARD mode

RotoPol-21/-22/-25
Instruction Manual
16
WATER ON w, WATER OFF W and SPEED d can only be
selected freely at User Select.
MENU m, SELECT L and DISC A can only be activated
when the machine has been stopped.
SELECT L can only be activated when MENU m is selected.
When pressing a key, a short beep indicates that the command
has been accepted, whereas a long beep indicates that the key
cannot be activated at the moment.
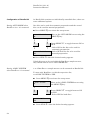
WATER ON 300RPM
GRINDING
- The first line on the screen shows the
setting of parameters WATER and
SPEED.
- The second line, if any, shows a
selected preset mode (GRINDING or
POLISHING).
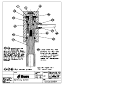
Place the disc on the turntable and turn it until the three
driving pins engage with the holes in the turntable.
Press START s. The disc starts rotating. Selected functions
are executed, and connected RotoSystem modules start
operating.
Press STOP o. The disc stops rotating. Selected functions and
connected RotoSystem modules stop.
General Use of Keys
Acoustic Signals
Reading the Display
Routine Operations
Mounting a Disc
Starting the Disc
Stopping the Disc
Seite laden ...
Seite laden ...
Seite laden ...
Seite laden ...
Seite laden ...
Seite laden ...
Seite laden ...
Seite laden ...
Seite laden ...
Seite laden ...
Seite laden ...
Seite laden ...
Seite laden ...
Seite laden ...
Seite laden ...
Seite laden ...
Seite laden ...
Seite laden ...
Seite laden ...
Seite laden ...
Seite laden ...
Seite laden ...
Seite laden ...
Seite laden ...
Seite laden ...
Seite laden ...
Seite laden ...
Seite laden ...
Seite laden ...
Seite laden ...
Seite laden ...
Seite laden ...
Seite laden ...
Seite laden ...
Seite laden ...
Seite laden ...
Seite laden ...
Seite laden ...
Seite laden ...
Seite laden ...
Seite laden ...
Seite laden ...
Seite laden ...
Seite laden ...
Seite laden ...
Seite laden ...
Seite laden ...
Seite laden ...
Seite laden ...
Seite laden ...
Seite laden ...
Seite laden ...
Seite laden ...
Seite laden ...
Seite laden ...
Seite laden ...
Seite laden ...
Seite laden ...
Seite laden ...
Seite laden ...
Seite laden ...
Seite laden ...
Seite laden ...
Seite laden ...
Seite laden ...
Seite laden ...
Seite laden ...
Seite laden ...
Seite laden ...
Seite laden ...
Seite laden ...
Seite laden ...
Seite laden ...
Seite laden ...
Seite laden ...
Seite laden ...
Seite laden ...
Seite laden ...
Seite laden ...
Seite laden ...
Seite laden ...
Seite laden ...
Seite laden ...
Seite laden ...
Seite laden ...
Seite laden ...
Seite laden ...
Seite laden ...
Seite laden ...
Seite laden ...
Seite laden ...
Seite laden ...
Seite laden ...
Seite laden ...
Seite laden ...
Seite laden ...
Seite laden ...
Seite laden ...
Seite laden ...
Seite laden ...
Seite laden ...
Seite laden ...
Seite laden ...
Seite laden ...
Seite laden ...
Seite laden ...
Seite laden ...
Seite laden ...
Seite laden ...
Seite laden ...
Seite laden ...
Seite laden ...
Seite laden ...
Seite laden ...
Seite laden ...
Seite laden ...
Seite laden ...
Seite laden ...
Seite laden ...
Seite laden ...
Seite laden ...
Seite laden ...
Seite laden ...
Seite laden ...
Seite laden ...
-
 1
1
-
 2
2
-
 3
3
-
 4
4
-
 5
5
-
 6
6
-
 7
7
-
 8
8
-
 9
9
-
 10
10
-
 11
11
-
 12
12
-
 13
13
-
 14
14
-
 15
15
-
 16
16
-
 17
17
-
 18
18
-
 19
19
-
 20
20
-
 21
21
-
 22
22
-
 23
23
-
 24
24
-
 25
25
-
 26
26
-
 27
27
-
 28
28
-
 29
29
-
 30
30
-
 31
31
-
 32
32
-
 33
33
-
 34
34
-
 35
35
-
 36
36
-
 37
37
-
 38
38
-
 39
39
-
 40
40
-
 41
41
-
 42
42
-
 43
43
-
 44
44
-
 45
45
-
 46
46
-
 47
47
-
 48
48
-
 49
49
-
 50
50
-
 51
51
-
 52
52
-
 53
53
-
 54
54
-
 55
55
-
 56
56
-
 57
57
-
 58
58
-
 59
59
-
 60
60
-
 61
61
-
 62
62
-
 63
63
-
 64
64
-
 65
65
-
 66
66
-
 67
67
-
 68
68
-
 69
69
-
 70
70
-
 71
71
-
 72
72
-
 73
73
-
 74
74
-
 75
75
-
 76
76
-
 77
77
-
 78
78
-
 79
79
-
 80
80
-
 81
81
-
 82
82
-
 83
83
-
 84
84
-
 85
85
-
 86
86
-
 87
87
-
 88
88
-
 89
89
-
 90
90
-
 91
91
-
 92
92
-
 93
93
-
 94
94
-
 95
95
-
 96
96
-
 97
97
-
 98
98
-
 99
99
-
 100
100
-
 101
101
-
 102
102
-
 103
103
-
 104
104
-
 105
105
-
 106
106
-
 107
107
-
 108
108
-
 109
109
-
 110
110
-
 111
111
-
 112
112
-
 113
113
-
 114
114
-
 115
115
-
 116
116
-
 117
117
-
 118
118
-
 119
119
-
 120
120
-
 121
121
-
 122
122
-
 123
123
-
 124
124
-
 125
125
-
 126
126
-
 127
127
-
 128
128
-
 129
129
-
 130
130
-
 131
131
-
 132
132
-
 133
133
-
 134
134
-
 135
135
-
 136
136
-
 137
137
-
 138
138
-
 139
139
-
 140
140
-
 141
141
-
 142
142
-
 143
143
-
 144
144
-
 145
145


in anderen Sprachen
- English: Struers RotoPol-21 User manual
- français: Struers RotoPol-21 Manuel utilisateur
Verwandte Papiere
-
 Struers RotoPol-31 Benutzerhandbuch
-
 Struers RotoPol-11 Benutzerhandbuch
-
 Struers Abramin Benutzerhandbuch
-
 Struers Prepamatic-2 Benutzerhandbuch
-
 Struers RotoForce-1 Benutzerhandbuch
-
 Struers ProntoPress-10 Benutzerhandbuch
-
 Struers Accutom-50 Benutzerhandbuch
-
 Struers LaboForce-3 Benutzerhandbuch
-
 Struers RotoForce-4 Benutzerhandbuch
-
 Struers MAPS Benutzerhandbuch


Sonstige Unterlagen
-
Husqvarna PG 530 Bedienungsanleitung
-
Numatic NuSpeed NR1500S Owner Instructions
-
Parkside PDAP 75 A1 Original Instructions Manual
-
Bresser 5116200 Bedienungsanleitung
-
-
-
-
Parkside PWS 125 A1 Benutzerhandbuch
-
-
GGM Gastro SSNC40S Bedienungsanleitung