
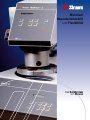
RotoPol-31
RotoPol-35
Instruction Manual
Gebrauchsanweisung
Mode d’emploi
Manual No.: 15287001
Date of release: 22.08.2008

RotoPol-31/-35
Instruction Manual
Table of Contents Page
User’s Guide ..............................................................1
Reference Guide.......................................................13
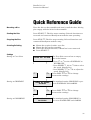
Quick Reference Guide............................................31
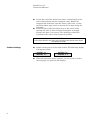
Always state Serial No and Voltage/frequency if you have technical questions or when ordering spare parts.
You will find the Serial No. and Voltage on the type plate of the machine itself. We may also need the Date
and Article No of the manual. This information is found on the front cover.
The following restrictions should be observed, as violation of the restrictions may cause cancellation of
Struers legal obligations:
Instruction Manuals: Struers Instruction Manual may only be used in connection with Struers equipment
covered by the Instruction Manual.
Service Manuals: Struers Service Manual may only be used by a trained technician authorised by Struers.
The Service Manual may only be used in connection with Struers equipment covered by the Service Manual.
Struers assumes no responsibility for errors in the manual text/illustrations. The information in this manual is
subject to changes without notice. The manual may mention accessories or parts not included in the present
version of the equipment.
The contents of this manual is the property of Struers. Reproduction of any part of this manual without the
written permission of Struers is not allowed.
All rights reserved. © Struers 2008.
Struers A/S
Pederstrupvej 84
DK-2750 Ballerup
Denmark
Telephone +45 44 600 800
Fax +45 44 600 801

RotoPol-31/-35
Instruction Manual
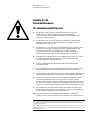
RotoPol-31/-35
Safety Precaution Sheet
To be read carefully
before use
1. The operator(s) should be fully instructed in the use of the machine,
any connected equipment and accessories and the applied
consumables according to the relevant Instruction Manuals.
2. The machine must be placed on a safe and stable table with an
adequate working height. All functions on the machine and any
connected equipment must be in working order.
3. Operators should ensure that the actual voltage corresponds to the
voltage on the back of the machine. The machine must be earthed.
Follow the local regulations. Always turn the power off and remove the
plug or the cable before opening the machine.
4. Connect only to cold water. Make sure that the water connections are
leak-proof and that the water outlet is working.
5. Struers recommend that the mains water supply is shut off or
disconnected if the machine is to be left unattended.
6. Establish efficient exhaust from the working area if consumables
containing alcohol, e.g. blue DP-Lubricant, are being used.
7. Make sure that the grinding or polishing discs are correctly mounted,
the driving pins engaged with the holes in the turntable.
8. Keep clear of the rotational disc and the specimen mover during
operation. Make sure that any screws for clamping of specimens in
specimen holders protrude as little as possible. While grinding
manually, be careful not to touch the grinding paper. Do not drop the
specimen while grinding.
9. Do not lift the specimen mover while preparing individual specimens.
RotoForce-4 or Pedemat must be set to Auto.
10. If you observe malfunctions or hear unusual noises - stop the machine
and call technical service.
The equipment is designed for use with consumables supplied by Struers. If subjected to misuse, improper
installation, alteration, neglect, accident or improper repair, Struers will accept no responsibility for
damage(s) to the user or the equipment.
Dismantling of any part of the equipment, during service or repair, should always be performed by a qualified
technician (electromechanical, electronic, mechanical, pneumatic, etc.).

RotoPol-31/-35
Instruction Manual
Disposal
Equipment marked with a WEEE symbol contain electrical and
electronic components and must not be disposed of as general
waste.
Please contact your local authorities for information on the correct
method of disposal in accordance with national legislation.

RotoPol-31/-35
Instruction Manual
1
User’s Guide
Table of Contents Page
1. Getting Started
Checking the Contents of Packing................................................... 2
RotoPol-31 (ROT31) RotoPol-35 (ROT35) ................................ 2
Lid, Optional (ROTLI)............................................................... 2
Recirculation Cooling Unit, Optional (TRECI) ........................ 2
Recirculation Cooling Unit Connector, Optional (ROPRE).....2
Getting Acquainted with RotoPol-31/-35......................................... 3
Unpacking RotoPol-31/-35................................................................ 4
Placing RotoPol-31/-35...................................................................... 4
Supplying Power............................................................................... 4
RotoPol-31.................................................................................. 4
Direction of the Turntable on RotoPol-35 ................................ 4
RotoPol-35 Single-phase Versions ............................................ 4
RotoPol-35 Three-phase versions .............................................4
Supplying Water ............................................................................... 5
Connection to Water Mains ......................................................5
Connection to Water Outlet ...................................................... 5
Software Settings.............................................................................. 6
Setting the Language .......................................................................7
2. Basic Operation
Using the Controls............................................................................ 8
The Front Panel of RotoPol-31.................................................. 8
The Front Panel of RotoPol-35.................................................. 8
Front Panel Controls ........................................................................ 9
General Use of Keys ................................................................ 10
Acoustic Signals....................................................................... 10
Reading the Display ................................................................ 10
Routine Operations......................................................................... 11
Mounting a Disc....................................................................... 11
Starting the Disc...................................................................... 11
Stopping the Disc..................................................................... 11
Selecting Water and Speed ..................................................... 11
Settings with a RotoCom Memory Unit ................................. 12

RotoPol-31/-35
Instruction Manual
1. Getting Started
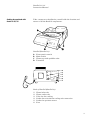
In the packing box you should find the following parts:
Checking the Contents of
Packing
1 RotoPol-31/-35
RotoPol-31 (ROT31)
RotoPol-35 (ROT35) 1 Pressure hose 3/4" x 2 m
1 Filter gasket
1 Gasket ø11/ø24 x 1.5 mm
1 Reduction ring with gasket
1 Drain hose, ø38 mm x 3 m
1 Drain elbow pipe
2 Hose clamps
1 Protection ring
1 Set of Instruction Manuals
1 Lid
Lid, Optional (ROTLI)
1 TRECI complete
Recirculation Cooling Unit,
Optional (TRECI) 1 Outlet angle
1 Funnel
2 Disposable plastic containers (TREPO)
1 Connection box
Recirculation Cooling Unit
Connector, Optional (ROPRE) 1 Hexagon nipple
1 Non-return valve with elbow and hexagon nipple
1 Reduction piece, large
1 Reduction piece, small
1 Hose clamp
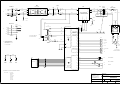
1 Diagram
2

RotoPol-31/-35
Instruction Manual
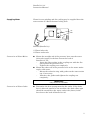
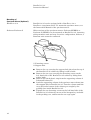
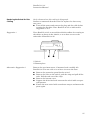
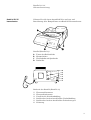
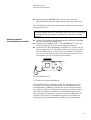
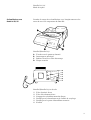
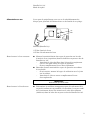
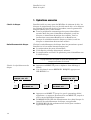
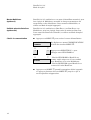
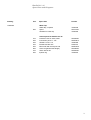
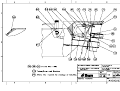
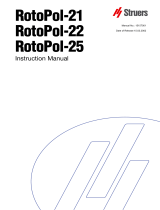
Take a moment to familiarise yourself with the location and
names of all the RotoPol components:
Getting Acquainted with
RotoPol-31/-35
RotoPol (RotoPol-31)
A Front panel controls
B Main switch
C Water tap with sprinkler tube
D Turntable
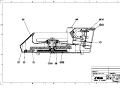
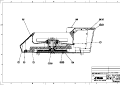
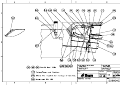
Back of RotoPol (RotoPol-31)
c Water inlet tube
d Water outlet tube
e Valve for disc cooling
f Socket for recirculation cooling unit connection
g Socket for specimen mover
h Fuse
3

RotoPol-31/-35
Instruction Manual
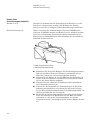
Detach RotoPol-31/-35 from the bottom of the packing case by
removing the four screws from below.
Unpacking RotoPol-31/-35
Place RotoPol-31/-35 on a steady table with an adequate working
height. The machine must be close to the power supply, water
mains and water outlet facilities. If water recirculation is used,
there must be room under the table for the Recirculation Cooling
Unit (TRECI).
Placing RotoPol-31/-35
RotoPol-31/-35 is factory mounted with electric cable.
Supplying Power
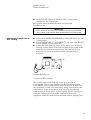
IMPORTANT
Check that the mains voltage corresponds to the voltage stated on the type
plate on the back of the machine.
Mount a plug on the cable or connect to mains:
RotoPol-31
Yellow-green or just green: earth
Other colours: phase
Check that the turntable rotates in the direction indicated by a
label on the turntable (anti-clockwise). If the direction of rotation
is incorrect, switch two of the phases.
Direction of the Turntable
on RotoPol-31
Mount a plug on the cable or connect to mains:
RotoPol-35
Single-phase Versions
Yellow-green: earth
Blue or white: neutral
Other colours: phase
Mount a plug on the cable or connect to mains:
RotoPol-35
Three-phase versions
Yellow-green or just green: earth
Other colours: phase
DANGER!
The machine must be earthed
4

RotoPol-31/-35
Instruction Manual
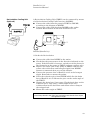
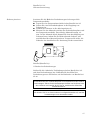
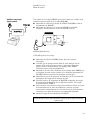
Water for wet grinding and disc cooling may be supplied from the
water mains or a Recirculation Cooling Unit.
Supplying Water
RotoPol (RotoPol-31)
c Water inlet tube
d Water outlet tube
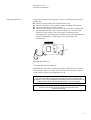
Mount the straight end of the pressure hose onto the water
inlet tube (upper) in the hose box on the back of
RotoPol-31/ -35:
Connection to Water Mains
− Insert the filter gasket in the coupling nut with the flat
side against the pressure hose.
− Tighten the coupling nut completely.
Mount the other end of the pressure hose on the water mains
tap for cold water:
− Mount the reduction ring with gasket on the water mains
tap, if necessary.
− Introduce the gasket and tighten the coupling nut
completely.
IMPORTANT
Only connect to cold water.
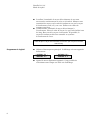
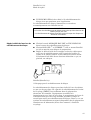
Determine the best arrangement for the outlet. If the drain
hose is directed parallel to the machine, the drain elbow pipe
should be mounted on the water outlet tube (lower) in the
hose box on the back of RotoPol-31/-35.
Connection to Water Outlet
5

RotoPol-31/-35
Instruction Manual
Locate the end of the drain hose where a short length of the
steel reinforcement has been stripped away. Mount the
stripped end of the hose onto the water outlet tube, or onto
the drain elbow pipe if such is mounted. Use hose clamp for
fastening.
Lead the other end of the drain hose to the water outlet.
Arrange the tube so that it slopes throughout its length.
Shorten the hose, if necessary. The drain hose should be
attached to the water outlet system if possible.
REMEMBER
Avoid sharp bends in the drain hose and make sure that the hose slopes
throughout its length.
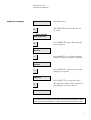
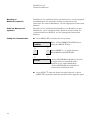
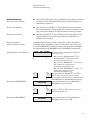
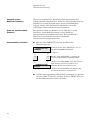
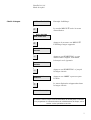
Switch on the power at the main switch. The following display
will appear briefly:
Software Settings
- ROTOPOL-31 -
VERSION X.Y
- ROTOPOL-35 -
VERSION X.Y
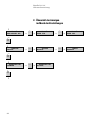
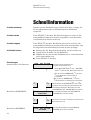
When the operation menu appears, you are ready to choose
the language you prefer in the display.
6

RotoPol-31/-35
Instruction Manual
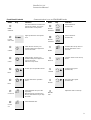
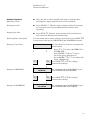
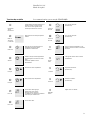
7
WATER OFF 150RPM Example screen
D
m The MENU m key activates the set-
up menu.
D
DISC COOLING
WHEN WATER OFF
D
m Press MENU m again. The language
screen appears.
D
LANGUAGE
ENGLISH
D
L Press SELECT L to choose between
English, German, French or Japanese
D
SPRACHE
DEUTSCH
D
L Press SELECT
L until you reach the
language you prefer.
D
LANGUE
FRANCAIS
D
Press STOP o to accept the choice.
o The Operation Menu will re-appear in
the language you have chosen.
D
EAU OFF 150 T/M
Setting the Language
Remember
to set the same language on all connected RotoSystem modules. Setting
the Communication and Disc Cooling: see Advanced Operation Section.

RotoPol-31/-35
Instruction Manual
2. Basic Operation
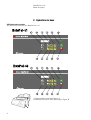
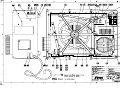
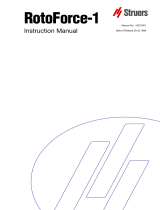
Using the Controls
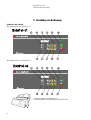
The Front Panel of RotoPol-31
The Front Panel of RotoPol-35
8
c Main Switch: figure A
5 Water Tap with Sprinkler Tube: figure B

RotoPol-31/-35
Instruction Manual
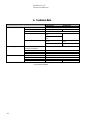
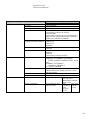
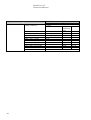
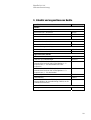
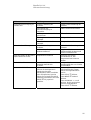
Communication is set to STANDARD mode
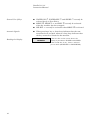
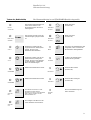
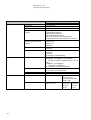
Name Key Function Name Key Function
c
MAIN
SWITCH
The main switch is located to the
right of the cabinet. Turn clock-
wise to switch on the power. k
SPEED
300 RPM
d
300
Select 300 RPM.
(RotoPol-31)
d
POWER
INDICATOR
Power Lights up when the main power
is on. l
SPEED
150 RPM
d
150
Select 150 RPM.
(RotoPol-31)
e
START s Starts the disc and any con-
nected RotoSystem equipment
set in Auto mode. 1
MENU m
Activates the set-up menu or
moves down in the menu
structure.
f
STOP o Stops the disc and any con-
nected RotoSystem equipment
set in Auto mode.
Exits the set-up menu.
2
SELECT L
Changes values in the set-up
menu.
g
DISC AO Scrolls up in the operation menu. 3
SPEED dOIncreases the speed.
(RotoPol-35)
h
DISC AN Scrolls down in the operation
menu. 4
SPEED dNDecreases the speed.
(RotoPol-35)
i
WATER ON w Select WATER ON: press the
key briefly.
Manual Dosing: keep pressing
the key. Release the key to stop
the water.
5
WATER
TAP Adjust the water on the tap.
j
WATER
OFF
W Select WATER OFF.
Front Panel Controls
9

RotoPol-31/-35
Instruction Manual
WATER ON w, WATER OFF W and SPEED d can only be
selected freely at User Select.
General Use of Keys
MENU m, SELECT L and DISC A can only be activated
when the machine has been stopped.
SELECT L can only be activated when MENU m is selected.
When pressing a key, a short beep indicates that the com-
mand has been accepted, whereas a long beep indicates that
the key cannot be activated at the moment.
A
coustic Signals
10
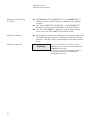
WATER ON 300RPM
GRINDING
- The first line on the screen shows the
setting of parameters WATER and SPEED.
- The second line, if any, shows a selected
pre-set mode (GRINDING or POLISHING).
Reading the Display

RotoPol-31/-35
Instruction Manual
Place the disc on the turntable and turn it until the three
driving pins engage with the holes in the turntable.
Routine Operations
Mounting a Disc
Press START s. The disc starts rotating. Selected functions
are executed and connected RotoSystem modules start
operating.
Starting the Disc
Press STOP o. The disc stops rotating. Selected functions
and connected RotoSystem modules stop.
Stopping the Disc
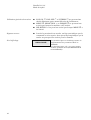
You can either select water and speed yourself or press DISC AN
to select one of the pre-set GRINDING and POLISHING modes.
Selecting Water and Speed
Setting to User Select WATER OFF 150RPM
The User Select screen has an empty line
at the bottom.
D U- Press w or W to select WATER ON or
WATER OFF.
- Press SPEED
d 150 or d 300 to
select the speed. (RotoPol-31)
- Press SPEED dN or dO to adjust the
speed. (RotoPol-35)
AN AO Press
DISC AN or AO to change
between the settin
g
s.
D U
Setting to GRINDING WATER ON 300RPM
GRINDING
The standard setting GRINDING is pre-
set to WATER ON and 300RPM.
D U
AN AO Press DISC AN or AO to change
between the settin
g
s.
D U
Setting to POLISHING WATER OFF 150RPM
POLISHING
The standard setting POLISHING is pre-
set to WATER OFF and 150RPM.
11

RotoPol-31/-35
Instruction Manual
If RotoPol is connected to RotoCom and communication is in
ROTOCOM mode, the following screen will appear:
Settings with a
RotoCom Memory Unit
WATER ON 300RPM
PG-Paper #120
- The first line on the screen shows the
settings of parameters for WATER and
(Example screen) SPEED.
- The second line shows the surface to be
used, according to the preparation pro-
gram selected on RotoCom.
DISC AN and AO toggles between the various surfaces defined
in RotoCom.
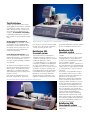
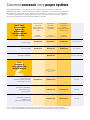
STRUERS CONSUMABLES
Struers offers a wide range of:
- Consumables for both plane and fine grinding.
- Polishing cloths, diamond and oxide abrasive materials.
12

RotoPol-31/-35
Instruction Manual
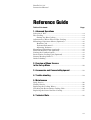
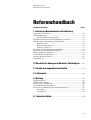
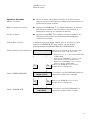
13
Reference Guide
Table of Contents Page
1. Advanced Operations
Selection of Disc.............................................................................. 14
Disc Cooling ....................................................................................14
Setting the Disc Cooling.......................................................... 14
Adjustment of Water Flow at Disc Cooling ................................... 15
Mounting of Specimen Mover (Optional)....................................... 16
RotoForce-3/4 ........................................................................... 16
Pedemat/Pedemax-S................................................................ 16
Adjusting Pedemat .................................................................. 17
Mounting of Multidoser (optional)................................................. 18
RotoCom Memory Unit (optional).................................................. 18
Setting the Communication ........................................................... 18
Recirculation Cooling Unit (Optional)........................................... 19
Struers Metalog Guide™................................................................ 20
Oxide Polishing............................................................................... 21
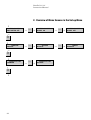
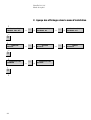
2. Overview of Menu Screens
in the Set-up Menu ..................................................................... 22
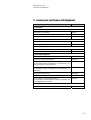
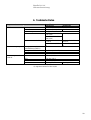
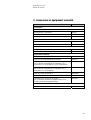
3. Accessories and Connected Equipment........................... 23
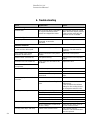
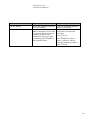
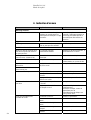
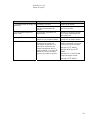
4. Trouble-shooting.................................................................... 24
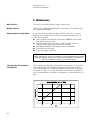
5. Maintenance
Daily Service ................................................................................... 26
Weekly Service................................................................................ 26
Replacing the Cooling Water.......................................................... 26
Checking the Recirculation Cooling Unit...................................... 26
Replacing the Swivel for Disc Cooling ........................................... 27
6. Technical Data........................................................................ 28

RotoPol-31/-35
Instruction Manual
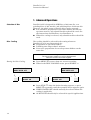
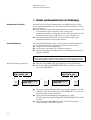
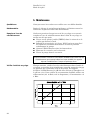
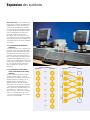
1. Advanced Operations
RotoPol-31/35 is designed for MD-Discs of 300 mm dia., wet
grinding discs of 305 mm dia. and polishing discs of 300 mm dia.
However, the whole range of Struers discs can be mounted.
Selection of Disc
For automatic preparation of specimen holders mounted in
specimen movers, only aluminium discs should be used. See
the instructions for RotoForce-3 or RotoForce-4.
When disc cooling is selected, only aluminium discs should be
used.
Disc cooling should be selected in the setting whenever
RotoPol-31/-35 is used intensively for:
Disc Cooling
Preparation of specimen holders.
Polishing time longer than 5 minutes.
Successive preparation of several specimen holders on the
same disc.
Important
The set-up menu setting can only be implemented
when the machine has been stopped.
Press MENU m to move from one screen to another.
Setting the Disc Cooling
When in the DISC COOLING menu, press SELECT L:
14
Press STOP o when the desired setting appears, or press
MENU m repeatedly until the operation menu appears again.
WHEN WATER OFF should normally be selected when disc
cooling is applicable.
ALWAYS ON should only be selected for special applications.
DISC COOLING
WHEN WATER OFF
DISC COOLING
WHEN WATER OFF
D
U
L DISC COOLING
ALWAYS ON
L DISC COOLING
ALWAYS OFF
L

RotoPol-31/-35
Instruction Manual
ALWAYS OFF should be selected if disc cooling is not
relevant for the application.
Disc cooling will automatically start and stop with
RotoPol-31/-35.
IMPORTANT
- Disc cooling will only be active at rotational speeds up to 300 RPM.
- Disc cooling is only efficient when aluminium discs are being used.
Select mode WHEN WATER OFF or ALWAYS ON in the disc
cooling menu.
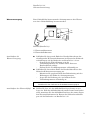
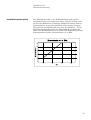
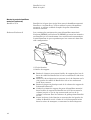
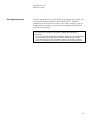
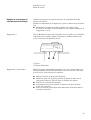
Adjustment of Water Flow at
Disc Cooling
Select WATER OFF W and SPEED d 150, and start RotoPol-
31/-35 without a preparation disc.
Adjust the flow using the valve at the rear of the cabinet so
that the cooling water flows from the hole in the centre of the
turntable at a height of about 2 mm. This will result in a
water flow of about 250 ml/min which will generally be
adequate.
RotoPol (RotoPol-31)
e Valve for Disc Cooling
Disc cooling works with both tap water or by means of
recirculation. The cooling capability for Recirculation Cooling
Unit (TRECI) will be sufficient for most situations. If, however,
the equipment is used very intensively, using recirculation, the
temperature of the cooling water may vary too much during
working time to be adequate for disc cooling. In this situation, a
separate cooling system (available from most laboratory
suppliers) should be connected to the Recirculation Cooling Unit.
15

RotoPol-31/-35
Instruction Manual
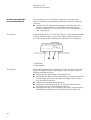
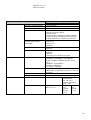
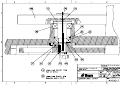
Mounting of
Specimen Mover (Optional)
RotoPol-31/-35 can be equipped with a RotoForce-3 or a
RotoForce-4 specimen mover. To mount the specimen mover, see
the Instruction Manual of the specimen mover.
RotoForce-3/4
Older versions of the specimen movers: Pedemat (PEDRO) or
Pedemax-S (PEDSO) can be mounted on RotoPol-31/-35, operating
with automatic start and stop. In such a configuration, however, a
RotoCom unit cannot be connected.
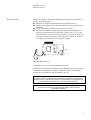
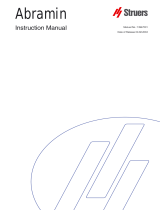
Pedemat/Pedemax-S
c Fastening screws.
d Support hole.
Remove the cap covering the support hole placed on the top of
the RotoPol-31/-35 cabinet by lifting it with a knife.
Remove the two caps covering the fastening screws on the
left- hand side of the RotoPol-31/-35 cabinet by lifting them
with a knife.
Remove the black plastic ring from the supporting column of
Pedemat/Pedemax-S.
Lead the supporting column of the specimen mover down into
the support hole in RotoPol-31/-35. Turn the column until the
cross pin in the bottom of the column gets caught by the
guiding slots inside RotoPol-31/-35.
Tighten the two fastening screws on the left-hand side of the
RotoPol-31/-35 cabinet by means of the hexagon key included
in the packing case, and mount the two caps again.
16
Seite wird geladen ...
Seite wird geladen ...
Seite wird geladen ...
Seite wird geladen ...
Seite wird geladen ...
Seite wird geladen ...
Seite wird geladen ...
Seite wird geladen ...
Seite wird geladen ...
Seite wird geladen ...
Seite wird geladen ...
Seite wird geladen ...
Seite wird geladen ...
Seite wird geladen ...
Seite wird geladen ...
Seite wird geladen ...
Seite wird geladen ...
Seite wird geladen ...
Seite wird geladen ...
Seite wird geladen ...
Seite wird geladen ...
Seite wird geladen ...
Seite wird geladen ...
Seite wird geladen ...
Seite wird geladen ...
Seite wird geladen ...
Seite wird geladen ...
Seite wird geladen ...
Seite wird geladen ...
Seite wird geladen ...
Seite wird geladen ...
Seite wird geladen ...
Seite wird geladen ...
Seite wird geladen ...
Seite wird geladen ...
Seite wird geladen ...
Seite wird geladen ...
Seite wird geladen ...
Seite wird geladen ...
Seite wird geladen ...
Seite wird geladen ...
Seite wird geladen ...
Seite wird geladen ...
Seite wird geladen ...
Seite wird geladen ...
Seite wird geladen ...
Seite wird geladen ...
Seite wird geladen ...
Seite wird geladen ...
Seite wird geladen ...
Seite wird geladen ...
Seite wird geladen ...
Seite wird geladen ...
Seite wird geladen ...
Seite wird geladen ...
Seite wird geladen ...
Seite wird geladen ...
Seite wird geladen ...
Seite wird geladen ...
Seite wird geladen ...
Seite wird geladen ...
Seite wird geladen ...
Seite wird geladen ...
Seite wird geladen ...
Seite wird geladen ...
Seite wird geladen ...
Seite wird geladen ...
Seite wird geladen ...
Seite wird geladen ...
Seite wird geladen ...
Seite wird geladen ...
Seite wird geladen ...
Seite wird geladen ...
Seite wird geladen ...
Seite wird geladen ...
Seite wird geladen ...
Seite wird geladen ...
Seite wird geladen ...
Seite wird geladen ...
Seite wird geladen ...
Seite wird geladen ...
Seite wird geladen ...
Seite wird geladen ...
Seite wird geladen ...
Seite wird geladen ...
Seite wird geladen ...
Seite wird geladen ...
Seite wird geladen ...
Seite wird geladen ...
Seite wird geladen ...
Seite wird geladen ...
Seite wird geladen ...
Seite wird geladen ...
Seite wird geladen ...
Seite wird geladen ...
Seite wird geladen ...
Seite wird geladen ...
Seite wird geladen ...
Seite wird geladen ...
Seite wird geladen ...
Seite wird geladen ...
Seite wird geladen ...
Seite wird geladen ...
Seite wird geladen ...
Seite wird geladen ...
Seite wird geladen ...
Seite wird geladen ...
Seite wird geladen ...
Seite wird geladen ...
Seite wird geladen ...
Seite wird geladen ...
Seite wird geladen ...
Seite wird geladen ...
Seite wird geladen ...
Seite wird geladen ...
Seite wird geladen ...
Seite wird geladen ...
Seite wird geladen ...
Seite wird geladen ...
Seite wird geladen ...
Seite wird geladen ...
Seite wird geladen ...
Seite wird geladen ...
Seite wird geladen ...
Seite wird geladen ...
Seite wird geladen ...
Seite wird geladen ...
-
 1
1
-
 2
2
-
 3
3
-
 4
4
-
 5
5
-
 6
6
-
 7
7
-
 8
8
-
 9
9
-
 10
10
-
 11
11
-
 12
12
-
 13
13
-
 14
14
-
 15
15
-
 16
16
-
 17
17
-
 18
18
-
 19
19
-
 20
20
-
 21
21
-
 22
22
-
 23
23
-
 24
24
-
 25
25
-
 26
26
-
 27
27
-
 28
28
-
 29
29
-
 30
30
-
 31
31
-
 32
32
-
 33
33
-
 34
34
-
 35
35
-
 36
36
-
 37
37
-
 38
38
-
 39
39
-
 40
40
-
 41
41
-
 42
42
-
 43
43
-
 44
44
-
 45
45
-
 46
46
-
 47
47
-
 48
48
-
 49
49
-
 50
50
-
 51
51
-
 52
52
-
 53
53
-
 54
54
-
 55
55
-
 56
56
-
 57
57
-
 58
58
-
 59
59
-
 60
60
-
 61
61
-
 62
62
-
 63
63
-
 64
64
-
 65
65
-
 66
66
-
 67
67
-
 68
68
-
 69
69
-
 70
70
-
 71
71
-
 72
72
-
 73
73
-
 74
74
-
 75
75
-
 76
76
-
 77
77
-
 78
78
-
 79
79
-
 80
80
-
 81
81
-
 82
82
-
 83
83
-
 84
84
-
 85
85
-
 86
86
-
 87
87
-
 88
88
-
 89
89
-
 90
90
-
 91
91
-
 92
92
-
 93
93
-
 94
94
-
 95
95
-
 96
96
-
 97
97
-
 98
98
-
 99
99
-
 100
100
-
 101
101
-
 102
102
-
 103
103
-
 104
104
-
 105
105
-
 106
106
-
 107
107
-
 108
108
-
 109
109
-
 110
110
-
 111
111
-
 112
112
-
 113
113
-
 114
114
-
 115
115
-
 116
116
-
 117
117
-
 118
118
-
 119
119
-
 120
120
-
 121
121
-
 122
122
-
 123
123
-
 124
124
-
 125
125
-
 126
126
-
 127
127
-
 128
128
-
 129
129
-
 130
130
-
 131
131
-
 132
132
-
 133
133
-
 134
134
-
 135
135
-
 136
136
-
 137
137
-
 138
138
-
 139
139
-
 140
140
-
 141
141
-
 142
142
-
 143
143
-
 144
144
-
 145
145
-
 146
146
-
 147
147


in anderen Sprachen
- English: Struers RotoPol-31 User manual
- français: Struers RotoPol-31 Manuel utilisateur
Verwandte Artikel
-
 Struers RotoPol-11 Benutzerhandbuch
-
 Struers RotoPol-21 Benutzerhandbuch
-
 Struers RotoForce-1 Benutzerhandbuch
-
 Struers RotoForce-4 Benutzerhandbuch
-
 Struers PDM-Force-20 Benutzerhandbuch
-
 Struers MAPS Benutzerhandbuch
-
 Struers Metason Benutzerhandbuch
-
 Struers Abramin Benutzerhandbuch
-
 Struers Prepamatic-2 Benutzerhandbuch
-
 Struers ProntoPress-10 Benutzerhandbuch


