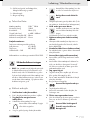
Parkside KH 3038 SCROLL SAW Operation and Safety Notes
- Kategorie
- Elektrowerkzeuge
- Typ
- Operation and Safety Notes
Dieses Handbuch eignet sich auch für

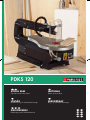
PDKS 120
DEKUPIERSÄGE
Bedienungs- und Sicherheitshinweise
LÖVSÅG
Bruksanvisning och säkerhetsanvisningar
DEKUPØRSaV
Brugs- og sikkerhedsanvisninger
LEHTISaHa
Käyttö- ja turvaohjeet
SCROLL SaW
Operation and Safety Notes
33383_SCROLL SAW_Dekupiersaege_Cover_LB3 (ohne GR).indd 3 21.07.09 09:06

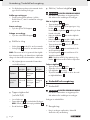
10 11 1
2
12
3
4
5
6
6 a
7
8
9
14
7
33383_SCROLL SAW_Dekupiersaege_Cover_LB3 (ohne GR).indd 5 21.07.09 09:06

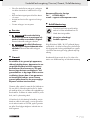
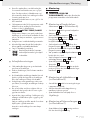
A B
C D
E F
13
10
10 b
1
45°
45°
10 a
12
10 c
33383_SCROLL SAW_Dekupiersaege_Cover_LB3 (ohne GR).indd 8 21.07.09 09:06

GB / IE Operation and Safety Notes Page 5
FI Käyttö- ja turvaohjeet Sivu 13
SE Bruksanvisning och säkerhetsanvisningar Sidan 21
DK Brugs- og sikkerhedsanvisninger Side 29
DE / AT / CH Bedienungs- und Sicherheitshinweise Seite 37
Before reading, unfold both pages containing illustrations and familiarise yourself with all functions of the
device.
Käännä ennen lukemista molemmat kuvalliset sivut esiin ja tutustu seuraavaksi laitteen kaikkiin toimintoihin.
Vik ut båda bildsidorna och ha den till hands när du läser igenom anvisningarna och gör dig bekant med
apparatens / maskinens funktioner.
Før du læser, vend begge sidene med billeder frem og bliv bekendt med alle apparatets funktioner.
Klappen Sie vor dem Lesen die beiden Seiten mit den Abbildungen aus und machen Sie sich anschließend
mit allen Funktionen des Gerätes vertraut.
33383_SCROLL SAW_Dekupiersaege_Cover_LB3 (ohne GR).indd 4 21.07.09 09:06

5 GB/IE
Table of contents
Introduction
Intended purpose ..........................................................................................................Page 6
Features and equipment ...............................................................................................Page 6
Included items ...............................................................................................................Page 6
Technical data ...............................................................................................................Page 7
Safety advice
Working safely ..............................................................................................................Page 7
Safety advice relating specifically to scroll saws ........................................................Page 8
Advice on use ................................................................................................................Page 9
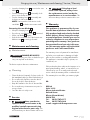
Assembly
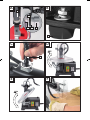
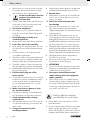
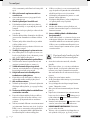
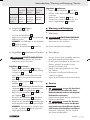
Attaching the blade guard (see Fig. A) .......................................................................Page 9
Attaching the feet (see Fig. B) ......................................................................................Page 10
Attaching the dust blow tube (see Fig. C) ...................................................................Page 10
Bringing into use
Setting the stroke rate ...................................................................................................Page 10
Tilting the saw table (see Figs. D, E) ............................................................................Page 10
Inserting / removing the saw blade ..............................................................................Page 10
Maintenance and cleaning
Maintenance .................................................................................................................Page 11
Cleaning ........................................................................................................................Page 11
Service .........................................................................................................................Page 11
Warranty ...................................................................................................................Page 11
Disposal ......................................................................................................................Page 12
Conformity Declaration / Manufacturer ..........................................Page 12
33383_SCROLL SAW_Dekupiersaege_Content_LB3 (ohne GR).indd 5 23.07.09 11:31

6 GB/IE
Scroll saw PDKS 120
Q
Introduction
Before you use it for the first time, it is es-
sential that you make yourself fully familiar
with the functions of the appliance and
find out how to correctly handle electrically powered
tools. To do this, read the following operating in-
structions carefully. Retain these instructions for
future reference. Additionally, pass them on to who-
ever might acquire the appliance at a future date.
Q
Intended purpose
The scroll saw is intended for the intricate cutting of
wood and plastic in a DIY environment (see Fig. F).
Any other uses, and modifications to the appliance,
are deemed to be improper usage and may result
in serious physical injury. The manufacturer accepts
no responsibility for damage(s) resulting from
improper usage.
Q
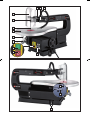
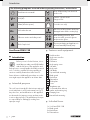
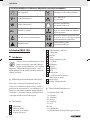
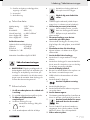
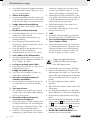
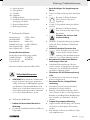
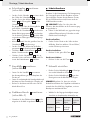
Features and equipment
1
Dust blow tube
2
Stroke rate controller
3
OFF button
4
ON button
5
Angle setting screw
6
Saw table
6 a
Angle scale
7
Saw blade
8
Top saw blade mounting
9
Blade guard
10
Knurled nut
10 a
Plain washer
10 b
Guide plate
10 c
Screw
11
Attachment arm
12
3 x Threaded feet with nut,
washer and retaining ring
13
Clamping lever
14
Bottom blade mounting
Q
Included items
1 x Scroll saw PDKS 120
1 x Blade guard
2 x Knurled nuts
2 x Plain washers
Introduction
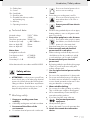
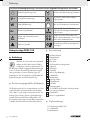
The following pictograms are used in these operating instructions / on the device:
Read instruction manual!
Keep children away from electrical
power tools!
V
~
Volt (AC)
Caution – electric shock!
Danger to life!
W
Watts (effective power) For indoor use only!
n
0
No-load stroke rate
Risk of loss of life by electric shock from
damaged mains lead or mains plug!
Observe caution and safety notes!
Wear hearing protection, dust
protection mask, protective glasses
and protective gloves.
Risk of explosion!
Dispose packaging and appliance in
an environmentally-friendly way!
33383_SCROLL SAW_Dekupiersaege_Content_LB3 (ohne GR).indd 6 23.07.09 11:31

7 GB/IE
2 x Guide plates
2 x Screws
10 x Saw blades
1 x Dust blow tube
3 x Threaded feet with nut, washer
and retaining ring
1 x Allen key
1 x Operating instructions
Q
Technical data
Nominal voltage: 230 V
~
50 Hz
Rated power: 120 W
Short-term operation time: 20 min (S2)
Stroke rate (no load): n
0
400 - 1600 min
-1
Max. cut depth 90°: 50 mm
Max. cut depth 45°: 22 mm
Noise data:
A-weighted sound levels.
Sound pressure level: 67,2 dB (A)
Sound level: 80,2 dB (A)
Uncertainty K = 3 dB
Values determined in accordance with EN 61029.
Safety advice
J ATTENTION! In order to protect yourself from
electric shock, injury or fire when using electrical
power tools, please observe the following basic
safety precautions. Read all these requirements
before you use the electrical power tool, and
keep the safety advice in a safe place.
Q
Working safely
1. Keep your working area clean
and tidy.
J A disorderly working area can lead to accidents.
2. Be aware of the effects of the
environment.
J
Do not leave electrical power tools out in the rain
.
J Do not use electrical power tools in
moist or wet surroundings.
J Ensure that your working area is well lit.
J Do not use electrical power tools in
areas where there is risk of fire or
explosion.
3.
Protect yourself from electric
shock.
J Avoid touching earthed objects such as pipes,
heating radiators, ovens or refrigerators with
parts of your body.
4. Keep other people at a safe distance.
J Do not allow other people, in partic-
ular children, to touch the electrical
power tool or the mains lead.
Keep them away from your working area.
5. Store currently unused electrical
power tools in a safe place.
J When not being used electrical power tools
should be stored in dry conditions in a high
or enclosed place, out of reach of children.
6. Do not overload your electrical
power tool.
J By keeping within the specified working range
of the tool you will work more safely and
achieve a better result.
7. Use the right electrical power tool for
the task.
J Do not use low-output devices for heavy tasks.
J Do not use an electrical power tool for purposes
for which it was not intended. For example, do
not use a hand operated circular saw for trim-
ming tree branches or cutting logs.
8. Wear suitable clothing.
J Do not wear loose-fitting clothing or jewellery.
They could become caught on moving parts.
J We recommend that you wear anti-slip foot-
wear when working outdoors.
J If you have long hair, wear a hair net.
9.
Use personal protective
equipment.
J Wear protective glasses.
J Wear a dust mask if your work generates dust.
10. Attach the vacuum dust extraction
device.
Introduction / Safety advice
33383_SCROLL SAW_Dekupiersaege_Content_LB3 (ohne GR).indd 7 23.07.09 11:31

8 GB/IE
J Where there are connection points provided
for vacuum dust extraction please use them,
and ensure they are working properly.
11.
Do not use the mains lead for
purposes for which it was
not intended.
J Do not use the mains lead to pull the plug out
of the mains socket. Protect the mains lead
from heat, oil and sharp edges.
12. Secure the workpiece.
J Use clamps or a vice to grip the workpiece
firmly. This is much safer than holding it with
your hand.
13. Avoid placing your body in an
unnatural position.
J Keep proper footing and balance at all times.
14. Look after your tools carefully.
J Keep cutting tools sharp and clean. This way
you will work more safely and achieve better
results.
J Follow the advice on tool lubrication and
consumables replacement.
J Check the condition of the mains lead on your
electrical power tool regularly and have any
damage repaired by a competent specialist.
J Check the condition of extension leads regu-
larly and replace them if they are damaged.
J Keep handles and hand grips clean, dry and
free of oil and grease.
15. Pull the mains plug out of the
mains socket.
J Do this if the electrical power tool is not being
used, before carrying out maintenance tasks
on the electrical power tool and whenever
you are changing inserted tools, e.g. saw
blades, drills or router bits.
16. Make sure that no spanners, keys
etc. are left attached.
J Check before switching on that all spanners,
keys and setting tools have been removed.
17. Avoid unintentionally starting
up the device.
J Check that the switch is set to OFF on the de-
vice when the mains plug is inserted into the
mains socket.
18. Using an extension lead for
working outdoors.
J When working outside, always use an approved
and appropriately labelled extension lead.
19. Remain alert.
J Watch what you are doing. Proceed with cau-
tion. Do not use electrical power tools if you
cannot concentrate.
20. Check the electrical power tool
for damage.
J Before the electrical power tool is used, care-
fully check the safety equipment and any
slightly damaged parts to see that they are still
working properly.
J Check that all moving parts on the tool are
working properly, can move freely and are not
damaged. All parts must be correctly attached
and fulfil all the requirements necessary to allow
the electrical power tool to operate properly.
J Damaged safety equipment and components
must be properly repaired or replaced at a com-
petent electrical equipment repair centre unless
otherwise indicated in the operating instructions.
J Damaged switches must be replaced at a
Customer Service Centre.
J Never use an electrical power tool that cannot
be switched on and off properly.
21. ATTENTION!
J The use of inserted tools and accessories other
than those recommended by the manufacturer
could lead to you being injured.
22. Have your electrical power tool
repaired at an electrical equipment
repair specialist.
J This electrical power tool complies with the
relevant safety regulations. Repairs may only
be carried out by a specialist electrical repair
centre using original spare parts, otherwise in-
jury could occur to the user.
Safety advice relating
specifically to scroll saws
J Ensure that the scroll saw stands on a level,
horizontal surface.
J Do not touch the mains lead if it becomes dam-
aged or cut through while you are using the
device. Pull the plug out of the mains socket im-
mediately and have the device repaired by a
Safety advice
33383_SCROLL SAW_Dekupiersaege_Content_LB3 (ohne GR).indd 8 23.07.09 11:31

9 GB/IE
suitably qualified person or at the Customer
Service Centre.
J Always work with the mains lead leading
away from the rear of the device.
J If a dangerous situation arises, pull the mains
plug immediately out of the mains socket.
J Always switch on the electrical power tool before
moving the workpiece against it. Otherwise
there is the risk of kickback.
J Do not cut moist materials or damp surfaces,
J Use only undamaged, defect-free saw blades
7
.
Distorted or blunt saw blades
7
can break or
cause a kickback.
J Ensure that the teeth on the saw blade
7
point
downwards before you mount it in the device.
J DANGER OF INJURY! Keep your hands
away from the area of the saw blade.
J Before sawing, check the workpiece for foreign
bodies such as nails etc. and remove them. In-
jury and / or damage to property may result from
the saw blade striking nails etc. embedded in
the workpiece.
J Always keep the device clean, dry and free
from oil or grease.
J Switch off the device before you remove any
wood residue from around the saw blade.
Otherwise you could become injured.
WARNING!
HAZARDOUS DUSTS /
VAPOURS! Any noxious dusts or vapours
generated from sawing represent a risk to the
health of the person operating the device and
to anyone near the work area.
J Do not saw materials containing substances
harmful to health.
J Do not use the tool on materials containing
asbestos. Asbestos is a known carcinogen.
J Make sure you have adequate ventilation.
J Wear protective glasses, hearing
protection, dust protection masks
and protective gloves.
Q
Advice on use
J Push the workpiece slowly and with minimum
pressure on to the saw blade.
J Reduce the rate of advance when you are
cutting thicker material.
J Hold the workpiece firmly on the table with
both hands and push it slowly towards the saw
blade. Otherwise the saw blade may twist or
break.
J Avoid making any sharp changes in direction
during sawing to prevent the saw blade from
twisting or tearing.
J Before starting the saw cut, drill a hole at a
corner or internal cut-out in the workpiece and
start sawing from the hole.
J Use the correct saw blade. The choice of saw
blade depends on the thickness and type of
material and the intended cut.
Select a saw blade with fine teeth to saw thin,
hard materials.
Use a narrow saw blade to saw small radius
cuts.
Q
Assembly
WARNING!
DANGER OF INJURY!
Pull the mains plug out of the socket before you
carry out any task on the device,
Q
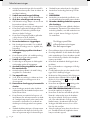
Attaching the blade guard
9
(see Fig. A)
j Push the screw
10 c
from the inside through the
slot in the blade guard
9
.
j From the outside of the blade guard
9
, place
the guide plate
10 b
on to the screw
10 c
.
The bent-up side of the guide plate
10 b
engages
around the blade guard
9
.
j Attach the blade guard
9
between the two at-
tachment arms
11
and insert the two screws
10 c
through the openings provided for them in the
attachment arms
11
.
j Ensure that the upwardly curved end of the
blade guard
9
is at the top.
j Put the plain washers
10 a
on from the outside
of the attachment arms
11
.
j Screw the knurled nuts
10
on to the two screw
ends
10 c
.
j Slide the blade guard
9
into the desired posi-
tion and fix it in that position by tightening the
knurled nuts
10
.
Safety advice / Assembly
33383_SCROLL SAW_Dekupiersaege_Content_LB3 (ohne GR).indd 9 23.07.09 11:31

10 GB/IE
Q
Attaching the feet
12
(see Fig. B)
j Attach the feet
12
from below through the
mounting holes in the device's base plate.
j Place the plain washers and then the nuts on to
the screw threads.
j Tighten the nuts using a size 10 open spanner.
Q
Attaching the dust blow tube
1
(see Fig. C)
j Screw the dust blow tube
1
clockwise into the
opening provided for it.
Q
Bringing into use
Take note of the mains voltage. The mains voltage
at the mains socket must match that shown on the
rating plate on the device. Devices marked with
230 V can also be operated at 220 V.
CAUTION! Make sure that the device is
switched off before you connect it to the mains supply.
J Always switch on the electrical power tool before
moving the workpiece against it. Otherwise
there is the risk of kickback.
Setting up the device:
j Grab the device at the position labelled "Bitte
hier anheben - Please lift here" to position the
device.
Switching on the device:
j Press the green ON button
4
.
Switching off the device:
j Press the red OFF button
3
.
Q
Setting the stroke rate
j Turn the stroke rate controller
2
clockwise to
increase the stroke rate.
j Turn the stroke rate controller
2
anticlockwise
to decrease the stroke rate.
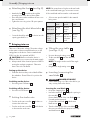
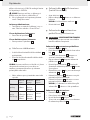
NOTE: Be aware that too high a stroke rate leads
to the saw blade heating up, an increase in wear
of the saw blade and burn marks on the material.
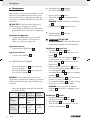
j Select a saw speed suitable for the material
being sawn.
Maximum
speed
Medium
speed
Minimum
speed
Thick woo-
den board
Straight
cut
Normal
fretsaw
work
-
Thin woo-
den or
plastic
board
Straight
and curved
cuts
Normal
and intrica-
te fretsaw
work
Intricate
fretsaw
work
Q
Tilting the saw table
6
(see Figs. D, E)
j Unscrew the angle setting screw
5
.
j Tilt the saw table
6
until the desired is
reached.
NOTE: The angle can be read off the angle
scale
6 a
.
j Retighten the angle setting screw
5
.
Q
Inserting / removing the
saw blade
7
WARNING!
DANGER OF INJURY!
Pull the mains plug out of the socket before you
carry out any task on the device,
Inserting the saw blade
7
:
j Lift up the clamping lever
13
.
j Insert the saw blade
7
through the opening in
the saw table
6
.
Ensure that the teeth of the saw blade
7
point
forwards and downwards.
j Suspend the saw blade
7
in the bottom
blade mount
14
.
j Then hook the top pin of the saw blade
7
in
the recess provided for this purpose in the top
saw blade mount
8
.
Assembly / Bringing into use
33383_SCROLL SAW_Dekupiersaege_Content_LB3 (ohne GR).indd 10 23.07.09 11:31

11 GB/IE
j Lower the clamping lever
13
to tension the saw
blade
7
.
j Turn the clamping lever
13
horizontally clock-
wise to increase the tension.
j Turn the clamping lever
13
horizontally anti-
clockwise to reduce the tension.
NOTE: Sawing with too little tension in the
saw blade
7
can lead to inaccurate results.
Removing the saw blade
7
:
j Lift up the clamping lever
13
.
j Press the top saw blade mount
8
downward.
j Lift the saw blade
7
slightly.
j Unhook the saw blade out of the bottom saw
blade mount
14
by moving it forward.
Q
Maintenance and cleaning
Q
Maintenance
WARNING!
DANGER OF INJURY!
Pull the mains plug out of the socket before you
carry out any task on the device,
The device requires almost no maintenance.
Q
Cleaning
j Clean the device frequently; for best results, do
this immediately after you have finished using it.
j Do not allow any liquids to enter the device.
Use a dry cloth to clean the device.
j Keep the ventilation slots free of dust and dirt.
j Do not under any circumstances use petrol or
strong solvents.
j Store the device in a dry room.
Q
Service
J
WARNING!
Have your device
repaired at the service centre or by
qualified specialist personnel using
original manufacturer parts only. This
will ensure that your device remains safe to use.
J
WARNING!
If the plug or lead
needs to be replaced, always have
the replacement carried out by the
manufacturer or its service centre. This
will ensure that your device remains safe to use.
Q
Warranty
This appliance is guaranteed for 3 years
from the date of purchase. It has been care-
fully produced and meti-culously checked
before delivery. Please keep your receipt
as proof of purchase. Contact your service
centre by telephone in case of questions
pertaining to the warranty. Your goods can
be transmitted free of cost only in this man-
ner. This warranty applies only to the initial
purchaser and is non-transferable.
The warranty covers only material or manufactur-
ing faults, not normal wear or damage to fragile
parts such as switches or rechargeable batteries.
The appliance is intended solely for private, not
commercial, use.
If this product has been subjected to improper or in-
appropriate handling, abuse, or interventions not
carried out by one of our authorised sales and
service outlets, the warranty will be considered void.
This warranty does not affect your statutory rights.
GB
DES Ltd
Units 14-15
Bilston Industrial Estate
Oxford Street
Bilston (Great Britain)
WV14 7EG
Tel.: 0870 / 787-6177
Fax: 0870 / 787-6168
e-mail: suppor[email protected]
Bringing into use / Maintenance and cleaning / Service / Warranty
33383_SCROLL SAW_Dekupiersaege_Content_LB3 (ohne GR).indd 11 23.07.09 11:31

12 GB/IE
IE
Kompernaß Service Ireland
Tel.: 1850 930 412 (0,082 €/Min.)
* Standard call rates apply.
Mobile operators may vary.
e-mail: [email protected]
Q
Disposal
The packaging is wholly composed of
environmentally-friendly materials that
can be disposed of at a local recycling
centre.
Do not dispose of electrical
power tools with the household
rubbish!
In accordance with European Directive
2002 / 96 / EC (covering waste electrical and elec-
tronic equipment) and its transposition into national
legislation, worn out electrical power tools must be
collected separately and taken for environmentally
compatible recycling.
Contact your local refuse disposal authority for
more details of how to dispose of your worn out
electrical devices.
Q
Conformity Declaration /
Manufacturer
We, Kompernaß GmbH, Burgstr. 21,
D-44867 Bochum, Germany, hereby declare that
this product complies with the requirements of the
following EU directives:
Machinery Directive
(98 / 37 / EC)
EC Low Voltage Directive
(2006 / 95 / EC)
Electromagnetic compatibility
(2004 / 108 / EC)
Type / Appliance Designation:
Scroll saw PDKS 120
Bochum, 31.07.2009
Hans Kompernaß
- Managing Director-
We reserve the right to make technical modifications
in the course of further development.
Warranty / Disposal / Conformity Declaration / Manufacturer
33383_SCROLL SAW_Dekupiersaege_Content_LB3 (ohne GR).indd 12 23.07.09 11:31

13 FI
Sisällysluettelo
Johdanto
Määräystenmukainen käyttö .........................................................................................Sivu 14
Varustus ...........................................................................................................................Sivu 14
Toimituskokonaisuus .......................................................................................................Sivu 14
Tekniset tiedot .................................................................................................................Sivu 15
Turvaohjeet
Turvallinen työskentely ...................................................................................................Sivu 15
Kuviosahoja koskevia laitekohtaisia turvaohjeita .........................................................Sivu 16
Työskentelyä koskevia ohjeita ........................................................................................Sivu 17
Asennus
Suojakuvun asennus (katso kuva A)..............................................................................Sivu 17
Jalkojen asennus (katso kuva B) ....................................................................................Sivu 17
Puhallinletkun asennus (katso kuva C) ..........................................................................Sivu 17
Käyttöönotto ...........................................................................................................Sivu 17
Iskuluvun säätäminen .....................................................................................................Sivu 18
Sahapöydän kallistaminen (katso kuvat D, E) ..............................................................Sivu 18
Sahanterän asettaminen paikoilleen / poistaminen .....................................................Sivu 18
Huolto ja puhdistus
Huolto .............................................................................................................................Sivu 19
Puhdistus .........................................................................................................................Sivu 19
Huolto ...........................................................................................................................Sivu 19
Takuu .............................................................................................................................Sivu 19
Hävittäminen ..........................................................................................................Sivu 19
Vaatimustenmukaisuusvakuutus / Valmistaja ...........................Sivu 20
33383_SCROLL SAW_Dekupiersaege_Content_LB3 (ohne GR).indd 13 23.07.09 11:31

14 FI
Johdanto
Lehtisaha PDKS 120
Q
Johdanto
Tutustu ennen ensimmäistä käyttöönottoa
laitteen toimintoihin ja perehdy sähkötyö-
kalujen oikeaan käsittelyyn. Lue seuraava
käyttöohje. Säilytä tämä käyttöohje hyvin. Anna
kaikki laitetta koskevat asiakirjat mukaan antaessasi
laitteen eteenpäin.
Q
Määräystenmukainen käyttö
Kuviosaha on tarkoitettu kotinikkareille puun ja
muovien kuviosahaukseen (katso kuva F). Laitteen
muu käyttö tai muuntaminen ei ole määräysten mu-
kaista ja voi aiheuttaa huomattavan tapaturmavaaran.
Valmistaja ei ota mitään vastuuta määräystenvastai-
sesta käytöstä aiheutuneista vahingoista.
Q
Varustus
1
Puhallinletku
2
Iskuluvun säädin
3
O-painike (virta päälle)
4
I-painike (virta pois)
5
Kallistuskulman säätöruuvi
6
Sahapöytä
6 a
Asteikko
7
Terä
8
Ylempi sahanterän pidin
9
Suojakupu
10
Rihlamutteri
10 a
Aluslevy
10 b
Ohjainlevy
10 c
Ruuvi
11
Kiinnitysvarsi
12
3 x Jalka kierteellä, aluslevy,
lukkorengas ja mutteri
13
Kiinnitysvipu
14
Alempi sahanterän pidin
Q
Toimituskokonaisuus
1 x lehtisaha PDKS 120
1 x suojakupu
2 x rihlamutteri
2 x aluslevy
2 x ohjainlevy
2 x ruuvi
10 x terä
1 x puhallinletku
3 x jalka kierteellä, aluslevy, lukkorengas ja mutteri
Tässä käyttöohjeessa / laitteessa käytetään seuraavia kuvakkeita:
Lue käyttöohje! Pidä lapset loitolla sähkötyökalusta!
V
~
Voltti (Vaihtojännite)
Varo sähköiskua!
Hengenvaara!
W
Watti (vaikutusteho)
Tarkoitettu käytettäväksi
ainoastaan sisätiloissa!
n
0
Mittauksen iskuluku
Viallisen verkkojohdon tai pistokkeen
käyttöön liittyvän sähköiskun aiheutta-
ma hengenvaara!
Huomioi varoitus- ja turvaohjeet!
Käytä aina laitteella työskennellessäsi
suojalaseja, kuulo- ja hengityssuojaimia
sekä asianmukaisia työkäsineitä.
Räjähdysvaara!
Hävitä pakkaus ja laite
ympäristöystävällisesti!
33383_SCROLL SAW_Dekupiersaege_Content_LB3 (ohne GR).indd 14 23.07.09 11:31

15 FI
Johdanto / Turvaohjeet
1 x sisäkuusiokoloavain
1 x käyttöohje
Q
Tekniset tiedot
Nimellisjännite: 230 V
~
50 Hz
Nimellisottoteho: 120 W
Hetkellinen käyttö: 20 min (S2)
Iskumäärä (ilma kuormaa): n
0
400 - 1.600 min
-1
Maks. sahausyvyys 90°: 50 mm
Maks. sahausyvyys 45°: 22 mm
Melutiedot:
A-painotettu melutaso.
Äänenpainetaso: 67,2 dB (A)
Melutaso: 80,2 dB (A)
Epävarmuus K = 3 dB
Mittausarvot selvitetty EN 61029:n mukaisesti.
Turvaohjeet
J HUOMIO! Sähkötyökalujen käytössä on nou-
datettava seuraavia varotoimenpiteitä, jotta
loukkaantumis- ja tulipalonvaara vältettäisiin.
Lue turvaohjeet ennen laitteen käyttöä, nouda-
ta niitä ja säilytä niitä hyvin.
Q
Turvallinen työskentely
1. Pidä työskentelyalue järjestyksessä.
J Epäjärjestys työskentelyalueella voi johtaa
tapaturmiin.
2. Huomioi ympäristön vaikutukset.
J Älä altista sähkötyökaluja sateelle.
J Älä käytä sähkötyökaluja kosteassa
tai märässä ympäristössä.
J
Huolehdi työskentelyalueen hyvästä valaistuksesta.
J Älä käytä sähkötyökaluja paikoissa,
joissa on tulipalon ja räjähdyksen
vaara.
3.
Suojaudu sähköiskulta.
J Vältä koskettamasta maadoitettuja osia (esim.
putkia, lämpöpattereita, sähköliesiä, jäähdy-
tyslaitteita).
4. Pidä muut ihmiset loitolla.
J Älä anna muiden ihmisten, erityisesti
lasten, koskettaa sähkötyökalua tai
johtoa.
Älä päästä heitä työskentelyalueelle.
5. Säilytä sähkötyökaluja turvallisessa
paikassa.
J Säilytä sähkötyökaluja kuivassa, korkeassa tai
lukitussa tilassa lasten ulottumattomissa.
6. Älä kuormita sähkötyökalua liikaa.
J Työskentely on parempaa ja turvallisempaa,
kun käytät annettua tehoaluetta.
7. Käytä oikeaa sähkötyökalua.
J Älä käytä vaativissa töissä pienitehoisia koneita.
J Älä käytä sähkötyökalua tarkoituksissa, joissa
niitä ei ole tarkoitettu käytettävän. Älä esimer-
kiksi käytä käsipyörösahaa puunoksien tai
halkojen sahaamiseen.
8. Käytä tarkoitukseen soveltuvia
vaatteita.
J Älä käytä väljiä vaatteita tai koruja, sillä ne
voivat jäädä kiinni koneen liikkuviin osiin.
J Ulkona työskenneltäessä kannattaa käyttää
luistamattomia kenkiä.
J Suojaa pitkät hiukset hiusverkolla.
9.
Käytä suojavarusteita.
J Käytä suojalaseja.
J Käytä pölyävissä töissä hengityssuojainta.
10. Liitä pölynimulaite.
J Mikäli käytettävissä on liitäntöjä pölyimua
varten, varmista, että ne on liitetty ja että niitä
käytetään oikein.
11.
Älä käytä johtoa väärin.
J Älä irrota pistotulppaa pistorasiasta johdosta
vetämällä. Suojaa johtoa kuumuudelta, öljyltä
ja teräviltä reunoilta.
12. Kiinnitä työstökappale.
J Käytä työstökappaleen kiinnityksessä kiinnitys-
laitteita tai ruuvipuristinta. Työstökappale pysyy
33383_SCROLL SAW_Dekupiersaege_Content_LB3 (ohne GR).indd 15 23.07.09 11:31

16 FI
Turvaohjeet
silloin varmemmin paikoillaan kuin käsin pidel-
tynä.
13. Älä työskentele epänormaaleissa
asennoissa.
J Asetu tukevaan asentoon ja pysyttele koko
ajan tasapainossa.
14. Hoida työkalujasi huolellisesti.
J Pidä katkaisutyökalut terävinä ja puhtaina,
jolloin työskentely on nopeampaa ja turvalli-
sempaa.
J Noudata voitelua ja työkalujen vaihtoa koske-
via ohjeita!
J Tarkasta sähkötyökalun liitäntäjohto huolellisesti,
ja anna alan ammattilaisen vaihtaa viallinen
johto.
J Tarkasta jatkojohdot säännöllisesti ja vaihda
vialliset johdot uusiin.
J Pidä kahvat kuivina ja puhtaina. Niissä ei saa
olla öljyä ja rasvaa.
15. Vedä pistotulppa pois pistorasiasta:
J Kun sähkötyökalu ei ole käytössä, ennen sen
huoltoa ja työkalujen (esim. sahanterä, poran-
terä, jyrsin) vaihdon yhteydessä.
16. Älä jätä työkaluavaimia paikoilleen.
J Tarkista ennen laitteen käynnistämistä, että
avaimet ja säätötyökalut on otettu pois.
17. Vältä tahatonta käynnistymistä.
J Varmista, että virtakytkintä ei ole kytketty päälle,
kun pistät pistotulpan pistorasiaan.
18. Käytä ulkona vain ulkokäyttöön
tarkoitettua jatkojohtoa.
J Käytä ulkona vain ulkokäyttöön sallittua ja
vastaavalla tavalla merkittyä jatkojohtoa.
19. Ole tarkkaavainen.
J Tarkkaile työskentelyäsi. Työskentele järkevästi.
Älä käytä sähkötyökalua, jos et pysty keskitty-
mään.
20. Tarkasta sähkötyökalu mahdollisten
vaurioiden varalta.
J Ennen kuin käytät sähkötyökalua uudelleen,
tarkista suojusten tai hieman viallisten osien
moitteeton ja käyttötarkoituksen mukainen
toiminta.
J Tarkista, toimivatko liikkuvat osat moitteettomasti
ja jumittumatta. Varmista, ettei niissä ole vikoja.
Kaikki osat on asennettava oikein paikoilleen
ja niiden on täytettävä kaikki sähkölaitteiden
turvallista käyttöä koskevat edellytykset.
J Vialliset suojukset ja osat on annettava hyväk-
sytyn korjaamon korjattavaksi tai vaihdettavaksi,
mikäli käyttöohjeessa ei toisin mainita.
J Valmistajan valtuuttaman korjaamon on vaih-
dettava vialliset kytkimet.
J Älä käytä sähkölaitetta, jonka virtakytkintä ei
voi kytkeä päälle tai pois päältä.
21. HUOMIO!
J Muiden kuin laitteen omien työkalujen tai
muiden lisävarusteiden käyttö voi merkitä louk-
kaantumisvaaraa.
22. Anna sähkötyökalu sähkömiehen
korjattavaksi.
J Tämä sähkötyökalu on voimassa olevien turva-
määräysten mukainen. Ainoastaan sähkömies
saa tehdä mahdollisesti tarvittavat korjaukset.
Vialliset osat on vaihdettava alkuperäisiin va-
raosiin; laitteen käyttö saattaa muuten johtaa
onnettomuuksiin.
Kuviosahoja koskevia lai-
tekohtaisia turvaohjeita
J Aseta kuviosaha vain tasaiselle, tukevalle
pinnalle.
J Älä kosketa johtoa, jos se vioittuu tai katkeaa
käytön aikana. Irrota pistoke välittömästi pisto-
rasiasta ja vie laite korjattavaksi ainoastaan
alan ammattilaiselle tai valtuutettuun huoltopis-
teeseen.
J Ohjaa johto aina laitteen taakse.
J Vedä pistotulppa välittömästi pois pistorasiasta
vaaratilanteissa.
J Vie työstökappale vain käynnistettyä laitetta
vasten. Takapotkun vaara.
J Älä työstä kostuneita materiaaleja tai kosteita
pintoja.
J Käytä vain vioittumattomia ja moitteettomassa
kunnossa olevia sahanteriä
7
. Vääntyneet ja
tylsät sahanterät
7
voivat katketa tai aiheut-
taa takapotkun.
J Varmista, että sahanterien
7
hampaat osoitta-
vat alas, ennen kuin laitat terät laitteeseen.
J LOUKKAANTUMISVAARA! Pidä kädet
poissa sahan alueelta.
J Tarkista, onko työstettävässä työkappaleessa
esiin pistäviä nauloja jne. ja poista, jos niitä
33383_SCROLL SAW_Dekupiersaege_Content_LB3 (ohne GR).indd 16 23.07.09 11:31

17 FI
Turvaohjeet / Asennus / Käyttöönotto
löytyy. Sahanterän joutuminen kosketuksiin
naulojen tms. kanssa voi johtaa loukkaantumi-
siin ja / tai esinevahinkoihin.
J Laitteen on aina oltava puhdas ja kuiva. Siinä
ei saa olla öljyä tai voitelurasvoja.
J Kytke laite pois päältä, ennen kuin poistat sa-
hanterän välittömään läheisyyteen jääneitä
puun osia. Voit loukkaantua.
VAROLTUS!
MYRKYLLISIÄ PÖLYJÄ /
HÖYRYJÄ! Työstön yhteydessä syntyvien myr-
kylliset pölyt / höyryt vaarantavat laitetta käyt-
tävän henkilön tai lähellä olevien henkilöiden
turvallisuuden.
J Vältä terveydelle haitallisten materiaalien
sahaamista.
J Asbestia sisältävän materiaalin työstö on kiel-
letty. Asbesti aiheuttaa syöpää.
J Huolehdi riittävästä tuuletuksesta.
J Käytä suojalaseja, kuulosuojainta,
hengityssuojainta ja suojakäsineitä.
Q
Työskentelyä koskevia ohjeita
J Työnnä työkappaletta hitaasti ja mahdollisim-
man pienellä paineella sahanterää kohti.
J Pienennä syöttöä, kun sahaat paksumpia
materiaaleja.
J Pidä työkappaletta paikoillaan pöydällä kaksin
käsin ja työnnä sitä hitaasti sahanterää kohti.
Sahanterä voi muuten vääntyä tai katketa.
J Vältä muuttamasta suuntaa voimakkaasti saha-
uksen aikana, jotta välttäisit sahanterän väänty-
misen tai repeämisen.
J Poraa ennen sahaamista reikä kohtaan, johon
on tarkoitus sahata kulma tai sisä-ääriviiva ja
aloita sahaaminen siitä.
J Käytä oikeaa sahanterää. Sahanterän valinta
riippuu materiaaline vahvuudetsa ja tyypistä
sekä halutusta leikkuusta.
Valitse hienohampainen sahanterä, kun haluat
sahata ohuita ja kovia materiaaleja.
Käytä kapeaa sahanterää sahatessäsi jyrkkiä
pyöristyksiä.
Q
Asennus
VAROLTUS!
LOUKKAANTUMISVAARA!
Vedä pistoke pois pistorasiasta ennen kaikkia
laitteelle tehtäviä toimenpiteitä.
Q
Suojakuvun
9
asennus
(katso kuva A)
j Pistä ruuvi
10 c
sisäpuolelta suojakuvun
9
raon läpi.
j Pistä ohjainlevy
10 b
suojakuvun ulkopuolelta
9
ruuviin
10 c
.
Ohjainlevyn
10 b
taivutettu puoli tarttuu suoja-
kupuun
9
.
j Aseta suojakupu
9
kummankin kiinnitysvarren
11
väliin ja pistä ruuvit
10 c
kiinnitysvarsiin
11
niitä
varten olevien aukkojen läpi.
j Varmista, että suojakuvun
9
kupera puoli
osoittaa ylöspäin.
j Pistä aluslevyt
10 a
paikoilleen kiinnitysvarsien
11
ulkopuolelta.
j Ruuvaa rihlamutterit
10
ruuvien päihin
10 c
.
j Työnnä suojakupu
9
tarvittavaan asentoon ja
kiinnitä se kiristämällä rihlamutterit
10
.
Q
Jalkojen
12
asennus
(katso kuva B)
j Aseta jalka
12
alhaalta laitteen pohjalevyssä
olevaan asennusreikään.
j Aseta peräkkäin aluslevy ja mutteri ruuvin
kierteeseen.
j Kiristä mutteri kiintoavaimen (SW 10) avulla.
Q
Puhallinletkun
1
asennus
(katso kuva C)
j Kierrä puhallinletku
1
myötäpäivään sitä
varten olevaan aukkoon.
Q
Käyttöönotto
Noudata verkkojännitteestä annettuja tietoja.
Virtalähteen jännitteen täytyy vastata laitteen tyyp-
33383_SCROLL SAW_Dekupiersaege_Content_LB3 (ohne GR).indd 17 23.07.09 11:31

18 FI
Käyttöönotto
pikilvessä olevia tietoja. 230 V:llä merkittyjä laitteita
voi käyttää myös 220 V:llä.
VARO! Varmista, että laite on kytketty pois
päältä, ennen kuin liität sen sähköverkkoon.
J Vie työstökappale vain käynnistettyä laitetta
vasten. Takapotkun vaara.
Laitteen paikoittaminen:
j Tartu laitteen nostamiseksi kohdasta, jossa on
tarra ”Bitte hier anheben - Please lift here“.
Virran kytkeminen laitteeseen:
j Paina vihreää I-painiketta
4
.
Virran katkaiseminen laitteesta:
j Paina punaista O-painiketta
3
.
Q
Iskuluvun säätäminen
j Lisää iskulukua kiertämällä iskulukusäädintä
2
myötäpäivään.
j Pienennä iskulukua kiertämällä iskulukusäädin-
tä
2
vastapäivään.
HUOM: Huomaa, että liian suuri iskuluku voi johtaa
sahanterän kuumenemiseen ja sen takia sen
tavallista suurempaan kulumiseen ja aiheuttaa
palamisjälkiä materiaaliin.
j Valitse sahausnopeus työstettävään materiaaliin
sopivaksi.
Maksimi-
nopeus
Keskisuuri
nopeus
Minimi-
nopeus
Paksu
puulevy
Suorat
leikkuut
Tavalli-set
kuviosa-
haustyöt
-
Ohuet
puu-ja
muovile-vyt
Suorat
leikkuut ja
pyöreät
leikkuut
Tavalli-set
ja hienot
kuviosa-
haustyöt
Hienot
kuviosa-
haustyöt
Q
Sahapöydän
6
kallistaminen
(katso kuvat D, E)
j Avaa säätöruuvi
5
.
j Kallista sahapöytää
6
, kunnes se on halutussa
kulmassa.
HUOM: Voit lukea kulman asteikosta
6 a
.
j Kiristä säätöruuvi
5
.
Q
Sahanterän
7
asettaminen
paikoilleen / poistaminen
VAROLTUS!
LOUKKAANTUMISVAARA!
Vedä pistoke pois pistorasiasta ennen kaikkia
laitteelle tehtäviä toimenpiteitä.
Sahanterän
7
asettaminen paikoilleen:
j Käännä kiristysvipu
13
ylös.
j Pistä sahanterä
7
sahapyödässä olevan aukon
läpi
6
.
Varmista, että sahanterän
7
hampaat on
suunnattu eteenpäin ja osoittavat alas.
j Ripusta sahanterä
7
alempaan sahanterän
pidikkeeseen
14
.
j Kiinnitä lopuksi sahanterän
7
ylempi pultti
ylemmässä sahanterän pidikkeessä
8
olevaan
syvennykseen.
j Käännä kiristysvipu
13
alas, jotta saat kiristettyä
sahanterän
7
.
j Käännä kiristysvipua
13
vaakatasossa myötä-
päivään kiristyksen lisäämiseksi.
j Käännä kiristysvipua
13
vaakatasossa vasta-
päivään kiristyksen vähentämiseksi.
HUOM: Jos sahataan liian vähän kiristetyllä
sahanterällä
7
, sahaus voi olla epätarkkaa.
Sahanterän
7
poistaminen:
j Käännä kiristysvipu
13
ylös.
j Paina ylempi sahanterän pidin
8
alas.
j Nosta sahanterää
7
kevyesti.
j Työnnä sitä eteenpäin, jotta se irtoaa alemmas-
ta sahanterän pidikkeestä
14
.
33383_SCROLL SAW_Dekupiersaege_Content_LB3 (ohne GR).indd 18 23.07.09 11:31

19 FI
Huolto ja puhdistus / Huolto / Takuu / Hävittäminen
Q
Huolto ja puhdistus
Q
Huolto
VAROLTUS!
LOUKKAANTUMISVAARA!
Vedä pistotulppa pois pistorasiasta ennen
kaikkia laitteelle tehtäviä toimenpiteitä.
Laite on suurelta osin huoltovapaa.
Q
Puhdistus
j Puhdista laite säännöllisesti, mieluiten heti työs-
kentelyn päätyttyä.
j Laitteen sisälle ei saa joutua nesteitä. Käytä
puhdistuksessa kuivaa kangasta.
j Älä anna pölyn ja lian kerääntyä ilmanvaihto-
rakoihin.
j Älä missään tapauksessa käytä bensiiniä tai
voimakkaita liuotinaineita.
j Säilytä laitetta kuivassa paikassa.
Q
Huolto
J
VAROLTUS!
Anna laitteet huolto-
liikkeen tai sähköliikkeen korjatta
vaksi.
Korjauksissa saa käyttää vain alku-
peräisiä varaosia. Laitteesi säilyy näin
turvallisena.
J
VAROLTUS!
Laitteen pistokkeen tai
verkkojohdon saa vaihtaa vain lait-
teen valmistaja tai sen valtuuttama
huoltoliike. Laitteesi säilyy näin turvallisena.
Q
Takuu
Laitteella on 3 vuoden takuu alkaen osto-
päivästä. Laite on valmistettu huolellisesti.
Se on tarkistettu ennen toimitusta. Säilytä
ostokuitti todisteeksi takuun voimassa-
olosta. Takuutapauksissa ota puhelimella
yhteyttä huoltopisteeseesi. Vain siten saat
varmasti lähetettyä tuotteen veloitukset-
ta. Tämä takuu koskee vain ensimmäistä
ostajaa eikä sitä voi luovuttaa tuotteen
mukana.
Takuu koskee ainoastaan materiaali- tai valmistus-
virheitä tai akkujen. Takuu ei korvaa kuluvia osia tai
mahdollisesti viallisten osien, esimerkiksi kytkimen
aiheuttamia vahinkoja. Tuote on tarkoitettu ainoas-
taan yksityiseen käyttöön. Tuotetta ei siten saa käyt-
tää ammatillisiin tarkoituksiin.
Takuu raukeaa, jos tuotettta on käytetty tavalla,
joka ei vastaa tuotteen käyttötarkoitusta, tai muuten
asiattomasti tai liian kovaa voimaa käyttäen. Takuu
raukeaa myös, jos jokin muu taho kuin valmistajan
valtuuttama huoltoliike on yrittänyt muuttaa tai kor-
jata tuotetta. Takuu ei rajoita käyttäjän yleistä kulut-
tajasuojaa.
FI
Kompernaß Service Suomi
Tel.: 010 30 935 80
(Soittamisen hinta lankaliitty-
mästä: 8,21 snt/puh + 5,9 snt/
min / Matkapuhelimesta: 8,21
snt/puh + 16,90 snt/min)
e-mail: support.f[email protected]
Q
Hävittäminen
Pakkaus on valmistettu ympäristöystäväl-
lisistä kierrätettävistä materiaaleista.
Älä hävitä sähkötyökaluja
talousjätteiden mukana!
Sähkölaitteiden hävittämistä koskevan EU-normin
2002 / 96 / EC mukaan käytöstä poistettuja sähkö-
laitteita hävitettäessä on huolehdittava materiaalien
erottelusta ja kierrätyksestä.
Lisätietoja antavat mm. paikalliset ympäristöviran-
omaiset.
33383_SCROLL SAW_Dekupiersaege_Content_LB3 (ohne GR).indd 19 23.07.09 11:31

20 FI
Vaatimustenmukaisuusvakuutus / Valmistaja
Q
Vaatimustenmukaisuusvakuu-
tus / Valmistaja
Me, Kompernaß GmbH, Burgstr. 21,
D-44867 Bochum, Saksa, vakuutamme täten,
että tämä tuote vastaa seuraavia EY-direktiivejä:
Konedirektiivi
(98 / 37 / EC)
Pienjännitedirektiivi
(2006 / 95 / EC)
Sähkömagneettinen yhteensopivuus
(2004 / 108 / EC)
Tyyppi /Laitekuvaus:
Lehtisaha PDKS 120
Bochum, 31.07.2009
Hans Kompernaß
- Toimitusjohtaja -
Tekniset muutokset edelleenkehittelyn puitteissa
ovat mahdollisia.
33383_SCROLL SAW_Dekupiersaege_Content_LB3 (ohne GR).indd 20 23.07.09 11:31
Seite wird geladen ...
Seite wird geladen ...
Seite wird geladen ...
Seite wird geladen ...
Seite wird geladen ...
Seite wird geladen ...
Seite wird geladen ...
Seite wird geladen ...
Seite wird geladen ...
Seite wird geladen ...
Seite wird geladen ...
Seite wird geladen ...
Seite wird geladen ...
Seite wird geladen ...
Seite wird geladen ...
Seite wird geladen ...
Seite wird geladen ...
Seite wird geladen ...
Seite wird geladen ...
Seite wird geladen ...
Seite wird geladen ...
Seite wird geladen ...
Seite wird geladen ...
Seite wird geladen ...
Seite wird geladen ...
Seite wird geladen ...
-
 1
1
-
 2
2
-
 3
3
-
 4
4
-
 5
5
-
 6
6
-
 7
7
-
 8
8
-
 9
9
-
 10
10
-
 11
11
-
 12
12
-
 13
13
-
 14
14
-
 15
15
-
 16
16
-
 17
17
-
 18
18
-
 19
19
-
 20
20
-
 21
21
-
 22
22
-
 23
23
-
 24
24
-
 25
25
-
 26
26
-
 27
27
-
 28
28
-
 29
29
-
 30
30
-
 31
31
-
 32
32
-
 33
33
-
 34
34
-
 35
35
-
 36
36
-
 37
37
-
 38
38
-
 39
39
-
 40
40
-
 41
41
-
 42
42
-
 43
43
-
 44
44
-
 45
45
-
 46
46


Parkside KH 3038 SCROLL SAW Operation and Safety Notes
- Kategorie
- Elektrowerkzeuge
- Typ
- Operation and Safety Notes
- Dieses Handbuch eignet sich auch für
in anderen Sprachen
- English: Parkside KH 3038 SCROLL SAW
- dansk: Parkside KH 3038 SCROLL SAW
- svenska: Parkside KH 3038 SCROLL SAW
- suomi: Parkside KH 3038 SCROLL SAW
Verwandte Artikel
-
Parkside 271265 Operating And Safety Instructions Manual
-
Parkside PDKS 120 B3 Operation and Safety Notes
-
-
-
-
Parkside PDKS 120 A1 Operation and Safety Notes
-
-
-
Parkside PHKS 1300 A1 Operation and Safety Notes
-