
PDKS 120
DEKUPIERSÄGE
Bedienungs- und Sicherheitshinweise
PILICA ZA REZBARENJE
Upute za posluživanje i za Vašu sigurnost
SCROLL SAW
Operation and Safety Notes
33383_SCROLL SAW_Dekupiersaege_Cover_LB4 (GB-HR-DE).indd 3 21.07.09 09:07

10 11 1
2
12
3
4
5
6
6 a
7
8
9
14
7
33383_SCROLL SAW_Dekupiersaege_Cover_LB4 (GB-HR-DE).indd 5 21.07.09 09:07

A B
C D
E F
13
10
10 b
1
45°
45°
10 a
12
10 c
33383_SCROLL SAW_Dekupiersaege_Cover_LB4 (GB-HR-DE).indd 8 21.07.09 09:07

GB Operation and Safety Notes Page 5
HR Upute za posluživanje i za Vašu sigurnost Stranica 13
DE / AT / CH Bedienungs- und Sicherheitshinweise Seite 21
Before reading, unfold both pages containing illustrations and familiarise yourself with all functions of the
device.
Rasklopite prije čitanja obije stranice sa slikama i nakon toga se upoznajte sa svim funkcijama uređaja.
Klappen Sie vor dem Lesen die beiden Seiten mit den Abbildungen aus und machen Sie sich anschließend
mit allen Funktionen des Gerätes vertraut.
33383_SCROLL SAW_Dekupiersaege_Cover_LB4 (GB-HR-DE).indd 4 21.07.09 09:07

5 GB
Introduction
Intended purpose ..........................................................................................................Page 6
Features and equipment ...............................................................................................Page 6
Included items ...............................................................................................................Page 6
Technical data ...............................................................................................................Page 7
Safety advice
Working safely ..............................................................................................................Page 7
Safety advice relating specifically to scroll saws ........................................................Page 8
Advice on use ................................................................................................................Page 9
Assembly
Attaching the blade guard (see Fig. A) .......................................................................Page 9
Attaching the feet (see Fig. B) ......................................................................................Page 10
Attaching the dust blow tube (see Fig. C) ...................................................................Page 10
Bringing into use
Setting the stroke rate ...................................................................................................Page 10
Tilting the saw table (see Figs. D, E) ............................................................................Page 10
Inserting / removing the saw blade ..............................................................................Page 10
Maintenance and cleaning
Maintenance .................................................................................................................Page 11
Cleaning ........................................................................................................................Page 11
Service .........................................................................................................................Page 11
Warranty ...................................................................................................................Page 11
Disposal ......................................................................................................................Page 12
Conformity Declaration / Manufacturer ..........................................Page 12
Table of contents
33383_SCROLL SAW_Dekupiersaege_Content_LB4 (GB-HR-DE).indd 5 23.07.09 11:30

6 GB
Introduction
Scroll saw PDKS 120
Q
Introduction
Before you use it for the first time, it is es-
sential that you make yourself fully familiar
with the functions of the appliance and
find out how to correctly handle electrically powered
tools. To do this, read the following operating in-
structions carefully. Retain these instructions for
future reference. Additionally, pass them on to who-
ever might acquire the appliance at a future date.
Q
Intended purpose
The scroll saw is intended for the intricate cutting of
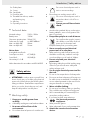
wood and plastic in a DIY environment (see Fig. F).
Any other uses, and modifications to the appliance,
are deemed to be improper usage and may result
in serious physical injury. The manufacturer accepts
no responsibility for damage(s) resulting from
improper usage.
Q
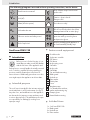
Features and equipment
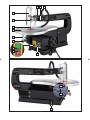
1
Dust blow tube
2
Stroke rate controller
3
OFF button
4
ON button
5
Angle setting screw
6
Saw table
6 a
Angle scale
7
Saw blade
8
Top saw blade mounting
9
Blade guard
10
Knurled nut
10 a
Plain washer
10 b
Guide plate
10 c
Screw
11
Attachment arm
12
3 x Threaded feet with nut,
washer and retaining ring
13
Clamping lever
14
Bottom blade mounting
Q
Included items
1 x Scroll saw PDKS 120
1 x Blade guard
2 x Knurled nuts
2 x Plain washers
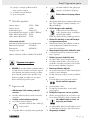
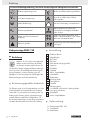
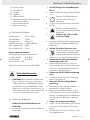
The following pictograms are used in these operating instructions / on the device:
Read instruction manual!
Keep children away from electrical
power tools!
V
~
Volt (AC)
Caution – electric shock!
Danger to life!
W
Watts (effective power) For indoor use only!
n
0
No-load stroke rate
Risk of loss of life by electric shock from
damaged mains lead or mains plug!
Observe caution and safety notes!
Wear hearing protection, dust
protection mask, protective glasses
and protective gloves.
Risk of explosion!
Dispose packaging and appliance in
an environmentally-friendly way!
33383_SCROLL SAW_Dekupiersaege_Content_LB4 (GB-HR-DE).indd 6 23.07.09 11:30

7 GB
2 x Guide plates
2 x Screws
10 x Saw blades
1 x Dust blow tube
3 x Threaded feet with nut, washer
and retaining ring
1 x Allen key
1 x Operating instructions
Q
Technical data
Nominal voltage: 230 V
~
50 Hz
Rated power: 120 W
Short-term operation time: 20 min (S2)
Stroke rate (no load): n
0
400 - 1600 min
-1
Max. cut depth 90°: 50 mm
Max. cut depth 45°: 22 mm
Noise data:
A-weighted sound levels.
Sound pressure level: 67,2 dB (A)
Sound level: 80,2 dB (A)
Uncertainty K = 3 dB
Values determined in accordance with EN 61029.
Safety advice
J ATTENTION! In order to protect yourself from
electric shock, injury or fire when using electrical
power tools, please observe the following basic
safety precautions. Read all these requirements
before you use the electrical power tool, and
keep the safety advice in a safe place.
Q
Working safely
1. Keep your working area clean
and tidy.
J A disorderly working area can lead to accidents.
2. Be aware of the effects of the
environment.
J
Do not leave electrical power tools out in the rain
.
J Do not use electrical power tools in
moist or wet surroundings.
J Ensure that your working area is well lit.
J Do not use electrical power tools in
areas where there is risk of fire or
explosion.
3.
Protect yourself from electric
shock.
J Avoid touching earthed objects such as pipes,
heating radiators, ovens or refrigerators with
parts of your body.
4. Keep other people at a safe distance.
J Do not allow other people, in partic-
ular children, to touch the electrical
power tool or the mains lead.
Keep them away from your working area.
5. Store currently unused electrical
power tools in a safe place.
J When not being used electrical power tools
should be stored in dry conditions in a high
or enclosed place, out of reach of children.
6. Do not overload your electrical
power tool.
J By keeping within the specified working range
of the tool you will work more safely and
achieve a better result.
7. Use the right electrical power tool for
the task.
J Do not use low-output devices for heavy tasks.
J Do not use an electrical power tool for purposes
for which it was not intended. For example, do
not use a hand operated circular saw for trim-
ming tree branches or cutting logs.
8. Wear suitable clothing.
J Do not wear loose-fitting clothing or jewellery.
They could become caught on moving parts.
J We recommend that you wear anti-slip foot-
wear when working outdoors.
J If you have long hair, wear a hair net.
9.
Use personal protective
equipment.
J Wear protective glasses.
J Wear a dust mask if your work generates dust.
10. Attach the vacuum dust extraction
device.
Introduction / Safety advice
33383_SCROLL SAW_Dekupiersaege_Content_LB4 (GB-HR-DE).indd 7 23.07.09 11:30

8 GB
J Where there are connection points provided
for vacuum dust extraction please use them,
and ensure they are working properly.
11.
Do not use the mains lead for
purposes for which it was
not intended.
J Do not use the mains lead to pull the plug out
of the mains socket. Protect the mains lead
from heat, oil and sharp edges.
12. Secure the workpiece.
J Use clamps or a vice to grip the workpiece
firmly. This is much safer than holding it with
your hand.
13. Avoid placing your body in an
unnatural position.
J Keep proper footing and balance at all times.
14. Look after your tools carefully.
J Keep cutting tools sharp and clean. This way
you will work more safely and achieve better
results.
J Follow the advice on tool lubrication and
consumables replacement.
J Check the condition of the mains lead on your
electrical power tool regularly and have any
damage repaired by a competent specialist.
J Check the condition of extension leads regu-
larly and replace them if they are damaged.
J Keep handles and hand grips clean, dry and
free of oil and grease.
15. Pull the mains plug out of the
mains socket.
J Do this if the electrical power tool is not being
used, before carrying out maintenance tasks
on the electrical power tool and whenever
you are changing inserted tools, e.g. saw
blades, drills or router bits.
16. Make sure that no spanners, keys
etc. are left attached.
J Check before switching on that all spanners,
keys and setting tools have been removed.
17. Avoid unintentionally starting
up the device.
J Check that the switch is set to OFF on the de-
vice when the mains plug is inserted into the
mains socket.
18. Using an extension lead for
working outdoors.
J When working outside, always use an approved
and appropriately labelled extension lead.
19. Remain alert.
J Watch what you are doing. Proceed with cau-
tion. Do not use electrical power tools if you
cannot concentrate.
20. Check the electrical power tool
for damage.
J Before the electrical power tool is used, care-
fully check the safety equipment and any
slightly damaged parts to see that they are still
working properly.
J Check that all moving parts on the tool are
working properly, can move freely and are not
damaged. All parts must be correctly attached
and fulfil all the requirements necessary to allow
the electrical power tool to operate properly.
J Damaged safety equipment and components
must be properly repaired or replaced at a com-
petent electrical equipment repair centre unless
otherwise indicated in the operating instructions.
J Damaged switches must be replaced at a
Customer Service Centre.
J Never use an electrical power tool that cannot
be switched on and off properly.
21. ATTENTION!
J The use of inserted tools and accessories other
than those recommended by the manufacturer
could lead to you being injured.
22. Have your electrical power tool
repaired at an electrical equipment
repair specialist.
J This electrical power tool complies with the
relevant safety regulations. Repairs may only
be carried out by a specialist electrical repair
centre using original spare parts, otherwise in-
jury could occur to the user.
Safety advice relating
specifically to scroll saws
J Ensure that the scroll saw stands on a level,
horizontal surface.
J Do not touch the mains lead if it becomes dam-
aged or cut through while you are using the
device. Pull the plug out of the mains socket im-
mediately and have the device repaired by a
Safety advice
33383_SCROLL SAW_Dekupiersaege_Content_LB4 (GB-HR-DE).indd 8 23.07.09 11:30

9 GB
suitably qualified person or at the Customer
Service Centre.
J Always work with the mains lead leading
away from the rear of the device.
J If a dangerous situation arises, pull the mains
plug immediately out of the mains socket.
J Always switch on the electrical power tool before
moving the workpiece against it. Otherwise
there is the risk of kickback.
J Do not cut moist materials or damp surfaces,
J Use only undamaged, defect-free saw blades
7
.
Distorted or blunt saw blades
7
can break or
cause a kickback.
J Ensure that the teeth on the saw blade
7
point
downwards before you mount it in the device.
J DANGER OF INJURY! Keep your hands
away from the area of the saw blade.
J Before sawing, check the workpiece for foreign
bodies such as nails etc. and remove them. In-
jury and / or damage to property may result from
the saw blade striking nails etc. embedded in
the workpiece.
J Always keep the device clean, dry and free
from oil or grease.
J Switch off the device before you remove any
wood residue from around the saw blade.
Otherwise you could become injured.
WARNING!
HAZARDOUS DUSTS /
VAPOURS! Any noxious dusts or vapours
generated from sawing represent a risk to the
health of the person operating the device and
to anyone near the work area.
J Do not saw materials containing substances
harmful to health.
J Do not use the tool on materials containing
asbestos. Asbestos is a known carcinogen.
J Make sure you have adequate ventilation.
J Wear protective glasses, hearing
protection, dust protection masks
and protective gloves.
Q
Advice on use
J Push the workpiece slowly and with minimum
pressure on to the saw blade.
J Reduce the rate of advance when you are
cutting thicker material.
J Hold the workpiece firmly on the table with
both hands and push it slowly towards the saw
blade. Otherwise the saw blade may twist or
break.
J Avoid making any sharp changes in direction
during sawing to prevent the saw blade from
twisting or tearing.
J Before starting the saw cut, drill a hole at a
corner or internal cut-out in the workpiece and
start sawing from the hole.
J Use the correct saw blade. The choice of saw
blade depends on the thickness and type of
material and the intended cut.
Select a saw blade with fine teeth to saw thin,
hard materials.
Use a narrow saw blade to saw small radius
cuts.
Q
Assembly
WARNING!
DANGER OF INJURY!
Pull the mains plug out of the socket before you
carry out any task on the device,
Q
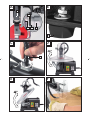
Attaching the blade guard
9
(see Fig. A)
j Push the screw
10 c
from the inside through the
slot in the blade guard
9
.
j From the outside of the blade guard
9
, place
the guide plate
10 b
on to the screw
10 c
.
The bent-up side of the guide plate
10 b
engages
around the blade guard
9
.
j Attach the blade guard
9
between the two at-
tachment arms
11
and insert the two screws
10 c
through the openings provided for them in the
attachment arms
11
.
j Ensure that the upwardly curved end of the
blade guard
9
is at the top.
j Put the plain washers
10 a
on from the outside
of the attachment arms
11
.
j Screw the knurled nuts
10
on to the two screw
ends
10 c
.
j Slide the blade guard
9
into the desired posi-
tion and fix it in that position by tightening the
knurled nuts
10
.
Safety advice / Assembly
33383_SCROLL SAW_Dekupiersaege_Content_LB4 (GB-HR-DE).indd 9 23.07.09 11:30

10 GB
Q
Attaching the feet
12
(see Fig. B)
j Attach the feet
12
from below through the
mounting holes in the device‘s base plate.
j Place the plain washers and then the nuts on to
the screw threads.
j Tighten the nuts using a size 10 open spanner.
Q
Attaching the dust blow tube
1
(see Fig. C)
j Screw the dust blow tube
1
clockwise into the
opening provided for it.
Q
Bringing into use
Take note of the mains voltage. The mains voltage
at the mains socket must match that shown on the
rating plate on the device. Devices marked with
230 V can also be operated at 220 V.
CAUTION! Make sure that the device is
switched off before you connect it to the mains supply.
J Always switch on the electrical power tool before
moving the workpiece against it. Otherwise
there is the risk of kickback.
Setting up the device:
j Grab the device at the position labelled “Bitte
hier anheben - Please lift here” to position the
device.
Switching on the device:
j Press the green ON button
4
.
Switching off the device:
j Press the red OFF button
3
.
Q
Setting the stroke rate
j Turn the stroke rate controller
2
clockwise to
increase the stroke rate.
j Turn the stroke rate controller
2
anticlockwise
to decrease the stroke rate.
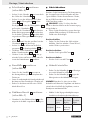
NOTE: Be aware that too high a stroke rate leads
to the saw blade heating up, an increase in wear
of the saw blade and burn marks on the material.
j Select a saw speed suitable for the material
being sawn.
Maximum
speed
Medium
speed
Minimum
speed
Thick woo-
den board
Straight
cut
Normal
fretsaw
work
-
Thin woo-
den or
plastic
board
Straight
and curved
cuts
Normal
and intrica-
te fretsaw
work
Intricate
fretsaw
work
Q
Tilting the saw table
6
(see Figs. D, E)
j Unscrew the angle setting screw
5
.
j Tilt the saw table
6
until the desired is
reached.
NOTE: The angle can be read off the angle
scale
6 a
.
j Retighten the angle setting screw
5
.
Q
Inserting / removing the
saw blade
7
WARNING!
DANGER OF INJURY!
Pull the mains plug out of the socket before you
carry out any task on the device,
Inserting the saw blade
7
:
j Lift up the clamping lever
13
.
j Insert the saw blade
7
through the opening in
the saw table
6
.
Ensure that the teeth of the saw blade
7
point
forwards and downwards.
j Suspend the saw blade
7
in the bottom
blade mount
14
.
j Then hook the top pin of the saw blade
7
in
the recess provided for this purpose in the top
saw blade mount
8
.
Assembly / Bringing into use
33383_SCROLL SAW_Dekupiersaege_Content_LB4 (GB-HR-DE).indd 10 23.07.09 11:30

11 GB
j Lower the clamping lever
13
to tension the saw
blade
7
.
j Turn the clamping lever
13
horizontally clock-
wise to increase the tension.
j Turn the clamping lever
13
horizontally anti-
clockwise to reduce the tension.
NOTE: Sawing with too little tension in the
saw blade
7
can lead to inaccurate results.
Removing the saw blade
7
:
j Lift up the clamping lever
13
.
j Press the top saw blade mount
8
downward.
j Lift the saw blade
7
slightly.
j Unhook the saw blade out of the bottom saw
blade mount
14
by moving it forward.
Q
Maintenance and cleaning
Q
Maintenance
WARNING!
DANGER OF INJURY!
Pull the mains plug out of the socket before you
carry out any task on the device,
The device requires almost no maintenance.
Q
Cleaning
j Clean the device frequently; for best results, do
this immediately after you have finished using it.
j Do not allow any liquids to enter the device.
Use a dry cloth to clean the device.
j Keep the ventilation slots free of dust and dirt.
j Do not under any circumstances use petrol or
strong solvents.
j Store the device in a dry room.
Q
Service
J
WARNING!
Have your device
repaired at the service centre or by
qualified specialist personnel using
original manufacturer parts only. This
will ensure that your device remains safe to use.
J
WARNING!
If the plug or lead
needs to be replaced, always have
the replacement carried out by the
manufacturer or its service centre. This
will ensure that your device remains safe to use.
Q
Warranty
This appliance is guaranteed for 3 years
from the date of purchase. It has been care-
fully produced and meti-culously checked
before delivery. Please keep your receipt
as proof of purchase. Contact your service
centre by telephone in case of questions
pertaining to the warranty. Your goods can
be transmitted free of cost only in this man-
ner. This warranty applies only to the initial
purchaser and is non-transferable.
The warranty covers only material or manufactur-
ing faults, not normal wear or damage to fragile
parts such as switches or rechargeable batteries.
The appliance is intended solely for private, not
commercial, use.
If this product has been subjected to improper or in-
appropriate handling, abuse, or interventions not
carried out by one of our authorised sales and
service outlets, the warranty will be considered void.
This warranty does not affect your statutory rights.
GB
DES Ltd
Units 14-15
Bilston Industrial Estate
Oxford Street
Bilston (Great Britain)
WV14 7EG
Tel.: 0870 / 787-6177
Fax: 0870 / 787-6168
e-mail: [email protected]
Bringing into use / Maintenance and cleaning / Service / Warranty
33383_SCROLL SAW_Dekupiersaege_Content_LB4 (GB-HR-DE).indd 11 23.07.09 11:30

12 GB
Q
Disposal
The packaging is wholly composed of
environmentally-friendly materials that
can be disposed of at a local recycling
centre.
Do not dispose of electrical
power tools with the household
rubbish!
In accordance with European Directive
2002 / 96 / EC (covering waste electrical and elec-
tronic equipment) and its transposition into national
legislation, worn out electrical power tools must be
collected separately and taken for environmentally
compatible recycling.
Contact your local refuse disposal authority for
more details of how to dispose of your worn out
electrical devices.
Q
Conformity Declaration /
Manufacturer
We, Kompernaß GmbH, Burgstr. 21,
D-44867 Bochum, Germany, hereby declare that
this product complies with the requirements of the
following EU directives:
Machinery Directive
(98 / 37 / EC)
EC Low Voltage Directive
(2006 / 95 / EC)
Electromagnetic compatibility
(2004 / 108 / EC)
Type / Appliance Designation:
Scroll saw PDKS 120
Bochum, 31.07.2009
Hans Kompernaß
- Managing Director-
We reserve the right to make technical modifications
in the course of further development.
Disposal / Conformity Declaration / Manufacturer
33383_SCROLL SAW_Dekupiersaege_Content_LB4 (GB-HR-DE).indd 12 23.07.09 11:30

13 HR
Popis sadržaja
Uvod
Uporaba u skladu sa namjenom ...............................................................................Stranica 14
Oprema ......................................................................................................................Stranica 14
Opseg pošiljke ...........................................................................................................Stranica 14
Tehnički podatci .........................................................................................................Stranica 15
Sigurnosne upute
Siguran rad .................................................................................................................Stranica 15
Karakteristične sigurnosne upute za stolarske kružne pile ......................................Stranica 16
Radne upute ...............................................................................................................Stranica 17
Montaža
Montiranje zaštitnog poklopca (vidite prikaz A) .....................................................Stranica 17
Montiranje postavnih nogara (vidite prikaz A) ........................................................Stranica 17
Montiranje gipke cijevi puhaljke (vidite prikaz C) ...................................................Stranica 17
Stavljanje u pogon .........................................................................................Stranica 17
Namještanje broja podizanja ...................................................................................Stranica 18
Naginjanje stola za piljenje (vidite prikaz D, E) ......................................................Stranica 18
Postavljanje / otklanjanje lista pile.............................................................................Stranica 18
Redovito održavanje i čišćenje
Redovito održavanje ..................................................................................................Stranica 19
Čišćenje ......................................................................................................................Stranica 19
Servis .........................................................................................................................Stranica 19
Jamstveni list.......................................................................................................Stranica 19
Zbrinjavanje ........................................................................................................Stranica 20
Izjava o sukladnosti / Proizvođač .....................................................Stranica 20
33383_SCROLL SAW_Dekupiersaege_Content_LB4 (GB-HR-DE).indd 13 23.07.09 11:30

14 HR
Uvod
Pilica za rezbarenje PDKS 120
Q
Uvod
Upoznajte se prije prvog puštanja uređaja
u rad sa funkcijama uređaja i informirajte
se o ispravnom rukovanju sa električnim
alatima. Pročitajte slijedeće upute za rukovanje. Ove
upute dobro sačuvajte. Priložite svu dokumentaciju
prilikom predavanja uređaja trećim osobama.
Q
Uporaba u skladu sa namjenom
Stolarska kružna pila namijenjena je za izvođenje
hobi radova od drva i plastike (vidite prikaz F).
Svaki drugi način uporabe i svaka promjena uređa-
ja smatra se nenamjenskom i krije znatnu opasnost
od nastanka nezgode. Proizvođač ne preuzima
odgovornost od štete nastale uslijed korištenja ure-
đaja protivnog njegovoj namjeni.
Q
Oprema
1
gipka cijev puhaljke
2
namještač broja podizanja
3
tipka ISKLJUČENO
4
tipka UKLJUČENO
5
postavni vijak kuta nagiba
6
stol za piljenje
6 a
ljestvica stupnja
7
list pile
8
gornji držač lista pile
9
zaštitni poklopac
10
nazubljena matica
10 a
podložna ploča
10 b
vodeći lim
10 c
vijak
11
pričvrsna poluga
12
3 x postolje s navojem, podložna ploča,
razorni prsten i matica
13
zatezna poluga
14
donji držač lista pile
Q
Opseg pošiljke
1 x pilica za rezbarenje PDKS 120
1 x zaštitni poklopac
2 x nazubljena matica
2 x podložna ploča
2 x vodeći lim
2 x vijak
10 x list pile
1 x gipka cijev puhaljke
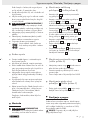
U ovim uputama za uporabu / na uređaju rabi se slijedeće prikaze:
Čitati upute za rukovanje!
Držite djecu podalje od
električnog alata!
V
~
Volt (Imjenični napon)
Čuvajte se strujnog udara!
Opasnost po život!
W
W (efektivna snaga)
Isključivo namijenjeno za uporabu
u unutarnjim prostorijama!
n
0
Broj dimenzioniranja-podizanja
Opasnost po život zbog udara strujom
ako je oštećen mrežni kabel ili mrežni
utikač!
Obratiti pažnju na upozoravajuće
i sigurnosne upute!
Nosite zaštitne naočale, zaštitu za uši,
zaštitnu masku i zaštitne rukavice.
Opasnost od eksplozije!
Materijal ambalaže i uređaj zbrinite na
način neškodljiv za okoliš!
33383_SCROLL SAW_Dekupiersaege_Content_LB4 (GB-HR-DE).indd 14 23.07.09 11:30

15 HR
Uvod / Sigurnosne upute
3 x postolje s navojem, podložna ploča,
razorni prsten i matica
1 x unutrašnji šesterobridni ključ
1 x upute za uporabu
Q
Tehnički podatci
Nazivni napon: 230 V
~
50 Hz
Nazivni prijem: 120 W
Kratkotrajni pogon: 20 min (S2)
Broj podizanja (bez tereta): n
0
400 - 1.600 min
-1
Maks. dubina piljenja 90°: 50 mm
Maks. dubina piljenja 45°: 22 mm
Informacije o buki:
Razina buke utvrđena pomoću A-vrijednovanja.
Razina zvučnog tlaka: 67,2 dB (A)
Razina buke: 80,2 dB (A)
Nesigurnost K = 3 dB
Mjerne vrijednosti utvrđene sukladno EN 61029.
Sigurnosne upute
J POZOR! Pri uporabi električnog alata potrebno
je voditi računa o slijedećim osnovnim sigurno-
snim mjerama, kao zaštita od strujnog udara,
protiv ozljeda i požara. Prije uporabe ovog
električnog alata, pročitajte sve ove upute i
dobro sačuvajte sigurnosne upute.
Q
Siguran rad
1. Održavajte Vaše radno područje
uredno.
J Nered u radnom području može prouzročiti
nezgode.
2. Uzmite u obzir okolne utjecaje.
J Ne izlažite električni alat kiši.
J Ne rabite električni alat u vlažnoj ili
mokroj okolini.
J Osigurajte dobro osvjetljenje radnog područja.
J Ne rabite električni alat, gdje prijeti
opasnost od požara ili eksplozije.
3.
Štitite sebe od strujnog udara.
J Izbjegavajte dodir tijela s uzemljenim dijelovima
(npr. cijevi, radijatori, električni štednjaci, ure-
đaji za hlađenje).
4. Držite druge osobe podalje.
J Vodite računa o tome da druge
osobe, posebno djeca, ne dodiruju
električni alat ili kabel.
Držite ih podalje od Vašeg radnog područja.
5. Električni alat koji se ne rabi čuvajte
na sigurnome mjestu.
J Nekorišteni električni alat odlažite na suhom,
visoko podignutom ili zaključanom mjestu,
izvan dječjeg dohvata.
6. Ne preopterećujte Vaš električni alat.
J U navedenom području učinkovitosti radite
bolje i sigurnije.
7. Rabite ispravni električni alat.
J Ne rabite slabe strojeve za teške radove.
J Ne rabite električni alat u svrhe, za koje nije
predviđen. Ne rabite na primjer ručnu kružnu
pilu za rezanje stabala ili cjepanica.
8. Nosite prikladnu odjeću.
J Ne nosite široku odjeću ili nakit. Pomični dijelovi
mogli bi ih inače zahvatiti.
J Pri radu vani preporučljivo je nositi protuklizne
postole.
J U slučaju dulje kose nosite mrežu za kosu.
9.
Nosite zaštitnu opremu.
J Nosite zaštitne očale.
J Pri radu koji stvara prašinu, nosite masku
protiv prašine.
10. Priključite napravu za usis prašine.
J Ukoliko postoje priključci za usis prašine, uvje-
rite se da su priključeni i da ih se ispravno rabi.
11.
Ne rabite kabel u svrhe, za
koje nije predviđen.
J Ne rabite kabel, kako bi izvukli utikač iz utični-
ce. Štitite kabel od vrućine, ulja i oštrih rubova.
12. Osigurajte izradak.
33383_SCROLL SAW_Dekupiersaege_Content_LB4 (GB-HR-DE).indd 15 23.07.09 11:30

16 HR
Sigurnosne upute
J Rabite zatezne naprave ili škripac, kako bi
učvrstili izradak. Izradak je na taj način bolje
učvršćen nego Vašom rukom.
13. Izbjegavajte nenaravan položaj tijela.
J Osigurajte da sigurno stojite na tlu i održavajte
uvijek ravnotežu.
14. Brižljivo njegujte Vaš alat.
J Održavajte rezni alat oštrim i čistim, kako bi
bolje i sigurnije radili.
J Pridržavajte se uputa za podmazivanje i za
zamjenu alata.
J Redovito provjeravajte priključni vod električnog
alata i prepustite priznatom stručnjaku obnovu
istog u slučaju oštećenja.
J Redovito provjeravajte produžne vodove i
zamjenite iste, ako su oštećeni.
J Održavajte ručke suhe, čiste i oslobođene od
ulja i masti.
15. Izvucite utikač iz utičnice:
J U slučaju nekorištenja električnog alata, prije
redovitog održavanja i pri zamjeni alata kao
npr. lista pile, svrdla, glodala.
16. Ne ostavljajte alatne ključeve
utaknute.
J Prije uključenja provjerite da li su izvađeni
ključ i alat za namještanje.
17. Izbjegavajte slučajno pokretanje.
J Uvjerite se u to, da je sklopka pri utakanju
utikača u utičnicu isključena.
18. Rabite produžni kabel za vanjsko
područje.
J Rabite vani isključivo produžne kabele, koji su
za to dozvoljeni i odgovarajuće označeni.
19. Budite pozorni.
J Vodite račna o tome što radite. Pristupajte
razumno radu. Ne rabite električni alat, ako
niste sabrani.
20. Provjerite električni alat na moguća
oštećenja.
J Prije svake uporabe električnog alata, potrebno
je brižljivo provjeriti zaštitne naprave ili lagano
oštećene dijelove na besprijekornu i namjen-
sku funkciju.
J Provjerite da li pomični dijelovi besprijekorno
funkcioniraju i da nisu uklješteni, ili da dijelovi
nisu oštećeni. Svi dijelovi trebaju biti ispravno
montirani i ispunjati sve uvjete, kako bi se jam-
čilo besprijekorni pogon električnog alata.
J Oštećene zaštitne naprave i dijelove treba se
namjenski popraviti ili zamjeniti u priznatoj
stručnoj radionici, ukoliko nije suprotno nave-
deno u uputama za uporabu.
J Oštećene sklopke treba zamjeniti u radionici
servisne službe.
J Ne rabite električni alat, čiju se sklopku nemože
uključiti i isključiti.
21. POZOR!
J Uporaba drugog alata i druge opreme može
za Vas prouzročiti opasnost od ozljede.
22. Prepustite popravke Vašeg električnog
alata isključivo električaru.
J Ovaj električni alat odgovara dotičnim sigurno-
snim odredbama. Popravke su isključivo dozvlje-
ne električaru, na način da se rabi originalne
rezervne dijelove, inače prijeti opasnost od
nezgode za korisnika.
Karakteristične sigurno-
sne upute za stolarske
kružne pile
J Postavljajte stolarsku kružnu pilu isključivo na
ravnim, stabilnim površinama.
J Ne dodirujte mrežni kabel, ako se tijekom po-
gona ošteti ili prereže. Smjesta izvucite utikač i
nakon toga, predajte uređaj isključivo stručnjaku
ili nadležnoj servisnoj službi na popravak.
J Mrežni kabel treba uvijek ležati iza uređaja.
J U slučaju opasnosti smjesta izvucite utikač iz
utičnice.
J Vodite izradak isključivo prema uključenom
električnom alatu. Inače prijeti opasnost od
protuudarca.
J Ne obrađujte navlažene materijale ili vlažne
površine.
J Rabite isključivo neoštećene, besprijekorne li-
stove pile
7
. Izvijeni i tupi listovi pile
7
mogu
se polomiti i prouzročiti protuudarac.
J Osigurajte, da zubi listova pile
7
pokazuju
prema dolje, prije nego što ih umetnete u uređaj.
J OPASNOST OD OZLJEDA! Držite prste
podalje od područja pilanja.
J Provjerite izradak koji će te obraditi na eventu-
alne čavle koje strše vani, itd. i otklonite iste.
33383_SCROLL SAW_Dekupiersaege_Content_LB4 (GB-HR-DE).indd 16 23.07.09 11:30

17 HR
Sigurnosne upute / Montaža / Stavljanje u pogon
Dodir lista pile s čavlima, itd. mogao bi prou-
zročiti ozljede i / ili materijalnu štetu.
J Uređaj treba uvijek biti čist, suh i oslobođen od
ulja ili maziva.
J Isključite uređaj, prije nego što otklonite ostatke
drva iz neposredne blizine lista pile. Mogli bi
se inače ozlijediti.
UPOZORENJE!
OTROVNE PRAŠINE /
PARE! Prašine / pare koje nastaju pri obradi,
ugrožavaju zdravlje osobe koja poslužuje stroj
kao i osoba koje se nalaze u njegovoj blizini.
J Izbjegavajte piljenje materijala koji su štetni za
zdravlje.
J Zabranjena je obrada materijala koji sadrži
azbest. Azbest se smatra kancerogenim.
J Osigurajte dostatno provjetravanje.
J Nosite zaštitne očale, zaštitu za
sluh, masku protiv prašine i zaštitne
rukavice.
Q
Radne upute
J Gurajte izradak lagano i s minimalnim priti-
skom prema listu pile.
J Ako režete jači materijal, smanjite pomicanje.
J Držite izradak obim rukama čvrsto na stolu i la-
gano ga gurajte prema listu pile. List pile bi se
inače mogao zakrenuti ili polomiti.
J Izbjegavajte oštre promjene smjera tijekom
piljenja, kako bi izbjegli zakretanje ili kidanje
lista pile.
J Prije piljenja bušite rupu na mjestu na kojemu
treba nastati kut ili unutarnji obris i pilajte isti
od tud.
J Rabite ispravni list pile. Odabir lista pile ovisi o
jačini i vrsti materijala kao i o željenom rezu.
Odaberite list pile s finim zubima, kako bi
obradili tanke i tvrde materijale.
Za piljenje oštrih zaoblina, rabite isključivo
tanki list pile.
Q
Montaža
UPOZORENJE!
OPASNOST OD
OZLJEDA! Prije izvođenja bilo kakvih radova
na uređaju, izvucite utikač iz utičnice.
Q
Montiranje zaštitnog
poklopca
9
(vidite prikaz A)
j Umetnite vijak
10 c
iznutra kroz prorez zaštit-
nog poklopca
9
.
j Umetnite s vanjske strane zaštitnog poklopca
9
vodeći lim
10 b
na vijak
10 c
.
U obliku kuta savijena strana vodećeg lima
10 b
zahvaća oko zaštitnog poklopca
9
.
j Postavite zaštitni poklopac
9
između dvije pri-
čvrsne poluge
11
i umetnite oba vijka
10 c
kroz
za to predviđene otvore u pričvrsne poluge
11
.
j Pri tome vodite računa da izbočena strana za-
štitnog poklopca
9
pokazuje prema gore.
j Umetnite s vanjske strane pričvrsnih poluga
11
podložne ploče
10 a
.
j Zavijte nazubljene matice
10
na oba kraja
vijaka
10 c
.
j Gurnite zaštitni poklopac
9
na željenu poziciju
i pričvrstite ga, na način da ga čvrsto zavijete
nazubljenim maticama
10
.
Q
Montiranje postavnih nogara
12
(vidite prikaz A)
j Namjestite postavnu nogu
12
odozdo na mon-
tažnu bušotinu podne ploče uređaja.
j Postavite uzastopce podložnu ploču i maticu
na navoj vijka.
j Čvrsto zavijte maticu čeljusnim ključem SW10.
Q
Montiranje gipke cijevi
puhaljke
1
(vidite prikaz C)
j Zavijte gipku cijev puhaljke
1
u smjeru vrtnje
kazaljke sata u za to predviđeni otvor.
Q
Stavljanje u pogon
Vodite računa o mrežnom naponu. Mrežni napon
izvora struje treba odgovarati podatcima na tipskoj
ploči uređaja. Uređaji koji su označeni sa 230 V,
mogu također raditi na 220 V.
OPREZ! Osigurajte, da je uređaj isključen
prije priključka na struju.
33383_SCROLL SAW_Dekupiersaege_Content_LB4 (GB-HR-DE).indd 17 23.07.09 11:30

18 HR
Stavljanje u pogon
J Vodite izradak isključivo prema uključenom
električnom alatu. Inače prijeti opasnost od
protuudarca.
Postavljanje uređaja:
j Zahvatite uređaj na mjestu s naljepnicom
„Molimo ovdje podižite - Pleas lift here“, kako
bi namjestili uređaj.
Uključivanje uređaja:
j Pritisnite zelenu tipku UKLJUČENO
4
.
Isključivanje uređaja:
j Pritisnite crvenu tipku ISKLJUČENO
3
.
Q
Namještanje broja podizanja
j Okrećite namještač broja podizanja
2
u smje-
ru vrtnje kazaljke sata, kako bi povećali broj
podizanja.
j Okrećite namještač broja podizanja
2
u su-
protnom smjeru vrtnje kazaljke sata, kako bi
smanjili broj podizanja.
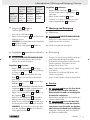
UPUTA: Vodite računa o tome, da previsoki broj
podizanja može prouzročiti zagrijavanje lista pile i
time znatno habanje lista pile, kao i tragove vatre
na materijalu.
j Odaberite brzinu piljenja prema materijalu
koji će se obraditi.
Najveća
brzina
Srednja
brzina
Najmanja
brzina
Debela
drvena
ploča
Ravni
rezovi
Uobičajeni
radovi
rezbarske
lisne pile
-
Tanke
drvene i
plastične
ploče
Ravni i ok-
rugli rezovi
Normalni
fini radovi
rezbarske
lisne pile
Fini radovi
rezbarske
lisne pile
Q
Naginjanje stola za piljenje
6
(vidite prikaz D, E)
j Otpustite vijak za namještanje
5
.
j Nagnite stol za piljenje
6
sve do željenog kuta.
UPUTA: Kut se može očitati na ljestvici
stupnja
6 a
.
j Ponovno pritegnite vijak za namještanje
5
.
Q
Postavljanje / otklanjanje
lista pile
7
UPOZORENJE!
OPASNOST OD
OZLJEDA! Prije izvođenja bilo kakvih radova
na uređaju, izvucite utikač iz utičnice.
Postavljanje lista pile
7
:
j Preklopite zateznu polugu
13
prema gore.
j Umetnite list pile
7
kroz otvor u stolu za
piljenje
6
.
Vodite računa o tome, da su zubi lista pile
7
usmjereni prema naprijed i da pokazuju prema
dolje.
j Ovjesite list pile
7
u donjem držaču lista pile
14
.
j Nakon toga zakvačite gornji klin lista pile
7
u
za to predviđeni otvor na gornjem držaču lista
pile
8
.
j Preklopite zateznu polugu
13
prema dolje,
kako bi stegli list pile
7
.
j Okrećite zateznu polugu
13
vodoravno u
smjeru vrtnje kazaljke sata kako bi povećali
napon.
j Okrećite zateznu polugu
13
vodoravno u su-
protnom smjeru vrtnje kazaljke sata kako bi
smanjili napon.
UPUTA: Ako pilate sa preniskim naponom lista
pile
7
, rezultati pilanja mogli bi biti netočni.
Otklanjanje lista pile
7
:
j Preklopite zateznu polugu
13
prema gore.
j Pritisnite gornji držač lista pile
8
prema dolje.
j Lagano podignite list pile
7
.
j Gurnite ga prema naprijed, kako bi ga iskvačili
iz donjeg držača lista pile
14
.
33383_SCROLL SAW_Dekupiersaege_Content_LB4 (GB-HR-DE).indd 18 23.07.09 11:31

19 HR
Redovito održavanje i čišćenje / Servis / Jamstveni list
Q
Redovito održavanje i čišćenje
Q
Redovito održavanje
UPOZORENJE!
OPASNOST OD
OZLJEDA! Prije izvođenja bilo kakvih radova
na uređaju, izvucite utikač iz utičnice.
Uređaj uglavnom nije potrebno redovito održavati.
Q
Čišćenje
j Redovito čistite uređaj i to najbolje odmah
nakon završetka rada.
j Obvezno spriječite prodiranje tekućina u unu-
trašnjost uređaja. Rabite za čišćenje suhu krpu.
j Održavajte ventilacijske proreze slobodnim od
prašine i prljavštine.
j Ne rabite ni u kojem slučaju benzin ili oštra
otapala.
j Skladištite uređaj u suhoj prostoriji.
Q
Servis
J
UPOZORENJE!
Električne naprave
smiju popravljati samo ovlašteni ser-
viseri ili električari. Time ćete zadržati
sigurnost vaših uređaja.
J
UPOZORENJE!
Zamjenu utikača
ili mrežnih vodova neka izvodi uvijek
proizvođač ili korisnička služba. Time
ćete zadržati sigurnost vaših uređaja
Q
Jamstveni list
Na ovaj uređaj dajemo jamstvo u trajanju
3 godine od datuma kupnje. Ovo jamstvo
vrijedi za područje Republike Hrvatske.
Uređaj je pažljivo proizveden i prije ispo-
ruke brižljivo kontroliran. Jamčimo da će
raditi bez greške uzrokovane eventualnom
lošom izradom i lošim materijalima. Svi
eventualno nastali kvarovi bit će besplatno
otklonjeni u ovlaštenom servisu. Jamstvo
se priznaje samo uz predočenje računa.
Molimo Vas da se u slučaju kvara telefonski
povežete s ovlaštenim servisom. Samo
tako možete besplatno ostvariti svoja
jamstvena prava.
Jamstvo vrijedi samo za greške u materijalu i izradi,
a ne za potrošne dijelove ili za oštećenja lomljivih
dijelova, npr. prekidača ili baterija. Uređaj je nami-
jenjen isključivo za privatnu, a ne za gospodarsku
upotrebu.
U slučaju zloupotrebe ili nenamjenske upotrebe,
primjene sile, kao i u slučaju zahvata koji nisu nači-
njeni od strane ovlaštenog servisa jamstvo prestaje
vrijediti. Ovo jamstvo ne utječe na potrošačka prava
u odnosu na prodavača važeća u državi kupnje.
Proizvođač:
Kompernaß GmbH
Burgstraße 21
D-44867 Bochum (Germany)
Njemačka
HR
Ovlašteni servis:
Microtec sistemi d.o.o.
Koprivnička 27 a
10000 Zagreb
Tel.: 01/3692-008
email: [email protected]
Proizvođač:
KOMPERNASS GMBH
BURGSTRASSE 21
D-44867 BOCHUM, Njemačka
Uvoznik
Lidl Hrvatska d.o.o. k.d.,
p.p. 61
10020 Novi Zagreb
33383_SCROLL SAW_Dekupiersaege_Content_LB4 (GB-HR-DE).indd 19 23.07.09 11:31

20 HR
Zbrinjavanje / Izjava o sukladnosti / Proizvođač
Q
Zbrinjavanje
Ambalaža se sastoji od okolini primjere-
nih materijala koju možete zbrinuti u
mjesnim stanicama za reciklažu.
Električni alat ne bacajte
u kućni otpad!
Sukladno europskim smjernicama 2002 / 96 / EC
o starim električnim i elektroničkim uređajima i njihovo
provođenje u nacionalno pravo, stari se električni
uređaji moraju odvojeno sakupljati kao bi se ponovno
upotrijebili.
O mogućnostima zbrinjavanja isluženih uređaja
saznat ćete u vašoj općini ili gradskoj upravi.
Q
Izjava o sukladnosti /
Proizvođač
Mi, Kompernaß GmbH, Burgstr. 21,
D-44867 Bochum, Njemačka, ovime izjavljujemo,
da je ovaj proizvod konforman sa slijedećim
EG-smjernicama:
Smjernica za strojeve
(98 / 37 / EC)
EG-smjernica za nizak napon
(2006 / 95 / EC)
Elektromagnetsko podnošenje
(2004 / 108 / EC)
Tip / naziv uređaja:
Pilica za rezbarenje PDKS 120
Bochum, 31.07.2009
Hans Kompernaß
- Poslovođa -
Tehničke promjene u smislu daljnjeg razvoja
proizvoda pridržane.
33383_SCROLL SAW_Dekupiersaege_Content_LB4 (GB-HR-DE).indd 20 23.07.09 11:31
Seite laden ...
Seite laden ...
Seite laden ...
Seite laden ...
Seite laden ...
Seite laden ...
Seite laden ...
Seite laden ...
Seite laden ...
Seite laden ...
-
 1
1
-
 2
2
-
 3
3
-
 4
4
-
 5
5
-
 6
6
-
 7
7
-
 8
8
-
 9
9
-
 10
10
-
 11
11
-
 12
12
-
 13
13
-
 14
14
-
 15
15
-
 16
16
-
 17
17
-
 18
18
-
 19
19
-
 20
20
-
 21
21
-
 22
22
-
 23
23
-
 24
24
-
 25
25
-
 26
26
-
 27
27
-
 28
28
-
 29
29
-
 30
30


Parkside PDKS 120 Operation and Safety Notes
- Typ
- Operation and Safety Notes
- Dieses Handbuch ist auch geeignet für
in anderen Sprachen
- English: Parkside PDKS 120
Verwandte Papiere
-
Parkside 271265 Operating And Safety Instructions Manual
-
-
-
-
Parkside PDKS 120 A1 Operation and Safety Notes
-
-
-
-
-
Parkside PDKS 120 B3 Operation and Safety Notes