Silvercrest SDRB 1000 C1 Operating Instructions Manual
- Kategorie
- Eisen
- Typ
- Operating Instructions Manual

STEAM BRUSH SDRB 1000 C1
STEAM BRUSH
Operating instructions
GŐZÖLŐS KEFE
Kezelési útmutató
PARNÍ KARTÁČ
Návod k obsluze
DAMPFBÜRSTE
Bedienungsanleitung
SZCZOTKA PAROWA
Instrukcja obsługi
PARNA KRTAČA
Navodilo za uporabo
NAPAROVACIA KEFA
Návod na obsluhu
IAN 270057
&3HB'DPSIEXŴUVWHB&RYHUB/%LQGG

English..................................................................................... 2
Polski .................................................................................... 14
Magyar ................................................................................. 28
Slovenšina ........................................................................... 42
esky .................................................................................... 54
Slovenina............................................................................. 66
Deutsch ................................................................................. 78
,'6'5%&BB9
BB&3(B%ERRN6HLWH0RQWDJ-XOL

1
2
4
6
7
9
10
11
12
14
15
16
17
18
19
8
3
5
13
B
A
17
1
6
17
16
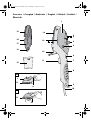
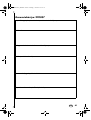
Overview / Przegld / Áttekintés / Pregled / Pehled / Prehad /
Übersicht
BB&3(B%ERRN6HLWH0RQWDJ-XOL

2
GB
Contents
1. Overview ........................................................................................ 2
2. Intended purpose ............................................................................ 3
3. Safety information ........................................................................... 3
4. Items supplied ................................................................................. 6
5. Before using for the first time ........................................................... 7
6. Operation ........................................................................................ 7
6.1 Care instructions ................................................................................... 7
6.2 Filling the water tank ............................................................................. 7
6.3 Set iron temperature.............................................................................. 8
6.4 Steam jet function ................................................................................. 8
6.5 Ironing with the brush attachment............................................................ 9
6.6 Ironing............................................................................................... 10
7. Cleaning ........................................................................................ 10
8. Storage ......................................................................................... 11
9. Troubleshooting ............................................................................. 11
10. Disposal ........................................................................................ 11
11. Technical specifications .................................................................. 12
12. Warranty of the HOYER Handel GmbH ........................................... 12
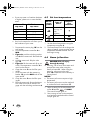
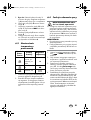
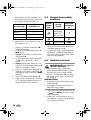
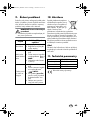
1. Overview
1 Water tank
2 Cover
3 Filler opening
4 Temperature controller
5MAXMarking of the maximum filling level of the water tank
6 Unlocking the water tank
7 Control lamp: lights up as soon as the operating temperature is reached
8 Handle
9 Eyelet (for hanging up the iron)
10 Mains power cable with mains plug (not visible)
11 Steam jet button
12 Stand
13 Side lugs on the water tank
14 Sole plate
15 Measuring beaker
16 Unlocking the brush attachment
17 Brush attachment
18 Lint brush
19 Clothes brush
BB&3(B%ERRN6HLWH0RQWDJ-XOL

3
GB
Thank you for your trust!
Congratulations on your new steam brush.
For a safe handling of the device and in or-
der to get to know the entire scope of fea-
tures:
• Thoroughly read these operat-
ing instructions prior to initial
commissioning.
• Above all, observe the safety in-
structions!
• The device should only be used
as described in these operating
instructions.
• Keep these operating instruc-
tions for reference.
• If you pass the device on to
someone else, please include
these operating instructions. The
operating instructions are a part
of the product.
We hope you enjoy using your new steam
brush!
Symbols on your device
DANGER!
Hot surfaces
In order to avoid injury as a result of burns, the
surfaces of the device must not be touched dur-
ing operation. Only use the handle and con-
trol elements.
2. Intended purpose
The steam brush is suitable for smoothing
and removing creases, lint and hairs from
laundry items.
The device must only be used indoors.
This device must not be used for commercial
purposes. The device is designed for pri-
vate, domestic use.
Foreseeable misuse
FIRE HAZARD!
~
Always place the steam brush back on its
stand and not on the sole plate, even if
you interrupt your ironing for only a very
short time. It must be placed on a level,
stable, dry and heat-resistant surface. Pull
out the mains plug during longer interrup-
tions or if you leave the room.
DANGER! Risk of injury
through burning!
~ Never iron or remove creases from
clothes while they are being worn.
3. Safety information
Warnings
If necessary, the following warnings will be
used in these operating instructions:
DANGER! High risk: failure to ob-
serve this warning may result in inju-
ry to life and limb.
WARNING! Moderate risk: failure to ob-
serve this warning may result in injury or se-
rious material damage.
CAUTION: low risk: failure to observe this
warning may result in minor injury or mate-
rial damage.
NOTE: circumstances and specifics that
must be observed when handling the de-
vice.
BB&3(B%ERRN6HLWH0RQWDJ-XOL

4
GB
Instructions for safe operation
~
This device can be used by children from the age of 8 and people
with restricted physical, sensory or intellectual abilities or people
without adequate experience and/or understanding, if they are su-
pervised or instructed on how to use this device safely and if they
are aware of the resulting danger. Children must not play with the
device. Cleaning and user maintenance must not be performed by
unsupervised children unless they are older than 8 years and super-
vised.
~
Children under the age of 8 must be kept away from the device
and the power cable.
~
While switched on or cooling down, the iron and its power cable
must be kept out of the reach of children younger than 8 years.
~
The device must not be left unattended when it is connected to the
power mains.
~
Always place the steam brush back on its stand and not on the sole
plate, even if you interrupt your ironing for only a very short time. It
must be placed on a level, stable, dry and heat-resistant surface.
Pull out the mains plug during longer interruptions or if you leave
the room.
~
Warning: risk of burns from steam and sprayed hot water when us-
ing the steam jet button. When using the steam jet, always point
the sole plate towards the item of laundry or ironing board.
~
The mains plug has to be disconnected from the wall socket …
… before the water tank is filled with water and
… before the device is cleaned.
~
The filler opening of the water tank must not be opened while the
iron is being used. Allow the device to cool down.
~
The water tank must not be filled with water above the
MAX
mark-
ing, otherwise it may overflow.
~
Do not use any astringent or abrasive cleaning agents.
~
You should use a commercially available limescale remover that is
based on citric acid to descale the iron. Please follow the instruc-
tions for the limescale remover.
BB&3(B%ERRN6HLWH0RQWDJ-XOL

5
GB
~
The sole plate becomes very hot during operation. Only
touch the handle and control elements of the device during
operation.
~
Never put the device into operation if there are visible damages to
the device or the mains power cable, if the device has been
dropped before or is leaking.
~
If the mains power cable of this device should become damaged, it
must be replaced by the manufacturer, the manufacturer's customer
service department or a similarly qualified specialist, in order to
avoid any hazards.
DANGER for children
~ Packing materials are not children's
toys. Children should not be allowed to
play with the plastic bags: There is a
risk of suffocation!
~ Keep the device out of the reach of chil-
dren.
DANGER to and from pets
and livestock
~ Electrical devices can represent a haz-
ard to pets and livestock. In addition,
animals can also cause damage to the
device. For this reason you should keep
animals away from electrical devices at
all times.
DANGER! Risk of electric
shock due to moisture
~ Do not use this device under any circum-
stances in the vicinity of water in bath-
tubs, showers, washbasins or other
vessels. The proximity of water repre-
sents a hazard even when the device is
switched off.
~ The device, the mains power cable and
the mains plug must not be immersed in
water or any other liquids.
~ Protect the device from moisture, water
drops and water splashes: Failure to ob-
serve this instruction may result in an
electrical shock hazard.
~ If liquid gets into the device, remove the
mains plug immediately. Have the de-
vice checked before reusing.
~ If the device has fallen into water, pull
out the mains plug immediately, and
only then remove the device from the
water. Do not use the device again, and
have it checked by a specialist.
~ Never touch the device with wet hands.
DANGER! Risk of electric
shock
~ Lay the mains power cable such that no
one can step on it, get caught on it, or
trip over it.
~ Never put the device into operation if
there are visible damages to the device
or the mains power cable, if the device
has been dropped before or is leaking.
~ Only connect the mains plug to a prop-
erly installed and easily accessible
grounded power socket whose voltage
corresponds to the specifications on the
rating plate. The wall socket must contin-
ue to be easily accessible after the de-
vice is plugged in.
~ Ensure that the mains power cable can-
not be damaged by sharp edges or hot
points.
~ When using the device, ensure that the
mains power cable cannot be trapped
or crushed.
BB&3(B%ERRN6HLWH0RQWDJ-XOL

6
GB
~ The device is not fully disconnected from
the power supply, even after it is
switched off. In order to fully disconnect
it, pull out the mains plug.
~ When removing the mains plug from the
wall socket, always pull the plug and
never the cable.
~ Disconnect the mains plug from the wall
socket …
… if there is a fault,
… when you are not using the device,
… before you clean the device and
… during thunderstorms.
~ To avoid any risk, do not make modifi-
cations to the product.
FIRE HAZARD
~ Always place the steam brush back on
its stand and not on the sole plate, even
if you interrupt your ironing for only a
very short time. It must be placed on a
level, stable, dry and heat-resistant sur-
face. Pull out the mains plug during
longer interruptions or if you leave the
room.
DANGER! Risk of injury
through burning!
~ Do not touch the hot surfaces of the de-
vice.
~ Allow the device to cool down com-
pletely before you clean it or put it
away.
~ Warning: risk of burns from steam and
sprayed hot water when using the
steam jet button. When using the steam
jet, always point the sole plate towards
the item of laundry or ironing board.
~ The sole plate becomes very hot during
operation. Only touch the handle and
control elements of the device during
operation.
~ Never iron or remove creases from
clothes while they are being worn.
~ Only transport the device when it has
cooled down.
~ Wait for the device to cool down before
cleaning.
~ Please wait until the device has cooled
down before you attach and remove the
brush attachment.
~ Allow the item of clothing to cool down
on a hanger before you wear it.
WARNING! Risk of material
damage
~
Only use the original accessories.
~ Do not use any astringent or abrasive
cleaning agents.
~ Do not iron over e.g. zips, metal buttons
or applications that could damage the
sole plate.
~ Never fill the water tank with chemical
substances, cleaning agents – with the
exception of limescale removers – or
other liquids. Do not use any chemically
descaled water. This may result in irrep-
arable damage to the device.
4. Items supplied
1 steam brush
1 brush attachment17 with protective cover
1 measuring beaker15
1 operating instructions
Please observe the illustrations on the fold-
out page.
Unpacking
1. Remove all parts from the packaging.
2. Check that all parts are present and in-
tact.
3. Remove any stickers or films from the
device.
4. Remove the protective cover from the
brush attachment17.
BB&3(B%ERRN6HLWH0RQWDJ-XOL

7
GB
5. Before using for the
first time
NOTE: you may notice an odour when us-
ing for the first time. This is a result of the
manufacturing process and is not a defect
with the device. Ensure adequate ventila-
tion.
1. Ensure that you have pulled out the
mains plug10.
2. Figure A: push the unlocking mecha-
nism6 of the water tank1 towards the
rear.
3. Hold the water tank1 by the side
lugs13.
4. Figure A: lift the water tank1 up ver-
tically. The temperature controller4 re-
mains on the device.
5. Open the cover2 over the filler open-
ing3.
6. Fill the water tank1 to about halfway
and then close the cover2.
7. Place the water tank1 onto the device.
The water tank must be heard to en-
gage with the unlocking mechanism6.
8. Insert the mains plug10 into a ground-
ed power socket corresponding to the
technical data.
9. Set the temperature controller4 to
MAX. The temperature control lamp7
lights up.
10. As soon as the device has reached the
set temperature, the control lamp7
goes off. Iron an old cotton cloth with
repeat jets of steam until the water
tank1 is empty.
6. Operation
6.1 Care instructions
• If the care instructions in the item of
clothing state that it must not be ironed
( symbol), you must not use the
steam brush on the item of clothing.
Otherwise the garment might be dam-
aged.
• Do not treat any leather, velvet, impreg-
nated furniture or materials which are
sensitive to steam. Otherwise the textile/
piece of furniture might be damaged.
• The steam brush can be used for many
types of garment. Caution is required in
the case of materials which are sensitive
to heat, such as synthetic materials (e.g.
polyamide or rayon). With these materi-
als you should test beforehand in a spot
which is not visible (e.g. the inside of a
seam) whether the hot steam damages
the material. Do not touch these materi-
als directly with the hot sole plate14.
You should only use the steam jet func-
tion.
6.2 Filling the water tank
DANGER! Risk of electric
shock due to moisture!
~ Pull the mains plug10 out of the socket
before you fill up the water tank1.
DANGER! Risk of injury
through burning!
~ The filler opening of the water tank must
not be opened while the iron is being
used.
• Use clean tap water without any addi-
tives (e.g. vinegar, limescale remover,
starch, perfume, softener).
BB&3(B%ERRN6HLWH0RQWDJ-XOL

8
GB
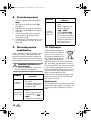
• If your tap water is of medium hardness
or higher, please mix in some distilled
water:
• Your local waterworks will inform you of
the hardness of your water.
1. Disconnect the mains plug10 from the
wall socket.
2. Turn the temperature controller4 to
MIN.
3. Figure A: push the unlocking mecha-
nism6 of the water tank1 towards the
rear.
4. Hold the water tank1 by the side
lugs13.
5. Figure A: lift the water tank1 up ver-
tically. The temperature controller4 re-
mains on the device.
6. Open the cover2 over the filler open-
ing3.
7. Fill in the water with the measuring
beaker15 up to the MAX mark on the
water tank1.
8. Close the cover2 over the filler open-
ing3.
9. Place the water tank1 onto the device.
The water tank must be heard to en-
gage with the unlocking mechanism6.
6.3 Set iron temperature
1. Set the desired temperature using the
temperature controller4.
2. The control lamp
7
is lit for as long as the
device is heating. It goes out when the set
temperature has been reached. You can
then begin ironing.
6.4 Steam jet function
DANGER! Risk of injury
through burning!
~ Warning: risk of burns from steam and
sprayed hot water when using the
steam jet button11. When using the
steam jet, always point the sole
plate14 towards the item of laundry or
ironing board.
NOTES:
• The steam jet function requires a high
temperature.
• The steam jet function can be used with
or without the brush attachment17.
1. Select a setting for the temperature con-
troller4 between and MAX.
The control lamp7 goes on.
2. Start ironing as soon as the tempera-
ture has been reached and the control
lamp7 goes off.
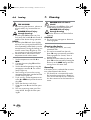
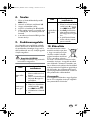
Hardness of the
tap water
Distilled water :
tap water
very soft/soft 0
medium 1 : 1
hard 2 : 1
very hard 3 : 1
Mainte-
nance
symbol
Type of
tissue
Tempera-
ture
controller
Man-made fi-
bre, e.g. vis-
cose,
polyester
Silk, wool
Cotton, linen
BB&3(B%ERRN6HLWH0RQWDJ-XOL

9
GB
3. Press the steam jet button11 while the
steam brush slides over the item of
laundry. It may be necessary to press
repeatedly to trigger the first jet of
steam.
4. After triggering the first jet of steam,
please wait a few seconds before press-
ing the steam jet button
11
again. You
should only press the steam jet button
11
repeatedly until the control lamp
7
lights
up or water drips out of the sole
plate
14
. Please wait for the control
lamp
7
to go off before triggering anoth-
er jet of steam.
6.5 Ironing with the brush
attachment
DANGER! Risk of injury
through burning!
~ Please wait until the device has cooled
down before you attach and remove the
brush attachment17.
~ Never iron or remove creases from
clothes while they are being worn.
~ Allow the item of clothing to cool down
on a hanger before you wear it.
Attaching the brush attachment
• Figure B: push the brush attach-
ment17 along the guide groove on the
sole plate14 until it reaches the stop
position on the device. The unlocking
mechanism16 of the brush attach-
ment17 must be heard to lock into
place.
Removing the brush attachment
• Figure B: press down the unlocking
mechanism16 of the brush attach-
ment17 and pull the brush attach-
ment17 off towards the front at the
same time.
Caring for your garments
1. Hang the creased garment up on a
hanger.
2. Pull the garment flat with one hand, ap-
plying the steam from top to bottom.
Apply slight pressure with the clothes
brush19 and move the device from
top to bottom across the garment. At
the same time you can press the steam
jet button11 at short intervals. The
combination of steam and clothes
brush19 gently removes all of the
creases.
Caring for curtains and uphol-
stery
1. Remove creases and wrinkles from dra-
pery by hanging them over a rail.
2. Follow the instructions under “Caring
for your garments”.
3. Always carry out a test beforehand on
a spot which is not visible.
4. If you use the device horizontally, hold
it vertically from time to time in order to
obtain the maximum steam power.
Removing lint
• Threads, lint and hairs can be easily re-
moved with the lint brush18 by brush-
ing slowly from right to left across the
garment.
• You can clean the lint brush18 by
brushing in the opposite direction (from
left to right), e.g. across remnants of ma-
terial.
BB&3(B%ERRN6HLWH0RQWDJ-XOL

10
GB
6.6 Ironing
FIRE HAZARD!
~ Before turning the device on, place it on
a level, stable, dry, heat-resistant sur-
face.
DANGER! Risk of injury
through burning!
~ The sole plate14 becomes very hot.
Only touch the handle8 and control el-
ements of the device during operation.
NOTES:
• The sole plate14 cools down slightly
while you are ironing and therefore has
to be repeatedly heated back up to the
set temperature. During the heating pro-
cess the control lamp7 lights up. You
can continue ironing at the same time.
• Sensitive fabrics are ironed at lower
temperatures and without steam.
1. Set the temperature controller4 to
MIN.
2. Connect the mains plug10 with the
wall socket.
3. Set the desired temperature using the
temperature controller4. The control
lamp7 lights up.
4. Start ironing as soon as the ironing
temperature has been reached and the
control lamp7 goes out.
5. Finish ironing, set the temperature con-
troller4 to MIN and pull out the mains
plug10.
6. Allow the device to cool down.
7. Open the cover2 over the filler open-
ing3.
8. Pour any remaining water out of the
water tank1 through the filler open-
ing3.
7. Cleaning
DANGER! Risk of electric
shock!
~ Pull the mains plug10 out of the wall
socket before you clean the device.
DANGER! Risk of injury
through burning!
~ Allow the device to cool down before
cleaning.
CAUTION:
~ Do not use any astringent or abrasive
cleaning agents.
Cleaning the device
• For cleaning the device, use a soft,
moistened cloth.
• Dirt can be removed from the sole
plate14 using commercially available
cleaning agents for chrome, silver or
stainless steel.
• Residues that have melted on the sole
plate14 can be removed by heating the
device up to the MAX setting and then
ironing on an old cotton cloth.
Descaling
If the steam power is reduced after a certain
time, please descale the device.
• You should use a commercially availa-
ble limescale remover that is based on
citric acid to descale the iron. Please fol-
low the instructions for the limescale re-
mover.
BB&3(B%ERRN6HLWH0RQWDJ-XOL

11
GB
8. Storage
1. Set the temperature controller4 to
MIN.
2. Pull out the mains plug10.
3. Allow the device to cool down.
4. Open the cover2 over the filler open-
ing3.
5. Pour any remaining water out of the
water tank1 through the filler open-
ing3.
6. Store the steam brush by hanging it up
on the eyelet9.
9. Troubleshooting
If your device fails to function as required,
please try this checklist first. Perhaps there is
only a minor problem, and you can solve it
yourself.
DANGER! Risk of electric
shock!
~ Do not attempt to repair the device your-
self under any circumstances.
10. Disposal
The symbol showing a wheel-
ie bin crossed through indi-
cates that the product
requires separate refuse col-
lection in the European Un-
ion. This applies to the
product and all accessories marked with this
symbol. Products identified with this symbol
may not be discarded with normal house-
hold waste, but must be taken to a collection
point for recycling electric and electronic ap-
pliances. Recycling helps to reduce the con-
sumption of raw materials and protect the
environment.
Packaging
When disposing of the packaging, make
sure you comply with the environmental reg-
ulations applicable in your country.
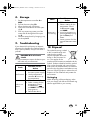
Fault
Possible causes /
Action
No function
• Connect the device to
the mains power supply.
• Use the temperature
controller4 to turn up
the temperature.
Little or no
steam
• Fill the water tank
1
.
•
Select a setting for the
temperature control-
ler4 between
and MAX. The control
lamp goes on.
• Descale the device.
Steam jet is
not working.
• Fill the water tank
1
.
• Select a setting for the
temperature control-
ler4 between
and MAX.
• It may be necessary to
press repeatedly to trig-
ger the first jet of
steam.
• Leave a pause of a few
seconds between steam
jets.
Fault
Possible causes /
Action
BB&3(B%ERRN6HLWH0RQWDJ-XOL

12
GB
11. Technical
specifications
Subject to technical modification.
12. Warranty of the
HOYER Handel GmbH
Dear Customer,
your device is provided with a 3 year war-
ranty starting with the purchase date. In the
event of product defects, you are entitled to
statutory rights against the vendor. These
statutory rights are not restricted by our war-
ranty presented in the following.
Warranty conditions
The warranty period starts with the purchase
date. Please keep the original purchase re-
ceipt in a safe place. This document is re-
quired to verify the purchase.
If within three years from the purchase date
of this product a material or factory defect
occurs, the product will be repaired or re-
placed by us – at our discretion – free of
charge to you. This warranty implies that
within the period of three years the defective
device and the purchase receipt are present-
ed, including a brief written description of
the defect and the time it occurred.
If the defect is covered by our warranty, the
repaired or a new product will be returned
to you. No new warranty period starts with
a repair or replacement of the product.
Warranty period and statutory
claims for defects
The warranty period is not extended when
the warranty has been claimed. This also ap-
plies to replaced and repaired parts. Any
damages and defects already existing at the
time of purchase must be reported immedi-
ately upon unpacking. Repairs arising after
the expiration of the warranty period are
subject to a charge.
Warranty coverage
The device was produced carefully according
to strict quality guidelines and tested diligent-
ly prior to delivery.
The warranty applies to material or factory
defects. This warranty does not include prod-
uct parts that are subject to standard wear
and therefore can be considered wear parts;
the same applies to damages at fragile parts,
e.g. switches, rechargeable batteries or parts
made of glass.
This warranty expires if the product is dam-
aged, not used as intended or not serviced.
For the proper operation of the product, all in-
structions listed in the operating instructions
must be observed carefully. Any form of use
and handling that is advised against in the
operating instructions or warned against
must always be avoided.
The product is only intended for private and
not for commercial use. In the case of incor-
rect and improper treatment, use of force and
interventions not performed by our author-
ised Service Centre, the warranty shall cease.
Handling in case of a warranty
claim
In order to ensure prompt processing of your
matter, please observe the following notes:
• Please keep the article number
IAN: 270057
and the purchase receipt
as a purchase verification for all inquiries.
• If faulty operation or other defects occur,
first contact the Service Centre listed in
the following by telephone or email.
Model: SDRB 1000 C1
Mains voltage: 220 - 240 V~ 50/60 Hz
Protection class: I
Power rating: 800 - 1000 W
BB&3(B%ERRN6HLWH0RQWDJ-XOL

13
GB
• Then, you are able to send a product re-
ported as defective free of charge to the
service address specified to you, includ-
ing the purchase receipt and the infor-
mation on the defect and when it
occurred.
Please visit www.lidl-service.com to
download this and many other
manuals, product videos and soft-
ware.
Service Centre
Service Great Britain
Tel.: 0871 5000 720 (£ 0.10/Min.)
E-Mail: hoyer@lidl.co.uk
Service Ireland
Tel.: 1890 930 034
(0,08 EUR/Min., (peak))
(0,06 EUR/Min., (off peak))
E-Mail: hoyer@lidl.ie
IAN: 270057
Supplier
Please note that the following address is no
service address. First contact the afore-
mentioned Service Centre.
HOYER Handel GmbH
Kühnehöfe 5
22761 Hamburg
Germany
GB
IE
BB&3(B%ERRN6HLWH0RQWDJ-XOL

14 PL
Spis treci
1. Przegld......................................................................................... 14
2. Przeznaczenie urzdzenia............................................................... 15
3. Zasady bezpieczestwa.................................................................. 15
4. Zawarto zestawu ........................................................................ 19
5. Przed pierwszym uyciem .............................................................. 19
6. Obsuga ......................................................................................... 20
6.1 Wskazówki dotyczce prasowania........................................................ 20
6.2 Napenianie zbiornika wody................................................................. 20
6.3 Nastawianie temperatury prasowania .................................................... 21
6.4 Funkcja uderzenia pary ........................................................................ 21
6.5 Prasowanie z nakadk szczotkow....................................................... 22
6.6 Prasowanie stop elazka .................................................................... 23
7. Czyszczenie .................................................................................... 23
8. Przechowywanie ............................................................................ 24
9. Rozwizywanie problemów ........................................................... 24
10. Utylizacja ....................................................................................... 24
11. Dane techniczne.............................................................................. 25
12. Gwarancja firmy HOYER Handel GmbH .......................................... 25
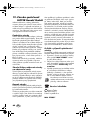
1. Przegld
1 Zbiornik na wod
2 Pokrywka
3 Otwór wlewowy
4 Regulator temperatury
5MAXOznaczenie maksymalnego poziomu wody w zbiorniku
6 Suwak odblokowania zbiornika wody
7 Kontrolka: ganie po osigniciu temperatury roboczej
8 Uchwyt
9 Ucho do powieszenia
10 Przewód zasilajcy z wtyczk sieciow (niewidoczne)
11 Przycisk uderzenia pary
12 Podpórka
13 Wypusty boczne przy zbiorniku wody
14 Stopa do prasowania
15 Miarka
16 Przycisk odblokowania nakadki szczotkowej
17 Nakadka szczotkowa
18 Szczotka do odmechacania
19 Szczotka do ubra
BB&3(B%ERRN6HLWH0RQWDJ-XOL

15PL
Dzikujemy za Pastwa
zaufanie!
Gratulujemy Pastwu zakupu nowej szczot-
ki parowej.
Aby móc bezpiecznie posugiwa si urz-
dzeniem i pozna cay zakres moliwoci
produktu, naley stosowa si do poni-
szych wskazówek:
• Przed pierwszym uruchomie-
niem naley dokadnie przeczy-
ta niniejsz instrukcj obsugi.
• Przede wszystkim naley prze-
strzega zasad bezpieczestwa!
• Urzdzenie wolno obsugiwa
wycznie w sposób opisany w
niniejszej instrukcji obsugi.
• Prosimy zachowa niniejsz in-
strukcj obsugi na przyszo.
• W przypadku przekazania urz-
dzenia innym osobom naley
doczy do niego instrukcj ob-
sugi. Instrukcja obsugi stanowi
cz
produktu.
yczymy Pastwu wiele zadowolenia z no-
wej szczotki parowej!
Symbole widniejce na
urzdzeniu
NIEBEZPIECZESTWO!
Gorce elementy
Aby unikn oparzenia, nie wolno dotyka
gorcych powierzchni urzdzenia podczas
pracy. Uywa wycznie uchwytu i elemen-
tów obsugowych.
2. Przeznaczenie
urzdzenia
Szczotka parowa jest przeznaczona do
prasowania oraz usuwania z odziey fad,
kaczków i wosów.
Urzdzenie moe by uywane wycznie
wewntrz pomieszcze.
Nie wolno uywa urzdzenia do celów ko-
mercyjnych. Urzdzenie jest przeznaczone
do uytku domowego.
Przewidywalne uytkowanie w
nieprawidowy sposób
NIEBEZPIECZESTWO wyst-
pienia poaru!
~
Nawet w przypadku krótkich przerw za-
wsze ustawia szczotk parow na pod-
pórce; nie pozostawia na stopie do
prasowania. Powierzchnia przeznaczo-
na do odstawienia powinna by równa,
stabilna, sucha i odporna na wysok
temperatur. W razie duszej przerwy
lub opuszczania pomieszczenia wyj
wtyczk sieciow z gniazdka.
NIEBEZPIECZESTWO obra-
e na skutek oparzenia!
~ Nigdy nie prasowa i nie prostowa
odziey zaoonej na ciao.
3. Zasady
bezpieczestwa
Wskazówki ostrzegawcze
W miejscach wymagajcych zwrócenia
uwagi uyto w niniejszej instrukcji obsugi
nastpujcych wskazówek ostrzegaw-
czych:
NIEBEZPIECZESTWO! Wyso-
kie ryzyko: zlekcewaenie tego
ostrzeenia moe stanowi zagro-
enie dla zdrowia i ycia.
BB&3(B%ERRN6HLWH0RQWDJ-XOL

16 PL
OSTRZEENIE! rednie ryzyko: zlekcewa-
enie tego ostrzeenia moe by przyczyn
obrae ciaa lub powanych szkód mate-
rialnych.
OSTRONIE:
Niskie ryzyko: zlekcewae-
nie tego ostrzeenia moe by przyczyn lek-
kich obrae ciaa lub szkód materialnych.
WSKAZÓWKA: sytuacje i aspekty, które
powinny by brane pod uwag podczas
pracy z urzdzeniem.
Wskazówki dotyczce bezpiecznej pracy
~
To urzdzenie moe by uywane przez dzieci powyej 8. roku
ycia i osoby z ograniczonymi zdolnociami psychicznymi, senso-
rycznymi lub umysowymi lub brakiem dowiadczenia i/lub odpo-
wiedniej wiedzy, jeeli zostay poinstruowane w zakresie
bezpiecznego uywania urzdzenia i zrozumiay wynikajce z
tego zagroenia. Dzieci nie mog bawi si urzdzeniem. Czyn-
noci zwizane z czyszczeniem i konserwacj nie mog by wy-
konywane przez dzieci, chyba e maj one skoczone 8 lat i
pozostaj pod nadzorem.
~
Dzieciom poniej 8. roku ycia nie wolno zblia si do urzdze-
nia i przewodu zasilajcego.
~
Gdy elazko jest wczone lub znajduje si w fazie stygnicia, e-
lazko i przewód zasilajcy nie mog si znajdowa w zasigu
dzieci do lat 8.
~
Nie wolno pozostawia urzdzenia podczonego do prdu bez
nadzoru.
~
Nawet w przypadku krótkich przerw zawsze ustawia szczotk
parow na podpórce; nie pozostawia na stopie do prasowania.
Powierzchnia przeznaczona do odstawienia powinna by równa,
stabilna, sucha i odporna na wysok temperatur. W razie du-
szej przerwy lub opuszczania pomieszczenia wyj wtyczk sie-
ciow z gniazdka.
~
Uwaga na moliwo oparzenia par i gorcymi kroplami pod-
czas uywania przycisku uderzenia pary. Podczas wczania funk-
cji uderzenia pary stop do prasowania kierowa zawsze w
kierunku prasowanej odziey lub deski do prasowania.
~
Wtyczk naley wyj z gniazda sieciowego…
… przed napenianiem zbiornika wod oraz
… przed rozpoczciem czyszczenia urzdzenia.
BB&3(B%ERRN6HLWH0RQWDJ-XOL

17PL
~
Podczas pracy nie wolno otwiera otworu wlewowego zbiornika
na wod. Odczeka do ostygnicia urzdzenia.
~
Zbiornika na wod nie wolno napenia do poziomu powyej zna-
ku
MAX
, poniewa woda moe si przela.
~
Do czyszczenia nie wolno uywa ostrych ani rysujcych rodków
czyszczcych.
~
Do odkamieniania naley uywa dostpnych na rynku odkamie-
niaczy na bazie kwasu cytrynowego. Postpowa zgodnie z in-
strukcj znajdujc si na rodku do odkamieniania.
~
Podczas pracy stopa do prasowania nagrzewa si do
bardzo wysokiej temperatury. Podczas pracy urzdzenia
wolno dotyka jedynie uchwytu i elementów przeznaczo-
nych do obsugi.
~
Nie wcza urzdzenia, jeli urzdzenie lub przewód zasilajcy
maj widoczne uszkodzenia, jeeli zostao ono wczeniej upusz-
czone na ziemi lub jest nieszczelne.
~
W przypadku uszkodzenia przewodu sieciowego urzdzenia
musi by on wymieniony przez producenta, jego serwis lub wy-
kwalifikowan osob, co wykluczy ewentualne zagroenia.
NIEBEZPIECZESTWO dla
dzieci
~ Materia opakowania nie jest zabawk
dla dzieci. Dzieci nie mog bawi si
workami z tworzywa sztucznego. Istnie-
je ryzyko uduszenia.
~ Urzdzenie naley przechowywa
poza zasigiem dzieci.
NIEBEZPIECZESTWO dla i
ze strony zwierzt domo-
wych oraz hodowlanych
~ Urzdzenia elektryczne mog by ró-
dem zagroe dla zwierzt domowych
i hodowlanych. Równie same zwierz-
ta mog spowodowa uszkodzenie
urzdzenia. Z tego wzgldu nie wolno
pozwala na zblianie si zwierzt do
urzdze elektrycznych.
NIEBEZPIECZESTWO
poraenia prdem
wskutek wilgoci
~ Pod adnym pozorem nie uywa urz-
dzenia w pobliu wody napuszczonej
do wanny, brodzika, umywalki lub in-
nych zbiorników. Blisko wody stwa-
rza zagroenie równie po wyczeniu
urzdzenia.
~ Urzdzenia, przewodu zasilajcego
oraz wtyczki sieciowej nie wolno zanu-
rza w wodzie ani innych cieczach.
~ Urzdzenie naley chroni przed wilgo-
ci lub wod natryskow. Istnieje ryzy-
ko poraenia prdem.
~ W przypadku dostania si cieczy do
urzdzenia naley natychmiast wyci-
gn wtyczk sieciow. Przed ponow-
nym uruchomieniem naley zleci
sprawdzenie urzdzenia.
BB&3(B%ERRN6HLWH0RQWDJ-XOL

18 PL
~ Jeli urzdzenie wpadnie do wody, na-
ley natychmiast wycign wtyczk
sieciow z gniazdka, a nastpnie wy-
j urzdzenie z wody. W takim przy-
padku urzdzenia nie wolno uywa,
lecz naley zleci jego sprawdzenie
przez specjalistyczny serwis.
~ Urzdzenia nie wolno obsugiwa mo-
krymi rkoma.
NIEBEZPIECZESTWO
poraenia prdem
~ Przewód zasilajcy naley ukada w
taki sposób, aby wykluczy ryzyko
ewentualnego nadepnicia, zaczepie-
nia lub potknicia.
~ Nie wcza urzdzenia, jeli urzdze-
nie lub przewód zasilajcy maj wi-
doczne uszkodzenia, jeeli zostao ono
wczeniej upuszczone na ziemi lub
jest nieszczelne.
~ Wtyczk sieciow naley podcza
wycznie do prawidowo zainstalowa-
nego i atwo dostpnego gniazda ze
stykiem ochronnym, którego napicie
odpowiada danym umieszczonym na
tabliczce znamionowej. Gniazdko musi
by atwo dostpne równie po pod-
czeniu urzdzenia.
~ Naley uwaa, aby nie uszkodzi
przewodu zasilajcego o ostre kraw
-
dzie lub gorce miejsca.
~ Podczas eksploatacji uwaa, aby
przewód zasilajcy nie by zakleszcza-
ny lub zgniatany.
~ Po wyczeniu urzdzenie wci nie
jest cakowicie odczone od zasilania
sieciowego. W tym celu konieczne jest
wyjcie wtyczki sieciowej.
~ Podczas wycigania wtyczki sieciowej
z gniazdka naley zawsze cign za
wtyczk, w adnym wypadku za prze-
wód zasilajcy.
~ Wtyczk sieciow naley wyciga z
gniazdka...
… w przypadku wystpienia usterki,
… w przypadku nieuywania urzdze-
nia,
… przed czyszczeniem urzdzenia
oraz
… podczas burzy.
~ Aby zapobiec zagroeniom, nie wolno
dokonywa adnych modyfikacji urz-
dzenia.
NIEBEZPIECZESTWO
wystpienia poaru
~ Nawet w przypadku krótkich przerw
zawsze ustawia szczotk parow na
podpórce; nie pozostawia na stopie
do prasowania. Powierzchnia przezna-
czona do odstawienia powinna by
równa, stabilna, sucha i odporna na
wysok temperatur. W razie duszej
przerwy lub opuszczania pomieszcze-
nia wyj wtyczk sieciow z gniazd-
ka.
NIEBEZPIECZESTWO
obrae na skutek
oparzenia
~ Nie dotyka gorcych powierzchni
urzdzenia.
~ Przed czyszczeniem lub odoeniem od-
czeka, a urzdzenie cakowicie osty-
gnie.
~ Uwaga na moliwo oparzenia par i
gorcymi kroplami podczas uywania
przycisku uderzenia pary. Podczas w-
czania funkcji uderzenia pary stop do
prasowania kierowa zawsze w kierun-
ku prasowanej odziey lub deski do
prasowania.
~ Podczas pracy stopa do prasowania
nagrzewa si do bardzo wysokiej tem-
peratury. Podczas pracy urzdzenia
wolno dotyka jedynie uchwytu i ele-
mentów przeznaczonych do obsugi.
~ Nigdy nie prasowa i nie prostowa
odziey zaoonej na ciao.
BB&3(B%ERRN6HLWH0RQWDJ-XOL
Seite wird geladen ...
Seite wird geladen ...
Seite wird geladen ...
Seite wird geladen ...
Seite wird geladen ...
Seite wird geladen ...
Seite wird geladen ...
Seite wird geladen ...
Seite wird geladen ...
Seite wird geladen ...
Seite wird geladen ...
Seite wird geladen ...
Seite wird geladen ...
Seite wird geladen ...
Seite wird geladen ...
Seite wird geladen ...
Seite wird geladen ...
Seite wird geladen ...
Seite wird geladen ...
Seite wird geladen ...
Seite wird geladen ...
Seite wird geladen ...
Seite wird geladen ...
Seite wird geladen ...
Seite wird geladen ...
Seite wird geladen ...
Seite wird geladen ...
Seite wird geladen ...
Seite wird geladen ...
Seite wird geladen ...
Seite wird geladen ...
Seite wird geladen ...
Seite wird geladen ...
Seite wird geladen ...
Seite wird geladen ...
Seite wird geladen ...
Seite wird geladen ...
Seite wird geladen ...
Seite wird geladen ...
Seite wird geladen ...
Seite wird geladen ...
Seite wird geladen ...
Seite wird geladen ...
Seite wird geladen ...
Seite wird geladen ...
Seite wird geladen ...
Seite wird geladen ...
Seite wird geladen ...
Seite wird geladen ...
Seite wird geladen ...
Seite wird geladen ...
Seite wird geladen ...
Seite wird geladen ...
Seite wird geladen ...
Seite wird geladen ...
Seite wird geladen ...
Seite wird geladen ...
Seite wird geladen ...
Seite wird geladen ...
Seite wird geladen ...
Seite wird geladen ...
Seite wird geladen ...
Seite wird geladen ...
Seite wird geladen ...
Seite wird geladen ...
Seite wird geladen ...
Seite wird geladen ...
Seite wird geladen ...
Seite wird geladen ...
Seite wird geladen ...
Seite wird geladen ...
Seite wird geladen ...
Seite wird geladen ...
Seite wird geladen ...
-
 1
1
-
 2
2
-
 3
3
-
 4
4
-
 5
5
-
 6
6
-
 7
7
-
 8
8
-
 9
9
-
 10
10
-
 11
11
-
 12
12
-
 13
13
-
 14
14
-
 15
15
-
 16
16
-
 17
17
-
 18
18
-
 19
19
-
 20
20
-
 21
21
-
 22
22
-
 23
23
-
 24
24
-
 25
25
-
 26
26
-
 27
27
-
 28
28
-
 29
29
-
 30
30
-
 31
31
-
 32
32
-
 33
33
-
 34
34
-
 35
35
-
 36
36
-
 37
37
-
 38
38
-
 39
39
-
 40
40
-
 41
41
-
 42
42
-
 43
43
-
 44
44
-
 45
45
-
 46
46
-
 47
47
-
 48
48
-
 49
49
-
 50
50
-
 51
51
-
 52
52
-
 53
53
-
 54
54
-
 55
55
-
 56
56
-
 57
57
-
 58
58
-
 59
59
-
 60
60
-
 61
61
-
 62
62
-
 63
63
-
 64
64
-
 65
65
-
 66
66
-
 67
67
-
 68
68
-
 69
69
-
 70
70
-
 71
71
-
 72
72
-
 73
73
-
 74
74
-
 75
75
-
 76
76
-
 77
77
-
 78
78
-
 79
79
-
 80
80
-
 81
81
-
 82
82
-
 83
83
-
 84
84
-
 85
85
-
 86
86
-
 87
87
-
 88
88
-
 89
89
-
 90
90
-
 91
91
-
 92
92
-
 93
93
-
 94
94


Silvercrest SDRB 1000 C1 Operating Instructions Manual
- Kategorie
- Eisen
- Typ
- Operating Instructions Manual
in anderen Sprachen
- slovenčina: Silvercrest SDRB 1000 C1
- polski: Silvercrest SDRB 1000 C1
Verwandte Artikel
-
Silvercrest SDBK 2400 D3 Operating Instructions Manual
-
Silvercrest SDBK 2400 E4 Operating Instructions Manual
-
-
Silvercrest SDRB 1000 B1 Operating Instructions Manual
-
-
-
-
-
-