Parkside PLPD 60 A1 Translation Of The Original Instructions
- Typ
- Translation Of The Original Instructions

IAN 285751
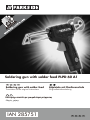
Soldering gun with solder feed PLPD 60 A1
Κολλητήρι-πιστόλι με τροφοδότηση σύρματος
Οδηγίες χρήσης
Lötpistole mit Drathvorschub
Originalbetriebsanleitung
Soldering gun with solder feed
Translation of the original instructions
IE NI CYGB
IE NI CYGB
GR CY

Manual PLPD 60 A1 - GB/IE/NI/CY, Version 1.07 vom 15.04.2017
Traduction du mode d‘emploi d‘origine
Originalbetriebsanleitung
13Seite DE/AT
Falten Sie vor dem Lesen die Seite mit den Abbildungen auf und machen Sie sich mit allen Funktionen
des Geräts vertraut.
Before reading, unfold the page containing the illustrations and familiarise yourself with all functions of
the device.
1 egaP GB/IE/NI/CY
27ΣελίδαΥποδείξεις χειρισµού και ασφαλείας GR/CY
GB NI CYIE
DE AT
Πριν ξεκινήσετε την ανάγνωση, ανοίξτε τις δυο σελίδες µε τις εικόνες και εξοικειωθείτε µε
όλες τις λειτουργίες της συσκευής.
GR CY

2 3
1
4
√
×
6 71 2 3 4
14
8 9
10
5
111213

6
5

1
GB
IE
NI
CY
Contents
Introduction....................................................................................2
Intended use...................................................................................................2
Depicted components.....................................................................................2
Package contents..........................................................................................2
Technical data ...........................................................................................2
General power tool safety warnings...............................................3
1. Work area safety ......................................................................................3
2. Electrical safety.........................................................................................3
3. Personal safety...........................................................................................4
4. Power tool use and care............................................................................6
5. Service ....................................................................................................7
Original accessories/auxiliary equipment.......................................................8
Before first use ..............................................................................8
Assembling the solder wire roller assembly ..............................................................8
Feeding/changing the solder wiree ........................................................................8
Change the solder wire...........................................................................8
Tinning/Replacing the soldering tip....................................................................9
LED indicator .................................................................................................9
Temperature setting..................................................................................9
Operation .......................................................................................10
Switching ON/OFF and auto shut down ................................................................10
Soldering........................................................................................................10
Maintenance and Cleaning...............................................................11
Disposal .........................................................................................11
Warranty......................................................................................12
Service ...........................................................................................12
Importer.......................................................................................12
Translation of the original Conformity Declaration...................................41

2
GB
IE
NI
CY
Soldering gun with solder feed
PLPD 60 A1
Introduction
Congratulations on the purchase
of your new appliance. You have
selected a high quality product. The
operating instructions are part of this
product. They contain important information
on safety, usage and disposal. Before using
the product, familiarise yourself with all
handling and safety guidelines. Use the
product only as described and for the range
of applications specified. Please also pass
these operating instructions on to any future
owner.
Intended use
This appliance is intended for electronic
soldering for leisure and DIY purposes. It is
designed for applications such as soldering,
welding of plastics and the application of
ornamentation. Use this product only as
described and for the areas of applications
specified. The appliance is not meant for
commercial use. Any other usage of or
modification to the appliance is deemed to
be improper and carries a significant risk
of accidents. The manufacturer accepts no
responsibility for damage(s) attributable to
misuse.
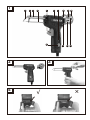
Depicted components
Soldering tip
Soldering tip fixing screw(not visible)
Heating element tube
4
Solder wire guide tube
Wire feeding Trigger
Main body
LED indicator
Solder wire
9
Roller shaft
10
Solder wire roller
11
Shaft fixing screw
12
Roller frame
13
Solder wire guide cone
14
Temperature adjustment knob
Package contents
1pc soldering iron
1pc solder wire roller assembly with 20g
Ø1.2mm solder wire
1pc operation manual
Technical data
Rated voltage: 230 V~, 50 Hz
Nominal power: 60 W
Temperature: 0 ~ 330 °C , 4 stages,
0 °C / 150 °C ~ 170 °C
/ 220 °C ~ 250 °C /
300 °C ~ 330 °C
Auto shut down: 20 minutes
Solder wire: Ø1.0-1.2 mm
Power cord: 2 m
LED indicator: RED – heating,
GREEN – Ready

3
GB
IE
NI
CY
General power tool
safety warnings
WARNING!
►
Read all safety
warnings and all
instructions.
Failure to
follow the warnings and
instructions may result in
electric shock, fire and/or
serious injury.
Save all warnings and
instructions for future
reference.
The term “power tool” in
the warnings refers to your
mains-operated (corded/
mains adapter) power tools
or battery-operated (cordless)
power tool.
1. Work area safety
a)
Keep work area clean
and well lit.
Cluttered
or dark areas invite
accidents.
b)
Do not operate power
tools in explosive
atmospheres, such
as in the presence of
flammable liquids,
gases or dust.
Power
tools create sparks which
may ignite the dust or
fumes.
c)
Keep children and
bystanders away while
operating a power tool.
Distractions can cause
you to lose control.
2. Electrical safety
a)
Power tool plugs must
match the outlet. Never
modify the plug in any
way. Do not use any
adapter plugs with
earthed (grounded)
power tools.
Unmodified
plugs and matching
outlets will reduce risk of
electric shock.
b)
Avoid body contact with
earthed or grounded
surfaces, such as pipes,
radiators, ranges and

4
GB
IE
NI
CY
refrigerators.
There is an
increased risk of electric
shock if your body is
earthed or grounded.
c)
Do not expose power
tools to rain or wet
conditions.
Water
entering a power tool
will increase the risk of
electric shock.
d)
Do not abuse the cord.
Never use the cord for
carrying, pulling or
unplugging the power
tool. Keep cord away
from heat, oil, sharp
edges or moving parts.
Damaged or entangled
cords increase the risk of
electric shock.
e)
When operating a
power tool outdoors,
use an extension cord
suitable for outdoor
use.
Use of a cord
suitable for outdoor use
reduces the risk of electric
shock.
f)
If operating a power
tool in a damp location
is unavoidable, use a
residual current device
(RCD) protected supply.
Use of an RCD reduces
the risk of electric shock.
g) Always hold the power
cord away from the
working area of the
appliance and run it to
the rear away from the
appliance.
h) Always pull out the plug
if you leave the appliance
unattended or carry out
work on the appliance.
3. Personal safety
This appliance may be used
by children aged 8 years
and above and by persons
with limited physical, sensory
or mental capabilities or
lack of experience and
knowledge, provided that
they are under supervision
or have been told how to

5
GB
IE
NI
CY
use the appliance safely and
are aware of the potential
risks. Children must not
use the appliance as a
plaything. Cleaning and user
maintenance tasks may not
be carried out by children
unless they are supervised.
a) Stay alert, watch what
you are doing and use
common sense when
operating
a power
tool. Do not use a
power tool while you
are tired or under the
influence of drugs,
alcohol or medication.
A moment of inattention
while operating power
tools may result in serious
personal injury.
RISK OF BURNS!
Do not
touch the heated soldering
tip or the molten solder.
There is a risk of being
burnt. Always allow the
appliance to cool down
completely before changing
components, cleaning or
checking it.
After work, allow the
soldering iron to cool down
in the air only. Do not
attempt to quench it with
water.
CAUTION! RISK OF FIRE!
Use only the special multi-
functional holder or another
fireproof surface when
putting down the soldering
iron.
During breaks in work,
the soldering iron must be
placed in the multi-functional
holder.
Keep the appliance away
from flammable material.
Never leave a switched-on
appliance unsupervised.
CAUTION! RISK OF
INJURY!
Keep your hands
away from the heated

6
GB
IE
NI
CY
workpiece. The heat can
be emitted through the
workpiece.
Avoid contact between the
hot soldering tip and the
plastic parts of the multi-
functional holder. Otherwise,
the appliance might be
damaged.
In case of danger, remove
the plug from the socket
immediately.
CAUTION! RISK OF
POISONING!
Avoid
inhaling vapours!
During work over an
extended period in which
hazardous vapours can
be created, always ensure
sufficient ventilation of the
workplace. In addition,
protective gloves, a face
mask and work apron are
recommended.
Avoid eating, drinking and
smoking in rooms where
soldering work is taking
place.
Otherwise, lead residues
on your hands might
contaminate the food or
cigarettes and be absorbed
into your body.
Always wash your hands
thoroughly after soldering.
Do not dispose of solder
waste in normal domestic
waste! Solder waste
should be disposed of with
hazardous waste.
4. Power tool use and
care
a)
Store idle power
tools out of the reach
of children and do
not allow persons
unfamiliar with the
power tool or these
instructions to operate
the power tool.
Power
tools are dangerous in the
hands of untrained users.

7
GB
IE
NI
CY
b)
Maintain power tools.
Check for misalignment
or binding of moving
parts, breakage of parts
and any other condition
that may affect the
power tool’s operation.
If damaged, have the
power tool repaired
before use.
Many
accidents are caused by
poorly maintained power
tools.
c)
Use the power tool,
accessories and tool
bits etc. in accordance
with these instructions,
taking into account
the working conditions
and the work to be
performed.
Use of the
power tool for operations
different from those
intended could result in a
hazardous situation.
5. Service
Have your power tool
serviced by a qualified repair
person using only identical
replacement parts. This will
ensure that the safety of the
power tool is maintained.
Always ensure that the
power plug or the power
cord is replaced only
by the manufacturer of
the appliance or by an
approved customer service
provider. This will ensure that
the safety of the appliance is
maintained.

8
GB
IE
NI
CY
Note
Note
Original accessories/auxiliary
equipment
Use only the additional equipment and
accessories specified in the operating
instructions. Using attachments or
accessory tools other than those
recommended in the operating
instructions can lead to a risk of injury.
Before First Use
Assembling the solder wire roller
assembly (Fig. 1, 3, 4 )
●
Insert the roller frame(12) opening into
the groove on the back of main body(6)
●
Push the roller frame(12) down to hear a
‘click’
●
Make sure the limiting bump engage into
the plastic slot.
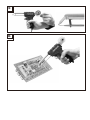
Feeding/changing the solder
wire (Fig. 1, 5)
Feeding the solder wire
●
Unplug the device.
●
Unpack the solder wire (8) from the solder
wire roller (10).
●
Use one hand to insert the solder wire
(8) into the solder wire guide cone(13)
and another hand to keep squeezing /
releasing wire feeding trigger(5) until the
solder wire(8) get into the wire feeding
system.
●
Free one hand and keep squeezing /
releasing wire feeding trigger(5) until the
solder wire (8) come out from the solder
wire guide tube(4)
►
The solder wire (8) could only go
forward to protect the internal solder
wire feeding system, use plier to cut off
the extra solder wire(8) or pull out the
last solder wire after the feeding system.
Change the solder wire
●
Unplug the device
●
For short solder wire change
cut off solder wire (8) on the back and
remove the solder wire (8) from solder
wire roller (10) and solder wire guide
tube (4)
Wind new solder wire (8) on solder
wire roller (10) and feed solder
wire(8) for operation.
●
For complete solder wire roller change
Unscrew and remove shaft fixing
screw (11)
Remove old solder wire roller (10) and
roller shaft (9) from roller frame (12)
Put new solder wire roller (10) and
roller shaft (9) into roller frame (12)
Insert shaft fixing screw (11) and
tighten
Feed solder wire (8) for operation.
Tinning/Replacing the soldering
tip (Fig. 1)
CAUTION! RISK OF BURNS!
►
The soldering tip must be tinned
before using the soldering iron for
the first time and/or using a new
soldering tip.
►
The heating element will smoke

9
GB
IE
NI
CY
Note
at the first using of soldering iron
and the heating element tube
color will change after first using
Tinning procedure:
●
Plug the mains plug into a wall socket.
●
Set temperature adjustment knob(14)
to 250
℃
stage and wait until LED
indictor(7) turned to GREEN.
●
Squeeze wire feeding trigger (5) to allow
a little bit of solder to melt into a thin film
on soldering tip(1).
Replacing procedure:
Never heat the soldering gun
without a soldering tip
●
Unplug the device and cool down the
soldering tip (1) to room temperature.
●
Unscrew soldering tip fixing screw(2) ,
pull to remove old soldering tip (1) from
heating element tube(3)
●
Insert new soldering tip (1) into heating
element tube (3) and tighten soldering tip
fixing screw (2) to fix.
LED indicator (Fig. 1)
●
LED indicator (7) will light in RED to
indicate “HEATING’ when plugging in
and the temperature adjustment knob was
not on ‘0’ position.
●
LED indicator (7) will turn to GREEN to
indicate ’READY’ when the solder iron
reaches the setting temperature.
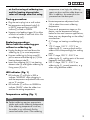
Temperature setting (Fig. 1)
►
Perfect soldering requires appropriate
solder and correct soldering temperature.
If the soldering temperature is too low,
the solder is not sufficiently fluid to
cause bad solder joints. If the soldering
temperature is too high, the soldering
agent can burn and the solder does not
flow. In addition, the materials to be
processed can be destroyed.
●
Rotate temperature adjustment knob
(14) to select the correct soldering
temperature.
●
There are 4 temperature stages on this
device, use the temperature settings
below for the most common applications,
these may vary depending on the solder/
manufacturer.
●
0 °C stage, no heating on soldering tip
(1).
●
170 °C stage, 150 °C - 170 °C on
soldering tip (1), warm-up level and for
solders with correspondingly low melting
point.
●
250 °C stage, 220 °C - 250 °C on
soldering tip (1), melting point of the most
frequently used soft solders.
●
330 °C stage, 300 °C - 330 °C on
soldering tip (1), normal operation, e. g.
when using lead-free solder.

10
GB
IE
NI
CY
Note
Operation (Fig.1)
Switching ON/OFF and auto shut
down
Switching ON
Insert the mains plug into a suitable mains
socket. The LED indicator ( 7) will light in
RED when the temperature adjustment knob
was not on ‘0’ stage.
Switching OFF
Pull the plug out of the mains socket to switch
off the device.
Auto shut down
●
There is a motion switch inside the device,
the heating element will be shut down
automatically 20 minutes after the last
movement of device, LED indicator(7) will
turn off at the same time.
●
Unplug and plug the device will re-heat
the heating element, LED indicator (7) will
turn on in RED.
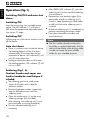
Soldering (Fig.1, 6)
Caution! Smoke and vapor can
lead to headaches and fatigue if
inhaled.
The soldering gun has a rated power
output of 60 watts and is ideal for
electronic solders.
One hand operation makes it especially
easy for difficult-to-access and fine
soldering work.
●
Clean the soldering tip (1) on the moist
soldering sponge (not provided).
●
After cleaning, the soldering tip (1) must
be tinned (refer to tinning procedure).
●
Flux the intended soldering join if
necessary.
●
After GREEN LED indicator (7), point the
soldering tip(1) to the intended soldering
joint and heat it.
●
Squeeze the wire feeding trigger (5) to
feed solder wire(8) to soldering tip (1)
to melt it, keep Squeezing to feed solder
wire(8) until the entire soldering joint is
covered.
●
Withdraw soldering tip (1) immediately to
prevent overheating the molten solder.
●
Cool down the solder to harden and
avoid vibrations.
►
The flux is either already contained in
the solder or applied separately. Ask the
advice of the retailer when buying solder
in order to choose the most suitable
solder for your intended purpose.

11
GB
IE
NI
CY
Note
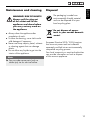
Maintenance and cleaning
WARNING! RISK OF INJURY!
Always pull the plug out
of the socket and let the
appliance cool down before
you carry out any work on
the appliance.
●
Always clean the appliance after
completion of work.
●
To clean the housing, use a cloth and a
mild detergent if necessary.
●
Never use sharp objects, petrol, solvents
or cleaning agents that can damage
plastic.
●
Do not allow any liquids to get into the
interior of the appliance.
►
You can order spare parts (such as
solder tips) via our service hotline.
Disposal
The packaging is made from
environmentally friendly material
and can be disposed of at your
local recycling plant.
Do not dispose of power
tools in your normal domestic
waste!
European Directive 2012/19/EU requires
that worn-out power tools are collected
separately and fed into an environmentally
compatible recycling process.
Your local community or municipal authorities
can provide information on how to dispose
of the wornout appliance.

12
GB
IE
NI
CY
Note
Warranty
The warranty for this appliance is for 3 years
from the date of purchase. The appliance
has been manufactured with care and
meticulously examined before delivery.
Please retain your receipt as proof of
purchase. In the case of a warranty claim,
please make contact by telephone with our
Customer Service Department. Only in this
way can a post-free despatch for your goods
be assured.
►
The warranty covers only claims for
material and manufacturing defects, but
not for transport damage, wearing parts
or for damage to fragile components,
e.g. buttons or batteries.
This product is for domestic use only and
is not intended for commercial use. The
warranty is void in the case of abusive and
improper handling, use of force and internal
tampering not carried out by our authorised
service branch.
Your statutory rights are not restricted in any
way by this warranty. The warranty period
is not extended by repairs made under the
warranty. This applies also to replaced and
repaired parts.
Damages and defects extant at the time of
purchase must be reported immediately after
unpacking, resp. no later than two days after
the date of purchase.
Repairs made after the lapse of the warranty
period are subject to charge.
Service-Center
Service Great Britain
teknihall Elektronik GmbH
Breitefeld 15 64839 Münster Germany
Email: gapo-ser[email protected]
Tel: 0044 2036300345
Fax: 0049 21529603111
Service Ireland
teknihall Elektronik GmbH
Breitefeld 15 64839 Münster Germany
gapo-ser[email protected]
Tel: 0035314372338
Fax: 0049 21529603111
IAN 285751
Importer
Please note that the following address is
not a service address. Please initially con-
tach the service centre specified above.
Ga-Po-Vertrieb GmbH & Co. KG
Heinrich-Horten-Straße 5
47906 Kempen, Germany
GB
IE

13
DE
AT
Inhalt
Einleitung...................................................................................14
Bestimmungsgemäße Verwendung..........................................................................14
Abgebildete Bestandteile....................................................................................14
Verpackungsinhalt..........................................................................................14
Technische Daten .............................................................................................14
Allgemeine Sicherheitshinweise für Elektrowerkzeuge............................15
1. Arbeitsplatzsicherheit ...................................................................................15
2. Elektrische Sicherheit........................................................................................16
3. Sicherheit von Personen.....................................................................................17
4. Verwendung und Pflege von Elektrowerkzeugen ................................................19
5. Service ..................................................................................................20
Originalzubehör/Zusatzgeräte..........................................................................21
Vor dem ersten Gebrauch ............................................................21
Montage der Lötdraht- Vorschubwalzeneinheit ..........................................................21
Zuführen / Wechseln des Lötdrahts ........................................................................21
Wechseln des Lötdrahts ...................................................................................21
Verzinnen/Ersetzen der Lötspitze ........................................................................22
LED-Anzeige ..............................................................................................22
Temperatureinstellung..................................................................................22
Betrieb .......................................................................................23
Ein-/Ausschalten und automatisches Abschalten.......................................................23
Löten..........................................................................................................23
Wartung und Reinigung...................................................................24
Entsorgung .........................................................................................25
Garantie .....................................................................................25
Kundendienst ........................................................................................26
Importeur .......................................................................................26
EU-Konformitätserklärung ...................................................................41

14
DE
AT
Lötpistole mit Drathvorschub
PLPD 60 A1
Einleitung
Herzlichen Glückwunsch zum Kauf
Ihres neuen Geräts. Sie haben
sich damit für ein Qualitätsprodukt
entschieden. Die
Bedienungsanleitung ist Teil dieses Produkts.
Sie enthält wichtige Informationen zu
Sicherheit, Verwendung und Entsorgung.
Bitte machen Sie sich mit allen Gebrauchs-
und Sicherheitshinweisen vertraut, bevor Sie
das Produkt benutzen. Verwenden Sie das
Produkt nur wie beschrieben und für den
angegebenen Einsatzbereich. Bitte geben
Sie diese Bedienungsanleitung auch an
etwaige zukünftige Besitzer weiter.
Bestimmungsgemäße Verwendung
Dieses Gerät ist für das Elektroniklöten
für Freizeit- und Heimwerkerzwecke
bestimmt. Es ist für Anwendungen wie Löten,
Kunststoffschweißen und Verzierungsarbeiten
vorgesehen. Verwenden Sie dieses
Produkt nur wie beschrieben und für die
angegebenen Einsatzbereiche. Das Gerät ist
nicht für den gewerblichen Einsatz bestimmt.
Jede andere Verwendung oder Änderung
des Gerätes gilt als unsachgemäß und
birgt erhebliche Unfallrisiken. Der Hersteller
übernimmt keine Haftung für Schäden, die
auf Missbrauch zurückzuführen sind.
Abgebildete Komponenten
Lötspitze
Fixierschraube Lötspitze (nicht sichtbar)
Heizelementrohr
4
Lötdrahtführungsrohr
Auslöser für Drahtvorschub
Gerätegehäuse
LED-Anzeige
Lötdraht
9
Abrollwelle
10
Lötdrahtrolle
11
Fixierschraube
12
Vorschubrahmen
13
Lötdrahtführungskonus
14
Temperaturregler
Packungsinhalt
1 Lötkolben
1 Lötdraht-Vorschubwalzeneinheit mit 20 gr.
Ø1,2 mm Lötdraht
1 Bedienungsanleitung
Technische Daten
Nennspannung: 230 V~, 50 Hz
Nennleistung: 60 W
Temperaturbereich: 0 ~ 330 °C , 4 Stufen,
0 °C / 150 °C ~ 170 °C
/ 220 °C ~ 250 °C /
300 °C ~ 330 °C
Automatische Abschaltung: 20 Minuten
Lötdraht: Ø 1,0 mm bis 1,2 mm
Netzkabel: 2 m
LED-Anzeige: ROT - Heizbetrieb,
GRÜN -
Betriebsbereitschaft

15
DE
AT
Allgemeine
Sicherheitshinweise
für
Elektrowerkzeuge
WARNHINWEIS!
►
Lesen Sie alle
Sicherheitswarnungen
und Anweisungen
sorgfältig durch. Bei
Nichtbeachtung der
Sicherheitshinweise
und Anweisungen
besteht die Gefahr von
Stromschlägen, Feuer
und/oder schweren
Verletzungen.
Bewahren Sie alle
Sicherheitshinweise und
Anweisungen für den
zukünftigen Gebrauch
auf.
Der in den
Sicherheitshinweisen
verwendete Begriff
"Elektrowerkzeug" bezieht
sich auf netzbetriebene
(kabelgebundene/
netzteilbetriebene)
Elektrowerkzeuge oder auf
akkubetriebene (schnurlose)
Elektrowerkzeuge.
1. Arbeitssicherheit
a)
Halten Sie den
Arbeitsbereich immer
sauber und sorgen
Sie für ausreichende
Beleuchtung.
Unordnung
und schlecht beleuchtete
Arbeitsbereiche erhöhen
die Unfallgefahr.
b)
Benutzen Sie
Elektrowerkzeuge
nicht in
explosionsgefährdeten
Bereichen, in denen
sich z. B. brennbare
Flüssigkeiten, Gase
oder Stäube befinden.
Elektrowerkzeuge
erzeugen Funken,
die Staub oder Gase
entzünden können.
c)
Halten Sie Kinder
und andere Personen
während der Benutzung

16
DE
AT
des Elektrowerkzeugs
fern.
Wenn Sie abgelenkt
sind, können Sie die
Kontrolle über das
Werkzeug verlieren.
2. Elektrische Sicherheit
a)
Der Stecker des
Elektrowerkzeugs
muss in die Steckdose
passen. Nehmen Sie
keine Veränderungen
am Netzstecker
vor. Verwenden Sie
keine Adapterstecker
zusammen mit
schutzgeerdeten
Elektrowerkzeugen.
Unveränderte Stecker
und passende Steckdosen
vermindern das Risiko
eines Stromschlags.
b)
Vermeiden Sie
Körperkontakt
mit geerdeten
Oberflächen, wie Rohre,
Heizkörper, Herde
und Kühlschränke.
Es besteht ein erhöhtes
Stromschlagrisiko, wenn
Ihr Körper geerdet ist.
c)
Setzen Sie
Elektrowerkzeuge weder
Regen noch Nässe
aus.
Das Eindringen von
Wasser in ein Elektrogerät
erhöht das Risiko eines
Stromschlags.
d)
Zweckentfremden
Sie das Kabel nicht,
um das Gerät zu
tragen, zu ziehen
oder um den Stecker
aus der Steckdose zu
ziehen. Halten Sie das
Netzkabel von Hitze, Öl,
scharfen Kanten oder
sich bewegenden Teilen
fern.
Beschädigte oder
verwickelte Kabel erhöhen
die Stromschlaggefahr.
e)
Wenn Sie mit einem
Elektrowerkzeug
im Freien arbeiten,
verwenden Sie nur
Verlängerungskabel,
die für die Verwendung
im Freien geeignet sind.
Seite wird geladen ...
Seite wird geladen ...
Seite wird geladen ...
Seite wird geladen ...
Seite wird geladen ...
Seite wird geladen ...
Seite wird geladen ...
Seite wird geladen ...
Seite wird geladen ...
Seite wird geladen ...
Seite wird geladen ...
Seite wird geladen ...
Seite wird geladen ...
Seite wird geladen ...
Seite wird geladen ...
Seite wird geladen ...
Seite wird geladen ...
Seite wird geladen ...
Seite wird geladen ...
Seite wird geladen ...
Seite wird geladen ...
Seite wird geladen ...
Seite wird geladen ...
Seite wird geladen ...
Seite wird geladen ...
Seite wird geladen ...
-
 1
1
-
 2
2
-
 3
3
-
 4
4
-
 5
5
-
 6
6
-
 7
7
-
 8
8
-
 9
9
-
 10
10
-
 11
11
-
 12
12
-
 13
13
-
 14
14
-
 15
15
-
 16
16
-
 17
17
-
 18
18
-
 19
19
-
 20
20
-
 21
21
-
 22
22
-
 23
23
-
 24
24
-
 25
25
-
 26
26
-
 27
27
-
 28
28
-
 29
29
-
 30
30
-
 31
31
-
 32
32
-
 33
33
-
 34
34
-
 35
35
-
 36
36
-
 37
37
-
 38
38
-
 39
39
-
 40
40
-
 41
41
-
 42
42
-
 43
43
-
 44
44
-
 45
45
-
 46
46


Parkside PLPD 60 A1 Translation Of The Original Instructions
- Typ
- Translation Of The Original Instructions
in anderen Sprachen
- English: Parkside PLPD 60 A1
Verwandte Artikel
-
Parkside PLKA 4 B3 Bedienungsanleitung
-
Parkside PLLL 16 A2 Original Instructions Manual
-
Parkside PLS 48 C1 Original Instruction
-
Parkside PLS 48 A1 Operation and Safety Notes
-
-
Parkside PLBS 30 B2 Bedienungsanleitung
-
-
-
Parkside PLBS 48 B1 Operation and Safety Notes
-