
• gebruiksaanwijzing
• instruction manual
• Gebrauchsanleitung
• mode d’emploi
MOBILE AIR COOLER
•
MOBILER LUFTKÜHLER
•
CLIMATISEUR MOBILE
mobiele luchtkoeler
VLK500W

2 •

Nederlands
English
1. veiligheidsvoorschriften pagina 4
2. productomschrijving pagina 7
3. vóór het eerste gebruik pagina 8
4. de bediening van de luchtkoeler pagina 8
5. reiniging en onderhoud pagina 10
algemene service- en garantievoorwaarden pagina 31
Deutsch
Français
• 3
1. safety instructions page 11
2. product description page 13
3. prior to first use page 14
4. operating the air cooler page 14
5. cleaning and maintenance page 16
general terms and conditions of service and warranty page 32
1. Sicherheitsvorschriften Seite 17
2. Produktbeschreibung Seite 20
3. Vor der ersten Verwendung Seite 21
4. Bedienung des Luftkühlers Seite 21
5. Reinigung und Wartung Seite 23
Allgemeine Service- und Garantiebedingungen Seite 33
1. consignes de sécurité page 24
2. description du produit page 27
3. avant la toute première utilisation page 28
4. commande du rafraîchisseur d'air page 28
5. nettoyage et entretien page 30
conditions générales de garantie et de service après-vente page 34

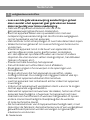
• Lees eerst de gebruiksaanwijzing aandachtig en geheel
door voordat u het apparaat gaat gebruiken en bewaar
deze zorgvuldig voor latere raadpleging.
• Gebruik dit apparaat uitsluitend voor de in de
gebruiksaanwijzing beschreven doeleinden.
• Sluit het apparaat alleen aan op wisselstroom met een
netspanning overeenkomstig met de informatie aangegeven
op het typeplaatje van het apparaat.
• Het netsnoer nooit scherp buigen of over hete delen laten lopen.
• Wikkel het snoer geheel af om oververhitting van het snoer te
voorkomen.
• Plaats het apparaat nooit in de buurt van apparaten die
warmte afgeven zoals ovens, gasfornuizen, kookplaten,
etc. Het apparaat op afstand houden van muren of andere
objecten die vlam kunnen vatten zoals gordijnen, handdoeken
(katoen of papier, etc.).
• Plaats nooit iets bovenop het apparaat.
• De luchtinlaten en luchtuitlaten nooit afdekken.
• Steek geen vingers of voorwerpen in de openingen van
het apparaat.
• Zorg er altijd voor dat het apparaat op een effen, vlakke
ondergrond staat. De ondergrond mag geen hellend vlak zijn.
• Gebruik het apparaat uitsluitend binnenshuis.
• Laat het apparaat niet onbeheerd achter indien het apparaat
in werking is.
• Indien u het apparaat wilt verplaatsen dient u ervoor te zorgen
dat het apparaat uitgeschakeld is.
• Gebruik het apparaat niet wanneer de stekker, het snoer of het
apparaat beschadigd is, of wanneer het apparaat niet meer
naar behoren functioneert of wanneer het gevallen of op een
andere manier beschadigd is. Raadpleeg dan de winkelier
of onze technische dienst.
• Als het aansluitsnoer van dit apparaat beschadigd raakt, moet
deze door de fabrikant, diens klantenservice of een vergelijkbaar
gekwalificeerd persoon worden vervangen om gevaarlijke
situaties te voorkomen.
Nederlands
veiligheidsvoorschriften
1
4 • Nederlands

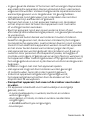
• In geen geval de stekker of het snoer zelf vervangen. Reparaties
aan elektrische apparaten dienen uitsluitend door vakmensen
uitgevoerd te worden. Verkeerd uitgevoerde reparaties kunnen
aanzienlijke gevaren voor de gebruiker tot gevolg hebben.
• Het apparaat nooit gebruiken met onderdelen die niet door
de fabrikant zijn aanbevolen of geleverd.
• Niet aan het snoer c.q. het apparaat trekken om de stekker
uit het stopcontact te halen. Het apparaat nooit met natte
of vochtige handen aanraken.
• Sluit het apparaat nooit aan op een externe timer of een
afzonderlijk afstandbedieningssysteem, om gevaarlijke situaties
te voorkomen.
• Het apparaat buiten bereik van kinderen houden. Kinderen
beseffen de gevaren niet, die kunnen ontstaan bij het omgaan
met elektrische apparaten. Laat kinde ren daarom nooit zonder
toezicht met elektrische apparaten werken. Houd het apparaat
en het snoer buiten bereik van kinderen jonger dan 8 jaar.
• Het apparaat kan worden gebruikt door kinderen van 8 jaar en
ouder en door personen met beperkte fysieke, zintuiglijke of
mentale vermogens of gebrek aan ervaring of kennis, wanneer zij
het apparaat onder toezicht gebruiken of zijn geïnstrueerd over
het veilige gebruik ervan en zij de daaruit voortkomende gevaren
begrijpen.
• Kinderen mogen niet met het apparaat spelen.
• Het apparaat mag niet door kinderen worden gereinigd
of onderhouden, tenzij dit onder toezicht gebeurt.
• Indien het apparaat niet gebruikt of gereinigd wordt,
het apparaat geheel uit zetten door de stekker uit het
stopcontact te verwijderen.
• Dompel het apparaat, het snoer of de stekker nooit onder
in water.
• Dit apparaat is bedoeld voor huishoudelijk en soortgelijk
gebruik, zoals:
- in personeelkeukens, in winkels, kantoren en andere
werkomgevingen;
- door gasten in hotels, motels en andere residentiële
omgevingen;
- in Bed&Breakfast type omgevingen;
- boerderijen.
Nederlands • 5

• Wanneer het apparaat oneigenlijk gebruikt wordt, kan er bij
eventuele defecten geen aanspraak op schadevergoeding
worden gemaakt en vervalt het recht op garantie.
• Als u besluit het apparaat, vanwege een defect,
niet langer te gebruiken, adviseren wij u, nadat u de stekker
uit de wandcontact-doos heeft verwijderd, het snoer
af te knippen. Klein huishoudelijke apparaten horen niet
in de vuilnisbak. Breng het apparaat naar de betreffende
afvalverwerkingsafdeling van uw gemeente.
6 • Nederlands

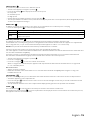
productomschrijving
2
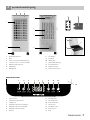
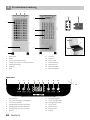
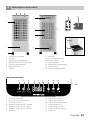
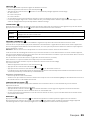
1. Bedieningspaneel
2. Klep
3. Sensor voor afstandsbediening
4. Louvre rooster - voorste lamellen
5. Waterniveau indicator
6. Zwenkwiel
7. Handgreep
Nederlands • 7
7
10
9
8
4
5
6
1 32
11
12
2
14
1 3 1312117
4
5
6
8
9
10
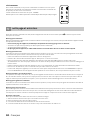
1. aan/ uit toets
2. ventilatie snelheid toets
3. swing toets
4. windtype indicatie: standaard
5. windtype indicatie: natuurlijk
6. windtype indicatie: slaap
7. display
8. Luchtfilter
9. Koelblok
10. Watertank
11. Afstandsbediening
12. Koelelementen
13. Waterreservoir
14. Overloopreservoir
8. aan indicatie
9. timer indicatie
10. koelen indicatie
11. timer toets
12. windtype toets
13. koelen toets
14. klep
BEDIENINGSPANEEL
2
13
14

vóór het eerste gebruik
3
Voordat u het apparaat voor de eerste maal in gebruik neemt, dient u als volgt te werk te gaan: pak de luchtkoeler en alle
accessoires voorzichtig uit en verwijder al het verpakkingsmateriaal en eventuele promotionele stickers.
De verpakking (plastic zakken en karton) buiten het bereik van kinderen houden.
Controleer na het uitpakken het apparaat zorgvuldig op uiterlijke schade dat mogelijk ontstaan is tijdens het transport.
Plaats het apparaat op een stevige, vlakke ondergrond en let op dat er genoeg ruimte omheen is voor voldoende ventilatie.
Open de klep van de luchtkoeler en controleer of alle genoemde accessoires meegeleverd zijn.
Druk de zwenkwielen in de vier gaten aan de onderzijde van het apparaat.
Reinig de buitenzijde van de luchtkoeler met een licht vochtige doek.
Vul de bijgeleverde koelelementen éénmalig met water. Sluit de koelelementen af. Het water in de koelelementen hoeft
nooit vervangen te worden. Leg de koelelementen in de diepvries tot ze volledig bevroren zijn.
Let op: het water in de koelelementen is niet geschikt voor consumptie. Gebruik de koelelementen alleen in de luchtkoeler.
De koelelementen zijn niet geschikt om te gebruiken als waterfles of andere doeleinden.
Controleer vóór het aansluiten van het apparaat of:
• de aansluitspanning overeenkomt met die op het typeplaatje;
• stopcontact en stroomvoorziening geschikt zijn voor het apparaat;
• de stekker van het snoer in het stopcontact past;
• het apparaat op een stabiele en vlakke ondergrond staat.
Een mobiele luchtkoeler moet geplaatst worden op een vlakke ondergrond met voldoende vrije ruimte erom heen.
Blokkeer de luchtinlaten en - uitlaten niet en zorg voor een vrije ruimte van minimaal 50 cm rondom het apparaat.
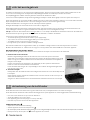
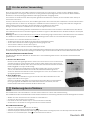
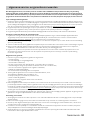
DE LUCHTKOELER VULLEN MET WATER
De luchtkoeler kan gevuld worden via het reservoir aan de bovenzijde of rechtstreeks in de watertank.
1. Rechtstreeks in de watertank
Draai de vergrendelingshendel van de tank naar een horizontale positie en trek de
watertank voorzichtig uit het apparaat om hem te vullen. Vul de watertank met vers koud
water en zorg ervoor dat het waterniveau in de watertank het maximum niveau (MAX - 5
liter) niet overschrijdt.
Plaatst u een bevroren koelelement in de watertank, let dan op dat het waterniveau
hierdoor niet boven het maximum niveau uitkomt.
Plaats de watertank terug in de oorspronkelijk positie en draai de vergrendelingshendel
naar de verticale positie.
2. Via de bovenzijde
Het bijvullen van de luchtkoeler kan eenvoudig via het waterreservoir onder de klep aan de
bovenzijde.
Open de klep en giet rustig vers koud water in het reservoir. Het zal via de overloop in de
watertank terecht komen.
Zorg ervoor dat het waterniveau in de watertank het maximum niveau niet overschrijdt.
8 • Nederlands
de bediening van de luchtkoeler
4
De luchtkoeler heeft naast het koelen nog twee andere functies, namelijk ventileren en lucht bevochtigen.
De luchtkoeler kan bedient worden via het bedieningspaneel op het apparaat en met de bijgeleverde afstandsbediening.
• Kies een locatie waar een stopcontact in de buurt is.
• Steek de stekker in een stopcontact.
• Het apparaat geeft een kort piepje en staat op standby.
• Deel het stopcontact niet met andere apparaten.
AAN EN UITZETTEN
-
• Open de voorste lamellen handmatig.
• Zet het apparaat aan met de aan/uit toets .
• Op het display wordt de kamertemperatuur getoond en zal geleidelijk veranderen naar mate de kamertemperatuur veranderd.
• Druk opnieuw op de aan/uit toets . om het apparaat uit te zetten.

VENTILEREN
-
De ventilatiestand kan op verschillende snelheden ingesteld worden.
• Zet het apparaat aan met de aan/uit toets
.
• Druk op de toets snelheid
. Op het display staat de ingestelde ventilator snelheid.
F1: lage snelheid
F2: gemiddelde snelheid
F3: hoge snelheid
• Wijzig de snelheid van de ventilator met elke druk op de toets snelheid
.
• De ingestelde snelheid knippert een aantal keer en daarna zal op het display de kamertemperatuur getoond worden en
zal geleidelijk veranderen naar mate de kamertemperatuur veranderd.
WINDTYPE -
De luchtkoeler kan naast de normale snelheden ingesteld worden op een natuurlijke wind of een zachte bries voor het
slapen gaan.
• Druk op de toets windtype
om het gewenste windtype te selecteren.
standaard De ventilator zal op de hoogste stand waaien.
natuurlijk
De ventilator zal continue waaien en zo een natuurlijke wind nabootsen door de ingestelde snelheid af te
wisselen met een lagere snelheid.
slaap
De snelheid van de ventilator verlaagt automatisch elk half uur en zal tot slot blijven waaien op de laagste
snelheid
KOELEN
/
BEVOCHTIGEN
-
Het apparaat kan de luchtstroom koelen of het huis bevochtigen door het toevoegen van koud water in de watertank.
Creëer extra koele lucht door een bevroren koelelement in het water in de watertank te plaatsen. Het apparaat wordt
geleverd met twee koelelementen zodat u deze afwisselend kunt gebruiken en het apparaat continue kan blijven koelen.
Let op: gebruik deze functie alleen als de watertank voorzien is van vers koud water.
Draai de vergrendelingshendel van de tank naar een horizontale positie en trek de watertank voorzichtig uit het apparaat
om hem te vullen. Vul de watertank met vers koud water en zorg ervoor dat het waterniveau in de watertank het maximum
niveau (MAX) niet overschrijdt.
Plaatst u een bevroren koelelement in de watertank, let dan op dat het waterniveau hierdoor niet boven het maximum
niveau uitkomt.
Plaats de watertank terug in de oorspronkelijk positie en draai de vergrendelingshendel naar de verticale positie.
• Zet het apparaat aan met de aan/uit toets
.
• Druk op de toets koelen
.
• Druk opnieuw op de toets koelen
om de functie uit te schakelen.
Wanneer de functie koelen uitgeschakeld wordt, zal het apparaat alleen nog maar ventileren en het water in de watertank
wordt niet meer gebruikt om te koelen of de lucht te bevochtigen.
Extra aanwijzingen
• Gebruik altijd vers koud water.
• Zorg ervoor dat het water in de watertank niet onder het minimum niveau (MIN) komt bij het gebruik van de functie koelen
of lucht bevochtigen.
SWING FUNCTIE -
Met de swing functie kunt u het heen en weer bewegen van de luchtstroom bepalen voor een betere luchtverplaatsing.
• Zet het apparaat aan op de gewenste functie.
• Druk op de swing toets en de binnenste lamellen zullen continue naar links en rechts bewegen waardoor de
luchtstroom heen en weer beweegt.
• De windrichting naar boven of beneden kunt u handmatig aanpassen door de voorste lamellen rustig omhoog of naar
beneden te duwen.
TIMER
-
Druk op de timertoets om de timer te starten. De tijdsduur kan ingesteld worden van 1 tot 12 uren.
Druk herhaaldelijk op de timertoets
om de gewenste tijd in te stellen. Op het display staat de ingestelde tijd.
Nadat de ingestelde tijd verstreken is, zal het apparaat automatisch uitschakelen.
Nederlands • 9

reiniging en onderhoud
5
Voordat u de luchtkoeler reinigt, zet u het apparaat uit met de aan/uit toets en verwijder altijd de stekker uit het
stopcontact.
Het reinigen van de buitenkant
Reinig de buitenkant van het apparaat met een vochtige doek of spons. Indien noodzakelijk kunt u de buitenkant van het
apparaat met behulp van een mild afwasmiddel reinigen.
• Gebruik geen agressieve of schurende schoonmaakmiddelen om het apparaat te reinigen.
• Zorg ervoor dat er geen water in het bedieningspaneel komt.
• Droog de buitenkant van het apparaat.
• Dompel het apparaat, het snoer of de stekker nooit in water of een andere vloeistof onder.
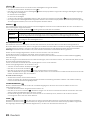
Het reinigen van het luchtfilter
Om de luchtkoeler optimaal te laten functioneren, adviseren wij om het luchtfilter regelmatig te reinigen. Het luchtfilter kan
namelijk verstopt raken met stof en vuil.
• Schroef het luchtfilter aan de achterzijde van het apparaat los en verwijder deze van het apparaat.
• Verwijder het koelblok uit de houder. Maak deze gelijk schoon als het nodig is.
• Reinig het luchtfilter met een zacht reinigingsmiddel in lauwwarm water (ca. 40°C). Spoel het luchtfilter daarna grond schoon
met schoon water en laat het aan de lucht drogen. Leg het luchtfilter niet in de zon of op de verwarming om te drogen.
• Plaats het luchtfilter terug in het apparaat. Controleer of deze volledig droog is voordat de luchtkoeler weer gebruikt wordt.
• Afhankelijk van het gebruik is het advies om het luchtfilter elke 2 maanden te reinigen.
• Het luchtfilter gaat langer mee als u deze laat drogen na elk gebruik van de KOELEN functie. Zet de KOELEN functie uit en
laat het apparaat nog 15 minuten ventileren, zodat het luchtfilter kan drogen.
Het reinigen van het koelblok
Wanneer u het luchtfilter heeft verwijderd, kunt u ook het koelblok verwijderen. Haal het koelblok uit de houder,
reinig deze met schoon water en een zachte borstel en plaats deze hierna voorzichtig terug in de houder. Gebruik geen
schoonmaakmiddelen aangezien dit het koelblok kan aantasten.
Het reinigen van de ventilatieroosters
Om de luchtkoeler optimaal te laten functioneren, kunt u de ventilatieroosters reinigen met behulp van een stofzuiger met
een zachte borstelzuigmond.
Het reinigen van de watertank
Verwijder de watertank uit het apparaat en maak voorzichtig de pomp los van de watertank. Gooi eventueel aanwezig water
uit de watertank en reinig deze met een zacht reinigingsmiddel en warm water. Spoel goed na met schoon water en droog af.
Maak de pomp weer vast in de houder en plaats de watertank terug in het apparaat.
Seizoensonderhoud
Reinig de luchtkoeler aan het einde van het seizoen voordat u deze opbergt.
1. Leeg de watertank en maak deze schoon volgens de instructies.
2. Reinig het luchtfilter en laat het goed drogen.
3. Bewaar de koelelementen in de watertank.
4. Dek de luchtkoeler af en bewaar hem rechtop op een droge plaats.
10 • Nederlands
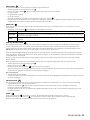
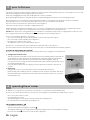
AFSTANDSBEDIENING
Met de afstandsbediening kunt u dezelfde functies bedienen als het
bedieningspaneel op de luchtkoeler. Richt de afstandsbediening op de sensor
voor een goede werking.
De afstandsbediening wordt geleverd inclusief een batterij - CR2025.
Verwijder de batterij als u de afstandsbediening voor langere tijd niet gebruikt.

• First carefully read the instruction manual in full prior to
using the appliance and store the manual in a safe place for
future reference.
• Only use this appliance for the purposes described in the
instruction manual.
• Only connect the appliance to alternate current, with a mains
voltage that corresponds with the information provided on the
information plate of the appliance.
• Never bend the power cord sharply or allow it to run across
hot parts.
• Fully unwind the cord to prevent it from overheating.
• Never place the appliance near appliances that give off heat,
such as ovens, gas cookers, hotplates, etc. Keep the appliance
away from walls or other objects that could catch flame,
such as curtains, towels (cotton or paper, etc.).
• Never place anything on top of the appliance.
• Never cover the air inlets and outlets.
• Do not insert fingers or objects in the openings of the appliance.
• Always make sure the appliance is placed on an even,
flat surface. The surface should never be a sloping surface.
• Only use the appliance indoors.
• Do not leave the appliance unsupervised when it is working.
• If you want to move the appliance, make sure the appliance
is switched off.
• Do not use the appliance if the plug, cord or appliance are
damaged, or if the appliance no longer functions properly
or if it is damaged in any other way. If this is the case, consult
the retailer or our maintenance service.
• If the cord of the appliance is damaged, it should be replaced by
the manufacturer, his customer service or a similarly qualified
person in order to prevent hazardous situations.
• Never replace the plug or cord yourself. Repairs to electrical
appliances should only be performed by skilled persons.
Incorrect repairs may expose the user to serious hazards.
• Never use the appliance with components that are not
recommended or supplied by the manufacturer.
English
safety instructions
1
English • 11

• Do not pull the cord and/or appliance to remove the plug from
the socket. Never touch the appliance with wet or damp hands.
• Never connect the appliance to an external timer or a separate
remote control system, in order to prevent hazardous situations.
• Keep the appliance out of reach of children. Children do not
see the dangers associated with handling electrical appliances.
Therefore, never allow children to operate electrical appliances
without supervision. Keep the appliance and cord out of reach of
children younger than 8 years of age.
• The appliance can be used by children of 8 years and older and
persons with a limited physical, sensory or mental capacity or
lack of experience or knowledge, provided they use the appliance
under supervision or have been instructed about its safe use and
understand the hazards involved.
• Children must not play with the appliance.
• The appliance must not be cleaned or maintained by children,
unless this is done under supervision.
• If the appliance is not being used or is being cleaned, fully
switch off the appliance by removing the plug from the socket.
• Never submerge the appliance, cord or plug in water.
• This appliance is intended for household and similar use, such as:
- in staff kitchens, in shops, offices and other work environments;
- by guests of hotels, motels and other residential environments;
- in Bed&Breakfast type environments;
- farms.
• If the appliance is not used as intended, no compensation can
be claimed in case of defects or accidents and the warranty will
be invalidated.
• If you decide to stop using the appliance due to a defect,
we recommend cutting the cord after removing the plug
from the wall socket. Small household appliances do not
belong in the dustbin. Take the appliance to the waste
processing department concerned of your municipality.
12 • English

product description
2
1. Operating panel
2. Flap
3. Sensor for remote control
4. Louvre grille - front fins
5. Water level indicator
6. Castor
7. Handle
English • 13
2
14
1 3 1312117
4
5
6
8
9
10
1. on/off key
2. ventilation speed key
3. swing key
4. wind type indication: standard
5. wind type indication: natural
6. wind type indication: sleep
7. display
8. Air filter
9. Cooling block
10. Water tank
11. Remote control
12. Cooling elements
13. Water reservoir
14. Overflow reservoir
8. on indication
9. timer indication
10. cooling indication
11. timer key
12. wind type key
13. cooling key
14. flap
OPERATING PANEL
7
10
9
8
4
5
6
1 32
11
12
2
13
14

prior to first use
3
Follow these instructions when using the appliance for the first time: Carefully unpack the air cooler and all accessories and
remove all packaging material and any promotional stickers.
Keep the packaging (plastic bags and cardboard) out of reach of children.
After unpacking the appliance, carefully check it for external damage that may have occurred during transport.
Place the appliance on a sturdy, flat surface and make sure there is enough space all around for sufficient ventilation.
Open the flap of the air cooler and check that all mentioned accessories have been supplied.
Press the castors in the four holes at the bottom of the appliance.
Clean the outside of the air cooler with a slightly damp cloth.
Fill the supplied cooling elements with water once. Close the cooling elements. The water in the cooling elements never
needs to be replaced. Place the cooling elements in the freezer until they are completely frozen.
Caution: the water in the cooling elements is not suitable for consumption. Only use the cooling elements in the air cooler.
The cooling elements are not suitable for use as water bottles or other similar purposes.
Prior to connecting the appliance, check that:
• the connection voltage corresponds with what is stated on the information plate;
• the socket and cord are suitable for the appliance;
• the plug of the cord fits in the socket;
• the appliance is placed on a stable and flat surface.
A mobile air cooler must be placed on a flat surface with sufficient room all around.
Do not block the air inlets and outlets and ensure a free space of minimum 50 cm around the appliance.
FILLING THE AIR COOLER WITH WATER
The air cooler can be filled with water via the reservoir at the top or straight into the water tank.
1. Straight into the water tank
Turn the lock lever of the tank to a horizontal position and carefully pull the water tank out
of the appliance to fill it. Fill the water tank with fresh cold water and make sure that the
water level in the water tank does not exceed the maximum level (MAX - 5 litres).
If you place a frozen cooling element in the water tank, make sure the water level does not
exceed the maximum level.
Place the water tank back in the original position and turn the lock lever to the vertical
position.
2. Via the top
Filling the air cooler is easy via the water reservoir under the flap at the top.
Open the flap and carefully pour fresh cold water into the reservoir. The water ends up in
the water tank via the overflow. Ensure the water level in the water tank does not exceed
the maximum level.
14 • English
operating the air cooler
4
In addition to cooling, the air cooler has two other modes, i.e. ventilation and air humidification.
The air cooler can be operated via the control panel on the appliance and with the provided remote control.
• Choose a location near a socket.
• Insert the plug in a socket.
• The appliance gives a short beep sound and enters the standby mode.
• Do not share the socket with any other appliances.
SWITCHING ON AND OFF
-
•
Manually open the front fins.
•
Switch on the appliance using the on/off key
.
• The display shows the room temperature and slowly changes as the room temperature changes.
• Press the on/off key once more to switch off the appliance.

VENTILATION
-
The ventilation position can be set to different speeds.
• Switch on the appliance using the on/off key
.
• Press the speed key
. The display shows the set fan speed.
F1: low speed
F2: medium speed
F3: high speed
• Change the fan speed with each press on the speed key
.
• The set speed flashes a number of time, after which the display shows the room temperature, which will gradually change
as the room temperature changes.
WIND TYPE -
In addition to normal speeds, the air cooler can be set to a natural wind or soft breeze prior to sleeping.
• Press the wind type key
to select the required wind type.
standard The fan will blow at the highest position.
natural The fan blows continuously and thus imitates a natural wind by alternating the set speed with a lower speed.
sleep
The speed of the fan is automatically reduced every thirty minutes and eventually remains blowing
at the lowest speed.
COOLING
/
HUMIDIFYING
-
The appliance is able to cool the air flow or humidify the house by adding cold water in the water tank.
Create additional cool air by placing a frozen cooling element in the water in the water tank. The appliance is supplied with
two cooling elements, so you can use them alternately and the appliance is able to cool continuously.
Caution: only use this mode when the water tank is provided with fresh cold water.
Turn the lock lever of the tank to a horizontal position and carefully pull the water tank
out of the appliance to fill it. Fill the water tank with fresh cold water and make sure that the water level in the water tank does
not exceed the maximum level (MAX).
If you place a frozen cooling element in the water tank, make sure the water level does not exceed the maximum level.
Place the water tank back in the original position and turn the lock lever to the vertical position.
• Switch on the appliance using the on/off key
.
• Press the cooling key
.
• Press the cooling key
once more to switch off the mode.
When cooling mode is switched off, the appliance will only ventilate and the water in the water tank is no longer used
to cool or humidify the air.
Extra instructions
• Always use fresh cold water.
• Make sure the water in the water tank does not come below the minimum level (MIN) when using the cooling or air
humidification mode.
SWING MODE -
By means of the swing mode you can determine the back and forth movements of air flow for a better air displacement.
• Switch the appliance to the required mode.
• Press the swing key and the inner fins start to move to the left and right continuously, as a result of which the air flow
moves back and forth.
• The up and down wind direction can be adjusted manually by pushing the front fins upwards or downwards.
TIMER
-
Press the timer key to start the timer. The time period can be set between 1 and 12 hours.
Repeatedly press the timer key
to set the required time. The display shows the set time. When the set time has passed,
the appliance switches off automatically.
English • 15

cleaning and maintenance
5
Before cleaning the air cooler, switch off the appliance using the on/off key and always remove the plug from the socket.
Cleaning the exterior
Clean the exterior of the appliance with a damp cloth or sponge. If necessary, you can clean the exterior of the appliance
by means of a mild washing-up liquid.
• Do not use aggressive or abrasive cleaning agents for cleaning the appliance.
• Ensure no water reaches the control panel.
• Dry the exterior of the appliance.
• Never submerge the appliance, cord or plug in water or any other liquid.
Cleaning the air filter
In order to allow the air cooler to function as well as possible, we recommend cleaning the air filter regularly. The air filter
could get clogged with dust and dirt.
• Unscrew the air filter at the rear of the appliance and remove it from the appliance.
• Remove the cooling block from the holder. Clean it immediately, if necessary.
• Clean the air filter with a mild detergent in lukewarm water (approx. 40°C). Then properly rinse clean the air filter with
clean water and allow it to dry in the air. Do not place the air filter in the sun or on the heating to dry it.
• Place the air filter back in the appliance. Check that it is fully dry, before using the air cooler again.
• Depending on use, it is recommended to clean the air filter every 2 months.
• The air filer will have a longer life span if you allow it to dry after every use of the COOLING mode. Switch off the
COOLING mode and allow the appliance to ventilate for another 15 minutes, so that the air filter is able to dry.
Cleaning the cooling block
When you have removed the air filter, you can also remove the cooling block. Remove the cooling block from the holder,
clean it with clean water and a soft brush and then carefully place it back in the holder. Do not use detergents, as they can
affect the cooling block.
Cleaning the ventilation grilles
In order to allow the air cooler to function as well as possible, you can clean the ventilation grilles by means of a vacuum
cleaner with a soft brush nozzle.
Cleaning the water tank
Remove the water tank from the appliance and carefully disconnect the pump from the water tank. Throw away any water
that is still present in the water tank and clean the tank with a soft detergent and warm water. Properly rinse with clean water
and dry. Fasten the pump in the holder again and place the water tank back in the appliance.
Seasonal maintenance
Clean the air cooler after the end of the season, before storing it.
1. Empty the water tank and clean it in accordance with the instructions.
2. Clean the air filter and allow it to dry properly.
3. Store the cooling elements in the water tank.
4. Cover the air cooler and store it upright on a dry location.
16 • English
REMOTE CONTROL
The remote control can be used for the same functions as the control panel
on the air cooler. Aim the remote control to the sensor for a good operation.
The remote control is provided with a battery included - CR2025.
Remove the battery if you will not be using the remote control for a longer period
of time.

• Lesen Sie die Gebrauchsanleitung vor der ersten
Verwendung des Geräts vollständig und aufmerksam
durch und bewahren Sie diese sorgfältig auf, damit Sie sie
später zurate ziehen können.
• Verwenden Sie dieses Gerät ausschließlich für die in der
Gebrauchsanleitung beschriebenen Zwecke.
• Schließen Sie das Gerät nur an Wechselstrom mit einer
Netzspannung an, die der auf dem Typenschild des Geräts
angegebenen Spannung entspricht.
• Knicken Sie das Netzkabel niemals stark und achten Sie darauf,
dass es nicht mit heißen Teilen in Kontakt kommt.
• Wickeln Sie das Kabel komplett ab, um einer Überhitzung des
Kabels vorzubeugen.
• Stellen Sie das Gerät nie in die Nähe von Wärmequellen wie
Öfen, Gasherden, Herdplatten usw. Halten Sie mit dem Gerät
immer einen sicheren Abstand zu Wänden oder anderen
Gegenständen ein, die in Brand geraten können, z.B. zu
Gardinen, Baumwoll- oder Papierhandtüchern usw.
• Stellen Sie nichts auf das Gerät.
• Die Luftansaug- und Luftaustrittsöffnungen dürfen niemals
abgedeckt werden.
• Stecken Sie nie Ihre Finger oder irgendwelche Gegenstände in
die Öffnungen des Geräts.
• Sorgen Sie immer dafür, dass das Gerät auf einem ebenen und
glatten Untergrund steht. Der Untergrund darf nicht abschüssig sein.
• Verwenden Sie das Gerät nur in Innenräumen.
• Lassen Sie ein eingeschaltetes Gerät niemals unbeaufsichtigt
stehen.
• Wenn Sie das Gerät umstellen möchten, müssen Sie dafür
sorgen, dass es ausgeschaltet ist.
• Verwenden Sie das Gerät nicht, wenn der Stecker, das Kabel
oder das Gerät beschädigt ist, wenn das Gerät nicht mehr
ordnungsgemäß funktioniert oder wenn es heruntergefallen ist
oder auf eine andere Weise beschädigt wurde. Wenden Sie sich
dann an Ihren Händler oder unseren technischen Dienst.
Deutsch
Sicherheitsvorschriften
1
Deutsch • 17

• Wenn das Anschlusskabel dieses Geräts beschädigt ist, muss
es vom Hersteller, dessen Kundendienst oder einer Person mit
einer vergleichbaren Qualifikation ausgetauscht werden,
um gefährliche Situationen zu vermeiden.
• Ersetzen Sie den Stecker oder das Kabel auf keinen Fall selbst.
Reparaturen an elektrischen Geräten dürfen ausschließlich von
Fachleuten ausgeführt werden. Falsch ausgeführte Reparaturen
können zu erheblichen Gefahren für den Benutzer führen.
• Verwenden Sie das Gerät niemals mit Teilen, die nicht vom
Hersteller empfohlen oder geliefert wurden.
• Ziehen Sie nie am Kabel oder am Gerät selbst, um den Stecker
aus der Steckdose zu ziehen. Fassen Sie das Gerät nie mit
nassen oder feuchten Händen an.
• Schließen Sie das Gerät niemals an einen externen Timer oder
ein separates Fernbedienungssystem an, andernfalls können
gefährliche Situationen entstehen.
• Sorgen Sie dafür, dass das Gerät für Kinder unzugänglich ist.
Kinder verstehen die Gefahren nicht, die beim Umgang mit
elektrischen Geräten entstehen können. Lassen Sie Kinder
deshalb nie ohne Aufsicht mit elektrischen Geräten hantieren.
Sorgen Sie dafür, dass das Gerät und das Kabel für Kinder unter
8Jahren unzugänglich sind.
• Das Gerät darf nur dann von Kindern ab 8Jahren und von
Personen mit eingeschränkter körperlicher, sensorischer oder
mentaler Leistungsfähigkeit oder einem Mangel an Erfahrung
oder Wissen verwendet werden, wenn das Gerät von ihnen unter
Aufsicht verwendet wird oder sie über den sicheren Gebrauch
des Gerätes instruiert wurden und die sich aus dem Gebrauch
ergebenden Gefahren verstehen.
• Kinder dürfen nicht mit dem Gerät spielen.
• Das Gerät darf von Kindern nicht gereinigt oder gewartet
werden, es sei denn, dies geschieht unter Aufsicht.
• Wenn das Gerät nicht verwendet oder gereinigt wird, müssen
Sie das Gerät komplett ausschalten und den Stecker aus der
Steckdose ziehen.
• Tauchen Sie das Gerät, das Kabel oder den Stecker niemals
in Wasser ein.
• Dieses Gerät ist für den Gebrauch in Haushalten oder für einen
ähnlichen Gebrauch ausgelegt, z.B.
- in Personalküchen, in Geschäften, in Büros und in anderen
Arbeitsumgebungen;
18 • Deutsch

- von Gästen in Hotels, Motels und anderen Unterkunftsbereichen;
- in Bed-and-Breakfast-Unterkünften;
- auf bäuerlichen Anwesen.
• Bei unsachgemäßer Verwendung des Geräts besteht bei
eventuellen Defekten kein Anspruch auf Schadensersatz;
dies führt außerdem zum Erlöschen der Garantieansprüche.
• Wenn Sie beschließen, das Gerät wegen eines Defekts
nicht mehr zu verwenden, empfehlen wir Ihnen,
das Kabel zu durchtrennen, nachdem Sie den Stecker
aus der Steckdose gezogen haben. Haushaltskleingeräte
gehören nicht in den Restmüll. Geben Sie das Gerät bei
dem zuständigen Abfallentsorger in Ihrer Gemeinde ab.
Deutsch • 19

Produktbeschreibung
2
1. Bedienfeld
2. Klappe
3. Sensor für Fernbedienung
4. Louvre-Luftschlitze - vordere Lamellen
5. Füllstandsanzeige
6. Lenkrolle
7. Griff
2
14
1 3 1312117
4
5
6
8
9
10
1. Ein/Aus-Taste
2. Taste für Lüftungsgeschwindigkeit
3. Taste für Schwenken
4. Anzeigelampe Windart: Standard
5. Anzeigelampe Windart: Natürlich
6. Anzeigelampe Windart: Schlafen
7. Display
8. Luftfilter
9. Kühlblock
10. Wassertank
11. Fernbedienung
12. Kühlelemente
13. Wasserbehälter
14. Überlaufbehälter
8. Anzeigelampe Ein
9. Timer-Anzeigelampe
10. Anzeigelampe Kühlen
11. Timer-Taste
12. Windart-Taste
13. Kühlen-Taste
14. Klappe
BEDIENFELD
20 • Deutsch
7
10
9
8
4
5
6
1 32
11
12
2
13
14
Seite laden ...
Seite laden ...
Seite laden ...
Seite laden ...
Seite laden ...
Seite laden ...
Seite laden ...
Seite laden ...
Seite laden ...
Seite laden ...
Seite laden ...
Seite laden ...
Seite laden ...
Seite laden ...
Seite laden ...
Seite laden ...
-
 1
1
-
 2
2
-
 3
3
-
 4
4
-
 5
5
-
 6
6
-
 7
7
-
 8
8
-
 9
9
-
 10
10
-
 11
11
-
 12
12
-
 13
13
-
 14
14
-
 15
15
-
 16
16
-
 17
17
-
 18
18
-
 19
19
-
 20
20
-
 21
21
-
 22
22
-
 23
23
-
 24
24
-
 25
25
-
 26
26
-
 27
27
-
 28
28
-
 29
29
-
 30
30
-
 31
31
-
 32
32
-
 33
33
-
 34
34
-
 35
35
-
 36
36


in anderen Sprachen
- English: Inventum VLK500W User manual
- français: Inventum VLK500W Manuel utilisateur
- Nederlands: Inventum VLK500W Handleiding
Verwandte Papiere
Sonstige Unterlagen
-
Tristar AT-5464 Benutzerhandbuch
-
Moa Air Cooler Benutzerhandbuch
-
Aqua Laser 49500 Benutzerhandbuch
-
Moa AC199WB Benutzerhandbuch
-
 Essentiel b ERA 553 Bedienungsanleitung
-
Tristar AT-5445 Benutzerhandbuch
-
Clatronic LK 3742 Benutzerhandbuch
-
SIGURO SGR-FC-H350W Benutzerhandbuch
-
ELRO AH8 Bedienungsanleitung
-
HoMedics MY CHILL PERSONAL SPACE COOLER HM PAC-25 Bedienungsanleitung
