Silvercrest SHLF 2000 B2 Operating Instructions Manual
- Typ
- Operating Instructions Manual

FAN HEATER WITH REMOTE CONTROL SHLF 2000 B2
IAN 114164
FAN HEATER WITH REMOTE CONTROL
Operating instructions
FŰTŐVENTILÁTOR TÁVIRÁNYÍTÓVAL
Kezelési útmutató
HORKOVZDUŠNÝ VENTILÁTOR
S DÁLKOVÝM OVLÁDÁNÍM
Návod k obsluze
HEIZLÜFTER MIT FERNBEDIENUNG
Bedienungsanleitung
TERMOWENTYLATOR ZE ZDALNYM
STEROWANIEM
Instrukcja obsługi
KALORIFER Z DALJINSKIM
UPRAVLJALNIKOM
Navodilo za uporabo
VÝHREVNÝ VENTILÁTOR
S DIAĽKOVÝM OVLÁDANÍM
Návod na obsluhu
RP114164_Heizluefter_Cover_LB4.indd 2 13.04.15 10:54

English..................................................................................... 2
Polski .................................................................................... 14
Magyar ................................................................................. 28
Slovenšina ........................................................................... 42
esky .................................................................................... 54
Slovenina............................................................................. 66
Deutsch ................................................................................. 78
ID: SHLF 2000 B2_15_V1.1
BB&3(B%ERRN6HLWH'LHQVWDJ0DL

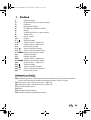
Overview / Przegld / Áttekintés / Pregled / Pehled / Prehad /
Übersicht
9
65
8
7
12
43
14
10
11
13
12
17
15
16
18
23
19
20
22
21
24
25
26
27 28 29 30
34
33
32
31
A
BB&3(B%ERRN6HLWH'LHQVWDJ0DL

2
GB
Contents
1. Overview ........................................................................................ 3
2. Intended purpose ............................................................................ 4
3. Safety information ........................................................................... 5
4. Items supplied ................................................................................. 7
5. How to use ...................................................................................... 8
5.1 Setting up the device ............................................................................. 8
5.2 Inserting the battery............................................................................... 8
6. Operation ........................................................................................ 8
6.1 Switching the device on and off.............................................................. 8
6.2 Setting the heat output ........................................................................... 9
6.3 Selecting the temperature....................................................................... 9
6.4 Setting the running time ......................................................................... 9
6.5 Swivel function ..................................................................................... 9
6.6 Overheating protection.......................................................................... 9
6.7 Safety switch ...................................................................................... 10
6.8 Frost monitor ...................................................................................... 10
7. Cleaning ........................................................................................ 10
8. Troubleshooting ............................................................................. 11
9. Disposal ........................................................................................ 11
10. Technical specifications .................................................................. 12
11. Warranty of the HOYER Handel GmbH ........................................... 12
BB&3(B%ERRN6HLWH'LHQVWDJ0DL

3
GB
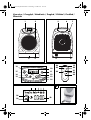
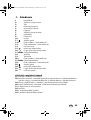
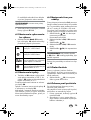
1. Overview
1 Operating panel
2 Protective grid of air outlet
3 Base
4 Safety switch
5 Compartment for remote control
6 Handle
7 Protective grid of air inlet
8 Temperature sensor
9 Main switch
10 Display
11 Standby button
12 + Increase values - temperature/time
13 - Reduce values - temperature/time
14 Infrared receiver
15 Switch the timer on / off
16 Switch the swivel function on / off
17 Mode Set operating mode
18 Control lamp
19 Remote control
20 + Increase values - temperature/time
21 Mode Set operating mode
22 - Reduce values - temperature/time
23 Standby button
24 Switch the timer on / off
25 Switch the swivel function on / off
26 Infrared transmitter
Display elements
27 Swivel function is switched on
28 Automatic mode: the device automatically adapts the heat output to the room temper-
ature. The device switches off automatically once the room temperature has reached
the desired temperature.
29 Low heat output: device operates at 1,000 watt
30 High heat output: device operates at 2,000 watt
31 Frost monitor is switched on
32 Running time
33 Display of the room temperature
34 Display of the set desired temperature
BB&3(B%ERRN6HLWH'LHQVWDJ0DL

4
GB
Thank you for your trust!
Congratulations on your new fan heater.
For a safe handling of the device and in or-
der to get to know the entire scope of fea-
tures:
• Thoroughly read these operat-
ing instructions prior to initial
commissioning.
• Above all, observe the safety in-
structions!
• The device should only be used
as described in these operating
instructions.
• Keep these operating instruc-
tions for reference, they are a
part of the product.
• If you pass the device on to
someone else, please include
these operating instructions.
We hope you enjoy your new fan heater!
Symbols on your device
Do not cover up
The adjacent symbol warns
against covering up the device,
as the resulting heat accumulation
could lead to damage and a fire
hazard.
2. Intended purpose
The device is suitable as auxiliary heating for
dry indoor spaces.
The device is designed for private home use
and must not be used for commercial pur-
poses. The device must only be used in-
doors.
The device must only be set up on the floor.
Foreseeable misuse
FIRE HAZARD!
~ Never use the device to dry textile mate-
rials or other objects on, above or in
front of the device.
~ The safety switch must not be disabled
manually under any circumstances.
~ The device must not be used in vehicles
of any kind.
BB&3(B%ERRN6HLWH'LHQVWDJ0DL

5
GB
3. Safety information
Warnings
If necessary, the following warnings will be
used in these operating instructions:
DANGER! High risk: failure to ob-
serve this warning may result in inju-
ry to life and limb.
WARNING! Moderate risk: failure to ob-
serve this warning may result in injury or se-
rious material damage.
CAUTION: low risk: failure to observe this
warning may result in minor injury or mate-
rial damage.
NOTE:
circumstances and specifics that must
be observed when handling the device.
Instructions for safe operation
~ Children under the age of 3 must be kept away, unless they are
constantly being supervised.
~ This device can be used by children from the age of 8 and peo-
ple with restricted physical, sensory or intellectual abilities or
people without adequate experience and/or understanding, if
they are supervised or instructed on how to use this device safely
and if they are aware of the resulting danger. Children must not
play with the device. Cleaning and maintenance by the user
must not be performed by children without supervision.
~ Children aged 3 and over, who are younger than 8 years old,
may only switch the device on and off, if they are supervised or
they have been instructed in the device’s safe use and they have
understood the resulting dangers, provided that the device is
placed or installed in its normal operating position. Children
aged 3 and over, who are younger than 8 years old, may not in-
sert the plug into the wall socket, adjust the device, clean the de-
vice and/or carry out any maintenance work, which the user is
required to carry out.
~ Some parts of the device may become very hot and
may cause burns. Particular care is necessary, if chil-
dren or vulnerable persons are present.
~ This device is equally intended for use in the home and in appli-
cations similar to the home, such as for example...
…in kitchens for employees in shops, offices and other commer-
cial areas;
…on agricultural estates;
…by customers in hotels, motels and other residential facilities;
…in bed-and-breakfast establishments.
BB&3(B%ERRN6HLWH'LHQVWDJ0DL

6
GB
~ In order to prevent overheating of the heating device, the heating
device must not be covered.
~ The device must never be set up directly under a wall socket, as
the forming heat may lead to damage to the electric system.
~ Never use the device close to a sink, a bath tub, a shower or a
swimming pool, as water splashes could enter the device.
~ If the power cable of this device should become damaged, it
must be replaced by the manufacturer, the manufacturer's custom-
er service department or a similarly qualified specialist, in order
to avoid any hazards.
DANGER for children
~ Packing materials are not children's
toys. Children should not be allowed to
play with the plastic bags. There is a
risk of suffocation!
~ Keep the device out of the reach of chil-
dren.
DANGER! Risk of electric
shock due to moisture
~ The device, the power cable and the
mains plug must not be immersed in wa-
ter or any other liquids.
~ Protect the device from moisture, water
drops and water splashes.
~ If liquid gets into the device, remove the
mains plug immediately. Have the de-
vice checked before reusing.
~ Never touch the device with wet hands.
~ If the device falls into water, disconnect
the mains plug immediately. Only then
is it safe to retrieve the device.
DANGER! Risk of electric
shock
~ Only connect the mains plug to a prop-
erly installed and easily accessible wall
socket whose voltage corresponds to
the specifications on the rating plate.
The wall socket must continue to be eas-
ily accessible after the device is
plugged in.
~ Ensure that the power cable cannot be
damaged by sharp edges or hot points.
~ The device is not fully disconnected from
the power supply, even after it is
switched off. In order to fully disconnect
it, pull out the mains plug.
~ When using the device, ensure that the
power cable cannot be trapped or
crushed.
~ When removing the mains plug from the
wall socket, always pull the plug and
never the cable.
~ Disconnect the mains plug from the wall
socket,…
…if there is a fault,
… when you are not using the device,
… before you clean the device and
… during thunderstorms.
~ Never attempt to reach into the device
interior by sticking your fingers or ob-
jects through the protective grids.
~ To avoid any risk, do not make modifi-
cations to the device.
~ Do not use the device if there is visible
damage to the device or the power ca-
ble.
FIRE HAZARD
~ There must be no flammable objects
(e.g. curtains, paper, etc.) in close prox-
imity to the device during operation.
BB&3(B%ERRN6HLWH'LHQVWDJ0DL

7
GB
~ Never use the device to dry textile mate-
rials or other objects on, above or in
front of the device.
~ The device must only be set up on a sol-
id, level, dry and non-flammable sur-
face.
~ When setting up the device, keep a min-
imum distance of 0.5 m all around to
other devices and walls.
~ Never operate the device in a potential-
ly explosive environment or close to
flammable gases or liquids.
~ Ensure at all times that the air can enter
and exit freely. Otherwise, heat may ac-
cumulate in the device.
DANGER! Risk of injury
through burning
~ The surfaces of the device may become
hot. For this reason, only touch the han-
dle of the device.
~ The device remains very hot after it is
switched off, and must not be touched.
~ Prior to cleaning, let the device cool
down until there is no longer a risk of
burning.
~ Only transport the device when it has
cooled down, and when doing so only
use the handle intended.
DANGER! Risk of injury
~ Ensure that the mains power cable nev-
er develops into a trip hazard, and that
nobody can get caught in or stand on it.
~ Keep an appropriate distance to the de-
vice, in order to prevent hair or clothing
from being sucked into the device fan.
DANGER from batteries
~ DANGER OF EXPLOSION! Be sure
to observe the correct polarity when in-
serting the battery. Replace only with
the same or an equivalent type.
~ Batteries can be life-threatening if swal-
lowed. Therefore you should store bat-
teries out of the reach of young
children. If a battery has been swal-
lowed, medical assistance must be
sought immediately.
~ Batteries must not be charged or reacti-
vated by other means, nor must they be
dismantled, thrown into a fire or short-
circuited.
~ Always remove used batteries immedi-
ately, as these could leak and therefore
cause damage.
~ Clean the battery and device terminals
before you insert the batteries.
~ Take the battery out of the remote con-
trol if you intend not to use it for an ex-
tended period of time. A leaking battery
could damage the remote control.
~ Do not subject batteries to extreme con-
ditions, e.g. do not place the remote
control on radiators or under direct sun-
light. Otherwise, there is an increased
danger of batteries leaking.
~ If battery acid has leaked, avoid con-
tact with the skin, eyes and mucous
membranes. In case of contact with the
acid, rinse the affected area at once
with plenty of clean water and seek
medical assistance immediately.
WARNING! Risk of material
damage
~ Never try to use the swivel function
manually, as this may damage the mo-
tor.
~ Do not use any astringent or abrasive
cleaning agents.
4. Items supplied
1 Fan heater
1Remote control19
1 Button cell CR2032
1 Operating instructions
BB&3(B%ERRN6HLWH'LHQVWDJ0DL

8
GB
5. How to use
5.1 Setting up the device
NOTE: some parts of the device might be
slightly greased when delivered, which is
why slight smoke and odour formation
might develop. This is harmless and stops af-
ter a short amount of time. Ensure sufficient
ventilation in the meantime.
1. Remove the device from the packaging.
2. Remove any transport packaging and
any protective foil present.
NOTE: there is a piece of corrugated board
between the device and base3, which also
needs to be removed.
3. Check that the device shows no dam-
age.
FIRE HAZARD!
~ Ensure that there is sufficient distance to
the wall, furniture and fixtures or other
devices. The distance should be at least
0.5 m, in order to exclude the risk of a
fire hazard.
4. Select a location which complies with
the safety information.
5. Select a location where people, animals
or plants will not be suddenly hit by the
hot air flow.
6. Insert the mains plug into a wall socket
corresponding to the technical data.
NOTE: the device requires up to 10 amps
electricity (2,000 watt). If you have connect-
ed other consumers in the same electric cir-
cuit, ensure that the maximum capacity of
the fuse is not exceeded, as the fuse will oth-
erwise trigger.
5.2 Inserting the battery
If the device is new or if the battery in the re-
mote control19 is empty, a new battery of
the type CR2032 must be inserted.
1. Figure A: press the closing flap to-
wards the centre and pull the battery
compartment out.
2. Remove the old battery, if applicable.
3. Insert a new battery.
NOTE: be sure to observe the correct polar-
ity when inserting the battery (+/–).
4. Slide the battery compartment back in.
6. Operation
Identical symbols on the buttons mean iden-
tical functioning. These instructions describe
the operation via the remote control19.
The selected function is shown on the dis-
play10.
As soon as the device is in operation, the
control lamp18 lights up.
The device can be operated via the operating
panel1 or via the remote control19.
6.1 Switching the device on
and off
1. Insert the mains plug into a wall socket
corresponding to the technical data.
2. Switch the device on by setting the main
switch9 to I.
The main switch9 and the display10
are lit up. The device is in standby
mode.
3.
Put the device into operating
mode by
pressing the standby button 23. The
control lamp18 lights up.
BB&3(B%ERRN6HLWH'LHQVWDJ0DL

9
GB
4. In order to switch back to standby mode,
press the standby button
23
again.
After a few seconds stopping time, the
device switches into standby mode.
NOTE: the device requires electricity in this
state.
5. In order to completely switch off the de-
vice, set the main switch9 to 0.
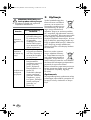
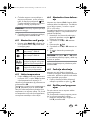
6.2 Setting the heat output
•Press Mode21 repeatedly until the de-
sired heat setting is shown on the dis-
play10:
6.3 Selecting the temperature
• The button
+
20
allows you to increase
the desired temperature up to 38 °C, while
the button
-
22
allows you to reduce the
desired temperature down to 6°C.
The selected desired temperature is shown
on the display34.
The room temperature is measured by the
temperature sensor8 and shown on the dis-
play33.
The device switches off automatically once
the room temperature has reached the de-
sired temperature. If the room temperature
falls below the desired temperature, the de-
vice automatically switches back on again.
6.4 Setting the running time
The device has a timer24, with which you
can set the desired running time. The run-
ning time can be set at between 1 minute
and 23 hours 59 minutes.
Upon reaching the end of the running time,
the device switches off automatically and
End appears on the display.
1. Press the button 24 in order to ad-
just the timer setting.
The hour indicator flashes.
2. Press the button +
20
/
-22 in order to
set the hours.
3. Press the button 24.
4. Press the button +
20
/
-22 in order to
set the minutes.
5. Press the button 24 in order to start
the timer.
NOTE:
by keeping the buttons
+
20
or
-
22
pressed, the values toggle until you release the
button.
The selected running time is shown on the
display10.
6.5 Swivel function
The device has a swivel function.
It causes the device to swivel to and fro, thus
distributing the escaping air more evenly in
the room.
• By pressing button 25, you can
switch the swivel function on and off.
6.6 Overheating protection
This device possesses overheating protec-
tion for your safety.
If the temperature inside the device becomes
too high, it automatically switches off:
1. Switch the device off by setting the main
switch9 to 0.
2. Check whether the air inlet or air outlet
are obstructed and eliminate the cause.
If the cause cannot be found and the
Low heat output: device oper-
ates at 1,000 watt
High heat output: device oper-
ates at 2,000 watt
Automatic mode: the device au-
tomatically adapts the heat out-
put to the room temperature.
Frost protection: the device only
switches on at 6 °C ambient
temperature.
BB&3(B%ERRN6HLWH'LHQVWDJ0DL

10
GB
fault occurs repeatedly, have the device
repaired or take it out of operation.
3. Wait for the device to cool down.
4. Then you can continue to use it normally.
6.7 Safety switch
A safety switch4 protects the device against
damage caused from falling over.
The safety switch4 is positioned on the un-
derside of the device and switches it off im-
mediately in the even of it falling over.
1. Place the device back into upright posi-
tion.
2. Select the desired function again.
6.8 Frost monitor
The device has a so-called frost monitor func-
tion. If this function is activated, the device
switches on automatically, as soon as the
ambient temperature falls down to 6 °C. The
device remains switched on until an ambient
temperature of 9 °C has been reached.
• Press the button Mode21 until the sym-
bol appears on the display. The frost
monitor function is switched on.
• Press the button Mode21 once and
the symbol disappears. The frost
monitor is switched off.
NOTE: high electricity costs when in
continuous operation.
Please observe that a lot of electrici-
ty is consumed in continuous opera-
tion (24 hours) due to the high
output of 2,000 watt. At a price of
€0.25 per kilowatt hour, this would
lead to costs of €12 per day or €360
per month.
7. Cleaning
In order to enjoy your device for a long time,
you should regularly clean it.
DANGER! Risk of electric
shock!
~ Disconnect the mains plug before any
cleaning.
DANGER! Risk of injury
through burning!
~ Allow the device to cool down.
WARNING! Risk of material dam-
age!
~ Do not use any astringent or abrasive
cleaning agents.
1. Carefully remove larger dust deposits
from the protective grids2 and7 using
a vacuum cleaner.
2. Remove the residue with a soft brush.
Ensure that no dust falls into the interior
of the device. Therefore, hold the de-
vice, which you are cleaning, in such a
way that the protective grid2 /7
shows downwards.
3. Clean the outside of the device with a
damp cloth. You can also use some de-
tergent.
4. Use a cloth dampened in clear water
for wiping afterwards.
5. Do not use the device until it is com-
pletely dry again.
BB&3(B%ERRN6HLWH'LHQVWDJ0DL

11
GB
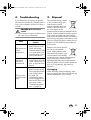
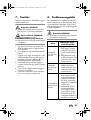
8. Troubleshooting
If your device fails to function as required,
please try this checklist first. Perhaps there is
only a minor problem, and you can solve it
yourself.
DANGER! Risk of electric
shock!
~ Do not attempt to repair the device your-
self under any circumstances.
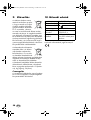
9. Disposal
The symbol showing a wheel-
ie bin crossed through indi-
cates that the product
requires separate refuse col-
lection in the European Un-
ion. This applies to the
product and all accessories marked with this
symbol. Products identified with this symbol
may not be discarded with normal house-
hold waste, but must be taken to a collection
point for recycling electric and electronic ap-
pliances. Recycling helps to reduce the con-
sumption of raw materials and protect the
environment.
Batteries must not be discard-
ed with your household
waste. Spent batteries must
be disposed of properly. Spe-
cial containers are available
for this purpose in shops selling batteries
and at municipal collection points.
(Rechargeable) batteries marked with the
following letters contain harmful substances
such as: Cd (cadmium), Hg (mercury),
Pb(lead).
Packaging
When disposing of the packaging, make
sure you comply with the environmental reg-
ulations applicable in your country.
Fault
Possible causes /
Action
The device can-
not be
switched on.
• Fuse or wall socket
faulty? Choose a dif-
ferent wall socket.
•Defective device? Take
it to a specialist work-
shop for repair, or dis-
pose of the device.
The device
cannot be
switched off.
• Electronic component
faulty? Take it to a spe-
cialist workshop for re-
pair, or dispose of the
device.
Device switch-
es off automati-
cally.
• Safety switch has trig-
gered: put the device
into its upright position
(see “Safety switch”
on page 10)
• Overheating protec-
tion has triggered: let
device cool down and
then clean it (see
“Overheating protec-
tion” on page 9)
BB&3(B%ERRN6HLWH'LHQVWDJ0DL

12
GB
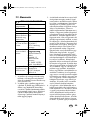
10. Technical
specifications
Subject to technical modification.
11. Warranty of the
HOYER Handel GmbH
Dear Customer,
your device is provided with a 3 year war-
ranty starting with the purchase date. In the
event of product defects, you are entitled to
statutory rights against the vendor. These
statutory rights are not restricted by our war-
ranty presented in the following.
Warranty conditions
The warranty period starts with the purchase
date. Please keep the original purchase re-
ceipt in a safe place. This document is re-
quired to verify the purchase.
If within three years from the purchase date
of this product a material or factory defect
occurs, the product will be repaired or re-
placed by us – at our discretion – free of
charge to you. This warranty implies that
within the period of three years the defective
device and the purchase receipt are present-
ed, including a brief written description of
the defect and the time it occurred.
If the defect is covered by our warranty, the
repaired or a new product will be returned
to you. No new warranty period starts with
a repair or replacement of the product.
Warranty period and statutory
claims for defects
The warranty period is not extended when
the warranty has been claimed. This also ap-
plies to replaced and repaired parts. Any
damages and defects already existing at the
time of purchase must be reported immedi-
ately upon unpacking. Repairs arising after
the expiration of the warranty period are
subject to a charge.
Warranty coverage
The device was produced carefully according
to strict quality guidelines and tested diligent-
ly prior to delivery.
Model: SHLF 2000 B2
Mains voltage: 220-240 V
~ 50 Hz
Protection class: II
Power rating: 1,000/2,000 W
Battery for the
remote control: CR2032/3 V
Ambient
conditions:
0 °C to +40 °C,
max. 85 % relative hu-
midity
BB&3(B%ERRN6HLWH'LHQVWDJ0DL

13
GB
The warranty applies to material or factory
defects. This warranty does not include prod-
uct parts that are subject to standard wear
and therefore can be considered wear parts;
the same applies to damages at fragile parts,
e.g. switches, rechargeable batteries or parts
made of glass.
This warranty expires if the product is dam-
aged, not used as intended or not serviced.
For the proper operation of the product, all in-
structions listed in the operating instructions
must be observed carefully. Any form of use
and handling that is advised against in the
operating instructions or warned against
must always be avoided.
The product is only intended for private and
not for commercial use. In the case of incor-
rect and improper treatment, use of force and
interventions not performed by our author-
ised Service Centre, the warranty shall cease.
Handling in case of a warranty
claim
In order to ensure prompt processing of your
matter, please observe the following notes:
• Please keep the article number
IAN: 114164
and the purchase receipt
as a purchase verification for all inquiries.
• If faulty operation or other defects occur,
first contact the Service Centre listed in
the following by telephone or email.
• Then, you are able to send a product re-
ported as defective free of charge to the
service address specified to you, includ-
ing the purchase receipt and the infor-
mation on the defect and when it
occurred.
Please visit www.lidl-service.com to
download this and many other
manuals, product videos and soft-
ware.
Service Centre
Service Great Britain
Tel.: 0871 5000 720 (£ 0.10/Min.)
E-Mail: [email protected]
Service Ireland
Tel.: 1890 930 034
(0,08 EUR/Min., (peak))
(0,06 EUR/Min., (off peak))
E-Mail: [email protected]
IAN: 114164
Supplier
Please note that the following address is no
service address. First contact the afore-
mentioned Service Centre.
HOYER Handel GmbH
Kühnehöfe 5
22761 Hamburg
Germany
GB
IE
BB&3(B%ERRN6HLWH'LHQVWDJ0DL

14 PL
Spis treci
1. Przegld......................................................................................... 15
2. Zakres uytkowania ...................................................................... 16
3. Zalecenia dotyczce bezpieczestwa .............................................. 17
4. Zakres dostawy ............................................................................. 20
5. Uruchomienie ................................................................................. 20
5.1 Ustawi urzdzenie w pozycji pionowej................................................. 20
5.2 Wkadanie baterii................................................................................ 21
6. Obsuga ......................................................................................... 21
6.1 Wczanie i wyczanie urzdzenia...................................................... 21
6.2 Ustawianie mocy grzewczej.................................................................. 21
6.3 Wybór temperatury.............................................................................. 22
6.4 Ustawianie czasu pracy........................................................................ 22
6.5 Funkcja obrotowa ................................................................................ 22
6.6 Zabezpieczenie przed przegrzaniem ..................................................... 22
6.7 Wycznik bezpieczestwa................................................................... 22
6.8 Czujnik mrozu ..................................................................................... 23
7. Czyszczenie .................................................................................... 23
8. Rozwizywanie problemów ........................................................... 23
9. Utylizacja ....................................................................................... 24
10. Dane techniczne.............................................................................. 25
11. Gwarancja firmy HOYER Handel GmbH .......................................... 25
BB&3(B%ERRN6HLWH'LHQVWDJ0DL

15PL
1. Przegld
1 Panel obsugi
2 Wylot powietrza kratki zabezpieczajcej
3 Cokó
4 Wycznik bezpieczestwa
5 Schowek na pilota
6 Uchwyt
7 Wlot powietrza kratki zabezpieczajcej
8 Czujniki temperatury
9 Wycznik gówny
10 Wywietlacz
11 Przycisk oczekiwania
12 + Zwikszy warto – temperatura/czas
13 + Zmniejszy warto – temperatura/czas
14 Odbiornik podczerwieni
15 Wczanie/wyczanie timera
16 Wczanie/wyczanie funkcji obrotowej
17 Mode Ustawienie trybu pracy
18 Lampka kontrolna
19 Pilot
20 + Zwikszy warto – temperatura/czas
21 Mode Ustawienie trybu pracy
22 - Zmniejszy warto – temperatura/czas
23 Przycisk oczekiwania
24 Wczanie/wyczanie timera
25 Wczanie/wy
czanie funkcji obrotowej
26 Nadajnik podczerwieni
Wskazania na wywietlaczu
27 Funkcja obrotowa jest wczona
28 Tryb automatyczny: Urzdzenie automatycznie dostosowuje moc grzewcz do tem-
peratury pomieszczenia. Urzdzenie wycza si po osigniciu temperatury zada-
nej w pomieszczeniu.
29 Maa moc grzewcza: Urzdzenie pracuje przy mocy 1.000 W
30 Dua moc grzewcza: Urzdzenie pracuje przy mocy 2.000 W
31 Wczony czujnik mrozu
32 Czas pracy
33 Wskanik temperatury pomieszczenia
34 Wskanika ustawionej temperatury zadanej
BB&3(B%ERRN6HLWH'LHQVWDJ0DL

16 PL
Dzikujemy za Pastwa
zaufanie!
Gratulujemy Pastwu zakupu nowego wen-
tylatora ogrzewania.
Aby móc bezpiecznie posugiwa si urz-
dzeniem i pozna cay zakres jego moli-
woci, naley stosowa si do poniszych
wskazówek:
• Przed pierwszym uruchomie-
niem naley dokadnie przeczy-
ta niniejsz instrukcj obsugi.
• Przede wszystkim naley prze-
strzega wskazówek bezpie-
czestwa!
• Urzdzenie wolno obsugiwa
wycznie w sposób opisany w
niniejszej instrukcji obsugi.
• Zachowa instrukcj obsugi,
stanowi ona cz produktu.
• W przypadku przekazania urz-
dzenia innym osobom naley
doczy do niego instrukcj ob-
sugi.
yczymy Pastwu duo zadowolenia z no-
wego wentylatora ogrzewania!
Symbole na urzdzeniu
Nie przykrywa
Symbol obok ostrzega przed
przykrywaniem urzdzenia, po-
niewa powstay zator mocy
grzewczej moe prowadzi do
uszkodzenia lub grozi poarem.
2. Zakres uytkowania
Urzdzenie suy do dodatkowego ogrze-
wania suchych pomieszcze.
Niniejsze urzdzenie jest przeznaczone do
uytku prywatnego i nie moe by uywane
do celów komercyjnych. Urzdzenie mona
stosowa tylko w pomieszczeniach.
Urzdzenie stawia wycznie na pododze.
Moliwe do przewidzenia
nieprawidowe sposoby uycia
RYZYKO POARU!
~ Nigdy nie uywa urzdzenia do su-
szenia odziey i innych rzeczy na, nad
lub przed urzdzeniem.
~ W adnym wypadku nie ustawia rcz-
nie wycznika bezpieczestwa.
~ Urzdzenia nie wolno stosowa w ad-
nych pojazdach.
BB&3(B%ERRN6HLWH'LHQVWDJ0DL

17PL
3. Zalecenia dotyczce
bezpieczestwa
Ostrzeenia
W miejscach wymagajcych zwrócenia uwa-
gi uyto w niniejszej instrukcji obsugi nast-
pujcych wskazówek ostrzegawczych:
NIEBEZPIECZESTWO! Wyso-
kie ryzyko: Zlekcewaenie tego
ostrzeenia moe by przyczyn
szkód na zdrowiu i yciu.
OSTRZEENIE! rednie ryzyko: Zlekcewa-
enie tego ostrzeenia moe by przyczyn
obrae lub strat materialnych.
OSTRONIE: Niskie ryzyko: Zlekcewae-
nie tego ostrzeenia moe by przyczyn
niewielkich obrae lub strat materialnych.
WSKAZÓWKA: Sytuacje i cechy, które
powinny by brane pod uwag podczas
pracy z urzdzeniem.
Wskazówki dotyczce bezpiecznej pracy
~ Trzyma z dala od dzieci poniej 3. roku ycia, chyba e znaj-
duj si one pod staym nadzorem.
~ Urzdzenie moe by uywane przez dzieci powyej 8. roku
ycia i osoby o ograniczonej sprawnoci fizycznej, sensorycznej
lub umysowej bd przez osoby nieposiadajce wystarczajce-
go dowiadczenia lub wiedzy, jeeli s nadzorowane przez in-
ne osoby lub zostan poinstruowane w zakresie bezpiecznego
uywania urzdzenia i zrozumiej wynikajce z tego zagroe-
nia. Dzieci nie mog bawi si urzdzeniem. Czynnoci zwi-
zane z czyszczeniem i konserwacj nie mog by wykonywane
przez dzieci bez odpowiedniego nadzoru.
~ Dzieci w wieku od 3 do 8 lat mog wcza i wycza urz-
dzenie tylko pod nadzorem lub jeeli zostay poinstruowane w
zakresie bezpiecznego uycia urzdzenia i zrozumiay wynika-
jce z niego zagroenia, pod warunkiem, e urzdzenie zosta-
o umieszczone lub zainstalowane w prawidowym pooeniu
uytkowania. Dzieci w wieku od 3 do 8 lat nie mog wkada
wtyczki do gniazdka, regulowa urzdzenia, czyci i/lub prze-
prowadza konserwacji dozwolonej dla uytkownika.
~ Niektóre czci urzdzenia mog si bardzo nagrze-
wa i doprowadzi do poparzenia. Szczególn
ostrono naley zachowa w obecnoci dzieci i
osób wymagajcych opieki.
3/B&3(B+HL]OXHIWHUIP6HLWH'LHQVWDJ0DL

18 PL
~ Urzdzenie jest równie przeznaczone do uywania w gospo-
darstwach i podobnych obiektach, np. …
…w kuchniach dla pracowników w sklepach, biurach oraz in-
nych miejscach zwizanych z prowadzeniem dziaalnoci go-
spodarczej;
…w gospodarstwach rolnych;
…przez klientów w hotelach, motelach i innych instytucjach oferu-
jcych miejsca noclegowe;
…w pensjonatach.
~ Aby unikn przegrzania urzdzenia grzewczego nie naley
go przykrywa.
~ Nigdy nie ustawia urzdzenia bezporednio pod gniazdkiem
elektrycznym w cianie, poniewa emitowane ciepo moe pro-
wadzi do uszkodzenia instalacji elektrycznej.
~ Urzdzenia nigdy nie wolno uywa blisko zlewu, wanny,
prysznica lub umywalki, poniewa woda rozpryskowa moe do-
sta si do urzdzenia.
~ W przypadku uszkodzenia przewodu zasilajcego tego urz-
dzenia naley zleci jego wymian producentowi, jego serwiso-
wi lub osobie o podobnych kwalifikacjach, co pozwoli na unik-
nicie zagroe.
NIEBEZPIECZESTWO dla
dzieci!
~ Materia opakowania nie jest zabawk
dla dzieci. Dzieci nie mog bawi si
workami z tworzywa sztucznego. Istnie-
je niebezpieczestwo uduszenia.
~ Urzdzenie naley przechowywa po-
za zasigiem dzieci.
NIEBEZPIECZESTWO
poraenia prdem
wskutek wilgoci
~ Urzdzenia, przewodu zasilajcego
oraz wtyczki sieciowej nie wolno zanu-
rza w wodzie ani innych cieczach.
~ Urzdzenie naley chroni przed wilgo-
ci, kapic lub rozbryzgiwan wod.
~ W przypadku dostania si cieczy do
urzdzenia naley natychmiast wyci-
gn wtyczk sieciow. Przed ponow-
nym uruchomieniem naley zleci
sprawdzenie urzdzenia.
~ Urzdzenia nie wolno obsugiwa mo-
krymi rkoma.
~ Jeli urzdzenie wpadnie do wody, na-
ley natychmiast wycign wtyczk
sieciow z gniazdka. Dopiero póniej
wyj urzdzenie z wody.
NIEBEZPIECZESTWO
poraenia prdem
~ Wtyczk sieciow naley podcza wy-
cznie do prawidowo zainstalowane-
go i atwo dostpnego gniazdka, które-
go napicie odpowiada danym
umieszczonym na tabliczce znamiono-
wej. Gniazdko musi by atwo dostpne
równie po podczeniu urzdzenia.
3/B&3(B+HL]OXHIWHUIP6HLWH'LHQVWDJ0DL
Seite laden ...
Seite laden ...
Seite laden ...
Seite laden ...
Seite laden ...
Seite laden ...
Seite laden ...
Seite laden ...
Seite laden ...
Seite laden ...
Seite laden ...
Seite laden ...
Seite laden ...
Seite laden ...
Seite laden ...
Seite laden ...
Seite laden ...
Seite laden ...
Seite laden ...
Seite laden ...
Seite laden ...
Seite laden ...
Seite laden ...
Seite laden ...
Seite laden ...
Seite laden ...
Seite laden ...
Seite laden ...
Seite laden ...
Seite laden ...
Seite laden ...
Seite laden ...
Seite laden ...
Seite laden ...
Seite laden ...
Seite laden ...
Seite laden ...
Seite laden ...
Seite laden ...
Seite laden ...
Seite laden ...
Seite laden ...
Seite laden ...
Seite laden ...
Seite laden ...
Seite laden ...
Seite laden ...
Seite laden ...
Seite laden ...
Seite laden ...
Seite laden ...
Seite laden ...
Seite laden ...
Seite laden ...
Seite laden ...
Seite laden ...
Seite laden ...
Seite laden ...
Seite laden ...
Seite laden ...
Seite laden ...
Seite laden ...
Seite laden ...
Seite laden ...
Seite laden ...
Seite laden ...
Seite laden ...
Seite laden ...
Seite laden ...
Seite laden ...
Seite laden ...
Seite laden ...
Seite laden ...
Seite laden ...
-
 1
1
-
 2
2
-
 3
3
-
 4
4
-
 5
5
-
 6
6
-
 7
7
-
 8
8
-
 9
9
-
 10
10
-
 11
11
-
 12
12
-
 13
13
-
 14
14
-
 15
15
-
 16
16
-
 17
17
-
 18
18
-
 19
19
-
 20
20
-
 21
21
-
 22
22
-
 23
23
-
 24
24
-
 25
25
-
 26
26
-
 27
27
-
 28
28
-
 29
29
-
 30
30
-
 31
31
-
 32
32
-
 33
33
-
 34
34
-
 35
35
-
 36
36
-
 37
37
-
 38
38
-
 39
39
-
 40
40
-
 41
41
-
 42
42
-
 43
43
-
 44
44
-
 45
45
-
 46
46
-
 47
47
-
 48
48
-
 49
49
-
 50
50
-
 51
51
-
 52
52
-
 53
53
-
 54
54
-
 55
55
-
 56
56
-
 57
57
-
 58
58
-
 59
59
-
 60
60
-
 61
61
-
 62
62
-
 63
63
-
 64
64
-
 65
65
-
 66
66
-
 67
67
-
 68
68
-
 69
69
-
 70
70
-
 71
71
-
 72
72
-
 73
73
-
 74
74
-
 75
75
-
 76
76
-
 77
77
-
 78
78
-
 79
79
-
 80
80
-
 81
81
-
 82
82
-
 83
83
-
 84
84
-
 85
85
-
 86
86
-
 87
87
-
 88
88
-
 89
89
-
 90
90
-
 91
91
-
 92
92
-
 93
93
-
 94
94


Silvercrest SHLF 2000 B2 Operating Instructions Manual
- Typ
- Operating Instructions Manual
in anderen Sprachen
- slovenčina: Silvercrest SHLF 2000 B2
- polski: Silvercrest SHLF 2000 B2
Verwandte Papiere
-
Silvercrest SFR 37 B1 Operating Instructions Manual
-
-
-
Silvercrest SRR 3.7 B1 Bedienungsanleitung
-
-
-
-
Silvercrest SHBS 600 A1 Operating Instructions Manual
-
-
