HP Deskjet 1280 Printer series Benutzerhandbuch
- Typ
- Benutzerhandbuch

Getting Started Guide
Guide de Mise en Marche
Leitfaden zur
Inbetriebnahme
Beknopte Handleiding
Guida introduttiva
EscherGSG_Europe-UFGDI.book Page 1 Tuesday, September 14, 2004 11:18 AM
π𫫨¨°°ûûààddGG AAóóHH ππ««ddOO

EscherGSG_Europe-UFGDI.book Page 2 Tuesday, September 14, 2004 11:18 AM

1
Copyright Information
© 2005 Copyright Hewlett-Packard Development Company, L.P.
Edition 1, 2/2005
Reproduction, adaptation or translation without prior written
permission is prohibited, except as allowed under the
copyright laws.
The information contained herein is subject to change
without notice.
The only warranties for HP products and services are set forth in
the express warranty statements accompanying such products
and services. Nothing herein should be construed as constituting
an additional warranty. HP shall not be liable for technical or
editorial errors or omissions contained herein.
Trademark Credits
Microsoft
®
and Windows
®
are U.S. registered trademarks of
Microsoft Corporation. All other products mentioned herein may
be trademarks of their respective companies.
Informations sur le copyright
© 2005 Copyright Hewlett-Packard Development Company, L.P.
Édition 1, 2/2005
Toute reproduction, adaptation ou traduction sans autorisation
écrite préalable est interdite, à l’exception de ce qui est autorisé
en vertu des lois sur le copyright.
Les informations contenues dans ce document peuvent faire
l’objet de modifications sans préavis.
Les seules garanties relatives aux produits et services HP sont
exclusivement définies dans les déclarations de garantie qui
accompagnent ces produits et services. Rien de ce qui a pu être
exposé dans la présente ne sera interprété comme constituant
une garantie supplémentaire. HP ne pourra être tenu responsible
des erreurs ou omissions techniques ou éditoriales contenues
dans la présente.
Marques citées
Microsoft
®
, Windows
®
et Windows NT
®
sont des marques
déposées américaines de Microsoft Corporation.Tous les autres
produits mentionnés peuvent être des marques de leurs sociétés
respectives.
Safety Information
Always follow basic safety precautions when using this product to
reduce risk of injury from fire or electric shock.
1 Read and understand all instructions in the documentation that
comes with the printer.
2 Observe all warnings and instructions marked on the product.
3 Unplug this product from wall outlets before cleaning.
4 Do not install or use this product near water, or when
you are wet.
5 Install the product securely on a stable surface.
6 Install the product in a protected location where no one can
step on or trip over the line cord, and the line cord cannot
be damaged.
7 If the product does not operate normally, see Troubleshooting
in the onscreen user’s guide on the Starter CD.
8 There are no user-serviceable parts inside. Refer servicing to
qualified service personnel.
EscherGSG_Europe-UFGDI.book Page 1 Tuesday, September 14, 2004 11:18 AM

2
Consignes de sécurité
Pour éviter les risques de blessures dus aux flammes et aux
chocs électriques, toujours respecter les précautions de sécurité
en utilisant cet appareil.
1 Lisez et comprenez toutes les instructions de la documentation
fournie avec l’imprimante.
2 Respectez tous les avertissements et étiquettes de mise en
garde sur l’imprimante.
3 Débranchez l’imprimante de la prise murale avant de
la nettoyer.
4 N’installez et n’utilisez pas cet appareil à proximité de l’eau,
ou si vous êtes mouillé.
5 Placez l’imprimante bien à plat sur une surface stable.
6 Installez le produit dans un endroit protégé, où personne ne
peut marcher ni trébucher sur le cordon secteur afin de ne pas
endommager le cordon.
7 Si le produit ne fonctionne pas normalement, lisez la section
Dépannage.
8 L’imprimante ne contient pas de pièces réparables par
l’utilisateur. Confiez l’entretien et les réparations de
l’imprimante à des techniciens qualifiés.
Sicherheitsinformationen
Verwenden Sie dieses Produkt zur Vermeidung von Verletzungen
(Feuer und Stromschlag) ausschließlich unter Einhaltung der
allgemeinen Sicherheitsvorschriften.
1 Lesen Sie alle Anweisungen in der mit dem Drucker gelieferten
Dokumentation, und stellen Sie sicher, daß Sie alles
verstehen.
2 Beachten Sie alle am Produkt angebrachten Warnungen
und Anweisungen.
3 Ziehen Sie das Netzkabel aus der Steckdose, bevor Sie das
Produkt reinigen.
4 Installieren bzw. verwenden Sie das Produkt nicht in der Nähe
von Wasser. Verwenden Sie das Produkt nicht, wenn Sie
naß sind.
5 Installieren Sie das Produkt auf einer stabilen Oberfläche.
6 Installieren Sie das Produkt an einem geschützten Ort, an dem
die Kabel weder betreten noch beschädigt werden können.
7 Wenn das Produkt nicht normal funktioniert, schlagen Sie
unter “Fehlersuche” nach.
8 Im Innern des Druckers gibt es keine kundenseitig wartbaren
Teile. Vergeben Sie Servicearbeiten ausschließlich an
qualifiziertes Personal.
Veiligheidsinformatie
Neem bij gebruik van dit product altijd de elementaire
voorzorgsmaatregelen in acht om de kans op letsel te beperken
1 Zorg dat u alle instructies in de documentatie die bij de printer
geleverd wordt, heeft gelezen en begrepen.
2 Neem alle op dit product vermelde waarschuwingen en
instructies in acht.
3 Haal het netsnoer uit het stopcontact voordat u dit
product reinigt.
4 Plaats of gebruik dit product niet in de buurt van water en zorg
dat u niet nat bent als u het product gebruikt.
5 Zorg dat het product stevig op een stabiel oppervlak staat.
6 Zet het product op een veilige plaats waar niemand op het
netsnoer kan trappen of erover kan struikelen en het netsnoer
niet wordt beschadigd.
7 Als het product niet naar behoren functioneert, zie dan
Problemen oplossen.
8 De printer bevat geen onderdelen die door de gebruiker
kunnen worden gerepareerd. Onderhoud en reparaties moeten
worden verricht door gekwalificeerde onderhoudstechnici.
Informazioni sulla sicurezza
Per utilizzare questo prodotto, attenersi sempre alle precauzioni
di base sulla sicurezza onde evitare il rischio di lesioni da incendio
o folgorazione.
1 Leggere e comprendere bene tutte le istruzioni contenute nella
documentazione in dotazione con la stampante.
2 Osservare tutti i messaggi di avvertenza e le istruzioni riportate
sul prodotto.
3 Scollegare il prodotto dalla presa di rete prima di pulirlo.
4 Non installare o usare questo prodotto in prossimità di acqua o
se è bagnato.
5 Installare il prodotto in modo sicuro e su una superficie stabile.
6 Installare il prodotto in un punto protetto, in cui non si corra il
rischio di inciampare nel cavo di alimentazione e in cui il cavo
non possa venire essere danneggiato.
7 In caso di problemi di funzionamento, consultare la sezione
Risoluzione dei problemi.
8 All’interno della stampante non vi sono parti riparabili
dall’utente. Rivolgersi pertanto al personale di assistenza
qualificato.
EscherGSG_Europe-UFGDI.book Page 2 Tuesday, September 14, 2004 11:18 AM

English
Deutsch
Français
Nederlands
Italiano
3
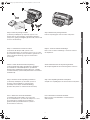
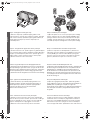
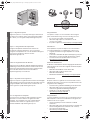
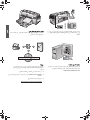
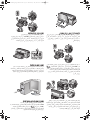
Step 1: Check the package contents.
1) HP Deskjet 1280 printer, 2) output tray, 3) power cord,
4) black and color print cartridges, 5) printed documentation
(setup poster, getting started guide), 6) Starter CD (software and
electronic documentation).
Step 2: Remove the packing materials.
Remove all packing tapes from the inside of the printer.
1
2
3
4
6
5
Etape 1 : vérification du contenu du carton.
1) imprimante HP Deskjet 1280, 2) bac de sortie,
3) cordon d’alimentation, 4) cartouches d’encre noire et couleur,
5) documentation imprimée (carte d’installation, guide de mise en
marche), 6) CD de démarrage (logiciel et documentation
électronique).
Etape 2 : retrait du matériel d’emballage.
Retirez tous les rubans d’emballage se trouvant à l’intérieur
de l’imprimante.
Schritt 1: Prüfen Sie den Inhalt der Verpackung.
1) Drucker HP Deskjet 1280 2) Ausgabefach, 3) Netzkabel,
4) Schwarzdruck- und Farbdruckpatronen, 5) Gedruckte
Dokumentation (Faltblatt mit Installationshinweisen, Leitfaden
zur Inbetriebnahme), 6) Starter-CD (Dokumentation für Software
und Elektronik).
Schritt 2: Entfernen Sie das Verpackungsmaterial.
Alle Verpackungsklebestreifen im Druckergehäuse entfernen.
Stap 1: de inhoud van de verpakking controleren.
1) HP Deskjet 1280 printer, 2) uitvoerbak, 3) netsnoer,
4) zwarte en kleureninktpatroon, 5) documentatie
(installatieposter, beknopte installatiehandleiding),
6) Starter-CD (software en elektronische documentatie).
Stap 2: het verpakkingsmateriaal verwijderen.
Verwijder het verpakkingstape aan de binnenkant van de printer.
Fase 1: Verificare il contenuto dell’imballo.
1) Stampante HP Deskjet 1280, 2) vassoio di uscita,
3) cavo di alimentazione, 4) cartucce di stampa nero e colori,
5) documentazione stampati (poster installazione,
guida introduttiva), 6) CD di avviamento (software e
documentazione elettronica).
Fase 2: Rimuovere il materiale di imballo.
Rimuovere tutti i nastri dell’imballo contenuti all’interno
della stampante.
EscherGSG_Europe-UFGDI.book Page 3 Tuesday, September 14, 2004 11:18 AM

English
Deutsch
Français
Nederlands
Italiano
4
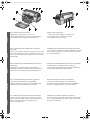
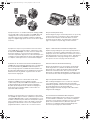
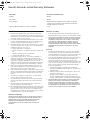
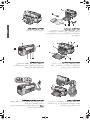
Step 3: Identify printer parts (front).
1) Output tray, 2) paper guide, 3) access cover,
4) Print Cartridge light, 5) Cancel button, 6) Resume button,
7) Power button, 8) postcard guide, 9) main paper tray.
Identify printer parts (back).
1) Universal serial bus (USB) port, 2) parallel port,
3) rear manual feed, 4) removable panel knob,
5) removable panel, 6) power input.
1
2
3
4
5
6
7
98
1
2
3
4
5
6
Etape 3 : identification des éléments de l’imprimante
(face avant).
1) bac de sortie, 2) guides du papier, 3) capot d’accès, 4) voyant
de cartouche d’impression, 5) bouton d’annulation, 6) bouton de
reprise, 7) bouton d’alimentation, 8) guide pour cartes postales,
9) bac principal.
identification des éléments de l’imprimante (face arrière).
1) port USB, 2) port parallèle, 3) module d’alimentation manuelle
arrière, 4) bouton de panneau amovible, 5) panneau amovible,
6) entrée d’alimentation.
Schritt 3: Sehen Sie sich die Einzelteile des Druckers an
(Vorderseite).
1) Ausgabefach, 2) Papierführungen, 3) Gerätedeckel,
4) Druckpatronenleuchte, 5) Cancel-Taste, 6) Resume-Taste,
7) Netzschalter, 8) Postkartenführung, 9) Hauptpapierfach.
Sehen Sie sich die Einzelteile des Druckers an (Rückseite).
1) USB-Anschluss, 2) Parallelanschluss, 3) Hinterer
manueller Einzug, 4) Drehknauf für abnehmbare Abdeckung,
5) Abnehmbare Abdeckung, 6) Netzanschluss.
Stap 3: de printeronderdelen controleren (voorkant).
1) uitvoerbak, 2) papiergeleiders, 3) toegangsklep,
4) inktpatroonlampje, 5) knop Annuleren, 6) knop Doorgaan,
7) Aan/Uit-knop, 8) briefkaartgeleider, 9) hoofdlade.
De printeronderdelen controleren (achterkant).
1) Universal serial bus (USB)-poort, 2) parallelle poort,
3) handinvoer aan de achterkant, 4) knop van verwijderbaar
paneel, 5) verwijderbaar paneel, 6) stroomaansluiting.
Fase 3: Identificare le parti della stampante (anteriore).
1) Vassoio di uscita, 2) guide carta, 3) coperchio di accesso,
4) spia Cartuccia di stampa, 5) pulsante Annulla, 6) pulsante
Riavvia, 7) pulsante Accensione, 8) guida cartoline,
9) vassoio principale carta.
Identificare le parti della stampante (posteriore).
1) Porta USB, 2) porta parallela, 3) alimentazione manuale dal
retro, 4) manopola pannello removibile, 5) pannello removibile,
6) ingresso alimentazione.
EscherGSG_Europe-UFGDI.book Page 4 Tuesday, September 14, 2004 11:18 AM

5
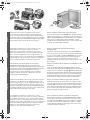
Step 4: Install the output tray.
1) Unpack the output tray. 2) Align the guides on the output tray
with the grooves on the printer. 3) Push in to lock the left side
of the tray, then the right side. 4) Lower the tray to its
horizontal position.
Step 5: Connect the power cord and turn on the printer.
1) Connect the power cord to the printer and an alternating
current (AC) power receptacle. 2) Press the Power button to
turn on the printer. Note: Only connect the printer to the
computer when you have completed the software installation
or when prompted to do so during installation.
Etape 4 : installation du bac de sortie.
1) Déballez le bac de sortie. 2) Alignez les guides du bac de sortie
sur les rainures de l’imprimante. 3) Poussez afin de verrouiller
le côté gauche, puis le côté droit du bac. 4) Abaisser le bac
à l’horizontale.
Etape 5 : branchement du cordon d’alimentation et mise sous
tension de l’imprimante.
1) Branchez le cordon d’alimentation sur l’imprimante et sur
une prise de courant alternatif. 2) Appuyez sur le bouton
d’alimentation pour mettre l’imprimante sous tension.
Remarque : Ne connectez l’imprimante à l’ordinateur qu’après
avoir terminé d’installer le logiciel ou lorsque le système invite
à le faire au cours de l’installation.
Schritt 4: Bringen Sie das Ausgabefach an.
1) Packen Sie das Ausgabefach aus. 2) Passen Sie die
Führungen am Ausgabefach in die Aussparungen am Drucker ein.
3) Drücken Sie das Fach zum Arretieren erst links und dann
rechts ein. 4) Schwenken Sie das Fach nach unten bis
in Horizontallage.
Schritt 5: Schließen Sie das Netzkabel an und schalten Sie
den Drucker ein.
1) Schließen Sie das Netzkabel an den Drucker und an eine
Steckdose für Wechselspannung an. 2) Drücken Sie den
Netzschalter, um den Drucker in Betrieb zu setzen.
Hinweis: Verbinden Sie den Drucker erst dann mit dem Rechner,
wenn Sie die Installation der Software abgeschlossen haben oder
wenn Sie während der Installation dazu aufgefordert werden.
Stap 4: de uitvoerbak plaatsen.
1) Pak de uitvoerbak uit. 2) Plaats de geleiders op de uitvoerbak in
één lijn met de groeven op de printer. 3) Duw eerst de linkerkant
en dan de rechterkant van de bak in de printer om de bak te
vergrendelen. 4) Laat de bak in de horizontale positie zakken.
Stap 5: het netsnoer aansluiten en de printer aanzetten.
1) Sluit het netsnoer aan op de printer en op een stopcontact met
wisselstroom (AC). 2) Druk op de Aan/Uit-knop
om de printer aan te zetten. N.B.: sluit de printer pas aan
op de computer nadat u de software heeft geïnstalleerd
of tijdens de installatie hiervan, als de computer u dit vraagt.
Fase 4: Installare il vassoio di uscita.
1) Togliere dall’imballo il vassoio di uscita. 2) Allineare le guide del
vassoio di uscita con le scanalature della stampante. 3) Spingere
fino a bloccare il lato sinistro del vassoio, quindi il lato destro.
4) Abbassare il vassoio in posizione orizzontale.
Fase 5: Collegare il cavo di alimentazione e accendere
la stampante.
1) Collegare il cavo di alimentazione alla stampante e a una
presa elettrica a corrente alternata (CA). 2) Premere il pulsante
Accensione per accendere la stampante. Nota: Collegare la
stampante al computer solo dopo aver terminato l’installazione
del software o quando richiesto durante l’installazione.
EscherGSG_Europe-UFGDI.book Page 5 Tuesday, September 14, 2004 11:18 AM

English
Deutsch
Français
Nederlands
Italiano
6
Step 6: Load paper in main paper tray.
1) Raise the output tray. 2) Slide the paper guides to their
outmost positions. 3) Insert up to 150 sheets of paper, print-side
down, into the main tray. 4) Slide the paper guides until they fit
snugly against the paper. 5) Lower the output tray to its
horizontal position.
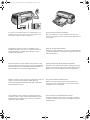
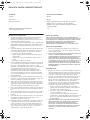
Step 7: Install the print cartridges.
1) Open the printer access cover. 2) Lift up the print cartridge
latches. 3) Remove the color print cartridge (C6578) from its
package, and then remove the protective tape from the print
cartridge. 4) Insert and push the color print cartridge into the
left cradle. 5) Snap the cartridge latch onto the print cartridge.
1
2
3
2
Etape 6 : chargement du papier dans le bac principal.
1) Soulevez le bac de sortie. 2) Faites glisser les guides du papier
en les écartant le plus possible. 3) Introduisez jusqu’à 150 feuilles
de papier (ou 10 transparents) dans le bac. 4) Faites glisser les
guides jusqu’à ce qu’ils soient bien ajustés contre le papier.
5) Abaisser le bac de sortie à l’horizontale.
Etape 7 : installation des cartouches d’impression.
1) Ouvrez le capot d’accès de l’imprimante. 2) Soulevez les
loquets des cartouches d’impression. 3) Déballez la cartouche
couleur (C6578), puis retirez le ruban adhésif la protégeant.
4) Insérez et poussez la cartouche couleur dans le logement
gauche. 5) Refermez le loquet sur la cartouche couleur.
Schritt 6: Legen Sie Papier in das Hauptpapierfach ein.
1) Schwenken Sie das Ausgabefach nach oben. 2) Schieben Sie
die Papierführungen ganz nach außen. 3) Legen Sie bis zu 150
Blatt Papier (oder 10 Transparentfolien) in das Fach. 4) Schieben
Sie die Papierführungen bis zum Anschlag gegen das Papier.
5) Schwenken Sie das Ausgabefach nach unten in Horizontallage.
Schritt 7: Setzen Sie die Druckpatronen ein.
1) Öffnen Sie die Geräteabdeckung des Druckers. 2) Klappen Sie
die Arretierungen der Druckpatronen hoch. 3) Nehmen Sie die
Farbdruckpatrone (C6578) aus der Verpackung und ziehen
Sie die Schutzfolie von der Druckpatrone ab. 4) Setzen Sie die
Druckpatrone in die linke Halterung und rasten Sie die Patrone
ein. 5) Klappen Sie die Arretierung über die Patrone und rasten
Sie die Arretierung ein.
Stap 6: papier in de hoofdlade plaatsen.
1) Til de uitvoerbak op. 2) Schuif de papiergeleiders zover
mogelijk naar buiten. 3) Plaats maximaal 150 vel papier (of
10 transparanten) in de lade. 4) Schuif de papiergeleiders
goed tegen het papier aan. 5) Laat de uitvoerbak
zakken in de horizontale positie.
Stap 7: de inktpatronen aanbrengen.
1) Open de toegangsklep van de printer. 2) Duw de grendels
van de inktpatronen omhoog. 3) Verwijder de kleureninktpatroon
(C6578) uit de verpakking en verwijder vervolgens de
beschermtape van de inktpatroon. 4) Duw de kleureninktpatroon
in de linker patroonhouder. 5) Vergrendel de inktpatroon met
de grendel.
Fase 6: Caricare la carta nel vassoio principale.
1) Sollevare il vassoio di uscita. 2) Far scorrere le guide della
carta fino alla loro posizione estrema. 3) Inserire fino a 150 fogli
di carta (o 10 lucidi) nel vassoio. 4) Far scorrere le guide del
supporto di stampa finché si appoggiano contro la carta.
5) Abbassare il vassoio di uscita in posizione orizzontale.
Fase 7: Installare le cartucce di stampa.
1) Aprire il coperchio di accesso della stampante. 2) Sollevare
i fermi delle cartucce di stampa. 3) Togliere dal suo imballo la
cartuccia a colori (C6578), quindi rimuovere il nastro protettivo
dalla cartuccia. 4) Inserire e spingere la cartuccia di stampa a
colori nel supporto di sinistra. 5) Chiudere il fermo sulla cartuccia.
EscherGSG_Europe-UFGDI.book Page 6 Tuesday, September 14, 2004 11:18 AM

7
6) Repeat steps 3 to 5 to install the black print cartridge (51645)
into the right cradle. 7) Close the printer cover. Note: Both print
cartridges must be correctly installed for the printer to work.
The printer aligns the print cartridges and prints an alignment
page. If no alignment page prints, check to ensure there is paper
in the tray.
Step 8: Test the printer setup.
Print the diagnostic page to test that the printer is set up correctly.
1) Turn on the power of your printer. 2) Press and hold down
the Power button and press the Resume button four times.
3) Release the Power button. Your printer prints a diagnostic
page. You may like to keep this page for future reference.
6) Répétez les étapes 3 à 5 pour installer la cartouche d’encre
noire (51645) dans le logement de droite. 7) Refermez le capot
de l’imprimante. Remarque : Les deux cartouches d’impression
doivent être installées correctement pour que l’imprimante
fonctionne. L’imprimante aligne alors les cartouches d’impression
et imprime une page d’alignement. Si aucune page d’alignement
ne s’imprime, vérifiez que les bacs contiennent bien du papier.
Etape 8 : vérification de l’installation de l’imprimante.
Imprimez la page de diagnostic pour vérifier que l’imprimante a
été installée correctement. 1) Mettez l’imprimante sous tension.
2) Appuyez sur le bouton d’alimentation et maintenez-le enfoncé,
puis appuyez quatre fois sur le bouton de reprise. 3) Relâchez le
bouton d’alimentation. Une page de diagnostic est imprimée.
Vous pouvez conserver cette page à titre de référence.
6) Wiederholen Sie zum Einsetzen der Schwarzdruckpatrone
(51645) in die rechte Halterung die Schritte 3 bis 5. 7) Schließen
Sie die Druckerabdeckung. Hinweis: Beide Druckpatronen
müssen richtig eingesetzt sein, damit der Drucker arbeitet. Der
Drucker richtet die Druckpatronen aus und druckt eine Probeseite.
Wird keine Probeseite gedruckt, vergewissern Sie sich, dass
Papier im Fach eingelegt ist.
Schritt 8: Prüfen Sie die Druckereinrichtung.
Drucken Sie die Diagnoseseite, um zu prüfen, ob der Drucker
korrekt eingerichtet ist. 1) Schalten Sie den Drucker mit dem
Netzschalter aus. 2) Halten Sie den Netzschalter gedrückt und
drücken Sie viermal die Resume-Taste. 3) Lassen Sie den
Netzschalter los. Daraufhin gibt der Drucker eine Diagnoseseite
aus. Sie können diese Seite für Vergleichszwecke aufbewahren.
6) Herhaal stap 3 t/m 5 voor de installatie van de zwarte
inktpatroon (51645) in de rechter inktpatroonhouder.
7) Sluit de klep van de printer. N.B.: beide inktpatronen moeten
goed geïnstalleerd zijn om de printer te kunnen gebruiken.
De printer lijnt de inktpatronen uit en drukt een testpagina af.
Als de printer geen testpagina afdrukt, controleer dan of er
papier in de lade aanwezig is.
Stap 8: de printerinstallatie controleren.
Druk een diagnostiekpagina af om te controleren of de printer
correct geïnstalleerd is. 1) Zet de printer aan. 2) Houd de
Aan/Uit-knop ingedrukt en druk vier maal op de knop Doorgaan.
3) Laat de Aan/Uit-knop los. De printer drukt een
diagnostiekpagina af. Bewaar de pagina zodat u deze indien
nodig later kunt raadplegen.
6) Ripetere le operazioni da 3 a 5 per installare la cartuccia del
nero (51645) nel supporto di destra. 7) Chiudere il coperchio della
stampante. Nota: Entrambe le cartucce di stampa devono essere
installate correttamente per far funzionare la stampante. A questo
punto la stampante allinea le cartucce di stampa e stampa una
pagina di prova allineamento. Se non viene stampata alcuna
pagina di allineamento, verificare che ci sia carta nel vassoio.
Fase 8: Verificare l’installazione della stampante.
Stampare la pagina diagnostica per verificare che la stampante
sia stata installata correttamente. 1) Accendere la stampante.
2) Premere e tenere premuto il pulsante Accensione e premere
quattro volte il pulsante Riavvia. 3) Rilasciare il pulsante
Accensione. La stampante stampa una pagina diagnostica.
Conservare questa pagina per riferimenti futuri.
EscherGSG_Europe-UFGDI.book Page 7 Tuesday, September 14, 2004 11:18 AM

English
Deutsch
Français
Nederlands
Italiano
8
If the printer does not print, check that the power cord is
connected firmly, the print cartridges are properly installed,
the top cover of the printer is closed, and the removable panel
(located at the printer’s back) is tightly pushed into the slot and the
knob is in the lock position. Try printing the diagnostic page again.
If this still fails, call your nearest HP customer support.
Step 9: Install the software and connect the printer.
Insert the Starter CD into the CD-ROM drive, and then follow the
appropriate procedure for your operating system and connection
(USB or parallel). Note: Only connect the printer to the computer
when you have completed the software installation or when
prompted to do so during installation. Also, connect only the cable
you have selected during the installation.
Si l’imprimante n’imprime pas, assurez-vous que le cordon
d’alimentation a bien été enfoncé, que les cartouches
d’impression ont été installées correctement, que le capot
supérieur de l’imprimante est fermé, que le panneau amovible
(situé à l’arrière de l’imprimante) a bien été poussé dans son
logement et que le bouton est verrouillé. Réessayez d’imprimer la
page de diagnostic. Si cette deuxième tentative se solde par un
échec, contactez l’assistance clientèle HP la plus proche.
Etape 9 : installation du logiciel et branchement
de l’imprimante.
Introduisez le CD de démarrage dans le lecteur de CD-ROM et
suivez les instructions données pour votre système d’exploitation
et votre connexion (USB ou parallèle). Remarque : Ne connectez
l’imprimante à l’ordinateur qu’après avoir terminé d’installer le
logiciel ou lorsque le système invite à le faire au cours de
l’installation. Par ailleurs, n’utilisez que le câble spécifié au cours
de l’installation.
Falls der Drucker nicht druckt, prüfen Sie, ob folgende
Bedingungen erfüllt sind: Netzkabel fest angeschlossen,
Druckpatronen ordnungsgemäß eingebaut, oberer Gerätedeckel
des Druckers geschlossen und abnehmbare Abdeckung (auf der
Rückseite des Druckers) fest eingedrückt und arretiert.
Versuchen Sie noch einmal, die Diagnoseseite zu drucken.
Schlägt auch dieser Versuch fehl, wenden Sie sich an den
nächstgelegenen HP Kundendienst.
Schritt 9: Installieren Sie die Software und schließen Sie den
Drucker an.
Legen Sie die Starter-CD in das CD-ROM-Laufwerk ein und
folgen Sie der Anleitung für das jeweilige Betriebssystem und den
richtigen Anschluss (USB oder parallel). Hinweis: Verbinden Sie
den Drucker erst dann mit dem Rechner, wenn Sie die Installation
der Software abgeschlossen haben oder wenn Sie während der
Installation dazu aufgefordert werden. Schließen Sie außerdem
nur das Kabel an, das Sie bei der Installation gewählt haben.
Als de printer niet afdrukt, controleer dan of het netsnoer goed is
aangesloten, of de inktpatronen goed geïnstalleerd zijn, of de
bovenste klep gesloten is en of het verwijderbare paneel (aan de
achterkant van de printer) goed in de opening is geplaatst en of
de knop is vergrendeld. Probeer opnieuw een diagnostiekpagina
af te drukken. Lukt dit nog niet, neem dan contact op met het HP
klantenondersteuningscentrum bij u in de buurt.
Stap 9: de software installeren en de printer aansluiten.
Plaats de Starter-CD in het cd-romstation en volg de procedure
voor het besturingssysteem en de aansluiting (USB of parallel) die
u gebruikt. N.B.: sluit de printer pas aan op de computer nadat
u de software heeft geïnstalleerd of tijdens de installatie hiervan,
als de computer u dit vraagt. Sluit uitsluitend de kabel aan die u
tijdens de installatie heeft geselecteerd.
Se la stampante non funziona, controllare che il cavo di
alimentazione sia inserito e ben saldo, che le cartucce di stampa
siano installate correttamente, che il coperchio superiore della
stampante sia chiuso e che il pannello removibile (sul retro della
stampante) sia ben spinto nella relativa fessura e che la manopola
sia in posizione di bloccaggio. Riprovare a stampare la pagina
diagnostica. Se la stampante continua a non funzionare,
contattare il centro di assistenza HP più vicino.
Fase 9: Installare il software e collegare la stampante.
Inserire il CD di avviamento nell’unità CD-ROM, quindi seguire
la procedura confacente il sistema operativo e la connessione in
uso (USB o parallela). Nota: Collegare la stampante al computer
solo dopo aver terminato l’installazione del software, o quando
richiesto durante l’installazione. Collegare inoltre soltanto il cavo
selezionato durante l’installazione.
EscherGSG_Europe-UFGDI.book Page 8 Tuesday, September 14, 2004 11:18 AM

9
If you have connected the printer to the computer before you
install the software, refer to the onscreen user’s guide on the
Starter CD to complete the printer installation.
Step 10: Test the software installation.
After you complete the software installation and connect the
printer to the computer, print a document from an application you
use frequently.
Si l’imprimante était déjà connectée à l’ordinateur lors de
l’installation du logiciel, reportez-vous au guide de l’utilisateur
en ligne disponible sur le CD de démarrage pour terminer
l’installation de l’imprimante.
Etape 10 : test du logiciel installé.
Après avoir terminé d’installer le logiciel et raccordé l’imprimante
à l’ordinateur, imprimez un document d’une application que vous
utilisez fréquemment.
Falls Sie den Drucker vor dem Installieren der Software an den
Rechner angeschlossen haben, gehen Sie zum Fertigstellen der
Druckereinrichtung nach der Anleitung im Benutzerhandbuch vor
(dieses Handbuch ist auf der Starter-CD gespeichert).
Schritt 10: Prüfen Sie die Installation der Software.
Nachdem Sie die Installation der Software fertiggestellt und den
Drucker an den Rechner angeschlossen haben, drucken Sie ein
Dokument aus einer Anwendung, mit der Sie häufig arbeiten.
Wanneer u de printer op de computer heeft aangesloten, maar de
software nog niet heeft geïnstalleerd, raadpleeg dan de
elektronische gebruikershandleiding van de Starter-CD om de
printerinstallatie te voltooien.
Stap 10: de software-installatie testen.
Nadat u de software heeft geïnstalleerd en de printer heeft
aangesloten op de computer drukt u een document af vanuit
een applicatie die u vaak gebruikt.
Se la stampante è stata collegata al computer prima di aver
installato il software, seguire le istruzioni della guida utente del
CD di avviamento visualizzate sullo schermo per completare
l’installazione della stampante.
Fase 10: Verificare l’installazione del software.
Terminata l’installazione del software e collegata la stampante
al computer, stampare un documento da un’applicazione usata
frequentemente.
EscherGSG_Europe-UFGDI.book Page 9 Tuesday, September 14, 2004 11:18 AM

English
Deutsch
Français
Nederlands
Italiano
10
Step 11: Register the printer.
Register the printer to receive important support and technical
information. If you did not register your printer while installing
the software, you can register at http://www.register.hp.com.
Congratulations!
Your printer is ready to use. For information about using the
printer and troubleshooting, refer to the following resources:
• the onscreen user’s guide on the Starter CD
• HP Instant Support (For more information, see the
onscreen user’s guide.)
• the product support site at http://www.hp.com/support/dj1280
Etape 11 : enregistrement de l’imprimante.
Enregistrez l’imprimante afin d’obtenir de l’aide et des
informations techniques importantes. Si vous n’avez pas
enregistré votre imprimante au cours de l’installation du logiciel,
vous pouvez l’enregistrer à l’adresse suivante :
http://www.register.hp.com.
Félicitations !
Votre imprimante est prête à l’emploi. Pour toute information
concernant l’imprimante et son dépannage, reportez-vous :
• au guide de l’utilisateur en ligne disponible sur le CD de
démarrage
• à l’assistance immédiate HP (HP Instant Support) (pour plus
d’informations, consultez le guide de l’utilisateur en ligne).
• au site d’assistance du produit à l’adresse suivante :
http://www.hp.com/support/dj1280
Schritt 11: Registrieren Sie den Drucker.
Registrieren Sie den Drucker, damit Sie Kundenunterstützung
und wichtige technische Informationen erhalten. Falls Sie den
Drucker nicht beim Installieren der Software registriert haben,
können Sie dies über das Internet unter der Adresse
http://www.register.hp.com nachholen.
Herzlichen Glückwunsch!
Ihr Drucker ist betriebsbereit. Für den Umgang mit dem Drucker
und zur Fehlersuche stehen Ihnen folgende Informationsquellen
zur Verfügung:
• Online-Benutzerhandbuch auf der Starter-CD
• HP Instant Support (näheres hierzu siehe
Online-Benutzerhandbuch)
• Kundendienst-Website http://www.hp.com/support/dj1280
Stap 11: de printer on line registreren.
Registreer de printer om gebruik te kunnen maken van belangrijke
ondersteuning en technische informatie. Als u de printer niet heeft
geregistreerd tijdens de installatie van de software kunt u de
printer registreren op http://www.register.hp.com.
Gefeliciteerd!
De printer is klaar voor gebruik. Voor meer informatie over het
gebruik van de printer en het oplossen van problemen kunt u de
volgende bronnen raadplegen:
• de elektronische gebruikershandleiding van de Starter-CD
• HP Instant Support (Voor meer informatie kunt u de
elektronische gebruikershandleiding raadplegen.)
• de website voor productondersteuning
http://www.hp.com/support/dj1280
Fase 11: Registrare la stampante.
Per poter ricevere un supporto e delle informazioni tecniche
importanti è necessario effettuare la registrazione della
stampante. Se la stampante non viene registrata durante
l’installazione del software, la registrazione può essere
effettuata all’indirizzo http://www.register.hp.com.
Congratulazioni!
La vostra stampante è pronta per l’uso. Per informazioni sull’uso
della stampante e sulla ricerca ed eliminazione dei guasti, fare
riferimento alle risorse seguenti:
• istruzioni di guida per l’utente visualizzate sul CD di
avviamento
• HP Instant Support (per ulteriori informazioni si rimanda alle
istruzioni della guida utente visualizzate sullo schermo.)
• sito di assistenza del prodotto
http://www.hp.com/support/dj1280
EscherGSG_Europe-UFGDI.book Page 10 Tuesday, September 14, 2004 11:18 AM

11
Hewlett-Packard Limited Warranty Statement
Extent of Limited Warranty
1 Hewlett-Packard warrants to the end-user customer that the HP
products specified above will be free from defects in materials and
workmanship for the duration specified above, which duration begins
on the date of purchase by the customer.
2 For software products, HP's limited warranty applies only to a failure
to execute programming instructions. HP does not warrant that the
operation of any product will be uninterrupted or error free.
3 HP's limited warranty covers only those defects that arise as a result
of normal use of the product, and does not cover any other problems,
including those that arise as a result of:
a Improper maintenance or modification;
b Software, media, parts, or supplies not provided or supported by
HP;
c Operation outside the product's specifications.
d Unauthorized modification or misuse.
4 For HP printer products, the use of a non-HP print cartridge or a
refilled print cartridge does not affect either the warranty to the
customer or any HP support contract with the customer. However, if
printer failure or damage is attributable to the use of a non-HP or
refilled print cartridge, HP will charge its standard time and materials
charges to service the printer for the particular failure or damage.
5 If HP receives, during the applicable warranty period, notice of a
defect in any product which is covered by HP's warranty, HP shall
either repair or replace the product, at HP's option.
6 If HP is unable to repair or replace, as applicable, a defective product
which is covered by HP's warranty, HP shall, within a reasonable time
after being notified of the defect, refund the purchase price for the
product.
7 HP shall have no obligation to repair, replace, or refund until the
customer returns the defective product to HP.
8 Any replacement product may be either new or like new, provided
that it has functionality at least equal to that of the product being
replaced.
9 HP products may contain remanufactured parts, components, or
materials equivalent to new in performance.
10 HP's Limited Warranty Statement is valid in any country/region where
the covered HP product is distributed by HP. Contracts for additional
warranty services, such as on-site service, are available from any
authorized HP service facility in countries/regions where the product
is distributed by HP or by an authorized importer.
Limitations of Warranty
TO THE EXTENT ALLOWED BY LOCAL LAW, NEITHER HP NOR ITS
THIRD PARTY SUPPLIERS MAKES ANY OTHER WARRANTY OR
CONDITION OF ANY KIND, WHETHER EXPRESS OR IMPLIED
WARRANTIES OR CONDITIONS OF MERCHANTABILITY,
SATISFACTORY QUALITY, AND FITNESS FOR A PARTICULAR
PURPOSE.
Limitations of Liability
1 To the extent allowed by local law, the remedies provided in this
Warranty Statement are the customeris sole and exclusive remedies.
2 TO THE EXTENT ALLOWED BY LOCAL LAW, EXCEPT FOR THE
OBLIGATIONS SPECIFICALLY SET FORTH IN THIS WARRANTY
STATEMENT, IN NO EVENT SHALL HP OR ITS THIRD PARTY
SUPPLIERS BE LIABLE FOR DIRECT, INDIRECT, SPECIAL,
INCIDENTAL, OR CONSEQUENTIAL DAMAGES, WHETHER
BASED ON CONTRACT, TORT, OR ANY OTHER LEGAL THEORY
AND WHETHER ADVISED OF THE POSSIBILITY OF SUCH
DAMAGES.
Local Law
1 This Warranty Statement gives the customer specific legal rights.
The customer may also have other rights which vary from state to
state in the United States, from province to province in Canada, and
from country/region to country/region elsewhere in the world.
2 To the extent that this Warranty Statement is inconsistent with local
law, this Warranty Statement shall be deemed modified to be
consistent with such local law. Under such local law, certain
disclaimers and limitations of this Warranty Statement may not apply
to the customer. For example, some states in the United States, as
well as some governments outside the United States (including
provinces in Canada), may:
a Preclude the disclaimers and limitations in this Warranty
Statement from limiting the statutory rights of a customer (e.g. the
United Kingdom);
b Otherwise restrict the ability of a manufacturer to enforce such
disclaimers or limitations; or
c Grant the customer additional warranty rights, specify the
duration of implied warranties which the manufacturer cannot
disclaim, or allow limitations on the duration of implied warranties.
3 FOR CONSUMER TRANSACTIONS IN AUSTRALIA AND NEW
ZEALAND, THE TERMS IN THIS WARRANTY STATEMENT,
EXCEPT TO THE EXTENT LAWFULLY PERMITTED, DO NOT
EXCLUDE, RESTRICT, OR MODIFY, AND ARE IN ADDITION TO,
THE MANDATORY STATUTORY RIGHTS APPLICABLE TO THE
SALE OF THE HP PRODUCTS TO SUCH CUSTOMERS.
HP product Duration of Limited Warranty
Software 90 days
Accessories 90 days
Print cartridges Until the HP print cartridge has been depleted of HP ink,
or until the “end of warranty” date printed on the HP print
cartridge, whichever occurs first
Printer peripheral hardware (see below for details) 1 year
EscherGSG_Europe-UFGDI.book Page 11 Tuesday, September 14, 2004 11:18 AM

12
Garantie limitée Hewlett-Packard
Etendue de la Garantie limitée
1 Hewlett-Packard garantit à l’utilisateur final que les produits HP
spécifiés précédemment ne comporteront aucun défaut de
fabrication ou de matériau pendant la période précisée ci-dessus, à
compter de la date d’achat par le client.
2 Pour les produits logiciels, la Garantie limitée HP ne s’applique qu’à
l’impossibilité d’exécuter des instructions de programmation. HP ne
garantit pas le fonctionnement ininterrompu ou sans erreur de ses
produits.
3 La Garantie limitée HP couvre uniquement les défauts détectés dans
le cadre d’une utilisation normale du produit. Elle ne couvre donc
aucun autre problème, quel qu’il soit, dû aux raisons suivantes :
a maintenance ou modification inadéquates ;
b logiciels, supports, pièces ou fournitures non fournis ni pris en
charge par HP ;
c utilisation non conforme aux spécifications indiquées pour le
produit ;
d modification non autorisée ou abusive.
4 Pour les imprimantes HP, l’utilisation de cartouches d’encre non HP
ou de cartouches d’encre reconditionnées n’affecte ni la garantie au
client, ni les contrats d’assistance HP conclus avec le client.
Cependant, si une imprimante tombe en panne ou est endommagée
suite à l’utilisation d’une cartouche d’encre non HP ou
reconditionnée, HP facturera le coût de la main d’uvre et des
matériaux nécessaires au dépannage de l’imprimante dans ces
cas précis. Cette garantie ne couvre pas les cartouches HP vides,
les cartouches HP reconditionnees ou les cartouches HP alterees
par une modification.
5 Si, pendant la période de garantie applicable, HP est informé d’un
défaut dans un produit couvert par la garantie HP, HP s’engage alors
à réparer ou à remplacer le produit, à sa discrétion.
6 Si HP n’est pas en mesure de réparer ou de remplacer le produit
défectueux couvert par la garantie HP, comme cela est prévu par la
garantie, HP s’engage à rembourser le prix d’achat du produit dans
un délai raisonnable après que le défaut lui ait été signalé.
7 HP n’a aucune obligation de réparer, de remplacer ni de rembourser
le produit tant que le client n’a pas renvoyé le produit défectueux à
HP.
8 Tout produit de remplacement sera neuf ou remis à neuf, à condition
que ses fonctionnalités soient au moins égales à celle du produit
remplacé.
9 Les produits HP peuvent comporter des pièces, des composants ou
des matériaux reconditionnés dont les performances sont
équivalentes aux éléments à l’état neuf.
10 La Garantie limitée HP est valable dans tous les pays ou régions où
le produit HP couvert par cette garantie est distribué par HP. Des
contrats couvrant des services de garantie supplémentaires, tels
qu’un service sur site, sont proposés chez tous les prestataires de
services agréés HP dans les pays ou régions où le produit est
distribué par HP ou par un importateur agréé.
Limites de la garantie
DANS LA MESURE PERMISE PAR LA LEGISLATION LOCALE EN
VIGUEUR, HP ET SES FOURNISSEURS TIERS N’OFFRENT AUCUNE
AUTRE GARANTIE OU CONDITION, DE QUELQUE SORTE QUE CE
SOIT, EXPLICITES OU IMPLICITES, OU CONCERNANT LES
CONDITIONS DE COMMERCIALISATION, DE QUALITE
SATISFAISANTE ET D’ADEQUATION A UN USAGE PARTICULIER.
Limites de la responsabilité
1 Dans la mesure permise par la législation locale en vigueur, les
recours s’inscrivant dans le cadre de cette Garantie sont les seuls
recours exclusifs du client.
2 DANS LA MESURE PERMISE PAR LA LEGISLATION LOCALE EN
VIGUEUR, A L’EXCEPTION DES OBLIGATIONS
SPECIFIQUEMENT STIPULEES DANS CETTE GARANTIE, HP OU
SES FOURNISSEURS TIERS NE PEUVENT EN AUCUN CAS
ETRE TENUS POUR RESPONSABLES DE DOMMAGES DIRECTS
OU INDIRECTS, SPECIAUX, FORTUITS OU CONSECUTIFS, QUE
LA RECLAMATION SOIT FONDEE SUR UN CONTRAT OU UN
PREJUDICE SUBI, OU QUELLE QUE SOIT LA RAISON LEGALE
INVOQUEE, MEME S’ILS AVAIENT ETE AVISES DU RISQUE DE
TELS DOMMAGES.
Législation locale
1 Cette Garantie confère au client des droits juridiques spécifiques. Le
client peut également bénéficier d’autres droits pouvant varier, d’un
état à l’autre aux Etats-Unis ou d’une province à l’autre au Canada,
et d’un pays ou d’une région à l’autre ailleurs dans le monde.
2 Si le texte de cette Garantie contredit une législation locale, il sera
considéré comme modifié pour se conformer à cette législation.
Dans le cadre d’une telle législation locale, certaines exclusions et
limitations de responsabilité stipulées dans cette Garantie ne
s’appliquent pas au client. Par exemple, certains états des Etats-
Unis, de même que certains gouvernements hors des Etats-Unis
(notamment ceux de provinces canadiennes), peuvent :
a annuler les exclusions et les limitations de responsabilité
stipulées dans cette Garantie restreignant les droits statutaires
d’un client (c’est le cas du Royaume-Uni).
b restreindre la capacité pour un fabricant d’imposer de telles
exclusions ou limitations ; ou bien
c accorder au client des droits de garantie supplémentaires,
spécifier la durée de garanties implicites que le fabricant ne peut
dénoncer, ou autoriser des limitations quant à la durée des
garanties implicites.
3 POUR TOUTE VENTE A DES CLIENTS EN AUSTRALIE OU EN
NOUVELLE-ZELANDE, LES TERMES DE CETTE GARANTIE,
SAUF DANS LA LIMITE DES DISPOSITIONS LEGALES,
N’EXCLUENT, NE LIMITENT NI NE MODIFIENT LES DROITS
STATUTAIRES OBLIGATOIRES APPLICABLES A LA VENTE DE
PRODUITS HP A DE TELS CLIENTS, MAIS VIENNENT S’Y
AJOUTER.
Produit HP Durée de la garantie limitée
Logiciel 90 jours
Accessoires 90 jours
Cartouches d’encre Jusqu’a l’epuisement de l’encre HP dans la cartouche
d’impression HP, ou jusqu’a la « fin de la garantie »
imprimee sur la cartouche d’impression HP, la premiere
condition prevalant.
Equipement périphérique de l’imprimante
(voir les détails ci-dessous)
1 an
EscherGSG_Europe-UFGDI.book Page 12 Tuesday, September 14, 2004 11:18 AM

13
Vereinbarung zur beschränkten Gewährleistung
Umfang der beschränkten Gewährleistung
1 Hewlett-Packard (HP) gewährleistet dem Endkunden, dass die
obengenannten HP Produkte während des obengenannten
Gewährleitungszeitraums frei von Material- und Verarbeitungsfehlern
sind. Der Gewährleitungszeitraum beginnt mit dem Kaufdatum.
2 Bei Softwareprodukten gilt die beschränkte HP Gewährleistung
ausschließlich für die fehlerhafte Ausführung von
Programmieranweisungen. HP gewährleistet weder einen
unterbrechungs- noch fehlerfreien Betrieb eines Softwareproduktes.
3 Die beschränkte Garantie von HP deckt nur solche Defekte ab, die
sich aus dem normalen Gebrauch des Produkts ergeben. Sie deckt
keinerlei andere Probleme ab, einschließlich solcher, die sich auf die
folgenden Ursachen zurückführen lassen:
a Unsachgemäße Wartung oder Modifikationen;
b Verwendung von Software, Druckmedien, Ersatzteilen oder
Zubehör, die von HP nicht zur Verfügung gestellt bzw. unterstützt
werden;
c Betrieb außerhalb der Produktspezifikationen;
d Nicht autorisierte Änderungen oder Missbrauch.
4 HP Druckerprodukte: Die Verwendung von Nicht-HP Druckpatronen
oder nachgefüllten Druckpatronen hat keine Auswirkung auf die
Gewährleistung oder andere HP Unterstützungsvereinbarungen mit
dem Kunden. Falls jedoch die Verwendung einer nicht von HP
hergestellten oder einer nachgefüllten Druckpatrone für das
Druckerversagen oder den Druckerschaden verantwortlich ist,
berechnet HP für die Druckerwartung bezüglich dieses spezifischen
Versagens oder Schadens die Standardgebühren für Arbeitszeit
und Materialkosten. Diese Garantie erstreckt sich nicht auf leere
HP-Druckpatronen, wieder aufgefullte HP-Druckpatornen oder
HP-Druckpatronen, an denen Anderungen vorgenommen wurden.
5 Wenn HP während des Garantiezeitraums von einem Defekt in
einem durch die HP-Garantie abgedeckten Produkt in Kenntnis
gesetzt wird, wird HP das Produkt nach eigenem Ermessen
entweder reparieren oder ersetzen.
6 Falls HP nicht in der Lage sein sollte, ein defektes Produkt, das durch
die HP-Garantie abgedeckt ist, zu reparieren oder zu ersetzen, wird
HP den Kaufpreis des Produkts innerhalb eines angemessenen
Zeitraums ab Mitteilung des Defekts zurückerstatten.
7 HP ist erst dann verpflichtet, das mangelhafte Produkt zu reparieren,
zu ersetzen oder den Kaufpreis zurückzuerstatten, wenn der
Endkunde dieses an HP zurückgesandt hat.
8 Das Ersatzprodukt kann entweder neu oder neuwertig sein,
vorausgesetzt, seine Funktionalität ist der Funktionalität des zu
ersetzenden Produkts zumindest gleichwertig.
9 HP-Produkte können umgearbeitete Teile, Komponenten oder
Materialien enthalten, die in Bezug auf ihre Leistung neuwertig sind.
10 Die beschränkte Gewährleistung von HP ist in allen Ländern/
Regionen gültig, in denen das durch sie gedeckte HP Produkt von
HP vertrieben wird. Vereinbarungen für zusätzliche Gewährleistung,
zum Beispiel Service vor Ort, sind in Ländern/Regionen, in denen
das Produkt durch HP oder durch einen autorisierten Importeur
vertrieben wird, über jede autorisierten HP Servicestelle verfügbar.
Gewährleistungsausschlüsse
IM UMFANG DER BEDINGUNGEN DES ÖRTLICH GELTENDEN
RECHTS LEHNEN HP UND DEREN LIEFERANTEN ALLE WEITEREN
GARANTIEN ODER GEWÄHRLEISTUNGEN AB, GLEICH OB
AUSDRÜCKLICHE ODER KONKLUDENTE GEWÄHRLEISTUNGEN
DER MARKTGÄNGIGKEIT, DER HANDELSÜBLICHEN QUALITÄT UND
DER EIGNUNG FÜR EINEN BESTIMMTEN ZWECK.
Haftungsausschlüsse
1 Sofern durch die geltende Gesetzgebung keine anderen
Bestimmungen festgelegt sind, stehen dem Endkunden über die in
dieser Hersteller-Gewährleistung genannten Leistungen hinaus
keine weiteren Ansprüche zu.
2 IM UMFANG DER BESTIMMUNGEN DES ÖRTLICH GELTENDEN
RECHTS, UND MIT AUSNAHME DER IN DIESER
GARANTIEERKLÄRUNG AUSDRÜCKLICH GENANNTEN
VERPFLICHTUNGEN, ÜBERNEHMEN HP UND DEREN
LIEFERANTEN KEINERLEI HAFTUNG FÜR UNMITTELBARE,
MITTELBARE, KONKRETE, ZUFÄLLIG ENTSTANDENE ODER
FOLGESCHÄDEN, UNABHÄNGIG DAVON, OB SOLCHE
ANSPRÜCHE AUF VERTRAG, DELIKTSRECHT ODER EINER
ANDEREN RECHTSTHEORIE BASIEREN, UND UNABHÄNGIG VON
DER MITTEILUNG DER MÖGLICHKEIT SOLCHER SCHÄDEN.
Geltendes Recht
1 Diese Gewährleistungserklärung stattet den Endkunden mit
bestimmten Rechten aus. Der Endkunde hat unter Umständen noch
weitere Rechte, die in den Vereinigten Staaten von Bundesstaat zu
Bundesstaat, in Kanada von Provinz zu Provinz, in der restlichen
Welt von Land/Region zu Land/Region verschieden sein können.
2 Soweit diese Erklärung zur Gewährleistung nicht dem geltenden
Recht entspricht, soll sie so als abgeändert gelten, dass die hierin
enthaltenen Bestimmungen dem geltenden Recht entsprechen.
Nach geltendem Recht treffen u.U. bestimmte Erklärungen und
Einschränkungen dieser Gewährleistungserklärung nicht auf den
Endkunden zu. In einigen US-Staaten und in einigen Ländern
außerhalb der USA (sowie in einigen kanadischen Provinzen):
a ausschließen, dass die Ausschlüsse und Beschränkungen in
dieser Garantieerklärung die gesetzlichen Rechte eines Kunden
einschränken (z. B. in Großbritannien);
b Ist ein Hersteller nicht berechtigt, solche Erklärungen und
Einschränkungen durchzusetzen;
c dem Kunden zusätzliche Garantieansprüche einräumen, die Dauer
von konkludenten Gewährleistungen festlegen, die der Hersteller
nicht beschränken kann, oder die zeitliche Befristung von
konkludenten Gewährleistungen gestatten.
3 FÜR VERBRAUCHERGESCHÄFTE IN AUSTRALIEN UND
NEUSEELAND STELLEN DIE BESTIMMUNGEN IN DIESER
GARANTIEERKLÄRUNG, AUSSER IM RECHTLICH
GESTATTETEN UMFANG, KEINEN AUSSCHLUSS, KEINE
BESCHRÄNKUNG ODER MODIFIKATION, SONDERN EINE
ERGÄNZUNG DER OBLIGATORISCHEN GESETZLICHEN
RECHTE DAR, DIE FÜR DEN VERKAUF VON HP-PRODUKTEN
AN SOLCHE KUNDEN GELTEN.
HP-produkt Dauer der beschränkten Gewährleistung
Software 90 Tage
Zubehör 90 Tage
Tintenpatronen Bis die HP-Tinte in der HP-Druckpatrone leer ist oder das auf
der HP-Druckpatrone angegebene Ablaufdatum der Garantie
erreicht ist, je nachdem, was zuerst eintritt.
Drucker-Hardware (Einzelheiten siehe unten) 1 Jahr
EscherGSG_Europe-UFGDI.book Page 13 Tuesday, September 14, 2004 11:18 AM

14
Beperkte garantieverklaring van Hewlett-Packard
Geldigheid van beperkte garantie
1 Hewlett-Packard verstrekt aan de eindgebruiker de garantie dat
bovengenoemde producten van HP vrij zijn van materiaal- en
fabricagefouten gedurende bovengenoemde periode die begint op
de dag van aankoop door de klant.
2 Wat softwareproducten betreft, geldt de beperkte garantie van HP
uitsluitend voor niet-uitvoerbare programmeerinstructies. HP
garandeert niet dat de werking van een product ononderbroken of vrij
van fouten is.
3 De beperkte garantie van HP geldt alleen voor defecten die zich
voordoen als resultaat van normaal gebruik van het product en is niet
van toepassing bij andere problemen, met inbegrip van defecten die
het resultaat zijn van:
a verkeerd of ondeskundig onderhoud of aanpassing;
b software, informatiedragers, onderdelen of benodigdheden die
niet door HP worden geleverd of ondersteund;
c gebruik dat niet in overeenstemming is met de specificaties van
het product;
d niet-toegestane modificaties of misbruik.
4 Wat printerproducten van HP betreft, heeft het gebruik van een niet
door HP vervaardigde of een nagevulde inktpatroon geen invloed op
de garantie aan de klant of op eventuele ondersteuningscontracten
van HP met de klant. Als defecten of beschadigingen van de printer
echter aan het gebruik van een niet door HP vervaardigde of een
nagevulde inktpatroon kunnen worden toegeschreven, zal HP de
gebruikelijke arbeidsuren en materiaalkosten voor het repareren van
het betreffende defect of de betreffende beschadiging van de printer
in rekening brengen. Deze garantie is niet van toepassing op lege HP
inktpatronen, nagevulde HP inktpatronen of HP inktpatronen
waarmee is geknoeid.
5 Als HP tijdens de garantieperiode op de hoogte wordt gebracht van
een defect van een product dat onder de garantie van HP valt, wordt
het defecte product door HP ofwel gerepareerd ofwel vervangen naar
goeddunken van HP.
6 Als een defect product dat onder de garantie van HP valt, niet door
HP gerepareerd of vervangen kan worden, zal HP de aankoopprijs
voor het defecte product terugbetalen binnen een redelijke termijn
nadat HP op de hoogte is gebracht van het defect.
7 HP is niet verplicht tot reparatie, vervanging of terugbetaling zo lang
de klant het defecte product niet aan HP heeft geretourneerd.
8 Een vervangingsproduct mag nieuw of bijna nieuw zijn op
voorwaarde dat het ten minste dezelfde functionaliteit bezit als het
product dat vervangen wordt.
9 Producten van HP kunnen gereviseerde onderdelen, componenten
of materialen bevatten, waarvan de prestaties gelijkwaardig zijn aan
die van nieuwe producten.
10 De beperkte garantieverklaring van HP is geldig in alle landen of
regio’s waar het product van HP waarop deze garantie betrekking
heeft, door HP wordt gedistribueerd. Contracten voor extra
garantieservice, zoals service op de locatie van de klant, zijn
verkrijgbaar bij ieder erkend HP servicekantoor in landen of regio’s
waar het product door HP of een erkende importeur wordt
gedistribueerd.
Beperking van garantie
IN ZOVERRE DOOR DE PLAATSELIJKE WET IS TOEGESTAAN,
VERSTREKKEN NOCH HP, NOCH DERDE LEVERANCIERS ENIGE
ANDERE GARANTIE OF VOORWAARDE, HETZIJ UITDRUKKELIJKE
OF STILZWIJGENDE GARANTIES OF VOORWAARDEN VAN
VERKOOPBAARHEID, BEVREDIGENDE KWALITEIT EN
GESCHIKTHEID VOOR EEN BEPAALD DOEL.
Beperking van aansprakelijkheid
1 In zoverre door de plaatselijke wet is toegestaan, zijn de
rechtsmiddelen in deze garantieverklaring het enige en exclusieve
verhaal van de klant.
2 IN ZOVERRE DOOR DE PLAATSELIJKE WET IS TOEGESTAAN,
MET UITZONDERING VAN DE SPECIFIEKE VERPLICHTINGEN IN
DEZE GARANTIEVERKLARING, ZIJN HP EN DERDE
LEVERANCIERS ONDER GEEN BEDING AANSPRAKELIJK VOOR
DIRECTE, INDIRECTE, SPECIALE EN INCIDENTELE SCHADE OF
GEVOLGSCHADE, ZIJ HET OP BASIS VAN CONTRACT,
BENADELING OF ENIG ANDERE JURIDISCHE THEORIE EN OF
HP AL DAN NIET VAN DE MOGELIJKHEID VAN DERGELIJKE
SCHADE OP DE HOOGTE IS.
Plaatselijke wet
1 Deze garantieverklaring biedt de klant specifieke juridische rechten.
De klant kan over andere rechten beschikken die in de VS van staat
tot staat, in Canada van provincie tot provincie en elders van land tot
land of regio tot regio kunnen verschillen.
2 In zoverre deze garantieverklaring niet overeenstemt met de
plaatselijke wet, zal deze garantieverklaring als aangepast en in
overeenstemming met dergelijke plaatselijke wet worden
beschouwd. Krachtens dergelijke plaatselijke wet is het mogelijk dat
bepaalde afwijzingen en beperkingen in deze garantieverklaring niet
op de klant van toepassing zijn. Sommige staten in de VS en
bepaalde overheden buiten de Verenigde Staten (inclusief provincies
in Canada) kunnen bijvoorbeeld:
a de afwijzingen en beperkingen in deze garantieverklaring als
tenietgedaan beschouwen ter bescherming van de wettelijk
voorgeschreven rechten van de klant (bijvoorbeeld in het
Verenigd Koninkrijk);
b de mogelijkheid van een fabrikant voor het doen gelden van
dergelijke afwijzingen of voorwaarden anderzijds beperken; of
c de klant aanvullende rechten onder de garantie bieden, de
tijdsduur van stilzwijgende garanties bepalen die niet door de
fabrikant afgewezen kan worden, en beperkingen op de tijdsduur
van stilzwijgende garanties niet toestaan.
3 MET BETREKKING TOT CONSUMENTENTRANSACTIES IN
AUSTRALIË EN NIEUW-ZEELAND WORDEN DE WETTELIJK
VOORGESCHREVEN RECHTEN DIE VAN TOEPASSING ZIJN OP
DE AANKOOP VAN PRODUCTEN VAN HP AAN DERGELIJKE
KLANTEN, DOOR DE VOORWAARDEN IN DEZE
GARANTIEVERKLARING NIET TENIETGEDAAN, BEPERKT OF
VERANDERD, BEHALVE IN ZOVERRE DOOR DE WET IS
TOEGESTAAN, EN VORMEN DE VOORWAARDEN VAN DEZE
GARANTIEVERKLARING EEN AANVULLING OP DEZE
RECHTEN.
HP Product Duur van beperkte garantie
Software 90 dagen
Accessoires 90 dagen
Inktpatronen Totdat er geen HP inkt meer in de HP inktpatroon zit of, zo
dit eerder is, tot de verloopdatum van de garantie die op de
HP inktpatroon is vermeld.
Printerrandapparatuur (zie details hieronder) 1 jaar
EscherGSG_Europe-UFGDI.book Page 14 Tuesday, September 14, 2004 11:18 AM

15
Dichiarazione di garanzia limitata Hewlett-Packard
Estensione della garanzia limitata
1 La Hewlett-Packard garantisce al cliente finale che i prodotti HP
specificati in precedenza saranno esenti da difetti di materiale e di
manodopera per la durata specificata sopra, a decorrere dalla data
d’acquisto da parte del cliente stesso.
2 Per i prodotti software, la garanzia limitata HP vale solo per errori
durante l’esecuzione delle istruzioni di programmazione. HP non
garantisce che il funzionamento dei prodotti sarà ininterrotto o privo
di errori.
3 La garanzia limitata HP copre solo quei difetti risultanti dal normale
utilizzo del prodotto, e non copre altri problemi, inclusi quelli che
derivano da:
a Manutenzione inadeguata o modifiche
b Software, supporti, parti o forniture non forniti o supportati
dalla HP
c Funzionamento non conforme alle specifiche del prodotto
d Modifiche non autorizzate o uso improprio.
4 Per i prodotti per stampanti HP, l’uso di una cartuccia di stampa non
HP non compromette la garanzia offerta al cliente o il contratto di
assistenza HP con il cliente stesso. Tuttavia, qualora il guasto o il
danno alla stampante fossero attribuibili all’uso di una cartuccia di
stampa non HP o ricaricabile, HP addebiterà le sue tariffe orarie
standard ed il materiale per riparare il guasto o eventuali danni alla
stampante. Questa garanzia non include cartucce di stampa HP
vuote, cartucce ricaricate oppure cartucce manomesse.
5 Qualora durante il periodo di garanzia applicabile la HP ricevesse
avviso di un difetto in uno dei prodotti coperti dalla garanzia, si
impegna a riparare o sostituire il prodotto, a propria discrezione.
6 Qualora la HP non fosse in grado di riparare o sostituire (a seconda
del caso) un prodotto coperto dalla garanzia HP, dovrà entro un
periodo di tempo ragionevole dal momento in cui ha ricevuto avviso
del difetto, rimborsare il prezzo dell’acquisto del prodotto stesso.
7 La HP non avrà alcun obbligo a riparare, sostituire o rimborsare il
prezzo di acquisto fin quando il cliente non avrà restituito alla HP il
prodotto difettoso.
8 Le parti di ricambio dovranno essere nuove o come nuove, ammesso
che la loro funzionalità sia almeno pari a quella del prodotto
sostituito.
9 I prodotti HP potrebbero contenere parti, componenti o materiali
fabbricati equivalenti a parti, componenti o materiali nuovi in termini
di prestazioni.
10 La garanzia limitata HP è valida in qualsiasi Paese/regione in cui la
HP distribuisce il prodotto HP coperto dalla garanzia. Sono inoltre
disponibili contratti per servizi addizionali in garanzia; a tale proposito
rivolgersi ad un centro di assistenza HP autorizzato nei Paesi o nelle
regioni in cui il prodotto viene distribuito dalla HP o da un importatore
autorizzato.
Limitazioni di garanzia
LADDOVE CONSENTITO DALLE LEGGI LOCALI VIGENTI, LA HP O I
SUOI FORNITORI DI PARTI TERZE NON OFFRONO ALCUNA
GARANZIA O CONDIZIONE DI ALCUN TIPO, SIA ESPRESSA CHE
IMPLICITA, O CONDIZIONI DI COMMERCIABILITÀ, QUALITÀ
SODDISFACENTE O IDONEITÀ AD UNO SCOPO PARTICOLARE.
Limitazioni di responsabilità
1 Laddove consentito dalle leggi locali vigenti, i rimedi previsti in
questa Garanzia sono gli unici ed esclusivi rimedi a disposizione del
cliente.
2 LADDOVE CONSENTITO DALLE LEGGI LOCALI VIGENTI, FATTA
ECCEZIONE PER GLI OBBLIGHI DELINEATI IN MANIERA
SPECIFICA IN QUESTA GARANZIA, IN NESSUN CASO LA HP O I
SUOI FORNITORI DI PARTI TERZE SARANNO RITENUTI
RESPONSABILI PER DANNI DIRETTI, INDIRETTI, SPECIALI,
FORTUITI O DERIVATI, SIA CHE SI BASINO SU CONTRATTO,
TORNO O ALTRA TEORIA LEGALE E SIA CHE SIANO STATI
AVVISATI DELLA POSSIBILITÀ DI TALI DANNI.
Leggi locali vigenti
1 Questa garanzia offre al cliente diritti legali specifici. Il cliente
potrebbe godere di altri diritti, che variano da stato a stato negli Stati
Uniti, da provincia a provincia in Canada e da Paese/regione a
Paese/regione nel resto del mondo.
2 Laddove questa Garanzia dovesse risultare non conforme alle leggi
locali vigenti, verrà modificata al fine di renderla conforme a tali leggi.
Secondo queste leggi locali, alcune rinunce di responsabilità o
limitazioni di questa Garanzia potrebbero non essere pertinenti per il
cliente. Ad esempio, alcuni stati negli Stati Uniti ed alcuni governi
fuori degli Stati Uniti (incluse alcune province del Canada)
potrebbero:
a Precludere le rinunce di responsabilità e le limitazioni previste in
questa Garanzia dal limitare i diritti statutari di un cliente (ad
esempio, Gran Bretagna)
b Limitare altrimenti la capacità di un fabbricante di applicare tali
rinunce di responsabilità o limitazioni; oppure
c Concedere al cliente diritti di garanzia addizionali, specificare la
durata delle garanzie implicite che il fabbricante non può
rinnegare, o consentire limitazioni sulla durata delle garanzie
implicite.
3 PER TRANSAZIONI CON I CLIENTI IN AUSTRALIA E NUOVA
ZELANDA, I TERMINI DI QUESTA GARANZIA, LADDOVE
CONSENTITO DALLE LEGGI VIGENTI, NON ESCLUDONO,
LIMITANO O MODIFICANO, E NON SI AGGIUNGONO AI DIRITTI
STATUTORI OBBIGATORI RELATIVI ALLA VENDITA DI PRODOTTI
HP A TALI CLIENTI.
Prodotto HP Durata della garanzia limitata
Software 90 giorni
Accessori 90 giorni
Cartucce di inchiostro Fin quando la cartuccia di stampa HP non risulta
completamente scarica di inchiostro HP, oppure fino alla
data di scadenza della garanzia stampata sulla cartuccia
stessa, a seconda del caso.
Hardware per le periferiche della stampante
(vedere sotto per dettagli in merito)
1 anno
EscherGSG_Europe-UFGDI.book Page 15 Tuesday, September 14, 2004 11:18 AM

EscherGSG_Europe-UFGDI.book Page 16 Tuesday, September 14, 2004 11:18 AM

ácô°ûd IOhóÙG áfɪ°†dG ¿É«H
Hewlett-Packard
èàæe
HP
OhóÙG ¿Éª°†dG Ióe
èeGÈdG Ωƒj 90
äÉ≤ë∏ŸGΩƒj 90
È◊G ¢û«WGôN ÈM òØæj ≈àMHP áYÉÑW á°TƒWôN øeHP''¿Éª°†dG AÉ¡àfG'' ïjQÉJ ≈àM hCG ,
áYÉÑW á°TƒWôN ≈∏Y áYƒÑ£ŸGHP.k’hCG çóëj ɪ¡jCG ,
(π«°UÉØàdG øe ójõŸ √ÉfOCG ô¶fG) á≤ë∏ŸG á©HÉ£dG Iõ¡LCGóMGh ΩÉY
á«dƒÄ°ùŸG OhóM
1‘ ÉgÒaƒJ ºàj »àdG ¢†jƒ©àdG ¬LhCG Èà©J ,»∏ÙG ¿ƒfÉ≤dG ¬H íª°ùj …òdG óë∏d Ék≤ah
.√óMh ¬«∏Y Iô°UÉbh 𫪩dÉH á°UÉN äÉ°†jƒ©J Gòg ¿Éª°†dG ¿É«H
2¿É«H ‘ IOóÙG äÉeGõàd’G AÉæãà°SÉH ,»∏ÙG ¿ƒfÉ≤dG ¬H íª°ùj …òdG óë∏d Ék≤ah
ácô°T πªëàJ ød ,Gòg ¿Éª°†dG
HPájCG ,ådÉãdG ±ô£dG ,É¡FÓchh É¡«YRƒe øe …CG hCG
hCG á«°VôY hCG á°UÉN hCG Iô°TÉÑe ÒZ hCG Iô°TÉÑe QGô°VCG ájCÉH ≥∏©àj ɪ«a á«dƒÄ°ùe
ájô¶f …CG hCG Oƒ°ü≤e ÒZ hCG Oƒ°ü≤e Qô°V hCG ó≤Y ≈∏Y Ióæà°ùe âfÉc AGƒ°S áªLÉf
.QGô°VC’G √òg OƒLh á«dɪàMÉH ácô°ûdG ÆÓHEG ” ¿EGh ≈àM iôNCG á«fƒfÉb
á«∏ÙG ÚfGƒ≤dG
1IOófi á«fƒfÉb Ékbƒ≤M 𫪩∏d ¿Éª°†dG ¿É«H íæÁ .iôNG ¥ƒ≤M ¿ƒHõ∏d ¿ƒµj ób ɉEG
‘ iôNCG á≤£æe ¤EG á©WÉ≤e øeh ,IóëàŸG äÉj’ƒdG ‘ áj’ƒd áj’h øe ∞∏àîJ
.⁄É©dG ‘ iôNCG ádhO ¤EG ádhO øeh ,Góæc
2Gòg πjó©J ºàj ,»∏ÙG ¿ƒfÉ≤dÉH Oôj Ée ™e ¿Éª°†dG ¿É«H ¥É°ùJG ΩóY ádÉM ‘
,»∏ÙG ¿ƒfÉ≤dG Gòg ÖLƒÃh .Gòg »∏ÙG ¿ƒfÉ≤dG ‘ Oôj Ée ™e ≥aGƒàJ »c ¿Éª°†dG
≈∏©a .¿Éª°†dG ¿É«ÑH ≥∏©àj ɪ«a ä’RÉæàdGh Ohó◊G ¢†©H 𫪩dG ≈∏Y ≥Ñ£æJ ’ ób
¤EG áaÉ°VE’ÉH ,᫵jôeC’G IóëàŸG äÉj’ƒdG ‘ äÉj’ƒdG ¢†©H ∑Éæg ,∫ÉãŸG π«Ñ°S
:ób ,(Góæc äÉ©WÉ≤e ¢†©H ∂dP ‘ ÉÃ) á«ÑæLC’G äÉeƒµ◊G ¢†©H
CG¥ƒ≤◊G øe ¿Éª°†dG ¿É«H ‘ IOQGƒdG Ohó◊Gh äGAÉæãà°S’G ó– ¿CG ¿hO ∫ƒ–
;(IóëàŸG áµ∏ªŸG ,∫ÉãŸG π«Ñ°S ≈∏Y) 𫪩∏d á«fƒfÉ≤dG
ÜäGAÉæãà°S’G √òg πãe ¢Vôa ≈∏Y ™«æ°üàdG á¡L IQób øe ó– ,’EGh
hCG ;äGójóëàdGh
ê’ »àdG á«æª°†dG äÉfɪ°†dG Ióe Oó– hCG ,á«aÉ°VEG á«fɪ°V ¥ƒ≤M 𫪩dG íæ“
äÉfɪ°†dG Ióe ≈∏Y GkOƒ«b ¢VôØJ hCG ,ÉgAÉæãà°SG ™«æ°üàdG á¡L ™£à°ùJ
.á«æª°†dG
,Gòg ¿Éª°†dG ¿É«H •hô°T »æãà°ùJ ’ ,Góæ∏jRƒ«fh É«dGΰSCG ‘ AÓª©dG äÓeÉ©Ã ≥∏©àj ɪ«a
ájQÉÑLE’G á«fƒfÉ≤dG ¥ƒ≤◊G ∫ó©J hCG øe ó– hCG ,¿ƒfÉ≤dG ¬H íª°ùj …òdG ó◊G AÉæãà°SÉH
äÉéàæe ™«H ≈∏Y á≤Ñ£ŸG
HP.AÓª©dG A’Dƒg πãŸ
OhóÙG ¿Éª°†dG ióe
1 ácô°T øª°†JHewlett-Packard äÉéàæe ƒ∏N Úeóîà°ùŸG øe É¡FÓª©dHP
√ÓYCG áæ«ÑŸG IÎØ∏d áeóîà°ùŸG OGƒŸG hCG ™«æ°üàdG ‘ ܃«Y ájCG øe √ÓYCG IQƒcòŸG
èàæª∏d 𫪩dG AGô°T ïjQÉJ øe CGóÑJ »àdGh.
2 ¿Éª°V ≥Ñ£æj ,èeGÈ∏d áÑ°ùædÉH
HPäɪ«∏©J ò«ØæJ ‘ π°ûØdG ≈∏Y §≤a OhóÙG
á›ÈdG . ácô°T øª°†J ’h
HP¬°Vô©J ΩóY hCG AÉ£NC’G øe èàæe …CG 𫨰ûJ á«∏ªY ƒ∏N
´É£≤f’.
3 ácô°T ¿Éª°V »£¨j
HP»£¨j ’h ,èàæª∏d …OÉ©dG ΩGóîà°S’G øY áªLÉædG ܃«©dG §≤a
øY áªLÉædG ∂∏J ∂dP ‘ Éà iôNCG äÓµ°ûe ájCG:
CG;᪫∏°ùdG ÒZ πjó©àdG hCG áfÉ«°üdG äÉ«∏ªY
ÜÉ¡ªYO hCG ÉgÒaƒJ ºàj ’ »àdG OQGƒŸG hCG QÉ«¨dG ™£b hCG áYÉÑ£dG §FÉ°Sh hCG èeGÈdG
ácô°T πÑb øe
HP ;
ê.èàæŸG äÉØ°UGƒe ¥É£f êQÉN 𫨰ûàdG
OΩGóîà°S’G Aƒ°S hCG óªà©e ÒZ πjó©J AGôLCG.
4 á©HÉW äÉéàæŸ áÑ°ùædÉH
HP ácô°T ÉgôaƒJ ’ »àdG È◊G ¢û«WGôN ΩGóîà°SG ôKDƒj ’ ,HP
¬eÈJ ºYO ó≤Y …CG ≈∏Y hCG 𫪩dG ¿Éª°V ≈∏Y AGƒ°S É¡àÄÑ©J OÉ©ŸG È◊G ¢û«WGôN hCG
ácô°T
HP𫪩dG ™e .ΩGóîà°S’ áé«àf ∞∏J hCG Qô°V …CG á©HÉ£dÉH ≥◊ GPEG ,∂dP ™eh
ácô°T ÉgôaƒJ ’ »àdG È◊G ¢û«WGôN
HP≈°VÉ≤àà°S ,É¡àÄÑ©J OÉ©ŸG È◊G ¢û«WGôN hCG
ácô°T
HPìÓ°UE’ áé«àf á©HÉ£dG áeóN ‘ áµ∏¡à°ùŸG ÉgOGƒeh É¡àbh πHÉ≤e Ékeƒ°SQ
ójóëàdG ¬Lh ≈∏Y ¥ÉØNE’G hCG ∞∏àdG Gòg.
5 ácô°T â≤∏J GPEG
HP»àdG äÉéàæŸG øe …CG ‘ Ö«Y OƒLƒH GkQÉ£NEG ,¿Éª°†dG IÎa ∫ÓN ,
¿Éª°V É¡«£¨j
HP,ÉgQÉ«àNG Ö°ùM ¬dGóÑà°SG hCG èàæŸG ìÓ°UEÉH ÉeEG ácô°ûdG Ωƒ≤à°ùa.
6 ácô°T øµªàJ ⁄ GPEG
HP`¡«∏Y ¢Uƒ°üæe ƒg ɪc ` Ö«©e èàæe ∫GóÑà°SG hCG ìÓ°UEG øe
¿Éª°V ¬«£¨jHPÖ«©dG OƒLƒH ÉgQÉ£NEG ó©H ádƒ≤©e IÎa ∫ÓN ácô°ûdG Ωƒ≤à°ùa ,
𫪩∏d èàæŸG AGô°T øªK IOÉYEÉH.
7 ácô°T Ωõà∏J ød
HP𫪩dG Ωƒ≤j ¿CG ó©H ’EG èàæŸG øªK IOÉYEG hCG ∫GóÑà°SG hCG ìÓ°UEÉH
ácô°ûdG ¤EG Ö«©ŸG èàæŸG IOÉYEÉH.
8á«∏«¨°ûàdG ¬JÉØ°UGƒe ¿ƒµJ ¿CG á£jô°T ójóL ¬Ñ°T hCG ójóL ÉeEG πjóÑdG èàæŸG ¿ƒµj ób
∫GóÑà°S’G ó«b èàæª∏d á«∏«¨°ûàdG äÉØ°UGƒª∏d πbC’G ≈∏Y ádOÉ©e.
9 äÉéàæe …ƒà– ób
HPäÉØ°UGƒŸ ádOÉ©e ™«æ°üàdG IOÉ©e OGƒe hCG Iõ¡LCG hCG ™£b ≈∏Y
AGOC’G å«M øe Iójó÷G OGƒŸGh Iõ¡LC’Gh ™£≤dG.
10 ácô°ûd OhóÙG ¿Éª°†dG ¿É«H ó©j
HPádhO ájCG ‘ ∫ƒ©ØŸG …QÉ°S/É¡«a ºàj á≤£æe
äÉéàæe ™jRƒJ
HP¿Éª°†dG Gòg É¡«£¨j »àdG .ºàj »àdG äÉfɪ°†dG Oƒ≤Y ôaGƒàJh ,Gòg
‘ ,äÉéàæŸG óLGƒàJ å«M ™bƒŸÉH áeóÿG πãe ,á«aÉ°VEG äÉeóN ≈∏Y ∫ƒ°üë∏d É¡eGôHEG
áeóN õcôe …CG
HP äÉéàæe ™jRƒJ É¡«a ºàj »àdG ∫hódG ‘ óªà©eHPOQƒà°ùe πÑb øe
óªà©e.
áfɪ°†dG OhóM
ácô°T Ωõà∏J ’ ,»∏ÙG ¿ƒfÉ≤dG ¬H íª°ùj …òdG óë∏d Ék≤ahHPÉ¡jOQƒe øe ådÉK ±ôW …CG hCG
áëjô°U äÉfɪ°V hCG á«æª°V •hô°T hCG äÉfɪ°V âfÉcCG AGƒ°S ,´ƒf …CG øe •hô°T hCG ¿Éª°V …CÉH
.Ú©e ¢Vô¨d èàæŸG áªFÓe hCG á«°VôŸG IOƒ÷G hCG …QÉéàdG êGhôdÉH ≥∏©àj ɪ«a
HPCrickMLK_GSG_UGFDIA.book Page 58 Wednesday, May 19, 2004 4:26 PM
»»``````HHôôYY

.èeÉfÈdG â«ÑãJ ÈàNG :10 Iƒ£N
óæà°ùe áYÉÑ£H ºb ,ôJƒ«ÑªµdÉH á©HÉ£dG π«°UƒJh èeÉfÈdG â«ÑãJ ∫ɪcEG ó©H
.QGôªà°SÉH ¬eóîà°ùJ ≥«Ñ£J øe
´ƒLôdG ≈Lôj èeÉfÈdG â«ÑãJ πÑb ôJƒ«ÑªµdÉH á©HÉ£dG π«°UƒàH âªb GPEG
‘á°TÉ°ûdG ≈∏Y Ωóîà°ùŸG ó°Tôe ¤EG
CDâ«ÑãàJ ∫ɪcE’ 𫨰ûàdG AóH
.á©HÉ£dG
.á©HÉ£dG πé°S :11 Iƒ£N
ób øµJ ⁄ GPEG .á«æØdG äÉeƒ∏©ŸGh ΩÉ¡dG ºYódG ≈≤∏àd á©HÉ£dG π«é°ùàH ºb
‘ É¡∏«é°ùJ ∂浪«a èeÉfÈdG â«ÑãJ óæYá©HÉ£dG π«é°ùàH âªb
register.hp.comhttp://www.
!∑hÈe
∫ƒM äÉeƒ∏©ŸG øe ójõe »∏Y ∫ƒ°üë∏d .ΩGóîà°SEÓd IõgÉL ∂à©HÉW
QOÉ°üŸG ¤EG ™LQCG ,É¡MÓ°UEGh AÉ£NC’G ±É°ûµà°SGhá©HÉ£dG ΩGóîà°SG
:á«dÉàdG
● ‘ á°TÉ°ûdG ≈∏Y Ωóîà°ùŸG ó°TôeCD.𫨰ûàdG AóH
●HP Instant Support≈∏Y Ωóîà°ùŸG π«dO ô¶fCG ,äÉeƒ∏©ŸG øe ójõª∏d)
.(á°TÉ°ûdG
● ‘ èàæŸG ºYód âfÎfE’G ™bƒe
http://www.hp.com/support/dj1280
»```HôY
Seite wird geladen ...
Seite wird geladen ...
Seite wird geladen ...
Seite wird geladen ...
-
 1
1
-
 2
2
-
 3
3
-
 4
4
-
 5
5
-
 6
6
-
 7
7
-
 8
8
-
 9
9
-
 10
10
-
 11
11
-
 12
12
-
 13
13
-
 14
14
-
 15
15
-
 16
16
-
 17
17
-
 18
18
-
 19
19
-
 20
20
-
 21
21
-
 22
22
-
 23
23
-
 24
24


HP Deskjet 1280 Printer series Benutzerhandbuch
- Typ
- Benutzerhandbuch
in anderen Sprachen
Verwandte Artikel
-
HP Deskjet 450 Mobile Printer series Benutzerhandbuch
-
HP Business Inkjet 1100 Printer series Benutzerhandbuch
-
HP Deskjet 460 Mobile printer serie Benutzerhandbuch
-
HP Business Inkjet 2800 Benutzerhandbuch
-
HP BUSINESS INKJET 1000 PRINTER Benutzerhandbuch
-
HP OFFICEJET PRO K850DN Bedienungsanleitung
-
HP (Hewlett-Packard) Color LaserJet 4600 Printer series Benutzerhandbuch
-
HP OFFICEJET PRO K550 Bedienungsanleitung
-
HP Deskjet 9600 Printer series Benutzerhandbuch
-