
Assistenza tecnica Italia 0346/750090
Commerciale Italia 0346/750091
Technical service abroad (+39) 0346750092
Export department (+39) 0346750093
Comelit Group S.p.A. - Via Don Arrigoni 5 - 24020 Rovetta S. Lorenzo BG Italy - tel. (+39) 0346 750 011 - fax (+39) 0346 71436
IT
MANUALE
TECNICO
EN
TECHNICAL
MANUAL
FR
MANUEL
TECHNIQUE
PT
MANUAL
TÉCNICO
NL
TECHNISCHE
HANDLEIDING
DE
TECHNISCHES
HANDBUCH
ES
MANUAL
TÉCNICO
Manuale utilizzo kit iPower Art. 8595 / 8596
User Manual for iPower kit Art. 8595 / 8596
Manuel d’utilisation kit iPower Art. 8595 / 8596
Gebruikshandleiding iPower-kit Art. 8595 / 8596
Gebrauchsanleitung iPower-Set Art. 8595 / 8596
Manual de uso del kit iPower arts. 8595 y 8596
Manual de utilização kit iPower art. 8595/8596

2
1
1
23 4 5678
9
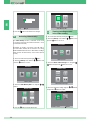
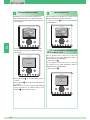
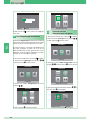
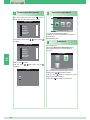
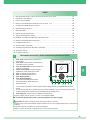
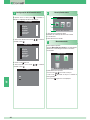
IT
1 Pulsante fonica. Permette di attivare o
disattivare la conversazione.
2 Pulsante menu. Permette di accedere,
uscire e salire di un livello nel menu.
3 Pulsante conferma. Permette di confermare
una selezione all'interno del menu.
4 Pulsanti navigazione. Permettono di
navigare / modifi care valori all’interno del
menu.
5 Pulsante 1. Chiamata Generale Interna. *
6 Pulsante 2. Chiamata Generale Esterna. *
7 Pulsante Autoaccensione. *
8 Pulsante Privacy / Dottore. *
• La funzione Privacy permette l’esclusione
della suoneria su chiamata dal posto esterno
e intercomunicante.
* Programmabile, rivolgersi al proprio installatore di fi ducia.
N. B. Le funzioni citofoniche dei pulsanti sono disponibili solo a menu spento.
Attenzione! Al fi ne di ridurre il rischio di guasti e scosse elettriche:
• Non aprire l’apparecchio o effettuare personalmente riparazioni. In caso di necessità richiedere
l’intervento di personale qualifi cato.
• Non inserire oggetti né versare liquidi all’interno del dispositivo.
• Pulire con un panno inumidito con acqua. Evitare Alcool e altri prodotti aggressivi.
• La funzione Privacy + Dottore oltre a disattivare la suoneria come nella funzione Privacy, permette
l’azionamento automatico dell’apriporta su chiamata da posto esterno.
• La funzione Dottore permette l’azionamento automatico dell’apriporta su chiamata da posto
esterno.
9 Pulsante Serratura. Permette di attivare la serratura del posto esterno. *
Descrizione monitor e funzioni citofoniche dei pulsanti
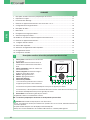
1. Descrizione monitor e funzioni citofoniche dei pulsanti ................................................................. 2
2. Rispondere ad una chiamata ........................................................................................................ 3
3. Funzione Autoaccensione ............................................................................................................. 3
4. Effettuare una chiamata intercomunicante con i pulsanti 1 o 2 ..................................................... 3
5. Impostazione lingua menu ............................................................................................................ 4
6. Descrizione menu ......................................................................................................................... 4
7. Menu di stato ................................................................................................................................. 4
8. Registrare il messaggio per assente ............................................................................................. 5
9. Attivare messaggio per assente .................................................................................................... 5
10. Effettuare una chiamata intercomunicante .................................................................................... 6
11. Modifi care nome nella rubrica intercomunicante........................................................................... 6
12. Impostare data e ora ..................................................................................................................... 6
13. Attivare video segreteria ............................................................................................................... 7
14. Visualizzare registrazioni della video segreteria ........................................................................... 7
15. Registrazione manuale ................................................................................................................. 8
16. Confi gurare melodie ...................................................................................................................... 8
SOMMARIO

3
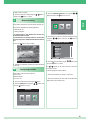
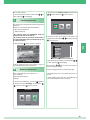
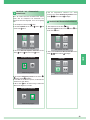
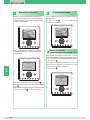
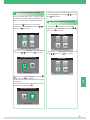
2
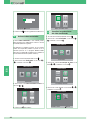
Porta 1 : In attesa risposta
Porta 1
3
Porta 1 : In attesa risposta
4
Generale interna
CHIAMATA INTERCOMUNICANTE
IT
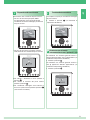
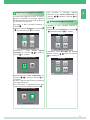
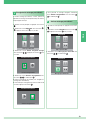
Rispondere ad una chiamata
Alla ricezione di una chiamata da posto esterno:
• Nel caso di un monitor principale (MAX 1
per appartamento) viene automaticamente
visualizzata sul monitor l’immagine proveniente
da posto esterno.
• Nel caso di un monitor secondario compare
l’indicazione di una chiamata dal posto esterno.
} Per attivare / disattivare la fonica premere il
pulsante
.
} Per attivare la serratura del posto esterno
premere il pulsante
.
} Per visualizzare l’immagine senza attivare la
fonica con il posto esterno premere il pulsante
(solo monitor secondario).
Funzione Autoaccensione
Con impianto a riposo per visualizzare l’immagine
da posto esterno:
} Premere il pulsante
(se mantenute le
impostazioni di fabbrica).
Per effettuare una chiamata generale interna a
tutti gli apparecchi dello stesso appartamento (se
mantenute le impostazioni di fabbrica):
} Premere il pulsante
Per effettuare una chiamata generale esterna a
tutti gli apparecchi dell’altro appartamento (se
mantenute le impostazioni di fabbrica):
} Premere il pulsante
Effettuare una chiamata
intercomunicante con i pulsanti 1 o 2

4
5
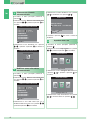
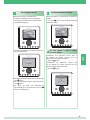
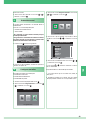
MENU LINGUE
Italiano
English
Français
Español
Português
Deutsch
LANGUAGES MENU
Italiano
Français
Español
Português
Deutsch
English
English
NO
OK
6
MENU PRINCIPALE
Rubrica intercomunicante
1
2
3
4
7
MENU DI STATO
Nuovi messagi presenti
IT
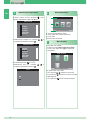
Al primo accesso al menu (pulsante ), viene
richiesto di impostare la lingua di utilizzo.
1. Selezionare la lingua con i pulsanti
, e
confermare premendo il pulsante
.
2. Premere il pulsante per uscire.
3. Selezionare “OK” con i pulsanti
, e
confermare premendo il pulsante
.
Impostazione lingua menu Descrizione menu
1 Titolo menu attualmente aperto.
2 Cornice indicante il menu selezionato.
3 Icone menu.
4 Titolo menu selezionato.
Menu di stato
Da questo menu è possibile:
• Con i pulsanti
, selezionare le funzioni.
• Con il pulsante
disattivare le funzioni e vedere
i video registrati.
• Con il pulsante
tornare al menu principale.
Accessibile solo quando:
• È attiva la funzione Messaggio per assente.
• C’è un nuovo video messaggio in segreteria.
• Porta aperta.

5
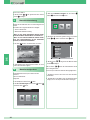
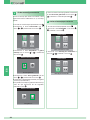
8
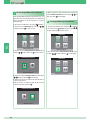
SEGRETERIA
Video segreteria non attiva
MESSAGGIO PER ASSENTE
Ascolta registrazione
MESSAGGIO PER ASSENTE
Ferma registrazione
9
SEGRETERIA
Video segreteria non attiva
SEGRETERIA
Messaggio per assente ON
IT
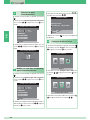
Registrare il messaggio per assente
La funzione messaggio per assente, se attivata,
permette di riprodurre un messaggio registrato
sull’altoparlante del posto esterno nel momento in
cui viene inviata una chiamata.
1. Accedere al menu principale premendo il
pulsante
.
2. Selezionare il menu Segreteria con i pulsanti
, e premere il pulsante per accedere.
3. Selezionare il menu Ascolta registra
messaggio con i pulsanti
, e premere il
pulsante
per accedere.
4. Selezionare l’icona Avvia registrazione con
i pulsanti
, e premere il pulsante per
confermare.
5. Parlare al microfono del monitor per registrare il
messaggio (Max 20 sec.)
6. Per interrompere la registrazione prima dello
scadere dei 20 secondi premere il pulsante
.
7. Per riascoltare il messaggio registrato
selezionare l’icona Ascolta registrazione con
i pulsanti , e premere il pulsante per
confermare.
Attivare messaggio per assente
1. Accedere al menu principale premendo il
pulsante
.
2. Selezionare il menu Segreteria con i pulsanti
, e premere il pulsante per accedere.
3. Selezionare l’icona Messaggio per assente
OFF con i pulsanti , e premere il pulsante
per confermare.

6
10
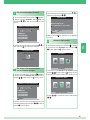
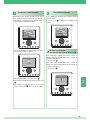
RUBRICA CHIAMATE INTERCOM
SECONDARIO 1
PRINCIPALE
GENERALE ESTERNA
GENERALE INTERNA
SECONDARIO 2
SECONDARIO 3
Modifica
CHIAMATA INTERCOMUNICANTE
Generale interna
In attesa risposta
11
RUBRICA CHIAMATE INTERCOM
SECONDARIO 1
PRINCIPALE
GENERALE ESTERNA
GENERALE INTERNA
SECONDARIO 2
SECONDARIO 3
Modifica
MODIFICA VOCE
G E N E R A L E I N T E R N A
Configura Nome
Cancella
Sinistra Destra
12
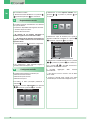
MENU PRINCIPALE
Impostazioni
MENU IMPOSTAZIONI
Configura data e ora
IT
Effettuare una chiamata
intercomunicante
1. Accedere al menu principale premendo il
pulsante
.
2. Selezionare il menu Rubrica intercomunicante
con i pulsanti , e premere il pulsante per
accedere.
3. Selezionare la voce desiderata con i pulsanti
, e premere il pulsante per inviare la
chiamata.
Modifi care nome nella rubrica
intercomunicante
1. Accedere al menu principale premendo il
pulsante
.
2. Selezionare il menu Rubrica intercomunicante
con i pulsanti
, e premere il pulsante per
accedere.
3. Selezionare la voce della rubrica per cui si
desidera modifi care il nome con i pulsanti
,
e premere il pulsante
per accedere.
4. Selezionare la lettera desiderata con i pulsanti
, e modifi carla con i pulsanti , .
5. Premere il pulsante
per uscire e salvare le
modifi che.
1. Accedere al menu principale premendo il
pulsante
.
2. Selezionare il menu Impostazioni con i pulsanti
, e premere il pulsante per accedere.
Impostare data e ora
3. Selezionare il menu Confi gura data e ora con
i pulsanti
, e premere il pulsante per
accedere.
4. Selezionare il campo da modifi care con i pulsanti
, e variare il valore con i pulsanti , .

7
IMPOSTA DATA E ORA
Sinistra Destra
0 2 / 0 2 / 2 0 1 1
1 0
:
0 2
13
MENU PRINCIPALE
Segreteria
SEGRETERIA
Video segreteria non attiva
SEGRETERIA
Video segreteria attiva
14
MENU PRINCIPALE
Segreteria
SEGRETERIA
Guarda video messaggi
SEGRETERIA
02/02/2011 10:48
Cancella
IT
5. Premere il pulsante per uscire e salvare le
modifi che.
Attivare video segreteria
1. Accedere al menu principale premendo il
pulsante
.
2. Selezionare il menu Segreteria con i pulsanti
, e premere il pulsante per accedere.
3. Selezionare l’icona Video segreteria non attiva
con i pulsanti , .
4. Premere il pulsante
per attivare.
La funzione video segreteria, se attivata, permette
di registrare l’immagine dal posto esterno nel
momento in cui viene ricevuta una chiamata (Max
8 secondi).
Visualizzare registrazioni
della video segreteria
1. Accedere al menu principale premendo il
pulsante
.
2. Selezionare il menu Segreteria con i pulsanti
, e premere il pulsante per accedere.
3. Selezionare l’icona Guarda video messaggi
con i pulsanti
, e premere il pulsante per
accedere.
4. Selezionare il video desiderato con i pulsanti ,
e premere il pulsante per confermare.
Le registrazioni vengono salvate in formato
.avi nella scheda SD sotto la cartella “video” e
possono essere visualizzate anche su pc con
Windows Media Player. In assenza della scheda
SD le registrazioni vengono salvate nella fl ash del
monitor (Max 8 registrazioni).

8
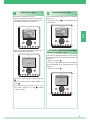
15
Porta1: In comunicazione
16
MENU PRINCIPALE
Impostazioni
MENU MELODIE
Chiamata intercomunicante
MELODIA CHIAMATA INTERCOM
Volume -
Melodia 1
Melodia 3
Vibey
Amazing
Bomba
Melodia 2
Volume +
IT
Per cancellare un video:
} Selezionare il video desiderato con i pulsanti
,
e premere il pulsante per confermare.
Registrazione manuale
È possibile registrare manualmente una chiamata
con il posto esterno.
} Premere il pulsante
per iniziare a registrare.
La funzione è disponibile nelle seguenti situazioni:
√ Chiamata da posto esterno.
√ Durante Autoaccensione.
• Se attivato da un monitor principale la
funzione registrerà sia l’audio che il video.
1. • Se attivato da un monitor secondario, per
registrare l’audio occorre essere in fonica con
il posto esterno
} Per visualizzare i video registrati seguire la
procedura descritta al punto 14.
Confi gurare melodie
1. Accedere al menu principale premendo il
pulsante
.
2. Selezionare il menu Impostazioni con i pulsanti
, e premere il pulsante per accedere.
3. Selezionare il menu Imposta melodie con i
pulsanti
, e premere il pulsante per
accedere.
4. Selezionare il tipo di chiamata per la quale si
desidera modifi care la melodia con i pulsanti
,
e premere il pulsante per accedere.
5. Selezionare la melodia desiderata con i pulsanti
, e premere il pulsante per confermare.
Con i pulsanti
, è possibile aumentare o
diminuire il volume della suoneria.
È possibile aggiungere delle suonerie
personalizzate.
√ I fi le devono essere in formato .wav da 8Khz
mono 16 bit.
} Inserire le melodie nella cartella “wav” della
scheda SD per visualizzarle nell’apposito menu.
È possibile personalizzare le melodie per:
• Chiamata intercomunicante.
• Chiamata da posto esterno.
• Chiamata fuori porta.

9
1
1
23 4 5678
9
EN
1 Speech button. Enables or disables
conversation.
2 Menu button. Used to access, exit or go up one
level in the menu.
3 Confi rmation button. Confi rms a selection in
the menu.
4 Navigation buttons. For navigating items /
editing values in the menu.
5 Button 1. General Internal Call. *
6 Button 2. General External Call. *
7 Self-Ignition button. *
8 Privacy / Doctor button. *
• The Privacy function mutes the ringtone when
an external unit call or intercom call is received.
* Programmable, contact your usual installer.
NOTE: The door entry functions associated with the buttons are only available when the menu is switched off.
Caution! In order to reduce the risk of faults and electric shocks:
• Do not open the apparatus or carry out any repairs yourself. If necessary, request the services of qualifi ed personnel.
• Do not insert objects or pour liquids into the device.
• Clean using a damp cloth. Do not use alcohol or other aggressive products.
• The Privacy + Doctor function, apart from disabling the ringtone as in the Privacy function, enables automatic
activation of the lock release in response to a call from the external unit.
• The Doctor function enables automatic activation of the lock release in response to a call from the external unit.
9 Door Lock button. Used to activate the door lock associated with the external unit. *
Description of monitor and button door entry functions
TABLE OF CONTENTS
1. Description of monitor and button door entry functions ................................................................ 9
2. Answering a call .......................................................................................................................... 10
3. Self-Ignition function.................................................................................................................... 10
4. Making an intercom call using buttons 1 or 2 .............................................................................. 10
5. Setting the menu language ......................................................................................................... 11
6. Description of menu .................................................................................................................... 11
7. Condition menu ........................................................................................................................... 11
8. Recording the absent message .................................................................................................. 12
9. Activating the absent message ................................................................................................... 12
10. Changing a name in the intercom directory ................................................................................ 13
11. Making an intercom call .............................................................................................................. 13
12. Setting the date and time ............................................................................................................ 13
13. Activating video memory ............................................................................................................. 14
14. Viewing recordings stored in the video memory ......................................................................... 14
15. Manual recording ........................................................................................................................ 15
16. Confi guring melodies .................................................................................................................. 15

10
2
Door 1: Waiting for reply
Door 1
EXTERNAL UNIT CALL
Waiting for reply
3
Door 1: Waiting for reply
4
General internal
Waiting for Reply
INTERCOM CALL
EN
Answering a call
When a call is received from the external unit:
• In the case of a main monitor (MAX 1 per apartment), the
image from the external unit is automatically displayed on
the monitor.
• In the case of a secondary monitor, the device indicates
that a call has been received from the external unit.
} To enable / disable audio communication press the
button.
} To activate the door lock associated with the external unit
press the
button.
} To display the image without activating audio
communication with the external unit press the
button
(secondary monitor only).
Self-Ignition function
When the system is in standby, to display the image from
the external unit:
} Press the
button (if the factory settings have been
kept).
To make a general internal call to all devices in the same
apartment (if the factory settings have been kept):
} Press button
To make a general external call to all devices in another
apartment (if the factory settings have been kept):
} Press button
Making an intercom call using
buttons 1 or 2

11
5
LANGUAGES MENU
Italiano
English
Français
Español
Português
Deutsch
MENU LINGUE
Français
Español
Português
Deutsch
English
Italiano
Italiano
NO
OK
6
MAIN MENU
Intercom Directory
1
2
3
4
7
CONDITION MENU
New Messages in Video Memory
EN
When you fi rst access the menu ( button), you will be
asked to set the language.
1. Select the language using the
, buttons and
confi rm by pressing the
button.
2. Press the button to exit.
3. Select “OK” using the
, buttons and confi rm by
pressing the
button.
Setting the menu language
Description of menu
1 Title of currently open menu.
2 Frame indicating selected menu.
3 Menu icons.
4 Title of selected menu.
Condition menu
From this menu it is possible to:
• Select functions using the
, buttons.
• Deactivate functions and watch recorded video using the
buttons.
• Return to the main menu using the
button.
Can only be accessed when:
• The Absent Message function is activated.
• There is a new video message in the memory.
• Door open.

12
8
MEMORY MENU
Video Memory OFF
ABSENT MESSAGE
Listen Recorded Message
ABSENT MESSAGE
Stop Recording
9
MEMORY MENU
Video Memory OFF
MEMORY MENU
Absent Message ON
EN
Recording the absent message
The Absent Message function, if activated, can be used
to play a recorded message over the loudspeaker of the
external unit when a call is sent.
1. Access the main menu by pressing the
button.
2. Select the Memory menu using the
, buttons and
press the
button to access it.
3. Select the Listen recorded message menu using the
, buttons and press the button to access it.
4. Select the Record Message icon using buttons
,
and press the
button to confi rm.
5. Speak into the monitor’s microphone to record the
message (max 20 secs)
6. To stop the recording before the 20 seconds have
elapsed, press the
button.
7. To listen to the recorded message select the Listen
Recorded Message icon using the
, buttons and
press the
button to confi rm.
Activating the absent message
1. Access the main menu by pressing the button.
2. Select the Memory menu with the
, buttons and
press the
button to access it.
3. Select the Absent Message OFF button using the ,
buttons and press the button to confi rm.

13
10
INTERCOM DIRECTORY
SECONDARY 1
MAIN
GENERAL EXTERNAL
GENERAL INTERNAL
SECONDARY 2
SECONDARY 3
Modify
INTERCOM CALL
GENERAL INTERNAL
Waiting for Reply
11
INTERCOM DIRECTORY
SECONDARY 1
MAIN
GENERAL EXTERNAL
GENERAL INTERNAL
SECONDARY 2
SECONDARY 3
Modify
MODIFY NAME
G E N E R A L I N T E R N A L
Configure name
Delete
Left Right
12
MAIN MENU
Settings
SETTINGS MENU
Date & Time Settings
EN
Making an intercom call
1. Access the main menu by pressing the button.
2. Select the Intercom Directory menu with the ,
buttons and press the
button to access it.
3. Select the desired item using the
, buttons and
press the
button to send the call.
Changing a name in the
intercom directory
1. Access the main menu by pressing the button.
2. Select the Intercom Directory menu with the
,
buttons and press the
button to access it.
3. Select the directory item whose name you want to edit
using the
, buttons and press the button to
access it.
4. Select the desired letter using the , buttons and
change it using the
, buttons.
5. Press the
button to exit and save the changes.
1. Access the main menu by pressing the button.
2. Select the Settings menu with the
, buttons and
press the
button to access it.
Setting the date and time
3. Select the Date & Time Settings menu with the ,
buttons and press the
button to access it.
4. Select the fi eld that you want to edit using the
,
buttons and change the value using the
, buttons.

14
SET DATE & TIME
Left Right
0 2 / 0 2 / 2 0 1 1
1 0
:
0 2
13
MAIN MENU
Memory menu
MEMORY MENU
Video Memory OFF
MEMORY MENU
Video Memory ON
14
MAIN MENU
Memory menu
MEMORY MENU
Watch video messages
MEMORY MENU
02/02/2011 10:48
Delete
EN
5. Press the button to exit and save the changes.
Activating video memory
1. Access the main menu by pressing the button.
2. Select the Memory menu with the
, button and
press the
button to access it.
3. Select the Video Memory OFF icon using the ,
buttons.
4. Press the
button to activate the function.
The video memory function, if activated, can be used
to record the image from the external unit when a call is
received (max 8 seconds).
Viewing recordings stored
in the video memory
1. Access the main menu by pressing the button.
2. Select the Memory menu with the
, buttons and
press the
button to access it.
3. Select the Watch video messages icon using the
,
buttons and press the button to access it.
4. Select the desired recording using the
, buttons
and press the
button to confi rm.
Recordings are saved in .avi format on the SD card, in
the "video" folder, and may also be viewed on a PC using
Windows Media Player. If there is no SD card the recordings
will be saved in the fl ash memory of the monitor (max 8
records).

15
15
Door 1: Call connected
16
MAIN MENU
Settings
MELODIES MENU
Intercom Call
INTERCOM CALL MELODIES
Volume -
Melody 1
Melody 3
Vibey
Amazing
Bomba
Melody 2
Volume +
EN
To delete a video recording:
} Select the desired recording using the
, buttons
and press the
button to confi rm.
Manual recording
It is possible to manually record a call with the external unit.
} Press the
button to start recording.
The function is available in the following situations:
√ External unit call.
√ During self-ignition.
• If activated from a main monitor, the function will
record both audio and video.
• If activated from a secondary monitor, to record audio
it is necessary to be in communication with the external
unit,
} To display recorded video follow the procedure described
in point 14.
Confi guring melodies
1. Access the main menu by pressing the button.
2. Select the Settings menu using the
, buttons and
press the
button to access it.
3. Select the Melodies Settings menu using the
,
buttons and press the
button to access it.
4. Select the type of call whose melody you want to change
using the
, buttons and press the button to
access it.
5. Select the desired melody using the
, buttons and
press the
button to confi rm.
The , buttons can be used to increase or decrease
the ringtone volume.
Customised ringtones may be added.
√ Files must be 8 Khz mono 16 bit, in .wav format.
} Place the melodies in the "wav" folder on the SD card to
display them in the relevant menu.
It is possible to customise the melodies for:
• Intercom call.
• External unit call.
• Floor door call.

16
1
1
23 4 5678
9
FR
1 Touche phonie. Permet d'activer ou de désactiver
la conversation.
2 Touche menu. Permet d'accéder au menu, de
sortir du menu et de monter d'un niveau dans le
menu.
3 Touche confi rmation. Permet de confi rmer une
sélection dans le menu.
4 Touches navigation. Permettent de naviguer /
modifi er les valeurs dans le menu.
5 Touche 1. Appel général interne. *
6 Touche 2. Appel général externe. *
7 Touche Auto-allumage. *
8 Touche Privacy / Docteur. *
• La fonction Privacy permet d'exclure la sonnerie
sur appel du poste externe et intercommunicant.
* Programmable, s'adresser à un installateur de confi ance.
N.B. : Les fonctions parlophoniques des touches ne sont disponibles que menu éteint.
Attention ! Afi n de réduire le risque de pannes et les électrocutions :
• Ne pas ouvrir l'appareil ni effectuer personnellement les réparations. En cas de nécessité, demander l'intervention de
techniciens spécialisés.
• Ne jamais introduire d'objets ni verser des liquides à l'intérieur du dispositif.
• Nettoyer avec un chiffon humidifi é avec de l'eau. Éviter d'utiliser de l'alcool ou d'autres produits agressifs.
• La fonction Privacy + Docteur permet non seulement de désactiver la sonnerie comme dans la fonction Privacy, mais
aussi d'activer automatiquement l'ouvre-porte sur appel du poste externe.
• La fonction Docteur permet l'activation automatique de l'ouvre-porte sur appel du poste externe.
9 Touche Gâche. Permet d'activer la gâche du poste externe. *
Description moniteur et fonction parlophonique des touches
SOMMAIRE
1. Description moniteur et fonction parlophonique des touches ..................................................... 16
2. Répondre à un appel................................................................................................................... 17
3. Fonction d’Auto-allumage ............................................................................................................ 17
4. Effectuer un appel intercommunicant avec les touches 1 ou 2 ................................................... 17
5. Confi guration de la langue du menu ........................................................................................... 18
6. Description du menu ................................................................................................................... 18
7. Menu d'état ................................................................................................................................. 18
8. Enregistrer le message pour absent ........................................................................................... 19
9. Activer message pour absent ...................................................................................................... 19
10. Modifi er un nom dans le répertoire appels intercommunicants .................................................. 20
11. Effectuer un appel intercommunicant .......................................................................................... 20
12. Confi gurer la date et l’heure ....................................................................................................... 20
13. Activer vidéo répondeur .............................................................................................................. 21
14. Affi cher les enregistrements vidéo répondeur ............................................................................. 21
15. Enregistrement manuel ............................................................................................................... 22
16. Confi gurer les mélodies .............................................................................................................. 22

17
2
Porte 1: En attente de réponse
Porte 1
En attente de réponse
APPEL DU POSTE EXTERNE
3
Porte 1: En attente de réponse
4
General interne
En Attente de Réponse
APPEL INTERCOMMUNICANT
FR
Répondre à un appel
À la réception d'un appel du poste externe :
• Dans le cas d'un moniteur principal (1 par appartement
au maximum), l'image provenant du poste externe est
automatiquement visualisée sur le moniteur.
• Dans le cas d'un moniteur secondaire, l'indication d'un
appel du poste externe apparaît alors.
} Pour activer / désactiver la phonie, appuyer sur la touche
.
} Pour activer la gâche du poste externe, appuyer sur la
touche
.
} Pour visualiser l'image sans activer la phonie avec le
poste externe, appuyer sur la touche
(seulement
moniteur secondaire).
Fonction d'Auto-allumage
Pour visualiser l'image à partir du poste externe, l'installation
étant au repos :
} Appuyer sur la touche
(si les paramétrages d'usine
sont maintenus).
Pour effectuer un appel général interne à tous les appareils
du même appartement (si les paramétrages d'usine sont
maintenus) :
} Appuyer sur la touche
Pour effectuer un appel général externe à tous les appareils
de l'autre appartement (si les paramétrages d'usine sont
maintenus) :
} Appuyer sur la touche
Effectuer un appel intercommunicant
avec les touches 1 ou 2

18
5
MENU LANGUE
Italiano
English
Français
Español
Português
Deutsch
MENU LINGUE
Italiano
Español
Português
Deutsch
English
Français
NO
OK
Français
6
MENU PRINCIPAL
Repertoire Intercommunicant
1
2
3
4
7
MENU D’ETAT
Nouveaux Messages Présents
FR
Lors du premier accès au menu (touche ), choisir la
langue que l'on désire utiliser.
1. Sélectionner la langue avec les touches
, et
confi rmer par
.
2. Appuyer sur la touche pour sortir.
3. Sélectionner “OK” avec les touches
, et confi rmer
par
.
Confi guration de la langue du menu Description du menu
1 Titre du menu actuellement ouvert.
2 Bordure (cadre) indiquant le menu sélectionné.
3 Icône menu.
4 Titre du menu sélectionné.
Menu d'état
À partir de ce menu, il est possible :
• De sélectionner les fonctions avec les touches
, .
• De désactiver les fonctions et regarder les vidéos
enregistrées avec la touche
.
• De revenir au menu principal avec la touche
.
Accessible seulement quand :
• La fonction Message pour absent est active (ON).
• Un nouveau message vidéo est enregistré dans le répondeur.
• Porte ouverte.

19
8
REPONDEUR
Vidéo répondeur OFF
MESSAGE POUR ABSENT
Ecouter l'enregistrement
MESSAGE POUR ABSENT
Arrêter l'enregistrement
9
REPONDEUR
Vidéo répondeur OFF
REPONDEUR
Message pour absent ON
FR
Enregistrer le message pour absent
La fonction message pour absent, si active, permet de
reproduire un message sur l'haut-parleur du poste externe
lorsqu'un appel est envoyé.
1. Accéder au menu principal en appuyant sur la touche
.
2. Sélectionner le menu Répondeur avec les touches
,
et appuyer sur la touche pour y accéder.
3. Sélectionner le menu Écouter enregistrer message
avec les touches
, et appuyer sur la touche pour
y accéder.
4. Sélectionner l'icône Démarrer l'enregistrement avec
les touches
, et confi rmer par .
5. Parler au microphone du moniteur pour enregistrer le
message (20 s au maximum)
6. Pour interrompre l'enregistrement avant le délai de 20
secondes, appuyer sur la touche
.
7. Pour réécouter le message enregistré, sélectionner
l'icône Écouter l'enregistrement avec les touches ,
et confi rmer par .
Activer message pour absent
1. Accéder au menu principal en appuyant sur la touche
.
2. Sélectionner le menu Répondeur avec les touches
,
et appuyer sur la touche pour y accéder.
3. Sélectionner l'icône Message pour absent OFF avec
les touches , et confi rmer par .

20
10
REPERT. APPELS INTERCOM
SECONDAIRE 1
PRINCIPAL
GENERAL EXTERNE
GENERAL INTERNE
SECONDAIRE 2
SECONDAIRE 3
Modifier
APPEL INTERCOMMUNICANT
General interne
En Attente de Réponse
11
REPERT. APPELS INTERCOM
SECONDAIRE 1
PRINCIPAL
GENERAL EXTERNE
GENERAL INTERNE
SECONDAIRE 2
SECONDAIRE 3
Modifier
CHANGER ELEMENT
G E N E R A L I N T E R N E
Configurer nom
Effacer
Gauche Droit
12
MENU PRINCIPAL
Réglages
MENU REGLAGES
Configurer Date et Heure
FR
Effectuer un appel
intercommunicant
1. Accéder au menu principal en appuyant sur la touche
.
2. Sélectionner le menu Répertoire appels intercommunicants
avec les touches
, et appuyer sur la touche pour y
accéder.
3. Sélectionner la rubrique (l’élément) désirée avec les
touches
, et appuyer sur la touche pour envoyer
l'appel.
Modifi er un nom dans le répertoire
appels intercommunicants
1. Accéder au menu principal en appuyant sur la touche
.
2. Sélectionner le menu Répertoire appels intercommunicants
avec les touches
, et appuyer sur la touche pour y
accéder.
3. Sélectionner la rubrique (l'élément) du répertoire dont on
désire modifi er le nom avec les touches
, et appuyer
sur la touche
pour y accéder.
4. Sélectionner la lettre désirée avec les touches
, et
la modifi er avec les touches
, .
5. Appuyer sur la touche
pour sortir et sauvegarder les
modifi cations.
1. Accéder au menu principal en appuyant sur la touche .
2. Sélectionner le menu Réglages avec les touches ,
et appuyer sur la touche pour y accéder.
Confi gurer la date et l’heure
3. Sélectionner le menu Confi gurer date et heure avec
les touches
, et appuyer sur la touche pour y
accéder.
4. Sélectionner le champ à modifi er avec les touches
,
et modifi er la valeur avec les touches , .
Seite wird geladen ...
Seite wird geladen ...
Seite wird geladen ...
Seite wird geladen ...
Seite wird geladen ...
Seite wird geladen ...
Seite wird geladen ...
Seite wird geladen ...
Seite wird geladen ...
Seite wird geladen ...
Seite wird geladen ...
Seite wird geladen ...
Seite wird geladen ...
Seite wird geladen ...
Seite wird geladen ...
Seite wird geladen ...
Seite wird geladen ...
Seite wird geladen ...
Seite wird geladen ...
Seite wird geladen ...
Seite wird geladen ...
Seite wird geladen ...
Seite wird geladen ...
Seite wird geladen ...
Seite wird geladen ...
Seite wird geladen ...
Seite wird geladen ...
Seite wird geladen ...
Seite wird geladen ...
Seite wird geladen ...
Seite wird geladen ...
Seite wird geladen ...
-
 1
1
-
 2
2
-
 3
3
-
 4
4
-
 5
5
-
 6
6
-
 7
7
-
 8
8
-
 9
9
-
 10
10
-
 11
11
-
 12
12
-
 13
13
-
 14
14
-
 15
15
-
 16
16
-
 17
17
-
 18
18
-
 19
19
-
 20
20
-
 21
21
-
 22
22
-
 23
23
-
 24
24
-
 25
25
-
 26
26
-
 27
27
-
 28
28
-
 29
29
-
 30
30
-
 31
31
-
 32
32
-
 33
33
-
 34
34
-
 35
35
-
 36
36
-
 37
37
-
 38
38
-
 39
39
-
 40
40
-
 41
41
-
 42
42
-
 43
43
-
 44
44
-
 45
45
-
 46
46
-
 47
47
-
 48
48
-
 49
49
-
 50
50
-
 51
51
-
 52
52


Comelit iPower 8595 Benutzerhandbuch
- Typ
- Benutzerhandbuch
- Dieses Handbuch eignet sich auch für
in anderen Sprachen
- English: Comelit iPower 8595 User manual
- français: Comelit iPower 8595 Manuel utilisateur
- español: Comelit iPower 8595 Manual de usuario
- italiano: Comelit iPower 8595 Manuale utente
- Nederlands: Comelit iPower 8595 Handleiding
- português: Comelit iPower 8595 Manual do usuário
Verwandte Artikel
-
Comelit Planux ViP 6202 Benutzerhandbuch
-
-
-
-
-
-
-
-
-