Venjakob game panel Assembly Instructions
- Typ
- Assembly Instructions

Aufbauanleitung:
Paneel 9803 & 9804
Service Hotline: Tel. +49 5209/592-0
Internet: www.venjakob-moebel.de (Weitere Aufbauanleitungen)
1. Die genaue Position für das Paneel an der Zimmerwand
festlegen.
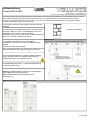
2. Bohrmaße für Aufhängeschienen Abb. 1 an Zimmerwand
übertragen. Ø8 mm Löcher in das Mauerwerk bohren und
Dübel Ø8 x 51 mm (Teil-Nr. 50802) einsetzen.
Aufhängeschiene (Teil-Nr. 50811) mit 2 x Flachkopfschraube
Ø5 x 50 mm (Teil-Nr. 00055) anschrauben.
Abbildung 1:
Bohrmaße von Paneel-Außenkante für Aufhängeschienen
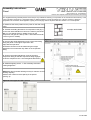
4. Die Höhenstellschraube des unteren Hängebeschlages
soweit eindrehen, dass der Hängebeschlag unter die
Hängeschiene greift = Aushängesicherung!
5. Zusatzartikel Beleuchtung: => Siehe Montageanleitung
"Anschluss Beleuchtung"
Achtung: Alle Beschläge aus Gründen der Tragfähigkeit
gleichmäßig ausrichten und belasten!
Maximale Belastbarkeit der Paneele beachten
(siehe Abb. 2)!
Abbildung 2: Paneeltypen und Position Beschlag
Das mitgelieferte Befestigungsmaterial (Dübel und Schrauben) ist ausschließlich für die Befestigung von Bauteilen an Beton und/oder
festem Mauerwerk geeignet. Bei abweichender Beschaffenheit (z. B. Leichtbauwänden) ist eine andere Befestigung bauseits
vorzunehmen. Klären Sie elektrische Vorleistungen für Anschluss- und Gerätetechnik. Beleuchtungen in frei hängenden Möbeln
erfordern Kabelkanallösungen auf oder unter Putz.
3. Höhenstellschraube des unteren Beschlages
herausdrehen. Paneel auf die oberen Aufhängeschienen
hängen.
Ausrichten mit der Wasserwaage:
Eine horizontale Korrektur ist mit der Höhen-Stellschraube mit
Inbusschlüssel SW4 am Hängebeschlag vorzunehmen.
Beispiel: Modell 9803
17.10.2023

Assembly instructions:
Panel
Service hotline: Tel. +49 5209/592-0
Internet: www.venjakob-moebel.de (more assembly instructions)
1.
Determine the exact position for the panel on the wall of the
room.
2. Transfer the drilling dimensions for suspension rails (fig. 1)
to the room wall. Drill Ø8 mm holes in the masonry and insert
Ø8 x 51 mm dowels (part no. 50802). Screw on the
suspension rail (part no. 50811) with 2 x flat-head screws Ø5
x 50 mm (part no. 00055).
Figure 1:
Drilling dimensions of panel outer edge for suspension rails
4. Screw in the height adjustment screw of the lower
suspension fitting so that the suspension fitting engages
under the suspension rail = secured against detachment!
5. Additional lighting article: => See assembly instruction
"Wiring diagramm"
Attention:
Align and load all fittings evenly for reasons of load-
bearing capacity!
Observe the maximum load capacity of the panels
(see fig. 2)!
Figure 2: Panel types and fitting position
The supplied fastening material (dowels and screws) is only suitable for fastening of components to concrete and/or solid masonry. In the
case of deviating properties (e.g. lightweight walls), a different fastening must be provided by the customer. Clarify any electrical
preparations for connection and equipment. Lighting in free-hanging furniture requires cable duct solutions on or under plaster.
3. Unscrew the height adjustment screw of the lower fitting.
Hang the panel on the upper suspension rails.
Align with the spirit level:
Horizontal correction must be made using the height
adjustment screw with Allen key SW4 on the suspension
fitting.
Example: Model 9803
17.10.2023
-
 1
1
-
 2
2


Venjakob game panel Assembly Instructions
- Typ
- Assembly Instructions
in anderen Sprachen
- English: Venjakob game panel
Verwandte Artikel
-
Venjakob X6 hanging lowboard Assembly Instructions
-
-
-
-
-