Lenco Classic Bedienungsanleitung
- Kategorie
- CD-Spieler
- Typ
- Bedienungsanleitung
Dieses Handbuch eignet sich auch für

1
Model: TCD-2600
USER MANUAL- Turntable with bluetooth and built-in speakers
GEBRUIKERSHANDLEIDING- Platenspeler met bluetooth en ingebouwde
luidsprekers
BEDIENUNGSANLEITUNG – Plattenspieler mit Bluetooth und integrierten
Lautsprechern
MODE D’EMPLOI - Tourne-disque avec enceintes intégrées et Bluetooth
MANUAL DE USUARIO- Tocadiscos con bluetooth y altavoces integrados

2
Index:
English ......................................................................................................................................................... 3
Nederlands ................................................................................................................................................ 20
Deutsch ..................................................................................................................................................... 38
Français ..................................................................................................................................................... 57
Español ...................................................................................................................................................... 76
Version: 1.0

3
English TCD-2600
CAUTION:
Usage of controls or adjustments or performance of procedures other than those specified
herein may result in hazardous radiation exposure.
This unit should not be adjusted or repaired by anyone except qualified service personnel.
PRECAUTIONS BEFORE USE
KEEP THESE INSTRUCTIONS IN MIND:
1. Do not use this device near water.
2. Clean only with a slightly damp cloth.
3. Do not cover or block any ventilation openings. When placing the device on a shelf, leave 5
cm (2”) free space around the whole device.
4. Install in accordance with the supplied user manual.
5. * Don’t step on or pinch the power adaptor. Be very careful, particularly near the plugs and
the cable’s exit point. Do not place heavy items on the power adaptor, which may damage
it. Keep the entire device out of children’s reach! When playing with the power cable, they
can seriously injure themselves.
6. * Unplug this device during lightning storms or when unused for a long period.
7. Keep the device away from heat sources such as radiators, heaters, stoves, candles and
other heat-generating products or naked flame.
8. Avoid using the device near strong magnetic fields.
9. Electrostatic discharge can disturb normal usage of this device. If so, simply reset and
restart the device following the instruction manual. During file transmission, please handle
with care and operate in a static-free environment.
10. Warning! Never insert an object into the product through the vents or openings. High
voltage flows through the product and inserting an object can cause electric shock and/or
short circuit internal parts. For the same reason, do not spill water or liquid on the product.
11. Do not use in wet or moist areas such as bathrooms, steamy kitchens or near swimming
pools.
12. Do not use this device when condensation may occur.
13. Although this device is manufactured with the utmost care and checked several times
before leaving the factory, it is still possible that problems may occur, as with all electrical
appliances. If you notice smoke, an excessive build-up of heat or any other unexpected
phenomena, you should disconnect the plug from the main power socket immediately.
14. This device must operate on a power source as specified on the specification label. If you
are not sure of the type of power supply used in your home, consult your dealer or local
power company.
15. * The socket outlet must be installed near the equipment and must be easily accessible.
16. * Do not overload ac outlets or extension cords. Overloading can cause fire or electric
shock.
17. * Devices with class 1 construction should be connected to a main socket outlet with a
protective earthed connection.
18. * Devices with class 2 construction do not require a earthed connection.
19. Keep away from rodents. Rodents enjoy biting on power cords.
20. * Always hold the plug when pulling it out of the main supply socket. Do not pull the power
cord. This can cause a short circuit.
21. Avoid placing the device on any surfaces that may be subject to vibrations or shocks.
22. To clean the device, use a soft dry cloth. Do not use solvents or petrol based fluids. To
remove severe stains, you may use a damp cloth with dilute detergent.
23. The supplier is not responsible for damage or lost data caused by malfunction, misuse,
modification of the device or battery replacement.
24. Do not interrupt the connection when the device is formatting or transferring files.
Otherwise, data may be corrupted or lost.
25. If the unit has USB playback function, the usb memory stick should be plugged into the
unit directly. Don’t use an usb extension cable because it can cause interference resulting
in failing of data.
26. The apparatus shall not be exposed to dripping or splashing and make sure that no objects
filled with liquids, such as vases, are placed on or near the apparatus.

4
27. * To completely disconnect the power input, the mains plug of the apparatus shall be
disconnected from the mains, as the disconnect device is the mains plug of apparatus.
28. If the unit works with battery, Battery shall not be exposed to excessive heat such as
sunshine, fire or the like.
29. Attention should be drawn to the environmental aspects of battery disposal.
30. The apparatus can only be used in moderate extremely cold or climates warm
environments should be avoided.
31. The rating label has been marked on the bottom or back panel of the apparatus.
32. This device is not intended for use by people (including children) with physical, sensory or
mental disabilities, or a lack of experience and knowledge, unless they’re under
supervision or have received instructions about the correct use of the device by the person
who is responsible for their safety.
33. This product is intended for non-professional use only and not for commercial or industrial
use.
34. Make sure the unit is adjusted to a stable position. Damage caused by using this product in
an unstable position or by failure to follow any other warning or precaution contained
within this user manual will not be covered by warranty.
35. Never remove the casing of this apparatus.
36. Never place this apparatus on other electrical equipment.
37. Do not use or store this product in a place where it is subject to direct sunlight, heat,
excessive dust or vibration.
38. Do not allow children access to plastic bags.
39. Only use attachments/accessories specified by the manufacturer.
40. Refer all servicing to qualified service personnel. Servicing is required when the apparatus
has been damaged in any way, such as the power supply cord or the plug, when liquid has
been spilled or objects have fallen into the apparatus, when the apparatus has been
exposed to rain or moisture, does not operate normally, or has been dropped.
41. *Do not use a damaged power cord or plug or a loose outlet. Doing so may result in fire or
electric shock.
42. Prolonged exposure to loud sounds from personal music players may lead to temporary or
permanent hearing loss.
INSTALLATION
• Unpack all parts and remove protective material.
• *Do not connect the unit to the mains before checking the mains voltage and before all
other connections have been made.
*These instructions are related only to products using power cable or AC power adaptor.

5
GETTING STARTED
CONNECTING THE AC POWER CORD
1. Unwind the AC POWER CORD (30) fully and connect it to any convenient household 230V ~ 50Hz
outlet
2. Rotate the POWER/VOLUME ON/OFF SWITCH (5) clockwise to turn on the TCD-2600.
LOCATION OF CONTROLS
1. SPEAKERS
2. FUNCTION SELECTOR
3. DIAL SCALE
4. TUNING KNOB
5. POWER/VOLUME ON/OFF SWITCH
6. FOLDER/REPEAT BUTTON
7. PLAY/PAUSE BUTTON
8. CD DOOR OPEN/CLOSE BUTTON
9. STOP BUTTON
10. LINE-IN JACK
1
24 25 26
27
28
293031
32
33 34
223635 23
2 3 4 5
19
6
9
7
8
18
17
16
15
14
11 2013 12 10
21

6
11. LED DISPLAY
12. CD DOOR
13. EARPHONE JACK
14. B. SKIP BUTTON
15. AM/FM SELECTOR
16. F, SKIP BUTTON
17. PROGRAM BUTTON
18. REPEAT ONE SONG LED INDICATOR
19. REPEAT ALL
20. PLAYBACK PROGRAMMED SONG LED INDICATOR
21. PLAYBACK NON-PROGRAMMED SONG LED INDICATOR
22. CASSETTE EJECT/FAST FORWARD BUTTON
23. CASSETTE SLOT
24. TURNTABLE SHAFT
25. TURNTABLE PLATTER
26. 45 RPM ADAPTOR
27. LIFT LEVER
28. AUTO STOP SWITCH
29. TONE ARM
30. 33/45/78 RPM SPEED SELECTOR
31. TONE ARM REST
32. AIR CIRCULATION
33. FM ANTENNA
34. AC POWER CORD
35. BLUETOOTH/CASSETTE FUNCTION SELECTOR BUTTON
36. USB SOCKET FOR PC ENCODING
CAUTION:
This unit should not be adjusted or repaired by anyone except qualified service personnel.
RADIO OPERATION
1. Rotate the POWER/VOLUME ON/OFF SWITCH (5) to turn on the TCD-2600.
2. Rotate the FUNCTION SELECTOR (2) to select Radio mode. The dial scale LED will light up.
3. Use the AM/FM SELECTOR (15) to select the desired bands.
4. Adjust the TUNING KNOB (4) to tune in the station you want to listen to.
5. Rotate the POWER/VOLUME ON/OFF SWITCH (5) to the desired volume level.
6. When you wish to turn off the Radio, rotate the POWER/VOLUME ON/OFF SWITCH (5) to the OFF
position.
Hints for best reception:-
- AM: The receiver has a built-in AM bar antenna. If AM reception is weak, slightly rotate or change
the position of the unit will usually improve the AM reception.
- FM: The receiver has a build-in FM ANTENNA (33) which can be found at the back of the unit. This
wire should be totally unraveled and extended for best reception.

7
CD OPERATION
NOTE: THIS UNIT NOT ONLY PLAYS COMMERCIAL COMPACT DISCS BUT ALSO SELF-COMPILED CD-RW
DISCS.
PLEASE READ THIS IMPORTANT INFORMATION:
CD mechanisms used in devices like this are designed to fully read all commercial CDs. They will also
read self-compiled CD-R/CD-RW discs but it may take up to 10 seconds for playback to start. If playback
does not start, it is likely due to the quality of the CD-R/RW disc and/or the compatibility of the CD
compilation software. Manufacturer is not responsible for the playback quality of CD-R/RW discs.
Do not attach a label or seal to either side of the CD-R/RW disc. It may cause a malfunction.
PLAYING A CD
1. Rotate the POWER/VOLUME ON/OFF SWITCH (5) to turn on the TCD-2600.
2. Rotate the FUNCTION SELECTOR (2) to select CD mode.
3. Press CD DOOR OPEN/CLOSE BUTTON (8) to open the disc tray.
4. Carefully place an audio CD with its label side upward on the tray.
5. Press CD DOOR OPEN/CLOSE BUTTON (8) to close the tray, the disc will started playing the first track
once loaded.
6. To pause playback, press the PLAY/PAUSE BUTTON (7). To resume playing press PLAY/PAUSE BUTTON
(7) again.
7. You can choose to play your favorite track directly by pressing either the F. SKIP BUTTON (16) or B.
SKIP BUTTON (14). The LED DISPLAY (11) will indicate the correct track number selected.
8. To locate a particular section within a track, press and hold the F. SKIP BUTTON (16) or B. SKIP
BUTTON (14) until the section is found. Release the button to continue playing your selection.
9. To stop playing, press STOP BUTTON (9).
10. When you wish to turn off the CD Player, rotate the POWER/VOLUME ON/OFF SWITCH (5) to the OFF
position
REPEAT MODE
REPEAT 1
When the FOLDER/REPEAT BUTTON (6) is pressed once, the REPEAT ONE SONG INDICATOR (18) on the
LED DISPLAY (11) will be lit steadily. The current track will be played repeatedly.
REPEAT ALL
When the FOLDER/REPEAT BUTTON (6) is pressed third time, the REPEAT ALL INDICATOR(19) on the LED
DISPLAY (11) will be lit steadily. The whole disc will be played repeatedly.
CD PROGRAM PLAY MODE
This function allows the CD tracks to be played in programmed sequence.
NOTE: Program can only be set in STOP mode.
1. Load the CD Disc you wish to program.

8
2. Make sure the unit is in STOP mode.
3. Press the PROGRAM BUTTON (17) once, location "P01" will show on the LED DISPLAY (11).
4. Press F. SKIP BUTTON (16) or B. SKIP BUTTON (14) until the desired track number is reached.
5. Press the PROGRAM BUTTON (17) to store the selection.
6. Repeat the (4) & (5) steps until you have entered all the tracks you want to program.
7. To play the stored sequence, press the PLAY/PAUSE BUTTON (7). The PROGRAMMED PLAYBACK
SONG LED INDICATOR (20) will light steadily
8. After all memory tracks have been played, the CD will stop automatically.
NOTES:
When 20 tracks of CD music have been programmed, the memory is full “FUL” will indicate on the
LED DISPLAY (11). Then press Play/Pause to start the program playback.
If you want to cancel the program memory, press the STOP Button (14) twice during playback or
change to other mode or turn off the power.
The Repeat function also applies to programmed track playback.
To repeat programmed tracks
1. During program play, press FOLDER/REPEAT BUTTON (6) once will repeat the specifically
programmed tracks.
2. Press the/REPEAT BUTTON (6) again will repeat all the programmed tracks.
3. Press the STOP BUTTON (9) twice to cancel program playback.
PHONO OPERATION
Please Note - Before Use
- Remove the stylus protector.
- Be sure that the TONE ARM (29) is unlocked and free
to move from the TONE ARM REST (31) prior to
operating. Lock the TONE ARM (29) in place again
when not in use.
1. Rotate the FUNCTION SELECTOR (2) to select the
PHONO mode
2. Raise the turntable wood cover.
3. Place a record on the TURNTABLE PLATTER (25), use the 45 RPM ADAPTER (26) if required.
4. Set the RPM SPEED SELECTOR (30) to the proper position depending on the record to be played.
5. Lift the TONE ARM (29) from the TONE ARM REST (31) by using the LIFT
LEVER (27) and slowly move it over the record. The TURNTABLE PLATTER
(25) will start to rotate.
6. Place the TONE ARM (29) to the desired position of the record.
7. Adjust the volume to the desired level.
8. At the end of record, the platter will automatically stop spinning. Lift the
TONE ARM (29) from the record and return it to the TONE ARM REST (31).
9. To stop playing manually, lift the TONE ARM (29) from the record and return it to the TONE ARM
REST (31).
Carttridge
Stylus assembly

9
NOTES:
Certain types of records may have an auto-stop area outside the preset limit, so the turntable may stop
before the last track finishes. If this occurs, set the AUTO-STOP SWITCH (28) to the “OFF” position. This
allows the record to play to the end, but please note that it will not stop automatically. You must
manually raise the TONE ARM (29) and place it back in the TONE ARM REST (31) and then turn off the
power to stop the turntable from spinning.
CASSETTE OPERATION
1. Rotate the FUNCTION SELECTOR (2) to select to the TAPE/LINE position.
2. Select Cassette function by pressing BLUETOOTH/CASSETTE FUNCTION SELECTOR BUTTON (35) to
TAPE position.
3. Rotate the POWER/VOLUME ON/OFF SWITCH (5) to turn on the unit.
4. Fully insert the cassette tape into CASSETTE SLOT (23), Playback will
begin automatically.
5. Adjust the volume to the desired level.
6. Press EJECT/FAST FORWARD BUTTON (22) halfway to engage Fast
Forward, press again to disengage and resume playback.
7. Press EJECT (22) fully to eject the cassette
BLUETOOTH OPERATION
1. Rotate the FUNCTION SELECTOR (2) to select to the TAPE/LINE position.
2. Select Bluetooth function by pressing BLUETOOTH/CASSETTE FUNCTION SELECTOR BUTTON (35) to
BT position. The blue LED light(at the bottom of the dial scale) will begin to flash
3. Turn your external device’s Bluetooth Setting ON. Wait a moment, then look for the Bluetooth
pairing name “TCD-2600”.
PLAY
FAST FORWARD
EJECT

10
4. Select the Bluetooth pairing name, to connect the unit. Once connected, the blue LED light will stop
flashing.
5. You are now connected to your external device via Bluetooth.
6. Rotate the VOLUME CONTROL KNOB(5) to adjust the sound level
AUXILIARY INPUT
The TCD-2600 provides an LINE IN JACK (10) for connecting external audio devices like MP3 players, CD
players etc to listen through the speakers of this system.
1. Use an audio cable (not included) with one 3.5 mm stereo plug on each end of the cable.
2. Plug one end into the LINE IN JACK (10) on the front of the TCD-2600 and the other end of the cable
into the Line-out Jack or Headphone Jack of your external audio device.
3. Turn on the TCD-2600 and your external audio device.
4. Rotate the FUNCTION SELECTOR (2) to select the TAPE/LINE mode.
5. The volume level can now be controlled through the main unit. Operate all other functions on the
auxiliary device as usual.
Notes:
If the Headphone Jack of your external device is connected, then you may need to adjust both the
volume control of your external device and the volume control of this system to find the most
desirable volume setting.
Rotate the POWER/VOLUME ON/OFF SWITCH (5) to turn off the TCD-2600 when you finish listening.
Don't forget to switch off the power on your external device as well.
PC ENCODING
RECORD YOUR VINYL TO YOUR WINDOWS PC
1. Setup
Connect the USB cable with your turntable and your computer. No extra driver is required.
2. Audacity Installation
Insert the installation CD. Your computer will auto-run the program. Follow the instructions to
complete installation.
If your computer does not auto run, click on the “Start” menu, select “Run” and choose the CD
located on your computer and run “Setup.exe”
3. Run Audacity Program
Double-click on the Audacity program and the Audacity interface window will be displayed on your
computer screen.

4.
5.
6.
Playback Control Toolbar
Audacity will display a control toolbar for you to edit an
Playing Your Record
Play the record you want to record by following the procedure
TO A RECORD”
Adjusting Input and Output
Adjust the output and input volume.
Playback Control Toolbar
Audacity will display a control toolbar for you to edit an
Playing Your Record
Play the record you want to record by following the procedure
TO A RECORD”
Adjusting Input and Output
Adjust the output and input volume.
Playback Control Toolbar
Audacity will display a control toolbar for you to edit an
Button
Playing Your Record
Play the record you want to record by following the procedure
TO A RECORD”
Adjusting Input and Output
Adjust the output and input volume.
Playback Control Toolbar
Audacity will display a control toolbar for you to edit an
Button
Playing Your Record
Play the record you want to record by following the procedure
TO A RECORD”
Adjusting Input and Output
Adjust the output and input volume.
Playback Control Toolbar
Audacity will display a control toolbar for you to edit an
Playing Your Record
Play the record you want to record by following the procedure
TO A RECORD”
Adjusting Input and Output
Adjust the output and input volume.
Playback Control Toolbar
Audacity will display a control toolbar for you to edit an
Action
moves
plays your project from the position of the cursor.
pressing the record button will record a new track from your
pause playback or record
stops playback or record
moves
Playing Your Record
Play the record you want to record by following the procedure
Adjusting Input and Output
Adjust the output and input volume.
Playback Control Toolbar
Audacity will display a control toolbar for you to edit an
Action
moves the
plays your project from the position of the cursor.
pressing the record button will record a new track from your
pause playback or record
stops playback or record
moves the
Playing Your Record
Play the record you want to record by following the procedure
Adjusting Input and Output
Adjust the output and input volume.
Output volume
Playback Control Toolbar
Audacity will display a control toolbar for you to edit an
the
cursor to the start
plays your project from the position of the cursor.
pressing the record button will record a new track from your
pause playback or record
stops playback or record
the
cursor to
Play the record you want to record by following the procedure
Adjusting Input and Output
Adjust the output and input volume.
Output volume
Audacity will display a control toolbar for you to edit an
cursor to the start
plays your project from the position of the cursor.
pressing the record button will record a new track from your
pause playback or record
stops playback or record
cursor to
Play the record you want to record by following the procedure
Adjust the output and input volume.
Output volume
Audacity will display a control toolbar for you to edit an
cursor to the start
plays your project from the position of the cursor.
pressing the record button will record a new track from your
pause playback or record
stops playback or record
the end of
Play the record you want to record by following the procedure
Adjust the output and input volume.
Output volume
Audacity will display a control toolbar for you to edit an
cursor to the start
plays your project from the position of the cursor.
pressing the record button will record a new track from your
pause playback or record
i
ng
stops playback or record
ing
.
e end of
Play the record you want to record by following the procedure
Adjust the output and input volume.
Output volume
Audacity will display a control toolbar for you to edit an
cursor to the start of the
plays your project from the position of the cursor.
pressing the record button will record a new track from your
ng
.
Press aga
.
e end of th
Play the record you want to record by following the procedure
Audacity will display a control toolbar for you to edit an
of the
plays your project from the position of the cursor.
pressing the record button will record a new track from your
Press aga
the pro
Play the record you want to record by following the procedure
Audacity will display a control toolbar for you to edit an
of the
protect.
plays your project from the position of the cursor.
pressing the record button will record a new track from your
Press agai
e proj
Play the record you want to record by following the procedure
11
Audacity will display a control toolbar for you to edit an
protect.
plays your project from the position of the cursor.
pressing the record button will record a new track from your
in to
j
ect
.
Play the record you want to record by following the procedure
Audacity will display a control toolbar for you to edit an
protect.
plays your project from the position of the cursor.
pressing the record button will record a new track from your
n to unpause.
.
Play the record you want to record by following the procedure
Audacity will display a control toolbar for you to edit an
plays your project from the position of the cursor.
pressing the record button will record a new track from your
unpause.
Play the record you want to record by following the procedure
Audacity will display a control toolbar for you to edit and manage your recordings.
Use to
pressing the record button will record a new track from your
unpause.
Play the record you want to record by following the procedure
Input
d manage your recordings.
Use to
pressing the record button will record a new track from your
Play the record you want to record by following the procedure
Input
d manage your recordings.
Use to listen
pressing the record button will record a new track from your
Play the record you want to record by following the procedure described in the section “LISTENING
Input
volume
d manage your recordings.
listen
to
pressing the record button will record a new track from your computer’s sound input device.
described in the section “LISTENING
volume
d manage your recordings.
to the
computer’s sound input device.
described in the section “LISTENING
volume
d manage your recordings.
the
au
computer’s sound input device.
described in the section “LISTENING
d manage your recordings.
au
dio
computer’s sound input device.
described in the section “LISTENING
d manage your recordings.
in
your protect
computer’s sound input device.
described in the section “LISTENING
d manage your recordings.
your protect
computer’s sound input device.
described in the section “LISTENING
your protect
computer’s sound input device.
described in the section “LISTENING
your protect
computer’s sound input device.
described in the section “LISTENING
your protect
.
computer’s sound input device.
described in the section “LISTENING
described in the section “LISTENING
described in the section “LISTENING
described in the section “LISTENING

7.
Rec
Select the RECORD button
You will need to position the needle on the record for a few seconds before the track starts, so that
you select the RECORD button at the beginning of your track.
Start playback on the USB turntable. You will see the waveform of the audio on the screen a
recording. You will hear the audio coming from the output of your computers soundcard.
No Audio?
selected and the speaker volume up on your computer.
Press Stop
SA
Select the destination and file name for the project and click “Save”
Once finished recording, your screen should display your recording as below.
Recording
Select the RECORD button
You will need to position the needle on the record for a few seconds before the track starts, so that
you select the RECORD button at the beginning of your track.
Start playback on the USB turntable. You will see the waveform of the audio on the screen a
recording. You will hear the audio coming from the output of your computers soundcard.
No Audio?
selected and the speaker volume up on your computer.
Press Stop
SAVE YOUR FILE NOW by clicking on “File” followed by “Save Project”
Select the destination and file name for the project and click “Save”
Once finished recording, your screen should display your recording as below.
ording
Select the RECORD button
You will need to position the needle on the record for a few seconds before the track starts, so that
you select the RECORD button at the beginning of your track.
Start playback on the USB turntable. You will see the waveform of the audio on the screen a
recording. You will hear the audio coming from the output of your computers soundcard.
No Audio?
selected and the speaker volume up on your computer.
Press Stop
VE YOUR FILE NOW by clicking on “File” followed by “Save Project”
Select the destination and file name for the project and click “Save”
Once finished recording, your screen should display your recording as below.
Select the RECORD button
You will need to position the needle on the record for a few seconds before the track starts, so that
you select the RECORD button at the beginning of your track.
Start playback on the USB turntable. You will see the waveform of the audio on the screen a
recording. You will hear the audio coming from the output of your computers soundcard.
No Audio?
-
go back to the preference menu and make sure you have “Software Play
selected and the speaker volume up on your computer.
Press Stop
VE YOUR FILE NOW by clicking on “File” followed by “Save Project”
Select the destination and file name for the project and click “Save”
Once finished recording, your screen should display your recording as below.
Select the RECORD button
You will need to position the needle on the record for a few seconds before the track starts, so that
you select the RECORD button at the beginning of your track.
Start playback on the USB turntable. You will see the waveform of the audio on the screen a
recording. You will hear the audio coming from the output of your computers soundcard.
go back to the preference menu and make sure you have “Software Play
selected and the speaker volume up on your computer.
VE YOUR FILE NOW by clicking on “File” followed by “Save Project”
Select the destination and file name for the project and click “Save”
Once finished recording, your screen should display your recording as below.
to start recording while your record is playing.
You will need to position the needle on the record for a few seconds before the track starts, so that
you select the RECORD button at the beginning of your track.
Start playback on the USB turntable. You will see the waveform of the audio on the screen a
recording. You will hear the audio coming from the output of your computers soundcard.
go back to the preference menu and make sure you have “Software Play
selected and the speaker volume up on your computer.
VE YOUR FILE NOW by clicking on “File” followed by “Save Project”
Select the destination and file name for the project and click “Save”
Once finished recording, your screen should display your recording as below.
12
to start recording while your record is playing.
You will need to position the needle on the record for a few seconds before the track starts, so that
you select the RECORD button at the beginning of your track.
Start playback on the USB turntable. You will see the waveform of the audio on the screen a
recording. You will hear the audio coming from the output of your computers soundcard.
go back to the preference menu and make sure you have “Software Play
selected and the speaker volume up on your computer.
VE YOUR FILE NOW by clicking on “File” followed by “Save Project”
Select the destination and file name for the project and click “Save”
Once finished recording, your screen should display your recording as below.
to start recording while your record is playing.
You will need to position the needle on the record for a few seconds before the track starts, so that
you select the RECORD button at the beginning of your track.
Start playback on the USB turntable. You will see the waveform of the audio on the screen a
recording. You will hear the audio coming from the output of your computers soundcard.
go back to the preference menu and make sure you have “Software Play
VE YOUR FILE NOW by clicking on “File” followed by “Save Project”
Select the destination and file name for the project and click “Save”
Once finished recording, your screen should display your recording as below.
to start recording while your record is playing.
You will need to position the needle on the record for a few seconds before the track starts, so that
Start playback on the USB turntable. You will see the waveform of the audio on the screen a
recording. You will hear the audio coming from the output of your computers soundcard.
go back to the preference menu and make sure you have “Software Play
VE YOUR FILE NOW by clicking on “File” followed by “Save Project”
Once finished recording, your screen should display your recording as below.
to start recording while your record is playing.
You will need to position the needle on the record for a few seconds before the track starts, so that
Start playback on the USB turntable. You will see the waveform of the audio on the screen a
recording. You will hear the audio coming from the output of your computers soundcard.
go back to the preference menu and make sure you have “Software Play
through”
You will need to position the needle on the record for a few seconds before the track starts, so that
Start playback on the USB turntable. You will see the waveform of the audio on the screen a
recording. You will hear the audio coming from the output of your computers soundcard.
through”
You will need to position the needle on the record for a few seconds before the track starts, so that
Start playback on the USB turntable. You will see the waveform of the audio on the screen as it is
recording. You will hear the audio coming from the output of your computers soundcard.
through”
You will need to position the needle on the record for a few seconds before the track starts, so that
s it is
through”
You will need to position the needle on the record for a few seconds before the track starts, so that
s it is
You will need to position the needle on the record for a few seconds before the track starts, so that

13
8. Editing your Recording
Audio Levels
Select your entire recording by selecting “Edit,” then “Select…” then click “All.”
Select the “Effect” menu and choose the desired effect. There are various types of effects which are
described further on Audacity’s website.
Selecting “Normalize” should be used to have Audacity auto-correct volume on the recording.

14
Noise Reduction
Drag your cursor over a portion of the audio track which contains unwanted noise. We recommend
using the beginning or end of a track where there is no music and only noise.

15
- Select “Effect” and then “Noise Removal” from the drop down menu to bring up the “Noise Removal
Window”
- Click “Get Noise Profile” and the window will close automatically.
- Select the entire track of audio you wish to remove noise from.
- Adjust the amount of audio that you would like to filter by moving the slider in the “Noise Removal”
window. We recommend using the minimum noise removal for optimum sound. Note: you can
preview the audio before removing the noise by clicking on ‘Preview’.
- Click on ‘Remove Noise’.

16
The Editing Toolbar
Button Action
The Cut button
removes selected audio data and places it on the clipboard.
The Copy button
copies the selected audio data to the clipboard without removing it from the track.
The Paste button
pastes whatever is in the clipboard into the track at the position of the selection cursor.
The Trim button
deletes all of the track except the current selection.
The Silence button
replaces the current selection with silence instead of removing it completely.
The Undo button
undo the last editing operation performed.
The Redo button
redo any editing operations that were just undone.
The Zoom In button
zooms in on displayed tracks displaying less time and giving a more detailed view of the track.
The Zoom Out button
zooms out displaying more time and a less detailed view of tracks.
The Fit Selection button
fits selected audio into the width of the screen to show the selection in more detail.
The Fit Project button
Shows entire project in one screen.
The Tools Toolbar
Button Action
The Selection Tool
use to select sections of an audio track to work on.
The Envelope Tool
this tool allows you to control how tracks fade in and out.
The Draw Tool
allows you to draw on the waveforms of individual tracks.
The Zoom Tool
zooms in or out of a specific part of the audio.
The Timeshift Tool
allows you to change the positioning of tracks relative to one another in time.
Before editing, you must make a selection of the recording you would like to cut or copy. This will
trim any music from the previous track, or any silence on the record between tracks.
- To select the part you wish to cut, copy or paste, use the selection tool. If it is not activated, do
so by clicking on it in the toolbar.
- Press and hold the left mouse button while you drag the mouse to a marked area.
- This area is darker than the surrounding area of the clip. Note, even though you can mark an
area larger than or extending beyond the actual audio clip in the track, the operations will only
work on the actual clip. Playback however will work outside the clip.
- Press the space bar to listen to the audio in the marked area.

9.
For additiona
operating instructions.
Inserting the plug of your head
READ THIS IMPORTANT INFORMATION BEFORE USING YOUR HEADPHONES
1.
2.
3.
-
-
Now you must cut
Create a new file and paste your cut into the new file.
Exporting to MP3
To export your recording to mp3 format, select “Export As” from the “File” menu. You will
choose which format to export to. Choose “.mp3” as your file extension. When exporting, do not
choose your Desktop as the destination folder. You can only choose “My Documents” folder. After
export, you can move the files as desired.
For additiona
operating instructions.
Inserting the plug of your head
READ THIS IMPORTANT INFORMATION BEFORE USING YOUR HEADPHONES
Avoid extended play at very high volume as it may impair your hearing.
If you experience ringing in your ears, reduce the volume or shut off your unit.
Keep the volume at a reasonable level even if your headset is an open
to hear outside sounds. Please note that excessively high volume may still block outside sounds.
To extend or contract your selection, hold down the SHIF
your selection to extend or contract to.
If you click at a spot that is on the right hand side from the middle of the current selection, you
will set the right hand boundary of your new selection.
Now you must cut
Create a new file and paste your cut into the new file.
Exporting to MP3
To export your recording to mp3 format, select “Export As” from the “File” menu. You will
choose which format to export to. Choose “.mp3” as your file extension. When exporting, do not
choose your Desktop as the destination folder. You can only choose “My Documents” folder. After
export, you can move the files as desired.
For additional software information, please refer
operating instructions.
Inserting the plug of your head
READ THIS IMPORTANT INFORMATION BEFORE USING YOUR HEADPHONES
Avoid extended play at very high volume as it may impair your hearing.
If you experience ringing in your ears, reduce the volume or shut off your unit.
Keep the volume at a reasonable level even if your headset is an open
to hear outside sounds. Please note that excessively high volume may still block outside sounds.
To extend or contract your selection, hold down the SHIF
your selection to extend or contract to.
If you click at a spot that is on the right hand side from the middle of the current selection, you
will set the right hand boundary of your new selection.
Now you must cut
Create a new file and paste your cut into the new file.
Exporting to MP3
To export your recording to mp3 format, select “Export As” from the “File” menu. You will
choose which format to export to. Choose “.mp3” as your file extension. When exporting, do not
choose your Desktop as the destination folder. You can only choose “My Documents” folder. After
export, you can move the files as desired.
l software information, please refer
operating instructions.
Inserting the plug of your head
READ THIS IMPORTANT INFORMATION BEFORE USING YOUR HEADPHONES
Avoid extended play at very high volume as it may impair your hearing.
If you experience ringing in your ears, reduce the volume or shut off your unit.
Keep the volume at a reasonable level even if your headset is an open
to hear outside sounds. Please note that excessively high volume may still block outside sounds.
To extend or contract your selection, hold down the SHIF
your selection to extend or contract to.
If you click at a spot that is on the right hand side from the middle of the current selection, you
will set the right hand boundary of your new selection.
Now you must cut
your selection. Select “Cut” from the “Edit” menu.
Before the Cut
Create a new file and paste your cut into the new file.
Exporting to MP3
To export your recording to mp3 format, select “Export As” from the “File” menu. You will
choose which format to export to. Choose “.mp3” as your file extension. When exporting, do not
choose your Desktop as the destination folder. You can only choose “My Documents” folder. After
export, you can move the files as desired.
l software information, please refer
operating instructions.
Inserting the plug of your head
READ THIS IMPORTANT INFORMATION BEFORE USING YOUR HEADPHONES
Avoid extended play at very high volume as it may impair your hearing.
If you experience ringing in your ears, reduce the volume or shut off your unit.
Keep the volume at a reasonable level even if your headset is an open
to hear outside sounds. Please note that excessively high volume may still block outside sounds.
To extend or contract your selection, hold down the SHIF
your selection to extend or contract to.
If you click at a spot that is on the right hand side from the middle of the current selection, you
will set the right hand boundary of your new selection.
your selection. Select “Cut” from the “Edit” menu.
Before the Cut
Create a new file and paste your cut into the new file.
To export your recording to mp3 format, select “Export As” from the “File” menu. You will
choose which format to export to. Choose “.mp3” as your file extension. When exporting, do not
choose your Desktop as the destination folder. You can only choose “My Documents” folder. After
export, you can move the files as desired.
l software information, please refer
Inserting the plug of your headphones into the EARPHONE JACK (
READ THIS IMPORTANT INFORMATION BEFORE USING YOUR HEADPHONES
Avoid extended play at very high volume as it may impair your hearing.
If you experience ringing in your ears, reduce the volume or shut off your unit.
Keep the volume at a reasonable level even if your headset is an open
to hear outside sounds. Please note that excessively high volume may still block outside sounds.
To extend or contract your selection, hold down the SHIF
your selection to extend or contract to.
If you click at a spot that is on the right hand side from the middle of the current selection, you
will set the right hand boundary of your new selection.
your selection. Select “Cut” from the “Edit” menu.
Before the Cut
Create a new file and paste your cut into the new file.
To export your recording to mp3 format, select “Export As” from the “File” menu. You will
choose which format to export to. Choose “.mp3” as your file extension. When exporting, do not
choose your Desktop as the destination folder. You can only choose “My Documents” folder. After
export, you can move the files as desired.
l software information, please refer
USING HEADPHONES (NOT INCLUDED)
phones into the EARPHONE JACK (
READ THIS IMPORTANT INFORMATION BEFORE USING YOUR HEADPHONES
Avoid extended play at very high volume as it may impair your hearing.
If you experience ringing in your ears, reduce the volume or shut off your unit.
Keep the volume at a reasonable level even if your headset is an open
to hear outside sounds. Please note that excessively high volume may still block outside sounds.
To extend or contract your selection, hold down the SHIF
your selection to extend or contract to.
If you click at a spot that is on the right hand side from the middle of the current selection, you
will set the right hand boundary of your new selection.
your selection. Select “Cut” from the “Edit” menu.
Create a new file and paste your cut into the new file.
To export your recording to mp3 format, select “Export As” from the “File” menu. You will
choose which format to export to. Choose “.mp3” as your file extension. When exporting, do not
choose your Desktop as the destination folder. You can only choose “My Documents” folder. After
export, you can move the files as desired.
l software information, please refer
USING HEADPHONES (NOT INCLUDED)
phones into the EARPHONE JACK (
READ THIS IMPORTANT INFORMATION BEFORE USING YOUR HEADPHONES
Avoid extended play at very high volume as it may impair your hearing.
If you experience ringing in your ears, reduce the volume or shut off your unit.
Keep the volume at a reasonable level even if your headset is an open
to hear outside sounds. Please note that excessively high volume may still block outside sounds.
To extend or contract your selection, hold down the SHIF
If you click at a spot that is on the right hand side from the middle of the current selection, you
will set the right hand boundary of your new selection.
your selection. Select “Cut” from the “Edit” menu.
Create a new file and paste your cut into the new file.
To export your recording to mp3 format, select “Export As” from the “File” menu. You will
choose which format to export to. Choose “.mp3” as your file extension. When exporting, do not
choose your Desktop as the destination folder. You can only choose “My Documents” folder. After
l software information, please refer http://audacity.sourceforge.net
USING HEADPHONES (NOT INCLUDED)
phones into the EARPHONE JACK (
READ THIS IMPORTANT INFORMATION BEFORE USING YOUR HEADPHONES
Avoid extended play at very high volume as it may impair your hearing.
If you experience ringing in your ears, reduce the volume or shut off your unit.
Keep the volume at a reasonable level even if your headset is an open
to hear outside sounds. Please note that excessively high volume may still block outside sounds.
17
To extend or contract your selection, hold down the SHIF
If you click at a spot that is on the right hand side from the middle of the current selection, you
will set the right hand boundary of your new selection.
your selection. Select “Cut” from the “Edit” menu.
Create a new file and paste your cut into the new file.
To export your recording to mp3 format, select “Export As” from the “File” menu. You will
choose which format to export to. Choose “.mp3” as your file extension. When exporting, do not
choose your Desktop as the destination folder. You can only choose “My Documents” folder. After
http://audacity.sourceforge.net
USING HEADPHONES (NOT INCLUDED)
phones into the EARPHONE JACK (
READ THIS IMPORTANT INFORMATION BEFORE USING YOUR HEADPHONES
Avoid extended play at very high volume as it may impair your hearing.
If you experience ringing in your ears, reduce the volume or shut off your unit.
Keep the volume at a reasonable level even if your headset is an open
to hear outside sounds. Please note that excessively high volume may still block outside sounds.
To extend or contract your selection, hold down the SHIF
If you click at a spot that is on the right hand side from the middle of the current selection, you
will set the right hand boundary of your new selection.
your selection. Select “Cut” from the “Edit” menu.
To export your recording to mp3 format, select “Export As” from the “File” menu. You will
choose which format to export to. Choose “.mp3” as your file extension. When exporting, do not
choose your Desktop as the destination folder. You can only choose “My Documents” folder. After
http://audacity.sourceforge.net
USING HEADPHONES (NOT INCLUDED)
phones into the EARPHONE JACK (
READ THIS IMPORTANT INFORMATION BEFORE USING YOUR HEADPHONES
Avoid extended play at very high volume as it may impair your hearing.
If you experience ringing in your ears, reduce the volume or shut off your unit.
Keep the volume at a reasonable level even if your headset is an open
to hear outside sounds. Please note that excessively high volume may still block outside sounds.
To extend or contract your selection, hold down the SHIFT button and click on the area you wish
If you click at a spot that is on the right hand side from the middle of the current selection, you
will set the right hand boundary of your new selection.
your selection. Select “Cut” from the “Edit” menu.
To export your recording to mp3 format, select “Export As” from the “File” menu. You will
choose which format to export to. Choose “.mp3” as your file extension. When exporting, do not
choose your Desktop as the destination folder. You can only choose “My Documents” folder. After
http://audacity.sourceforge.net
USING HEADPHONES (NOT INCLUDED)
phones into the EARPHONE JACK (13
READ THIS IMPORTANT INFORMATION BEFORE USING YOUR HEADPHONES
Avoid extended play at very high volume as it may impair your hearing.
If you experience ringing in your ears, reduce the volume or shut off your unit.
Keep the volume at a reasonable level even if your headset is an open
to hear outside sounds. Please note that excessively high volume may still block outside sounds.
T button and click on the area you wish
If you click at a spot that is on the right hand side from the middle of the current selection, you
your selection. Select “Cut” from the “Edit” menu.
To export your recording to mp3 format, select “Export As” from the “File” menu. You will
choose which format to export to. Choose “.mp3” as your file extension. When exporting, do not
choose your Desktop as the destination folder. You can only choose “My Documents” folder. After
http://audacity.sourceforge.net
USING HEADPHONES (NOT INCLUDED)
13) will
READ THIS IMPORTANT INFORMATION BEFORE USING YOUR HEADPHONES
Avoid extended play at very high volume as it may impair your hearing.
If you experience ringing in your ears, reduce the volume or shut off your unit.
Keep the volume at a reasonable level even if your headset is an open
to hear outside sounds. Please note that excessively high volume may still block outside sounds.
T button and click on the area you wish
If you click at a spot that is on the right hand side from the middle of the current selection, you
your selection. Select “Cut” from the “Edit” menu.
To export your recording to mp3 format, select “Export As” from the “File” menu. You will
choose which format to export to. Choose “.mp3” as your file extension. When exporting, do not
choose your Desktop as the destination folder. You can only choose “My Documents” folder. After
http://audacity.sourceforge.net
USING HEADPHONES (NOT INCLUDED)
) will
READ THIS IMPORTANT INFORMATION BEFORE USING YOUR HEADPHONES
Avoid extended play at very high volume as it may impair your hearing.
If you experience ringing in your ears, reduce the volume or shut off your unit.
Keep the volume at a reasonable level even if your headset is an open
to hear outside sounds. Please note that excessively high volume may still block outside sounds.
T button and click on the area you wish
If you click at a spot that is on the right hand side from the middle of the current selection, you
your selection. Select “Cut” from the “Edit” menu.
After the Cut
To export your recording to mp3 format, select “Export As” from the “File” menu. You will
choose which format to export to. Choose “.mp3” as your file extension. When exporting, do not
choose your Desktop as the destination folder. You can only choose “My Documents” folder. After
http://audacity.sourceforge.net
USING HEADPHONES (NOT INCLUDED)
) will
enable you to listen in
READ THIS IMPORTANT INFORMATION BEFORE USING YOUR HEADPHONES
Avoid extended play at very high volume as it may impair your hearing.
If you experience ringing in your ears, reduce the volume or shut off your unit.
Keep the volume at a reasonable level even if your headset is an open-
to hear outside sounds. Please note that excessively high volume may still block outside sounds.
T button and click on the area you wish
If you click at a spot that is on the right hand side from the middle of the current selection, you
After the Cut
To export your recording to mp3 format, select “Export As” from the “File” menu. You will
choose which format to export to. Choose “.mp3” as your file extension. When exporting, do not
choose your Desktop as the destination folder. You can only choose “My Documents” folder. After
http://audacity.sourceforge.net
enable you to listen in
READ THIS IMPORTANT INFORMATION BEFORE USING YOUR HEADPHONES
Avoid extended play at very high volume as it may impair your hearing.
If you experience ringing in your ears, reduce the volume or shut off your unit.
-air type designed to allow you
to hear outside sounds. Please note that excessively high volume may still block outside sounds.
T button and click on the area you wish
If you click at a spot that is on the right hand side from the middle of the current selection, you
After the Cut
To export your recording to mp3 format, select “Export As” from the “File” menu. You will
choose which format to export to. Choose “.mp3” as your file extension. When exporting, do not
choose your Desktop as the destination folder. You can only choose “My Documents” folder. After
http://audacity.sourceforge.net
enable you to listen in
If you experience ringing in your ears, reduce the volume or shut off your unit.
air type designed to allow you
to hear outside sounds. Please note that excessively high volume may still block outside sounds.
T button and click on the area you wish
If you click at a spot that is on the right hand side from the middle of the current selection, you
After the Cut
To export your recording to mp3 format, select “Export As” from the “File” menu. You will
choose which format to export to. Choose “.mp3” as your file extension. When exporting, do not
choose your Desktop as the destination folder. You can only choose “My Documents” folder. After
http://audacity.sourceforge.net
for d
enable you to listen in
If you experience ringing in your ears, reduce the volume or shut off your unit.
air type designed to allow you
to hear outside sounds. Please note that excessively high volume may still block outside sounds.
T button and click on the area you wish
If you click at a spot that is on the right hand side from the middle of the current selection, you
After the Cut
To export your recording to mp3 format, select “Export As” from the “File” menu. You will
choose which format to export to. Choose “.mp3” as your file extension. When exporting, do not
choose your Desktop as the destination folder. You can only choose “My Documents” folder. After
for d
enable you to listen in
air type designed to allow you
to hear outside sounds. Please note that excessively high volume may still block outside sounds.
T button and click on the area you wish
If you click at a spot that is on the right hand side from the middle of the current selection, you
After the Cut
To export your recording to mp3 format, select “Export As” from the “File” menu. You will
choose which format to export to. Choose “.mp3” as your file extension. When exporting, do not
choose your Desktop as the destination folder. You can only choose “My Documents” folder. After
for detailed
enable you to listen in
air type designed to allow you
to hear outside sounds. Please note that excessively high volume may still block outside sounds.
T button and click on the area you wish
If you click at a spot that is on the right hand side from the middle of the current selection, you
To export your recording to mp3 format, select “Export As” from the “File” menu. You will
choose which format to export to. Choose “.mp3” as your file extension. When exporting, do not
choose your Desktop as the destination folder. You can only choose “My Documents” folder. After
etailed
enable you to listen in
air type designed to allow you
to hear outside sounds. Please note that excessively high volume may still block outside sounds.
T button and click on the area you wish
If you click at a spot that is on the right hand side from the middle of the current selection, you
To export your recording to mp3 format, select “Export As” from the “File” menu. You will need to
choose which format to export to. Choose “.mp3” as your file extension. When exporting, do not
choose your Desktop as the destination folder. You can only choose “My Documents” folder. After
etailed
enable you to listen in
private.
air type designed to allow you
to hear outside sounds. Please note that excessively high volume may still block outside sounds.
T button and click on the area you wish
If you click at a spot that is on the right hand side from the middle of the current selection, you
need to
choose which format to export to. Choose “.mp3” as your file extension. When exporting, do not
choose your Desktop as the destination folder. You can only choose “My Documents” folder. After
etailed
private.
air type designed to allow you
to hear outside sounds. Please note that excessively high volume may still block outside sounds.
T button and click on the area you wish
If you click at a spot that is on the right hand side from the middle of the current selection, you
need to
choose which format to export to. Choose “.mp3” as your file extension. When exporting, do not
choose your Desktop as the destination folder. You can only choose “My Documents” folder. After
private.
air type designed to allow you
to hear outside sounds. Please note that excessively high volume may still block outside sounds.
T button and click on the area you wish
If you click at a spot that is on the right hand side from the middle of the current selection, you
need to
choose your Desktop as the destination folder. You can only choose “My Documents” folder. After
private.
air type designed to allow you
air type designed to allow you

18
CARE AND MAINTENANCE
1. Avoid operating your unit under direct sunlight or in hot, humid or dusty places.
2. Keep your unit away from heating appliances and sources of electrical noise such as fluorescent
lamps or motors.
3. Unplug the unit from the electrical power outlet immediately in case of malfunction.
CLEANING THE UNIT
To prevent fire or shock hazard, disconnect your unit from the AC power source when cleaning.
The finish on the unit may be cleaned with a dust cloth and cared for as other furniture. Use caution
when cleaning and wiping the plastic parts.
If the cabinet becomes dusty, wipe it with a soft dry dust cloth. Do not use any wax or polish sprays
on the cabinet.
If the front panel becomes dirty or smudged with fingerprints it may be cleaned with a soft cloth
slightly dampened with a mild soap and water solution. Never use abrasive cloths or polishes as
these will damage the finish of your unit.
Thoroughly clean dust off the stylus and record regularly
Use a soft brush to clean the stylus. Brush from the base to the tip as shown below.
Use a good quality record cleaner and brush set to keep your records clean.
CAUTION: Never allow any water or other liquids to get inside the unit while cleaning.
CLEAN STYLUS WITH A SOFT BRUSH

19
SPECIFICATION
Power requirement:
Main Unit:
AC 230V ~ 50Hz 18 Watts
Radio Frequency:
AM: 525-1640 KHz
FM: 87.5-108 MHz
Bluetooth Pairing name:
TCD-2600
Guarantee
Lenco offers service and warranty in accordance with the European law, which means that in case of
repairs (both during and after the warranty period) you should contact your local dealer.
Important note: It is not possible to send products that need repairs to Lenco directly.
Important note: If this unit is opened or accessed by a non-official service center in any way, the
warranty expires.
This device is not suitable for professional use. In case of professional use, all warranty obligations of the
manufacturer will be voided.
Disclaimer
Updates to Firmware and/or hardware components are made regularly. Therefore some of the
instruction, specifications and pictures in this documentation may differ slightly from your particular
situation. All items described in this guide for illustration purposes only and may not apply to particular
situation. No legal right or entitlements may be obtained from the description made in this manual.
Disposal of the Old Device
This symbol indicates that the relevant electrical product or battery should not be
disposed of as general household waste in Europe. To ensure the correct waste
treatment of the product and battery, please dispose them in accordance to any
applicable local laws of requirement for disposal of electrical equipment or batteries.
In so doing, you will help to conserve natural resources and improve standards of
environmental protection in treatment and disposal of electrical waste (Waste
Electrical and Electronic Equipment Directive).
Service
For more information and helpdesk support, please visit www.lenco.com
Lenco Benelux BV, Thermiekstraat 1a, 6361 HB Nuth, The Netherlands.

20
Nederlands TCD-2600
LET OP:
Gebruik van bedieningen of afstellingen of uitvoer van procedures anders dan gespecificeerd in
deze documentatie kan leiden tot blootstelling aan schadelijke straling.
Dit apparaat dient uitsluitend te worden aangepast of gerepareerd door gekwalificeerd
onderhoudspersoneel.
VOORZORGSMAATREGELEN VOOR GEBRUIK
ONTHOUD DE VOLGENDE INSTRUCTIES:
1. Gebruik dit apparaat niet in de buurt van water.
2. Reinig het uitsluitend met een licht vochtige doek.
3. Bedek of blokkeer de ventilatieopeningen niet. Wanneer u het apparaat op een schap
plaatst, dient u 5 cm (2”) vrije ruimte rondom het gehele apparaat te behouden.
4. Installeer het product volgens de meegeleverde gebruikershandleiding.
5. *Nooit op de stroomadapter stappen of deze indrukken. Wees voornamelijk voorzichtig in
de buurt van de stekkers en het punt waar de kabel uit het apparaat komt. Plaats geen
zware voorwerpen op de stroomadapter, om beschadiging ervan te voorkomen. Houd het
gehele apparaat buiten bereik van kinderen! Wanneer kinderen met de voedingskabel
spelen, kunnen zij ernstig letsel oplopen.
6. *Haal de stekker uit het stopcontact tijdens onweer of wanneer u deze langere tijd niet
gebruikt.
7. Houd het apparaat uit de buurt van hittebronnen, zoals radiatoren, verwarmingen, kachels,
kaarsen en andere hittegenererende producten of open vuur.
8. Gebruik dit apparaat niet in de buurt van krachtige magnetische velden.
9. Elektrostatische ontlading kan normaal gebruik van dit apparaat verstoren. U hoeft het
apparaat in dit geval slechts te resetten en opnieuw op te starten volgens de
gebruikershandleiding. Wees voorzichtig tijdens bestandsoverdracht en gebruik het
product in een omgeving zonder statische interferentie.
10. Waarschuwing! Steek nooit een voorwerp via de ventilatie- of andere openingen in het
product. Er is hoogspanning in het product aanwezig en als u er een object insteekt, kan
dat een elektrische schok veroorzaken en/of kortsluiting in de interne onderdelen. Mors
om dezelfde reden geen water of vloeistof op het product.
11. Gebruik het toestel niet in vochtige ruimtes, zoals badkamers, stomende keukens of in de
buurt van zwembaden.
12. Gebruik dit apparaat niet wanneer condensatie kan optreden.
13. Alhoewel dit apparaat met grote zorg gefabriceerd en verschillende keren geïnspecteerd is
voordat het de fabriek verlaat, is het nog steeds mogelijk dat er problemen optreden, zoals
met alle elektrische apparaten. Als u rook, een overmatige hitteontwikkeling of enig ander
onverwacht verschijnsel opmerkt, moet u onmiddellijk de stekker van het netsnoer uit het
stopcontact halen.
14. Dit apparaat moet werken op een voedingsbron, zoals aangegeven op het
specificatieplaatje. Als u twijfelt over het type voeding dat gebruikt wordt in uw huis,
raadpleeg dan uw dealer of plaatselijk energiebedrijf.
15. *Het stopcontact moet in de buurt van de apparatuur zijn geïnstalleerd en eenvoudig te
bereiken zijn.
16. *Overbelast stopcontacten of verlengsnoeren niet. Overbelasting kan brand of een
elektrische schok veroorzaken.
17. *Apparaten met een Klasse 1 structuur dienen te worden aangesloten op een stopcontact
met een beschermende aardverbinding.
18. *Apparaten met een Klasse 2 structuur vereisen geen aardverbinding.
19. Houd het uit de buurt van knaagdieren. Knaagdieren knauwen graag aan voedingskabels.
20. *Houd altijd de stekker vast wanneer u deze uit het stopcontact trekt. Trek nooit aan de
voedingskabel. Dit kan tot een kortsluiting leiden.
21. Vermijd om het toestel te plaatsen op een ondergrond die blootgesteld kan worden aan
trillingen of schokken.
22. Gebruik een zacht, droog doekje om het apparaat te reinigen. Gebruik geen oplosmiddelen
of op benzine gebaseerde vloeistoffen. U kunt een vochtig doekje met verdund
schoonmaakmiddel gebruiken om hardnekkige vlekken te verwijderen.
Seite wird geladen ...
Seite wird geladen ...
Seite wird geladen ...
Seite wird geladen ...
Seite wird geladen ...
Seite wird geladen ...
Seite wird geladen ...
Seite wird geladen ...
Seite wird geladen ...
Seite wird geladen ...
Seite wird geladen ...
Seite wird geladen ...
Seite wird geladen ...
Seite wird geladen ...
Seite wird geladen ...
Seite wird geladen ...
Seite wird geladen ...
Seite wird geladen ...
Seite wird geladen ...
Seite wird geladen ...
Seite wird geladen ...
Seite wird geladen ...
Seite wird geladen ...
Seite wird geladen ...
Seite wird geladen ...
Seite wird geladen ...
Seite wird geladen ...
Seite wird geladen ...
Seite wird geladen ...
Seite wird geladen ...
Seite wird geladen ...
Seite wird geladen ...
Seite wird geladen ...
Seite wird geladen ...
Seite wird geladen ...
Seite wird geladen ...
Seite wird geladen ...
Seite wird geladen ...
Seite wird geladen ...
Seite wird geladen ...
Seite wird geladen ...
Seite wird geladen ...
Seite wird geladen ...
Seite wird geladen ...
Seite wird geladen ...
Seite wird geladen ...
Seite wird geladen ...
Seite wird geladen ...
Seite wird geladen ...
Seite wird geladen ...
Seite wird geladen ...
Seite wird geladen ...
Seite wird geladen ...
Seite wird geladen ...
Seite wird geladen ...
Seite wird geladen ...
Seite wird geladen ...
Seite wird geladen ...
Seite wird geladen ...
Seite wird geladen ...
Seite wird geladen ...
Seite wird geladen ...
Seite wird geladen ...
Seite wird geladen ...
Seite wird geladen ...
Seite wird geladen ...
Seite wird geladen ...
Seite wird geladen ...
Seite wird geladen ...
Seite wird geladen ...
Seite wird geladen ...
Seite wird geladen ...
-
 1
1
-
 2
2
-
 3
3
-
 4
4
-
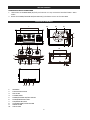 5
5
-
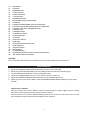 6
6
-
 7
7
-
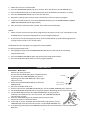 8
8
-
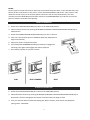 9
9
-
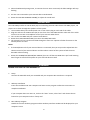 10
10
-
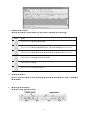 11
11
-
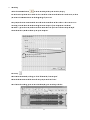 12
12
-
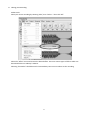 13
13
-
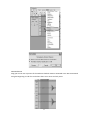 14
14
-
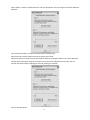 15
15
-
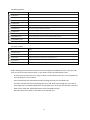 16
16
-
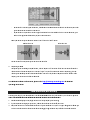 17
17
-
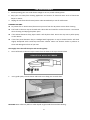 18
18
-
 19
19
-
 20
20
-
 21
21
-
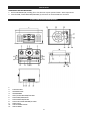 22
22
-
 23
23
-
 24
24
-
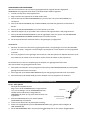 25
25
-
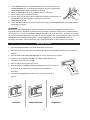 26
26
-
 27
27
-
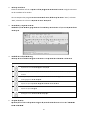 28
28
-
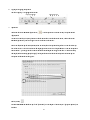 29
29
-
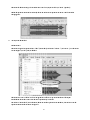 30
30
-
 31
31
-
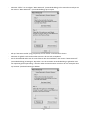 32
32
-
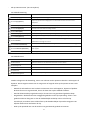 33
33
-
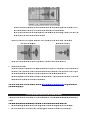 34
34
-
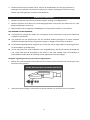 35
35
-
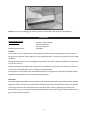 36
36
-
 37
37
-
 38
38
-
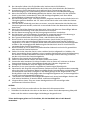 39
39
-
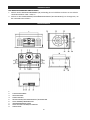 40
40
-
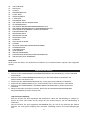 41
41
-
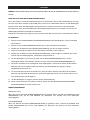 42
42
-
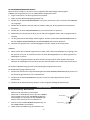 43
43
-
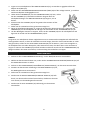 44
44
-
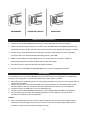 45
45
-
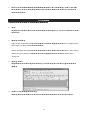 46
46
-
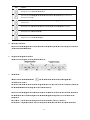 47
47
-
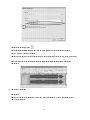 48
48
-
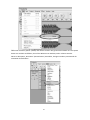 49
49
-
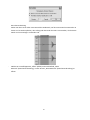 50
50
-
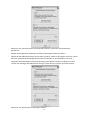 51
51
-
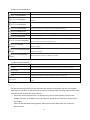 52
52
-
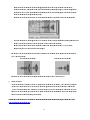 53
53
-
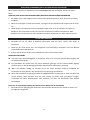 54
54
-
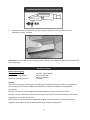 55
55
-
 56
56
-
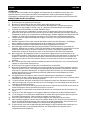 57
57
-
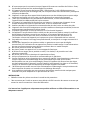 58
58
-
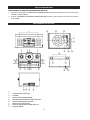 59
59
-
 60
60
-
 61
61
-
 62
62
-
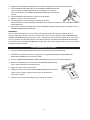 63
63
-
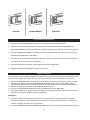 64
64
-
 65
65
-
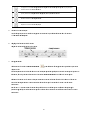 66
66
-
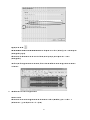 67
67
-
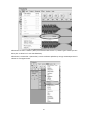 68
68
-
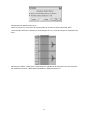 69
69
-
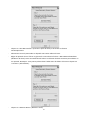 70
70
-
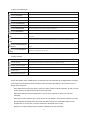 71
71
-
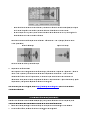 72
72
-
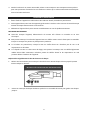 73
73
-
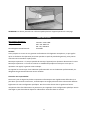 74
74
-
 75
75
-
 76
76
-
 77
77
-
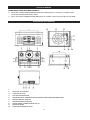 78
78
-
 79
79
-
 80
80
-
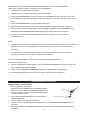 81
81
-
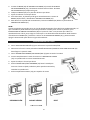 82
82
-
 83
83
-
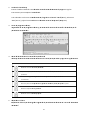 84
84
-
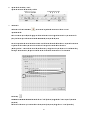 85
85
-
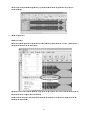 86
86
-
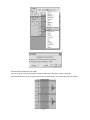 87
87
-
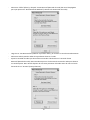 88
88
-
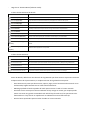 89
89
-
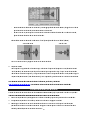 90
90
-
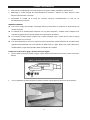 91
91
-
 92
92


Lenco Classic Bedienungsanleitung
- Kategorie
- CD-Spieler
- Typ
- Bedienungsanleitung
- Dieses Handbuch eignet sich auch für
in anderen Sprachen
- English: Lenco Classic Owner's manual
- français: Lenco Classic Le manuel du propriétaire
- español: Lenco Classic El manual del propietario
- Nederlands: Lenco Classic de handleiding
Verwandte Artikel
-
Lenco L-30 Bedienungsanleitung
-
Lenco Classic Phono TT-110RDWH Bedienungsanleitung
-
Lenco TT-116 Benutzerhandbuch
-
Lenco LS-50 Benutzerhandbuch
-
-
-
Lenco L-87 Benutzerhandbuch
-
Lenco L-91 Turntable Benutzerhandbuch
-
Andere Dokumente
-
Muse MT-110 GR Bedienungsanleitung
-
Fenton RP118F Bedienungsanleitung
-
 ION Audio Audacity Bedienungsanleitung
-
Fenton 102.104 Benutzerhandbuch
-
Fenton RP115 Series Record Player Briefcase Bedienungsanleitung
-
-
Silvercrest 288644 Operation and Safety Notes
-
-
Auna 10003601 Benutzerhandbuch
-
Yamaha GX-5 Bedienungsanleitung
