ADVANCE PX1 Bedienungsanleitung
- Kategorie
- Musikausrüstung
- Typ
- Bedienungsanleitung

QuickStart
DUAL MONO PREAMPLIFIER
PRÉAMPLIFICATEUR DUAL MONO
DUAL MONO VORVERSTÄRKER
PREAMPLIFICATORE DUAL MONO
ADVANCE
PARIS
Smart PX1

RECYCLING IN EUROPEAN UNION COUNTRIES
Disposal of your old appliance
This symbol on the product or on its packaging means that
your electrical and electronic equipment should be disposed
at the end of life separately from your household wastes.
There are separate coilection systems for recycling in EU.
For more information, please contact the local authority or
the dealer where you purchased the product.
Ce symbole figurant sur le produit ou son emballage signifie
que votre équipement électrique et électronique doit être
mis au rebut séparément de vos déchets ménagers lorsqu’il
atteint Ia fin de sa durée de vie.II existe des systèmes de
coilecte séparée pour le recyclage dans l’UE.
Pour pius d’informations, veuiliez prendre contact avec lês
autorités locales ou lê revendeur auquel vous avez acheté
ce produit.
Das auf dem Produkt oder auf der Verpackung angebrachte
Symbol bedeutet, dass Ihre elektrischen und
elektronischen Geräte nicht mit dem Haushaltsmüll
entsorgt werden sollen. Es existieren separate Recycling-
Sammelsysteme in der EU. Für mehr Informationen
wenden Sie sich bitte an Ihre örtlichen Behörden
oder an den Fachhändier, bei dem Sie das Produkt
erworben haben.
Questo simbolo sul prodotto o sull’imballaggio
indica che 1’apparato elettrico o elettronico alia fine
dei suo periodo di vita dovrebbe essere smaltito
separatamente dai rifiuti domestici. Nell’UE esistono
altri sistemi di raccolta differenziata. Per ulteriori infor-
mazioni, contattare lê autorità locali o il rivenditore presso il
quale è stato acquistato il prodotto.
Este simbolo en el producto o en su embalaje significa que
deberfa deshacerse de su equipo eléctrico o electrônico, al
final de su vida util, de forma separada del resto de los
residuos domésticos. Para estos productos hay sistemas de
recogida selectiva para reciclarlos en la Union Europea.
Para mas informaciôn, rogamos contacte con la autoridad
local o el distribuidor donde adquirio el producto.
Este sîmbolo no produto ou na respectiva embalagem,
significa que o equipamento eléctrico ou electrônico deverà
ser descartado no fim da sua vida util separadamente do
lixo doméstico. Existem diverses sistemas de recolha
separada para reciclagem na Uniào Europeia.Para mais
informaçôes, queira contactar as autoridades locais ou o
revendedor onde adquiriu o produto.
Märkningen av produkter och fôrpackningar med denna
symbol betyder att elektrisk och elektronisk utrustning
maste tasom hand séparât fràn hushàlissopor nàr
utrustningen har förbrukats. EU har sàrskilda
àtervinningsanlàggningar för denna typ av utrustning.
Kontakta de lokala myndigheterna eller àterförsäijaren dàr
produkten har köpts för mer information.
Dette symbol pà produktet eller pâ emballagen betyder, at
dit elektriske og elektroniske udstyr ved afslutningen af dets
levetid ikke skaï bortskaffes sammen med dit
hushoidningsaffald. Derfindes separate opsamiingssystemer
til genbrug i EU. For mere information bedes du venligst
kontakte de lokale myndigheder eller forhandieren, hvor du
har kebt produktet.
Dit symbool op het product of op zijn verpakking betekent
dat uw elektrische of elektronische apparatuur na het
verstrijken van de levensduur gescheiden van het huisvuil
moet worden weggegooid. Er zijn afzonderlijke
ophaalsystemen voor recyclage in de E.U. Voor
meer informatie neemt u contact op met de
plaatselijke overheid of de dealer waar u het product
hebt gekocht.
Dersom produktet eller emballasjen er merket med
dette symbolet, bor ditt elektriske eller elektroniske
utstyr kasseres atskilt fra ditt hushoidningsavfall nàr
det er utsiitt. 1 Norgefinnes det egne
innsamiingssystemer for resirkulering. Venniigst ta
kontakt med lokale myndigheter eller forhandieren hvor du
kjepte produktet for mer informasjon.
Jos tuotteessa tai sen pakkauksessa on tämä symboli, se
tarkoittaa, että kyseiset sähköisetja elektroniset laitteet pitää
hävittää niiden käytön loputtua erillään kotitalousjätteistä.
EU:ssa on erillisiä keräysjärjestelmiä. Jos haluat lisätietoja,
ota yhteyttä paikallisiin viranomaisiin tai tuotteen myyjään.
Ten symbol na produkcie lub na jego opakowaniu oznacza,
ze. Pahstwa urzadzenie elektryczne lub elektroniczne po
zakohczeniu uzytkowania musi zostac poddane utylizacji
oddzieinie od odpadôw z gospodarstwa domowego. W Unii
Europejskiej istnieja^ oddzieine systemy zbierania odpadô
w poddawanych recykiingowi. Aby uzyskaô wiecej
informacji, proszç skontaktowac sic z lokainymi wtadzami
lub sprzedawca, u ktôrego zakupiono produkt.
English
Swedish
Danish
Dutch
Norwegian
Finnish
Polish
French
German
Italian
Spanish
Portuguese

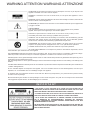
WARNING ATTENTION WARNUNG ATTENZIONE
ATTENTION: afin de réduire tout risques de chocs électriques ou de feu, ne pas exposer votre
appareil à l’humidité ou à toutes sortes de liquides
WARNING: to reduce the risk of fire or electric shock, do not expose this appliance to rain or
moisture.
WARNUNG: Um die Gefahr eines Brandes oder eines Stromschlags zu mindern, halten Sie das
Gerät von Nässe und Feuchtigkeit fern.
ATTENZIONE: per ridurre il rischio di incendi o scosse elettriche evitare di esporre l’apparecchio
a pioggia o umidità.
AVERTISSEMENT
Pour prévenir tout risques de chocs électriques, ne pas ouvrir l’appareil. Si un problème
apparait, faites réparer votre appareil par un technicien qualifié.
CAUTION: To prevent the risk of electric shock, do not remove cover (or back); no user
serviceable parts inside. Refer servicing to qualified service personnel.
VORSICHT: Um die Gefahr eines Stromschlags zu vermeiden, sollte die Abdeckung (und die
Rückwand) nicht entfernt werden. Das Gerät enthält keine Teile, die vom Benutzer gewartet
werden können. Überlassen Sie die Wartung qualifiziertem Fachpersonal.
AVVERTENZE: Per prevenire il rischio di shock elettrici si fa divieto di aprire sia il coperchio
superiore che quello posteriore dell’apparecchio. Non ci sono parti all’interno riparabili o
sostituibili dal’utente finale. Per problemi fare riferimento a personale qualificato.
LE POINT D’EXCLAMATION vous indiquera la présence d’informations importantes, tant au
niveau utilisation que maintenance de votre appareil.
THE LIGHTNING FLASH with arrow-head symbo is intended to alert the user to the presence of uninsulated «dangerous voltage»
within the product’s enclosure that may be of sufficient magnitude to constitute a risk of electric shock to persons.
Das Blitzsymbol in einem gleichschenkligen Dreieck warnt vor nicht isolierten Komponenten mit gefährlicher Stromspannung, die zu
ernsthaften Personenschäden führen kann.
Das Ausrufungszeichen in einem gleichschenkligen Dreieck kennzeichnet wichtige Hinweise für die Nutzung und Wartung Ihres
Gerätes.
IL PUNTO ESCLAMATIVO evidenzia pericolo di shock elettrici e la presenza di istruzioni importanti nel manuale per la manutenzione
o l’utilizzo dell’apparecchio.
Si vous souhaitez déplacer ou transporter votre appareil, nous vous conseillons dans le cas d’un déménagement, d’un retour pour
réparation, etc...de réemballer dans son emballage d’origine votre appareil.
An appliance and cart combination should be moved with care. Before any transportation, your product must be packed correctly
in order to avoid any damage.
Bei der Beförderung des Gerätes mit Transportwagen ist mit Vorsicht vorzugehen. Vor jeder Art von Transport muss das Produkt
ordnungsgemäß verpackt werden, um Beschädigungen zu vermeiden.
* POUR PREVENIR LES CHOCS ELECTRIQUES NE PAS UTILISER CETTE FICHE POLARISEE AVEC UN
PROLONGATEUR, UNE PRISE DE COURANT OU UNE AUTRE SORTIE DE COURANT, SAUF SI LES LAMES
PEUVENT ETRE INSEREES A FOND SANS EN LAISSER AUCUNE PARTIE A DECOUVERT.
* TO PREVENT ELECTRIC SHOCK, DO NOT USE THIS PLUG WITH AN EXTENSION CORD, RECEPTACLE OR
OTHER OUTLET UNLESS THE BLADES CAN BE FULLY INSERTED TO PREVENT BLADE EXPOSURE.
* UM DIE GEFAHR EINES STROMSCHLAGS ZU VERMEIDEN, VERWENDEN SIE DIESEN STECKER
NUR IN KOMBINATION MIT VERLÄNGERUNGSKABELN, KUPPLUNGEN UND STECKDOSEN,
IN DIE DIE STECKERKONTAKTE VOLLSTÄNDIG EINGEFÜHRT WERDEN KÖNNEN, SO DASS KEINE
SPANNUNGSFÜHRENDEN TEILE FREILIEGEN.
PER EVITARE SHOCK ELETTRICI NON UTILIZZARE LA SPINA IN DOTAZIONE CON UNA PROLUNGA, UNA
PRESA A MURO O ALTRO CHE NON CONSENTA IL COMPLETO INSERIMENTO DELLE LAMELLE, EVITANDO
ANCHE LA MINIMA ESPOSIZIONE.
IMPORTANT

LIRE LES INSTRUCTIONS
Toutes les consignes de sécurité et instructions
quand à l’utilisation de notre produit doivent faire
l’objet d’une lecture attentive.
MEMORISER CES INSTRUCTIONS
Les consignes de sécurité et instructions doivent
être retenues pour un usage futur de votre produit
TENEZ COMPTE DES ALERTES
Les mises en garde inscrites sur votre appareil ou
imprimées dans ce manuel doivent être respectées.
SUIVRE LES INSTRUCTIONS
Toutes les instructions concernant l’utilisation et
le fonctionnement de votre appareils doivent être
suivies.
EAU ET MOISISSURE
Votre appareil ne doit pas être utilisé prés d’un point
d’eau ou dans un environnement trop humide.
VENTILATION
Votre appareil doit être installé de telle façon que
sa ventilation ne soit en aucun cas entravée. Il ne
faut pas l’utiliser sur un lit, un sofa ou une surface
similaire qui obstrurait ses grilles de ventilation. Dans
tous les cas, il convient de vérifier que votre appareil
puisse être ventilé naturellement. Ne pas l’encastrer.
SOURCES DE CHALEUR
Il est conseillé d’éloigner votre appareil d’une source
de chaleur type radiateur ou autres sources
produisant une source de chaleur.
ALIMENTATION ELECTRIQUE
Le branchement de votre appareil doit se faire
en respectant les indications contenues dans ce
manuel. Votre installation électrique doit être en
conformité afin de permettre une utilisation en toute
sécurité de votre appareil.
MASSE ET POLARITÉ
Des précautions doivent être prises afin de respecter
la polarité et la mise à la terre de votre appareil.
PROTECTION DU CORDON SECTEUR
Votre cordon d’alimentation doit être correctement
installée afin qu’il ne soit pas piétiner ou arracher.
NETTOYAGE
Votre appareil doit être néttoyée seulement avec les
produits préconisés par le fabricant. Des produits
trop agressifs contenant des acides peuvent
endommagés les différentes surfaces de votre
appareil.
AUTRES SOURCES D’ALIMENTATION
Dans le cas d’une utilisation d’une antenne externe,
vous devez l’éloigner d’une ligne électrique.
PERIODE D’INUTILISATION
Si vous quittez votre domicile pour une longue
pèriode, nous vous conseillons de débrancher votre
appareil.
PÉNÉTRATION D’OBJETS OU DE LIQUIDE
Des précautions doivent être prises afin d’empécher
la pénétration d’objets ou de liquide à l’intérieur de
votre appareil.
SERVICE
Votre appareil doit être impérativement dépanné par
du personnel compétent et qualifié. Afin de connaitre
la station technique la plus proche, merci de
contacter votre distributeur national.
LEGGERE ATTENTAMENTE TUTTE LE
ISTRUZIONI
sulla sicurezza e sul funzionamento prima di
utilizzare l’apparecchio.
CONSERVARE QUESTE ISTRUZIONI per
consultazioni future.
ATTENERSI ALLE AVVERTENZE E SEGUIRE
TUTTE LE ISTRUZIONI sul funzionamento
dell’apparecchio.
ACQUA E UMIDITÀ – L’apparecchio non deve
essere utilizzato vicino all’acqua, ad es. vasca da
bagno, al lavabo, in un seminterrato umido o vicino
ad una piscina, ecc.
VENTILAZIONE – Posizionare l’apparecchio in
modo che riceva una corretta ventilazione, non su
divani, tappeti o superfici simili, in scaffali o armadi
che impediscano il flusso d’aria.
RISCALDAMENTO ¬- Posizionare l’apparecchio
lontano da fonti di calore, come termosifoni,
radiatori termici, cucine o altri apparecchi (inclusi
amplificatori).
ALIMENTAZIONE – Collegare l’apparecchio
soltanto al tipo di alimentazione descritto nelle
istruzioni di funzionamento o indicato
sull’apparecchio stesso.
Messa a terra e polarizzazione – Assicurarsi che
l’apparecchio sia correttamente ed effettivamente
collegato alla massa di terra e sia osservata la
polarizzazione della spina.
PROTEZIONE DEL CAVO DI ALIMENTAZIONE
– Disporre i cavi di alimentazione in modo che non
vengano calpestati e quindi non sotto oggetti che
possano perforare l’isolante o comunque premerli.
Prestare molta attenzione ai cavi ed alle spine che
fuoriescono direttamente dall’apparecchio.
PULIZIA – L’apparecchio deve essere pulito solo
secondo le raccomandazioni del produttore.
LINEE ELETTRICHE – Montare l’antenna esterna
lontano dalle linee elettriche.
PERIODO DI NON-UTILIZZO – Staccare la spina
dell’apparecchio dalla presa quando non viene
utilizzato per un lungo periodo di tempo.
CADUTA DI OGGETTI E LIQUIDI – Non lasciar
cadere oggetti e non versare liquidi nelle aperture
dello chassis.
DANNI CHE RICHIEDONO MANUTENZIONE –La
manutenzione deve essere effettuata solo da
personale qualificato nei seguenti casi:
• Ilcavodialimentazioneolaspinasono
danneggiati , oppure
• Oggettioliquidisonocadutidentro
l’unità, oppure
• L’unitàèstataespostaapioggia,oppure
• L’unitànonfunzionanormalmenteole
sue prestazioni hanno subito un cambiamento
significativo, oppure
• L’unitàècadutaoilcontenitoreèstato
danneggiato.
MANUTENZIONE – L’utente non deve effettuare
alcuna manutenzione, eccetto quella descritta nelle
istruzioni per il funzionamento. Il resto deve essere
eseguito da personale autorizzato.
CONSIGNES DE SECURITE - ISTRUZIONI DI SICUREZZA

READ INSTRUCTIONS
All the safety and operating instructions should be read before the appliance is operated.
RETAIN INSTRUCTIONS
The safety anil operating instructions should be retained for future use.
HEED WARNINGS
All warnings on the appliance and in the operating instructions should be adhered to.
FOLLOW INSTRUCTIONS
All operating and use instructions should be followed.
WATER AND MOISTURE
The appliance should not be used near water for example, near a bathtub, washbowl, kitchen sink, laundry tub, in a
wet basement, or near a swimming pool, etc.
VENTILATION
The appliance should be situated so that its location or position does not interfere with its proper ventilation. For
example, the appliance should not be situated on a bed. sofa, rug, or similar surface that may block the ventilation
openings; or, placed in a built-in installation, such as a bookcase or cabinet that may impede the flow of air through
the ventilation openings.
HEAT
The appliance should be situated away from heat sources such as radiators, heat registers, stoves, or other appliance
(including amplifiers) that produce heat.
POWER SOURCES
The appliance should be connected to a power supply only of the type described in the operating instructions or as
markedon the appliance.
GROUNDING OR POLARIZATION
Precautions should be taken so that the grounding or polarization means of anappliance is not defeated.
POWER-CORD PROTECTION
Power-supply cords should be routed so that they are not likely to be walked on or pinched by paying particular
attention to cords at plugs, convenience receptacles, and the point where they exit from the appliance.
CLEANING
The appliance should be cleaned only as recommended by the manufacturer.
POWER LINES
An outdoor antenna should be located away from power lines.
NON-USE PERIODS
The power cord of the appliance should be unplugged from the outlet when left unused for a long period of time.
OBJECT AND LIQUID ENTRY
Care should be taken so that objects do not fall and liquids are not spilled into the enclosure through openings.
DAMAGE REQUIRING SERVICE
The appliance should be serviced by qualified service personnel when:
•Thepower-supplycordortheplughasbeendamaged;or
•Objectshavefallen,orliquidshavespilledintotheappliance;or
•Theappliancehasbeen.exposedtorain:or
•Theappliancedoesnotappeartooperatenormallyorexhibitsamarkedchangeinperformance;or
•Theappliancehasbeendropped,ortheenclosuredamaged.
SERVICING
The user should not attempt to service the appliance beyond that described in the operating instructions. All other
servicing should be referred to qualified service personnel.
SAFETY INSTRUCTIONS

HINWEISE LESEN
Alle Sicherheits- und Bedienungshinweise
müssen gelesen werden, bevor das Gerät in
Betrieb genommen wird.
HINWEISE AUFBEWAHREN
Die Sicherheitshinweise und die Bedienungsan-
leitung müssen zur späteren Verwendung aufbe-
wahrt werden.
WARNUNGEN BEACHTEN
Alle Warnungen auf dem Gerät und in der
Bedienungsanleitung müssen beachtet werden.
ANWEISUNGEN BEFOLGEN
Alle Anweisungen zur Bedienung und Verwen-
dung müssen befolgt werden.
WASSER UND FEUCHTIGKEIT
Das Gerät darf nicht in der Nähe von Wasser,
z.B. in der Nähe von Badewannen, Wasch-
becken, Spülbecken, Waschwannen, in feuchten
Kellern oder an Swimmingpools, verwendet
werden. Achten Sie bitte darauf, dass keine
Gefäße, die Flüssigkeiten enthalten wie z.B.
Vasen, auf dem Gerät abgestellt werden.
BELÜFTUNG
Das Gerät muss so aufgestellt werden, dass eine
ordnungsgemäße Belüftung gewährleistet ist.
Beispielsweise darf das Gerät nicht auf einem
Sofa, Teppich oder einer ähnlichen Oberfläche
aufgestellt werden, die die Kühlkörper oder
Lüftungsöffnungen versperren könnten, und es
darf nicht in eine umschlossene Umgebung,
etwa in ein Bücherregal oder einen Schrank,
eingebaut werden, die den Luftstrom durch die
Belüftungsöffnungen behindert.
STANDSICHERHEIT
Verwenden Sie bitte ausschließlich Möbel und
andere Geräte zum Anbringen und Draufstellen
der Produkte, die beim Hersteller erhältlich sind
oder von Ihm empfohlen werden. Beachten Sie
bitte, dass fahrbare Tischgeräte oder Regale,
auf denen die Produkte platziert werden, sehr
vorsichtig zu bewegen sind, um Schäden oder
Verletzungen durch ein Umkippen zu vermeiden.
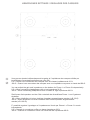
WARNUNG
Dieses Produkt muss auf einer festen, ebenen
Oberfläche aufgestellt werden. Legen Sie das
Gerät nicht auf die Seite, da auf die einzelnen
Seiten eine starke Belastung ausgeübt wird.
Hierdurch kann das Gehäuse beschädigt werden.
Beachten Sie bitte die Abbildung.
WÄRME
Das Gerät ist von Wärmequellen, wie Heiz-
körpern, Heißluftschächten, Öfen und anderen
Wärme erzeugenden Geräten (einschließlich
Verstärkern) entfernt aufzustellen. Setzen Sie das
Gerät nicht direkter Sonneneinstrahlung aus.
STROMQUELLEN
Das Gerät darf nur an Stromnetzen
angeschlossen werden, die in der
Bedienungsanleitung
beschrieben oder auf dem Gerät angegeben
sind.
ERDUNG UND POLUNG
Es ist dafür zu sorgen, dass die Mittel zur
ordnungsgemäßen Erdung und Polung des
Geräts nicht beeinträchtigt werden.
SCHUTZ DER KABEL
Alle Anschlusskabel müssen so verlegt
werden, dass sie nicht betreten oder gequetscht
werden oder auch zu Stolperfallen werden.
Auf das Netzkabel ist besonders an Steckern,
Mehrfachsteckdosen und an der Anschlusstelle
des Gerätes zu achten.
REINIGUNG
Das Gerät sollte nur entsprechend der
Empfehlung des Herstellers gereinigt werden.
ÜBERLANDLEITUNGEN
Eine etwaige Außenantenne darf keinesfalls in
der Nähe von Überlandleitungen installiert
werden.
AUßERBETRIEBNAHME
Der Netzstecker sollte bei Gewitter, oder wenn
das Gerät längere Zeit nicht verwendet wird, aus
der Steckdose entfernt werden.
EINDRINGENDE GEGENSTÄNDE UND
FLÜSSIGKEITEN
Achten Sie darauf, dass in die Öffnungen des
Gehäuses keine Gegenstände fallen und keine
Flüssigkeiten laufen.
VERPACKUNG
Bitte heben Sie die Verpackung für einen
eventuell späteren Transport auf, und halten
Sie die Polybeutel von Kindern fern, da hier bei
unsachgemäßem Umgang ein Erstickungsrisiko
besteht.
REPARATURBEDÜRFTIGE
BESCHÄDIGUNGEN
Das Gerät muss von qualifiziertem Fachper-
sonal gewartet werden, wenn einer der
folgenden Punkte zutrifft:
•DasNetzkabeloderderNetzstecker
beschädigt ist.
•IndasGerätFremdkörperoderFlüssigkeiten
eingedrungen sind.
•DasGerätderNässeausgesetztwurde.
•DasGerätnichtordnungsgemäßfunktioniert
oder Auffälligkeiten hinsichtlich der Leistung
aufweist.
•DasGeräteinemSturzschadenunterlag,oder
das Gehäuse beschädigt ist.
WARTUNG
Eine Wartung des Geräts durch den Benutzer
darf nur in dem in der Bedienungsanleitung
beschriebenen Umfang erfolgen. Alle
weiteren Wartungsarbeiten müssen von
qualifiziertem Fachpersonal durchgeführt
werden.
SICHERHEITSHINWEISE

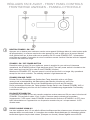
RÉGLAGES FACE AVANT - FRONT PANEL CONTROLS
FRONTSEITIGE ANZEIGEN - PANNELLO FRONTALE
BOUTON STANDBY ON / OFF
Appuyez sur ce bouton pour mettre en marche votre appareil (éclairage blanc de votre bouton après
sa temporisation). La mise en marche de votre appareil ne peut se faire que si le bouton Marche/
Arrêt général situé sur la face arrière est en position ON. En mode STANDBY OFF, l’alimentation
principale est coupée à l’exception du micro-contrôleur servant à activer l’état de veille de l’appareil.
Le bouton est allumé en rouge.
STANDBY ON / OFF POWER BUTTON
Press this button to turn ON your appliance, power is supplied to your unit and it becomes
operational, the STANDBY button’s light becomes white. (The main power switch is located on the
back panel and must be ON in order to use STANDBY function).
When set to STANDBY OFF, the main power is cut-off and the unit is no longer fully operational
except for the micro controller. The standby indicator’s light becomes red.
STANDBY EIN/AUS-TASTE
Drücken Sie zum Einschalten des Geräts diese Taste, daraufhin wird es mit Strom
versorgt und ist betriebsfähig; die Beleuchtung des Standby Knopfes wir weiß. (Der
Hauptnetzschalter befindet sich auf der Geräterückseite und muss auf ON stehen).
Durch nochmaliges Drücken der Taste schalten Sie das Gerät in den Zustand STANDBY AUS, d.
h. die Stromversorgung wird bis auf die Funktion der Fernbedienung abgeschaltet. Die Standby-
Leuchte wird rot.
PULSANTE STANDBY/ON
L’interruttore principale si trova sul pannello posteriore e deve essere su ON per usare la funzione di
STANDBY. Sul pannello frontale, il led è rosso. Premere questo pulsante per accendere
l’apparecchio; il LED sopra il tasto STANDBY diventa bianco Quando lo STANDBY è in OFF viene
tolta l’alimentazione e l’apparecchio non è operativo eccetto che per i microprocessori. Il LED
diventa rosso.
PRISES CASQUE 3.5MM X 2
Les deux embases Jack 3,5 mm stéréo délivrent suffisamment de puissance pour alimenter tous les
casques stéréo conventionnels, à l’exception des modèles électrostatiques qui nécessitent généra-
lement des signaux de plus haut niveau. (Casques non fournis). Niveau réglable menu HPVOL.
w
q

3.5MM STEREO JACK HEADPHONES X2
The headphone terminal provides a stereo audio signal sufficient for driving all conventional
stereo headphones except electrostatic headphones which generally require signal from a high level
ouputs. (Headphones not included)
KOPFHÖRER-BUCHSE (3,5 mm Stereo-Klinke)
Der Kopfhörer-Anschluss bietet ein Stereo-Audiosignal für den Betrieb aller herkömmlichen Stereo-
Kopfhörer außer elektrostatischer Kopfhörer, die in der Regel einen höheren Signalpegel erfordern.
(Kopfhörer nicht im Lieferumfang enthalten)
PRESA CUFFIA 3.5mm
Questeduepresepermettonol’utilizzodiqualsiasicuastereofonicaconvenzionale(manon
elettrostatica) con presa jack .
AFFICHEUR
Cet écran indique de nombreuses informations, en fonction des paramètres du menu choisi. Par
défaut, il affiche la source sélectionnée.
DISPLAY
This display will indicate different information depends on chosen menu. By default, it will
indicate the source input.
DISPLAY
Das Display zeigt verschiedene Informationen, abhängig vom gewählten Menü. Standardmäßig wird
es den Lautstärkepegel anzeigen. Im INPUT Quellen-Modus zeigt es die gewählte Eingangsquelle.
DISPLAY
Questo display indica differenti informazioni a seconda dell’impostazione data. Di base indica il
livello del volume. In modalità INPUT indica la sorgente d’ingresso selezionata.
e

Après avoir brancher électriquement votre amplificateur, mettre l’interrupteur principal ON/OFF situé sur la
face arrière en position ON. Le bouton de standby situé sur la façade avant de votre amplificateur s’allume en
rouge. Appuyer sur ce bouton pour mettre en marche l’appareil, le standby s’allume alors en blanc, l’afficheur
indique la source active.
Vous pouvez naviguer aisément dans les menus de votre SMART PX1 et, par exemple, augmenter ou
diminuer le volume des casques grâce au bouton multi-fonctions. Vous pouvez configurer votre appareil en
pressant le centre de cette commande pour passer d’un menu à l’autre, l’écran affichant INPUT -> APD ->ON
-> MVOL -> HPVOL. En tournant ce bouton, vous pouvez choisir l’entrée parmi toutes celles qui sont
proposées. Vous pouvez répéter l’opération pour naviguer dans les menus en pressant le bouton et
paramétrer votre choix en le tournant.
Comment utiliser le bouton multifonctions ?
How to use the multifunctions button ?
So funktioniert der Multifunktionsknopf ?
Plug your amplifier on the outlet, then switch ON the general power supply button located on the rear panel.
The standby button located on the front panel will light on in red. Push the standby button (front panel) and
the light will become white, the display indicate the last source.
You can easily navigate in the different menus of SMART PX1, and, for example, increase or decrease
the headphone sound level with this multi-functions knob. At that time, you can select the different
configurations of your SMART PX1.
Push once the center of this multi-functions button, and the display indicates INPUT -> APD -> ON ->
MVOL -> HPVOL.
Turn the button and you can choose a different source. You can repeat same way to navigate in the menus.
Schließen Sie Ihren Verstärker an die Steckdose an und schalten Sie anschließend den Hauptnetz-schalter
auf der Rückseite auf ON. Die Standby-Taste auf der Frontplatte leuchtet rot.
Drücken Sie die Standby-Taste (Frontplatte) und das Licht wird weiß, das Display zeigt die gewählte
Lautstärke.
Erhöhen oder verringern Sie die Lautstärke durch Drehen am mittig positionierten Multifunktions-knopf.
Danach können Sie die verschiedenen Menüs des Verstärkers anwählen. Drücken Sie einmal auf den
Multifunktionsknopf und das Display zeigt INPUT. Durch Drehen des Knopfes können Sie eine andere Quelle
wählen. Durch einen erneuten Druck auf den Knopf wird die Auswahl bestätigt und angezeigt. In dieser
Weise können Sie die verschiedenen Ebenen des Menüs durchlaufen. Jeweils durch einen Druck auf den
Knopf wird Ihre Auswahl bestätigt.
Come utilizzare i tasti multifunzione ?
PULSANTE MULTIFUNZIONE: E’ possibile navigare facilmente nei differenti menù dell’apparecchio e, per
esempio, aumentare o diminuire il volume in cuffia. Premendo il centro del tasto il display indicherà INPUT/
APDON/MVOL/HPVOL. Ruotare il tasto e scegliere una sorgente differente. Ripetere l’operazione per
navigare nel menu.
r

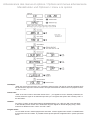
Arborescence des menus et options / Options and menus arborescence
Menüstruktur und Optionen / menu e le opzioni
Remarque :
“APD” est une fonction du menu, qui, par défaut, active le retour à la mise en veille de l’appareil après
30 minutes sans signal sur l’entrée choisie. Vous pouvez désactiver cette fonction en plaçant le menu
“APD” sur “OFF”.
Please note :
“APD” in the menu means “Automatic Power Down” : your appliance turns in Standby mode after 30
minutes without a signal on its selected input. But you can bypass this option with choosing “OFF” in
the APD Menu.
Hinweis:
Die «APD» Funktion ist eine Automatische Geräteabschaltung. Ist « APD auf «ON» wird das Gerät
in den Standbymodus versetz wenn 30 Minuten lang kein Signal am Geräte Eingang anlag . Diese
Funktion ist deaktiviert wenn «APD» auf «OFF» steht.
Pregasi notare:
La voce APD nel menu indica spegnimento automatic. Il Vostro apparecchio entrerà in modalità stand-
by dopo 30 minuti di inutilizzo. E’ possibile evitare questa opzione scegliendo OFF in questo punto del
menù.

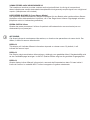
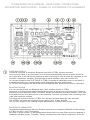
CONNEXIONS FACE ARRIÈRE - REAR PANEL CONNECTIONS
RÜCKSEITIGE ANSCHLÜSSE - PANNELLO POSTERIORE COLLEGAMENTI
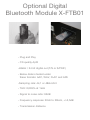
PRISE BLUETOOTH
Permet de connecter le récepteur Bluetooth Aptx/AAX X-FTB01 Advance Acoustic.
Nous évoluons dans un environnement où la musique dématérialisée prend une place de plus en
plus importante. Il est maintenant possible de faire communiquer sans fil toutes les musiques de vos
nomades, ordinateurs, tablettes, Smartphones et autres baladeurs vers votre chaîne HIFI.
Le nouveau récepteur sans fil APTX/AAC X-FTB01 s’acquitte de cette tâche avec un réel talent. Il
s’adapte facilement sur n’importe quelle entrée analogique de votre amplificateur.
Le X-FTB01 vous apporte des performances musicales élevées, associées au confort d’utilisation.
BLUETOOTH PLUG
You can connect directly our Bluetooth Aptx / AAC wireless receiver X-FTB01
We evolve in an environment where dematerialized music is taking more and more place. Stored in
diverse and varied devices (mobile, computers, tablets, smartphones and other players), it only asks
to express itself on hifi systems more or less elaborate, but more importantly with a rendering more
«real» and natural as possible .
The new audio wireless receiver X-FTB01 from Advance Acoustic does this with real talent.
The X-FTB01 can easily be connected to any analog input of your amplifier.
The X-FTB01 brings to you amazing musical performance, combined with an easy use.
BLUETOOTH CONNECTOR
Diese Spannungsversorgung dient zur direkten Verbindung mit unserem Bluetooth Funkempfänger
X-FTB01 mit apt-X / AAC Technologie.
Wir leben in einem Umfeld, in dem gespeicherte Musik mehr und mehr Platz einnimmt, abgelegt in
vielfältigen Geräten (Handy, Computer, Tablets, Smartphones und anderen Zuspielern). Es ist nun
q

möglich, drahtlos Ihre Musik auf Ihre Hifi-Anlage zu übertragen. Der neue Audio-Funkempfänger
X-FTB01 von Advance Acoustic tut dies mit echtem Talent.
Der X-FTB01 kann problemlos an jeden analogen Eingang des Verstärkers angeschlossen werden.
Der X-FTB01 bringt Ihnen eine erstaunliche musikalische Leistung, kombiniert mit einfacher
Handhabung.
BLUETOOTH CONNECTOR
Permette di collegare il ricevitore bluetooth modello X-FTB01.
Con l’adattatore X-FTB01 di Advance Acoustic si possono ascoltare ad alta qualità i brani presenti
su tutti i PC, Mac, smartphone, tablet e riproduttori digitali dotati di trasmettitore Bluetooth. E’
compatibile con il codec APT-X / AAC.
PRE OUT HI-PASS PRE OUT XLR PRE OUT
SORTIES ASYMÉTRIQUES / SORTIES SYMÉTRIQUES
VotrepréamplicateurPX1intègredeuxsortiesstéréoanalogiquesasymétriques,lasortiePRE-OUT
et la sortie PRE-OUT HI-PASS. La sortie PRE-OUT fonctionne sur l’intégralité de la bande passante
alors que la sortie PRE-OUT HI_PASS s’utilise uniquement avec un caisson de grave actif sur la sortie
SUB-OUT. En plus de ces deux sorties, votre PX1 dispose d’une sortie PRE OUT stéréo symétrique.
UNBALANCED / BALANCED OUTPUTS
YourPX1preamplierincludestwostereoanalogunbalancedoutputs,thePRE-OUTandthePRE-
OUT HI-PASS. PRE OUT works on the full frequency range. The PRE OUT HI-PASS works only with
an active subwoofer connected on the SUB OUT.
You can also use your PX1 with the stereo balanced outputs (XLR sockets).
UNSYMMETRISCHER / SYMMETRISCHER AUSGANG
Der PX1 Vorverstärker besitzt 2 Unsymmetrische Analoge Stereoausgänge, einen PRE-OUT und
einen PRE-OUT mit HI-PASS Filter. Der normale PRE-OUT gibt das Komplette Frequenzband
wieder. Der PRE-OUT HIGH-PASS wird benutzt, wenn ein extra Subwoofer über den SUB OUT
angeschlossen wird. Der PX1 bietet des Weiteren einen Symmetrischen Stereoausgang (XLR).
USCITE SBILANCIATE/BILANCIATE
Il preamplificatore PX 1 include due uscite stereo analogiche sbilanciate, il PRE-OUT e PRE-OUT
HI-PASS. La prima lavora sull’intera gamma di frequenze. La seconda lavora solo con un subwoofer
attivo collegato all’uscita SUB OUT.
E’ inoltre possibile utilizzare il PX1 con le uscite stereo bilanciate (prese XLR).
ENTRÉES NUMÉRIQUES OPTIQUES ET COAXIALE
Le Smart PX1 est équipé de 3 entrées optiques et d’une entrée coaxiale. Vous pouvez relier la sortie
numérique de votre lecteur CD, DVD etc afin de bénéficier de la conversion de haute qualité du PX1
afin d’obtenir le meilleur son possible.
OPTICAL AND COAXIAL INPUTS
Smart PX1 has 3 optical inputs and 1 coaxial input. You can connect the digital output of your CD,
DVD etc… and use the high quality DAC converter in order to obtain a better sound result.
OPTISCHE UND COAXIALE EINGÄNGE
Der Smart PX1 hat 3 Optische und 1 Coaxiale Eingänge. Sie können hier die Digitalen Ausgänge
Ihrer Abspielgeräte anschließen
INGRESSI OTTICI, COASSIALI E DIGITALI
Questo apparecchio incorpora 3 ingressi ottici e 1 ingressi coassiali.
Se si possiede un lettore cd, un dvd o altre sorgenti con uscite digitali coassiali o ottiche, è possibile
collegarle a questi ingressi per ottenere migliori risultati, sfruttando il DAC interno
w
e
f
w e f
r

ENTRÉE USB A
Permet de lire des fichiers audio MP3 à partir de baladeur ou clé USB.
USB A INPUT
You can connect and play MP3 player on this input
USB A Eingang
Dient zur Wiedergabe von MP3-Dateien
INGRESSO USB A
E’ possibile collegare a questo ingresso un lettore MP3.
ENTRÉE USB B / XMOS
Note: Ne pas allumer votre amplificateur avant que la connexion USB ait été faite.
A partir de votre ordinateur fixe ou portable, vous pouvez lire ces fichiers audio sur votre
amplificateur par l’intermédiaire de la prise USB. Compatible avec Window 2000 / Win XP / Vista / 7,
8 et 10 Linux, et Mac OS X. Driver téléchargeable sur notre site www.advance-acoustic.com
USB B INPUT / XMOS
Note: Do not turn on the unit until all connections have been made.
You can listen music files that are on your computer. Connect a USB cable from the amplifier USB
input to one of the USB ports on the PC or Mac.
Compatible with Window 2000 / Window XP / Vista / 7, 8 and 10 Linux, and Mac OS X. Driver
downloadable on our website www.advance-acoustic.com
USB B EINGANG / XMOS
Ermöglicht den Anschluss des Verstärker an den PC. Verarbeitet Daten bis 192 kHz/24 Bit.
Kompatibel mit Windows 2000 / Windows XP / Vista / 7, 8, 10Linux und Mac OS X. Driver am
website www.advance-acoustic.com
INGRESSO USB B / XMOS
Nota : non accendere l’apparecchio sinché tutti i collegamenti non sono stati effettuati.
E’ possibile scoltare files dal Vostro computer. Collegare un cavo USB dall’ingresso USB
dell’amplificatore ad una delle porte USB del computer o pc.
Compatibile con Window 2000/Window XP/Vista/7, 8, ,10 Linux e Mac OS X. Driver su website
ENTRÉE TRIGGER IN / SORTIE TRIGGER OUT
Entrée de commande pour allumer ou éteindre l’appareil à distance / Sortie de commande pour
allumer ou éteindre un appareil à distance à partir du Smart SX1.
TRIGGER IN / TRIGGER OUT
Control trigger to ON/OFF this unit by other device / Control trigger to ON/OFF others device.
CONTROL TRIGGER ANSCHLUSS
Über den Control Trigger Anschluss kann der Smart PX1 über andere Geräte an oder aus geschaltet
werden, oder andere Geräte an und aus Schalten
TRIGGER IN / OUT
Trigger per opzioni avanzate di controllo remoto per accensione e spegnimento da ulteriori
elettroniche
MISE À JOUR DU MICROGICIEL INTERNE
Ce connecteur est dédié aux mises à jour du système d’exploitation du PX1, à effectuer par un
revendeur agréé. Ne tentez pas de mettre vous-même à jour le PX1 sous peine de l’endommager !
UPDATE
For dealer use only - software upgrade.
Do not upgrade the software by yourself as damage may result !
t
y
u

UPDATE ANSCHLUSS
Dieser Anschluss ist nur für Service Personal zum Aktualisieren der Software gedacht. Versuchen
Sie nicht selbst die Software zu aktualisieren da das Gerät beschädigt werden kann !
UPDATE
Ad uso esclusivo del rivenditore – aggiornamenti software.
Non effettuate aggiornamenti da soli, potrebbero causare danni.
CÂBLE SECTEUR / SÉLECTEUR DE TENSION / COMMUTATEUR GÉNÉRAL D’ALIMENTATION
Vous devez vous assurer de la bonne tension secteur de votre pays. Par défaut et par sécurité, le
sélecteur a été configuré pour 230 V. Avant de relier le Smart PX1 au secteur, vérifiez que le
commutateur général est sur “OFF”.
POWER CORD / VOLTAGE SELECTOR / GENERAL ON OFF SWITCH
You need to be sure about the voltage of your country. In case that you need to use your appliance
in 115V, you need to change the position of the voltage on the rear panel.
Before plugging in the Smart PX1, its master power switch must be in the OFF position.
STROMANSCHLUSS / SPANNUNGSSCHALTER / GERÄTESCHALTER
Stellen Sie sicher das der Spannungswahlschalter auf die Spannung eingestellt ist, die in Ihrem Land
Standard ist. Der Hauptschalter muss vor dem Anschließen an das Stromnetz auf OFF stehen.
CAVO DI ALIMENTAZIONE/SELETTORE DI VOLTAGGIO/ INTERRUTTORE GENERALE
In questa collocazione troviamo la presa di alimentazione, il selettore del voltaggio e
l’interruttore di accensione.
Prima di inserire il cavo nella presa attiva, l’interruttore principale deve essere su OFF ed allo stesso
tempo accertarsi della tensione del proprio paese.
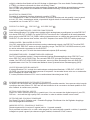
SORTIE REC
Il s’agit d’une sortie ligne fixe analogique (le signal ne varie pas avec le potentiomètre de volume).
Permet de raccorder un enregistreur de type cassette, MD, etc...
REC OUTPUT
This analog audio ouput are for connecting a recorder with an analog audio input such as a cassette
deck, MD recorder, etc. The output signal is not variable.
REC OUT
Dieser analoge Audioausgang stellt ein Signal für Aufnahmegeräte wie Cassettenlaufwerke oder
MD-Rekorder bereit. Dieses Signal wird durch die Klang- und Lautstärkeregelung nicht beeinflusst.
REC OUT
Queste uscite audio analogiche permettono di collegare un registratore con ingressi analogici quali
un registratore, MD, ecc. Il segnale non è variabile.
ENTRÉE SYMÉTRIQUE XLR
Si vous disposez d’une source possédant une sortie symétrique, vous pouvez raccorder sa sortie
stéréo à l’entrée symétrique stéréo XLR de votre préamplificateur PX1
BALANCED XLR INPUT
If your source has a stereo balanced output, you can connect it on the stereo balanced XLR input of
your preamplifier PX1.
SYMMETRISCHER XLR EINGANG
Wenn Ihr Einspielgerät einen Symmetrischen Stereoausgang besitzt, können Sie es an den
Symmetrischen XLR Eingang Ihres PX1 anschließen.
i
o
a
s
d

INGRESSI BILANCIATI XLR
Se la vostra sorgente dispone di una uscita stereo bilanciata, si può collegare la stessa all’ingresso
XLR stereo bilanciato del preamplificatore PX1.
Connector ground terminal: Chassis grounded
The pin assignments for this terminal are given above.
The amplifier uses the European type XLR terminal.
ENTRÉES DES SOURCES
Vous devez connecter vos sources sur les entrées stéréophoniques correspondantes. Toutes ces
entrées sont normalisées, elles conviennent à toutes sources standards
comme des tuners, des lecteurs CD, des lecteurs MP3, des lecteurs DVD, etc...
Remarque : Ces entrées conviennent uniquement à des signaux audio analogiques. Elles ne doivent
pas être raccordées à la sortie numérique d’un lecteur de CD ou d’un autre appareil à sortie
numérique.
INPUTS
You can connect your stereo sources on those inputs. These inputs are suitable for any line level
source equipment such as tuners, CD players, DVD, MP3 players, etc.
Note: These inputs are only for analogue audio signals. They should not be connected to the digital
output of a CD player or any other digital device.
AUDIO EINGÄNGE
Diese RCA-Eingänge dienen zum Anschluss Ihrer Signalquellen wie Tuner, CD-Player, MP3-Player,
DVD-Player, etc ...Hinweis: Diese Eingänge sind nur für analoge Audiosignale.
INGRESSI
A queste prese si possono collegare i Vostri apparecchi stereo. Questi ingressi sono adatti a tutte
le sorgenti linea quali Cd, Dvd, lettori MP3,ecc e per segnali di tipo analogico. Non devono essere
collegati a uscite digitali.
FREQUENCES DE COUPURE DU CAISSON DE GRAVE 75/150Hz
Vous pouvez sélectionner la fréquence de coupure de votre caisson de grave sur 75 Hz ou 150Hz.
En simplifiant, une fréquence de coupure de 150Hz est plus adaptée au petit caisson de grave et
75Hz pour les caissons plus imposants capables de restituer les fréquences inférieures à 75Hz.
CROSSOVER FREQ. 150Hz/75Hz
Switch this button to set the crossover frequency of subwoofer at 150Hz or 75Hz. Broadly speaking,
the 150Hz setting is for smaller subwoofer that don’t have much output below 100Hz. The 75Hz
setting is for conventional powerful subwoofer.
FREQUENZÜBERGANG 150Hz/75Hz
Mit diesem Schalter können Sie die Trennfrequenz für Ihren Subwoofer auf 150Hz oder 75Hz
einstellen. Die 150Hz Trennfrequenz ist für kleine Subwoofer die bauartbedingt nicht weit unter
100Hz kommen gedacht. Die 75Hz Trennfrequenz ist für größere Leistungsstarke Subwoofer.
FREQUENZE CROSSOVER 150Hz/75Hz
Selezionare questo pulsante per impostare la frequenza crossover del subwoofer a 150Hz o 75Hz. In
linea di massima, l’impostazione 150Hz è per subwoofer più piccoli che hanno poca potenza, sotto i
100Hz. L’impostazione 75Hz è per subwoofer convenzionali più potenti.
g
h

ENTREE PHONO ET MASSE PHONO
Vous pouvez brancher votre platine disque sur les entrées RCA gauche (L) et droite (R). Les platines
disque sont généralement munis d’un fil de terre que vous devez connecter sur «ground of phono»
en dévissant puis vissant ce connecteur en coinçant le fil de terre de la platine.
Vous pouvez adapter votre cellule à l’entrée phono de votre préamplificateur PX1. Cellule à aimant
mobile (MM) ou bobine mobile (MC), haut et bas niveau (MC LOW ou MC HIGH).
La capacitance est elle aussi réglable (100P/200P/320P).
PHONO INPUT AND GROUND TERMINAL
You can connect your turntable on the RCA connectors left (L) and right (R). Turntables normally
includes a single wire earth lead. Use the phono ground connector to connect this lead. Unscrew
the terminal to expose the hole which will accept the lead. After insertion, tighten the terminal to
secure the lead.
You can choose suitable Phono type(MC LOW/MM/MC HIGH) and phono capacitance
(100P/200P/320P)
PHONO EINGANG UND MASSE ANSCHLUSS
Sie können Ihren Plattenspieler an den Phono RCA links (L) und rechts (R) anschließen.
Plattenspielern liegt in der Regel ein extra Massekabel bei. Schließen Sie das Massekabel des
Plattenspielers an die Masse Schraubklemme des PX1 an. Schrauben Sie dazu den Anschluss
am PX1 soweit auf bis Sie das Loch am Anschluss sehen. Stecken Sie das Massekabel Ihres
Plattenspielers in das Loch und drehen Sie die Schraubklemme so fest zu, dass das Kabel sicher
in der Schraubklemme sitzt. Sie können den passenden Phono Typ (MC LOW/MM/MC) und die
passende Phono Kapazität (100P/200P/320P) wählen.
INGRESSO PHONO E MESSA A TERRA
E’ possibile collegare il proprio giradischi ai connettori RCA sinistro (L) e destro (R). I giradischi
normalmente includono un cavo singolo per la messa a terra. Utilizzare il connettore phono della
messa a terra per il collegamento di questo cavo. Svitare il terminale per esporre il foro che
accetterà il cavo. Dopo l’inserimento, serrare nuovamente il terminale per fissare il cavetto. E’
possibile scegliere la più adatta classificazione phono (MC LOW/MM/MC HIGH) e capacità
(100P/200P/320P)
SORTIE SUBWOOFER / CAISSON DE GRAVE
Permet de connecter un caisson de grave
SUBWOOFER OUTPUT
To connect an active subwoofer
SUBWOOFER OUT
Zu active subwoofer anschließen
SUBWOOFER TERMINALI
Permette di collegare subwoofer
j
k

HEADPHONES SETTINGS / REGLAGES DES CASQUES
Vous pouvez ajuster indépendamment les gains et l’impédance des casques utilisés par
les différents commutateurs situés sous votre PX1.
0Ω=Quandvousconnectezdescasquesavecunebasseimpédancede32Ω.
100Ω=Quandvousconnectezdescasquesavecuneimpédancemoyenneouhautede600Ω.
You can adjust the gain and impedance on the bottom for Phone 1 or Phone 2 independently.
0Ω=Whenconnectingheadphoneswithalowimpedance32Ω.
100Ω=Whenconnectingheadphoneswithamiddleorhighimpedance600Ω.
Sie können die Impedanz und den Gain unterhalb der Anschlüsse Phone 1 und 2 getrennt
einstellen.
0Ω=WennKopfhörermiteinerniedrigenImpedanzangeschlossenwerden(z.B.32Ω).
100Ω=WennKopfhörermiteinermittlerenoderhohenImpedanzangeschlossen
werden(z.B.600Ω)
E’ possibile regolare il guadagno e l’impedenza sul fondo per Phone 1 o Phone 2 in modo
indipendente.
0Ω=Quandosiconnettonocuffieconbassaimpedenza32Ω.
100Ω=Quandosiconnettonocuffieconmediaedaltaimpedenza600Ω
q
w

NOTES

NOTES

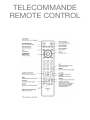
TELECOMMANDE
REMOTE CONTROL
Seite wird geladen ...
Seite wird geladen ...
Seite wird geladen ...
Seite wird geladen ...
-
 1
1
-
 2
2
-
 3
3
-
 4
4
-
 5
5
-
 6
6
-
 7
7
-
 8
8
-
 9
9
-
 10
10
-
 11
11
-
 12
12
-
 13
13
-
 14
14
-
 15
15
-
 16
16
-
 17
17
-
 18
18
-
 19
19
-
 20
20
-
 21
21
-
 22
22
-
 23
23
-
 24
24


ADVANCE PX1 Bedienungsanleitung
- Kategorie
- Musikausrüstung
- Typ
- Bedienungsanleitung
in anderen Sprachen
- English: ADVANCE PX1 Owner's manual
- français: ADVANCE PX1 Le manuel du propriétaire
- italiano: ADVANCE PX1 Manuale del proprietario
Verwandte Artikel
-
ADVANCE Classic X-P500 Schnellstartanleitung
-
-
-
-
-
-
ADVANCE AIR90 Bedienungsanleitung
-
-
-
