ADVANCE X-i120 Bedienungsanleitung
- Kategorie
- Musikinstrumentenverstärker
- Typ
- Bedienungsanleitung
Dieses Handbuch eignet sich auch für

QuickStart
X-i120
Stereo audiophile integrated amplier
Amplicateur intégré stéréo audiophile
Audiophiler Stereo-Vollvererstärker

RECYCLING IN EUROPEAN UNION COUNTRIES
Disposal of your old appliance
This symbol on the product or on its packaging means that
your electrical and electronic equipment should be dis-
posed at the end of life separately from your household
wastes. There are separate coilection systems for recy-
cling in EU. For more information, please contact the local
authority or the dealer where you purchased the product.
Ce symbole figurant sur le produit ou son emballage signi-
fie que votre équipement électrique et électronique doit
être mis au rebut séparément de vos déchets ménagers
lorsqu’il atteint Ia fin de sa durée de vie.II existe des sys-
tèmes de coilecte séparée pour le recyclage dans l’UE.
Pour pius d’informations, veuiliez prendre contact avec lês
autorités locales ou lê revendeur auquel vous avez acheté
ce produit.
Das auf dem Produkt oder auf der Verpackung angebrach-
te Symbol bedeutet, dass Ihre elektrischen und elektroni-
schen Geräte nicht mit dem Haushaltsmüll entsorgt werden
sollen. Es existieren separate Recycling-Sammelsysteme
in der EU. Für mehr Informationen wenden Sie
sich bitte an Ihre örtlichen Behörden oder an den
Fachhändier, bei dem Sie das Produkt erworben
haben.
Questo simbolo sul prodotto o sull’imballaggio
indica che 1’apparato elettrico o elettronico alia fine
dei suo periodo di vita dovrebbe essere smaltito
separatamente dai rifiuti domestici. Nell’UE esis-
tono altri sistemi di raccolta differenziata. Per ulteriori infor-
mazioni, contattare lê autorità locali o il rivenditore presso il
quale è stato acquistato il prodotto.
Este simbolo en el producto o en su embalaje significa que
deberfa deshacerse de su equipo eléctrico o electrônico, al
final de su vida util, de forma separada del resto de los
residuos domésticos. Para estos productos hay sistemas
de recogida selectiva para reciclarlos en la Union Europea.
Para mas informaciôn, rogamos contacte con la autoridad
local o el distribuidor donde adquirio el producto.
Este sîmbolo no produto ou na respectiva embalagem,
significa que o equipamento eléctrico ou electrônico deverà
ser descartado no fim da sua vida util separadamente
do lixo doméstico. Existem diverses sistemas de recolha
separada para reciclagem na Uniào Europeia.Para mais
informaçôes, queira contactar as autoridades locais ou o
revendedor onde adquiriu o produto.
Märkningen av produkter och fôrpackningar med denna
symbol betyder att elektrisk och elektronisk utrustning
maste tasom hand séparât fràn hushàlissopor nàr utrus-
tningen har förbrukats. EU har sàrskilda àtervinningsan-
làggningar för denna typ av utrustning.Kontakta de lokala
myndigheterna eller àterförsäijaren dàr produkten har köpts
för mer information.
Dette symbol pà produktet eller pâ emballagen betyder,
at dit elektriske og elektroniske udstyr ved afslutningen af
dets levetid ikke skaï bortskaffes sammen med dit hus-
hoidningsaffald. Derfindes separate opsamiingssystemer
til genbrug i EU. For mere information bedes du venligst
kontakte de lokale myndigheder eller forhandieren, hvor du
har kebt produktet.
Dit symbool op het product of op zijn verpakking betekent
dat uw elektrische of elektronische apparatuur na het vers-
trijken van de levensduur gescheiden van het huisvuil moet
worden weggegooid. Er zijn afzonderlijke ophaalsystemen
voor recyclage in de E.U. Voor meer informatie
neemt u contact op met de plaatselijke overheid of
de dealer waar u het product hebt gekocht.
Dersom produktet eller emballasjen er merket med
dette symbolet, bor ditt elektriske eller elektroniske
utstyr kasseres atskilt fra ditt hushoidningsavfall nàr
det er utsiitt. 1 Norgefinnes det egne innsamiings-
systemer for resirkulering. Venniigst ta kontakt med
lokale myndigheter eller forhandieren hvor du kjepte pro-
duktet for mer informasjon.
Jos tuotteessa tai sen pakkauksessa on tämä symboli, se
tarkoittaa, että kyseiset sähköisetja elektroniset laitteet
pitää hävittää niiden käytön loputtua erillään kotitalous-
jätteistä. EU:ssa on erillisiä keräysjärjestelmiä. Jos haluat
lisätietoja, ota yhteyttä paikallisiin viranomaisiin tai tuotteen
myyjään.
Ten symbol na produkcie lub na jego opakowaniu oznacza,
ze. Pahstwa urzadzenie elektryczne lub elektroniczne po
zakohczeniu uzytkowania musi zostac poddane utylizacji
oddzieinie od odpadôw z gospodarstwa domowego. W
Unii Europejskiej istnieja^ oddzieine systemy zbierania
odpadô w poddawanych recykiingowi. Aby uzyskaô wiecej
informacji, proszç skontaktowac sic z lokainymi wtadzami
lub sprzedawca, u ktôrego zakupiono produkt.
English
Swedish
Danish
Dutch
Norwegian
Finnish
Polish
French
German
Italian
Spanish
Portuguese

WARNING ATTENTION WARNUNG ATTENZIONE
ATTENTION: afin de réduire tout risques de chocs électriques ou de feu, ne pas exposer votre appareil
à l’humidité ou à toutes sortes de liquides
WARNING: to reduce the risk of fire or electric shock, do not expose this appliance to rain or moisture.
WARNUNG: Um die Gefahr eines Brandes oder eines Stromschlags zu mindern, halten Sie das Gerät
von Nässe und Feuchtigkeit fern.
ATTENZIONE: per ridurre il rischio di incendi o scosse elettriche evitare di esporre l’apparecchio a
pioggia o umidità.
AVERTISSEMENT
Pour prévenir tout risques de chocs électriques, ne pas ouvrir l’appareil. Si un problème apparait, faites
réparer votre appareil par un technicien qualifié.
CAUTION: To prevent the risk of electric shock, do not remove cover (or back); no user serviceable parts
inside. Refer servicing to qualified service personnel.
VORSICHT: Um die Gefahr eines Stromschlags zu vermeiden, sollte die Abdeckung (und die Rückwand)
nicht entfernt werden. Das Gerät enthält keine Teile, die vom Benutzer gewartet werden können.
Überlassen Sie die Wartung qualifiziertem Fachpersonal.
AVVERTENZE: Per prevenire il rischio di shock elettrici si fa divieto di aprire sia il coperchio superiore
che quello posteriore dell’apparecchio. Non ci sono parti all’interno riparabili o sostituibili dal’utente
finale. Per problemi fare riferimento a personale qualificato.
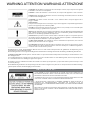
LE POINT D’EXCLAMATION vous indiquera la présence d’informations importantes, tant au niveau
utilisation que maintenance de votre appareil.
THE LIGHTNING FLASH with arrow-head symbo is intended to alert the user to the presence of unin-
sulated «dangerous voltage» within the product’s enclosure that may be of sufficient magnitude to
constitute a risk of electric shock to persons.
Das Blitzsymbol in einem gleichschenkligen Dreieck warnt vor nicht isolierten Komponenten mit gefährlicher Stromspannung, die zu
ernsthaften Personenschäden führen kann.
Das Ausrufungszeichen in einem gleichschenkligen Dreieck kennzeichnet wichtige Hinweise für die Nutzung und Wartung Ihres Gerätes.
IL PUNTO ESCLAMATIVO evidenzia pericolo di shock elettrici e la presenza di istruzioni importanti nel manuale per la manutenzione o l’uti-
lizzo dell’apparecchio.
Si vous souhaitez déplacer ou transporter votre appareil, nous vous conseillons dans le cas d’un déménagement, d’un retour pour réparation,
etc...de réemballer dans son emballage d’origine votre appareil.
An appliance and cart combination should be moved with care. Before any transportation, your product must be packed correctly in order
to avoid any damage.
Bei der Beförderung des Gerätes mit Transportwagen ist mit Vorsicht vorzugehen. Vor jeder Art von Transport muss das Produkt ordnungs-
gemäß verpackt werden, um Beschädigungen zu vermeiden.
* POUR PREVENIR LES CHOCS ELECTRIQUES NE PAS UTILISER CETTE FICHE POLARISEE AVEC UN
PROLONGATEUR, UNE PRISE DE COURANT OU UNE AUTRE SORTIE DE COURANT, SAUF SI LES LAMES PEUVENT
ETRE INSEREES A FOND SANS EN LAISSER AUCUNE PARTIE A DECOUVERT.
* TO PREVENT ELECTRIC SHOCK, DO NOT USE THIS PLUG WITH AN EXTENSION CORD, RECEPTACLE OR OTHER
OUTLET UNLESS THE BLADES CAN BE FULLY INSERTED TO PREVENT BLADE EXPOSURE.
* UM DIE GEFAHR EINES STROMSCHLAGS ZU VERMEIDEN, VERWENDEN SIE DIESEN STECKER NUR IN
KOMBINATION MIT VERLÄNGERUNGSKABELN, KUPPLUNGEN UND STECKDOSEN, IN DIE DIE
STECKERKONTAKTE VOLLSTÄNDIG EINGEFÜHRT WERDEN KÖNNEN, SO DASS KEINE SPANNUNGSFÜHRENDEN
TEILE FREILIEGEN.
PER EVITARE SHOCK ELETTRICI NON UTILIZZARE LA SPINA IN DOTAZIONE CON UNA PROLUNGA, UNA PRESA
A MURO O ALTRO CHE NON CONSENTA IL COMPLETO INSERIMENTO DELLE LAMELLE, EVITANDO ANCHE LA
MINIMA ESPOSIZIONE.
IMPORTANT

LIRE LES INSTRUCTIONS
Toutes les consignes de sécurité et instructions
quand à l’utilisation de notre produit doivent faire
l’objet d’une lecture attentive.
MEMORISER CES INSTRUCTIONS
Les consignes de sécurité et instructions doivent
être retenues pour un usage futur de votre produit
TENEZ COMPTE DES ALERTES
Les mises en garde inscrites sur votre appareil ou
imprimées dans ce manuel doivent être respectées.
SUIVRE LES INSTRUCTIONS
Toutes les instructions concernant l’utilisation et
le fonctionnement de votre appareils doivent être
suivies.
EAU ET MOISISSURE
Votre appareil ne doit pas être utilisé prés d’un point
d’eau ou dans un environnement trop humide.
VENTILATION
Votre appareil doit être installé de telle façon que
sa ventilation ne soit en aucun cas entravée. Il ne
faut pas l’utiliser sur un lit, un sofa ou une surface
similaire qui obstrurait ses grilles de ventilation. Dans
tous les cas, il convient de vérifier que votre appareil
puisse être ventilé naturellement. Ne pas l’encastrer.
SOURCES DE CHALEUR
Il est conseillé d’éloigner votre appareil d’une source
de chaleur type radiateur ou autres sources produi-
sant une source de chaleur.
ALIMENTATION ELECTRIQUE
Le branchement de votre appareil doit se faire
en respectant les indications contenues dans ce
manuel. Votre installation électrique doit être en
conformité afin de permettre une utilisation en toute
sécurité de votre appareil.
MASSE ET POLARITÉ
Des précautions doivent être prises afin de respecter
la polarité et la mise à la terre de votre appareil.
PROTECTION DU CORDON SECTEUR
Votre cordon d’alimentation doit être correctement
installée afin qu’il ne soit pas piétiner ou arracher.
NETTOYAGE
Votre appareil doit être néttoyée seulement avec les
produits préconisés par le fabricant. Des produits
trop agressifs contenant des acides peuvent endom-
magés les différentes surfaces de votre appareil.
AUTRES SOURCES D’ALIMENTATION
Dans le cas d’une utilisation d’une antenne externe,
vous devez l’éloigner d’une ligne électrique.
PERIODE D’INUTILISATION
Si vous quittez votre domicile pour une longue
pèriode, nous vous conseillons de débrancher votre
appareil.
PÉNÉTRATION D’OBJETS OU DE LIQUIDE
Des précautions doivent être prises afin d’empécher
la pénétration d’objets ou de liquide à l’intérieur de
votre appareil.
SERVICE
Votre appareil doit être impérativement dépanné par
du personnel compétent et qualifié. Afin de connaitre
la station technique la plus proche, merci de contac-
ter votre distributeur national.
LEGGERE ATTENTAMENTE TUTTE LE
ISTRUZIONI
sulla sicurezza e sul funzionamento prima di utiliz-
zare l’apparecchio.
CONSERVARE QUESTE ISTRUZIONI per consul-
tazioni future.
ATTENERSI ALLE AVVERTENZE E SEGUIRE
TUTTE LE ISTRUZIONI sul funzionamento dell’ap-
parecchio.
ACQUA E UMIDITÀ – L’apparecchio non deve
essere utilizzato vicino all’acqua, ad es. vasca da
bagno, al lavabo, in un seminterrato umido o vicino
ad una piscina, ecc.
VENTILAZIONE – Posizionare l’apparecchio in
modo che riceva una corretta ventilazione, non su
divani, tappeti o superfici simili, in scaffali o armadi
che impediscano il flusso d’aria.
RISCALDAMENTO ¬- Posizionare l’apparecchio
lontano da fonti di calore, come termosifoni, radia-
tori termici, cucine o altri apparecchi (inclusi ampli-
ficatori).
ALIMENTAZIONE – Collegare l’apparecchio soltan-
to al tipo di alimentazione descritto nelle istruzioni di
funzionamento o indicato sull’apparecchio stesso.
Messa a terra e polarizzazione – Assicurarsi che
l’apparecchio sia correttamente ed effettivamente
collegato alla massa di terra e sia osservata la pola-
rizzazione della spina.
PROTEZIONE DEL CAVO DI ALIMENTAZIONE
– Disporre i cavi di alimentazione in modo che non
vengano calpestati e quindi non sotto oggetti che
possano perforare l’isolante o comunque premerli.
Prestare molta attenzione ai cavi ed alle spine che
fuoriescono direttamente dall’apparecchio.
PULIZIA – L’apparecchio deve essere pulito solo
secondo le raccomandazioni del produttore.
LINEE ELETTRICHE – Montare l’antenna esterna
lontano dalle linee elettriche.
PERIODO DI NON-UTILIZZO – Staccare la spina
dell’apparecchio dalla presa quando non viene uti-
lizzato per un lungo periodo di tempo.
CADUTA DI OGGETTI E LIQUIDI – Non lasciar
cadere oggetti e non versare liquidi nelle aperture
dello chassis.
DANNI CHE RICHIEDONO MANUTENZIONE –La
manutenzione deve essere effettuata solo da perso-
nale qualificato nei seguenti casi:
• Ilcavodialimentazioneolaspinasono
danneggiati , oppure
• Oggettioliquidisonocadutidentro
l’unità, oppure
• L’unitàèstataespostaapioggia,oppure
• L’unitànonfunzionanormalmenteole
sue prestazioni hanno subito un cambiamento signi-
ficativo, oppure
• L’unitàècadutaoilcontenitoreèstato
danneggiato.
MANUTENZIONE – L’utente non deve effettuare
alcuna manutenzione, eccetto quella descritta nelle
istruzioni per il funzionamento. Il resto deve essere
eseguito da personale autorizzato.
CONSIGNES DE SECURITE - ISTRUZIONI DI SICUREZZA

READ INSTRUCTIONS
All the safety and operating instructions should be read before the appliance is operated.
RETAIN INSTRUCTIONS
The safety anil operating instructions should be retained for future use.
HEED WARNINGS
All warnings on the appliance and in the operating instructions should be adhered to.
FOLLOW INSTRUCTIONS
All operating and use instructions should be followed.
WATER AND MOISTURE
The appliance should not be used near water for example, near a bathtub, washbowl, kitchen sink, laundry tub, in a
wet basement, or near a swimming pool, etc.
VENTILATION
The appliance should be situated so that its location or position does not interfere with its proper ventilation. For
example, the appliance should not be situated on a bed. sofa, rug, or similar surface that may block the ventilation
openings; or, placed in a built-in installation, such as a bookcase or cabinet that may impede the flow of air through
the ventilation openings.
HEAT
The appliance should be situated away from heat sources such as radiators, heat registers, stoves, or other appliance
(including amplifiers) that produce heat.
POWER SOURCES
The appliance should be connected to a power supply only of the type described in the operating instructions or as
markedon the appliance.
GROUNDING OR POLARIZATION
Precautions should be taken so that the grounding or polarization means of anappliance is not defeated.
POWER-CORD PROTECTION
Power-supply cords should be routed so that they are not likely to be walked on or pinched by paying particular atten-
tion to cords at plugs, convenience receptacles, and the point where they exit from the appliance.
CLEANING
The appliance should be cleaned only as recommended by the manufacturer.
POWER LINES
An outdoor antenna should be located away from power lines.
NON-USE PERIODS
The power cord of the appliance should be unplugged from the outlet when left unused for a long period of time.
OBJECT AND LIQUID ENTRY
Care should be taken so that objects do not fall and liquids are not spilled into the enclosure through openings.
DAMAGE REQUIRING SERVICE
The appliance should be serviced by qualified service personnel when:
•Thepower-supplycordortheplughasbeendamaged;or
•Objectshavefallen,orliquidshavespilledintotheappliance;or
•Theappliancehasbeen.exposedtorain:or
•Theappliancedoesnotappeartooperatenormallyorexhibitsamarkedchangeinperformance;or
•Theappliancehasbeendropped,ortheenclosuredamaged.
SERVICING
The user should not attempt to service the appliance beyond that described in the operating instructions. All other
servicing should be referred to qualified service personnel.
SAFETY INSTRUCTIONS

HINWEISE LESEN
Alle Sicherheits- und Bedienungshinweise müs-
sen gelesen werden, bevor das Gerät in Betrieb
genommen wird.
HINWEISE AUFBEWAHREN
Die Sicherheitshinweise und die Bedienungsan-
leitung müssen zur späteren Verwendung aufbe-
wahrt werden.
WARNUNGEN BEACHTEN
Alle Warnungen auf dem Gerät und in der
Bedienungsanleitung müssen beachtet werden.
ANWEISUNGEN BEFOLGEN
Alle Anweisungen zur Bedienung und Verwen-
dung müssen befolgt werden.
WASSER UND FEUCHTIGKEIT
Das Gerät darf nicht in der Nähe von Wasser,
z.B. in der Nähe von Badewannen, Wasch-
becken, Spülbecken, Waschwannen, in feuchten
Kellern oder an Swimmingpools, verwendet wer-
den. Achten Sie bitte darauf, dass keine Gefäße,
die Flüssigkeiten enthalten wie z.B. Vasen, auf
dem Gerät abgestellt werden.
BELÜFTUNG
Das Gerät muss so aufgestellt werden, dass eine
ordnungsgemäße Belüftung gewährleistet ist.
Beispielsweise darf das Gerät nicht auf einem
Sofa, Teppich oder einer ähnlichen Oberfläche
aufgestellt werden, die die Kühlkörper oder
Lüftungsöffnungen versperren könnten, und es
darf nicht in eine umschlossene Umgebung,
etwa in ein Bücherregal oder einen Schrank,
eingebaut werden, die den Luftstrom durch die
Belüftungsöffnungen behindert.
STANDSICHERHEIT
Verwenden Sie bitte ausschließlich Möbel und
andere Geräte zum Anbringen und Draufstellen
der Produkte, die beim Hersteller erhältlich sind
oder von Ihm empfohlen werden. Beachten Sie
bitte, dass fahrbare Tischgeräte oder Regale,
auf denen die Produkte platziert werden, sehr
vorsichtig zu bewegen sind, um Schäden oder
Verletzungen durch ein Umkippen zu vermeiden.
WARNUNG
Dieses Produkt muss auf einer festen, ebenen
Oberfläche aufgestellt werden. Legen Sie das
Gerät nicht auf die Seite, da auf die einzelnen
Seiten eine starke Belastung ausgeübt wird.
Hierdurch kann das Gehäuse beschädigt werden.
Beachten Sie bitte die Abbildung.
WÄRME
Das Gerät ist von Wärmequellen, wie Heiz-
körpern, Heißluftschächten, Öfen und anderen
Wärme erzeugenden Geräten (einschließlich
Verstärkern) entfernt aufzustellen. Setzen Sie das
Gerät nicht direkter Sonneneinstrahlung aus.
STROMQUELLEN
Das Gerät darf nur an Stromnetzen angeschlos-
sen werden, die in der Bedienungsanleitung
beschrieben oder auf dem Gerät angegeben
sind.
ERDUNG UND POLUNG
Es ist dafür zu sorgen, dass die Mittel zur
ordnungsgemäßen Erdung und Polung des
Geräts nicht beeinträchtigt werden.
SCHUTZ DER KABEL
Alle Anschlusskabel müssen so verlegt wer-
den, dass sie nicht betreten oder gequetscht
werden oder auch zu Stolperfallen werden.
Auf das Netzkabel ist besonders an Steckern,
Mehrfachsteckdosen und an der Anschlusstelle
des Gerätes zu achten.
REINIGUNG
Das Gerät sollte nur entsprechend der
Empfehlung des Herstellers gereinigt werden.
ÜBERLANDLEITUNGEN
Eine etwaige Außenantenne darf keinesfalls in
der Nähe von Überlandleitungen installiert wer-
den.
AUßERBETRIEBNAHME
Der Netzstecker sollte bei Gewitter, oder wenn
das Gerät längere Zeit nicht verwendet wird, aus
der Steckdose entfernt werden.
EINDRINGENDE GEGENSTÄNDE UND
FLÜSSIGKEITEN
Achten Sie darauf, dass in die Öffnungen des
Gehäuses keine Gegenstände fallen und keine
Flüssigkeiten laufen.
VERPACKUNG
Bitte heben Sie die Verpackung für einen even-
tuell späteren Transport auf, und halten Sie die
Polybeutel von Kindern fern, da hier bei unsach-
gemäßem Umgang ein Erstickungsrisiko besteht.
REPARATURBEDÜRFTIGE
BESCHÄDIGUNGEN
Das Gerät muss von qualifiziertem Fachper-
sonal gewartet werden, wenn einer der folgen-
den Punkte zutrifft:
•DasNetzkabeloderderNetzstecker
beschädigt ist.
•IndasGerätFremdkörperoderFlüssigkeiten
eingedrungen sind.
•DasGerätderNässeausgesetztwurde.
•DasGerätnichtordnungsgemäßfunktioniert
oder Auffälligkeiten hinsichtlich der Leistung
aufweist.
•DasGeräteinemSturzschadenunterlag,oder
das Gehäuse beschädigt ist.
WARTUNG
Eine Wartung des Geräts durch den Benutzer
darf nur in dem in der Bedienungsanleitung
beschriebenen Umfang erfolgen. Alle weiteren
Wartungsarbeiten müssen von qualifiziertem
Fachpersonal durchgeführt werden.
SICHERHEITSHINWEISE

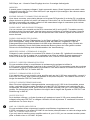
RÉGLAGES FACE AVANT - FRONT PANEL CONTROLS
FRONTSEITIGE ANZEIGEN - PANNELLO FRONTALE
q
q
r
w
BOUTON STANDBY ON / OFF
Appuyez sur ce bouton pour mettre en marche votre appareil (éclairage blanc de votre bouton après
sa temporisation). La mise en marche de votre appareil ne peut se faire que si le bouton Marche/
Arrêt général situé sur la face arrière est en position ON. En mode STANDBY OFF, l’alimentation
principale est coupée à l’exception du micro-contrôleur servant à activer l’état de veille de l’appareil.
Le bouton est allumé en rouge.
STANDBY ON / OFF POWER BUTTON
Press this button to turn ON your appliance, power is supplied to your unit and it becomes opera-
tional, the STANDBY button’s light becomes white. (The main power switch is located on the back
panel and must be ON in order to use STANDBY function).
When set to STANDBY OFF, the main power is cut-off and the unit is no longer fully operational
except for the micro controller. The standby indicator’s light becomes red.
STANDBY EIN/AUS-TASTE
Drücken Sie zum Einschalten des Geräts diese Taste, daraufhin wird es mit Strom
versorgt und ist betriebsfähig; die Beleuchtung des Standby Knopfes wir weiß. (Der
Hauptnetzschalter befindet sich auf der Geräterückseite und muss auf ON stehen).
Durch nochmaliges Drücken der Taste schalten Sie das Gerät in den Zustand STANDBY AUS, d.
h. die Stromversorgung wird bis auf die Funktion der Fernbedienung abgeschaltet. Die Standby-
Leuchte wird rot.
PULSANTE ON/OFF
Premere questo tasto per accendere l’apparecchio e renderlo operativo. L’indicatore standby si illu-
minerà di bianco dopo qualche secondo. (Il pulsante generale di alimentazione è localizzato poste-
riormente e deve essere su ON per l’utilizzo della funzione Standby). Premere una ulteriore volta per
mettere l’unità in standby. L’indicatore di standby si illuminerà di rosso in questa modalità.
AFFICHEUR
Cette afficheur vous indiquera plusieurs informations en fonction du menu sélectionné. Par défaut, il
affichera le niveau du volume. En mode source INPUT, il indiquera la source sélectionnée, en mode
BALANCE, les niveaux gauche et droite. En mode BPA l’activation ou la désactivation des réglages
d’aigus, de graves et du loudness (Off) ou le traitement direct du signal (On). En mode SPE (unique-
ment sur X-i90), l’activation de la paire A ou de la paire B ou des paires A+B.
e
w
e

r
DISPLAY
This display will indicate several informations depending of chosen menu. By default, it will indicate
the level of volume. In INPUT source mode, it will display the input source selected. In BALANCE
mode, the right and left level. In BPA mode if this mode is OFF, then treble, bass and loudness
adjustments are available. In ON mode, the signal goes directly (direct path). Treble, bass and loud-
ness controls are disabled for pure sound results. In SPE mode (only for X-i90), you can choose pair
A or pair B or pair A+B of speakers.
IMPORTANT: When the BPA mode is OFF, three additionnal menus appear to control treble and
bass levels and switch Off/On the loudness.
DISPLAY
Das Display zeigt verschiedene Informationen, abhängig vom gewählten Menü. Standardmäßig wird
es den Lautstärkepegel anzeigen. Im INPUT Quellen-Modus zeigt es die gewählte Eingangsquelle.
Im BALANCE-Modus, den rechten und linken Kanal. Wenn der BPA-Modus (Bypass-Modus) aus-
geschaltet ist stehen Treble, Bass und Loudness Regelungen zur Verfügung. Im ON-Modus sind
diese Regelungen für ein reineres Klangergebnis deaktiviert und werdeen auch im Menü nicht mehr
angezeigt. In SPE-Modus (nur für X-i90) können Sie die Lautsprecherpaare anwählen, Paar A oder
Paar B oder A + B.
DISPLAY
Questo display indica differenti informazioni a seconda dell’impostazione data. Di base indica il livel-
lo del volume. In modalità INPUT indica la sorgente d’ingresso selezionata. In modalità BALANCE
indica il livello destro e sinistro. In modalità BPA, se disattivata, sono disponibili le regolazioni di
medi, bassi e alti. In modalità ON il segnale arriva direttamente. I medi, bassi e alti sono disattivati
per un suono puro. In modalità SPE (solo per l’X-I90) è possibile scegliere i diffusori A o B oppure
entrambi.
INDICATEURS DE SOURCES
Ces différentes Led indiquent la source sélectionnée.
SOURCES INDICATORS
Those leds indicate the selected source.
QUELLEN-INDIKATOREN
Diese LEDs zeigen die gewählte Quelle.
INDICATORI DI SORGENTE
Questi led indicano quale sorgente è stata selezionata.
PRISE CASQUE 6,35MM
La sortie casque de votre amplificateur permet d’alimenter un casque stéréophonique conventionnel
(non fourni) disposant d’une prise de type jack 6,35mm stéréophonique. Le niveau de sortie de cette
prise ne permet pas l’utilisation d’un casque électrostatique.
6,35MM STEREO JACK HEADPHONES
The headphone terminal provides a stereo audio signal sufficient for driving all conventional ste-
reo headphones except electrostatic headphones which generally require signal from a high level
ouputs. (Headphones not included)
KOPFHÖRER-BUCHSE (6,3 mm Stereo-Klinke)
Der Kopfhörer-Anschluss bietet ein Stereo-Audiosignal für den Antrieb aller herkömmlichen Stereo-
Kopfhörer außer elektrostatischer Kopfhörer, die in der Regel einen höheren Signalpegel erfordern.
(Kopfhörer nicht im Lieferumfang enthalten)
e

Après avoir brancher électriquement votre amplificateur, mettre l’interrupteur principal ON/OFF situé sur la
face arrière en position ON. Le bouton de standby situé sur la façade avant de votre amplificateur s’allume en
rouge. Appuyer sur ce bouton pour mettre en marche l’appareil, le standby s’allume alors en blanc, l’afficheur
indique le niveau sonore.
Vous pouvez augmenter ou diminuer le son en tournant le volume vers la droite ou vers la gauche.
A présent, vous souhaitez accéder aux menus de votre amplificateur. Appuyer au centre du bouton et le pre-
mier menu INPUT apparaitra. Tourner alors ce bouton pour choisir une autre source puis valider en appuyant
sur ce même bouton. La source sélectionné s’affichera.
Comment utiliser le bouton multifonctions ?
How to use the multifunctions button ?
So funktioniert der Multifunktionsknopf ?
Plug your amplifier on the outlet, then switch ON the general power supply button located on the rear panel.
The standby button located on the front panel will light on in red. Push the standby button (front panel) and
the light will become white, the display indicate the level of the volume.
You can increase or decrease the sound level with this multifunctions knob.
At that time, you can select the different menus of your amplifier. Push one time the center of this multifunc-
tions button and the display indicates INPUT. Turn the button and you can choose a different source. You
can repeat same way to navigate in the menu.
Schließen Sie Ihren Verstärker an die Steckdose und schalten Sie anschließend den Hauptnetz-schalter auf
der Rückseite auf ON. Die Standby-Taste auf der Frontplatte leuchtet in rot.
Drücken Sie die Standby-Taste (Frontplatte) und das Licht wird weiß, das Display zeigt die gewählte
Lautstärke.
Erhöhen oder verringern Sie die Lautstärke durch Drehen am mittig positionierten Multifunktions-knopf.
Danach können Sie die verschiedenen Menüs des Verstärkers anwählen. Drücken Sie einmal auf den
Multifunktionsknopf und das Display zeigt INPUT. Durch Drehen des Knopfes können eine andere Quelle
wählen. Durch einen erneuten Druck auf den Knopf wird die Auswahl bestätigt und angezeigt. In dieser
Weise können Sie die verschiedenen Ebenen des Menüs durchlaufen. Jeweils durch einen Druck auf den
Knopf wird Ihre Auswahl bestätigt.
PRESA CUFFIE STEREO
Aquestoterminalesipossonocollegarecuestereoconvenzionalieccettoquelleelettrosta-
tiche.
Nota:abbassaresempreilvolumeprimadicollegarelacuaetenerepresentecheidiusori
sarannoesclusisinoaquandositieneinseritalacua.
Come utilizzare i tasti multifunzione ?
Collegare l’amplificatore alla presa di corrente, poi attivarlo col pulsante generale che si trova sul pannello
posteriore. Il tasto Standby del pannello frontale diventerà rosso.
Premere il pulsante di accensione e la luce diventerà bianca, mentre il display indicherà il livello del volume.
E’ possibile aumentare o diminuire il volume con la relativa manopola multifunzione.
A quel punto, si possono selezionare i diversi menu dell’amplificatore.
Premere una volta al centro della manopola ed il display indicherà INPUT. Ruotarla e scegliere una sorgente
differente. Ripetendo nello stesso modo è possibile navigare nel menu.

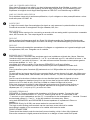
Arborescence des menus et options / Options and menus arborescence
Menüstruktur und Optionen / menu e le opzioni
20
INP
BAL
BPA
SPE
VOL
BAS
TRE
LOU
OFF
ON
-10
+10
-10
+10
R 0-20
L 0-20
A
B
0-60
A+B
Turn the button
Tourner le bouton
Den Knopf drehen
ruotare la manopola
Push the button
Pousser sur le bouton
Den Knopf drücken
Premere il tasto
CO1 n CO2 n OPT n PHONO n CD n TUNER
AU1 n AU2 n AU3 n AU4 n PC2 n USB n USA
Menu when
BPAisO
N
O
0-60
*OnlywhenBPAisO/UniquementquandBPAestO/NurwennBPAO
OFF
ON

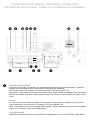
CONNEXIONS FACE ARRIÈRE - REAR PANEL CONNECTIONS
RÜCKSEITIGE ANSCHLÜSSE - PANNELLO POSTERIORE COLLEGAMENTI
ENTRÉES DES SOURCES
Vous devez connecter vos sources sur les entrées stéréophoniques correspondantes. Toutes ces
entrées sont normalisées, elles conviennent à toutes sources standards
comme des tuners, des lecteurs CD, des lecteurs MP3, des lecteurs DVD, etc...
Remarque : Ces entrées conviennent uniquement à des signaux audio analogiques. Elles ne doivent
pas être raccordées à la sortie numérique d’un lecteur de CD ou d’un autre appareil à sortie numé-
rique.
INPUTS
You can connect your stereo sources on those inputs. These inputs are suitable for any line level
source equipment such as tuners, CD players, DVD, MP3 players, etc.
Note: These inputs are only for analogue audio signals. They should not be connected to the digital
output of a CD player or any other digital device.
AUDIO EINGÄNGE
Diese RCA-Eingänge dienen zum Anschluss Ihrer Signalquellen wie Tuner, CD-Player, MP3-Player,
q
q
w
e
r
y
i
u
t o
a d
f g
s
h

w
e
DVD-Player, etc ...Hinweis: Diese Eingänge sind nur für analoge Audiosignale.
INGRESSI
A queste prese si possono collegare i Vostri apparecchi stereo. Questi ingressi sono adatti a tutte
le sorgenti linea quali Cd, Dvd, lettori MP3,ecc e per segnali di tipo analogico. Non devono essere
collegati a uscite digitali.
ENTRÉE PHONO ET CONNECTEUR DE MASSE
Vous devez connecter votre platine disque sur les prises RCA gauche (L) et droite (R). Les platines
disque incluent en général un petit fil de masse qu’il faut relier à la vis de masse PHONO GROUND.
Dévisser le connecteur de masse, insérer le fil de masse dans la tige du connecteur puis revisser
afin que le fil de masse soit maintenu.
PHONO INPUT AND GROUND TERMINAL
You can connect your turntable on the RCA connectors left (L) and right (R). Turntables normally
includes a single wire earth lead. Use the phono ground connector to connect this lead. Unscrew
the terminal to expose the hole which will accept the lead. After insertion, tighten the terminal to
secure the lead.
PHONO UND MASSE FÜR PHONO
RCA-Anschlüsse für Ihren Plattenspieler. In der Regel verfügen Phono-Anschlusskabel über
einen Erdungsleiter. Dafür ist die Verschraubung über den Steckern vorgesehen. Falls der
Erdungsanschluss Ihres Plattenspielers nicht über einen Kabelschuh verfügt, lösen Sie bitte die
Schraube vollständig. Durch die sichtbar werdenden Bohrung kann der Leiter geführt werden.
Sichern sie die Verbindung durch Wiederherstellen der Verschraubung.
INGRESSO PHONO e TERMINALE DI MASSA
Collegare il vostro giradischi ai connettori RCA sinistro (L) e destro (R). I giradischi normalmente
sono dotati di un cavo di massa che va collegato al terminale di massa di questo apparecchio.
Svitare il terminale per permettere l’immissione del cavo, inserirlo e riavvitare per assicurarlo.
PRE OUT / SORTIES PREAMPLIFICATEUR
Si vous souhaitez utiliser un amplificateur de puissance plus puissant et utiliser le
X-i120 comme préamplificateur, branchez-le aux prises PRE OUT et connectez toutes les enceintes
et le caisson de grave à l’amplificateur de puissance. Vous devez enlever le cavalier en forme de U
reliant la sortie PRE-OUT à l’entrée AMP-IN.
PRE OUT / PREAMPLIFIER OUTPUTS
If you want to use a more powerful power amplifier and use the X-i120 as a preamplifier, connect it
to the PRE OUT jacks, and connect all speakers to the power amplifier. You need to remove the U
bridge first between PRE-OUT and AMP IN.
PRE OUT VORVERSTÄRKERAUSGANG
Wenn Sie einen kräftigeren Leistungsverstärker verwenden und X-i120 X-als Vorverstärker nutzen
wollen, verbinden Sie den zweiten Verstärker mit den PRE OUT-Buchsen, und verbinden Sie alle
Lautsprecher mit diesem Gerät. Dazu muss die U Brücke zwischen PRE-OUT und IN AMP entfernt
werden. Die Verwendung eines Equalizers ist möglich durch Abgriff des Signales an PRE-OUT und
Rückführung in AMP.IN.
USCITE PRE OUT
Se si desidera utilizzare un finale di potenza più potente ed usare l’X-i20 come preamplificatore
collegarlo alle prese PRE OUT e collegare i diffusori al finale di potenza. E’ necessario rimuovere il
ponticello tra Pre Out e Amp In.
AMP. IN / POWER AMPLIFIER IN
Si vous souhaitez utiliser uniquement la section amplificateur de puissance de votre
X-i1200, connecter sur les prises L/R AMP IN votre autre préamplificateur ou table de mixage audio.
AMP. IN / POWER AMPLIFIER IN
If you only want to use the power amplifier section of your X-i120, you can connect another pream-
plifier or audio mixer on L/R AMP. IN jacks.
r
t

y
AMP. IN / POWER AMPLIFIER IN
Über diesen Eingang ist es möglich nur den Leistungsverstärker Ihres Gerätes zu nutzen, zum
Beispiel in Kombination mit einer anderen Vorstufe oder einem Mixer. Die Verwendung eines
Equalizers ist möglich durch Abgriff des Signales an PRE-OUT und Rückführung in AMP.IN.
AMP IN/ POWER AMPLIFIER IN
Se si desidera usare solo la sezione amplificatrice, si può collegare un altro preamplificatore o mixer
audio alle prese L/R AMP. IN.
SORTIE REC
Il s’agit d’une sortie ligne fixe analogique (le signal ne varie pas avec le potentiomètre de volume).
Permet de raccorder un enregistreur de type cassette, MD, etc...
REC OUTPUT
This analog audio ouput are for connecting a recorder with an analog audio input such as a cassette
deck, MD recorder, etc. The output signal is not variable.
REC OUT
Dieser analoge Audioausgang stellt ein Signal für Aufnahmegeräte wie Cassettenlaufwerke oder
MD-Rekorder bereit. Dieses Signal wird durch die Klang- und Lautstärkeregelung nicht beeinflusst.
REC OUT
Queste uscite audio analogiche permettono di collegare un registratore con ingressi analogici quali
un registratore, MD, ecc. Il segnale non è variabile.
BORNIER HAUT-PARLEURS
Paire d’enceinte A: Brancher des enceintes ayant une impédance minimale de 4 ohms. Brancher
l’enceinte droite aux bornes repérées ‘R +’ et ‘R-’ en s’assurant que ‘R+’ est reliée à la borne ‘+’ de
l’enceinte et ‘R-’ est reliée à la borne ‘-’ de cette même enceinte. Brancher le haut-parleur gauche
aux bornes repérées ‘L+’ et ‘L-’ en
procédant de la même manière. Si les bornes SPEAKERS A et B sont utilisées
simultanément, ne raccorder que des haut-parleurs ayant une impédance minimale de 8
ohms.
Pour la deuxième paire d’enceinte (B) (seulement sur le X-i90)procéder de la même façon que la
paire B.
On peut utiliser les bornes serre-fils pour courants élevés comme bornes à vis pour les câbles com-
portant des cosses plates, des broches, des prises “banane“, ou pour des câbles comportant des
fils nus.
Les fils nus et les broches s’insèrent dans le trou diamétral percé dans la tige de la borne.
Desserrer la bague en plastique jusqu’à ce que le trou dans la tige soit visible. Insérer la
broche ou le fil nu dans le trou, puis fixer le câble en vissant la bague de la borne.
Eviter tout risque que le métal nu des câbles de haut-parleurs ne touche la face arrière ou
un autre connecteur. S’assurer que la longueur dénudée ou la longueur de la broche ne
dépasse pas 1/2” (1 cm) et qu’il n’y a aucun brin libre.
SPEAKER TERMINALS
SPEAKERS A: Connect speakers with impedance of 4 Ohms or greater. Connect the right
speaker to the terminals market ‘R +’ and ‘R-’ ensuring that the ‘R+’ is connected to the
‘+’ terminal on your loudspeaker and the ‘R-’ is connected to the loudspeaker’s ‘-’ terminal. Connect
the terminals marked ‘L+’ and ‘L-’ to the left speaker in the same way. When
using both SPEAKERS A and SPEAKERS B connect speakers of impedance 8 Ohms or
greater.
SPEAKERS B (only for X-i90): use same method to connect the B pair.
The high current binding post terminals can be used as a screw terminal for cables
terminating in spade or pin connectors or for cables with bare wire ends.
SPADE CONNECTORS
These should be slotted under the terminal’s screw bushing, which is then fully tightened.
Ensure the connector is tightly secured and there is no danger of bare metal from spade
u

connectors touching the back panel or another connector as this may cause damage.
BARE WIRES AND PIN CONNECTORS
Bare wires and pin connectors should be inserted into the hole in the shaft of the terminal.
Unscrew the speaker terminal’s plastic bushing until the hole in the screw shaft is revealed. Insert
the pin or bare cable end into the hole and secure the cable by tightening down the terminal’s
bushing.
BANANA CONNECTORS
You also can use banana connectors on the speakers terminal.
Avoid any danger of bare metal from the speaker cables touching the back panel or
another connector.
LAUTSPRECHERANSCHLÜSSE
Hinweis: Für ein unverfälschtes Klangerlebnis stellen Sie bitte einen verpolungsfreien
Lautsprecheranschluss sicher!
SPEAKERS A: Verwenden Sie Lautsprecher mit einer Impedanz von 4 Ohm oder größer. Verbinden
Sie den rechten Lautsprecher an den Klemmen «R +» und «R-». Verbinden Sie die Klemmen «L +»
und «L-» vom linken Lautsprecher in der gleichen Weise. Bei der gleichzeitigen Verwendung von
SPEAKERS A und SPEAKERS B muss die Lautsprecherimpedanz 8 Ohm oder mehr betragen.
SPEAKERS B : Verwenden Sie dieselbe Methode, um das Paar B zu verbinden.
Die Hochstrom-Schraubterminals können als Schraubklemmen für Kabel mit oder ohne
Kabelschuhen oder Pin-Anschlüssen verwendet werden.
FLACHSTECKER können unter die Mutter des Terminals gesteckt werden, die dann fest angezo-
gen werden muss. Bitte beachten Sie, dass der Stecker fest sitzen muss. Es darf nicht die Gefahr
bestehen, dass blankes Metall des Flachsteckers die Rückwand sitzen oder eine anderen Anschluss
berührt, da es hierdurch zu Beschädigungen kommen kann.
BLANKE DRÄHTE UND PIN-ANSCHLÜSSE sollten in das Loch im Gewindes des Terminals einge-
setzt werden.
Lösen Sie die Mutter des Terminals bis das Loch im Gewinde sichtbar wird. Setzen Sie den Stift
oder das blanke Kabel in das Loch und sichern Sie die Verbindung durch Anziehen der Mutter.
BANANENSTECKER können mit diesen Terminals ebenfalls verwendet werden.
TERMINALI DEI DIFFUSORI
SPEAKERS A: Collegare i diffusori da 4 Ohm o superiori e collegare il diffusore destro ai terminali
marcata “R+” e “R- ” accertandosi che “R+” sia collegato al terminale “+” sul diffusore e che “R-“
sia collegato al terminale “-“ del diffusore. Allo stesso modo collegare i terminali marcati “L+” e “L-“.
Quando si usano sia i diffusori A che B collegare diffusori con impedenza da 8 Ohm o superiori.
SPEAKERS B : collegarli esattamente come i precedenti.
I terminali ad alta corrente dei diffusori possono essere collegati ai cavi tramite le forcelle, pin
oppure direttamente al cavo spellato.
Connettori a forcella: devono scivolare sotto la vite del terminale che viene poi avvitato a fondo,
assicurandosi che non vi siano parti in metallo scoperte a contatto con il pannello posteriore o
con altri connettori a rischio di cortocircuito.
Cavi spellati o pin: dovrebbero essere inseriti nel foro presente sul terminale che viene scoperto svi-
tando la protezione di plastica sul terminale. Inserire il cavo spellato nel foro e fissarlo avvitando la
boccola del terminale.
Banane: è possibile utilizzare anche terminali a banana per i collegamenti.
SELECTEUR HIGH BIAS
En mode High Bias (ON), votre amplificateur est assimilable à un amplificateur en Classe A sur les
premiers watts d’utilisation. L’utilisation de ce mode se traduit par un échauffement important, aussi
votre amplificateur doit rester correctement ventilé.
HIGH BIAS SELECTOR
By switching the High Bias mode in ON mode, your amplifier will be similar as a Class’A amplifier
for the first watts of use. In this mode, the temperature of your amplifier will be important, also, it’s
important that there should be enough clear space around the amplifier to permit a free flow of air.
SELETTORE DI HIGH BIAS
Attivando la modalità High Bias (su ON) l’amplificatore si comporterà quasi come un Classe A sui
primi watts di utilizzo. In questa modalità la temperatura dell’ampli aumenterà e quindi sarà necessa-
rio garantirgli una buona ventilazione.
i

o
a
ENTRÉE USB A
Permet de lire des fichiers audio MP3 à partir de baladeur ou clé USB.
USB A INPUT
You can connect and play MP3 player on this input
USB A Eingang
Dient zur Wiedergabe von MP3-Dateien
INGRESSO USB A
E’ possibile collegare a questo ingresso un lettore MP3.
ENTRÉE USB B
Note: Ne pas allumer votre amplificateur avant que la connexion USB ait été faite.
A partir de votre ordinateur fixe ou portable, vous pouvez lire ces fichiers audio sur votre amplifica-
teur par l’intermédiaire de la prise USB. Compatible avec Window 2000 / Win XP / Vista / 7, Linux,
et Mac OS X. La technologie utilisée ne nécessite pas de pilote.
USB B INPUT
Note: Do not turn on the unit until all connections have been made.
You can listen music files that are on your computer. Connect a USB cable from the amplifier USB
input to one of the USB ports on the PC or Mac.
Compatible with Window 2000 / Window XP / Vista / 7, Linux, and Mac OS X. You don’t need any
additional driver to use this input.
USB B Eingang
Ermöglicht den Anschluss des Verstärker an den PC. Verarbeitet Daten bis 192 kHz/24 Bit.
Kompatibel mit Windows 2000 / Windows XP / Vista / 7, Linux und Mac OS X. Es ist keine
Treiberinstallation erforderlich.
INGRESSO USB B
Nota : non accendere l’apparecchio sinché tutti i collegamenti non sono stati effettuati.
E’ possibile scoltare files dal Vostro computer. Collegare un cavo USB dall’ingresso USB dell’ampli-
ficatore ad una delle porte USB del computer o pc.
Compatibile con Window 2000/Window XP/Vista/7,Linus e Mac OS X. Non servono driver addizio-
nali.
PRISE ALIMENTATION 5V
Permet de connecter le récepteur Bluetooth Aptx WTX-500 Advance Acoustic.
Nous évoluons dans un environnement où la musique dématérialisée prend une place de plus en
plus importante. Il est maintenant possible de faire communiquer sans fil toutes les musiques de vos
nomades, ordinateurs, tablettes, Smartphones et autres baladeurs vers votre chaîne HIFI.
Le nouveau récepteur sans fil WTX 500 s’acquitte de cette tâche avec un réel talent. Il s’adapte faci-
lement sur n’importe quelle entrée analogique de votre amplificateur.
Le WTX 500 vous apporte des performances musicales élevées, associées au confort d’utilisation.
5V POWER SUPPLY PLUG
You can connect directly our Bluetooth Aptx wireless receiver WTX-500
We evolve in an environment where dematerialized music is taking more and more place. Stored in
diverse and varied devices (mobile, computers, tablets, smartphones and other players), it only asks
to express itself on hifi systems more or less elaborate, but more importantly with a rendering more
«real» and natural as possible .
The new audio wireless receiver WTX500 from Advance Acoustic does this with real talent.
The WTX500 can easily be connected to any analog input of your amplifier.
The WTX500 brings to you amazing musical performance, combined with an easy use.
DC 5 V
Diese Spannungsversorgung dient zur direkten Verbindung mit unserem Bluetooth Funkempfänger
WTX-500 mit apt-X Technologie.
s

Wir leben in einem Umfeld, in dem gespeicherte Musik mehr und mehr Platz einnimmt, abgelegt in
vielfältigen Geräten (Handy, Computer, Tablets, Smartphones und anderen Zuspielern). Es ist nun
möglich, drahtlos Ihre Musik auf Ihre Hifi-Anlage zu übertragen. Der neue Audio-Funkempfänger
WTX500 von Advance Acoustic tut dies mit echtem Talent.
Der WTX500 kann problemlos an jeden analogen Eingang des Verstärkers angeschlossen werden.
Der WTX500 bringt Ihnen eine erstaunliche musikalische Leistung, kombiniert mit einfacher
Handhabung.
PRESA ALIMENTAZIONE 5V
Permette di collegare il ricevitore bluetooth modello WTX 500.
Con l’adattatore WTX-500 di Advance Acoustic si possono ascoltare ad alta qualità i brani presenti
su tutti i PC, Mac, smartphone, tablet e riproduttori digitali dotati di trasmettitore Bluetooth. E’
compatibile con il codec APT-X.
ENTRÉES DIGITALES COAXIALES (2), OPTIQUE (1)
Votre amplificateur est équipé de deux entrées coaxiales et une entrée optique. Vous pouvez
connecter sur ces entrées, la sortie numérique de votre lecteur Cd, MD, etc... et profiter de l’excel-
lente qualité du convertisseur intégré.
OPTICAL (1), COAXIAL (2) DIGITAL INPUTS
Your amplifier integrates a DAC (Digital audio converter) with two coaxials inputs and one optical
input. You can connect the digital output of your CD, MD, etc... and use the high quality DAC
converter of your amplifier in order to obtain a better sound result.
OPT., COAX (1+2) DIGITALEINGÄNGE
Ihr Verstärker verfügt über einen integrierten DAC (Digital-Audio-Konverter) mit zwei koaxialen
Eingängen und einem optischen Eingang. Sie können den digitalen Ausgang Ihres CD, MD, etc. ..
nutzen um die hohe
Qualität des DA-Wandler für einen besseren Klang zu nutzen.
INGRESSI DIGITALI COASSIALE (2) E OTTICO (1)
L’integrato incorpora un DAC (Convertitore Digitale-Analogico) con 3 ingressi, di cui 2 sono coas-
siali ed 1 ottico. A questi ingressi si possono collegare le uscite digitali di CD, MD, ecc. e quindi
sfruttare l’eccellente qualità del convertitore incorporato.
PRISE D’ALIMENTATION / SÉLECTEUR DE TENSION / INTERRUPTEUR GENERAL
Vérifier la tension d’alimentation. Si votre tension est de 115V vous devez changer la position du
sélecteur de voltage et remplacer le fusible comme indiqué sur la face arrière. Pour alimenter votre
appareil, commuter l’interrupteur général sur ON.
POWER CORD / VOLTAGE SELECTOR / GENERAL ON OFF SWITCH
You need to be sure about the voltage of your country. In case that you need to use your
appliance in 115V, you need to change the position of the voltage and replace the fuse by the right
value indicated on the rear panel.
Before plugging in the amplifier, its master power switch must be in the OFF position.
NETZANSCHLUSS / NETZSPANNUNGS-WAHLSCHALTER / HAUPTNETSCHALTER ON OFF
Bitte vergewissern Sie sich über die Netzspannung in Ihrem Land. Für den Fall das diese115V
beträgt, muss der Netzspannungs-Wahlschalter auf die richtige Position gestellt werden und die
Sicherung durch eine mit dem richtigen Wert ersetzt werden.(Siehe hierzu die Angaben auf der
Rückseite des Gerätes).
Vor dem Einstecken des Netzkabels in den Verstärker, muss der Hauptschalter in der Position OFF
sein.
PRESA DI ALIMENTAZIONE, SELETTORE VOLTAGGIO, ACCENSIONE
In questa collocazione troviamo la presa di alimentazione, il selettore del voltaggio e l’interruttore di
accensione. Prima di inserire il cavo nella presa attiva, l’interruttore principale deve essere su OFF
ed allo stesso tempo accertarsi della tensione del proprio paese. In caso si debba utilizzare 115 V
si deve cambiare la posizione del selettore.
f
d
g
h

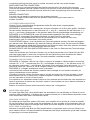
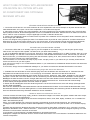
3 ÉTAPES POUR RÉGLER VOTRE SYSTÈME
1 - Connecter le WTX-500 sur une entrée auxiliaire de votre amplificateur HiFi comme indiqué sur la photo et brancher son
cable d’alimentation sur la prise +5V de votre amplificateur. La led bleu doit clignoter.
2 - Allez dans le menu réglage, sous-menu bluetooth, de la source audio que vous souhaitez appairer avec votre WTX-500.
Après quelques instants, le WTX-500 apparaitra sous le nom ADVANCE ACOUSTIC. Sélectionnez le et valider sa connexion.
Aucun code Pin n’est nécessaire. Lorsque l’appairage est réalisé, la led bleu devient fixe.
3 - Passer votre périphèrique audio en mode lecture et profitez d’une restitution sonore de qualité “Airblue Certified“ grâce à
la technologie Apt-X Bluetooth.
Si vous vous éloignez votre périphèrique audio à une distance hors de portée de votre système Air, la liaison bluetooth se
désactivera et vous devrez répéter l’étape 2 pour vous reconnecter. Si vous souhaitez changer de périphèrique Bluetooth,
vous devez désactiver la connexion du premier et activer la connexion du second via les menus réglages respectifs.
TO FINE TUNE, FOLLOW THOSE 3 STEPS
1 - Connect the WTX-500 on an auxiliary input of your HiFi amplifier or AV receiver. Plug on the mini jack power supply
cable to the +5V output of the amplifier. The blue led of your WTX-500 is flashing.
2 - Go to the Bluetooth Manager of your iPhone, iPod touch, iPad, tablet, smartphone, PC or MAC computer, then go on the
bluetooth settings. You will see a new bluetooth connection under ADVANCE ACOUSTIC name. Confirm that you choose it,
after few seconds, your audio device is pairing with the WTX-500. If pairing is ok, then, the blue led of the Air amplifier will
be fixed. You don’t need any Pin code confirmation.
Your WTX-500 is now connected and ready to play music! Just play music on your device as you normally would and the
sound will come out of your HiFi system.
If you move out of range or turn off the Bluetooth feature on your audio device, the Bluetooth Music Receiver will disconnect
from your device.
To reconnect, simply access the Bluetooth Manager on your device and select the ADVANCE ACOUSTIC connection.
Zur Feinabstimmung folgen Sie diesen drei Schritten:
1 - Schließen Sie den WTX-500 an einem AUX-Eingang Ihres HiFi-Verstärkers oder AV-Receivers an. Verbinden Sie das
Stromkabel mit der Mini-Buchse für die +5 V-Versorgung am Verstärker. Die blaue LED des WTX-500 blinkt.
2 - Öffnen Sie den Bluetooth Manager Ihrer Quelle. Sei es Ihr iPhone, iPod touch, iPad, Tablet, Smartphone, PC oder MAC-
Computer. Suchen Sie nach neuen Geräten und eine Verbindung mit dem Namen ADVANCE ACOUSTIC wird angezeigt.
Bestätigen Sie diese Auswahl und nach wenigen Sekunden wird Ihre Audio-Quelle mit dem WTX-500 verbunden. Wenn die
Verbindung in Ordnung ist, schaltet die blaue LED am WTX-500 auf Dauerlicht um. Es wird kein PIN-Code benötigt.
Ihr WTX-500 ist jetzt angeschlossen und bereit, Musik zu spielen!
3 -Starten Sie die Wiedergabe auf Ihrem Gerät wie gewohnt und der Sound kommt aus Ihrer HiFi-Anlage. (Richtige Quelle
am HiFi-Gerät eingestellt?)
Wenn Sie sich außerhalb der Reichweite befinden oder Sie die Bluetooth-Funktion an Ihrer Audio-Quelle abschalten, wird
der Bluetooth Receiver von Ihrem Gerät getrennt. Für eine Wiederherstellung der Verbindung einfach im Bluetooth-Manager
auf Ihrem Gerät die Verbindung ADVANCE ACOUSTIC erneut auswählen.
MODULO WIRELESS OPZIONALE WTX 500
Il modulo wireless WTX 500 è plug & play, pertanto è sufficiente collegare il ricevitore all’ingresso ausiliario del vostro ampli-
ficatore e poi eseguire l’accoppiamento.
Permette di trasmettere il segnale audio del Vostro Smartphone, iPhone, iPod, iPad, laptop, notebook, ecc in modalità nor-
male o alta definizione (APTX).
APTX : è un codex lossless che consente lo streaming via bluetooth di audio ad alta risoluzione, fino a 96 Khz/24bit.
1 Collegare il WTX 500 all’ingresso ausiliario dell’amplificatore. Collegare il cavo mini-jack all’uscita +5V. Il led blue lampeg-
gia.
2 Andare nelle impostazioni bluetooth del Vostro iPhone, iPod touch, iPad, tablet, smartphone, Pc o computer e cercare il
dispositivo identificato come « Advance Acoustic », confermarlo e dopo qualche secondo sarà eseguito il pairing. Una volta
terminato il riconoscimento il led blue rimarrà fisso.
La connessione è confermata ed è possibile effettuare la riproduzione dei brani.
Scollegato il collegamento bluetooth anche il ricevitore sarà disconnesso. Per la riconnessione è sufficiente selezionare nuo-
vamente il dispositivo.
HOW TO USE OPTIONAL WTX-500 RECEIVER
UTILISATION DE L’OPTION WTX-500
SO FUNKTIONIERT DER OPTIONALE
RECEIVER WTX-500

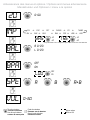
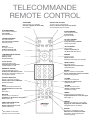
TELECOMMANDE
REMOTE CONTROL
ON/STANDBY
Sets the unit to On or Standby.
Commute l’appareil en ON ou Stby
Ein / Standby
CD PLAY/PAUSE
Play or pause
Lecture ou pause du cd
CD-Wiedergabe Start/Pause
DIRECT INPUTS SELECTOR
Selects main sources
Sélection directe des sources
Direkte Quellenwahl
SCAN BACKWARD*
scan a track/cd backward
retour rapide
Schneller Rücklauf
NUMERICAL KEYPAD*
Used with differents sources
S’utilise avec différentes sources
Numerisches Zahlenfeld, Nutzung mit
verschiedenen Quellen
BYPASS*
Bypass tone control/Direct signal
Désactive les contrôles de tonalité
Abschaltung der Klangregelung für
direkten Signalweg
VOLUME
Increase the volume level
Augmente le volume sonore
Laustärke erhöhen
CONFIRMATION /VALIDATION
Conrm a choice
Valide un choix
Eingabebestätigung
MUTING*
Mutes or unmutes the preamplier
Active ou désactive la mise en sourdine.
Stummschaltung Ein/aus
TREBLE
Increase/decrease the treble level
Augmente/diminue le niveau des aigus
Höhenregler -/+
BASS
Increase/decrease the bass level
Augmente/diminue le niveau des
graves
Bassregler -/+
BALANCE
Increase level of left channel
Augmenter ou diminuer le canal gauche
Balanceregler L/R
DIMMER
Adjust level of brightness of the display
Réglage du niveau lumineux afcheur
Helligkeitsregler für das Display
*Not available on all models
Pas dispo sur tous les modèles
SOURCES SELECTOR
Selects sources UP and Down
Sélection des sources délement
Quellenwahlschalter
OPEN/CLOSE OR EJECT
To open or close or eject the CD
Ouvrir ou fermer le tiroir du CD (ou éjecter)
CD-Lade Auf/Zu oder CD-Auswurf
CD SKIP BACKWARD*
skip track backward
retour morceaux précédent
Titelsprung zurück
SCAN FORWARD*
scan a track/cd forward
avance rapide
Schneller Vorlauf
CD SKIP FORWARD*
skip track forward
avance morceaux précédent
Titelsprung vorwärts
ARROWS
Conrm a choice
Valide un choix
Pfeiltasten zum Treffen einer Auswahl
VOLUME
decrease the volume level
diminue le volume sonore
Lautstärke verringern
REPEAT TRACK
Play again a track
Répète la lecture d’un morceau
Titelwiederholung
A-B CD function
Activate the A-B function
Activation de la fonction A-B
CD-Wiedergabe von A-B
STOP CD
Stop play of the CD
Arrête la lecture du CD
Stop der CD-Wiedergabe

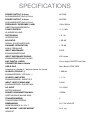
POWER OUTPUT 8 ohms 2x120W
AUSGANGSLEISTUNG (8 Ohm)
POWER OUTPUT 4 ohms 2x160W
AUSGANGSLEISTUNG (4 Ohm)
FREQUENCY RESPONSE (-3dB) 10Hz-35kHz
ÜBERTRAGUNGSBEREICH
TONE CONTROL +/- 10 dB
KLANGREGELUNG
DISTORSION < 0,1%
VERZERRUNG
S/N RATIO > 90 dB
SIGNAL RAUSCHABSTAND
CHANNEL SEPARATION > 70 dB
KANALTRENNUNG
INPUT IMPEDANCE 47KΩ
EINGANGSIMPEDANZ
INPUT IMPEDANCE PHONO 47K ohms
EINGANGSIMPEDANZ PHONO
DAC DIGITAL AUDIO Cirrus logic 8416CZZ low jitter
CONVERTER 24bit-192kHz
USB B DAC Burr-Brown PCM 2900
Adaptive for playback / asynchronous for record
IN LEVEL (CD/AUX...) < 300mV
EINGANGSPEGEL (CD/AUX/...)
IN LEVEL AMPLIFIER < 1,1V
EINGANGSPEGEL ENDSTUFE
INPUT LEVEL PHONO MM 2,5mV
EINGANGSPEGEL PHONO MM
AC INPUT 115-230V
NETZSPANNUNG
POWER CONSUMPTION MAX <500W
LEISTUNGSAUFNAHME MAX.
TRANSFORMER(S) 2
TRANSFORMATOR(EN)
DIMENSIONS H.17,5xl.43xD.32
ABMESSUNGEN H x B x T
NET WEIGHT / GROSS WEIGHT 14,4 kg
GEWICHT
SPECIFICATIONS

DECLARATION
OF CONFORMITY
DECLARATION OF CONFORMITY
We declare under our sole responsibility that this product, to which this decla-
ration relates, is in conformity with the council EMC directive 2004/108/EC, the
LVD directive 2006/95/EC and R&TTE 1999/5/CE.
DECLARATION DE CONFORMITE
Nous déclarons sous notre seule responsabilité que l’appareil, auquel se
réfère cette déclaration, est conforme à la règlementation européenne concer-
nant les directives suivantes :
la compatibilité électromagnétique CEM 2004/108/CE,
la basse tension 2006/95/CE et R&TTE 1999/5/CE.
KONFORMITÄTSERKLÄRUNG
Wir erklären in alleiniger Verantwortung, dass das Gerät, auf das sich diese
Erklärung bezieht, sich in Übereinstimmung mit den folgenden Europäischen
Richtlinien befi ndet:
EMV 2004/108/EG, Niederspannungsrichtlinie 2006/95/EG und R & TTE
1999/5/EG.
Advance Paris Sarl, 13 rue du coq gaulois - 77170 Brie Comte Robert - France
Seite wird geladen ...
Seite wird geladen ...
-
 1
1
-
 2
2
-
 3
3
-
 4
4
-
 5
5
-
 6
6
-
 7
7
-
 8
8
-
 9
9
-
 10
10
-
 11
11
-
 12
12
-
 13
13
-
 14
14
-
 15
15
-
 16
16
-
 17
17
-
 18
18
-
 19
19
-
 20
20
-
 21
21
-
 22
22


ADVANCE X-i120 Bedienungsanleitung
- Kategorie
- Musikinstrumentenverstärker
- Typ
- Bedienungsanleitung
- Dieses Handbuch eignet sich auch für
in anderen Sprachen
- English: ADVANCE X-i120 Owner's manual
- français: ADVANCE X-i120 Le manuel du propriétaire
- italiano: ADVANCE X-i120 Manuale del proprietario
Verwandte Artikel
-
ADVANCE WTX-1000 Bedienungsanleitung
-
-
-
-
ADVANCE AIR90 Bedienungsanleitung
-
-
-
-
-


