
Model No. : DAR-070
User Manual Music center with DAB+/ FM radio, Bluetooth, CD MP3 and USB
Gebruikshandleiding Muziekcentrum met DAB+/FM-radio, Bluetooth, CD, MP3 en
USB
Benutzerhandbuch Musikanlage mit DAB+-/UKW-Radio, Bluetooth, CD-MP3 und
USB
Guide d'utilisation Chaîne stéréo avec radio DAB+/FM, Bluetooth, CD MP3 et USB
Manual de usuario Centro de música con radio FM/DAB+, Bluetooth, CD MP3 y USB

Version: 1.0
Index:
English ............................................................................................................................................................. 1
Nederlands .................................................................................................................................................... 26
Deutsch ......................................................................................................................................................... 51
Français ....................................................................................................................................................... 778
Español ........................................................................................................................................................ 102

1
English
DAR-070
Safety Warnings
CAUTION:
Usage of controls or adjustments or performance of procedures other than those specified herein
may result in hazardous radiation exposure.
This unit should not be adjusted or repaired by anyone except qualified service personnel.
PRECAUTIONS BEFORE USE
KEEP THESE INSTRUCTIONS IN MIND:
1. Do not use this device near water.
2. Clean only with a slightly damp cloth.
3. Do not cover or block any ventilation openings. When placing the device on a shelf, leave 5 cm
(2”) free space around the whole device.
4. Install in accordance with the supplied user manual.
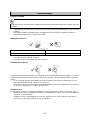
5. * Don’t step on or pinch the power adaptor. Be very careful, particularly near the plugs and the
cable’s exit point. Do not place heavy items on the power adaptor, which may damage it. Keep
the entire device out of children’s reach! When playing with the power cable, they can seriously
injure themselves.
6. * Unplug this device during lightning storms or when unused for a long period.
7. Keep the device away from heat sources such as radiators, heaters, stoves, candles and other
heat-generating products or naked flame.
8. Avoid using the device near strong magnetic fields.
9. Electrostatic discharge can disturb normal usage of this device. If so, simply reset and restart
the device following the instruction manual. During file transmission, please handle with care
and operate in a static-free environment.
10. Warning! Never insert an object into the product through the vents or openings. High voltage
flows through the product and inserting an object can cause electric shock and/or short circuit
internal parts. For the same reason, do not spill water or liquid on the product.
11. Do not use in wet or moist areas such as bathrooms, steamy kitchens or near swimming pools.
12. Do not use this device when condensation may occur.
13. Although this device is manufactured with the utmost care and checked several times before
leaving the factory, it is still possible that problems may occur, as with all electrical appliances.
If you notice smoke, an excessive build-up of heat or any other unexpected phenomena, you
should disconnect the plug from the main power socket immediately.
14. This device must operate on a power source as specified on the specification label. If you are
not sure of the type of power supply used in your home, consult your dealer or local power
company.
15. * The socket outlet must be installed near the equipment and must be easily accessible.
16. * Do not overload ac outlets or extension cords. Overloading can cause fire or electric shock.
17. * Devices with class 1 construction should be connected to a main socket outlet with a
protective earthed connection.
18. * Devices with class 2 construction do not require a earthed connection.
19. Keep away from rodents. Rodents enjoy biting on power cords.
20. * Always hold the plug when pulling it out of the main supply socket. Do not pull the power
cord. This can cause a short circuit.
21. Avoid placing the device on any surfaces that may be subject to vibrations or shocks.
22. To clean the device, use a soft dry cloth. Do not use solvents or petrol based fluids. To remove
severe stains, you may use a damp cloth with dilute detergent.
23. The supplier is not responsible for damage or lost data caused by malfunction, misuse,
modification of the device or battery replacement.
24. Do not interrupt the connection when the device is formatting or transferring files. Otherwise,
data may be corrupted or lost.

2
25. If the unit has USB playback function, the usb memory stick should be plugged into the unit
directly. Don’t use an usb extension cable because it can cause interference resulting in failing
of data.
26. The apparatus shall not be exposed to dripping or splashing and make sure that no objects filled
with liquids, such as vases, are placed on or near the apparatus.
27. * To completely disconnect the power input, the mains plug of the apparatus shall be
disconnected from the mains, as the disconnect device is the mains plug of apparatus.
28. If the unit works with battery, Battery shall not be exposed to excessive heat such as sunshine,
fire or the like.
29. Attention should be drawn to the environmental aspects of battery disposal.
30. The apparatus can only be used in moderate extremely cold or climates warm environments
should be avoided.
31. The rating label has been marked on the bottom or back panel of the apparatus.
32. This device is not intended for use by people (including children) with physical, sensory or
mental disabilities, or a lack of experience and knowledge, unless they’re under supervision or
have received instructions about the correct use of the device by the person who is responsible
for their safety.
33. This product is intended for non professional use only and not for commercial or industrial use.
34. Make sure the unit is adjusted to a stable position. Damage caused by using this product in an
unstable position or by failure to follow any other warning or precaution contained within this
user manual will not be covered by warranty.
35. Never remove the casing of this apparatus.
36. Never place this apparatus on other electrical equipment.
37. Do not use or store this product in a place where it is subject to direct sunlight, heat, excessive
dust or vibration.
38. Do not allow children access to plastic bags.
39. Only use attachments/accessories specified by the manufacturer.
40. Refer all servicing to qualified service personnel. Servicing is required when the apparatus has
been damaged in any way, such as the power supply cord or the plug, when liquid has been
spilled or objects have fallen into the apparatus, when the apparatus has been exposed to rain
or moisture, does not operate normally, or has been dropped.
41. *Do not use a damaged power cord or plug or a loose outlet. Doing so may result in fire or
electric shock.
42. Prolonged exposure to loud sounds from personal music players may lead to temporary or
permanent hearing loss.
INSTALLATION
• Unpack all parts and remove protective material.
• *Do not connect the unit to the mains before checking the mains voltage and before all other
connections have been made.
*Those instruction are related only to products using power cable or AC power adaptor.

3
Thank you for purchasing the DAR-070.
We recommend that you spend some time reading this instruction manual in order that you fully
understand all the operational features it offers. You will also find trouble shooting to help you
resolve any issues.
Read all the safety instructions carefully before use and keep this instruction manual for future
reference.
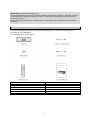
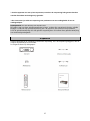
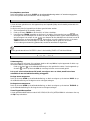
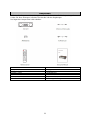
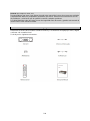
Unpacking
Remove all packaging from the unit. Retain the packaging If you dispose of it please do so
according to local regulations.
The following items are included:
EN
EN
main unit
main unit
AAA Batteries
AAA Batteries
Remote Control
Remote Control
3.5mm to 3.5mm cable
3.5mm to 3.5mm cable
AC Power Cord
AC Power Cord
Instruction Manual
Instruction Manual

4
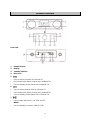
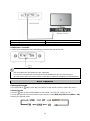
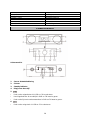
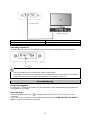
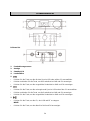
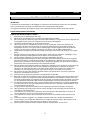
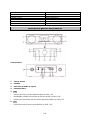
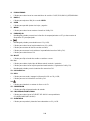
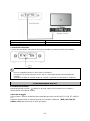
Product Overview
Front View
Rear View
1. Remote Sensor
2. Display
3. Standby indicator
4. Disc Door
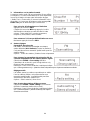
5.
• Press to select next track in USB and CD.
• Press and hold to display channel list in DABand FM.
• Press to display preset channel list in DABand FM.
6.
• Press to select previous track in USB and CD.
• Press and hold to display channel list in DABand FM.
• Press to display preset channel list in DABand FM.
7.
• Press to play and pause in CD, USB and BT.
MENU
• Press to display the menu in DAB and FM.

5
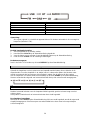
8. EQ
• Press to select sound characteristics:CLASS/POP/ROCK/JAZZ/NORMAL.
9.
• Press to change source after power on.
10.
• Press for power on and power off.
11. NAVIGATE
• Rotate to move down or move up on themenu screen in DAB and FM.
OK
• Press to select or skip to subsequent menuin DAB and FM.
VOL+/VOL-
• Rotate to increase and decrease the volumelevel.
12. INFO
• Press to on/off the ID3 information in CD andUSB.
• Press to view information in DAB and FM.
13. PAIR
• Pres and hold to activate the pairingfunction in BT and/or disconnect theexisting paired BT
device.
• Press to put disc in/out in CD.
14. 5V 1A output
• Connect to recharge for mobile device.
15. AUDIO input
16. USB
• Connect to a USB device for music playback.
17. Earphone
18. Power switch
19. AC input

6
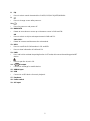
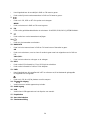
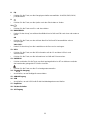
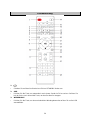
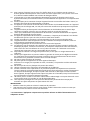
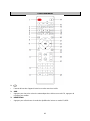
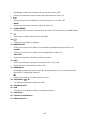
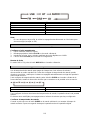
Remote Control
1.
• Switch the unit between ON and STANDBYmodes.
2. AMS
• Press to automatically search for channel inFM, when in searching, press again can stop it.
3. REPEAT
• Press to select a repeat playback mode in CDand USB.
4. EQ
• Press to select sound characteristics:CLASS/POP/ROCK/JAZZ/NORMAL.
5. BASS+/-

7
• Press to adjust the BASS in USER mode.
6. USER
• Press to allow you to adjust the Bass and Treble.
7. MENU
• Press to display the menu in DAB and FM.
8. PAIR
• Press and hold to activate the pairing functionin BT and/or disconnect the existing paired
BTdevice.
9.
• Press and hold for fast backward in CD and USB;
• Press to select the previous track in CD and USB;
• Press to display channel list in DAB;
• Press to move up on the menu screen in DABand FM;
• Press for fine tuning in FM.
10. MO/ST
• Press to set stereo or mono sound mode.
11. P+/-
• Press to skip to the beginning of a current/previous/subsequent album;
• Press to select previous/next preset track inDAB and FM;
• Press and hold for manual tuning in FM.
12. 0-9 Numeric.
13. INFO
• Press to on/off the ID3 information in CD andUSB;
• Press to view information in DAB and FM.
14.
• Press to put disc in/out in CD.
15. SLEEP
• Press to set sleep timer.
16. CD/USB/DAB/FM/BT/AUDIO
• Press to select the corresponding AUDIOSOURCE.(CD/USB/DAB/FM/BT/AUDIO)
17. RANDOM
• Press to play tracks randomly in CD and USB.
18. TREBLE +/-
• Press to adjust the TREBLE in USER mode.
19. PROGRAM
• Press to programme in CD, USB, DAB and FM.
20. DIM

8
• Press to select different levels of brightness forthe display screen.
21.
• Press to play/pause in BT, CD and USB;
• To select or skip to subsequent menu in DABand FM.
22.
• Press and hold for fast forward in CD andUSB;
• Press to select the next track in CD and USB;
• Press to display channel list in DAB;
• Press to move down on the menu screen inDAB and FM;
• Press for fine tuning in FM.
23.
• Press to stop playing in CD and USB.
24.
• Press to mute or resume the sound.
25. CLOCK
• Press and hold to set clock.(working instandby mode only)
26. V+/-
• Press to increase/decrease the volumelevel.
27. TIMER(working in standby mode only)
• Press to turn on/off the timer function;
• Press and hold for timer setting.
28. DISPLAY
• Press to display the date in power on mode.

9
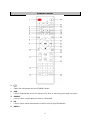
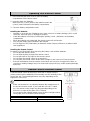
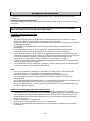
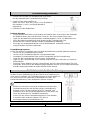
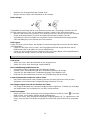
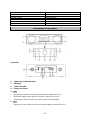
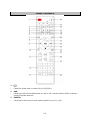
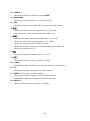
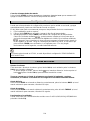
Operating Your Remote Control
1. Press and slide the back cover to open the battery
compartment of the remote control.
2. Insert two AAA size batteries.
Make sure the (+) and (-)ends of the batteries match the
(+)and (-)ends indicated in the battery compartment.
3. Close the battery compartment cover.
Handling the Batteries
• Improper or incorrect use of batteries may cause corrosion or battery leakage, which could
cause fire, personal injury or damage to property.
• Install the batteries correctly by following the polarity (+ and -) indications in the battery
compartment.
• When the batteries are exhausted, the remote control will not function.
• Only use the battery type indicated in this manual.
• Do not dispose of the used battery as domestic waste. Dispose of them in accordance with
local regulations.
Handling the Remote Control
Be aware of your fingernails when removing the battery cover and the batteries.
• Do not drop the remote control.
• Do not allow anything to impact the remote control.
• Do not spill water or any liquid on the remote control.
• Do not place the remote control on a wet object.
• Do not place the remote control under direct sunlight or near sources of excessive heat.
• Remove the batteries from the remote control when not in use for a long period of time, as
corrosion or battery leakage may occur and result in physical injury, and/or property damage,
and/or fire.
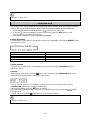
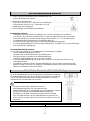
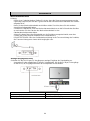
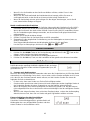
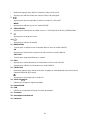
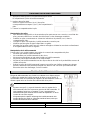
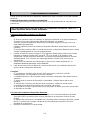
Remote Control Operation Range
Point the remote control at the unit no more than 5 metres from the
remote control sensor andwithin 60º horizontally and 20º vertically of the
front of the unit. The operating distance may vary depending on the
brightness of the room.
• Make sure that there is no obstacle between the remotesensor of
the unit and remote control. If you install the unit ona TV stand,
etc., the remote control range may decreasedepending on the
thickness or colour of the glass of the TVstand.
• Do not expose the infrared remote sensor to direct sunlight orother
strong light, such as inverter fluorescent light.
EN
EN
Within about 5 m
Within about 5 m

10
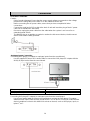
Connections
AC Power Connection
Caution:
- Risk of product damage! Ensure that the power supply voltage corresponds to the voltage
printed on the rating label on the back or on the underside of the unit.
- Before connecting the AC power cable, ensure that you have completed all other
connections.
- Connect the small end of AC socket at the back of unit and insert the plug of the AC power
cable into a standard AC wall outlet.
- Be sure to unplug the power cable from the outlet when the system is not in use for an
extended period of time.
- The MAINS plug or an appliance coupler is used as the disconnect device, the disconnect
device shall remain readily operable.
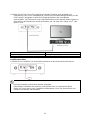
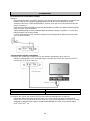
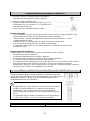
Analogue Inputs Connection
Connecting DVD player/TV outputs to analogue inputs from the sound board.
- Use the supplied 3.5mm to RCA audio cable to connect the DVD player/TV outputs with the
AUX(L/R) input socket from the sound board.
EN
EN
sound board inputs
sound board inputs
DVD player/TV outputs
DVD player/TV outputs
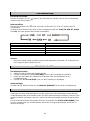
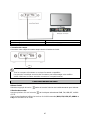
Connecting DVD player/TV outputs to analogue inputs from the sound board.
- Use a line-in audio cable (Φ 3.5mm) (not supplied) to connect the DVD player/TV outputs
withthe AUDIO input socket from the sound board. You can also to connect an external audio
device headphone socket to this AUDIO IN socket on the unit, such as MP3 player, Ipod
®
, or
Iphone
®
, etc…

11
EN
EN
sound board inputs
sound board inputs
DVD player/TV outputs
DVD player/TV outputs
Headphones Connection
Connect your headphones to the headphones socket at the rear of the unit.
• Not all headphones and earphones are supported.
• Excessive sound pressure from earphones and headphones can cause hearing loss.
• Be sure to turn down the volume before connecting or putting on headphones and earphones.
Basic Operation
Switching the Unit On
Press and hold the button at the top of the unit or on the remote control to switch the unit on.
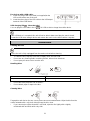
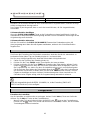
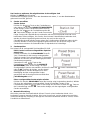
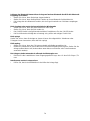
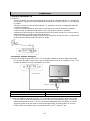
Selecting modes
Press the button on the unit repeatedly to select DAB, FM, USB, BT, AUDIO or CD.
You can also press the short-cut buttons on the remote control (DAB, FM, USB, BT, AUDIO or CD)
toselect your desired mode.

12
EN
EN
USB
USB
BT
BT
AUDIO
AUDIO
FM
FM
DAB
DAB
CD
CD
Note:
- If there is no signal, the unit will switch off automatically within 19 minutes to save energy
(except in FM).
Setting the Clock
Setting the Clock Manually
1. Set the unit to Standby mode.
2. Press and hold the CLOCK button on the remote control.
3. Input the date, hour and minutes by digital keys on RC.
4. Press the CLOCK button to confirm setting.
Display the Date
In DAB or FM mode press the DISPLAY button on the remote control.
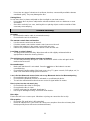
Setting the Sleep Timer
Use the sleep timer to turn the system off after a certain number off minutes in play mode. By
setting the sleep timer, you can fall asleep to music and know that your system will turn of by itself
rather than play all night.
To set the sleep timer press the SLEEP button on the remote control repeatedly, it changes
thenumber of minutes shown on the display in this sequence:
EN
EN
OFF
OFF
After setting the number of minutes for the sleep timer, the display will return to the previous
display.
The system is now set to turn off after the number of minutes you have set.
To Confirm the Sleep Timer
When the SLEEP button on the remote control is pressed once, the remaining sleep time is
displayed. Wait for a second until the display returns to the original display.
To Cancel the Sleep Timer
Press the SLEEP button repeatedly on the remote control until “off” is displayed. Turning off the
system also cancels the sleep timer.

13
Setting Timer
You can use the setting timer to make the unit automatically turn on and off at a certain time every
day from standby.
The clock must be correctly set for the timer to operate correctly.
1. Set the unit to Standby mode;
2. Press the TIMER button to the on/off timer function;
3. Press and hold the TIMER button for timer setting. Select source by , then input time
fortimer on by digital keys on RC, then, set volume by , after that, input the time for timer
offby digital keys on RC. Note, for all steps, you need to press the TIMER button to confirm
and goto the next step. If there is no operation in 10 seconds, it will be exit automatically.
If the selected source is BUZZER, then, the TIMER OFF setting is not available.
Sound Quality
Adjusting the Volume
To increase or decrease the volume, rotate the VOL+/- button on the unit or press the
VOL+/-buttons on the remote control.
- If you want to turn off the sound, press the button on the remote control. Press the
buttonagain or press the VOL+/- button to resume normal listening.
Note, if you adjust the volume above 26, then power off and power on again, the volume will
restore to the factory setting automatically.
Adjusting the Bass
Press the USER button on the remote control, then press the BASS +/- buttons on the remote
control to increase/decrease the bass.
Adjusting the Treble
Press the USER button on the remote control, then press the TREBLE +/- buttons on the
remotecontrol to increase/decrease the treble.
Preset Equalizer
You can select sound characteristics such as CLASS/POP/ROCK/JAZZ/NORMAL by pressing the
EQ button.
Bluetooth Operation
You can listen to tracks from a media device if it is connected to the unit via Bluetooth.
Pair Bluetooth-enabled Devices.
You need to pair your Bluetooth device with this unit before you connect them for the frst time.
In order to avoid interferences, de-activate Wi-Fi on your device(Smartphone, tablet, etc…)
when playing music using Bluetooth.

14
Pair Bluetooth-enabled Devices
Note:
- The operational range between this unit and a Bluetooth device is approximately 10
meters(without any object between the Bluetooth device and the unit).
- Before you connect a Bluetooth device to this unit, ensure that you know the device’s
capabilities.
- Any obstacle between this unit and the Bluetooth device can reduce e the operational range.
- If the signal strength is weak, your Bluetooth device may disconnect, but it will re-enter
automatically into pairing mode.
1. During ON mode, press the BT button on the remote control to select the Bluetooth mode or
change source to BT by pressing on the unit. If the unit is not paired to any
Bluetoothdevice, the system enters automatically into pairing mode; or you need to press and
hold the PAIR button to start pairing.
2. Activate the Bluetooth function on your device and select the search mode.“Lenco DAR-070”
will appear on your Bluetooth device.
3. To disconnect the Bluetooth function, switch to another function on the unit or disable
thefunction from your Bluetooth device.
Tips:
• If there is already an existing connection, press the PAIR button to re-activate the
pairingmode. The existing connection will be interrupted.
• The unit will also be disconnected when your device is moved beyond the operational range.
• If you want to reconnect your device to this unit, place it within the operational range.
• If the device is moved beyond the operational range, when it is brought back, check if the
device is still connected to the unit.
• If the connection is lost, follow the above instructions to pair your device again to the unit.
Listen to Music from Bluetooth Device
- If the connected Bluetooth device supports Advanced Audio Distribution Profile(A2DP), you
can listen to music stored on the device through this unit.
- If the device also supports Audio Video Remote Control Profile(AVRCP), you can use this
unit's remote control to play music stored on the device.
1. Pair your device with this unit.
2. Play music via your device (if it supports A2DP).
3. Use supplied remote control to control play (if it supports AVRCP).
- To pause/resume play, press the button.
- To skip to a track, press the or buttons.
AUDIO IN Operation
1. Press the AUDIO button on the remote control or press the button on the unit to select the
desired source.
2. Operate your audio device directly for playback features.
3. Press the VOL +/- button to adjust the volume to your desired level.

15
DAB Operation
DAB radio mode receives DAB/DAB+ digital radio and displays
information about the station and programme/track as broadcast.
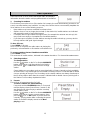
1. Scanning for stations
The first time you use the unit, or if the station list is empty, the radio automatically performs a full
scan to see what stations are available. You may also need to start a scan manually toupdate the
list of stations for one of the following reasons:
• New stations may become available from time to time.
• Stations close or can no longer be received (In the station list, invalid stations are indicated
with a question mark in front of their name).
• If reception was not good after the original scan (for example the antenna was not up), this
may result in an empty or incomplete list of available stations.
• If you have poor reception of some stations causing the audio to break up, you may wish to
list only stations with good signal strength.
To do a full scan
Select MENU> Full scan.
Once a scan is complete, the radio returns to playing the
previously -selected station or first station on thestation list.
To remove stations that are listed but unavailable
Select MENU> Prune
This removes all invalid stations, indicated in the station list with a “?” in front of the station name.
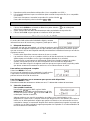
2. Selecting stations
To change station
Use the button on the RC or Rotate NAVIGATE
button onthe unit to scroll through the list of station,
press theon RC or OK button on unit to change
station.
Some stations are secondary services associated with a Primary channel and only available
at certain times. Any station that has associated secondary services is indicated with a double
chevron pointing to the right. The Secondary service station stations are always listed next to
their Primary station rather than the normal is indicated with a double chevron pointing left. In
the Station List Secondary alphabetical order.
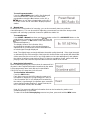
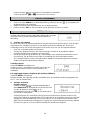
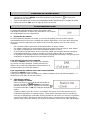
3. Presets
The unit has 40 preset memories for DAB.
To store a station in a preset memory
Press and hold the PROGRAM button 3~5 seconds
until the display shows Preset Store. Presets (1-40)
are displayed as either Empty or with the currently
stored station name.
Use the button on the RC or Rotate NAVIGATE
button onthe unit to choose a preset memory, then
press the on RC or OK button on unit to store the
currently - playing station.After confirming the preset
station is stored the display reverts to the Now
playing screen.

16
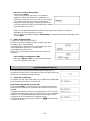
To recall a preset station
Press the PROGRAM button briefly, (the displaywill
show Preset Recall). Select one of the listed
presetstations using the P+/- buttons on the RC or
button on unit, then press button on the RC or
OKbutton on the unit to choose the displayed preset
station.
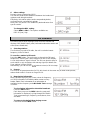
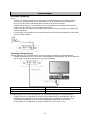
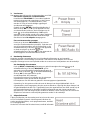
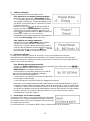
4. Manual tune
As well as the normal method of scanning, you can also manually tune to a particular
channel/frequency. This can be useful for adjusting your antenna to achieve the best possible
reception and scanning a particular channel to update the station list.
To manually tune
Press MENU > Manual tune then use the button on the RC or NAVIGATE button on the
unitto display a particular channel/frequency, press the
button on the RC or OK button on the unit to tune to
thatchannel/frequency.
The display shows a live indication of the
receivedsignal strength on the selected frequency.
Adjustments to your antenna will be manifestedin the
received signal strength displayed.
Note: The slightly larger rectangle indicates the audio quality threshold - if the signal strength,
as indicated by the solid rectangles, falls below this threshold the audio quality will deteriorate.
At the same time the unit scans for any DAB stations on the selectedfrequency and updates
the station list with any new stations found. To listen to anystations found, return to the Now
playing screen and select the required station from the station list as normal.
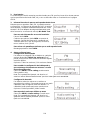
5. Now playing information
While a station is playing, the screen shows its name and DLS
(Dynamic Label Segment)information broadcast by the station
such asprogramme name, track title and contact details.
If DLS info over 16 characters, info will scroll.
To view further information
Press the INFO button.
Each time you press the INFO button the next set of
information is displayed, cycling through:DLS text, DL
Plus information (this is only displayed if broadcast by
the station), signalstrength, programme type, ensemble
name,channel number/frequency, signal errorrate, bit
rate, codec/DAB variant, time and date.
Note: DL Plus presents additional information that can be broadcast by stations and
storedtemporarily on your radio.
To return to the default Now playing screen at any time, press and hold the INFO button.

17
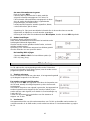
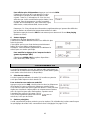
6. Other settings
Dynamic range compression (DRC)
This function reduces the difference between the loudest and
quietest audio being broadcast.
Effectively, this makes quiet sounds comparativelylouder,
and loud sounds comparatively quieter.
Note: DRC only works if it is enabled by thebroadcaster for a
specific station.
To change the DRC setting
Select MENU > DRC> The options available are:
DRC off | low | high.
FM Operation
FM radio mode receives analogue radio from the FMband and
displays RDS (Radio Data System) informationabout the station and
show (where broadcast).
1. Selecting stations
The first time you select FM radio, the unit is set tothe lowest
frequency in the FM band.
To scan for a station in FM mode
Press the AMS button. The unit scans up through theFM band
frequencies, showing the current frequencyon the screen display.
A scan stops when a signal is found. The unit can beset to stop at
each station or only at stations with astrong signal (for details see
Scan settings in Page GB-18).
Alternatively, you can use the buttons to tune,in 50 kHz steps.
2. Presets
The unit has 40 preset memories for FM, which work in the same way as DAB mode presets,
asdescribed earlier in Presets on Page GB-16.
3. Now playing information
While FM radio is playing, the screen shows its frequency,
or if RDS information is available,station name and any
further “Radio Text” information.If no information is
available just the frequency and aNO Radio Text message
is shown.
To view further information about the broadcast
Press the INFO button.
Each time you press the INFO button the next setof
information is displayed, cycling through:RDS Radio
Text, programme type, frequency,mono/stereo, time
and date.
To return to the default Now playing screen
Press and hold the INFO button.

18
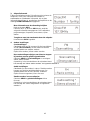
4. Other settings
Scan settings
By default, FM scans stop at any available station(ALL
Stations). This may result in poor qualityaudio from
weak stations.
Options: All stations | Strong stations only
To change the scan settings, to stop only at stations
with good signal strength
Select MENU > Scan setting then Strong stations only.
Note: In the example screen on the right, the
asteriskindicates “Strong stations only” is the
currentlyset value.
Audio settings
By default, all stereo stations are reproduced in stereo.
For weak stations, this may result inpoor quality audio.
The audio quality can be improvedusing mono.
Options: Stereo allowed | Forced mono
To play weak stations in mono
Select MENU > Audio setting> Forced mono.
Note: In the example screen on the right, theasterisk
indicates “Stereo allowed” is thecurrently set value.
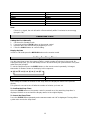
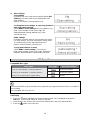
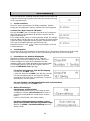
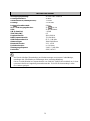
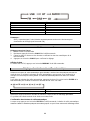
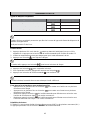
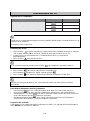
CD Operation
Compatible Disc Types
Disc Types
Disc Logo
Recorded Content
CD-R (CD Recordable - Audio/MP3/WMA)
AUDIO/MP3/WMA
CD-RW (CD-Rewritable - Audio/MP3/WMA)
AUDIO/MP3/WMA
AUDIO-CD (Compact Disc Digital Audio)
AUDIO
Some recorded files may not be able to be played due to the type and format of disc or condition of
the recording.
Not compatible with 8 cm mini CD
CD Playing
1. Press the button repeatedly on the top of the unit until “CD” is displayed or press the
CDbutton on the remote control to select CD function.
2. Insert the disc into the disc door, the unit will read the disc and play it automatically.
3. Press the button to eject the disc.
Seite wird geladen ...
Seite wird geladen ...
Seite wird geladen ...
Seite wird geladen ...
Seite wird geladen ...
Seite wird geladen ...
Seite wird geladen ...
Seite wird geladen ...
Seite wird geladen ...
Seite wird geladen ...
Seite wird geladen ...
Seite wird geladen ...
Seite wird geladen ...
Seite wird geladen ...
Seite wird geladen ...
Seite wird geladen ...
Seite wird geladen ...
Seite wird geladen ...
Seite wird geladen ...
Seite wird geladen ...
Seite wird geladen ...
Seite wird geladen ...
Seite wird geladen ...
Seite wird geladen ...
Seite wird geladen ...
Seite wird geladen ...
Seite wird geladen ...
Seite wird geladen ...
Seite wird geladen ...
Seite wird geladen ...
Seite wird geladen ...
Seite wird geladen ...
Seite wird geladen ...
Seite wird geladen ...
Seite wird geladen ...
Seite wird geladen ...
Seite wird geladen ...
Seite wird geladen ...
Seite wird geladen ...
Seite wird geladen ...
Seite wird geladen ...
Seite wird geladen ...
Seite wird geladen ...
Seite wird geladen ...
Seite wird geladen ...
Seite wird geladen ...
Seite wird geladen ...
Seite wird geladen ...
Seite wird geladen ...
Seite wird geladen ...
Seite wird geladen ...
Seite wird geladen ...
Seite wird geladen ...
Seite wird geladen ...
Seite wird geladen ...
Seite wird geladen ...
Seite wird geladen ...
Seite wird geladen ...
Seite wird geladen ...
Seite wird geladen ...
Seite wird geladen ...
Seite wird geladen ...
Seite wird geladen ...
Seite wird geladen ...
Seite wird geladen ...
Seite wird geladen ...
Seite wird geladen ...
Seite wird geladen ...
Seite wird geladen ...
Seite wird geladen ...
Seite wird geladen ...
Seite wird geladen ...
Seite wird geladen ...
Seite wird geladen ...
Seite wird geladen ...
Seite wird geladen ...
Seite wird geladen ...
Seite wird geladen ...
Seite wird geladen ...
Seite wird geladen ...
Seite wird geladen ...
Seite wird geladen ...
Seite wird geladen ...
Seite wird geladen ...
Seite wird geladen ...
Seite wird geladen ...
Seite wird geladen ...
Seite wird geladen ...
Seite wird geladen ...
Seite wird geladen ...
Seite wird geladen ...
Seite wird geladen ...
Seite wird geladen ...
Seite wird geladen ...
Seite wird geladen ...
Seite wird geladen ...
Seite wird geladen ...
Seite wird geladen ...
Seite wird geladen ...
Seite wird geladen ...
Seite wird geladen ...
Seite wird geladen ...
Seite wird geladen ...
Seite wird geladen ...
Seite wird geladen ...
Seite wird geladen ...
Seite wird geladen ...
Seite wird geladen ...
-
 1
1
-
 2
2
-
 3
3
-
 4
4
-
 5
5
-
 6
6
-
 7
7
-
 8
8
-
 9
9
-
 10
10
-
 11
11
-
 12
12
-
 13
13
-
 14
14
-
 15
15
-
 16
16
-
 17
17
-
 18
18
-
 19
19
-
 20
20
-
 21
21
-
 22
22
-
 23
23
-
 24
24
-
 25
25
-
 26
26
-
 27
27
-
 28
28
-
 29
29
-
 30
30
-
 31
31
-
 32
32
-
 33
33
-
 34
34
-
 35
35
-
 36
36
-
 37
37
-
 38
38
-
 39
39
-
 40
40
-
 41
41
-
 42
42
-
 43
43
-
 44
44
-
 45
45
-
 46
46
-
 47
47
-
 48
48
-
 49
49
-
 50
50
-
 51
51
-
 52
52
-
 53
53
-
 54
54
-
 55
55
-
 56
56
-
 57
57
-
 58
58
-
 59
59
-
 60
60
-
 61
61
-
 62
62
-
 63
63
-
 64
64
-
 65
65
-
 66
66
-
 67
67
-
 68
68
-
 69
69
-
 70
70
-
 71
71
-
 72
72
-
 73
73
-
 74
74
-
 75
75
-
 76
76
-
 77
77
-
 78
78
-
 79
79
-
 80
80
-
 81
81
-
 82
82
-
 83
83
-
 84
84
-
 85
85
-
 86
86
-
 87
87
-
 88
88
-
 89
89
-
 90
90
-
 91
91
-
 92
92
-
 93
93
-
 94
94
-
 95
95
-
 96
96
-
 97
97
-
 98
98
-
 99
99
-
 100
100
-
 101
101
-
 102
102
-
 103
103
-
 104
104
-
 105
105
-
 106
106
-
 107
107
-
 108
108
-
 109
109
-
 110
110
-
 111
111
-
 112
112
-
 113
113
-
 114
114
-
 115
115
-
 116
116
-
 117
117
-
 118
118
-
 119
119
-
 120
120
-
 121
121
-
 122
122
-
 123
123
-
 124
124
-
 125
125
-
 126
126
-
 127
127
-
 128
128


in anderen Sprachen
- English: Lenco DAR-070 User manual
- français: Lenco DAR-070 Manuel utilisateur
- español: Lenco DAR-070 Manual de usuario
- Nederlands: Lenco DAR-070 Handleiding
- português: Lenco DAR-070 Manual do usuário
Verwandte Artikel
-
Lenco DAR-040 Bedienungsanleitung
-
Lenco DAR-060 Benutzerhandbuch
-
-
Lenco PDR-015BK Bedienungsanleitung
-
Lenco SCD-720SI Bedienungsanleitung
-
-
-
-
Lenco MPR-034 Bedienungsanleitung
-
Lenco SCD-69 Benutzerhandbuch
Andere Dokumente
-
AEG MC 4469 DAB+ Bedienungsanleitung
-
Albrecht DR 790 CD, B-WARE (kleine Fehler möglich) Bedienungsanleitung
-
Yamaha MCR-N470 Bedienungsanleitung
-
Tangent Elio Mono Internet Radio Black Benutzerhandbuch
-
-
Yamaha R-N803 Bedienungsanleitung
-
Yamaha R-N303 Bedienungsanleitung
-
Muse M-1190 BTC Benutzerhandbuch
-
MPMan T180LBT Bedienungsanleitung
-
audizio Cannes Stereo Radio Bedienungsanleitung