
Model DAR-060
User manual - DAB+/FM radio with CD player and Bluetooth
Gebruikshandleiding - DAB+/FM-radio met cd-speler en Bluetooth
Benutzerhandbuch - DAB+/FM Radio mit CD Player und Bluetooth
Mode d’emploi - Radio DAB+/FM avec lecteur CD et Bluetooth
Manual del usuario - Radio DAB+/FM con reproductor de CD y Bluetooth

2
Index
English .................................................................................................................................................................................... 3
Nederlands ........................................................................................................................................................................... 17
Deutsch ................................................................................................................................................................................ 32
Français ................................................................................................................................................................................ 47
Español ................................................................................................................................................................................. 62

3
English
DAR-060
CAUTION:
Usage of controls or adjustments or performance of procedures other than those specified herein may result in hazardous
radiation exposure.
This unit should not be adjusted or repaired by anyone except qualified service personnel.
PRECAUTIONS BEFORE USE
KEEP THESE INSTRUCTIONS IN MIND:
1. Do not use this device near water.
2. Clean only with a slightly damp cloth.
3. Do not cover or block any ventilation openings. When placing the device on a shelf, leave 5 cm (2”) free space
around the whole device.
4. Install in accordance with the supplied user manual.
5. * Don’t step on or pinch the power adaptor. Be very careful, particularly near the plugs and the cable’s exit point. Do
not place heavy items on the power adaptor, which may damage it. Keep the entire device out of children’s reach!
When playing with the power cable, they can seriously injure themselves.
6. * Unplug this device during lightning storms or when unused for a long period.
7. Keep the device away from heat sources such as radiators, heaters, stoves, candles and other heat-generating
products or naked flame.
8. Avoid using the device near strong magnetic fields.
9. Electrostatic discharge can disturb normal usage of this device. If so, simply reset and restart the device following
the instruction manual. During file transmission, please handle with care and operate in a static-free environment.
10. Warning! Never insert an object into the product through the vents or openings. High voltage flows through the
product and inserting an object can cause electric shock and/or short circuit internal parts. For the same reason, do
not spill water or liquid on the product.
11. Do not use in wet or moist areas such as bathrooms, steamy kitchens or near swimming pools.
12. Do not use this device when condensation may occur.
13. Although this device is manufactured with the utmost care and checked several times before leaving the factory, it is
still possible that problems may occur, as with all electrical appliances. If you notice smoke, an excessive build-up of
heat or any other unexpected phenomena, you should disconnect the plug from the main power socket immediately.
14. This device must operate on a power source as specified on the specification label. If you are not sure of the type of
power supply used in your home, consult your dealer or local power company.
15. * The socket outlet must be installed near the equipment and must be easily accessible.
16. * Do not overload ac outlets or extension cords. Overloading can cause fire or electric shock.
17. * Devices with class 1 construction should be connected to a main socket outlet with a protective earthed connection.
18. * Devices with class 2 construction do not require a earthed connection.
19. Keep away from rodents. Rodents enjoy biting on power cords.
20. * Always hold the plug when pulling it out of the main supply socket. Do not pull the power cord. This can cause a
short circuit.
21. Avoid placing the device on any surfaces that may be subject to vibrations or shocks.
22. To clean the device, use a soft dry cloth. Do not use solvents or petrol based fluids. To remove severe stains, you
may use a damp cloth with dilute detergent.
23. The supplier is not responsible for damage or lost data caused by malfunction, misuse, modification of the device or
battery replacement.
24. Do not interrupt the connection when the device is formatting or transferring files. Otherwise, data may be corrupted
or lost.
25. If the unit has USB playback function, the usb memory stick should be plugged into the unit directly. Don’t use an usb
extension cable because it can cause interference resulting in failing of data.
26. The apparatus shall not be exposed to dripping or splashing and make sure that no objects filled with liquids, such as
vases, are placed on or near the apparatus.
27. * To completely disconnect the power input, the mains plug of the apparatus shall be disconnected from the mains,
as the disconnect device is the mains plug of apparatus.
28. If the unit works with battery, Battery shall not be exposed to excessive heat such as sunshine, fire or the like.
29. Attention should be drawn to the environmental aspects of battery disposal.
30. The apparatus can only be used in moderate extremely cold or climates warm environments should be avoided.
31. The rating label has been marked on the bottom or back panel of the apparatus.
32. This device is not intended for use by people (including children) with physical, sensory or mental disabilities, or a
lack of experience and knowledge, unless they’re under supervision or have received instructions about the correct
use of the device by the person who is responsible for their safety.
33. This product is intended for non-professional use only and not for commercial or industrial use.

4
34. Make sure the unit is adjusted to a stable position. Damage caused by using this product in an unstable position or
by failure to follow any other warning or precaution contained within this user manual will not be covered by warranty.
35. Never remove the casing of this apparatus.
36. Never place this apparatus on other electrical equipment.
37. Do not use or store this product in a place where it is subject to direct sunlight, heat, excessive dust or vibration.
38. Do not allow children access to plastic bags.
39. Only use attachments/accessories specified by the manufacturer.
40. Refer all servicing to qualified service personnel. Servicing is required when the apparatus has been damaged in any
way, such as the power supply cord or the plug, when liquid has been spilled or objects have fallen into the
apparatus, when the apparatus has been exposed to rain or moisture, does not operate normally, or has been
dropped.
41. *Do not use a damaged power cord or plug or a loose outlet. Doing so may result in fire or electric shock.
42. Prolonged exposure to loud sounds from personal music players may lead to temporary or permanent hearing loss.
INSTALLATION
• Unpack all parts and remove protective material.
• *Do not connect the unit to the mains before checking the mains voltage and before all other connections have been
made.
* Those instruction are related only to products using power cable or AC power adaptor.

5
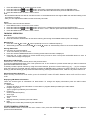
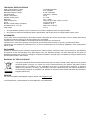
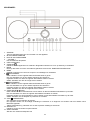
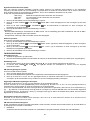
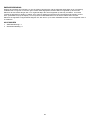
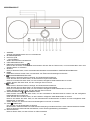
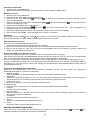
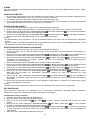
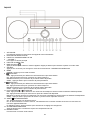
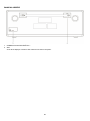
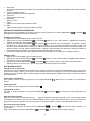
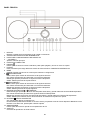
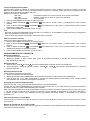
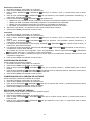
FRONT PANEL
1. DISPLAY
Display the unit operation status and information
2. IR RECEPTION WINDOW
3. CD DISC COMPARTMENT DOOR
4. – VOLUME +
Adjust the main volume
5. USB CHARGING PORT
6. STANDBY
Press to turn on the unit. Press again to turn off and go to Standby mode
7. SOURCE
Press this key to choose different modes of operation: DAB/FM/CD/AUX/Bluetooth
8. MENU
DAB/FM: Press to enter the Menu for setting change
9. /TUNE-
DAB: Press to display the next station information
FM: Short press to tune to a different frequency
Press and hold to scan the next available station
CD/BT: Press to search to the previous track
10. /TUNE+
DAB: Press to display the next station information
FM: Short press to tune to a different frequency
Press and hold to scan the next available station
CD/BT: Press to search to the next track
11. PLAY/PAUSE /SCAN
DAB: Press to start auto-scanning and store all available DAB stations
FM: Short press to scan the next available FM station
Press and hold to start auto-scanning and store all available FM stations
CD/BT: Press to toggle between pause and resume playback operation
12. STOP /PAIR/ENTER
CD: Press to stop the playback operation
BT: Press and hold to disconnect the current connection and start to search another new Bluetooth device
During menu operation, press to select the change setting
13. OPEN/CLOSE
Press to open/close the CD compartment door
14. AUDIO IN
Connect to external audio player

6
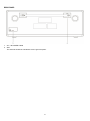
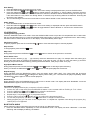
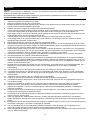
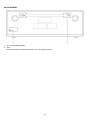
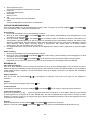
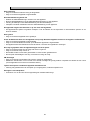
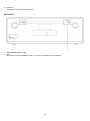
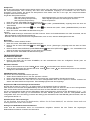
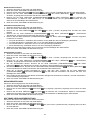
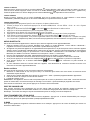
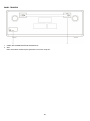
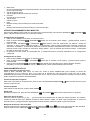
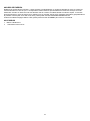
REAR PANEL
1. AC ~ IN POWER CORD
2. ANT
The antenna should be extended to ensure good reception.

7
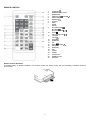
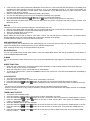
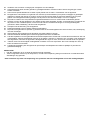
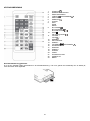
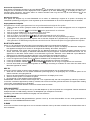
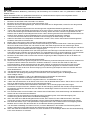
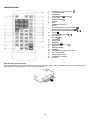
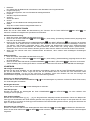
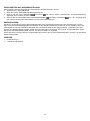
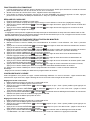
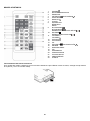
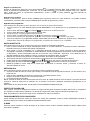
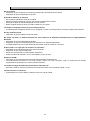
REMOTE CONTROL
1.
STANDBY
2.
NUMERIC BUTTONS
3.
MEM/PROG
4.
PREVIOUS /TUNE
5.
EQUALIZER
6.
REPEAT
7.
X-BASS
8.
INFO
SCAN
MENU
9.
BT PREVIOUS
BT NEXT
BT PLAY/PAUSE
10.
STOP
CD PLAY/PAUSE
11.
VOLUME +
VOLUME –
12.
MUTE
13.
RANDOM
14.
CH-
15.
NEXT /TUNE
16.
ENTER
17.
MONO/ST
18.
CH+
19.
SLEEP
20.
TIMER
21.
CLOCK SET
22.
OPEN/CLOSE
23.
SOURCE
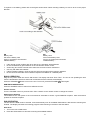
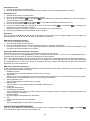
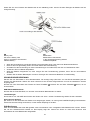
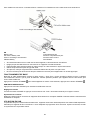
Remote Control Operation
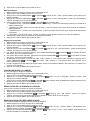
A CR2025 battery is already installed in the remote control unit. Before using, pull out the battery insulation sheet as
shown below.

8
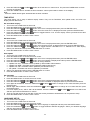
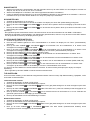
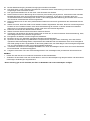
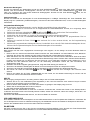
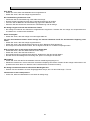
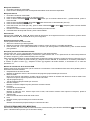
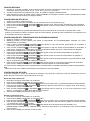
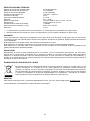
To replace a new battery, please refer to the figure shown below. When inserting a battery, be sure to do so in the proper
direction.
EN
EN
Battery case
Battery case
Pull out the battery case
Pull out the battery case
Push in according to this direction
Push in according to this direction
CR2025 battery
CR2025 battery
If the remote control conflicts with other devices, the operation will be affected.
Do not simultaneously press buttons on the unit and the remote control.
Avoid using two remote controls at the same time as it will cause a malfunction.
Use only CR-2025 size batteries.
If there is battery leakage, clean the remote control thoroughly before replacing batteries.
Do not short two terminals of the batteries. Dispose old batteries in a suitable place.
BASIC OPERATION
Plug the AC power cable into the AC wall socket. The display will show “Scan Time”. The unit is now updating the time
from the broadcaster. Wait for a while until it is finished and the real time will be display.
Press the STANDBY button to turn on the unit. To turn off, press the STANDBY button again.
DAB/FM/CD/AUX/Bluetooth
Press the SOURCE button to select from different sources.
Volume Control
Turn the VOLUME control or press the VOL-/VOL+ buttons on the remote control to change the volume.
Adjusting the Antenna
The antenna at the rear panel of the unit should be extended to ensure a good DAB/FM reception. Alter the antenna
position for the best reception.
DAB OPERATION
The first time the DAB mode is selected, it will automatically scan for available DAB stations. Wait until the scanning has
finished. The display will show the scanning progress. After scanning it will tune to the first station.
Auto Scan
1. Turn on the unit in DAB mode.
2. Press the SCAN button to start auto-scanning the available stations.

9
Manual Scan
1. Turn on the unit in DAB mode.
2. Press MENU button to access the menu control.
3. Press the PREVIOUS or NEXT button until “Manual tune” is displayed and then press the ENTER button.
4. Press the PREVIOUS or NEXT button to select the desired channel (5A-13F).
5. Press the ENTER button to confirm.
6. To select another channel (5A-13F), press the PREVIOUS or NEXT button and then press the ENTER button
to confirm.
7. When the station is found, press the ENTER button to select.
8. To quit manual scan, press the MENU button.
Tuning
Press the TUNE or TUNE button to display the information of the next station. Then press the ENTER button to
tune to this station within a few seconds.
Storing DAB Presets
You can save up to 20 DAB stations.
1. Tune to the station you wish to store.
2. Press and hold the MEM/PROG button to access the menu control. Display will flash.
3. Press the CH- or CH+ button to a preset number that you want to store. Then press the ENTER button to save.
Recall Stored DAB Presets
Press the CH- or CH+ button directly tune to the preset channel.
Or press the [MEM/PROG] button once. Then press the CH- or CH+ button to a preset number that you want to recall and
press the ENTER button to confirm.
To directly recall the preset channel by using the numeric buttons, press the numeric buttons [1], [2], …, [0]. For example
when the button [3] is pressed and then follow by pressing the ENTER button, it will tune to preset channel 3. Or when the
button [1] and then button [2] are pressed and then follow by pressing the ENTER button, it will tune to preset channel 12.
Displaying DAB Station Information
There are several types of information as listed below. To change the display information, press the INFO button
repeatedly.
1. Radio Text scrolling
Shows music titles or program details provided by the broadcaster.
2. Signal Bar
Transmission signal level. The more the star mark is displayed, the stronger the signal is received. To improve the
reception adjust the wire antenna position.
3. Program Type (PTY)
Type of program provided by the broadcaster.
4. Multiplex Name
Displays name of multiplex to which the current station belongs.
5. Frequency
Current channel frequency.
6. Signal Error Rate
Shows the error rate. The larger this value, the more errors it receives. To improve the reception, adjust the antenna
position.
7. Audio Bit Rate
This is the current channel audio Bitrate.
8. Time
Displays the time provided by the radio station.
9. Date
Displays the current date provided by the radio station.
OTHER DAB MENU OPERATIONS
Press the MENU button to access the menu control. Then press the PREVIOUS or NEXT button for different
options as described below.
Dynamic Range Control (DRC)
DRC can make quieter sounds easier to hear when the unit is used in a noisy environment. The DRC level of a broadcast
is set by the broadcaster and transmitted with the service. Changing the DRC value on your unit enables you to apply a
scaling factor to this level.
There are three levels of compression:
DRC high:
Maximum compression as sent with the transmitted service
DRC low:
Set to 1/2 that of the sent transmitted service
DRC off:
No compression

10
1. Press the MENU button to access the menu control.
2. Press the PREVIOUS or NEXT button until “DRC” is displayed and then press the ENTER button.
3. Press the PREVIOUS or NEXT button to select the DRC value and then press the ENTER to confirm.
4. Press the MENU button to exit the menu control.
Note:
- Not all DAB broadcasts are able to use DRC function. If the broadcast does not support DRC then the DRC setting in the
unit will have no effect.
- After you have adjusted the DRC level the sound may be louder.
Prune
This function removes inactive stations.
1. Press MENU button to access the menu control.
2. Press the PREVIOUS or NEXT button until “Prune” is displayed and then press the ENTER button.
3. Press the PREVIOUS or NEXT button to select “<Yes>” and then press the ENTER button to prune the unit.
4. Press the MENU button to exit the menu control.
FM RADIO OPERATION
Auto Scan
1. Turn on the unit in FM mode.
2. Press and hold the SCAN button to start auto-scanning and saving the available stations (max. 20 storage).
Manual Scan
1. Press the TUNE or TUNE button repeatedly to tune to a different frequency.
2. Alternatively press and hold the TUNE or TUNE button to automatically search to the next available station.
Storing FM Presets
You can save up to 20 FM stations.
1. Tune to the station you wish to store.
2. Press and hold the MEM/PROG button. Flashing preset channel number is displayed.
3. Press the CH- or CH+ button to a preset number that you want to store. Then press the ENTER button to save. A
confirmation message is displayed.
Recall Stored FM Presets
Press the CH- or CH+ button directly tune to the preset channel.
Or press the [MEM/PROG] button once. Then press the CH- or CH+ button to a preset number that you want to recall and
press the ENTER button to confirm.
To directly recall the preset channel by using the numeric buttons, press the numeric buttons [1], [2], …, [0]. For example
when the button [3] is pressed and then follow by pressing the ENTER button, it will tune to preset channel 3. Or when the
button [1] and then button [2] are pressed and then follow by pressing the ENTER button, it will tune to preset channel 12.
Stereo/Force Mono Selection
When receiving a Stereo FM radio station, press the MONO/ST button will switch between stereo audio and force mono
audio.
Displaying FM Station Information
There are several types of information as listed below. To change the display information press the INFO button
repeatedly.
1. Radio Text
Scrolling text which shows information on music titles or program details provided by the radio station.
2. Program Type (PTY)
Type of program provided by the broadcaster
3. Frequency
Current channel frequency
4. Audio Type
Stereo or Mono
5. Time
Displays the time provided by the radio station.
6. Date
Displays the current date provided by the radio station.
OTHER FM MENU OPERATION
Press the MENU button to access the menu control. Then press the PREVIOUS or NEXT button for different
options as described below.

11
Scan Setting
1. Press the MENU button to access the menu control.
2. Press the PREVIOUS or NEXT button until “Scan setting” is displayed and then press the ENTER button.
3. Press the PREVIOUS or NEXT button to toggle between “All stations” or “Strong station” selections and then
press the ENTER button confirm. When “All stations” is selected, all stations will be detected during FM scanning even
if the radio station is noisy. When the “Strong station” is selected, only the strong stations are detected. Scanning will
ignore the noisy stations.
4. The next time doing a FM scan the unit will search for the stations based on this confirmed setting.
Audio Setting
1. Press the MENU button to access the menu control.
2. Press the PREVIOUS or NEXT button until “Audio setting” is displayed and then press the ENTER button.
3. Press the PREVIOUS or NEXT button to toggle between “Stereo allowed” or “Forced mono” selection and
then press the ENTER button confirm.
CD OPERATION
Loading and Playing CD Disc
Press the SOURCE button to CD mode. Press the OPEN/CLOSE button to eject the CD compartment door. Install a disc
with the CD label side facing up. Press the OPEN/CLOSE button again to close the CD compartment door. After reading,
the total number of tracks will be shown on the display. It will automatically start to play.
Play/Pause Control
To pause playback press the CD PLAY/PAUSE button. Press the button again to resume playback.
Stop Control
To stop playback press the STOP button.
Skip Track
During playback press the PREVIOUS or NEXT button to search to the previous or next track.
Direct Select Track
Press the numeric buttons [1], [2], …, [0] to directly select the desired track to play. For example when the button [3] is
pressed and then follow by pressing the ENTER button, it will jump to track 3 to play. Or when the button [1] and then
button [2] are pressed and then follow by pressing the ENTER button, it will jump to track 12 to play.
High-Speed Music Search
During playback press & hold the PREVIOUS or NEXT button to start high-speed searching.
When you release the PREVIOUS or NEXT button normal speed playback will resume.
Repeat Playing
During playback press the REPEAT button once the display shows “REP_ONE”. The current track will be played
repeatedly. Press the REPEAT button again the display shows “REP_ALL”. All tracks will be played repeatedly. Press
the REPEAT button again to resume normal playback.
Random Play
During playback press the RANDOM button to play music in random order. The display will show “RANDOM”. Press the
RANDOM button again to resume normal playback.
Programmed Playback
This unit can be programmed to play a sequence of tracks selected.
1. Insert a disc and in stop mode press the MEM/PROG button. “P-01” is shown with “01” flashing in “T-01” shown.
2. Press the PREVIOUS or NEXT button to select the desired track.
3. Press the MEM/PROG button to save the desired track.
4. Repeat steps 2-4 to program up to 32 programmed tracks.
5. Press the CD PLAY/PAUSE button to play according to the programmed track.
6. To clear the program play, press the STOP button twice or change to another mode.
7. During program play you can also do the “Repeat One” or “Repeat All” operation. But during the program play,
random play is not supported.
BLUETOOTH AUDIO
Please follow the pairing instructions below to link the unit to your Bluetooth device.
1. Press the SOURCE button repeatedly to enter the Bluetooth mode. The display will show “Bluetooth”. It will start
searching and will display a flashing “BT AUDIO”.

12
2. If the unit has never been paired with a Bluetooth device before or cannot find the last paired device, the display and
the Bluetooth status indicator will keep on flashing. Turn on the Bluetooth function of your device and enable the
search until “Lenco DAR-060” is found. Select “Lenco DAR-060” on the Bluetooth device to make connection. Enter
the pass code “0000” if required.
3. After successfully paired the unit will display steady “BT AUDIO”.
4. You can now start playing music from your smartphone wirelessly to the speaker.
5. You can press the BT PLAY/PAUSE button to pause or resume the playback.
6. You can press the BT PREVIOUS or BT NEXT button to search to the previous or next song.
Press and hold the PAIR button on the unit will disconnect the current connection and start to search another new
Bluetooth device.
AUX IN
This allows you to connect an external player’s sound through your unit.
1. Plug a 3.5mm audio cable (not included) into your external player’s line out and the other end into the AUX IN jack.
2. Press the SOURCE button to enter AUX mode. Display shows “AUX”
3. Start your external player to play music.
4. The unit will output the sound.
NOTE: When the AUX mode is used for more than 4 hours, the unit will switch to standby mode. 10 minutes before
entering standby mode you will be notified with “AUTO-OFF” flashing on the display.
To extend the AUX mode you can press CD PLAY/PAUSE.
USB CHARGING PORT
To charge, connect your smartphone to the USB charging port on the front panel of the unit. Use only smartphone which
requires 5V USB power. Charging time may vary for different smartphones.
Note: Charging function may not be supported for all phones.
EQ OPERATION
You can enjoy different EQ sound effect modes. Press the EQUALIZER button will change to different sound effects of
FLAT/CLASSIC/ROCK/POP/JAZZ.
X-BASS
You can also boost the bass effect of the music. Press the X-BASS button will toggle the X-Bass effect between On and
Off.
SLEEP FUNCTION
1. When the unit is switched on, press the SLEEP button repeatedly to select a sleep duration from either sleep off,
90, 80, 70, 60, 50, 40, 30, 20 or 10 minutes.
2. When the sleep timer is zero, the unit will turn off automatically.
3. To cancel the sleep function, press the STANDBY button to turn off the unit. Or press the SLEEP button repeatedly to
select “sleep off”.
CLOCK SETUP
1. Turn off the unit in Standby mode.
2. Press the CLOCK SET button to set the clock. It will display “Clock Set”.
3. Press the PREVIOUS or NEXT button to adjust the hour. Press the CLOCK SET button to confirm.
4. Press the PREVIOUS or NEXT button to adjust the minute. Press the CLOCK SET button to finish the clock set.
Note:
- The time set may automatically be overriden by the DAB+ or FM station real time information.
- When the unit is turned on in any mode of operation, pressing the CLOCK SET button will display the time on the display
for a few seconds.
TIMER ON/OFF SETUP
1. Turn off the unit in Standby mode.
2. Press and hold the TIMER button to set the timer on/off. It will display “On Timer”.
3. Press the PREVIOUS or NEXT button to set the on timer hour value. Then press the TIMER button to confirm.
4. Press the PREVIOUS or NEXT button to set the on timer minute value. Then press the TIMER button to
confirm. It will display “Off Timer”.
5. Press the TIMER button to the next selection.
6. Press the PREVIOUS or NEXT button to set the off timer hour value. Then press the TIMER button to confirm.
7. Press the PREVIOUS or NEXT button to set the off timer on minute value. Then press the TIMER button to
confirm.
8. Press the PREVIOUS or NEXT button to set the timer on source (DISC, DAB, FM). Then press the TIMER
button to confirm.

13
9. Press the PREVIOUS or NEXT button to set the timer on volume level. The press the TIMER button to finish
the timer on/off setup.
10. Press the TIMER button to activate the timer schedule. A timer symbol will be shown on the display.
Note:
- Press the TIMER button again will deactivate the timer schedule.
TIME SETUP
This setup allows you to setup 4 different display modes. They are set Time/Date, time update mode, set 12/24 hour
display and set date format
Set 12/24 Hour Display
1. Turn on the unit in DAB mode or FM mode.
2. Press the MENU button to access the menu control.
3. Press the PREVIOUS or NEXT button until “Time” is displayed and then press the ENTER button.
4. Press the PREVIOUS or NEXT button until “Set 12/24 hour” is displayed and then press the ENTER button.
5. Press the PREVIOUS or NEXT button to toggle between 12 or 24 hour display. Select your desired and then
press the ENTER button to confirm.
6. Press the MENU button to exit the menu control.
Set Date Format
1. Turn on the unit in DAB mode or FM mode.
2. Press the MENU button to access the menu control.
3. Press the PREVIOUS or NEXT button until “Time” is displayed and then press the ENTER button.
4. Press the PREVIOUS or NEXT button until “Set date format” is displayed and then press the ENTER button.
5. Press the PREVIOUS or NEXT button to toggle between “DD-MM-YYYY” or “MM-DD-YYYY” date display.
Select your desired and then press the ENTER button to confirm.
6. Press the MENU button to exit the menu control.
Auto Update
1. Turn on the unit in DAB mode or FM mode.
2. Press the MENU button to access the menu control.
3. Press the PREVIOUS or NEXT button until “Time” is displayed and then press the ENTER button.
4. Press the PREVIOUS or NEXT button until “Auto update” is displayed and then press the ENTER button.
5. Press the PREVIOUS or NEXT button to change between
“Update from Any”: Time/Date will be updated by either DAB or FM broadcast
“Update from DAB”: Time/Date will be updated by DAB broadcast only
“Update from FM”: Time/Date will be updated by FM broadcast only
“No update”: Time/Date will never be updated by broadcast
6. Select your desired and then press the ENTER button to confirm.
7. Press the MENU button to exit the menu control.
Set Time/Date
1. Turn on the unit in DAB mode or FM mode.
2. Press the MENU button to access the menu control.
3. Press the PREVIOUS or NEXT button until “Time” is displayed and then press the ENTER button.
4. Press the PREVIOUS or NEXT button until “Set Time/Date” is displayed and then press the ENTER button.
5. Hour digits will be flashed. Press the PREVIOUS or NEXT button to change to hour value and then press the
ENTER button.
6. Minute digits will be flashed. Press the PREVIOUS or NEXT button to change to hour value and then press
the ENTER button.
7. If 12 hour display is set, “AM or “PM” will be flashed. Press the PREVIOUS or NEXT button to set AM or PM
and then press the ENTER button to confirm.
8. Then the unit will request to set the date. Follow the similar procedures as listed above to complete the setup.
9. Press the MENU button to exit the menu control.
LANGUAGE SETUP
You can set the unit’s language.
1. Turn on the unit in DAB mode or FM mode.
2. Press the MENU button to access the menu control.
3. Press the PREVIOUS or NEXT button until “Language” is displayed and then press the ENTER button.
4. Press the PREVIOUS or NEXT button to toggle between different languages. Select your desired language
and then press the ENTER button to confirm.
5. Press the MENU button to exit the menu control.

14
SOFTWARE VERSION CHECK
You can check the unit software version.
1. Turn on the unit in DAB mode or FM mode.
2. Press the MENU button to access the menu control.
3. Press the PREVIOUS or NEXT button until “SW version” is displayed and then press the ENTER button to
show the software version number.
4. Press the MENU button to exit the menu control.
FACTORY RESET
This function resets the unit to the original factory settings.
1. Turn on the unit in DAB mode.
2. Press the MENU button to access the menu control.
3. Press the PREVIOUS or NEXT button until “Factory Reset” is displayed and then press the ENTER button.
4. Press the PREVIOUS or NEXT button until “<Yes>” is displayed and then press the ENTER button to reset the
unit.
ENERGY SAVING
Due to ErP stage 2 requirement and protect the environment, the unit will turn off to the standby mode automatically once
no music has been playing around 15 minutes except in AUX mode. When the AUX mode is used for more than 4 hours,
the unit will switch to standby mode. 10 minutes before entering standby mode you will be notified with “AUTO-OFF”
flashing on the display. To extend the AUX mode you can press CD PLAY/PAUSE.
When the unit is power off due to ErP, you can press the STANDBY button to turn on the unit again.
ACCESSORIES
Remote control x 1
Instruction manual x 1

15
Trouble Shooting
No power
• Ensure that the mains cable is connected securely.
• Ensure that the unit is switched on.
The remote control does not function
• Use the remote control near to the unit.
• Point the remote control at the remote control sensor on the unit.
• Replace the batteries in the remote control with new ones.
• Remove any obstacles between the remote control and the unit.
The unit does not respond when pressing any buttons.
• The unit may freeze up during use. Switch off and then switch on the unit again at the mains socket to reset it.
No sound output
• Make sure that the unit is not muted.
I can’t find the Bluetooth name of this unit on my Bluetooth device for Bluetooth pairing
• Ensure that the unit is switched on.
• Ensure that the Bluetooth function is activated on your Bluetooth device.
• The unit has a Bluetooth function that can receive a signal within 10 metres.
Disc in place but the unit won’t play
• Ensure that the disc label is facing up.
• Ensure that the disc is clean.
• PAUSE mode may be activated, deactivate it.
• Disc may be damaged or dirty; check and clean the disc.
FM reception
• Ensure the FM telescopic antenna is fully extended.
• Electrical interference in your home can cause poor reception. Move the unit away from them (especially those with
motors and transformers).
The unit switches off automatically during playing
• Increase the volume level on your input source player like DVD player/TV etc.
Interferences in Speakers
• Check that you have not left a mobile phone near the unit.

16
TECHNICAL SPECIFICATIONS
DAB+ radio frequency range
174.928-239.2 MHz
FM radio frequency range
Bluetooth frequency range
87.5-108 MHz
2.402-2.480 GHz
AC power input
100-240V~, 50/60Hz
Power consumption
30 W
Speaker output power
2 x 10 W
Bluetooth
V2.1 + EDR
USB charging port
Aux in
USB 2.0 type A jack, 5VDC, 1A max.
3.5mm stereo jack
Remote control battery (included)
CR2025 x 1pcs
Unit dimension (L x D x H)
380 x 212 x 139 mm
Total weight
3.3 kg
The specification presents only as a reference. The value of weight and size are approximation.
Our product is improved ceaselessly and the specification and function may be changed without prior notice.
GUARANTEE
Lenco offers service and warranty in accordance with the European law, which means that in case of repairs (both during
and after the warranty period) you should contact your local dealer.
Important note: It is not possible to send products that need repairs to Lenco directly.
Important note: If this unit is opened or accessed by a non-official service center in any way, the warranty expires.
This device is not suitable for professional use. In case of professional use, all warranty obligations of the manufacturer
will be voided.
DISCLAIMER
Updates to Firmware and/or hardware components are made regularly. Therefore some of the instruction, specifications
and pictures in this documentation may differ slightly from your particular situation. All items described in this guide for
illustration purposes only and may not apply to a particular situation. No legal right or entitlements may be obtained from
the description made in this manual.
DISPOSAL OF THE OLD DEVICE
This symbol indicates that the relevant electrical product or battery should not be disposed of as general
household waste in Europe. To ensure the correct waste treatment of the product and battery, please
dispose them in accordance to any applicable local laws of requirement for disposal of electrical
equipment or batteries. In so doing, you will help to conserve natural resources and improve standards of
environmental protection in treatment and disposal of electrical waste (Waste Electrical and Electronic
Equipment Directive).
SERVICE
For more information and helpdesk support, please visit www.lenco.com
Lenco Benelux BV, Thermiekstraat 1a, 6361 HB Nuth, The Netherlands.

17
Nederlands
DAR-060
LET OP:
Gebruik van bedieningen of afstellingen of uitvoer van procedures anders dan gespecificeerd in deze documentatie kan
leiden tot blootstelling aan schadelijke straling.
Dit apparaat dient uitsluitend te worden aangepast of gerepareerd door gekwalificeerd onderhoudspersoneel.
VOORZORGSMAATREGELEN VOOR GEBRUIK
ONTHOUD DE VOLGENDE INSTRUCTIES:
1. Gebruik dit apparaat niet in de buurt van water.
2. Reinig het uitsluitend met een licht vochtige doek.
3. Bedek of blokkeer de ventilatie-openingen niet. Wanneer u het apparaat op een schap plaatst, dient u 5 cm (2”) vrije
ruimte rondom het gehele apparaat te behouden.
4. Installeer het product volgens de meegeleverde gebruikershandleiding.
5. *Nooit op de stroomadapter stappen of deze indrukken. Wees voornamelijk voorzichtig in de buurt van de stekkers
en het punt waar de kabel uit het apparaat komt. Plaats geen zware voorwerpen op de stroomadapter, om
beschadiging ervan te voorkomen. Houd het gehele apparaat buiten bereik van kinderen! Wanneer kinderen met de
voedingskabel spelen, kunnen zij ernstig letsel oplopen.
6. *Haal de stekker uit het stopcontact tijdens onweer of wanneer u deze langere tijd niet gebruikt.
7. Houd het apparaat uit de buurt van hittebronnen, zoals radiatoren, verwarmingen, kachels, kaarsen en andere
hittegenererende producten of naakte vlam.
8. Gebruik dit apparaat niet in de buurt van krachtige magnetische velden.
9. Elektrostatische ontlading kan normaal gebruik van dit apparaat verstoren. U hoeft het apparaat in dit geval slechts
te resetten en opnieuw op te starten volgens de gebruikershandleiding. Wees voorzichtig tijdens bestandsoverdracht
en doe dat in een omgeving zonder statische verstoringen.
10. Waarschuwing! Steek nooit een voorwerp via de ventilatie- of andere openingen in het product. Er is hoogspanning
in het product aanwezig en als u er een object insteekt, kan dat een elektrische schok veroorzaken en/of kortsluiting
in de interne onderdelen. Mors om dezelfde reden geen water of vloeistof op het product.
11. Gebruik het toestel niet in vochtige ruimtes, zoals badkamers, stomende keukens of in de buurt van zwembaden.
12. Gebruik dit apparaat niet wanneer condensatie kan optreden.
13. Alhoewel dit apparaat met grote zorg gefabriceerd en verschillende keren geïnspecteerd is voordat het de fabriek
verlaat, is het nog steeds mogelijk dat er problemen optreden, zoals met alle elektrische apparaten. Als u rook, een
overmatige hitteontwikkeling of enig ander onverwacht verschijnsel opmerkt, moet u onmiddellijk de stekker van het
netsnoer uit het stopcontact halen.
14. Dit apparaat moet aangedreven worden door een voedingsbron, zoals aangegeven op het specificatieplaatje. Als u
twijfelt over het type voeding dat gebruikt wordt in uw huis, raadpleeg dan a.u.b. uw dealer of plaatselijk
energiebedrijf.
15. *Het stopcontact moet in de buurt van de apparatuur zijn geïnstalleerd en eenvoudig te bereiken zijn.
16. *Overbelast stopcontacten of verlengsnoeren niet. Overbelasting kan brand of een elektrische schok veroorzaken.
17. *Apparaten met een Klasse 1 structuur dienen te worden aangesloten op een stopcontact met een beschermende
aardverbinding.
18. *Apparaten met een Klasse 2 structuur vereisen geen aardverbinding.
19. Houd ze uit de buurt van knaagdieren. Knaagdieren knauwen graag aan voedingskabels.
20. *Houd altijd de stekker vast wanneer u deze uit het stopcontact trekt. Trek nooit aan de voedingskabel. Dit kan tot
een kortsluiting leiden.
21. Vermijd om het toestel te plaatsen op een ondergrond die blootgesteld kan worden aan trillingen of schokken.
22. Gebruik een zacht, droog doekje om het apparaat te reinigen. Gebruik geen oplosmiddelen of op benzine
gebaseerde vloeistoffen. U kunt een vochtig doekje met verdund schoonmaakmiddel gebruiken om hardnekkige
vlekken te verwijderen.
23. De leverancier is niet verantwoordelijk voor schade of verloren gegevens veroorzaakt door storing, misbruik,
modificatie van het apparaat of batterijvervanging.
24. Onderbreek nooit de verbinding wanneer het apparaat formatteert of bestanden overdraagt. De gegevens kunnen
anders corrupt of verloren raken.
25. Indien het apparaat een USB-afspeelfunctie heeft, moet de USB-geheugenstick rechtstreeks op het apparaat
worden aangesloten. Gebruik geen USB-verlengkabel, omdat die kan leiden tot storingen met foutieve gegevens als
gevolg.
26. Het apparaat mag niet worden blootgesteld aan druppels of spatten en zorg ervoor dat er geen met vloeistof gevulde
voorwerpen, zoals vazen, op of nabij het apparaat zijn geplaatst.
27. *Om de verbinding met de stroomaansluiting volledig te verbreken, moet de stekker van het apparaat uit het
stopcontact worden gehaald, omdat de stekker van het apparaat de hoofdschakelaar is.
28. Indien het apparaat op batterijen kan werken, dan mogen de batterijen niet aan overmatige hitte, zoals zonlicht, open
vuur e.d. worden blootgesteld.

18
29. Aandacht voor het milieu is nodig bij het verwijderen van de batterijen.
30. Het apparaat kan alleen worden gebruikt in gematigde klimaten. Extreem koude of warme omgevingen moeten
worden vermeden.
31. Het nominale specificatielabel is te vinden op het paneel aan de onder- of achterkant van het apparaat.
32. Dit apparaat is niet bestemd voor gebruik door mensen (inclusief kinderen) met fysieke, zintuiglijke of geestelijke
gebreken of gebrek aan kennis en ervaring, tenzij zij onder toezicht staan of instructies hebben over het juiste
gebruik van het apparaat hebben gekregen van de persoon die verantwoordelijk is voor hun veiligheid.
33. Dit product is alleen voor niet-professioneel gebruik bedoeld en niet voor commercieel of industrieel gebruik.
34. Verzeker u ervan dat het apparaat in een stabiele positie staat opgesteld. Schade, veroorzaakt door het gebruik van
dit product in een onstabiele positie, of door het niet naleven van waarschuwingen of voorzorgsmaatregelen
genoemd in deze handleiding, valt niet onder de garantie.
35. Verwijder nooit de behuizing van dit apparaat.
36. Plaats dit apparaat nooit op andere elektrische apparatuur.
37. Dit product niet gebruiken of opslaan op plaatsen waar het wordt blootgesteld aan direct zonlicht, hitte, buitensporig
veel stof of trillingen.
38. Geef kinderen geen gelegenheid in aanraking met plastic zakken te komen.
39. Gebruik uitsluitend uitbreidingen/accessoires gespecificeerd door de fabrikant.
40. Laat alle reparaties over aan gekwalificeerd onderhoudspersoneel. Onderhoud is vereist als het toestel hoe dan ook
is beschadigd, zoals bijvoorbeeld het netsnoer of de stekker, wanneer er vloeistof of een voorwerp in het apparaat is
terechtgekomen, wanneer het apparaat is blootgesteld aan regen of vocht, als het niet normaal werkt of is gevallen.
41. *Gebruik nooit een beschadigde voedingskabel of stekker of een los stopcontact. Dit vormt namelijk een risico op
brand of elektrische schokken.
42. Langdurige blootstelling aan luid geluid van persoonlijke muziekspelers kan leiden tot tijdelijke of permanente
gehoorbeschadiging.
INSTALLATIE
• Pak alle onderdelen uit en verwijder de beschermende materialen.
• *Sluit het apparaat niet aan op het stopcontact, voordat u de netspanning hebt gecontroleerd en voordat alle andere
aansluitingen zijn gemaakt.
* deze instructies zijn enkel van toepassing voor producten met een voedingskabel of een AC voedingsadapter.

19
VOORPANEEL
1. SCHERM
Toont de gebruiksmodus van en informatie over het apparaat
2. IR ONTVANGSTVENSTER
3. KLEPJE VAN DISKHOUDER
4. – VOLUME +
Het hoofdvolume aanpassen
5. USB-LAADPOORT
6. STAND-BY
Indrukken om het apparaat in te schakelen. Nogmaals indrukken om uit en op stand-by te schakelen
7. BRON
Druk op deze toets om uit de verschillende gebruiksmodi te kiezen: DAB/FM/CD/AUX/Bluetooth
8. MENU
DAB/FM: Indrukken om het menu te openen en instellingen te veranderen
9. /AFSTEMMEN-
DAB: Indrukken om de volgende stationsinformatie weer te geven
FM: Kort indrukken om op een andere frequentie af te stemmen
Ingedrukt houden om naar het volgende beschikbare station te zoeken
CD/BT: Indrukken om naar de vorige track te zoeken
10. /AFSTEMMEN+
DAB: Indrukken om de volgende stationsinformatie weer te geven
FM: Kort indrukken om op een andere frequentie af te stemmen
Ingedrukt houden om naar het volgende beschikbare station te zoeken
CD/BT: Indrukken om naar de volgende track te zoeken
11. START/PAUZE /SCAN
DAB: Indrukken om een automatische scan te starten en alle beschikbare DAB-stations op te slaan.
FM: Kort indrukken om naar het volgende beschikbare FM-station te zoeken.
Ingedrukt houden om een automatische scan te starten en alle beschikbare FM-stations op te slaan.
CD/BT: Indrukken om het afspelen te pauzeren en hervatten.
12. STOP /PAREN/ENTER
CD: Indrukken om het afspelen te stoppen.
BT: Ingedrukt houden om de huidige verbinding te verbreken en te beginnen met zoeken naar een andere nieuw
Bluetooth-apparaat
Tijdens menubediening, indrukken om de aan te passen instelling te selecteren.
13. OPEN/SLUIT
Indrukken om de cd-houder te openen/sluiten.
14. AUDIO-INGANG
Sluit hier een externe audiospeler aan

20
ACHTERPANEEL
1. AC ~ IN VOEDINGSKABEL
2. ANT
De antenne dient te worden uitgetrokken voor een goede ontvangst.
Seite wird geladen ...
Seite wird geladen ...
Seite wird geladen ...
Seite wird geladen ...
Seite wird geladen ...
Seite wird geladen ...
Seite wird geladen ...
Seite wird geladen ...
Seite wird geladen ...
Seite wird geladen ...
Seite wird geladen ...
Seite wird geladen ...
Seite wird geladen ...
Seite wird geladen ...
Seite wird geladen ...
Seite wird geladen ...
Seite wird geladen ...
Seite wird geladen ...
Seite wird geladen ...
Seite wird geladen ...
Seite wird geladen ...
Seite wird geladen ...
Seite wird geladen ...
Seite wird geladen ...
Seite wird geladen ...
Seite wird geladen ...
Seite wird geladen ...
Seite wird geladen ...
Seite wird geladen ...
Seite wird geladen ...
Seite wird geladen ...
Seite wird geladen ...
Seite wird geladen ...
Seite wird geladen ...
Seite wird geladen ...
Seite wird geladen ...
Seite wird geladen ...
Seite wird geladen ...
Seite wird geladen ...
Seite wird geladen ...
Seite wird geladen ...
Seite wird geladen ...
Seite wird geladen ...
Seite wird geladen ...
Seite wird geladen ...
Seite wird geladen ...
Seite wird geladen ...
Seite wird geladen ...
Seite wird geladen ...
Seite wird geladen ...
Seite wird geladen ...
Seite wird geladen ...
Seite wird geladen ...
Seite wird geladen ...
Seite wird geladen ...
Seite wird geladen ...
-
 1
1
-
 2
2
-
 3
3
-
 4
4
-
 5
5
-
 6
6
-
 7
7
-
 8
8
-
 9
9
-
 10
10
-
 11
11
-
 12
12
-
 13
13
-
 14
14
-
 15
15
-
 16
16
-
 17
17
-
 18
18
-
 19
19
-
 20
20
-
 21
21
-
 22
22
-
 23
23
-
 24
24
-
 25
25
-
 26
26
-
 27
27
-
 28
28
-
 29
29
-
 30
30
-
 31
31
-
 32
32
-
 33
33
-
 34
34
-
 35
35
-
 36
36
-
 37
37
-
 38
38
-
 39
39
-
 40
40
-
 41
41
-
 42
42
-
 43
43
-
 44
44
-
 45
45
-
 46
46
-
 47
47
-
 48
48
-
 49
49
-
 50
50
-
 51
51
-
 52
52
-
 53
53
-
 54
54
-
 55
55
-
 56
56
-
 57
57
-
 58
58
-
 59
59
-
 60
60
-
 61
61
-
 62
62
-
 63
63
-
 64
64
-
 65
65
-
 66
66
-
 67
67
-
 68
68
-
 69
69
-
 70
70
-
 71
71
-
 72
72
-
 73
73
-
 74
74
-
 75
75
-
 76
76


in anderen Sprachen
- français: Lenco DAR-060 Manuel utilisateur
- español: Lenco DAR-060 Manual de usuario
- Nederlands: Lenco DAR-060 Handleiding
Verwandte Artikel
-
Lenco DAR-045BK Benutzerhandbuch
-
Lenco KCR-200WH Bedienungsanleitung
-
Lenco MC-150 Benutzerhandbuch
-
Lenco MC-150 Stereo Bedienungsanleitung
-
Lenco DAR-051 Benutzerhandbuch
-
-
Lenco DAR-070 Benutzerhandbuch
-
Lenco SCD-685 Benutzerhandbuch
-
-
Andere Dokumente
-
audizio Metz Micro HiFi System Bedienungsanleitung
-
Muse M-1190 BTC Benutzerhandbuch
-
audizio Metz Compact HiFi Stereo System Benutzerhandbuch
-
-
Sharp XL-B517D(BK) Bedienungsanleitung
-
-
MAC Audio MPS 501 Benutzerhandbuch
-
-
-