Intellinet 524025 Installationsanleitung
- Kategorie
- Netzwerkantennen
- Typ
- Installationsanleitung
Dieses Handbuch ist auch geeignet für

TRI-BAND CEILING MOUNT ANTENNA
INSTALLATION GUIDE
MODEL 524025
INT-524025-QIG-ML1-0810-01-0
FRANÇAIS
Antenne tri-bande pour montage au plafond
Pour la xation au plafond:
1 Placez un des quatre clips inclus à l’arrière de l’antenne d’une façon que le bout pointu se trouve dans la fente et le bout entaillé dépasse à la
bordure du panneau.
2 Fixez le clip avec une des quatre vis incluses d’une façon que la tête de la vis dépasse. Répétez ce processus avec les clips et vis restant, puis
mettez l’antenne sur des rails au plafond, des tôles ou d’autres fixations. NOTE: Pour la fixation supplémentaire, une suspension peut être
attachée à l’arrière de l’antenne.
Pour la xation au mur:
3 Marquez la position des deux trous de montage sur un mur ou d’autres surfaces horizontales, puis placez les vis incluses (et goujons, si
nécessaire), laissant un petit écart entre les têtes des vis et le mur. Alignez les deux trous de montage et placez l’antenne au mur.
4 Utilisez le câble inclus afin de connecter l’antenne au routeur ou point d’accès de votre réseau. NOTE: Évitez l’installation derrière une
armoire ou d’autre équipement.
Pour la feuille de données avec une liste de fonctions et spécifications complète, visitez www.intellinet-network.com.
ESPAÑOL
Antena para Montaje en Techo de Banda Triplicada
Para montaje en techo:
1 Coloque uno de los 4 clips incluidos en la parte posterior de la antena por lo que la punta se inserta en la ranura y el
extremo con las muescas crea un labio en el borde del panel.
2 Fije el clip con uno de los 4 tornilos incluidos. Repita con el resto de los clips y tornillos, a continuacion deslicelo sobre
los rieles del techo, chapa u otro soporte. NOTA: Para tener soporte adicional, puede usar un panel o soporte para
techo que puede ser conectado a la antena.
Para montaje en pared:
3 Sobre una pared o superficie horizontal, marcar la posición de los dos agujeros del panel posterior, fije los tornillos
incluidos (y anclas, si es necesario), dejando un pequeño espacio entre las cabezas de tornillos y la pared. Alinee los
agujeros de monataje con la cabeza de los tornillos y ajuste la antena.
4 Utilice el cable incluido para conectar la antena al router o access point. NOTA: Evite colocarla detras de gabinetes y
otro equipo.
Para ver una ficha tecnica con una lista completa de caracteristicas y especificaciones, visite www.intellinet-network.com.
POLSKI
Antena dookólna sutowa trzyzakresowa
Mocowanie sutowe:
1 Jeśli posiadasz na suficie szyny, do montażu anteny użyj dołączonych klipsów. Przyczep je z tyłu anteny, a następnie przykręć dołączonymi
śrubkami.
2 Antenę można również przymocować bezpośrednio do sufitu za pomocą śruby. Należy wcześniej wywiercić otwór na kołek rozporowy.
Mocowanie ścienne:
3 Na ścianie lub innej płaskiej powierzchni, należy zaznaczyć miejsca, a następnie wywiercić dwa otwory. Śruby należy wkręcić tak, aby ich
główki delikatnie odstawały od ściany. Na wystających główkach śrub należy zamontować antenę.
4 Użyj dołączonego kabla, aby podłączyć antenę do bezprzewodowego routera lub Access Pointa. UWAGA: Nie należy umiejscawiać sprzętu
za szafami rackowymi oraz innymi urządzeniami.
Aby uzyskać pełną specyfikację techniczną, zapoznaj się z kartą produktu dostępną na stronie www.intellinet-network.com.
ITALIANO
Antenna Tri-band per montaggio
a sotto
Per montaggio a sotto:
1 Posizionare sul retro dell’antenna una delle quattro
clip incluse cosicché la punta della clip trovi
collocazione nell’alloggiamento come indicato dalla
freccia rossa e che la parte dentellata crei un bordo adatto per permettere il supporto dell’antenna.
2 Assicurare la clip con una delle quattro viti incluse cosicché la testa della vite scompaia. Ripetere
l’operazione con le rimanenti clip e viti, quindi far scivolare l’antenna su delle staffe per l’attacco a
soffitto, su una sottile lastra di metallo o altro supporto. NOTA: Per un supporto aggiuntivo, un gancio
sul pannello a soffitto può essere agganciato al pannello posteriore dell’antenna.
Per montaggio a muro:
3 Su un muro o su un’altra superficie orizzontale, segnare la posizione dei due fori del pannello
posteriore di montaggio, quindi fissare le viti incluse (e anche i tasselli, se necessario), lasciando un
piccolo spazio tra le teste della vite e il muro. Allineare i due fori di fissaggio con le teste delle viti e
posizionare l’antenna.
4 Usare il cavo incluso per collegare l’antenna al router o al punto di accesso. NOTA: Evitare di
posizionare l’antenna dietro ad armadi o altre attrezzature.
Per prendere visione di una scheda tecnica con una lista completa delle caratteristiche e delle
specifiche, visitate il sito www.intellinet-network.com.
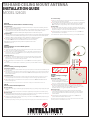
For overhead mounting:
1 Position one of the four included clips on the back of the antenna so the extended tip sits in the slot and
the notched end creates a lip at the edge of the panel.
2 Secure the clip with one of the four included machine screws so the screw head is recessed. Repeat using
the remaining clips and screws, then slide onto overhead ceiling rails, sheet metal or other support.
NOTE: For added support, a ceiling-panel hanger can be hooked to the back panel of the antenna.
For wall mounting:
3 On a wall or other horizontal surface, mark the position of the two back-panel mounting holes, then set
the included screws (and anchors, if needed), leaving a slight gap between the screw heads and the wall.
Align the two mounting holes on the screw heads and set the antenna in place.
4 Use the included cable to connect the antenna to your network’s router or access point. NOTE: Avoid
placement behind cabinets or other equipment.
To view a datasheet with a complete list of features and specifications, go to www.intellinet-network.com.
2
2
3
3
4
#
1
DEUTSCH
Omni-Direktionale Tri-Band-Antenne zur Deckenmontage
Zur Deckenmontage:
1 Platzieren Sie eine der vier beiliegenden Klammern so auf der Rückseite der Antenne, dass das spitze Ende in der Öffnung sitzt und das
halbrunde Ende am Rand der Platte hervorsteht.
2 Sichern Sie die Klammer mit einer der vier beiliegenden Schrauben, so dass der Schraubenkopf hervorsteht. Verfahren Sie ebenso mit den
übrigen Klammern und Schrauben, dann führen Sie die Antenne auf an der Decke montierte Schienen, Profilbleche oder andere
Halterungen. HINWEIS: Für zusätzliche Stützfunktion, kann ein Bügel an der Rückseite der Antenne befestigt werden.
Zur Wandmontage:
3 Markieren Sie die Positionen der beiden rückseitigen Montagelöcher an einer Wand oder einer anderen horizontalen Fläche, dann platzieren
Sie die beiliegenden Schrauben (und Dübel, falls notwendig) in den Löchern, wobei Sie eine kleine Fläche zwischen Schraubenkopf und
Wand freilassen. Richten Sie die beiden Montagelöcher auf die Schraubenköpfe aus und bringen Sie die Antenne an.
4 Verwenden Sie das beiliegende Kabel, um die Antenne an einen Router oder Access Point Ihres Netzwerks
anzuschließen. HINWEIS: Vermeiden Sie die Installation hinter Schränken oder anderer Ausstattung.
Das Datenblatt mit einer vollständigen Liste aller Eigenschaften und Spezifikationen finden Sie unter
www.intellinet-network.com.
Seite laden ...
-
 1
1
-
 2
2


Intellinet 524025 Installationsanleitung
- Kategorie
- Netzwerkantennen
- Typ
- Installationsanleitung
- Dieses Handbuch ist auch geeignet für
in anderen Sprachen
- English: Intellinet 524025 Installation guide
- español: Intellinet 524025 Guía de instalación
- italiano: Intellinet 524025 Guida d'installazione
Verwandte Papiere
-
Intellinet Network Router 524315 Benutzerhandbuch
-
Intellinet Wireless 150N Portable 3G Router Installationsanleitung
-
-
Intellinet 8-Port PoE Midspan Benutzerhandbuch
-
-
-
Intellinet 503280 Installationsanleitung
-
-
Intellinet 715591 Assembly Instructions