Parkside PMS 160 A1 Translation Of The Original Instructions
- Kategorie
- Elektrowerkzeuge
- Typ
- Translation Of The Original Instructions
Dieses Handbuch ist auch geeignet für

Detail Sander PMS 160 A1
Multischleifer
Originalbetriebsanleitung
Detail Sander
Translation of the original instructions
Πολυλειαντήρας
Μετάφραση των αυθεντικών οδηγιών λειτουργίας
IAN 317125_1904

Before reading, unfold the page containing the illustrations and familiarise yourself with all functions
of the device.
Πριν ξεκινήσετε την ανάγνωση, ανοίξτε τη σελίδα με τις εικόνες και εξοικειωθείτε με όλες τις λειτουργίες
της συσκευής.
Klappen Sie vor dem Lesen die Seite mit den Abbildungen aus und machen Sie sich anschließend mit
allen Funktionen des Gerätes vertraut.
GB / IE / NI/CY Translation of the original instructions Page 4
GR / CY Μετάφραση των αυθεντικών οδηγιών λειτουργίας Σελίδα 18
DE / AT / CH Originalbetriebsanleitung Seite 36

1
2
4
3 5
7 8 9
7
17
18
8
7 9
9
6
16
4
4
6
10
13
14
15
15
12
12
6
10
13
11
11
6

4
GB CYNIIE
Content
Introduction .................................4
Intended Use ................................4
General Description ......................5
Scope of delivery .............................. 5
Overview ......................................... 5
Technical Data ..............................5
Notes on Safety ...........................6
Symbols ........................................... 6
General safety instructions
for power tools ................................. 6
Additional safety instructions .............. 9
Residual risks .................................... 9
Assembling instructions ..............10
Attaching/removing sanding sheet .... 10
Mounting sanding fi nger .................. 10
Connecting/removing/emptying
the dust collection box ..................... 11
How to connect/remove
external dust extraction .................... 11
Operation ..................................11
Switching on/off ............................. 11
Practical tips ..............................12
Sanding ......................................... 12
Selection of sanding sheet ................ 12
Choosing the right sanding plate ...... 12
Cleaning/Maintenance ...............13
Cleaning ........................................ 13
Cleaning/replacing the fi lter
insert of the dust collection box ........ 13
Storage ......................................13
Waste Disposal/
Environmental Protection ...........13
Spare Parts/Accessories ............. 14
Trouble Shooting ........................15
Guarantee .................................16
Repair Service ............................17
Service-Center ............................17
Importer .................................... 17
Introduction
Congratulations on the purchase of your
new device. With it, you have chosen a
high quality product. During production,
this equipment has been checked for qual-
ity and subjected to a fi nal inspection. The
functionality of your equipment is therefore
guaranteed.
The operating instructions constitute
part of this product. They contain
important information on safety, use
and disposal.
Before using the product, familiarise
yourself with all of the operating
and safety instructions. Use the
product only as described and for
the applications specifi ed. Keep this
manual safely and in the event that
the product is passed on, hand over
all documents to the third party.
Intended Use
This device is designed for dry sanding of
wood, metal, plastic, fi llers and painted
surfaces.
The device is not suitable for commercial
use.
Any other use that is not explicitly ap-
proved in these instructions may result in
damage to the equipment and represent a
serious danger to the user.
The equipment is designed for use by
adults. Adolescents over the age of 16
may use the device only under supervision.
The manufacturer is not liable for damages
caused by unspecifi ed use or incorrect
operation.
Translation of the original EC
declaration of conformity ............ 55
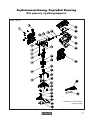
Exploded Drawing ...................... 57

5
GB CYNIIE
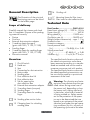
General Description
The illustration of the principal
functioning parts can be found
on the foldout page.
Scope of delivery
Carefully unpack the trimmer and check
that it is complete. Dispose of the packag-
ing material correctly.
• Device
• Dust box
• External dust extraction adaptor
• 3 sanding sheets (two-part)
(grain size P80 / P120 / P 180)
• Sanding fi nger
• 3 sanding sheets for sanding fi nger
(grain size P80 / P120 / P 180)
• Instruction manual
Overview
1 On/off switch
2 Hand rest
3 Vent
4 Connection for dust extraction
5 Mains cable
6 Sanding plate
7 Dust collection box lid
8 Dust collection box
9 Tab for opening the
dust collection box
10 External dust extraction adaptor
11 3 sanding sheets (two-part)
12 Sanding fi nger
13 3 sanding sheets for sanding
fi nger
14 Sanding plate suction holes
15 Clamping lever for unlocking
sanding plate
16 Guiding rail
17 Mounting frame for fi lter insert
18 Filter insert for dust collection box
Technical Data
Detail sander ......................... PMS 160 A1
Rated input voltage (U) ..... 230 V~, 50 Hz
Power input (P) ............................ 160 W
Idling speed (n
0
) ....................13000 min
-1
Oscillation rate (n) .................26000 min
-1
Weight (without accessories) ... appr. 1.1 kg
Protection class .................................
II
Protection category...........................IPX0
Sound pressure level
(L
pA
) ...................... 76 dB(A); K
pA
= 3 dB
Sound power level
(L
WA
) ....................87 dB(A); K
WA
= 3 dB
Vibration (a
h
) ............ 9 m/s
2
;K= 1.5 m/s
2
- The specifi ed total vibration value and
the stated noise emission value have
been measured according to a standar-
dised test method and can be used to
compare one power tool with another.
- The specifi ed total vibration value and
the stated specifi ed noise emission va-
lue can also be used for a provisional
assessment of the load.
Warning: The vibration and noise
emissions may deviate from the spe-
cifi ed values during actual use of
the power tool, depending on how
the power tool is being used and,
in particular, what kind of material
is being worked on. Safety measu-
res for the protection of the opera-
tor are to be determined that are
based on an estimate of the actual
vibration load under the real opera-
ting conditions (for this, all parts of
the operating cycle are to be taken

6
GB CYNIIE
into account, for example, times in
which the electric tool is turned off,
and those during which it is turned
on but running without a load).
Warning: The vibration emission
value may differ during actual use
of the power tool from the stated
value depending on the manner in
which the power tool is used.
Try to keep the exposure to vibra-
tions as low as possible. Examples
of measures to reduce vibration
exposure are the wearing of gloves
when using the tool and limiting the
working hours. For this purpose all
parts of the operating cycle have to
be considered (for example, times
when the electric tool is switched
off and times when it is switched on
but running without any load).
Notes on Safety
This section details the basic safety instruc-
tions for working with the appliance.
Symbols
Symbols on the Equipment
Warning!
Warning! Electric shock hazard.
Always unplug the device before
working on it.
Read through the instruction manual
carefully.
Wear ear and eye protection
Wear breathing protection
Wear safety gloves
Protection class II
(Double insulation)
Electrical appliances must not be
disposed of with the domestic waste.
Symbols in the manual
Warning symbols with in-
formation on damage and
injury prevention.
Hazard symbol with infor-
mation on the prevention of
personal injury caused by
electric shock.
Instruction symbols with information
on preventing damage.
Connect the machine to the power
supply.
Pull the mains plug.
Help symbols with information on
improving tool handling.
General safety instructions
for power tools
WARNING! Read all safety
notices, instructions, illustra-
tions and technical data that
have been provided with this
power tool. Omissions in the
compliance with safety directions
and instructions can cause electrical
shock, fi re and/or severe injuries.

7
GB CYNIIE
Retain all safety directions and in-
structions for future use.
The term “Power Tools” used in the safety
instructions refers to mains-operated power
tools (with power cord) and to battery-op-
erated power tools (without power cord).
1) WORK AREA SAFETY
a) Keep work area clean and well lit.
Cluttered or dark areas invite accidents.
b) Do not operate power tools in
explosive atmospheres, such as
in the presence of fl ammable
Iiquids, gases or dust. Power tools
create sparks which may ignite the
dust or fumes.
c) Keep children and bystanders
away while operating a power
tool. Distractions can cause you to
lose control.
2) ELECTRICAL SAFETY
a) Power tool plugs must match
the outlet. Never modify the
plug in any way. Do not use
any adapter plugs with earthed
(grounded) power tools. Unmodi-
fi ed plugs and matching outlets will
reduce risk of electric shock.
b) Avoid body contact with
earthed or grounded surfaces,
such as pipes, radiators, ranges
and refrigerators. There is an
increased risk of electric shock if your
body is earthed or grounded.
c) Do not expose power tools to
rain or wet conditions. Water
entering a power tool will increase the
risk of electric shock.
d) Do not abuse the cord. Never
use the cord for carrying, pulling
or unplugging the power tool.
Keep cord away from heat, oil,
sharp edges or moving parts.
Damaged or entangled cords increase
the risk of electric shock.
e) When operating a power tool
outdoors, use an extension cord
suitable for outdoor use. Use of a
cord suitable for outdoor use reduces
the risk of electric shock.
f) If operating a power tool in a
damp location is unavoidable,
use a residual current device
(RCD) protected supply. Use of an
RCD reduces the risk of electric shock.
3) PERSONAL SAFETY
a) Stay alert, watch what you are
doing and use common sense
when operating a power tool.
Do not use a power tool while
you are tired or under the infl u-
ence of drugs, alcohol or medi-
cation. A moment of inattention white
operating power tools may result in
serious personal injury.
b) Use personal protective equip-
ment. Always wear eye protec-
tion. Protective equipment such as
dust mask, non-slip safety shoes, hard
hat, or hearing protection used for
appropriate conditions will reduce per-
sonal injuries.
c) Prevent unintentional starting.
Ensure the switch is in the off-po-
sition before connecting to power
source and/or battery pack,
picking up or carrying the tool.
Carrying power tools with your fi nger on
the switch or energising power tools that
have the switch on invites accidents.
d) Remove any adjusting key or
wrench before turning the pow-
er tool on. A wrench or a key left at-

8
GB CYNIIE
tached to a rotating part of the power
tool may result in personal injury.
e) Do not overreach. Keep proper
footing and balance at all times.
This enables better control of the power
tool in unexpected situations.
f) Dress properly. Do not wear
loose clothing or jewellery. Keep
your hair, clothing and gloves
away from moving parts. Loose
clothes, jewellery or long hair can be
caught in moving parts.
g) If dust extraction and collection
devices can be installed, make
sure that these are connected
and used correctly. Use of dust
collection can reduce dust-related haz-
ards.
h) Do not allow yourself to be
lulled into a false sense of se-
curity and do not disregard the
safety rules for power tools,
even if you are familiar with the
power tool after using it many
times. Careless action can lead to
serious injuries within a fraction of a
second.
4) POWER TOOL USE AND CARE
a) Do not force the power tool.
Use the correct power tool for
your application. The correct pow-
er tool will do the job better and safer
at the rate for which it was designed.
b) Do not use the power tool if the
switch does not turn it on and
off. Any power tool that cannot be
controlled with the switch is dangerous
and must be repaired.
c) Remove the plug from the wall
socket and/or remove the re-
chargeable battery before you
change the device’s settings,
change accessory parts or put
away the power tool. Such pre-
ventive safety measures reduce the risk
of starting the power tool accidentaIly.
d) Store idle power tools out of
the reach of children and do not
allow persons unfamiliar with
the power tool or these instruc-
tions to operate the power tool.
Power tools are dangerous in the
hands of untrained users.
e) Look after the power tool and
application tool carefully. Check
for misalignment or binding
of moving parts, breakage
of parts and any other condi-
tion that may affect the power
tool’s operation. If damaged, have
the power tool repaired before use.
Many accidents are caused by poorly
maintained power tools.
f) Keep cutting tools sharp and
clean. Properly maintained cutting
tools with sharp cutting edges are less
Iikely to bind and are easier to control.
g) Use the power tool, accessories
and tool bits etc. in accordance
with these instructions, tak-
ing into account the working
conditions and the work to be
performed. Use of the power tool for
operations different from those intended
could result in a hazardous situation.
h) Keep handles and grip surfaces
dry, clean and free from oil and
grease. Slippery handles and grip
surfaces do not permit safe operation
and control over the power tool in un-
expected situations.
5) SERVICE
Have your power tool serviced
by a qualifi ed repair person us-

9
GB CYNIIE
ing only identical replacement
parts. This will ensure that the safety
of the power tool is maintained.
Additional safety instructions
WARNING! The device is not
suitable for grinding materi-
als containing lead and as-
bestos.
Warning! Sanding can result
in the formation of hazard-
ous dusts (e.g. metals or
some wood types) which
can present a hazard to the
operator or persons in the
vicinity. Make sure that the
workplace is well ventilated.
Always wear safety goggles,
safety gloves and respiratory
protection.
• Secure the workpiece. A work-
piece that is retained with clamping
appliances or a vice is held more se-
curely than with your hand.
• Only use the power tool for dry
sanding. Avoid using on damp
materials. Penetration of water into
the power tool increases the risk of
electric shock.
• Avoid overheating the sanded
object and the sander itself. Pos-
sible fi re hazard.
• The workpiece gets hot dur-
ing grinding. Do not touch the
machined area, allow it to cool
down. There is a risk of burning. Do
not use coolants or the like.
• Always empty the dust con-
tainer before work breaks.
Sanding dust in the dust sack, micro
fi lter, paper sack (or in the fi lter sack or
extraction system fi lter) can self-ignite
under unfavourable conditions such
as fl ying sparks caused by grinding
metals. Particular hazards are caused
if the sanding dust is mixed with paint,
polyurethane residues or other chemi-
cal substances, or if the sanded object
is hot after long working periods.
Please check the operating manual of
your vacuum cleaner whether it is suit-
able for the suction of grinding chips.
• Connect the appliance to a power
socket with a residual current circuit
breaker of rated residual current (RCD)
no more than 30 mA.
• If the supply cord of this power
tool is damaged, it must be re-
placed by a specially prepared
cord available through the ser-
vice organization.
Residual risks
Even if properly operating and handling
this electric tool, some residual risks will
remain. Due to its construction and build,
this electric tool may present the following
hazards:
a) Lung damage, if suitable respiratory
protection is not worn;
b) Cuts
c) Ear damage if working without ear
protection.
d) Eye damage if suitable eye protection
is not worn.
e) Damage to your health caused by
swinging your hands and arms when
operating the appliance for longer pe-
riods of time or if the unit is not held or
maintained properly.
Warning! During operation, this
electric tool generates an electro-

10
GB CYNIIE
magnetic fi eld which, under certain
circumstances, may impair the
functionality of active or passive
medical implants. To reduce the risk
of serious or lethal injuries, we rec-
ommend that persons with medical
implants consult their doctor and
the manufacturer of their medical
implant before operating the ma-
chine.
Assembling instructions
Pull the mains plug before any ad-
justments, maintenance or repair.
Danger of electric shock.
Attaching/removing sanding
sheet
Clean the sanding disc before you
attach a sanding sheet.
Use only appropriate sanding sheet
sizes. Sanding sheets, which ex-
tend beyond the sanding disc, can
cause injuries and can cause the
sanding sheets to block or tear.
The sanding plate (6) is fi tted with Velcro
for rapid attachment of the sanding sheet
(11).
The sanding sheets (11) comprise 2 parts
and can be individually replaced depend-
ing on wear.
To achieve optimal sanding results, only
use sanding sheets with the right grain
size.
Attaching sanding sheet:
1. Press both parts of the sanding
sheet (11) evenly onto the sand-
ing plate (6). Please ensure that
the sanding sheets lie fl ush and
the holes are placed directly
above the extraction openings
(14) of the sanding plate (6).
Removing sanding sheet:
2. Pull the sanding sheet (11) from
the sanding plate (6).
Only perform sanding once both
sanding sheets are mounted.
Mounting sanding fi nger
You can replace the pre-mounted sanding
plate (6) with the sanding fi nger (12) pro-
vided in the scope of delivery.
Unmounting sanding plate:
1. Open the clamping lever (15)
and turn it in the direction of the
sanding sheet until it reaches the
stop.
2. Remove the front section of the
sanding plate (6).
Inserting sanding fi nger:
3. Insert the sanding fi nger (12)
from above against the back sec-
tion of the sanding plate (6) and
push it fi rmly into place.
4. To lock, turn the clamping lever
(15) into its original position.
Attaching sanding sheet for
sanding fi nger:
5. Press the sanding plate for the
sanding fi nger (13) evenly onto
the sanding fi nger (12).
6. Place a sanding sheet onto the
back section of the sanding plate
(6). This will prevents soiling of
the Velcro.

11
GB CYNIIE
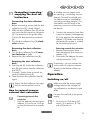
Connecting/removing/
emptying the dust col-
lection box
Connecting the dust collection
box:
1. Before connecting, ensure that the dust
collection box (8) is fi rmly closed.
2. Slide the dust collection box (8) all the
way onto the dust extraction connector
(4). Pay attention to the guide rollers
(16) on the dust extraction connector
(4).
3. Turn the dust collection box (8) clock-
wise to fasten.
Removing the dust collection
box:
4. Turn the dust collection box (8) coun-
ter-clockwise to undo.
5. Remove the dust collection box (8).
Emptying the dust collection
box:
6. Push the tab (9) on the dust collection
box (8) and remove the dust collection
box lid (7).
7 To empty, simply shake or knock out
the dust collection box (8).
8. Then close the dust collection box (8)
again.
Empty the dust collection box regu-
larly to ensure optimal suction.
How to connect/remove
external dust extraction
Connecting external dust
extraction
1. Push the external dust extraction
adaptor (10) as far as it will go
on the dust extraction connector
(4).
A suitable vacuum cleaner must
be used (e.g. a workshop vacuum
cleaner). Normal household vacu-
um cleaners are not intended for
vacuuming sanding material. This
information can be found in the
operating instructions of the exter-
nal device.
2. Connect the extraction hose from
a vacuum cleaner (sold separate-
ly) to the external dust extraction
adaptor (10).Make sure that the
dust extraction system is suitable
for the material to be cut.
Removing external dust extraction
1. Remove the extraction hose
from the external dust extraction
adaptor (10).
2. Disconnect the adapter for exter-
nal dust extraction (10).
If necessary, you can connect the
suction tube of a vacuum cleaner
directly to the device without an
adapter.
Operation
Switching on/off
Make sure that the power supply
voltage matches the voltage rat-
ing indicated on the device‘s type
plate.
Connect the machine to the power
supply.
1. To switch on, fl ick the on/off
switch (1) to position „I“. The
tool will power on.

12
GB CYNIIE
2. To switch off, fl ick the on/off
switch (1) to position „0“. The
tool will power off.
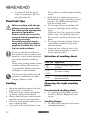
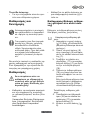
Practical tips
When working with the ap-
pliance, always wear suita-
ble clothing and appropriate
protective equipment.
Prior to each use it must be
ensured that the appliance is
working correctly.
Personal protective equip-
ment and a fully functional
appliance reduce the risk of
injuries and accidents.
Do not use the device without a
dust collection box or external dust
extraction. Use of a dust extraction
can reduce hazards caused by
dust.
When using sanding sheets without
ventilation holes, dust extraction
is not possible. Make sure that the
workplace is well ventilated.
Pull the mains plug before any ad-
justments, maintenance or repair.
Danger of electric shock.
Sanding
• Move the appliance against the work-
piece once it is switched on.
• After machining, lift the sanding disc
up before turning off the device.
• Always lead the mains cable towards
the back and away from the device.
• Clean the sanding plate before you at-
tach a sanding sheet.
• Only work with sanding sheets in per-
fect condition to achieve good sanding
results.
• Work with low and even pressure on
the hand rest (
2) and even forward
pressure. This protects the appliance
and the sanding sheet.
• Grind rough corners and edges with
the top or side edge of the sanding
sheet.
If the front tip of the triangular sanding
sheet is worn, the sanding sheet can
be removed, rotated and put back into
place.
• Do not use the same sanding sheet to
sand different materials (e.g. metal
and then wood).
• Empty the dust collection box or the
vacuum cleaner regularly in order to
ensure optimal suction.
Selection of sanding sheet
Grain size Application
P 60
P 80
for pre-sanding rough wood
surfaces
P 120
P 180
for plain sanding
P 240
for fi ne sanding of primed and
painted surfaces
Choosing the right sanding
plate
Pre-mounted sanding plate:
• For sanding/grinding large surfaces
as well as corners, edges and outer
curves.
Sanding fi nger:
• For machining small slots and narrow
intermediate spaces.

13
GB CYNIIE
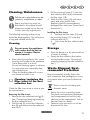
Cleaning/Maintenance
Pull the mains plug before any ad-
justments, maintenance or repair.
Repair and servicing work not
described in this manual should
always be carried by our Service
Centre. Use only original parts.
The following cleaning and servicing
should be done regularly. This will ensure
a long and reliable service life.
Cleaning
Do not spray the appliance
with water and do not im-
merse it in water. Electric
shock hazard!
• Keep clean the ventilation slots, motor
housing and handles of the appliance.
Use a damp cloth or a brush.
Do not use cleaning agents or solvents.
You may otherwise irreparably dam-
age the appliance.
• Clean the sanding sheet with a vacu-
um cleaner or knock it out.
Cleaning/replacing the
fi lter insert of the dust
collection box
Check the fi lter insert once or twice a year
for contamination.
Removing the fi lter insert:
1. Remove the dust collection box (
8)
(see “Connecting/removing/emptying
the dust collection box”).
2. Push the tab (9) on the dust collection
box (8) and remove the dust collection
box lid (7).
3. Pull the mounting frame (17) from the
dust collection box lid (6) and remove
the fi lter insert (18).
4. Wash the fi lter insert (18) with warm
water and soap and let it dry.
Replace a heavily contaminated or
damaged fi lter insert (see “Spare Parts/
Accessories”).
Installing the fi lter insert:
5. Replace the fi lter insert (18) and
the mounting frame (17) in the dust
collection box lid (7).
6. Then close the dust collection box
(
8).
Storage
• Store the device in a dry place well out
of reach of children.
• Empty the dust collection box before
storing the device (see “Connecting/
removing/emptying the dust collection
box”).
Waste Disposal/Envi-
ronmental Protection
Be environmentally friendly. Return the
tool, accessories and packaging to a recy-
cling centre when you have fi nished with
them.
Electric units do not belong with
domestic waste.
• Return the unit to a recycling centre.
The plastic and metal parts employed
can be separated out and thus recy-
cled use can be implemented. Ask our
Service-Center for details.
• Defective units returned to us will be
disposed of for free.

14
GB CYNIIE
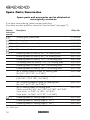
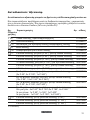
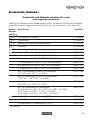
Spare Parts/Accessories
Spare parts and accessories can be obtained at
www.grizzly-service.eu
If you have issues ordering, please use the contact form.
If you have any other questions, contact the ”Service-Center” (see page 17).
Position Description Order No.
instruction
manual
6 Sanding plate, premounted 91104224
12 Sanding fi nger 91104227
10 External dust extraction adaptor 91104226
9 Dust box 91104228
18 Filter element for dust box 91104223
11 6 sanding sheets for wood (P 40*), for sanding plate 30211092
6 sanding sheets for wood (P 80*), for sanding plate 30211093
6 sanding sheets for wood (P 120*), for sanding plate 30211094
10 sanding sheets for wood (P 120*), for sanding plate 30211090
6 sanding sheets for wood (P 180*), for sanding plate 30211095
6 sanding sheets for wood (P 240*), for sanding plate 30211096
Set, 5 sanding sheets for wood, for sanding plate 30211088
(2x P 60*, 2x P 120*, 1x P 240*)
Set, 30 sanding sheets for wood, for sanding plate 30211089
(12x P 60*, 12x P 120*, 6x P 240*)
Set, 18 sanding sheets for wood, for sanding plate 30211091
(6x P 60*, 6x P 120*, 6x P 240*)
Set, 30 sanding sheets for sanding plate 30211097
24x for wood: 6x P 60*, 6x P 120*,6x P 180*, 6x P 240*
3x for stone: 1x P 80*, 1x 180*, 1x P 400*
3x for paint: 1x P 60*, 1x P 120*, 1x P 240*)
13 6 sanding sheets for sanding fi nger (P 80*) 30211085
6 sanding sheets for sanding fi nger (P 120*) 30211086
6 sanding sheets for sanding fi nger (P 180*) 30211087
*P = Grain size

15
GB CYNIIE
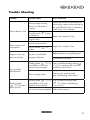
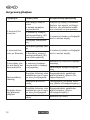
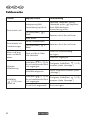
Trouble Shooting
Problem Possible Cause Error correction
Device doesn‘t start
Mains voltage missing
Main circuit breaker is
tripped
Check the socket, mains cable, line,
mains plug, repairs to be carried out
by qualifi ed electrician if necessary,
check main circuit breaker.
On/off switch (
1) may
be defective
Repair by Customer Care
Engine faulty
Device works with
interruptions
Internal loose contact
Repair by Customer Care
On/off switch (
1) is
broken
Engine is slowing
down and stops
Device is overloaded
through workpiece
Reduce pressure on grinding tool
Workpiece unsuitable
Poor grinding
performance
Sanding sheet (
11/13)
unsuitable for the work-
piece to be processed
Use a suitable sanding sheet (
11/13) or sanding disc (see “As-
sembling instructions”)
Worn sanding sheet
Insert a new sanding sheet
(see “Assembling instructions”)
Sanding sheet
(
11/13) wears
down quickly
Sanding sheet (
11/13)
unsuitable for the work-
piece to be processed
Use a suitable sanding sheet
(
11/13)(see “Assembling
instructions”)
Too much pressure applied Reduce the pressure

16
GB CYNIIE
Guarantee
Dear Customer,
This equipment is provided with a 3-year
guarantee from the date of purchase.
In case of defects, you have statutory rights
against the seller of the product. These
statutory rights are not restricted by our
guarantee presented below.
Terms of Guarantee
The term of the guarantee begins on the
date of purchase. Please retain the original
receipt. This document is required as proof
of purchase.
If a material or manufacturing defect
occurs within three years of the date of
purchase of this product, we will repair or
replace – at our choice – the product for
you free of charge. This guarantee requires
the defective equipment and proof of pur-
chase to be presented within the three-year
period with a brief written description of
what constitutes the defect and when it oc-
curred.
If the defect is covered by our guarantee,
you will receive either the repaired product
or a new product. No new guarantee pe-
riod begins on repair or replacement of the
product.
Guarantee Period and Statutory
Claims for Defects
The guarantee period is not extended by
the guarantee service. This also applies for
replaced or repaired parts. Any damages
and defects already present at the time of
purchase must be reported immediately af-
ter unpacking. Repairs arising after expiry
of the guarantee period are chargeable.
Guarantee Cover
The equipment has been carefully pro-
duced in accordance with strict quality
guidelines and conscientiously checked
prior to delivery.
The guarantee applies for all material and
manufacturing defects. This guarantee
does not extend to cover product parts that
are subject to normal wear and may there-
fore be considered as wearing parts (e.g.
tools, sanding sheets) or to cover damage
to breakable parts (e.g. switches).
This guarantee shall be invalid if the prod-
uct has been damaged, used incorrectly or
not maintained. Precise adherence to all of
the instructions specifi ed in the operating
manual is required for proper use of the
product. Intended uses and actions against
which the operating manual advises or
warns must be categorically avoided.
The product is designed only for private
and not commercial use. The guarantee
will be invalidated in case of misuse or
improper handling, use of force, or inter-
ventions not undertaken by our authorised
service branch.
Processing in Case of Guarantee
To ensure quick handling of you issue,
please follow the following directions:
• Please have the receipt and identifi ca-
tion number (IAN 317125_1904)
ready as proof of purchase for all en-
quiries.
• Please fi nd the item number on the rat-
ing plate.
• Should functional errors or other de-
fects occur, please initially contact the
service department specifi ed below by
telephone or by e-mail. You will then
receive further information on the pro-
cessing of your complaint.
• After consultation with our customer
service, a product recorded as defec-
tive can be sent postage paid to the
service address communicated to you,

17
GB CYNIIE
with the proof of purchase (receipt)
and specifi cation of what constitutes
the defect and when it occurred. In or-
der to avoid acceptance problems and
additional costs, please be sure to use
only the address communicated to you.
Ensure that the consignment is not sent
carriage forward or by bulky goods,
express or other special freight. Please
send the equipment inc. all accessories
supplied at the time of purchase and
ensure adequate, safe transport pack-
aging.
Repair Service
For a charge, repairs not covered by the
guarantee can be carried out by our ser-
vice branch, which will be happy to issue
a cost estimate for you. We can handle
only equipment that has been sent with ad-
equate packaging and postage.
Attention: Please send your equipment to
our service branch in clean condition and
with an indication of the defect.
Equipment sent carriage forward or by
bulky goods, express or other special
freight will not be accepted.
We will dispose of your defective devices
free of charge when you send them to us.
Service-Center
GB
Service Great Britain
Tel.: 800 404 7657
(£ 0.10/Min.)
E-Mail: [email protected]
IAN 317125_1904
NI
IE
Service Ireland
Service Northern Ireland
Tel.: 1890 930 034
(0,08 EUR/Min., (peak))
(0,06 EUR/Min., (off peak))
E-Mail: [email protected]
IAN 317125_1904
CY
Service Cyprus
Tel.: 8009 4409
E-Mail: [email protected]
IAN 317125_1904
Importer
Please note that the following address is
not a service address. Please initially con-
tact the service centre specifi ed above.
Grizzly Tools GmbH & Co. KG
Stockstädter Straße 20
DE-63762 Großostheim
Germany
www.grizzly-service.eu

18
GR CY
Περιεχόμενα
εισαγωγή ....................................... 18
Σκοπός χρήσης............................. 18
Γενική περιγραφή ......................... 19
Παραδοτέα υλικά .........................19
Επισκόπηση ................................ 19
Τεχνικά Χαρακτηριστικά .............. 19
Υποδείξεις ασφάλειας .................. 20
Σύμβολα και εικονοσύμβολα ........ 20
Περαιτέρω υποδείξεις ασφάλειας 23
Υπολειπόμενου κινδύνου ............24
Συναρμολόγηση ........................... 25
Τοποθέτηση/Απομάκρυνση
φύλλου λείανσης .......................... 25
Συναρμολόγηση γλωττίδας
λείανσης ...................................... 26
Σύνδεση/Απομάκρυνση/
Άδειασμα κουτιού σκόνης ............ 26
Σύνδεση/Αφαίρεση εξωτερικής
διάταξης αναρρόφησης σκόνης ... 27
Χρήση ............................................ 27
Ενεργοποίηση και
Απενεργοποίηση ......................... 27
Υποδείξεις εργασίας..................... 27
Λείανση ........................................ 28
Επιλογή του φύλλου λείανσης ..... 28
Επιλογή της πλάκας λείανσης ..... 28
Καθαρισμός και Συντήρηση ........ 29
Καθαρισμός ................................... 29
Καθαρισμός/Αλλαγή ενθέματος
φίλτρου στο κουτί σκόνης ........... 29
Αποθήκευση ................................. 30
Απόσυρση/προστασία του
περιβάλλοντος .............................. 30
Ανταλλακτικά / Αξεσουάρ ............ 31
Ανίχνευση βλαβών ....................... 32
Εγγύηση ........................................ 33
Σέρβις επισκευής .......................... 34
Service-Center .............................. 35
εισαγωγέας ................................... 35
εισαγωγή
Συγχαρητήρια για την αγορά της νέας
συσκευής σας. Προτιμήσατε να αγορά-
σετε ένα προϊόν ανώτερης ποιότητας.
Η ποιότητα αυτής της συσκευής ελέγ-
χθηκε κατά τη διάρκεια της παρα-
γωγής, αλλά και σε τελικό έλεγχο.
Με τον τρόπο αυτό εξασφαλίστηκε η
λειτουργικότητα της συσκευής σας.
Δεν αποκλείεται σε μεμονωμένες πε-
ριπτώσεις να βρίσκονται στη συσκευή
ή στους σωλήνες κατάλοιπα νερού ή
λιπαντικών. Το γεγονός αυτό δεν απο-
τελεί ελάττωμα ή βλάβη της συσκευής
και δεν είναι καθόλου ανησυχητικό.
Οι οδηγίες χρήσης αποτελούν
αναπόσπαστο τμήμα αυτού του
προϊόντος. Περιέχουν σημαντι-
κές υποδείξεις για την ασφά-
λεια, τη χρήση και διάθεση της
συσκευής. Πριν τη χρήση του
προϊόντος να εξοικειωθείτε με
όλες τις οδηγίες χειρισμούς και
τις υποδείξεις ασφαλείας. Να
χρησιμοποιείτε το προϊόν μόνο
όπως περιγράφεται και μόνο
για τον αναφερόμενο σκοπό.
Να φυλάξετε καλά τις οδηγίες
και να τις παραδώσετε σε τρί-
τους μαζί με το προϊόν.
Σκοπός χρήσης
Η συσκευή προβλέπεται για τη λείαν-
ση ξύλου, μετάλλου, πλαστικού, στό-
κου καθώς και βαμμένων επιφανειών.
Η συσκευή δεν προβλέπεται για όλα
τα άλλα είδη χρήσης (π.χ. λείανση μη
ακατάλληλα εργαλεία λείανσης, λείανση
με ψυκτικό υγρό, λείανση ή διαχωρισμό
υλικών επιβλαβών για την υγεία όπως
αμίαντος).
Μετάφραση της πρωτότυπης
Δήλωσης συμμόρφωσης CE ....... 56
Επί μέρoυς σχεδιαγράμματα ....... 57

19
GR CY
4 Σύνδεση της διάταξης αναρ-
ρόφησης σκόνης
5 Καλώδιο δικτύου
6 Πλάκα λείανσης
7 Καπάκι κουτιού σκόνης
8 Κουτί σκόνης
9 Προεξοχή για το άνοιγμα του
κουτιού σκόνης
10 Αντάπτορας για εξωτερική
διάταξη αναρρόφησης σκό-
νης
11 3 Φύλλα λείανσης (δύο τμη-
μάτων)
12 Γλωττίδα λείανσης
13 3 Φύλλα λείανσης για τη
γλωττίδα λείανσης
14 Ανοίγματα αναρρόφησης της
πλάκας λείανσης
15 Μοχλός σύσφιξης απασφάλι-
σης πλάκας λείανσης
16 Εγκοπές οδήγησης
17 Πλαίσιο συγκράτησης ενθέμα-
τος φίλτρου
18 Ένθεμα φίλτρου για το κουτί
σκόνης
Τεχνικά Χαρακτηριστικά
Πολυλειαντήρας ............ PMS 160 A1
Ονομαστική τάση εισόδου
(U) ............................ 230 V~, 50 Hz
Απόδοση (P) .............................160 W
Αριθμός στροφών
ρελαντί (n
0
) ...................... 13000 min
-1
Αριθμός ταλαντώσεων (n) 26000 min
-1
Βάρος (χωρίς αξεσουάρ) .... ca. 1,1 kg
Κατηγορία προστασίας ................. II
Είδoς προστασίας ....................... IPX0
Στάθμη ηχητικής πίεσης
(L
pA
) ................... 76 dB(A); K
pA
=3 dB
Η συσκευή προορίζεται για οικιακή
χρήση. Δεν είναι φτιαγμένη για συνε-
χή, επαγγελματική χρήση.
Η συσκευή απευθύνεται σε ενήλι-
κες. Ανήλικοι κάτω των 16 ετών δεν
επιτρέπεται να χρησιμοποιούν τη
συσκευή χωρίς επίβλεψη. Ο κατα-
σκευαστής δεν αναλαμβάνει καμία
ευθύνη για φθορές που οφείλονται σε
μη ορθή ή λάθος χρήση.
Γενική περιγραφή
Την απεικόνιση των ση-
μαντικότερων εξαρτημά-
των λειτουργίας θα βρείτε
στη σελίδα-φάκελλο.
Παραδοτέα υλικά
Βγάλτε τη συσκευή από τη συσκευα-
σία και ελέγξτε, αν είναι πλήρης. Δια-
θέστε τα υλικά συσκευασίας σύμφωνα
με τους κανονισμούς.
• Συσκευή
• Κουτί σκόνης
• Αντάπτορας για εξωτερική διάταξη
αναρρόφησης σκόνης
• 3 Φύλλα λείανσης (δύο τμημάτων)
(Κόκκωση P 80 / P 120 / P 180)
• Γλωττίδα λείανσης
• 3 Φύλλα λείανσης για τη γλωττίδα
λείανσης (Κόκκωση P 80 / P 120 /
P 180)
• Οδηγιών χρήσης
Επισκόπηση
1 Διακόπτης ενεργο-/απενερ-
γοποίησης
2 Στήριγμα χεριού
3 αεραγωγούς

20
GR CY
Σύμβολα και εικονοσύμβολα
Σήματα εικόνες στη συσκευή:
Προσοχή!
Κίνδυνος ηλεκτροπληξίας!
Βγάζετε το φις από την πρί-
ζα, - όταν δε χρησιμοποιείτε τη
συσκευή, όταν τη μεταφέρετε ή
την αφήνετε ανεπίβλεπτη
Διαβάστε προσεκτικά ολόκληρη
την οδηγία χειρισμού!
Φοράτε προστατευτικά ματιών
και ακοής
Να χρησιμοποιείτε ωτοασπίδες.
Φοράτε γάντια ασφαλή σε
κοπή.
Κατηγορία προστασίας II
(Διπλή μόνωση)
Μην πετάτε τις ηλεκτρικές συ-
σκευές στα σκουπίδια
Σύμβολα στις οδηγίες:
Σύμβολα κινδύνου με στοι-
χεία για την πρόληψη προ-
σωπικών και υλικών ζημιών.
Σύμβολα κινδύνων με πλη-
ροφορίες για την πρόληψη
βλαβών σε άτομα από ηλε-
κτροπληξία.
Σύμβολο υποχρέωσης με στοι-
χεία για την πρόληψη ζημιών.
Επιτρεπόμενη στάθμη θορύβου
(L
WA
) ..................87 dB(A); K
WA
=3 dB
Δόνηση (a
h
) .............9 m/s
2
; K=1,5 m/s
2
- Η αναγραφόμενη συνολική τιμή δονήσε-
ων και η αναγραφόμενη τιμή εκπομπής
θορύβου μετρήθηκαν σύμφωνα με μια
τυποποιημένη διαδικασία ελέγχου και
μπορούν να χρησιμοποιηθούν για τη σύ-
γκριση ενός ηλεκτρικού εργαλείου με ένα
άλλο.
- Η αναγραφόμενη συνολική τιμή δονήσε-
ων και η αναγραφόμενη τιμή εκπομπής
θορύβου μπορούν να χρησιμοποιηθούν
επίσης για προσωρινή εκτίμηση του φορ-
τίου.
Προειδοποίηση: Οι τιμές δο-
νήσεων και εκπομπής θορύβου
ενδέχεται να διαφέρουν από τις
καθορισμένες τιμές κατά τη χρήση
του ηλεκτρικού εργαλείου, ανάλογα
με τον τρόπο χρήσης του ηλεκτρι-
κού εργαλείου και ιδιαίτερα από το
είδος του τεμαχίου επεξεργασίας.
Υπάρχει η ανάγκη καθορισμού μέ-
τρων ασφάλειας για το χειριστή, τα
οποία βασίζονται σε έναν υπολογι-
σμό του φορτίου κραδασμών κατά
την πραγματική χρήση (πρέπει να
ληφθούν υπόψιν όλα τα στάδια
λειτουργίας, π.χ. η ώρα κατά την
οποία το ηλεκτρικό εργαλείο είναι
απενεργοποιημένο και η ώρα κατά
την οποία το ηλεκτρικό εργαλείο
είναι μεν ενεργοποιημένο, αλλά
λειτουργεί χωρίς επιβάρυνση).
Υποδείξεις ασφάλειας
Κατά τη χρήση της συσκευής πρέπει
να τηρούνται οι οδηγίες ασφαλείας.
Seite laden ...
Seite laden ...
Seite laden ...
Seite laden ...
Seite laden ...
Seite laden ...
Seite laden ...
Seite laden ...
Seite laden ...
Seite laden ...
Seite laden ...
Seite laden ...
Seite laden ...
Seite laden ...
Seite laden ...
Seite laden ...
Seite laden ...
Seite laden ...
Seite laden ...
Seite laden ...
Seite laden ...
Seite laden ...
Seite laden ...
Seite laden ...
Seite laden ...
Seite laden ...
Seite laden ...
Seite laden ...
Seite laden ...
Seite laden ...
Seite laden ...
Seite laden ...
Seite laden ...
Seite laden ...
Seite laden ...
Seite laden ...
Seite laden ...
Seite laden ...
-
 1
1
-
 2
2
-
 3
3
-
 4
4
-
 5
5
-
 6
6
-
 7
7
-
 8
8
-
 9
9
-
 10
10
-
 11
11
-
 12
12
-
 13
13
-
 14
14
-
 15
15
-
 16
16
-
 17
17
-
 18
18
-
 19
19
-
 20
20
-
 21
21
-
 22
22
-
 23
23
-
 24
24
-
 25
25
-
 26
26
-
 27
27
-
 28
28
-
 29
29
-
 30
30
-
 31
31
-
 32
32
-
 33
33
-
 34
34
-
 35
35
-
 36
36
-
 37
37
-
 38
38
-
 39
39
-
 40
40
-
 41
41
-
 42
42
-
 43
43
-
 44
44
-
 45
45
-
 46
46
-
 47
47
-
 48
48
-
 49
49
-
 50
50
-
 51
51
-
 52
52
-
 53
53
-
 54
54
-
 55
55
-
 56
56
-
 57
57
-
 58
58


Parkside PMS 160 A1 Translation Of The Original Instructions
- Kategorie
- Elektrowerkzeuge
- Typ
- Translation Of The Original Instructions
- Dieses Handbuch ist auch geeignet für
in anderen Sprachen
- English: Parkside PMS 160 A1
Verwandte Papiere
-
Parkside PHS 160 C4 Translation Of The Original Instructions
-
Parkside PEXS 270 C3 Translation Of The Original Instructions
-
Parkside PMS 160 B2 Benutzerhandbuch
-
Parkside PEXS 270 A1 Benutzerhandbuch
-
Parkside PMFS 200 A1 Bedienungsanleitung
-
Parkside 345815 2001 Translation Of The Original Instructions
-
Parkside PPS 200 A1 Translation Of The Original Instructions
-
-
-
Parkside PSS 250 A1 Benutzerhandbuch
