
Reolink Argus 2/Argus Pro
Quick Start Guide
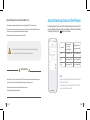
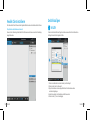
For more troubleshooting, please go to FAQs on our website:
https://reolink.com/faqs/
For other technical support, please contact us at
suppo[email protected]
Technical Support
QSG5-A
EN / DE
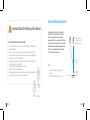
For Windows Client & Mac Client, please download the PC software:
https://reolink.com/software-and-manual/

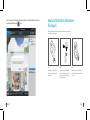
Welcome to Reolink
Easy Setup Within Minutes!
2 English 3English
Content
English
3
Deutsch
32

4 English 5English
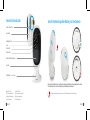
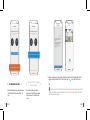
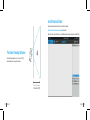
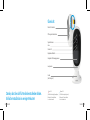
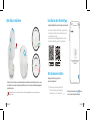
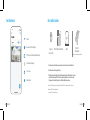
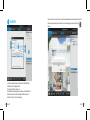
General Introduction
Micro SD Card Slot
Reset Hole
Daylight Sensor
Lens
Status LED
Built-in Mic
Built-in PIR Motion Sensor
Speaker
Wall Mount
(Only for Argus 2)
The LED in Blue
(WiFi connection succeeded)
Blinking: Standby status
On: Working status
The LED in Red
(WiFi connection failed)
Blinking: Standby status
On: Working status
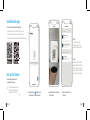
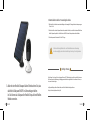
Install the Rechargeable Battery to the Camera
3OHDVHbSUHVVbWKHbEXWWRQbRQbWKHbWRSbRIbWKHbEDFNbFDVLQJbDQGbVOLGHWKHbEDFNbFDVLQJbGRZQZDUGbWRbFORVHbLWb
7KHbEXWWRQbDOVRbQHHGVWREHFORVHGbͤUPO\bIRUJRRGbZHDWKHUSURRIbSHUIRUPDQFH
)RUWKHZHDWKHUSURRISHUIRUPDQFHDOZD\VFRYHUWKH86%FKDUJLQJSRUWZLWKWKHUXEEHUSOXJ

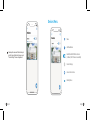
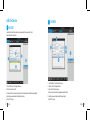
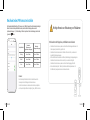
Install Reolink App
7KHUHDUHWZRZD\VWRJHWWKH5HROLQN$SS
Available on the
Get it on
Set up the Camera
3OHDVHIROORZWKHSURPSWWRQH
WRFRQͤJXUHWKHFDPHUD
Camera has been started up.
Please run Reolink App, add
the camera and set it up.
3OHDVHFOLFNWKH̸̹EXWWRQLQWKH
WRSULJKWFRUQHUWRDGGWKHFDPHUD
Note 1
Your family can click
"Access Camera" for live
view after the initial setup.
Note 2
If you have a Reolink Base,
please follow the Quick Start
Guide of the Base to add the
camera. The Reolink Base is
not included in the package.
6 English 7English
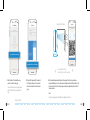
12:00
12:00
12:00
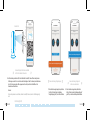
6FDQWKH45FRGHRQWKHEDFN
RIWKHFDPHUD
&OLFN̸&RQQHFWWR:L)L̹WR
FRQWLQXH
Search “Reolink” in App Store (for iOS), or Google
Play (for Android), download and install the app.
Scan the QR code below to download and install the app.

Distance (20cm)
8 English
9English
To help scanning, please click the QR code to display in full screen
12:0012:00
If you did not hear the voice prompt, please
press “I did not hear the voice prompt” for
help.
&OLFNWKHEXWWRQ̸,KDYHKHDUGWKHYRLFH
SURPSW̹WRHQWHUWKHQH[WSDJH
(QWHUWKH:L)LSDVVZRUGRIWKHVHOHFWHG
:L)LQHWZRUNDQGSUHVV̸,KDYHHQWHUHG
WKHFRUUHFWLQIRUPDWLRQ̹WRHQWHUWKHQH[W
SDJH
,KDYHKHDUGWKHYRLFHSURPSW
,KDYHHQWHUHGWKHFRUUHFWLQIRUPDWLRQ
About 20cm (8 inches)
6FDQ{VXFFHHGHG{&DPHUD{LV
FRQQHFWLQJ{WR{\RXU{URXWHU{3OHDVH{ZDLW
$45FRGHZLOOEHJHQHUDWHGRQWKHSKRQH3OHDVHSODFHWKH45FRGHRQ\RXUSKRQH
WRZDUGV5HROLQN$UJXVRU3URFDPHUD̵VOHQVDWDGLVWDQFHRIDERXWFPLQFKHVWROHW
WKHFDPHUDVFDQWKH45FRGH3OHDVHPDNHVXUHWKDW\RX̵YHULSSHGWKHSURWHFWLRQͤOPRI
WKHFDPHUD̵VOHQV
Note:
12:00

12:00 12:00
&RQQHFWLRQWRWKHURXWHUVXFFHHGHG
:HOFRPHWR5HROLQN
,I\RXKHDUWKHDERYHYRLFHSURPSWSOHDVHSUHVV
̸,KHDUG̴&RQQHFWLRQWRWKHURXWHUIDLOHG̵̹IRU
KHOS
,I\RXKHDUWKHDERYHYRLFHSURPSW
SOHDVHSUHVV̸,KHDUG̴&RQQHFWLRQWRWKH
URXWHUVXFFHHGHGWRͤQLVKWKHTXLFN
VHWXS
1DPH\RXUFDPHUDDQGFUHDWHDSDVVZRUGDWOHDVWFKDUDFWHUVWDS̸&UHDWH3DVVZRUG̹VOLGHWKH
SDJHWRUHDGWKHWLSVDQGWDS̸ͤQLVK̹WRVWDUWWKH/LYH9LHZ7DSWRJRWRWKH̸'HYLFHV̹PHQX
Note
“Name your camera” field refers to the display name of the camera rather than the login username.
“Playback” only displays when you’ve inserted a micro SD card into the camera. Make sure that the SD
card is recognized by the camera.
I heard “Connection to the router succeeded.”
I heard “Connection to the router failed! ”
English 11English
12:0012:00

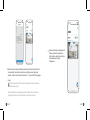
Battery Status
3OHDVHWDSWKHFDPHUDDQGIROORZWKHVWHSVWR
V\QFWKHWLPHDQGWKHQVWDUWOLYHYLHZRUJRWR
̸'HYLFH6HWWLQJV̹IRUPRUHFRQͤJXUDWLRQV
12 English 13English
12:00
12:00
$GG1HZ'HYLFHe
Menu
Enable/Disable PIR Motion Sensor
'HYLFH6HWWLQJV
$FFHVVWKH/LYH9LHZ
Devices Menu
,QGHIDXOWWKH3,5VHQVRULVHQDEOHG

14 English
15English
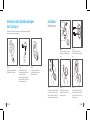
Charge the Battery
7KHUHLVDVWDWXV/('XQGHUWKHPLFUR86%SRUWRIWKHEDWWHU\LQGLFDWLQJWKHEDWWHU\FKDUJLQJVWDWXV
<RXFDQFKDUJHWKHEDWWHU\ZKHQLWVLQVWDOOHGWRWKHFDPHUD
Argus 2 or
Argus Pro
<RXFDQFKDUJHWKHEDWWHU\VHSDUDWHO\
<RXFDQFKDUJHWKHEDWWHU\ZLWK5HROLQNVRODUSDQHO3OHDVHQRWHWKDWWKHVRODU
SDQHOLV127LQFOXGHGLQWKHSDFNDJH<RXFDQEX\WKHVRODUSDQHORQ5HROLQNRIͤFLDO
RQOLQHVWRUH
Power Cable
Rechargeable
Battery
Reolink
Solar Panel
Green LED: Fully charged
Orange LED: Charging
(Not included in the package)
&KDUJHWKHEDWWHU\ZKHQLWVLQVWDOOHGWRWKHFDPHUD

16 English 17English
&KDUJHWKHEDWWHU\VHSDUDWHO\
&KDUJHWKHEDWWHU\ZLWKWKH5HROLQNVRODUSDQHO3OHDVHQRWH
WKDWWKHVRODUSDQHOLV127LQFOXGHGLQWKHSDFNDJH<RXFDQEX\
WKHVRODUSDQHORQ5HROLQNRIͤFLDORQOLQHVWRUH

3OHDVHFKDUJH\RXUUHFKDUJHDEOHEDWWHU\ZLWKDVWDQGDUGDQGKLJKTXDOLW\'&9RU9EDWWHU\FKDUJHU
18 English 19English
Important Safeguards on Rechargeable Battery Use
Important Note
!
!
!
,I\RXZDQWWRSRZHUWKHFDPHUDYLDWKHVRODUSDQHOSOHDVHQRWHWKDWWKHFDPHUDLV21/<FRPSDWLEOHZLWK5HROLQN
VRODUSDQHO<RXFDQQRWFKDUJHWKLVFDPHUDZLWKRWKHUVRODUSDQHOEUDQGV
3OHDVHFKDUJHWKHEDWWHU\LQWHPSHUDWXUHVEHWZHHQr&DQGr&
7KHGHIDXOWVHQVLWLYLW\RIWKH3,5VHQVRULVDW̸0LG̹DQGWKHGHWHFWLQJGLVWDQFHLVPHWHUVIW,I
\RXZDQWWRDGMXVWWKHVHQVLWLYLW\SOHDVHODXQFK\RXU5HROLQN$SSDQGWKHQFOLFN̸'HYLFH6HWWLQJV̹!
̸3,56HWWLQJV̹DQGFOLFNWKH̸VDYH̹EXWWRQWRVDYHWKHVHWWLQJV
6HQVLWLYLW\
Detecting Distance
)RUPRYLQJ
DQGOLYLQJWKLQJV
Detecting Distance
)RUPRYLQJYHKLFOHV
High
Mid
/RZ
8SWRPHWHUVIW
8SWRPHWHUVIW
8SWRPHWHUVIW 8SWRPHWHUVIW
8SWRPHWHUVIW
8SWRPHWHUVIW
12:00
Note:
Adjust the Detecting Distance of the PIR Sensor
3OHDVHUHDGWKHEDWWHU\ZDUQLQJVDQGVDIHW\GRFXPHQWSURYLGHGLQWKHSDFNDJHWR
XVH\RXU5HROLQN$UJXVRU$UJXV3URUHFKDUJHDEOHEDWWHU\VDIHO\
5HROLQN$UJXVRU$UJXV3URLVQRWGHVLJQHGIRUIXOOFDSDFLW\UXQQLQJRUDURXQGWKHFORFNOLYHVWUHDPLQJ,W̵V
GHVLJQHGWRUHFRUGPRWLRQHYHQWVDQGUHPRWHO\YLHZOLYHVWUHDPLQJRQO\ZKHQ\RXQHHGLW
3OHDVHOHDUQVRPHXVHIXOZD\VWRPD[LPL]HWKHEDWWHU\OLIHLQWKLVSRVW
KWWSVUHROLQNFRPIDTH[WHQGEDWWHU\OLIH
Higher sensitivity offers longer detecting distance, but it would
lead to more false alarms.
You are advised to set up the sensitivity level to “Low” or “Mid”
when you install the camera outdoors.

English 21English
7RUHGXFHIDOVHDODUPVSOHDVHQRWHWKDW
,PSRUWDQW1RWHVIRU5HGXFLQJ)DOVH$ODUPV
!
FYI:
Entrance
10°
Cover the Monitoring Area
Do not install the camera facing any objects with bright lights, including sunshine,
bright lamp lights, etc.
Do not place the camera too close to a place where there are frequently moving
vehicles. Based on our numerious tests, the recommended distance between the
camera and the vehicle is 15 meters (55ft).
Stay away from the outlets, including the air conditioner vents, humidifier outlets,
the heat transfer vents of projectors, etc.
Do not install the camera where there are strong winds.
Do not install the camera facing the mirror.
Keep the camera at least 1 meter away from any wireless devices, including Wi-Fi
routers and phones in order to avoid wireless interference.
:KHQLQVWDOOLQJWKHFDPHUDLW̵VQRWVXJJHVWHGWR
PDNHWKH3,5VHQVRUYHUWLFDOO\IDFHWKHPRYLQJ
REMHFW3OHDVHQRWHWKDWLIWKHPRYLQJREMHFW
DSSURDFKHVWKH3,5VHQVRUYHUWLFDOO\WKH3,5VHQVRU
PD\QRWGHWHFWWKHPRWLRQHYHQWV<RXDUHDGYLVHGWR
LQVWDOOWKHFDPHUDDQJXODUO\WKHDQJOHEHWZHHQWKH
3,5VHQVRUDQGWKHGHWHFWHGREMHFWLVODUJHUWKDQ
rIRUHIIHFWLYHPRWLRQGHWHFWLRQ
It’s not suggested to make
the PIR sensor vertically
face the moving object.
The path of the
moving object
The PIR sensor’s detecting distance: 20ft
(in default)
The PIR sensor’s detecting angle: 120° (H)

22 English 23English
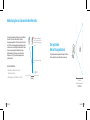
The Ideal Viewing Distance
Ideal Viewing Distance:
2-10 meters (7-33ft)
Install Reolink Client
KWWSVUHROLQNFRPVRIWZDUHDQGPDQXDODQGLQVWDOOLW
3OHDVHGRZQORDGWKHFOLHQWVRIWZDUHIURPRXURIͤFLDOZHEVLWH
Note:7KHFDPHUDPXVWEHͤUVWVHWXSRQ5HROLQN$SSEHIRUHEHLQJFRQQHFWHGWR5HROLQN&OLHQW
7KHLGHDOYLHZLQJGLVWDQFHLVPHWHUVIW
ZKLFKHQDEOHV\RXWRUHFRJQL]HDKXPDQ

24 English 25English
Add the Device
In LAN
1
/DXQFKWKH5HROLQN&OLHQWVRIWZDUHDQGPDQXDOO\DGGWKHFDPHra tRWKH&OLHQW
3OHDVHIROORZWKHVWHSVEHORZ
&OLFN̸Add DeYLFe̹RQWKHULJKWVLGHPHQX
&OLFN6FDQ'eYLFHLQL$1
'RXEOHFOLFNRQWKHFDPHra yRXZDQWtRDGG 7KHLQIRUPDWLRQZLOOEHͤOOHGLQDXtRPDWLFDOOy
,QSXWWKHSDVVZRrGFUHDWHGRQ5HROLQN$SSWRORJLQ
&OLFN̸2.̹tRORJLQ
In WAN
2
&OLFN̸Add DeYLFe̹RQWKHULJKWVLGHPHQX
&KRRVH̸8,'̹DVWKH5HJLVWHU0RGH
T\SHLQWKH8,'RIyRXUFDPHrD
&rHDWHDQDPHIRUWKHFDPHra displayHGRQ5HROLQN&OLHQW
,QSXWWKHSDVVZRUGFUHDWHGRQ5HROLQN$SSWRORJLQ
&OLFN̸2.̹tRORJLQ

26 English 27English
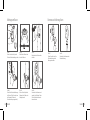
Please dress the camera with the skin for better weatherproof performance when
you install the camera outdoors.
Please dress the Reolink Argus 2
camera with the skin provided in
the package.
Step 1
The skin has an anti-falling safety
rope. Please fasten the other end
of the rope to the wall mount when
mounting it to the wall.
Step 2
Stick the camera on the wall mount
and twist the camera in any directions
you want.
Step 3
How to Install the Skin to the Camera
(for Argus 2)
1RWH7RVDYHSRZHUWKHFDPHUDZLOOORJRXWLIQRRSHUDWLRQLVFRQGXFWHGIRUDERXWRQHPLQXWH<RX
PXVWORJLQDJDLQE\FOLFNLQJWKHEXWWRQ

Press the button to release the
plate from the security mount.
Step 1 Step 2
Step 3
Step 4
Step 5
28 English 29English
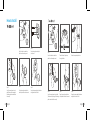
Step 1 Step 2 Step 3
Step 4 Step 5 Step 6
How to Install
Screw the camera, adjust its direction
and tighten the knob to fix it.
Screw the camera, adjust its direction
and tighten the knob to fix it.
Press the security mount button
until its plate clicks into the mount.
Thread the hook & loop strap
through the slots.
Press the button to release the
plate from the security mount.
Fasten the warp strap to the tree.
Latch the security mount on its plate
(Make sure the top edge of the backing
plate is inserted into the mount.)
Screw the security mount plate
into the wall.
Press the security mount button
until its plate clicks into the mount.
Latch the security mount on its
plate.(Make sure the top edge of
the backing plate is inserted into
the mount.)

English
31English
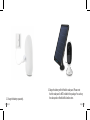
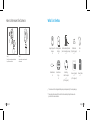
What’s in the BoxHow to Remove the Camera
Outdoor Security Mount
(with a hook & loop strap)
x1
Surveillance
x1
Mounting
Hole Template
x1
Screws (in pack)
x1 x1
The camera and the rechargeable battery are packed separately in the same package.
Skin
x1
*
*
Please dress the camera with the skin for better weatherproof performance when
you install the camera outdoors.
*
(x2 for Argus 2)
(x2 for Argus 2)
Argus 2/Argus Pro
x1
Wall Mount
x1
Rechargeable
Battery
x1
*
(Only for Argus 2)
Reset Needle
x1
Sign
Power Cable
Camera
Unscrew the camera from the
wall mount.
Press the security mount button
to pull the mount out.
Step 1 Step 2

Reolink Argu s 2/Argus pro
Kurzanleitung
roblembehebung nden Sie unter:
ren Sie uns bitte unter:
Support
DE -QG3_A
DE
Reolink Argus 2/Argus Pro
Kurzanleitung
32 Deutsch
33Deutsch

Danke, dass Sie sich für Reolink entschieden haben.
Einfache Installation in wenigen Minuten!
34 Deutsch 35Deutsch
Übersicht
Micro SD-Kartenslot
Öffnung zum Zurücksetzen
Tageslichtsensor
Linse
Status-LED
Eingebautes Mikrofon
Integrierter PIR-Bewegungssensor
Lautsprecher
Sockel
Blaues LED Rotes LED
(WLAN-Verbindung fehlgeschlagen)
Blinkend: Im Standby-Modus
An: Im Arbeitsmodus
(WLAN-Verbindung erfolgreich)
Blinkend: Im Standby-Modus
An: Im Arbeitsmodus
(Nur für Argus 2)

36 Deutsch
37Deutsch
Installation der Reolink App
Es gibt zwei Möglichkeiten, die Reolink App herunterzuladen:
Available on the Get it on
Suchen Sie im App Store (für iOS) oder in Google Play (für
Android) nach „Reolink“, führen Sie den Download durch
und installieren Sie die App.
Scannen Sie den unten abgebildeten QR-Code, um den
Download durchzuführen und die App zu installieren.
Die Kamera einrichten
Befolgen Sie bitte die Ansage, um die
.DPHUD]XNRQͤJXULHUHQ
Die Kamera wurde bereits gestartet. Bitte
öffnen Sie die Reolink App und fügen Sie
die Kamera hinzu, um sie einzurichten.
Klicken Sie bitte auf den Knopf„
“ oben
UHFKWVXPGLH.DPHUDKLQ]X]XI¾JHQ
12:00
Drücken Sie den Knopf oben an der Gehäuserückseite und schieben Sie das Gehäuse nach unten, um es
]XVFKOLH¡HQ)¾UHLQHJXWH/HLVWXQJEHLMHGHP:HWWHUPXVVGHU.QRSIZLHLQGHU$EELOGXQJGDUJHVWHOOW
NRPSOHWWHLQUDVWHQ
Bitte stellen Sie sicher, dass der USB-Ladeport für die Witterungsbeständigkeit stets mit dem Gummistopfen
DEJHGHFNWZLUG
Den Akku installieren

38 Deutsch
39Deutsch
Sollten Sie die Ansage nicht gehört haben,
klicken Sie auf „Ich habe die Ansage nicht
gehört“, um Hilfe zu erhalten.
Klicken Sie auf „Ich habe die Ansage gehört“,
XPIRUW]XIDKUHQ
Geben Sie das WLAN-Passwort des
gewählten WLAN-Netzwerks ein und
drücken Sie „Ich habe die richtigen Infos
HLQJHJHEHQ̸XPIRUW]XIDKUHQ
Ich habe die Ansage gehört
Ich habe die richtigen Infos eingegeben
Ich habe die Ansage nicht gehö rt
12:00
12:00
6FDQQHQ6LHGHQ45&RGHDXI
GHU5¾FNVHLWHGHU.DPHUD
.OLFNHQ6LHDXI̺:/$19HUELQGXQJ̸
XPIRUW]XIDKUHQ
Hinweis 1:
Ihre Familie kann nach der
Erstkonfiguration über „Auf
Kamera zugreifen“ zur
Live-Ansicht gelangen.
Wenn Sie eine Reolink Base
besitzen, befolgen Sie bitte
die Kurzanleitung zu
diesem Produkt, um die
Kamera hinzuzufügen. Bitte
beachten Sie, dass die
Reolink Base nicht im
Lieferumfang enthalten ist.
Hinweis 2:
12:00
Seite wird geladen ...
Seite wird geladen ...
Seite wird geladen ...
Seite wird geladen ...
Seite wird geladen ...
Seite wird geladen ...
Seite wird geladen ...
Seite wird geladen ...
Seite wird geladen ...
Seite wird geladen ...
Seite wird geladen ...
Seite wird geladen ...
-
 1
1
-
 2
2
-
 3
3
-
 4
4
-
 5
5
-
 6
6
-
 7
7
-
 8
8
-
 9
9
-
 10
10
-
 11
11
-
 12
12
-
 13
13
-
 14
14
-
 15
15
-
 16
16
-
 17
17
-
 18
18
-
 19
19
-
 20
20
-
 21
21
-
 22
22
-
 23
23
-
 24
24
-
 25
25
-
 26
26
-
 27
27
-
 28
28
-
 29
29
-
 30
30
-
 31
31
-
 32
32


REOLINK Argus 2 Benutzerhandbuch
- Typ
- Benutzerhandbuch
- Dieses Handbuch eignet sich auch für
in anderen Sprachen
- English: REOLINK Argus 2 User guide
Verwandte Artikel
-
REOLINK ARGUS2 Bedienungsanleitung
-
REOLINK Argus PT Benutzerhandbuch
-
-
-
REOLINK Outdoor Security Camera System Pan Tilt 3G/4G LTE Solar Battery Powered Camera, Starlight Night Vision, 2-Way Audio, PIR Motion Detection, No WiFi, No Wires, Reolink Go PT Benutzerhandbuch
-
-
REOLINK Duo 2 LTE Benutzerhandbuch
-
-
-
REOLINK Lumus Outdoor WiFi Security Camera Benutzerhandbuch
Andere Dokumente
-
Epson FX-890 Bedienungsanleitung
-
Sparky Group BAR 12E Benutzerhandbuch
-
merten 565426 Benutzerhandbuch
-
 ALGE-Timing ARGWIN Benutzerhandbuch
-
Schumacher SPI3 Automatic Battery Charger Bedienungsanleitung
-
Argus 163 Benutzerhandbuch
-
-
Panasonic NRBN31CX2 Bedienungsanleitung
-
Maverick SCOUT RC Benutzerhandbuch
-
Panasonic NR-BN31AX2-E & NRBN31AX2 Bedienungsanleitung
