
Montage- und Bedienungsanleitung
DE
OCEAN U6
Installation and operating instructions
EN

2 Urinalsteuerung SanTec OCEAN U6
DE
OCEAN U6
Allgemeine Hinweise
Gratulation zum Kauf Ihrer Urinalsteuerung SanTec OCEAN.
Damit Sie lange Jahre Freude mit dieser hochwertigen Armatur
haben, empfehlen wir Ihnen folgende Punkte bei der Reinigung
und Pflege zu beachten:
milde, seifenhaltige Reinigungsmittel verwenden
keine kratzenden, scheuernden oder säurehaltigen
Reinigungs- oder Desinfektionsmittel verwenden
nur mit weichem Schwamm oder Tuch behandeln
keine Reinigung mit Dampfstrahlgeräten
Diese Anleitung ist gültig für folgende Produkte:
SanTec OCEAN U6 230 V
weiß Art.Nr. 112 375
weiß/chrom Art.Nr. 112 368
schwarz Art.Nr. 112 351
schwarz/chrom Art.Nr. 114 577
Lieferumfang:
Glasfrontplatte mit Rahmen, Montagerahmen mit integrierter
Elektronik und Trafo, Magnetventil und Befestigungsmaterial.
Wichtige Installationshinweise:
Die Montage und Installation darf nur durch einen konzessi-
onierten Fachbetrieb, gemäß DIN 1988, ÖVE/ÖNORM E8001
sowie VDE 0100 Teil 701 erfolgen.
Die Netzzuleitung ist über einen 2-poligen Hauptschalter mit
mindestens 3 mm Kontaktöffnung zu führen und mit maximal
6 A abzusichern!
Bei der Planung und Errichtung von Sanitäranlagen sind die
entsprechenden örtlichen, nationalen und internationalen Nor-
men und Vorschriften zu beachten!
Es gelten die „Allgemeinen Installationsbedingungen“ unter
www.wimtec.com.

Urinalsteuerung SanTec OCEAN U6 3
DE
OCEAN U6
Technische Daten
Betriebsspannung: 230 V / 50 Hz
Leistungsaufnahme: ca. 3 VA
Magnetventil: Kartusche 6 V
Aktivbereich: 50 cm voreingestellt
30 - 70 cm einstellbar
Vorspülung: 1 s (einstellbar)
Hauptspülung: 1 - 10 s (5 s voreingestellt)
Fließdruck: 0,05 - 0,6 MPa (0,5 - 6 bar)
Durchfluss: 0,3 - 0,7 l/s nach DIN 3265 reduzierbar
Wasserzulauf: R 1/2“ IG
Wasserablauf: R 1/2“ AG
Abmessungen:
Frontplatte: 182,5 x 210,5 mm
Wandeinbaukasten: 135 x 165 x 77 mm
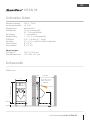
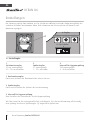
Einbaumaße
Maße in cm
51,5
OK-FFB
OK-RFB
10-19 min 100
Höhe Mitte Sensor
100 (im Element
ca. 100-120)
Zulauf
DN 15
65 (Erwachsene)
0-25
Ablauf
DN 50
115 (Laufen Caprino)
137 (Laufen Taro Nova)
ca. 50 aktiver Bereich

4 Urinalsteuerung SanTec OCEAN U6
DE
OCEAN U6
Montage
1 2 3
4
7
5
8
9
6
1110
ACHTUNG!
Folgende Schritte unbe-
dingt in beschriebener
Reihenfolge ausführen!
!

Urinalsteuerung SanTec OCEAN U6 5
DE
OCEAN U6
Montage
1. Vorspülung durchführen.
2. Vorabsperrung schließen. Schmutzfilter einsetzen.
3. Magnetventil mit Dichtungen einsetzen. Achtung! Flussrichtung bei MV beachten.
Netzspannung abschalten.
4. Magnetventil anstecken. Netztrafo einbauen und an Stromversorgung anstecken.
5. Elektronikplatte an Trafo anschließen.
6. Netzspannung wieder einschalten und Vorabsperrung öffnen.
7. Montagerahmen mit 4 Schrauben (M 4 x 40 mm) befestigen.
Dabei auf die Kabelverbindungen achten und die Kabel nicht quetschen.
Beim Festziehen der Schrauben darauf achten, dass sich der Montagerahmen
nicht verformt.
Montagerahmen exakt ausrichten. Beigelegtes Spezialfett an der Dichtung auftragen.
8. Gegebenenfalls Spülzeit und Reichweite einstellen (siehe Seite 6)
9. Glasplatte schräg aufsetzen und mit Druck nach hinten in die waagrechte Position drehen.
10. Glasplatte mit Sicherungsschraube unten links fixieren und unten rechts befestigen.
11. SanTec OCEAN U6 ist nun betriebsbereit.
Spülmengen-Übersicht
Fließdruck
Spülmenge in l
2,0 3,0 4,0
1 bar 5,5 s 7,0 s 10,0 s
2 bar 4,5 s 5,5 s 7,5 s
3 bar 3,0 s 4,5 s 6,0 s
4 bar 2,5 s 4,0 s 5,5 s
5 bar 2,5 s 4,0 s 5,0 s

6 Urinalsteuerung SanTec OCEAN U6
DE
OCEAN U6
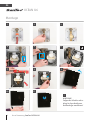
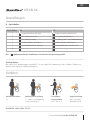
Einstellungen
1 2 3 4 5 6
ON
OFF
1 2 3 4 5 6
ON
OFF
A: Regler
1 2 3
B: Dip-Schalter
A - Einstellregler:
1.
Reichweitenregler
50 cm voreingestellt
30 - 70 cm einstellbar
2.
Spülzeitregler
5 s voreingestellt
1 - 10 s einstellbar
3.
Intervall für Hygienespülung
24 h voreingestellt
3 - 48 h einstellbar
1. Reichweitenregler:
Dient zum Justieren der Reichweite des Infrarot-Sensors.
2. Spülzeitregler:
Dient zum Einstellen der Spülzeit der Urinalsteuerung.
3. Intervall für Hygienespülung:
Zum Einstellen des Zeitintervalls für die Hygienespülung.
Wird das Urinal für die voreingestellte Zeit nicht benutzt, löst die Urinalsteuerung selbstständig
eine Spülung für die am Spülzeitregler (2) eingestellte Spülzeit aus.
Die Steuerung verfügt über mehrere, am Dip-Schalter einstellbare Funktionen. Regler ermöglichen das
stufenlose Einstellen verschiedener Werte. Nach Abnehmen der Glasfrontplatte sind diese Einstell-
elemente zugänglich:

Urinalsteuerung SanTec OCEAN U6 7
DE
OCEAN U6
Einstellungen
Dip-Schalter ON OFF
1
Hygienespülung aktiviert
Hygienespülung deaktiviert
2
Vorspülung aktiviert
Vorspülung deaktiviert
3
Vorspülung immer
Vorspülung nach 5 min Nichtbenützung
4
Stadion-Modus aktiviert
Stadion-Modus deaktiviert
5
Dauerspülfunktion aktiviert
Dauerspülfunktion
deaktiviert
6
--- ---
Mit (
) gekennzeichnete Funktionen
sind werksseitig voreingestellt.
B - Dip-Schalter:
Stadion-Modus:
Bei mehr als 3 Benützungen innerhalb 1 ½ min geht die Steuerung in den Stadion Modus: pro
Minute wird nur eine Spülung ausgelöst.
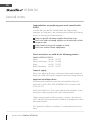
Ersatzteile siehe Seite 14/15
Funktion
Mindestverweilzeit:
4 s
Intelligente Vorspülung:
1 s, wenn Urinal länger als
5 min nicht benutzt
Einstellbare
Hauptspülung:
von 1 bis 10 s
Hygienespülung:
bei 24 Stunden
Nichtbenutzung

8 Urinal control SanTec OCEAN U6
EN
OCEAN U6
Congratulations on purchasing your urinal control SanTec
OCEAN.
In order that you will be satisfied with this high-valued
armature for long years, we recommend considering following
points for cleaning and maintenance:
Only use gentle cleaning supplies based on soap.
Don´t use acidic cleaning supplies or disinfectant, which
scrape or rub.
Only clean by using soft sponge or cloth.
Don´t use steam stream equipment.
These instructions are valid for the following products:
SanTec OCEAN U6 230 V
White Art.No. 112 375
White/chromium Art.No. 112 368
Black Art.No. 112 351
Black/chromium Art.No. 114 577
Scope of supply:
Glass front plate with frame, mounting frame with integrated
electronics and transformer, magnetic valve and fixing material.
Important installation hints:
Mounting and installation must be performed by licensed
craftsmen to DIN 1988, OVE/ONOERM E8001 as well as VDE
0100 part 701.
Make the feeder by a 2-pin main switch with minimum 3 mm
connection opening and protect with maximum 6A!
When planning and installing sanitary systems, the relevant
local, national and international standards and regulations must
be complied with!
The “general installation conditions” at www.wimtec.com are
valid.
General notes

Urinal control SanTec OCEAN U6 9
EN
OCEAN U6
Technical specifications:
Operating voltage: 230 V / 50 Hz
Power consumption: approx. 3 VA
Magnetic valve: cartridge 6 V
Active range: approx. 50 cm pre-adjusted
30 – 70 cm adjustable
Pre-flushing: 1 s (adjustable)
Main flushing: 1 - 10 s (5 s voreingestellt)
Flow pressure: 0,3 – 0,7 l/s reducible acc. to DIN 3265
Flow rate: 0,3 – 0,7 l/s reducible acc. to DIN 3265
Water inlet: 1/2” inside thread
Water outlet: 1/2” outside thread
Dimensions:
Front plate: 182,5 x 210,5 mm
In-wall box: 135 x 165 x 77 mm
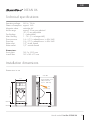
Installation dimensions
Dimensions in cm
51,5
OK-FFB
OK-RFB
10-19 min 100
Zulauf
DN 15
0-25
Ablauf
DN 50
115 (Laufen Caprino)
137 (Laufen Taro Nova)
Approx. 50
active range
height middle sensor
100 (in element
approx. 100-120)
65 (adults)

10 Urinal control SanTec OCEAN U6
EN
OCEAN U6
Installation
1 2 3
4
7
5
8
9
6
1110
ATTENTION!
Following steps must be
done in order as described
necessarily!
!

Urinal control SanTec OCEAN U6 11
EN
OCEAN U6
Flow pressure
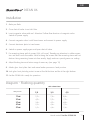
Installation
1. Make pre-flush
2. Close shut-off valve. Insert dirt filter.
3. Insert magnetic valve with seal. Attention! Follow flow direction of magnetic valve.
Switch off power supply.
4. Connect magnetic valve. Install transformer and connect to power supply.
5. Connect electronic plate to transformer.
6. Switch on power supply again and open shut-off valve.
7. Fix mounting frame with 4 screws (M 4 x 40 mm). Thereby pay attention to cable connec-
tion and don´t crush the cables. Mind at fixing the screws that the mounting frame will not
deform. Bring mounting frame into line exactly. Apply encloses special grease on sealing.
8. Adjust flushing time and active range if necessary (see page 12)
9. Attach glass front plate slant and swivel under pressure in level position.
10. Lock glass front plate by protect screw at the left bottom and fix at the right bottom.
11. SanTec OCEAN U6 is ready for operation.
Flush volume in liters
2,0 3,0 4,0
1 bar 5,5 s 7,0 s 10,0 s
2 bar 4,5 s 5,5 s 7,5 s
3 bar 3,0 s 4,5 s 6,0 s
4 bar 2,5 s 4,0 s 5,5 s
5 bar 2,5 s 4,0 s 5,0 s
Diagram - Flushing quantity

12 Urinal control SanTec OCEAN U6
EN
OCEAN U6
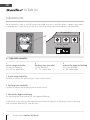
The armature has more, at the DIP-switch adjustable functions. Controllers allow a stepless adjustment
of different datas. After taking off the glass front plate these adjustment elements are accessible:
Adjustments
1 2 3 4 5 6
ON
OFF
1 2 3 4 5 6
ON
OFF
A: controler
1 2 3
B: Dip-switch
A – Adjustable controller:
1.
Active range controller
50 cm pre-adjusted
30 – 70 cm adjustable
2.
Flushing time controller
5 s pre-adjusted
10 – 10 s adjustable
3.
Interval for hygiene flushing
48 h pre-adjusted
3 – 48 h adjustable
1. Active range controller:
Conduce to justify the active range of the infrared sensor.
2. Flushing time controller
Conduce to adjust the flushing time of urinal control.
3. Interval for hygiene flushing
For adjusting the time interval for the hygiene flushing.
If the urinal is not used for the adjusted time the urinal releases a flushing for the on flushing
stop controller adjusted (2) time by itself.

Urinal control SanTec OCEAN U6 13
EN
OCEAN U6
Adjustments
Dip-switch ON OFF
1
Hygiene flushing activated Hygiene flushing deactivated
2
Pre-flushing activated Pre-flushing deactivated
3
Pre-flushing always Pre-flushing after 5 min non-use
4
Stadium mode activated Stadium mode deactivated
5
Continuous flow activated Continuous flow deactivated
6
--- ---
With (
) marked functions are pre-adjusted factory-made
B - DIP switch:
Stadium mode:
At more than 3 uses within 1 1/2 min the control switches into stadium mode: only one
flushing per minute will be released.
Function
Minimum stay time:
4 s
Intelligent pre-flushing:
1 s, if urinal was not used for
longer than 5 min
Adjustable main
flushing
from 1 – 10 s
Hygiene flushing:
at 24 h non-use

14 Urinal control SanTec OCEAN U6
OCEAN U6
DE/EN
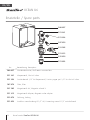
Ersatzteile / Spare parts
200 027
221 381
107 074
231 205
221 312
222 074
221 053
221 398
Wandeinbaukasten, Wall recess mounted box
Absperrventil, Shut-off valve
Sanitäroberteil 3/8” für Absperrventil, Sanitary upper part 3/8” for shut-off valve
Filter, Filter
Magnetventil 6 V, Magnetic valve 6 V
Magnetventil-Adapter, Magnetic valve adapter
Dichtung, Sealing
Anschluss verschraubung R 1/2“ AG, Connecting screw R 1/2” outside thread
200 027
221 381
221 398
107 074
231 205
221 312
222 074
221 053
Bezeichnung, Description
No.:

Urinal control SanTec OCEAN U6 15
OCEAN U6
DE/EN
Ersatzteile / Spare parts
1 2 3 4 5 6
ON
OFF
1 2 3 4 5 6
ON
OFF
Montagerahmen mit Elektronikmodul, Mounting frame with electronic module
Glas-Frontplatte weiß, Glass-front plate white
Glas-Frontplatte weiß/chrom, Glass-front plate white/chromium
Glas-Frontplatte schwarz, Glass-front plate black
Glas-Frontplatte schwarz/chrom, Glass-front plate black/chromium
Netzteil, Power supply
Netzstecker, Power plug
112 924
112 917
112 900
112 894
115 666
112 931
230 611
Bezeichnung, Description
No.:
112 924
112 931
230 611
112 917
112 900
112 894
115 666

WIMTEC Elektronische Steuerungs- u. Meßgeräte GmbH
p: A - 3325 Ferschnitz, Freidegg 50, AUSTRIA
t: +43 (0) 7473 5000 f: +43 (0) 7473 5000 - 500
m: verkauf@wimtec.com i: www.wimtec.com
Auflage: 31 03 2011 Art.Nr. 1001230
-
 1
1
-
 2
2
-
 3
3
-
 4
4
-
 5
5
-
 6
6
-
 7
7
-
 8
8
-
 9
9
-
 10
10
-
 11
11
-
 12
12
-
 13
13
-
 14
14
-
 15
15
-
 16
16


WimTec SanTec OCEAN U6 112 368 Installation And Operating Instructions Manual
- Typ
- Installation And Operating Instructions Manual
- Dieses Handbuch eignet sich auch für
in anderen Sprachen
- English: WimTec SanTec OCEAN U6 112 368
Verwandte Artikel
Andere Dokumente
-
Duravit WD5006 Bedienungsanleitung
-
-
GROHE 38 386 Installationsanleitung
-
-
Iqua S10 Installation & User Manual
-
 Schell Verona 02 233 03 99 Assembly And Service Instructions
-
Toto UWN926EBS Installationsanleitung
-
Oras Electra 6910 Data Terminal Benutzerhandbuch
-
Kemper KHS-HS2 689 03 001 Installation and Operating Instruction
-
