Lenco MC-020 Micro System Benutzerhandbuch
- Kategorie
- Wecker
- Typ
- Benutzerhandbuch
Dieses Handbuch eignet sich auch für

1
Model: MC-020
User manual Micro system with bluetooth, FM radio and USB
Gebruikshandleiding Microsysteem met Bluetooth, FM-radio en USB
Bedienungsanleitung Mikrosystem mit Bluetooth, UKW-Radio und USB
Guide d'utilisation de Micro système avec Bluetooth, radio FM et USB
Manual de usuario de sistema Micro con Bluetooth, radio FM y USB

2
Index
English ..................................................................................................................................................................................... 3
Nederlands ............................................................................................................................................................................ 10
Deutsch ................................................................................................................................................................................. 18
Français ................................................................................................................................................................................. 26
Español .................................................................................................................................................................................. 34
Version 3.0

3
English
MC-020
CAUTION:
Usage of controls or adjustments or performance of procedures other than those specified herein may result
in hazardous radiation exposure.
PRECAUTIONS BEFORE USE
KEEP THESE INSTRUCTIONS IN MIND:
1. Do not cover or block any ventilation openings. When placing the device on a shelf, leave
5 cm (2”) free space around the whole device.
2. Install in accordance with the supplied user manual.
3. Keep the device away from heat sources such as radiators, heaters, stoves, candles and other
heat-generating products or naked flame. The device can only be used in moderate climates. Extremely
cold or warm environments should be avoided. Working temperature between 0° and 35°C.
4. Avoid using the device near strong magnetic fields.
5. Electrostatic discharge can disturb normal usage of this device. If so, simply reset and restart the device
following the instruction manual. During file transmission, please handle with care and operate in a
static-free environment.
6. Warning! Never insert an object into the product through the vents or openings. High voltage flows
through the product and inserting an object can cause electric shock and/or short circuit internal parts.
For the same reason, do not spill water or liquid on the product.
7. Do not use in wet or moist areas such as bathrooms, steamy kitchens or near swimming pools.
8. The device shall not be exposed to dripping or splashing and make sure that no objects filled with
liquids, such as vases, are placed on or near the apparatus.
9. Do not use this device when condensation may occur. When the unit is used in a warm wet room with
damp, water droplets or condensation may occur inside the unit and the unit may not function properly;
let the unit stand in power OFF for 1 or 2 hours before turning on the power: the unit should be dry
before getting any power.
10. Although this device is manufactured with the utmost care and checked several times before leaving the
factory, it is still possible that problems may occur, as with all electrical appliances. If you notice smoke,
an excessive build-up of heat or any other unexpected phenomena, you should disconnect the plug
from the main power socket immediately.
11. This device must operate on a power source as specified on the specification label. If you are not sure of
the type of power supply used in your home, consult your dealer or local power company.
12. Keep away from animals. Some animals enjoy biting on power cords.
13. To clean the device, use a soft dry cloth. Do not use solvents or petrol based fluids.
To remove severe stains, you may use a damp cloth with dilute detergent.
14. The supplier is not responsible for damage or lost data caused by malfunction, misuse, modification of
the device or battery replacement.
15. Do not interrupt the connection when the device is formatting or transferring files. Otherwise, data may
be corrupted or lost.
16. If the unit has USB playback function, the USB memory stick should be plugged into the unit directly.
Don’t use an USB extension cable because it can cause interference resulting in failing of data.
17. The rating label has been marked on the bottom or back panel of the device.
18. This device is not intended for use by people (including children) with physical, sensory or mental
disabilities, or a lack of experience and knowledge, unless they’re under supervision or have received
instructions about the correct use of the device by the person who is responsible for their safety.
19. This product is intended for non professional use only and not for commercial or industrial use.
20. Make sure the unit is adjusted to a stable position. Damage caused by using this product in an unstable
position vibrations or shocks or by failure to follow any other warning or precaution contained within
this user manual will not be covered by warranty.
21. Never remove the casing of this device.
22. Never place this device on other electrical equipment.
23. Do not allow children access to plastic bags.
24. Only use attachments/accessories specified by the manufacturer.
25. Refer all servicing to qualified service personnel. Servicing is required when the device has been
damaged in any way, such as the power supply cord or the plug, when liquid has been spilled or objects
have fallen into the device, when the device has been exposed to rain or moisture, does not operate
normally, or has been dropped.
26. Long exposure to loud sounds from personal music players may lead to temporary or permanent
hearing loss.
27. If the product is delivered with power cable or AC power adaptor:
⚫ If any trouble occur, disconnect the AC power cord and refer servicing to qualified personnel.
⚫ Don’t step on or pinch the power adaptor. Be very careful, particularly near the plugs and the cable’s exit
point. Do not place heavy items on the power adaptor, which may damage it. Keep the entire device out
of children’s reach! When playing with the power cable, they can seriously injure themselves.

4
⚫ Unplug this device during lightning storms or when unused for a long period.
⚫ The socket outlet must be installed near the equipment and must be easily accessible.
⚫ Do not overload ac outlets or extension cords. Overloading can cause fire or electric shock.
⚫ Devices with class 1 construction should be connected to a main socket outlet with a protective
earthed connection.
⚫ Devices with class 2 construction do not require a earthed connection.
⚫ Always hold the plug when pulling it out of the main supply socket. Do not pull the power cord.
This can cause a short circuit.
⚫ Do not use a damaged power cord or plug or a loose outlet. Doing so may result in fire or electric
shock.
28. If the product contains or is delivered with a remote control containing coin/cell batteries:
Warning:
⚫ “Do not ingest battery, Chemical Burn Hazard” or equivalent working.
⚫ [The remote control supplied with] This product contains a coin/button cell battery. If the battery is
swallowed, it can cause severe internal burns in just
2 hours and can lead to death.
⚫ Keep new and used batteries away from children.
⚫ If the battery compartment does not close securely, stop using the product and keep it away from
children.
⚫ If you think batteries might have been swallowed or placed inside any part of the body, seek immediate
medical attention.
29. Caution about the use of Batteries:
⚫ Danger of explosion if battery is incorrectly replaced. Replace only with the same or equivalent type.
⚫ Battery cannot be subjected to high or low extreme temperatures, low air pressure at high altitude during
use, storage or transportation.
⚫ Replacement of a battery with an incorrect type that can result in an explosion or the leakage of
flammable liquid or gas.
⚫ Disposal of a battery into fire or a hot oven, or mechanically crushing or cutting of a battery, that can
result in an explosion.
⚫ Leaving a battery in an extremely high temperature surrounding environment that can result in an
explosion or that leakage of flammable liquid or gas.
⚫ A battery subjected to extremely low air pressure that may result in an explosion or the leakage of
flammable liquid or gas.
⚫ Attention should be drawn to the environmental aspects of battery disposal.
INSTALLATION
• Unpack all parts and remove protective material.
• Do not connect the unit to the mains before checking the mains voltage and before all other connections
have been made.

5
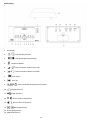
Description
1. LCD screen
2. Standby/Function button
3. Play/Pause/Stop button
4. Bluetooth mode
5. Volume-/Snooze button
6. Volume+/Alarm set button
7. Backward button
8. Forward button
9. Sleep/Time set button
10. Earphone jack
11. USB port
12. Speaker jack right side
13. Speaker jack left side
14. AC/DC adaptor jack
15. AUX IN jack
16. FM ANT Radio antenna

6
17. Batteries compartment
18. Stand auxiliary peripheral
Installing batteries
(Backup for the clock in case of a power outage)
- Open the battery compartment on the back of the appliance (17).
- Insert 2 LR3 1.5V batteries, respecting the indicated polarity.
- Close the battery compartment.
Installing the product
- Install the stand on the top of the sound station
- Connect the speakers to the sound station by plugging the sockets inside jacks (12) and (13)
- Connect the plug of the mains voltage adaptor into the socket (14). Plug the other end of the mains
adaptor into a mains socket.
- Only use the adaptor supplied. If another adaptor is used, first make sure that it has identical
specifications.
Standby/Function button
- Press and hold the button (2) to start up device and select a mode.
- To stop the device, press and hold the button (2).
Note: The last active mode before the stop of device is selected by default in starting up.
To set Volume
Press the buttons (5) and (6) to adjust the sound volume from 0 to 16.
TO SET THE CLOCK TIME
In STANDBY OFF mode, Press and hold the button (9), the digital will blink on the display, then
- Press (7) button to set the DESIRED HOUR,
- Press (8) button to set the DSIRED MINUTE. Then press TIME SET button to confirm.
TO SET ALARM FUNCTION
In Standby off mode
- Press and hold the button (6), icon “AL 1” and the TIME display will blink.
- Press (7) button to set the DESIRED HOUR,
- Press (8) button to set the DESIRED MINUTE.
- After setting the alarm time as you desired, to press ALARM SET button again. You can now select whether
the alarm should go on to Buzzer, Radio or USB
Wake with buzzer
Press the / button until “bb” icon is shown in the display, the buzzer sound will start at the set alarm
time.
Wake with Radio
Press the / button until the frequency is shown in the display. At the set time the alarm will go on at
the radio station you last listened to.
Wake with USB
Press the / button until the “USB” icon is shown in the display. This feature only works when you
have a USB disk inserted in the USB port (11). This USB will be played at the set alarm time
- Press the ALARM SET button again to confirm your settings for Alarm 1.

7
- The alarm icon (Alarm 2) appears and the TIME display is blinking.
- Repeat same step as alarm 1 in order to set Alarm 2.
To select which of the 2 alarms should be active, press the ALARM SET button repeatedly while the unit is in
standby mode (clock display). The display will show consecutively the Alarm 1 icon, the Alarm 2 icon, the
both Alarm icons. Press the ALARM SET button once again to deactivate the alarms (no alarm icon will be
displayed).
SNOOZE FUNCTION
If you want to snooze a few more minutes press the SNOOZE BUTTON will deactivate the sound for
approximately 9 minutes.
SHUT OFF ALARM:
When alarm goes off, press the STANDBY BUTTON to turn off alarm, the alarm will reset until the next day
SLEEP FUNCTION
- In standby on mode
- Press the button (2) to the desired source.
- Press and hold the SLEEP button (9). The “90” will appear on the display.
- Repeatedly press the SLEEP button (9) for desired sleep time between 90, 80, 70, 60, 50, 40, 30, 20 and 10
minutes.
- The unit will automatically switch off when the SLEEP time expires.
- To turn sleep mode off, press the SLEEP button (9) until “OFF” is displayed.
RADIO OPERATION
- Press the STANDBY button (2) until the frequency shown on the display
How to use the buttons for radio
- Press the backward (7) or forward (8) button to search for desired frequency.
Automatic Tuning
- Press & hold the backward (7) or forward (8) button until the display frequency starts run
- When a station of sufficient strength has been found Tuning will stop or you can stop the automatic tuning
by pressing backward (7) or forward (8) button.
- To turn off the radio, Press and hold the STANDBY (2) button.
UNIVERSAL SERIAL BUS PORT FUNCTION (USB) to listen
- Press the STANDBY (2) button until USB icon shown on the display
- Connect USB disk into the USB (11) port of the system.
- The USB disk will play automatically
- Press the PLAY/PAUSE again to stop playing temporarily Resume normal play by pressing the PLAY/PAUSE
button again.
- To stop playback, press and hold the STOP (3) button. The total number of tracks will be shown on the
display.
- To turn off the unit, Press and hold the STANDBY (2) button.
AUX INPUT JACK
- Press the STANDBY (2) button until AUX icon shown on the display
- Connect the AUX connect wire from the out jack of your Personal Player such as portable MP3 player to
the AUX input jack.
- Play Start from your Personal Player and adjust the volume

8
CONNECT THE BLUETOOTH
Make sure that your peripheral has A2DP profile for a perfect compatibility. To prevent interference, we
strongly recommend that you switch off WiFi on your peripheral during Bluetooth audio playback.
- Press the STANDBY (2) button until bL icon shown on the display
- Turn on the Bluetooth feature on your mobile compatible device. Search for Lenco MC-020. Pair and
connect to Lenco MC-020.
- You can now start playing your music
- Press the (7) or (8) button to choose the previous or next song
- When finished listening, press & hold the STANDBY (2) button to turn off the unit.
“This product has a bluetooth reception function, you can not transmit any bluetooth sound with it:
this means that you can receive wirelessly a bluetooth sound signal from an external source like a
smartphone.”
CLOCK TIME CHECK FUNCTION
If you want to check the clock time during the PLAY mode, press the TIME SET (9) button once.
MAINTENANCE AND CLEANING
- If unused for a long time: disconnect the appliance and remove the clock batteries.
- Wipe finger marks and dust with a soft clean and damp cloth. Do not use aggressive products or solvents
that may damage the appliance surface.
Caution: Never immerse the appliance in water or in any type of liquid.
Specifications
Description:
Bluetooth Sound Station
Speaker:
2 x 5W
Frequency Ranges:
87.5-108.0Mhz
LCD Display:
49 x 25 x 3mm
Power Requirements:
DC 5V/1.5A
Approx. Dimensions:
163 X 160 X 84mm (unit)
111 X 112 X 210mm (speaker)
USB:
USB2.0
This product operates at 2400 - 2483.5 MHz and is designated only to be used inside a normal household
environment. This product is suited for this purpose within all EU counties.
Information
Value and and precision
Manufacturers name or trade mark, commercial
registration and address
DongGuan Obelieve Electronic Co., Ltd
91441900050747698U
Huazhaoxin Industrial Park B-4/F, Golden Phoenix Industrial Zone,
FengGan Town, DongGuan, GuangDong Province,P.R.C
Model Identifier
OBL-0501500E, OBL-0501500B, OBL-0501500R
Input voltage
100-240VAC
Input AC frequency
50/60Hz
Output voltage
5.0Vdc
Output current
1.5A
Output Power
7.5W
Average active efficiency
77.67
Efficiency at low load (10%)
N/A
No load Power consumption
0.071

9
Guarantee
Lenco offers service and warranty in accordance to European law, which means that in case of
repairs (both during and after the warranty period) you should contact your local dealer.
Important note: It is not possible to send products that need repairs to Lenco directly.
Important note: If this unit is opened or accessed by a non-official service center in any way, the
warranty expires.
This device is not suitable for professional use. In case of professional use, all warranty obligations of
the manufacturer will be voided.
Disclaimer
Updates to Firmware and/or hardware components are made regularly. Therefore some of the instruction,
specifications and pictures in this documentation may differ slightly from your particular situation. All items
described in this guide for illustration purposes only and may not apply to particular situation. No legal right or
entitlements may be obtained from the description made in this manual.
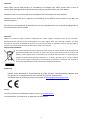
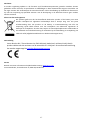
Disposal of the Old Device
This symbol indicates that the relevant electrical product or battery should not be disposed of as
general household waste in Europe. To ensure the correct waste treatment of the product and
battery, please dispose them in accordance to any applicable local laws of requirement for
disposal of electrical equipment or batteries. In so doing, you will help to conserve natural
resources and improve standards of environmental protection in treatment and disposal of
electrical waste (Waste Electrical and Electronic Equipment Directive).
CE Marking
Hereby, Lenco Benelux B.V., Thermiekstraat 1a, 6361 HB Nuth, The Netherlands, declares that
this product is in compliance with the essential EU directive requirements.
The declaration of conformity may be consulted via techdoc@commaxxgroup.com
Service
For more information and helpdesk support, please visit www.lenco.com
Lenco Benelux BV, Thermiekstraat 1a, 6361 HB, The Netherlands.

10
Nederlands
MC-020
LET OP:
Het gebruik van afstandsbedieningen of aanpassingen of de uitvoering van procedures die niet in dit
document zijn gespecificeerd, kan leiden tot gevaarlijke blootstelling aan straling.
VOORZORGSMAATREGELEN VOOR GEBRUIK
ONTHOUD DE VOLGENDE INSTRUCTIES:
1. Bedek of blokkeer de ventilatieopeningen niet. Wanneer u het apparaat op een schap plaatst, dient u 5
cm (2”) vrije ruimte rondom het gehele apparaat te behouden.
2. Installeer het product volgens de meegeleverde gebruikershandleiding.
3. Houd het apparaat uit de buurt van hittebronnen, zoals radiatoren, verwarmingen, kachels, kaarsen en
andere hittegenererende producten of open vuur. Het apparaat kan alleen worden gebruikt in een
gematigd klimaat. Extreem koude of warme omgevingen dienen te worden vermeden. Het
bedrijfstemperatuurbereik ligt tussen 0 °C en 35 °C.
4. Gebruik dit apparaat niet in de buurt van krachtige magnetische velden.
5. Elektrostatische ontlading kan normaal gebruik van dit apparaat verstoren. U hoeft het apparaat in dit
geval slechts te resetten en opnieuw op te starten volgens de gebruikershandleiding. Wees voorzichtig
tijdens bestandsoverdracht en gebruik het product in een omgeving zonder statische interferentie.
6. Waarschuwing! Steek nooit een voorwerp via de ventilatie- of andere openingen in het product. Er is
hoogspanning in het product aanwezig en als u er een object insteekt, kan dat een elektrische schok
veroorzaken en/of kortsluiting in de interne onderdelen. Mors om dezelfde reden geen water of
vloeistof op het product.
7. Gebruik het toestel niet in vochtige ruimtes, zoals badkamers, stomende keukens of in de buurt van
zwembaden.
8. Het apparaat mag niet worden blootgesteld aan druppels en spetters en zorg ervoor dat er geen met
vloeistof gevulde voorwerpen, zoals vazen, op of in de buurt van het apparaat worden geplaatst.
9. Gebruik dit apparaat niet wanneer condensatie kan optreden. Wanneer het apparaat in een warme,
natte ruimte wordt gebruikt, kunnen zich waterdruppels of condens vormen in het apparaat en kan het
apparaat niet goed functioneren. Laat het apparaat 1 of 2 uur uit staan voordat u het inschakelt: het
apparaat dient droog te zijn voordat deze stroom ontvangt.
10. Alhoewel dit apparaat met grote zorg gefabriceerd en verschillende keren geïnspecteerd is voordat het
de fabriek verlaat, is het nog steeds mogelijk dat er problemen optreden, zoals met alle elektrische
apparaten. Als u rook, een overmatige hitteontwikkeling of enig ander onverwacht verschijnsel opmerkt,
moet u onmiddellijk de stekker van het netsnoer uit het stopcontact halen.
11. Dit apparaat moet worden gebruikt met een voedingsbron zoals gespecificeerd op het specificatielabel.
Als u twijfelt over het type voeding dat gebruikt wordt in uw huis, raadpleeg dan uw dealer of plaatselijk
energiebedrijf.
12. Buiten bereik van dieren houden. Sommige dieren kauwen graag op voedingskabels.
13. Gebruik een zacht, droog doekje om het apparaat te reinigen. Gebruik geen oplosmiddelen of op
benzine gebaseerde vloeistoffen. U kunt een vochtig doekje met verdund schoonmaakmiddel gebruiken
om hardnekkige vlekken te verwijderen.
14. De leverancier is niet verantwoordelijk voor schade of verloren gegevens veroorzaakt door storing,
misbruik, modificatie van het apparaat of batterijvervanging.
15. Onderbreek nooit de verbinding wanneer het apparaat formatteert of bestanden overdraagt. De
gegevens kunnen anders corrupt of verloren raken.
16. Indien het apparaat een USB-afspeelfunctie heeft, moet de USB-geheugenstick rechtstreeks op het
apparaat worden aangesloten. Gebruik geen USB-verlengkabel, omdat die kan leiden tot storingen met
foutieve gegevens als gevolg.
17. Het classificatielabel bevindt zich op de onderkant of het achterpaneel van het apparaat.
18. Dit hulpmiddel is niet bedoeld voor gebruik door mensen (inclusief kinderen) met een fysieke,
zintuiglijke of mentale handicap, of een gebrek aan ervaring en kennis, tenzij zij toezicht of instructies
hebben gekregen over het juiste gebruik van het hulpmiddel door een persoon die verantwoordelijk is
voor hun veiligheid.
19. Dit product is alleen voor niet-professioneel gebruik bedoeld en niet voor commercieel of industrieel
gebruik.
20. Verzeker u ervan dat het apparaat in een stabiele positie staat opgesteld. Schade die wordt veroorzaakt
door het gebruik van dit product in een onstabiele positie, trillingen of schokken of het niet opvolgen
van de waarschuwingen of voorzorgsmaatregelen in deze gebruikershandleiding wordt niet gedekt door
de garantie.
21. Verwijder nooit de behuizing van dit apparaat.
22. Plaats dit apparaat nooit op andere elektrische apparatuur.
23. Geef kinderen geen gelegenheid in aanraking met plastic zakken te komen.
24. Gebruik uitsluitend uitbreidingen/accessoires gespecificeerd door de fabrikant.
25. Laat alle reparaties over aan gekwalificeerd onderhoudspersoneel. Onderhoud is nodig als het apparaat
is beschadigd, bijvoorbeeld als de voedingskabel of de stekker is beschadigd, als er vloeistof op het

11
apparaat is gemorst, als er voorwerpen in het apparaat zijn gevallen, als het apparaat is blootgesteld
aan regen of vocht, als het apparaat niet normaal werkt of als het is gevallen.
26. Langdurige blootstelling aan harde geluiden van persoonlijke muziekspelers kan leiden tot tijdelijk of
permanent gehoorverlies.
27. Als het product wordt geleverd met voedingskabel of wisselstroomvoedingsadapter:
⚫ Als er zich problemen voordoen, moet u de voedingskabel loskoppelen en het ter onderhoud aanbieden
aan gekwalificeerd personeel.
⚫ Nooit op de voedingsadapter stappen of deze indrukken. Wees zeer voorzichtig, vooral in het gebied rond
de stekkers en de kabelaansluitingen. Plaats geen zware voorwerpen op de voedingsadapter, om
beschadiging ervan te voorkomen. Houd het gehele apparaat buiten bereik van kinderen! Wanneer
kinderen met de voedingskabel spelen, kunnen zij ernstig letsel oplopen.
⚫ Haal de stekker uit het stopcontact tijdens onweer of wanneer u deze langere tijd niet gebruikt.
⚫ Het stopcontact moet in de buurt van de apparatuur zijn geïnstalleerd en eenvoudig te bereiken
zijn.
⚫ Laat AC-stopcontacten of verlengsnoeren nooit overbelast raken. Overbelasting kan brand of een
elektrische schok veroorzaken.
⚫ Apparaten met een Klasse 1 structuur dienen te worden aangesloten op een stopcontact met een
beschermende aardverbinding.
⚫ Apparaten met een Klasse 2 structuur vereisen geen aardverbinding.
⚫ Houd altijd de stekker vast wanneer u deze uit het stopcontact trekt. Trek nooit aan de
voedingskabel. Dit kan tot een kortsluiting leiden.
⚫ Gebruik nooit een beschadigde voedingskabel of stekker of een los stopcontact. Dit vormt namelijk
een risico op brand of elektrische schokken.
28. Indien het product knoopcelbatterijen bevat of wordt geleverd met een afstandsbediening die
knoopcelbatterijen bevat:
Waarschuwing:
⚫ “Batterij niet inslikken, chemisch brandgevaar” of gelijkwaardige werking.
⚫ De meegeleverde afstandsbediening bevat een knoopcelbatterij. Als de batterij wordt ingeslikt, kan deze
in slechts 2 uur ernstige interne brandwonden veroorzaken en tot de dood leiden.
⚫ Houd nieuwe en gebruikte batterijen buiten bereik van kinderen.
⚫ Als de batterijhouder niet goed kan worden gesloten, dient u het product niet meer te gebruiken en
buiten bereik van kinderen te houden.
⚫ Als u denkt dat batterijen zijn ingeslikt of binnenin een willekeurig lichaamsdeel terecht zijn gekomen,
dient u onmiddellijk medische hulp te zoeken.
29. Waarschuwing m.b.t. het gebruik van batterijen:
⚫ Als de batterij onjuist wordt geplaatst, bestaat er explosiegevaar. Vervang de batterij alleen door een
zelfde of vergelijkbare soort batterij.
⚫ Stel de batterij niet bloot aan extreem hoge of lage temperaturen of een lage luchtdruk op grote hoogte
tijdens gebruik, opslag of transport.
⚫ Vervanging van een batterij door een incorrect type kan leiden tot een ontploffing of de lekkage van
ontvlambare vloeistoffen of gas.
⚫ Het weggooien van een batterij in het vuur of een hete oven, of het mechanisch verpletteren of insnijden
van een batterij, kan leiden tot een explosie.
⚫ Het achterlaten van een batterij in een omgeving met extreem hoge temperaturen kan leiden tot een
explosie of het lekken van brandbare vloeistof of gas.
⚫ Een batterij die aan een extreem lage luchtdruk wordt blootgesteld, kan leiden tot een explosie of het
lekken van brandbare vloeistof of gas.
⚫ Aandacht voor het milieu is nodig bij het verwijderen van de batterijen.
INSTALLATIE
• Pak alle onderdelen uit en verwijder de beschermende materialen.
• Sluit het apparaat niet aan op het stopcontact, voordat u de netspanning hebt gecontroleerd en voordat
alle andere aansluitingen zijn gemaakt.

12
Omschrijving
1. LCD-scherm
2. Stand-by/Functietoets
3. Start/Pauze/Stoptoets
4. Bluetooth-modus
5. Volume-/Sluimertoets
6. Volume+/Alarminstellingstoets
7. Achteruittoets
8. Vooruittoets
9. Slaap/Tijdinstellingstoets
10. Hoofdtelefoonuitgang
11. USB-poort
12. Luidsprekeruitgang rechts
13. Luidsprekeruitgang links
14. AC/DC-adapteringang
15. AUX-ingang
16. FM ANT radioantenne

13
17. Batterijhouder
18. Aanvullende steun
Batterijen installeren
(Back-up voor de klok in geval van stroomuitval)
- Open de batterijhouder op de achterzijde van het apparaat (17).
- Installeer 2 type LR3 1,5V batterijen en let daarbij op de polariteit.
- Sluit de batterijhouder.
Het product installeren
- Installeer de steun boven op het geluidsstation
- Sluit de luidsprekers aan op de ingangen (12) en (13) van het geluidsstation
- Sluit de stekker van de netspanningadapter aan op de ingang (14). Steek het andere uiteinde van de
stroomadapter in het stopcontact.
- Gebruik uitsluitend de meegeleverde adapter. Als u een andere adapter wilt gebruiken, controleer dan
eerst of deze dezelfde specificaties heeft.
Stand-by/Functietoets
- Houd de toets (2) ingedrukt om het apparaat te starten en een modus te selecteren.
- Houd de toets (2) ingedrukt om het apparaat te stoppen.
Opmerking: De laatste actieve modus voordat het apparaat was uitgeschakeld wordt standaard geselecteerd
wanneer ingeschakeld.
Volumeregeling
Druk op de toetsen (5) en (6) om het geluidsvolume in te stellen tussen 0 en 16.
DE KLOKTIJD INSTELLEN
Houd in de modus STAND-BY UIT de toets (9) ingedrukt en de cijfers zullen op de display knipperen,
vervolgens
- Druk op de toets (7) om de GEWENSTE UREN in te stellen,
- Druk op de toets (8) om de GEWENSTE MINUTEN in te stellen. Druk vervolgens ter bevestiging op
de toets TIME SET.
DE ALARMFUNCTIE INSTELLEN
In de modus Stand-by Uit
- Houd de toets (6) ingedrukt; het icoontje “AL 1” en de tijdweergave zullen knipperen.
- Druk op de toets (7) om de GEWENSTE UREN in te stellen,
- Druk op de toets (8) om de GEWENSTE MINUTEN in te stellen.
- Druk nogmaals op de toets ALARM SET nadat de gewenste alarmtijd is ingesteld. U kunt nu selecteren of
het alarm moet inschakelen in de modus Zoemer, Radio of USB.
Gewekt worden door de zoemer
Druk op de toets / totdat het icoontje “bb” op de display verschijnt; de zoemer zal klinken op de
ingestelde alarmtijd.
Gewekt worden door de radio
Druk op de toets / totdat de frequentie op de display verschijnt. Het alarm zal op de ingestelde
alarmtijd het laatst beluisterde radiostation afspelen.

14
Gewekt worden door USB
Druk op de toets / totdat het icoontje “USB” op de display verschijnt. Deze functie werkt alleen
wanneer u een USB-disk in de USB-poort (11) hebt gestoken. Deze USB zal worden afgespeeld op de
ingestelde alarmtijd.
- Druk nogmaals op de toets ALARM SET om uw instellingen voor Alarm 1 te bevestigen.
- Het alarmicoontje (Alarm 2) verschijnt en de tijdweergave begint te knipperen.
- Herhaal dezelfde stappen als voor alarm 1 om Alarm 2 in te stellen.
Druk meerdere keren op de toets ALARM SET terwijl het apparaat op stand-by is geschakeld (klokweergave)
om te selecteren welk van de 2 alarmen actief moet zijn. De display zal achtereenvolgens het icoontje Alarm 1,
het icoontje Alarm 2 en beide Alarmicoontjes weergeven. Druk nogmaals op de toets ALARM SET om de
alarmen te deactiveren (geen alarmicoontje weergegeven).
SLUIMERFUNCTIE
Als u nog enkele minuten wilt blijven sluimeren, dan kunt u op de toets SNOOZE drukken om het geluid ca. 9
minuten te deactiveren.
ALARM UITSCHAKELEN:
Wanneer het alarm klinkt, dan kunt u op de toets STANDBY drukken om het alarm uit te schakelen; het alarm
zal opnieuw worden ingesteld voor de volgende dag
SLAAPFUNCTIE
- In de modus Stand-by Aan
- Druk op de toets (2) om de gewenste bron te selecteren.
- Houd de toets SLEEP (9) ingedrukt. “90” zal op de display verschijnen.
- Druk meerdere keren op de toets SLEEP (9) om de gewenste slaaptijd in te stellen op 90, 80, 70, 60, 50, 40,
30, 20 of 10 minuten.
- Het apparaat zal automatisch uitschakelen zodra de slaaptijd is verlopen.
- Druk op de toets SLEEP (9) totdat “OFF” (Uit) wordt weergegeven om de slaapmodus uit te schakelen.
RADIOBEDIENING
- Druk op de toets STANDBY (2) totdat de frequentie op de display verschijnt.
De toetsen voor de radio gebruiken
- Druk op de toets Achteruit (7) of Vooruit (8) om naar de gewenste frequentie te zoeken.
Automatisch afstemmen
- Houd de toets Achteruit (7) of Vooruit (8) ingedrukt totdat de frequentie op de display wordt
doorgelopen.
- Wanneer er een station is gevonden met voldoende signaalsterkte, dan zal de afstemming stoppen of u
kunt de automatische afstemming stoppen door op de toets Achteruit (7) of Vooruit (8) te drukken.
- Houd de toets STANDBY (2) ingedrukt om de radio uit te schakelen.
UNIVERSELE SERIËLE BUSPOORT (USB) om te luisteren
- Druk op de toets STANDBY (2) totdat het USB-icoontje op de display verschijnt
- Sluit een USB-disk aan op de USB-poort (11) van het systeem.
- De USB-disk zal automatisch worden afgespeeld
- Druk nogmaals op START/PAUZE om het afspelen tijdelijk te stoppen. Druk nog een keer op de toets
START/PAUZE om de normale afspeelmodus te hervatten.
- Houd de toets STOP (3) ingedrukt om het afspelen te stoppen. Het totale aantal tracks zal op de display
worden weergegeven.
- Houd de toets STANDBY (2) ingedrukt om het apparaat uit te schakelen.

15
AUX-INGANG
- Druk op de toets STANDBY (2) totdat het AUX-icoontje op de display verschijnt.
- Sluit de AUX-kabel uit de uitgang van uw persoonlijke speler, zoals een MP3-speler, aan op de AUX-ingang.
- Start het afspelen op uw persoonlijke speler en pas het volume aan
BLUETOOTH-VERBINDING
Controleer of uw externe apparaat het A2DP-profiel ondersteunt voor perfecte compatibiliteit. Om
interferentie te voorkomen, raden wij u sterk aan de WiFi-functie op uw externe apparaat uit te schakelen
tijdens Bluetooth-audioweergave.
- Druk op de toets STANDBY (2) totdat het “bL”-icoontje op de display verschijnt.
- Schakel de Bluetooth-functie in op uw mobiele compatibele apparaat. Zoek naar Lenco MC-020. Paar en
maak verbinding met Lenco MC-020.
- U kunt nu uw muziek beginnen af te spelen.
- Druk op de toets (7) of (8) om de vorige of volgende track te selecteren
- Wanneer u niet meer wilt luisteren, dan kunt u de toets STANDBY (2) ingedrukt houden om het apparaat
uit te schakelen.
“Dit product is voorzien van een Bluetooth-ontvangstfunctie, u kunt er geen Bluetooth-audio mee
sturen: dit betekent dat u van een externe bron zoals een smartphone draadloos een
Bluetooth-audiosignaal kunt ontvangen.”
CONTROLEFUNCTIE VOOR DE KLOKTIJD
Als u de kloktijd wilt controleren tijdens de afspeelmodus, druk dan eenmaal op de toets TIME SET (9).
ONDERHOUD EN REINIGING
- Wanneer voor langere tijd niet in gebruik: koppel het apparaat los en verwijder de klokbatterijen.
- Vingerafdrukken wegvegen en afstoffen met een zacht, schoon en vochtig doekje. Gebruik geen agressieve
producten of oplosmiddelen waardoor de oppervlakte van het apparaat kan worden beschadigd.
Let op: Dompel het apparaat nooit in water of andere vloeistoffen.

16
Specificaties
Omschrijving:
Bluetooth-geluidsstation
Luidspreker:
2 x 5W
Frequentiebereik:
87,5-108,0Mhz
LCD-Scherm:
49 x 25 x 3mm
Stroomvereisten:
DC 5V/1,5A
Benaderde afmetingen:
163 X 160 X 84mm (apparaat)
111 X 112 X 210mm (luidspreker)
USB:
USB 2.0
Dit product werkt op 2400 - 2483,5 MHz en is ontworpen om alleen te worden gebruikt in een normale
huishoudelijke omgeving. Dit product is geschikt voor dit doel binnen alle EU-landen.
Informatie
Waarde en precisie
Naam of handelsmerk van de fabrikant,
handelsregistratie en adres
DongGuan Obelieve Electronic Co., Ltd
91441900050747698U
Huazhaoxin Industrial Park B-4/F, Golden Phoenix Industrial Zone,
FengGan Town, DongGuan, GuangDong Province,P.R.C
Modelaanduiding
OBL-0501500E, OBL-0501500B, OBL-0501500R
Ingangsspanning
100-240VAC
Ingangsfrequentie AC
50/60Hz
Uitgangsspanning
5.0Vdc
Uitgangsstroom
1.5A
Uitgang
7.5W
Gemiddelde actieve efficiëntie
77.67
Efficiëntie bij lage belasting (10%)
N/A
Verbruik onbelast vermogen
0.071
Garantie
Lenco biedt service en garantie aan overeenkomstig met de Europese wetgeving. Dit houdt in dat u, in het
geval van reparaties (zowel tijdens als na de garantieperiode), uw lokale handelaar moet contacteren.
Belangrijke opmerking: Het is niet mogelijk om producten die gerepareerd moeten worden direct naar Lenco
te sturen.
Belangrijke opmerking: De garantie verloopt als een onofficieel servicecenter het apparaat op wat voor
manier dan ook heeft geopend, of er toegang toe heeft gekregen.
Het apparaat is niet geschikt voor professioneel gebruik. In het geval van professioneel gebruik worden alle
garantieverplichtingen van de fabrikant nietig verklaard.

17
Disclaimer
Er worden regelmatig updates in de firmware en/of hardwarecomponenten gemaakt. Daardoor kunnen
gedeelten van de instructie, de specificaties en afbeeldingen in deze documentatie enigszins verschillen van
uw eigen situatie. Alle onderwerpen die staan beschreven in deze handleiding zijn bedoeld als illustratie en
zijn niet van toepassing op specifieke situaties. Aan de beschrijving in dit document kunnen geen rechten
worden ontleend.
Afvoer van het oude apparaat
Dit symbool geeft aan dat het betreffende elektrische product of de batterij niet moet
worden verwijderd als algemeen huishoudelijk afval in Europa. Zorg voor een juiste
afvalverwerking door het product en de batterij in overeenstemming met alle van
toepassing zijnde lokale wetten voor het verwijderen van elektrische apparatuur of
batterijen te verwijderen. Als u dit doet, helpt u de natuurlijke hulpbronnen te behouden en
de standaard van milieubescherming te verbeteren bij de behandeling en verwijdering van
elektrisch afval (Afgedankte Elektrische en Elektronische Apparatuur).
CE-markering
Lenco Benelux B.V., Thermiekstraat 1a, 6361 HB Nuth, Nederland, verklaart hierbij dat dit
product voldoet aan de vereisten van de essentiële EU-richtlijnen. De conformiteitsverklaring
kan worden opgevraagd via techdoc@commaxxgroup.com
Service
Bezoek voor meer informatie en helpdeskondersteuning www.lenco.com
Lenco Benelux BV, Thermiekstraat 1a, 6361 HB, Nederland.

18
Deutsch
MC-020
ACHTUNG:
Eine andere als die hier beschriebene Bedienung, Einstellung oder Verwendung der Funktionen kann zu
gefährlicher Strahlenbelastung führen.
VORSICHTSMASSNAHMEN VOR DER BENUTZUNG
BEFOLGEN SIE IMMER FOLGENDE ANWEISUNGEN:
1. Blockieren oder bedecken Sie keine Lüftungsöffnungen. Wenn Sie das Gerät auf ein Regal stellen, lassen
Sie um das gesamte Gerät 5 cm (2”) freien Platz.
2. Stellen Sie das Gerät entsprechend den Anweisungen der mitgelieferten Bedienungsanleitung auf.
3. Halten Sie das Gerät von Hitzequellen wie Radiatoren, Heizern, Öfen, Kerzen oder anderen
hitzeerzeugenden Produkten oder offenen Flammen fern. Das Gerät darf nur bei gemäßigtem Klima
verwendet werden. Sehr kalte oder heiße Umgebungen sind zu vermeiden. Der
Betriebstemperaturbereich liegt zwischen 0 °C und 35 °C.
4. Meiden Sie bei der Nutzung des Produkts die Nähe starker Magnetfelder.
5. Elektrostatische Entladungen können die normale Verwendung von diesem Gerät stören. Sollte dies
geschehen, führen Sie einfach einen Reset aus und starten Sie dann das Gerät entsprechend den
Anweisungen dieser Bedienungsanleitung neu. Gehen Sie besonders bei Datenübertragungen mit dem
Gerät vorsichtig um und führen Sie diese nur in einer antielektrostatischen Umgebung aus.
6. Warnung! Niemals Gegenstände durch die Lüftungsschlitze oder Öffnungen in das Gerät stecken. In
diesem Gerät fließt Hochspannung und das Hineinstecken von Gegenständen kann zu elektrischem
Schock und/oder Kurzschluss interner elektrischer Bauteile führen. Aus dem gleichen Grund kein
Wasser oder Flüssigkeiten in das Gerät geben.
7. Benutzen Sie das Gerät nicht in nasser oder feuchter Umgebung wie Bad, Dampfküche oder in der Nähe
von Schwimmbecken.
8. Das Gerät darf weder Tropf- noch Spritzwasser ausgesetzt werden und es dürfen keine mit Flüssigkeit
gefüllten Behälter wie z.B. Vasen auf das Gerät oder in der Nähe des Gerätes gestellt werden.
9. Benutzen Sie das Gerät nicht bei Kondensationsgefahr. Wenn Sie das Gerät in einem warmen feuchten
Raum benutzen, dann können sich im Inneren des Geräts Wassertropfen oder Kondensationen bilden
und zu Fehlfunktionen des Geräts führen. Schalten Sie in diesem Fall das Gerät für 1 – 2 Stunden aus,
bevor Sie es erneut einschalten: Das Gerät sollte vollständig getrocknet sein, wenn Sie es wieder
einschalten.
10. Obwohl dieses Gerät unter größter Sorgfalt und vor Auslieferung mehrmals überprüft wurde, können
trotzdem wie bei jedem anderen elektrischen Gerät auch Probleme auftauchen. Trennen Sie das Gerät
im Falle einer Rauchentwicklung, starker Hitzeentwicklung oder jeden anderen unnatürlichen
Erscheinung sofort vom Netz.
11. Dieses Gerät ist durch eine Stromquelle wie auf dem Typenschild angegeben zu betreiben. Halten Sie
bei Unsicherheiten über die Art Ihrer Stromversorgung in Ihrer Wohnung Rücksprache mit Ihrem
Händler oder Ihrer Stromzuliefererfirma.
12. Halten Sie es von Haustieren fern. Einige Nagetiere lieben es, an Netzkabeln zu nagen.
13. Benutzen Sie für die Reinigung ein weiches und trockenes Tuch. Benutzen Sie niemals Lösungsmittel
oder Flüssigkeiten auf Ölbasis. Benutzen Sie zum Entfernen hartnäckiger Flecken ein feuchtes Tuch mit
mildem Reinigungsmittel.
14. Der Hersteller haftet nicht für Schäden oder Verluste durch Fehlfunktion, Zweckentfremdung oder
Modifikation des Geräts oder durch Wechseln der Batterien.
15. Unterbrechen Sie die Verbindung nicht während einer Formatierung oder einer Datenübertragung. Bei
Unterbrechung drohen Datenverlust und Datenbeschädigung.
16. Wenn das Gerät eine USB-Wiedergabefunktion besitzt, dann stecken Sie den USB-Stick direkt in das
Gerät. Verwenden Sie kein USB-Verlängerungskabel, weil die erhöhte Störungsanfälligkeit zu
Datenverlust führen könnte.
17. Das Typenschild befindet sich an der Unter- oder Rückseite des Geräts.
18. Dieses Gerät ist nicht zur Benutzung durch Personen (einschließlich Kinder) mit physischen,
sensorischen oder mentalen Beeinträchtigungen oder ohne ausreichender Erfahrung vorgesehen, es sei
denn, sie werden durch eine verantwortliche Person beaufsichtigt oder wurden in die ordnungsgemäße
Bedienung des Gerätes durch eine für ihre Sicherheit verantwortliche Person eingewiesen.
19. Dieses Produkt ist nur für den nicht-professionellen Gebrauch und nicht für gewerbliche oder
industrielle Zwecke bestimmt.
20. Stellen Sie sicher, dass das Gerät in einer stabilen Position aufgestellt ist. Schäden aufgrund Verwendung
dieses Produkts in einer instabilen Position, Vibrationen, Stöße oder Nichtbeachtung der anderen in
dieser Bedienungsanleitung enthaltenen Warnungen und Sicherheitshinweise werden nicht durch die
Garantie abgedeckt.
21. Entfernen Sie niemals das Gehäuse dieses Produkts.
22. Stellen Sie das Produkt niemals auf andere elektrische Geräte.
23. Halten Sie Kinder von den Plastiktüten fern.
24. Benutzen Sie nur vom Hersteller spezifizierte Erweiterungen/Zubehörteile.

19
25. Lassen Sie alle Eingriffe von qualifiziertem Servicepersonal ausführen. Eingriffe werden notwendig,
wenn das Gerät auf irgendeine Weise wie beispielsweise am Netzkabel oder am Netzstecker beschädigt
wurde, Flüssigkeit in das Gerät eingedrungen ist, Gegenstände in das Gerät gefallen sind, das Gerät
Regen oder Feuchtigkeit ausgesetzt war, es heruntergefallen ist oder nicht ordnungsgemäß funktioniert.
26. Langes Hören lauter Töne aus einem Musikgerät kann zum zeitweiligen oder permanenten Hörverlust
führen.
27. Wenn zum Lieferumfang des Produkts ein Netzkabel oder ein Netzadapter gehört:
⚫ Wenn irgendwelche Probleme auftreten, dann ziehen Sie den Netzstecker aus der Netzsteckdose und
setzen Sie sich anschließend mit einer qualifizierten Fachkraft in Verbindung.
⚫ Treten Sie nicht auf das Netzteil und klemmen Sie es auch nicht ein. Geben Sie besonders im näheren
Bereich des Steckers und der Stelle acht, wo das Kabel aus dem Gerät herausgeführt wird. Stellen Sie
keine schweren Gegenstände auf das Netzteil, weil es dadurch beschädigt werden könnte. Halten Sie das
gesamte Gerät außerhalb der Reichweite von Kindern! Durch Spielen mit dem Netzkabel können sie sich
ernsthafte Verletzungen zuziehen.
⚫ Trennen Sie das Gerät während eines Gewitters oder bei längerer Nichtbenutzung vom Netz.
⚫ Die Wandsteckdose muss sich in der Nähe des Geräts befinden und einfach zu erreichen sein.
⚫ Steckdosen und Verlängerungsleitungen nicht überlasten. Eine Überlastung kann zu Brandgefahr
bzw. Stromschlag führen.
⚫ Geräte der Schutzklasse 1 sind an eine Netzsteckdose mit Schutzleiter anzuschließen.
⚫ Geräte der Schutzklasse 2 benötigen keinen Schutzleiteranschluss.
⚫ Halten Sie den Netzstecker in der Hand, wenn Sie ihn aus der Netzsteckdose ziehen. Ziehen Sie ihn
nicht durch Zerren am Kabel heraus. Das kann zu einem Kurzschluss führen.
⚫ Verwenden Sie weder ein beschädigtes Netzkabel noch einen beschädigten Stecker oder eine
lockere Steckdose. Es besteht Brand- und Stromschlaggefahr.
28. Wenn das Produkt mit einer Fernbedienung mit Batterien/Knopfzellen geliefert wird oder das Produkt
eine derartige Fernbedienung umfasst:
Warnung:
⚫ „Die Batterie nicht einnehmen, er besteht Verätzungsgefahr”.
⚫ [Die mit diesem Produkt mitgelieferte Fernbedienung] enthält eine Knopfbatterie. Das Verschlucken der
Batterie kann innerhalb von nur 2 Stunden zu schwersten inneren Verbrennungen mit Todesfolge führen.
⚫ Halten Sie neue und gebrauchte Batterien von Kindern fern.
⚫ Verwenden Sie dieses Produkt nicht weiter und halten Sie es von Kindern fern, wenn das Batteriefach
nicht sicher schließt.
⚫ Suchen Sie umgehend ärztliche Hilfe auf, wenn Sie vermuten, dass Batterien verschluckt oder in
Körperöffnungen eingeführt wurden.
29. Warnhinweise bzgl. der Verwendung von Batterien:
⚫ Es besteht Explosionsgefahr, wenn die Batterien nicht korrekt eingelegt werden. Nur mit Batterien des
gleichen oder entsprechenden Typs ersetzen.
⚫ Die Batterie darf während der Benutzung, Aufbewahrung oder des Transports weder sehr hohen oder
sehr niedrigen Temperaturen noch niedrigem Luftdruck in großen Höhenlagen ausgesetzt werden.
⚫ Die Ersetzung der Batterie mit einem falschen Batterietyp kann zum Explodieren der Batterie oder dem
Auslaufen von entflammbarem Gas oder entflammbarer Flüssigkeit aus der Batterie führen.
⚫ Die Entsorgung der Batterie in Feuer oder einem heißen Ofen oder das mechanische Zerkleinern oder
Zerteilen der Batterie kann zu Explosionen führen.
⚫ Das Verbleiben der Batterie in einer Umgebung mit sehr hohen Temperaturen kann zum Explodieren der
Batterie oder dem Auslaufen von entflammbarem Gas oder entflammbarer Flüssigkeit führen.
⚫ Eine einem sehr niedrigen Luftdruck ausgesetzte Batterie kann explodieren oder es kann aus einer einem
sehr niedrigen Luftdruck ausgesetzten Batterie entflammbares Gas oder entflammbare Flüssigkeit
auslaufen.
⚫ Augenmerk ist auf den ökologischen Aspekt der Batterieentsorgung zu legen.
ANSCHLUSS
• Packen Sie alle Teile aus und entfernen Sie danach die Schutzmaterialien.
• Schließen Sie das Gerät nicht eher an das Netz an, bevor Sie die Netzspannung überprüft haben und alle
anderen notwendigen Verbindungen hergestellt sind.

20
Beschreibung
1. LCD-Display
2. Taste Standby/Funktion
3. Taste Wiedergabe/Pause/Stopp
4. Bluetooth-Modus
5. Taste Lautstärke–/Schlummermodus
6. Taste Lautstärke+/Wecker einstellen
7. Taste Zurück
8. Taste Vor
9. Taste Einschlafautomatik/Uhrzeit einstellen
10. Kopfhörerbuchse
11. USB-Anschluss
12. Buchse rechter Lautsprecher
13. Buchse linker Lautsprecher
14. Netzadapterbuchse
15. AUX-Eingangsbuchse
16. UKW-Radioantenne
Seite wird geladen ...
Seite wird geladen ...
Seite wird geladen ...
Seite wird geladen ...
Seite wird geladen ...
Seite wird geladen ...
Seite wird geladen ...
Seite wird geladen ...
Seite wird geladen ...
Seite wird geladen ...
Seite wird geladen ...
Seite wird geladen ...
Seite wird geladen ...
Seite wird geladen ...
Seite wird geladen ...
Seite wird geladen ...
Seite wird geladen ...
Seite wird geladen ...
Seite wird geladen ...
Seite wird geladen ...
Seite wird geladen ...
-
 1
1
-
 2
2
-
 3
3
-
 4
4
-
 5
5
-
 6
6
-
 7
7
-
 8
8
-
 9
9
-
 10
10
-
 11
11
-
 12
12
-
 13
13
-
 14
14
-
 15
15
-
 16
16
-
 17
17
-
 18
18
-
 19
19
-
 20
20
-
 21
21
-
 22
22
-
 23
23
-
 24
24
-
 25
25
-
 26
26
-
 27
27
-
 28
28
-
 29
29
-
 30
30
-
 31
31
-
 32
32
-
 33
33
-
 34
34
-
 35
35
-
 36
36
-
 37
37
-
 38
38
-
 39
39
-
 40
40
-
 41
41


Lenco MC-020 Micro System Benutzerhandbuch
- Kategorie
- Wecker
- Typ
- Benutzerhandbuch
- Dieses Handbuch eignet sich auch für
in anderen Sprachen
- English: Lenco MC-020 Micro System User manual
- français: Lenco MC-020 Micro System Manuel utilisateur
- español: Lenco MC-020 Micro System Manual de usuario
- Nederlands: Lenco MC-020 Micro System Handleiding
Verwandte Artikel
-
Lenco MC-020 Bedienungsanleitung
-
Lenco PIR-645BK Bedienungsanleitung
-
-
Lenco SCD-580SI Bedienungsanleitung
-
-
-
-
-
-