Lenco SCD-430RD Bedienungsanleitung
- Kategorie
- CD-Radios
- Typ
- Bedienungsanleitung

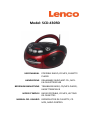
Model: SCD-430RD
USER MANUAL
PORTABLE RADIO, CD MP3, CASSETTE
PLAYER
HANDLEIDING
DRAAGBARE RADIO MET CD-, MP3-
EN CASSETTESPELER
BEDIENUNGSANLEITUNG
TRAGBARES RADIO, CD/MP3-PLAYER,
KASSETTENSPIELER
MODE D’EMPLOI
RADIO PORTABLE, CD MP3, LECTEUR
DE CASSETTES
MANUAL DEL USUARIO
REPRODUCTOR DE CASSETTE, CD
MP3, RADIO PORTÁTIL

Index:
English ...............................................................................................2
Nederlands ......................................................................................20
Deutsch ...........................................................................................40
Français ...........................................................................................61
Español ............................................................................................81

English
SCD-430RD
CAUTION:
Usage of controls or adjustments or performance of procedures other
than those specified herein may result in hazardous radiation
exposure.
PRECAUTIONS BEFORE USE
KEEP THESE INSTRUCTIONS IN MIND:
1. Do not cover or block any ventilation openings. When placing
the device on a shelf, leave 5 cm (2”) free space around the
whole device.
2. Install in accordance with the supplied user manual.
3. Keep the device away from heat sources such as radiators,
heaters, stoves, candles and other heat-generating products or
naked flame. The apparatus can only be used in moderate
climates. Extremely cold or warm environments should be
avoided. Working temperature between 0° and 35° C.
4. Avoid using the device near strong magnetic fields.
5. Electrostatic discharge can disturb normal usage of this device. If
so, simply reset and restart the device following the instruction
manual. During file transmission, please handle with care and
operate in a static-free environment.
6. Warning! Never insert an object into the product through the
vents or openings. High voltage flows through the product and
inserting an object can cause electric shock and/or short circuit
internal parts. For the same reason, do not spill water or liquid
on the product.
7. Do not use in wet or moist areas such as bathrooms, steamy
kitchens or near swimming pools.
8. The apparatus shall not be exposed to dripping or splashing and
make sure that no objects filled with liquids, such as vases, are
placed on or near the apparatus.

9. Do not use this device when condensation may occur. When the
unit is used in a warm wet room with damp, water droplets or
condensation may occur inside the unit and the unit could
maybe not work properly; let the unit stand in power OFF for 1
or 2 hours before turning on the power: the unit should be dry
before getting any power.
10. Although this device is manufactured with the utmost care and
checked several times before leaving the factory, it is still
possible that problems may occur, as with all electrical
appliances. If you notice smoke, an excessive build-up of heat or
any other unexpected phenomena, you should disconnect the
plug from the main power socket immediately.
11. This device must operate on a power source as specified on the
specification label. If you are not sure of the type of power
supply used in your home, consult your dealer or local power
company.
12. Keep away from rodents. Rodents enjoy biting on power cords.
13. To clean the device, use a soft dry cloth. Do not use solvents or
petrol based fluids. To remove severe stains, you may use a
damp cloth with dilute detergent.
14. The supplier is not responsible for damage or lost data caused by
malfunction, misuse, modification of the device or battery
replacement.
15. Do not interrupt the connection when the device is formatting or
transferring files. Otherwise, data may be corrupted or lost.
16. If the unit has USB playback function, the usb memory stick
should be plugged into the unit directly. Don’t use an usb
extension cable because it can cause interference resulting in
failing of data.
17. The rating label has been marked on the bottom or back panel of
the apparatus.

18. This device is not intended for use by people (including children)
with physical, sensory or mental disabilities, or a lack of
experience and knowledge, unless they’re under supervision or
have received instructions about the correct use of the device by
the person who is responsible for their safety.
19. This product is intended for non professional use only and not
for commercial or industrial use.
20. Make sure the unit is adjusted to a stable position. Damage
caused by using this product in an unstable position vibrations or
shocks or by failure to follow any other warning or precaution
contained within this user manual will not be covered by
warranty.
21. Never remove the casing of this apparatus.
22. Never place this apparatus on other electrical equipment.
23. Do not allow children access to plastic bags.
24. Only use attachments/accessories specified by the manufacturer.
25. Refer all servicing to qualified service personnel. Servicing is
required when the apparatus has been damaged in any way,
such as the power supply cord or the plug, when liquid has been
spilled or objects have fallen into the apparatus, when the
apparatus has been exposed to rain or moisture, does not
operate normally, or has been dropped.
26. Prolonged exposure to loud sounds from personal music players
may lead to temporary or permanent hearing loss.
27. If the product is delivered with power cable or AC power
adaptor:
⚫ If any trouble occur, disconnect the AC power card and refer
servicing to qualified personnel.
⚫ To completely disconnect the power input, the mains plug of
the apparatus shall be disconnected from the mains, as the
disconnect device is the mains plug of apparatus.

⚫ Don’t step on or pinch the power adaptor. Be very careful,
particularly near the plugs and the cable’s exit point. Do not
place heavy items on the power adaptor, which may damage
it. Keep the entire device out of children’s reach! When
playing with the power cable, they can seriously injure
themselves.
⚫ Unplug this device during lightning storms or when unused
for a long period.
⚫ The socket outlet must be installed near the equipment and
must be easily accessible.
⚫ Do not overload ac outlets or extension cords. Overloading
can cause fire or electric shock.
⚫ Devices with class 1 construction should be connected to a
main socket outlet with a protective earthed connection.
⚫ Devices with class 2 construction do not require a earthed
connection.
⚫ Always hold the plug when pulling it out of the main supply
socket. Do not pull the power cord. This can cause a short
circuit.
⚫ Do not use a damaged power cord or plug or a loose outlet.
Doing so may result in fire or electric shock.
28. If the product contains or is delivered with a remote control
containing coin/cell batteries:
Warning:
⚫ “Do not ingest battery, Chemical Burn Hazard” or equivalent
working.
⚫ [The remote control supplied with] This product contains a
coin/button cell battery is swallowed, it can cause severe
internal burns in just 2 hours and can lead to death.
⚫ Keep new and used batteries away from children.
⚫ If the battery compartment does not close securely, stop
using the product and keep it away from children.
⚫ If you think batteries might have been swallowed or placed
inside any part of the body, seek immediate medical
attention.

29. Caution about the use of Batteries:
⚫ Danger of explosion if battery is incorrectly replaced. Replace
only with the same or equivalent type.
⚫ Battery cannot be subjected to high or low extreme
temperatures, low air pressure at high altitude during use,
storage or transportation.
⚫ Replacement of a battery with an incorrect type that can
result in an explosion or the leakage of flammable liquid or
gas.
⚫ Disposal of a battery into fire or a hot oven, or mechanically
crushing or cutting of a battery, that can result in an
explosion.
⚫ Leaving a battery in an extremely high temperature
surrounding environment that can result in an explosion or
that leakage of flammable liquid or gas.
⚫ A battery subjected to extremely low air pressure that may
result in an explosion or the leakage of flammable liquid or
gas.
⚫ Attention should be drawn to the environmental aspects of
battery disposal.
INSTALLATION
• Unpack all parts and remove protective material.
• Do not connect the unit to the mains before checking the mains
voltage and before all other connections have been made.

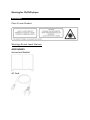
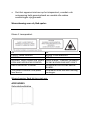
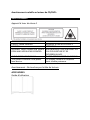
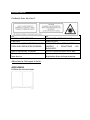
Warning for CD/DVD player:
WARNING
Class 1 Laser Product
Warning: Do not touch the lens.
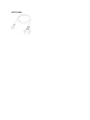
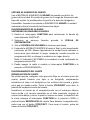
ACCESSORIES
Instruction Booklet
AC Cord

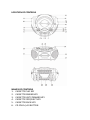
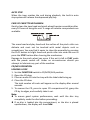
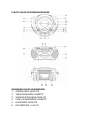
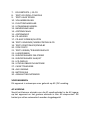
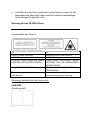
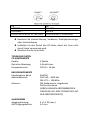
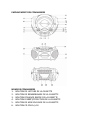
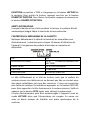
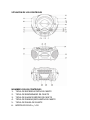
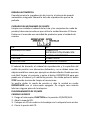
LOCATION OF CONTROLS
NAMES OF CONTROLS
1. CASSETTE PLAY KEY
2. CASSETTE REWIND KEY
3. CASSETTE FAST FORWARD KEY
4. CASSETTE STOP/EJECT KEY
5. CASSETTE PAUSE KEY
6. CD FOLD+/+10 BUTTON

7. CD FOLD-/-10 BUTTON
8. CD PROG./P-MODE BUTTON
9. BASS BUTTON
10. VOLUME CONTROL
11. FUNCTION SWITCH
12. FOLDING HANDLE
13. BAND SELECTOR
14. DIAL SCALE
15. TUNING CONTROL
16. CD COMPARTMENT
17. CD DOOR OPEN/CLOSE
18. CD SKIP/SEARCH FORWARD BUTTON
19. PLAY/PAUSE/STANDBY BUTTON
20. STOP BUTTON
21. CD SKIP/SEARCH BACKWARD BUTTON
22. SPEAKERS
23. FM STEREO INDICATOR
24. POWER INDICATOR
25. LCD DISPLAY
26. FM TELESCOPIC ANTENNA
27. CASSETTE COMPARTMENT
28. AUX IN JACK
29. BATTERY COMPARTMENT
30. AC SOCKET
POWER SOURCE
This unit is designed to be operated on AC/DC.
AC OPERATION
Plug the smaller end of AC power cord into AC jack on unit and the
other bigger end into AC wall outlet. The batteries will be
automatically disconnected.

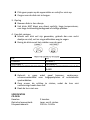
DC OPERATION
Open the BATTERY COMPARTMENT DOOR. Install 6 pcs UM-1/D size
batteries (not included) into compartment. Please follow correct
polarities as indicated.
CAUTION
⚫ Remove batteries if they are flat or not being used for a long
period of time.
⚫ Batteries contain chemical substances, so they should be disposed
of properly.
BASIC FUNCTION
SWITCHING ON THE UNIT
⚫ Set the FUNCTION switch to CD/MP3/AUX or RADIO.
⚫ In CD/MP3/AUX position, when the unit is not providing the main
function for 15 minutes, the unit will automatically switch into
standby mode. Press the PLAY/PAUSE/ button to turn on the
unit again.
REMARK:
⚫ Please note that low volume setting in the audio source may be
recognized as “no audio signal”, this will affect the capability of
signal detection from the device and can also originate an
automatic switch into standby mode. If this happens please
reactivate the audio signal transmission or increase the volume
setting on the audio source player in order to resume playback.
⚫ Electrostatic Discharge hints – The unit may reset or may not reset
to normal operation mode due to electrostatic discharge, just
switch it off and reconnect again.
TO ADJUST VOLUME
Rotate the VOLUME CONTROL back and forth to increase and
decrease volume.

BASS BOOST SYSTEM
The BASS BOOST BUTTON controls the bass of the unit. Bass sound is
the lower frequency ranges of sound. The knob can be pushed to OFF
or ON position. When the BASS BOOST is on, the unit boosts
(increases) the sound output of the bass frequencies.
RADIO OPERATION
TUNING IN RADIO STATIONS
1. Slide the FUNCTION switch to select the desired wave band:
AM/FM ST..
2. Tune to required station by rotating the TUNING KNOB.
3. Rotate the VOLUME CONTROL to comfortable volume level.
4. Extend the TELESCOPIC ANTENNA to its full length if you are
listening to FM broadcasting. Gently move the unit back and forth
to get the best reception when you are listening to AM program,
or place the unit in an open place.
Note: The FM STEREO indicator will be on if you are receiving FM
stereo program.
5. Turn off the radio by switching the FUNCTION switch to
"TAPE/OFF" position
CASSETTE OPERATION
PLAYBACK OF CASSETTE
Be sure to tighten any slack tape in the cassette before use, using
either a pencil or a ball-point pen, simply insert the pen or pencil into
the center of spool and rotate to remove slackness. Depress the
STOP/EJECT button to open the cassette door.
Insert the cassette into the compartment with the open end facing
upwards and the full reel on the left hand side, push the cassette well
down and close the door, be sure not to touch the tape surface, Set
the FUNCTION switch to “TAPE” position and press the cassette PLAY
button. To stop playback, press the STOP/EJECT button once. To
release the cassette, press the STOP/EJECT button again.

AUTO STOP
When the tape reaches the end during playback, the built-in auto
stop system will release the depressed play key.
CARE OF CASSETTE MECHANISM
Gently clean the tape head and pinch wheel/capstan assemblies after
every 10 hours of using the unit. A range of cassette care products are
available.
The erase head and play head and the surface of the pinch roller are
delicate and must not be touched with metal objects such as
screwdrivers. You may find it easier to clean the assembly by pressing
the PLAY button to bright head and pinch roller into view. Be sure to
press the STOP button after cleaning the mechanism.
Damage to the pinch wheel can occur if the unit is left in PLAY mode
with the power switch off. Under no circumstances should you
attempt to lubricate any part of the machine.
CD/MP3 OPERATION
LOADING A DISC
1. Set the FUNCTION switch to CD/MP3/AUX position.
2. Open the CD door.
3. Place an audio CD into the tray with the label side facing up.
4. Close the CD door.
The total number of tracks will appear on the display after several
seconds.
5. To remove the CD, press to open CD compartment lid, grasp the
CD by its edges, and carefully take it out.
Note:
⚫ To ensure good system performance, wait until the disc tray
completely reads the disc before proceeding.
⚫ If no disc is loaded into the compartment, or the disc is placed
upside down, the display will show N0d.

PLAYING A DISC
Discs for Playback
This system can playback all digital audio CD, MP3, WMA finalized
digital audio CD-Recordable (CD-R) discs, finalized digital audio
CD-Rewritable (CD-RW) discs and CD-DA format digital audio
CD/CD-R/CD-RW discs.
1. Press the PLAY/PAUSE/ button to start playback.
The playback starts from track 1, the “ ” indicator is shown on the
display.
To interrupt playback, press the PLAY/PAUSE/ button. The “ ”
indicator and the current track will flash on the display.
To resume playback, press the PLAY/PAUSE/ button again.
2. To stop playback, press the STOP button, the total number of
tracks appears on the display.
SELECTING A DESIRED TRACK/PASSAGE
To select a desired track
⚫ Press the CD SKIP FORWARD/BACKWARD button repeatedly in
stop mode or during play until the desired track appears on the
display.
⚫ Press the PLAY/PAUSE/ button to start play.
To search for a particular passage during playback (track scanning at
high speed)
Press and hold the CD SKIP FORWARD/BACKWARD button to scan
the current playing track at high speed until desired point passage,
and then release the button. Playback will start again from this point.
To select a song which track number exceeds 10
To select a song/track which number exceeds 10, press the
FOLD+/+10 or FOLD-/-10 button each time to skip forward/backward
10 tracks, then press the CD SKIP FORWARD/BACKWARD button to
select desired track.
To select a desired folder (for MP3 disc only, if the MP3 disc contains
more than one folder)

Press and hold the FOLD+/+10 or FOLD-/-10 button more than
1 second to skip next/previous folder. Until the desired folder number
appears on the LCD display, then release the button.
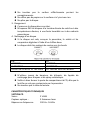
PROGRAM TRACKS
Programming tracks of disc are possible when playback is stopped. Up
to CD 20 tracks/MP3 99 tracks can be stored in the memory in any
order.
1. In stop mode, press the PROG./P-MODE button, the “PROG” will
flash and the P01 indicator will be on.
2. Press the CD SKIP/SEARCH FORWARD button to select the first
desired track to be programmed.
3. Press the PROG./P-MODE button to enter. The display changes to
show P02.
4. Repeat steps 2 & 3 to store other desired tracks until all tracks are
programmed.
5. Press the PLAY/PAUSE/ button to start playback from the first
programmed track.
6. Press the STOP button to stop program playback.
To Erase the Memory (Program)
To clear the program, you have two options:
1. Press the STOP button when the disc is stopped, or
2. Open the CD compartment lid, program will be erased.
REPEAT
To Repeat a Single Track
1. Press the PROG./P-MODE button once in play mode, “ ” will
flash on the display. The current track will be played repeatedly
until the STOP button is pressed
2. Press the PROG./P-MODE button once more to cancel.
To repeat all the Tracks
1. Press PROG./P-MODE button twice in play mode, “ ” shows
steady on the display, all tracks on the disc will be played
repeatedly until the STOP button is pressed.
2. To cancel repeat play, press the PROG./P-MODE button once more.

To repeat current Directory (for MP3 only)
1. Press PROG./P-MODE button twice in play mode, “ FOLD”
shows steady on the display, the current directory will be played
repeatedly until the STOP button is pressed.
2. Press the PROG./P-MODE button once to cancel.
RANDOM PLAY
Press the PROG./P-MODE button in play mode till the “RDM” shows
steady on the display, the random play will start from next track
automatically, until all tracks are played over and then stop. Press the
PROG./P-MODE button once to cancel.
INTROSCAN PLAY (for CD disc only)
Press the PROG./P-MODE button in play mode till the “INTRO” shows
steady on the display, the unit will start to play the first 10 seconds of
music of each track, until all tracks are played over and then stop.
Press the PROG./P-MODE button once to cancel.
AUX-IN OPERATION
This unit has provided special AUX-IN jack, through this jack other
audio sources can be connected to this unit and be amplified.
1. Set the FUNCTION switch to CD/MP3/AUX position.
2. Connect the audio cable into the AUX-IN jack and the other end
connects to the AUDIO OUT jack of the external audio source. The
unit will change to AUX mode automatically.
3. Adjust the volume of the main unit to your desired level.
4. Press PLAY of the external audio source (e.g. MP3 player) to start
playback.
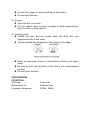
COMPACT DISC MAINTENANCE
1. Always use a compact disc bearing the mark as shown.
2. Notes on handling discs
⚫ Removing the disc from its storage case and loading it.
⚫ Do not touch the reflective recorded surface.

⚫ Do not stick paper or write anything on the surface.
⚫ Do not bend the disc.
3. Storage
⚫ Store the disc in its case.
⚫ DO not expose discs to direct sunlight or high temperatures,
high humidity or dusty places.
4. Cleaning a disc
⚫ Should the disc become soiled, wipe off dust, dirt and
fingerprints with a soft cloth.
⚫ The disc should be cleaned from the center to the edge.
⚫ Never use benzene, thinners, record cleaner fluid or anti-static
spray.
⚫ Be sure to close the CD door, so the lens is not contaminated
by dust.
⚫ Do not touch the lens.
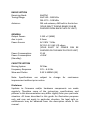
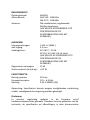
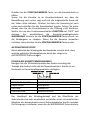
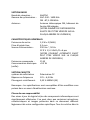
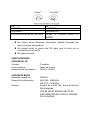
SPECIFICATIONS
CD SECTION
Channels:
2 channels
Optical pick-up:
3 beams laser
Frequency Response:
100Hz - 16KHz

RADIO SECTION
Receiving Band:
AM/FM
Tuning Range:
AM: 540 - 1600 KHz
FM: 87.5 - 108 MHz
Antenna:
FM rod antenna, AM built-in ferrite bar
(YOUR EXACT TUNING RANGE CAN BE
CHECKED FROM BACK PLATE OF UNIT)
GENERAL
Output Power:
1.5W x 2 (MAX)
Aux in jack:
3.5mm
Power Source:
AC 230V ~ 50Hz
DC 9V 1.5V UM-1/D x 6pcs
(YOUR EXACT AC POWER CAN BE
CHECKED ON THE BACK PLATE OF UNIT)
Power Consumption:
15 W
Power Consumption
(Standby):
<0.5W
CASSETTE SECTION
Biasing System
DC Bias
Frequency Response
125 – 6.3 KHz
Wow and Flutter
0.35 % WRMS (JIS)
Note: Specifications are subject to change for continuous
improvement without prior notice.
Disclaimer
Updates to Firmware and/or hardware components are made
regularly. Therefore some of the instruction, specifications and
pictures in this documentation may differ slightly from your particular
situation. All items described in this guide for illustration purposes
only and may not apply to particular situation. No legal right or
entitlements may be obtained from the description made in this
manual.

Guarantee
Lenco offers service and warranty in accordance to European law,
which means that in case of repairs (both during and after the
warranty period) you should contact your local dealer.
Important note: It is not possible to send products that need repairs
to Lenco directly.
Important note: If this unit is opened or accessed by a non-official
service center in any way, the warranty expires.
This device is not suitable for professional use. In case of professional
use, all warranty obligations of the manufacturer will be voided.
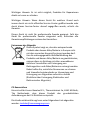
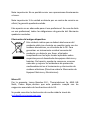
Disposal of the Old Device
This symbol indicates that the relevant electrical
product or battery should not be disposed of as
general household waste in Europe. To ensure the
correct waste treatment of the product and battery,
please dispose them in accordance to any applicable
local laws of requirement for disposal of electrical
equipment or batteries. In so doing, you will help to
conserve natural resources and improve standards of
environmental protection in treatment and disposal
of electrical waste (Waste Electrical and Electronic
Equipment Directive).
CE Marking
Hereby, Lenco Benelux B.V., Thermiekstraat 1a, 6361 HB Nuth, The
Netherlands, declares that this product is in compliance with the
essential EU directive requirements.
The declaration of conformity may be consulted via
techdoc@commaxxgroup.com

Seite laden ...
Seite laden ...
Seite laden ...
Seite laden ...
Seite laden ...
Seite laden ...
Seite laden ...
Seite laden ...
Seite laden ...
Seite laden ...
Seite laden ...
Seite laden ...
Seite laden ...
Seite laden ...
Seite laden ...
Seite laden ...
Seite laden ...
Seite laden ...
Seite laden ...
Seite laden ...
Seite laden ...
Seite laden ...
Seite laden ...
Seite laden ...
Seite laden ...
Seite laden ...
Seite laden ...
Seite laden ...
Seite laden ...
Seite laden ...
Seite laden ...
Seite laden ...
Seite laden ...
Seite laden ...
Seite laden ...
Seite laden ...
Seite laden ...
Seite laden ...
Seite laden ...
Seite laden ...
Seite laden ...
Seite laden ...
Seite laden ...
Seite laden ...
Seite laden ...
Seite laden ...
Seite laden ...
Seite laden ...
Seite laden ...
Seite laden ...
Seite laden ...
Seite laden ...
Seite laden ...
Seite laden ...
Seite laden ...
Seite laden ...
Seite laden ...
Seite laden ...
Seite laden ...
Seite laden ...
Seite laden ...
Seite laden ...
Seite laden ...
Seite laden ...
Seite laden ...
Seite laden ...
Seite laden ...
Seite laden ...
Seite laden ...
Seite laden ...
Seite laden ...
Seite laden ...
Seite laden ...
Seite laden ...
Seite laden ...
Seite laden ...
Seite laden ...
Seite laden ...
Seite laden ...
Seite laden ...
Seite laden ...
-
 1
1
-
 2
2
-
 3
3
-
 4
4
-
 5
5
-
 6
6
-
 7
7
-
 8
8
-
 9
9
-
 10
10
-
 11
11
-
 12
12
-
 13
13
-
 14
14
-
 15
15
-
 16
16
-
 17
17
-
 18
18
-
 19
19
-
 20
20
-
 21
21
-
 22
22
-
 23
23
-
 24
24
-
 25
25
-
 26
26
-
 27
27
-
 28
28
-
 29
29
-
 30
30
-
 31
31
-
 32
32
-
 33
33
-
 34
34
-
 35
35
-
 36
36
-
 37
37
-
 38
38
-
 39
39
-
 40
40
-
 41
41
-
 42
42
-
 43
43
-
 44
44
-
 45
45
-
 46
46
-
 47
47
-
 48
48
-
 49
49
-
 50
50
-
 51
51
-
 52
52
-
 53
53
-
 54
54
-
 55
55
-
 56
56
-
 57
57
-
 58
58
-
 59
59
-
 60
60
-
 61
61
-
 62
62
-
 63
63
-
 64
64
-
 65
65
-
 66
66
-
 67
67
-
 68
68
-
 69
69
-
 70
70
-
 71
71
-
 72
72
-
 73
73
-
 74
74
-
 75
75
-
 76
76
-
 77
77
-
 78
78
-
 79
79
-
 80
80
-
 81
81
-
 82
82
-
 83
83
-
 84
84
-
 85
85
-
 86
86
-
 87
87
-
 88
88
-
 89
89
-
 90
90
-
 91
91
-
 92
92
-
 93
93
-
 94
94
-
 95
95
-
 96
96
-
 97
97
-
 98
98
-
 99
99
-
 100
100
-
 101
101


Lenco SCD-430RD Bedienungsanleitung
- Kategorie
- CD-Radios
- Typ
- Bedienungsanleitung
in anderen Sprachen
- English: Lenco SCD-430RD Owner's manual
- français: Lenco SCD-430RD Le manuel du propriétaire
- español: Lenco SCD-430RD El manual del propietario
- Nederlands: Lenco SCD-430RD de handleiding
Verwandte Papiere
-
Lenco CD-011BU Portable CD player Bedienungsanleitung
-
-
-
-
-
-
-
Lenco SCD-6800GY Bedienungsanleitung
-
-
Lenco SCR-96 Benutzerhandbuch
Sonstige Unterlagen
-
AudioSonic CD-1572 Benutzerhandbuch
-
-
AudioSonic CD-571 Bedienungsanleitung
-
Elta 6733 Benutzerhandbuch
-
-
EDENWOOD CD RCD301 Bedienungsanleitung
-
Denver TCU-61 Benutzerhandbuch
-
-
Disney TS500BE Benutzerhandbuch
-