Aereco V4A Installation Instructions Manual
- Typ
- Installation Instructions Manual

1
TF3755_A
installation instructions - montageanleitung - notice d’installation
english
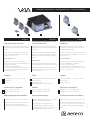
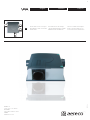
Acoustic fan for 4 wet rooms
The V4A fan is a silent fan being able to be ins-
talled directly inside dwelling in the inhabited
space.
It is possible to connect up to 4 mechanical
extract units with variable section (humidity
sensitive, motion sensor…)
Field of application :
Ventilation in technical rooms (kitchen,
bathrooms and toilets) in private dwelling and
business environment.
- Works: new or refurbishment.
- Place of installation: in cupboards, loft places
or on walls, in bathrooms, toilets, corridors or
any other inner rooms.
Contents
b ca e
a
b
c
Bag of fastening screws + bolts + rings
Stopper (x3)
Fan case
Before beginning the installation :
- Install the extraction units to be connected.
- Position the fan where it must be fixed, and
locate the place by estimating the space
necessary for ducts and passage of the electric
cable.
deutsch
Schallgedämmter Ventilator 4 Tech-
nische Sanitärräume
Die akustischen Werte des V4A erlauben die
Installation direkt in der Wohnung, im beheiz-
ten Raum.
Maximal 4 Abluftelemente (Hygro, mit Bewe
-
gungsensor usw.) mit verschiedenen Durch
-
messer können an den Ventilator angebracht
werden.
Einsatzbereich:
Technikraum (Küchen, Bad und WC) in Wohn-
oder Bürogebäude. Im Neubau oder Sanierung.
Installation im Abstellraum, im Keller, Dachbo
-
den oder im Flur, an der Wand, Decke oder in
der Zwischendecke.
Inhalt
a
b
c
Befestigungsmaterial ( Schrauben, Unterlegs-
cheiben, Dübel )
Abdeckungen (x3)
Ventilatorgehäuse mit Revisionsdeckel
Vor Installationsanfang :
français
Ventilateur acoustique 4 pièces
techniques
Le V4A est un ventilateur silencieux pouvant
être installé directement à l’intérieur du loge-
ment dans l’espace habité.
Il permet de raccorder jusqu’à 4 bouches VMC
à section variable (hygroréglable, à détection
de présence, etc).
Domaine d’emploi :
Ventilation des pièces techniques (cuisine, salle de
bain et wc) dans l’habitat ou le tertiaire.
- Travaux : neuf et rénovation.
- Lieu d’installation : Dans un placard, un faux
plafond ou au mur, en salle de bain, wc, couloir,
ou autre pièce intérieure.
Contenu
Sachet vis de fixation + chevilles + rondelles
Bouchons (x3)
Caisson ventilateur
a
b
c
Avant de commencer l’installation :
- Installer les bouches d’extraction à raccorder.
- Positionner le ventilateur là où il doit être fixé,
repérer en prévoyant la place nécessaire pour
les conduits et le passage du câble d’alimen
-
tation.
- Vor der Installation des Ventilators sollen die
Abluftlemente eingebaut werden.
- Den Ventilator an den gewünschten
Montageplatz halten, markieren, und die
notwendige Plätze für die Schläuche und den
Anschlußleitungdurchgang vorsorgen.
d
Accessoires (non fournis)
d
e
Adaptor for Ø 100 mm duct
Adaptor for Ø 125 mm duct
d
e
Rohr -Anschlußstutze Ø 100 mm
Rohr -Anschlußstutze Ø 120 mm
Adaptateur pour conduit Ø 100 mm
Adaptateur pour conduit Ø 125 mm
d
e
Accessories (not supplied) Zubehör

2
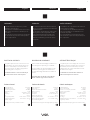
WARNINGS
- A qualified technician must carry out the
installation of this product.
- Manufacturer and distributors decline respon
-
sibility in the event of non conformity use of
the product
- If the product is used in a way not specified in
this document, the protection of the product
can be compromised.
Technical retail
Maximum airflow:
Maximum pressure:
Sound level @ 20m3/h:
Maximum power:
Supply:
Frequency:
Use:
Storage temperature:
Working temperature:
Pollution degree:
Fan fully protected by a double insulation.
160 m3/h
100 Pa
34 dB(A)
25 W
230 VAC +/- 10%
50 Hz or 60 Hz
indoor
from -20°C to + 55 °C
from +5°C to +40°C.
2
ELECTRICAL SECURITY
This symbol placed on the connection access
panel indicates an electric danger due to the
presence of 230 VAC (in version 230 VAC). It
is thus essential to cut off the supply before
dismounting the access panel.
The V4A fan must be connected directly in
the low-tension electric control panel.
english
AVERTISSEMENTS
- L’ installation de ce produit doit être effectuée
par un technicien qualifié.
- Le constructeur et le distributeur déclinent
toute responsabilité en cas d’utilisation non
conforme du produit.
- En cas d’utilisation non spécifiée par le pré-
sent document, la protection du produit peut
être compromise.
VORWORT
- Der elektrische Anschluss dieses Ventilators
darf nur von einem Fachmann nach VDE 0100
ausgeführt werden.
- Der Hersteller und der Vertreter lehnen jede
Haftung durch nicht sachgemäße Handha-
bung und Verwendung des Ventilators ab.
- Im Falle einer nicht in diesem Dokument
erwähnten Verwendung erlischt der Garan
-
tieanspruch.
deutsch
français
Technische details Détails techniques
Max. Luftmenge :
Max. Druck :
Akustischer Wert bei 20 m3/h :
Max. E-Leistung :
Anschluß :
Frequenz :
Anwendungsbereich :
Lagerungstemperatur :
Verwendungstemperatur :
Verschmutzungsklasse :
Gerät durch eine Doppelisolierung komplet geschützt.
Débit maximum :
Pression maximum :
Puissance acoustique @ 20m3/h :
Puissance maximum :
Alimentation :
Fréquence :
Utilisation :
Stockage :
Température de fonctionnement :
Degré de pollution :
Appareil entièrement protégé par une double isolation.
160 m3/h
100 Pa
34dB(A)
25 W
230 VAC +/- 10%
50 Hz oder 60 Hz
innen
von -20°C bis + 55 °C
von +5°C bis +40°C.
2
160 m3/h
100 Pa
34 dB(A)
25 W
230 VAC +/- 10%
50 Hz ou 60 Hz
en intérieur
de -20°C à + 55 °C
de +5°C à +40°C.
2
SÉCURITÉ ÉLECTRIQUE
Ce symbole placé sur la trappe de connection
indique un danger électrique lié à la présence
de 230 VAC (en version 230 VAC). Il est donc
indispensable de couper l’alimentation avant
de démonter la trappe !
Le V4A doit être branché directement au
tableau électrique basse tension.
ELEKTRISCHE SICHERHEIT
Dieses auf der Anschlussklappe sichtbare Zei-
chen besagt eine Spannung von 230 VAC.
Vor dem öffnen der Anschlussklappe ist der
Ventilator Spannungsfrei zu schalten und
vor unbeabsichtigtem Wiedereinschalten zu
sichern.
Der V4A Lüfter soll direkt an dem Nieder
-
druck-Schrank angeschlossen werden.

3
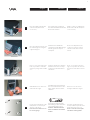
Place the adaptors Ø 100 mm
or Ø 125 mm (delivered as
accessories).
Fix the 4 provided plugs on the
wall (the fan can also be put
directly on the fl oor).
Note : the base of the case can
be used as gauge.
Once the adaptors placed, close
the remaining holes using the
supplied stoppers.
1
2
3
4
Note : in case of mounting mis-
take, it is possible to retire the
stopper by using a fl at screwdri-
ver.
Zum Befestigen des Ventilators
den Sockel des Gehäuses abne-
hmen, dabei die Ecken zuerst
abklicken.
Retirer le socle du caisson :
déclipper d’abord les angles.
english
deutsch
français
Fixer les 4 chevilles fournies au
mur (le ventilateur peut être aussi
directement posé sur le sol).
Note : le socle du caisson peut
être utilisé comme gabarit.
Note : en cas d’erreur de mon-
tage, il est possible de retirer un
bouchon à l’aide d’un tournevis
plat.
Une fois les adaptateurs mis
en place, boucher les orifi ces
restant à l’aide des bouchons
fournis.
Mettre en place les adaptateurs
Ø 100 mm ou Ø 125 mm (livrés
en accessoires).
Withdraw the base of the case:
start from the angles.
Die als Zuberhöre gelieferten
Anschluß Stutze Ø 100 mm bzw.
Ø 125 mm einbauen.
Einmal die Anschlußstutze
eingebaut sind, die Mündungen
mit den gelieferten Stöpsel
verstopfen.
Vermerk : Im falle eines falschen
Einbauen kann man eine Stöp-
sel mit einem Shraubenzieher
abnehmen.
Die 4 gelierten Dübeln auf die
Mauer festlegen (Der Lüfter kann
auch auf dem Boden legen).
Vermerk : die Gehäusesockel
kann als Schablone verwendet
werden.

4
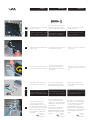
Fix the base using the provided
4 screws + rings.
Withdraw the lid by drawing the
2 green clips.
Thread the cable-shifter on the
feeder (feeder not provided).
Connect the feeder to the
corresponding terminals.
12VAC OUTPUT can be used
for electrical extract units. Then
use the transformer ref. AEA878
(transformer 12 VAC - 8 VDC).
Use rigid wire or galvanized
multi-wire.
6
7
8
9
Do not connect the electrical
supply network as long as the
fi tting is not completely fi nished.
L
N
230 VAC
INPUT
12 VAC
OUTPUT
Tighten moderately (be careful
not to crush the silent block).
Unscrew the lid of the electrical
case by using a PH1 screwdriver.
english
deutsch
français
Den Sockel mit den 4 mitgelie-
ferten Schrauben, Unterlegs-
cheiben und Dübeln befestigen.
Fixer le socle à l’aide des 4 vis +
rondelles fournies.
Achtung: die Schrauben nicht
zu fest anziehen, damit die
Grundplatte nicht ausbricht.
Serrer modérément (ne pas
écraser le silent bloc).
Die 2 grünen Clips ziehen und
den Deckel abnehmen.
Retirer le couvercle en tirant les
2 clips verts.
Den Deckel des Anschluss-
kastens mit einem kleinen
Kreuzschlitzschraubendreher
abnehmen.
Dévisser le couvercle du boîtier
électrique à l’aide d’un tournevis
PH1.
Die Anschlussleitung (wird
Bauseits gestellt) durch die
Kabeldurchführung einfädeln.
Enfi ler le passe-câble sur le
cordon d’alimentation (cordon
non fourni).
An Elektriknetz nicht anschlies-
sen bevor die Montage fertig ist.
Ne pas raccorder au réseau élec-
trique tant que le montage n’est
pas totalement terminé !
Die Anschlußleitung an die
entsprechenden Klemmen
anschliessen und die Kabeldur-
chführung in den Gehäusedec-
kel einfädeln.
Verwenden Sie das Netzans-
chluss 12 VAC - 8 VDC ref.
AEA878EX. Benützen Sie Starr-
kabel oder verzinntes Mehrfa-
chKabel.
Raccorder le cordon d’alimenta-
tion aux bornes correspondantes.
La sortie 12VAC peut être utilisée
pour la bouche d’extraction
électrique. Utiliser alors la carte
d’alimentation ref. AEA878 trans-
formateur 12 VAC - 8 VDC). Utiliser
du câble rigide ou multi-brins
étamé.
230 VAC
INPUT
12 VAC
OUTPUT
5
L Phase
Ground
N Neutral
L Phase
Masse
N Neutral
L Phase
Terre
N Neutre

5
10
Close the lid.
Fix the box on its base.
Check the installation of the
fi xing clips in the middle on
each side.
Close and screw up the lid of
the electric case.
11
12
13
14
Fix the case on its base (4
provided screws) using a PZ2
screwdriver.
x4
Den Deckel des Anschlusskas-
ten wieder verschrauben und
verschließen.
Refermer et revisser le couvercle
du boîtier électrique.
Den Deckel des Ventilators
wieder zumachen.
Refermer le couvercle.
Das Ventilatorgehäuse auf
seinen Sockel klicken.
Clipper le caisson sur son socle.
Darauf achten, dass der Ventila-
tor auf dem Sockel in der Mitte
richtig einrastet.
Vérifi er la mise en place des
clips de fi xation au centre de
chaque côté.
Das Gehäuse mit den mitge-
lieferten Schrauben auf dem
Sockel befestigen.
Fixer le caisson sur son socle
(4 vis fournies) à l’aide d’un
tournevis PZ 2.
english
deutsch
français
The lid must be perfectly closed
in order to ensure the airti-
ghtness of the fan.
Der Deckel soll vervollständig
geschlossen sein, um die Ab-
dichtung des Lüften zu sichern.
Le couvercle doit être parfai-
tement fermé afi n d’assurer
l’étanchéité du ventilateur.

6
TF3755_A
AERECO S.A
9, allée du clos des charmes
COLLEGIEN
77 615 Marne la Vallée cédex 3
FRANCE
www.aereco.com
Fix the ducts on the correspon-
ding adaptors, and connect the
extract units.
english
deutsch
français
Fixer les conduits aux emplace-
ments correspondants et con-
necter les bouches d’extraction.
15
Die Schläuche an die entspre-
chende Orte festzulegen und die
Abluftelemente anschliessen.
-
 1
1
-
 2
2
-
 3
3
-
 4
4
-
 5
5
-
 6
6


Aereco V4A Installation Instructions Manual
- Typ
- Installation Instructions Manual
in anderen Sprachen
- English: Aereco V4A
- français: Aereco V4A
Verwandte Artikel
-
Aereco V4A Installation Instructions Manual
-
-
-
-
-
-
-
-
-