Aereco VPH2 Installation Instructions Manual
- Typ
- Installation Instructions Manual

1
installation instructions- montageanleitung - beépítési útmutató
english
b
deutsch
magyar
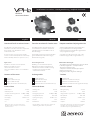
Központi ventilátor 6 helyiség elszívására
A VPH2 ventilátor kifejezetten úgy lett kifejlesztve,
hogy a padlástérben lévő tartó gerendákra
közvetlenül fel lehessen függeszteni, így biztosítva
a teljes rezgésmentességet.
A ventilátorra 6 db légelvezető elem csatla-
koztatható (higroszab., mozgásérzékelős,....)
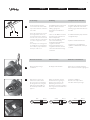
Tartalom
Ventilátorház
Csatlakozó csonk Ø 125 mm (x2)
Csatlakozó csonk Ø 80 mm (x4)
Csatlakozó csonk Ø 125 mm vagy Ø 150 mm (x1)
a
b
c
b
a
c
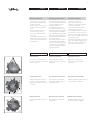
Technikai adatok
Amennyiben lehetősége van, válassza a micro-watt
változatot, mivel ezzel a berendezéssel a normál
változathoz képest energiát takaríthat meg.
-
Max. légmennyiség : 300 m
3
/h
Max. nyomás : 130 Pa
Hangnyomásszint Lp @ 300 m
3
/h 47 dB(A) - 51 dB(A)
Max. Telj. felvétel : 25 W - 42 W
Tápfeszültség : 230 VAC +/- 10%
Frekvencia : 50 Hz
Telepítése : beltérben
Centralised fan for 6 technical rooms
The VPH2 fan is specially designed for
installation in the attics of houses, suspended
from a beam on its attachment cord or
screwed to the wall.
It can be used to connect up to 6 variable-
section air extract units(demand-controlled by
relative humidity, detection of presence, etc.).
Contents of the carton
Fan housing
Adapters, Ø 125 mm (x2)
Stoppers, Ø 80 mm (x4)
Adapter, Ø 125 mm or Ø 150 mm (x1)
a
b
c
Technical data
Where two values are given, the rst is for
the “Microwatt” version, the second for the
”standard” version.
Maximum ow: 300 m
3
/h
Maximum pressure: 130 Pa
Sound pressure level Lp @ 300 m
3
/h 47 dB(A) - 51 dB(A)
Maximum power: 25 W - 42 W
Power supply: 230 VAC +/- 10%
Fréquency: 50 Hz
Use : indoor
Zentrales Ventilator für Feuchträume
Der VPH2-Ventilator wird am Dachboden
von Einzelhäusern installiert; und zwar in
Seilaufhängung an einem Balken oder in
Wandmontage.
Der Ventilator kann bis zu 6 unterschiedlich
große Abluftstutzen aufnehmen (Hygro,
Präsenzerfassung usw.).
Packungsinhalt
Ventilatorgehäuse
Adapter Ø 125 mm (x2)
Stutzen Ø 80 mm (x4)
Adapter Ø 125 mm oder Ø 150 mm (x1)
a
b
c
Technische Daten
Bei zwei Werten entsprechen diese jeweils der
Ausführung „Microwatt“ und „Standard“.
Luftmenge max: 300 m
3
/h
Druck max: 130 Pa
Druckpegel Lp @ 300 m
3
/h 47 dB(A) - 51 dB(A)
Leistungsaufnahme max: 25 W - 42 W
Spannungsversorgung: 230 VAC +/- 10%
Frequenz: 50 Hz
Einsatzbereich: Innenräume
Anwendungsbereich:
Belüftung von Feuchträumen (Küche,
Badezimmer und WC) in Wohnhäusern.
- Bauarbeiten: Neubau und Renovierung.
- Installationsort: Dachboden bzw.
unbewohnbare Räume.
Applications:
Ventilation of technical rooms (kitchen,
bathroom, and WC) in houses.
- Work: new and renovation.
- Place of installation: Attics or non-habitable
rooms.
d
d
d
d
Alkalmazási lehetőségek:
- Kiszolgáló helyiségek szellőztetésére (konyha, fürdő
és WC helyiségek) lakó - és középületekben.
- Új építés és felújítás esetén.
- Telepítése történhet: lakásban (pl. beépített
szekrény, álmennyezet, ....)
Hideg környezetben szigetelés szükséges.
Normál és
micro-watt változat

2
FIGYELMEZTETÉS
magyar
ELEKTROMOS BIZTONSÁG
A VPH2 ventilátort közvetlenül bekötheti az
alacsony feszültségű controll panelen keresztül.
•
•
•
•
•
ÚJRAHASZNOSÍTÁS
GARANCIA
Mielőtt a telepítéshez hozzákezdene:
- Építse be a vntilátorhoz kapcsolni
kívánt légelvezető elemeket az egyes helyiségekbe.
- Találja meg a ventilátor elhelyezésére a legalkalmasabb
helyet, építse ki a légelvezetők és a ventilátor összekötéséhez
szükséges légcsatornahálózatot.
WARNINGS
- This product must be installed by a
professional and in compliance with the rules
of standards in force.
- Tthe manufacturer and dealer decline all
responsibility in the event of improper
installation or use of the product.
english
ELECTRICAL SAFETY
The VPH2 must be connected directly to the •
low-voltage electrical panel.
Cut o power before doing any work on the fan.•
A contact separation device having an opening •
distance of at least 3 mm on each pole must be
provided in the xed wiring.
The connection to the xed wiring may be done •
via a exible cable, which must not be lighter
than H05VV-F or H05RR-F.
If the power supply cable is damaged, it must be •
replaced by a professional, with a cable having
the same reference, in compliance with the rules
of standards in force.
If the motor overheats, a thermostat with •
manual reset automatically stops the fan. In this
case, cut o the power supply (fuse on the elec-
trical panel), check that nothing interferes with
the operation of the fan (for example jamming,
friction, fouling of the impeller, problem creating
abnormal noise, etc.) and wait 1 hour before
restoring power (fuse).
If this or another problem persists, get in
touch with a specialist or with your dealer.
WARNHINWEIS
- Dieses Gerät muss von einem Fachmann
gemäß den Normen VDE 0100 installiert
werden.
- Bei nicht normgerechter Installation bzw.
Nutzung des Geräts haften Hersteller und
Vertrieb nicht.
deutsch
ELEKTROSICHERHEIT
Der VPH2 wird direkt an eine Schalttafel (Nie-•
derspannung) angeschlossen.
Vor Arbeiten am Ventilator muss die Stromver-•
sorgung unterbrochen werden.
In den festen Leitungen ist eine Kontakttren-•
nung mit mindestens 3 mm Önungsabstand
an beiden Polen vorzusehen.
Der Anschluss an das Netz erfolgt über eine •
Schlauchleitung (nicht leichter als H05VV-F oder
H05RR-F).
Beschädigte Versorgungskabel müssen von ei-•
nem Fachmann gemäß der VDE 0100 mit einem
gleichartigen Kabel ersetzt werden.
Bei Motorüberhitzung stoppt eine Wiedereins-•
chaltsperre automatisch den Ventilator. Unter-
brechen Sie die Stromversorgung (Sicherung an
der Schalttafel), prüfen Sie den reibungslosen
Betrieb des Geräts (keine Blockierung, Reiben,
Verschmutzung des Rades, ungewöhnliche Ge-
räusche usw.) und warten Sie eine Stunde, bevor
Sie die Stromversorgung (Sicherung) wieder
einschalten. Wenn das Problem damit nicht
gelöst ist, wenden Sie sich an einen Fachmann
oder an Ihren Händler.
RECYCLING
Dieses Gerät darf nicht mit dem Hausmüll
entsorgt werden. Bei der Produktentwicklung
wurde für problemloses Recycling gesorgt. Bei
Entsorgung oder Austausch muss das Pro-
einer Sammelstelle übergeben werden.
GARANTIE
Die Herstellergarantie für das VPH2-Ventilator
beträgt 1 Jahre ab Kaufdatum (als Beleg gilt die
Rechnung des Vertriebs). Die Garantie gilt nur
bei korrekter, anleitungsgerechter Installation,
Nutzung und Wartung.
Vor der Montage:
- Die Manschetten und Lüftungsleitungen nach
Anleitung anbringen.
- Bringen Sie den Ventilator an der vorgesehenen
Stelle an, markieren Sie die Position unter Berück-
sichtigung der Leitungen und Kabeldurchlässe.
RECYCLING
This product must not be thrown away with
household wastes. It is designed to be easy
to recycle. At the end of its life or when you
replace it, it must be taken to a waste disposal
site, to a dealer’s, or to a collection centre.
WARRANTY
The VPH2 fan is guaranteed by its manufacturer
for 1 years counting from the date of purchase
of the product, as established by the dealer’s
invoice. This warranty is valid provided that the
conditions of installation, of use, and of mainte-
nance indicated in this document are satised.
Before starting installation:
- Install the ventilation sleeves and ducts, to be
connected in accordance with these directions.
- Place the fan where it is to be attached and
mark; leave room for the ducts and the power
supply cable.
- A ventilátort csak hozzáértő szakember
helyezheti üzembe.
- A gyártó és a viszonteladó nem vállal
felelősséget a szakszerűtlenül üzembe helyezett
készülékért.
- Amennyiben a készüléket a dukomentumban
nem található helyeken alkalmazzák a garancia
Minden elektromos csatlakozást szüntessen
meg mielőtt a ventilátort bekötné.
•
Az egymástól független csatlakozási vezetékek
bekötéséhez 3 mm vastagságú kábeleket
használjon az egyes pólusokhoz.
A x bekötéshez a rugalmas kábelt is használhat,
mely nem lehet könnyebb a H05W-F vagy
H05RR-F típusoknál.
Esetleges kábelsérülések esetén, az alkalamzott
helyettesítő kábeleknek, meg kell felelniük az
érvényben lévő szabványoknak.
A motor túlmelegedése esetén a beépített motor-
védelem, automatikusan leállítja a ventilátort.
Lehetséges, hogy a biztosíték is kiold. Mielött
a rendszert visszakapcsolná, ellenörizze, hogy a
járokerék nincs-e megakadva, rendellenes zaj
nem hallható, és várjon a kapcsolással kb. 1 órát
a biztonság kedvéért, hogy visszahülhessen a motor.
Ha a probléma továbbra is fennáll, kérjük forduljon
szakemberhez, vagy hivja a kereskedőt,
rendszergazdát.
A ventilátort nem szabad kidobni a háztartási
hulladékok közé. Anyagát úgy tervezték, hogy
könnyen újrahasznosítható legyen. Életútja végén,
vagy csere esetén, kérjük forduljon a kereskedöhöz
vagy szállítsa hulladéklerakóba, ill. gyüjtőhelyre.
A ventilátorra a gyártó 1 év garanciát vállal.
Meghibásodás esetén forduljon ahhoz a
kereskedöhöz ahol a terméket megvásárolta.
A részletes garanciális feltételek a számlához csatolt
jótállási jegyen kerülnek feltüntetésre.

3
1
2
3
4
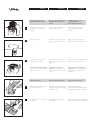
A légcsatornák beépítése:
Csatalkoztassa a kiválasztott
légcsatornákat (hőszigetelt változatot
a hideg térben lévő légcsatornákhoz).
english deutsch magyar
Vágja a kívánt méretre a légcsatornákat,
vagy toldja meg azokat ha szükséges.
Helyezze be az átvezető idomokat
az áttörésekbe (ha szükséges)
Építse a légelvezető elemeket
a helyükre. Kövesse a légelvezetők
típus szerint eltérő beépítési
utasításait.
-
Vágja vagy fúrja ki a megfelelő
ktm-ben a szükséges átvezetéseket.
A légelvezető és átvezető
elemek beépítése a
fal és födémáttörésékbe.
5
Fitting of the ducts:
Attach the duct (insulated exi-
ble duct) to the sleeve.
Cut the sheath in order to adjust
the length.
Insert the sleeve in the hole,
turning it anti-clockwise.
Installation of the extract units:
refer to the directions provided
with these products.
Cut out using a saw.
Fitting of the sleeves and
extract units (false ceiling).
Montage der Flexschläuche:
Befestigen Sie das Flexschlauch
(gedämmte Schlauchleitung) an
der Manschette.
Schneiden Sie die Rohrlänge
nach Bedarf zu.
Drehen Sie die Manschette
gegen den Uhrzeigersinn in die
Önung.
Installation der Abluftele-
mente: Bitte lesen Sie dazu in
den mitgelieferten Anleitungen
nach.
Schneiden Sie den gewünsch-
ten Ausschnitt mit einer Säge
aus.
Montage der Manschette und
Abluftelemene (Zwischen-
decke).
Mark the part to be cut out
using the sleeve as drilling
template.
Markieren Sie den Durchstich
anhand der Manschette.
Jelölje ki a légelvezető elemek
tervezetthelyeit a födémeken
ill. falakon.

4
7
8
english deutsch magyar
Csatlakoztassa a légcsatornákat a
ventilátor adaptereihez, ’b’ és ’d’
(nézze meg az 1. oldalon).
Megjegyzés: A ventilátor kivezetése
150 mm-es, valamint egy adapter
segítségével 125 mm-es méretben
is elérhető.
Húzza meg a csatorna
gallérját a csatlakozó idomra.
Végül csatlakoztassa az adapter
segítségével a ventilátorhoz a
légcsatornát.
6
Attach the duct to the adapter
provided «b» and «d» (see page
1) according to the used duct.
Note: outlet of the fan can be
tted with either adapter Ø 150
mm (d) or adapter Ø 125 mm.
Tighten the attachment collar
on the duct.
Clip the adapter to the fan.
Óvintézkedések a légcsatornák
telepítésekor:
- A rendszer hatékonysága érdeké-
ben ellenörizze a légcsatorna
tömítettségét a csatlakozásoknál.
- Használjon aluszalagot
- A légcsatornák vezetésénél
ügyeljen, hogy a cső ne
törjön meg
- A telepítéskor a csövek
deformálódására kell vigyázni
Precautions for installation of
- Make sure of the tightness of
the network at the sleeves and
taps, using attachment collars.
- Avoid unnecessary bends.
- Pull the sheath taut in straight
runs.
- Take care not to crush the ducts,
and leave them apparent so
that other people will not crush
them.
Befestigen Sie die Flexschlaüche
am mitgelieferten Adapter
(siehe Seite 1, Komponente „b“
und „d“ ) je nach der benutzten
Schläuche.
Bemerkung: der Abluft des
lüftens kann mit Adapted Ø 150
mm (d) oder mit einem Adapter
Ø 125 mm ausgerüstet werden.
Ziehen Sie die Schelle um das
Rohr an.
Klemmen Sie den Adapter an
das Ventilator.
Vorsichtsmaßnahmen bei der
Installation von Flexschlaüche:
- Dichtigkeit an Manschetten
und Anschlüssen überprüfen,
verwenden Sie Fixierschellen.
- Legen Sie möglichst wenige
Kniestücke.
- Strecken Sie das Fleckschlauch
nur in Geraden.
- Quetschen Sie die Leitungen
nicht. Die Flexschläuche sollten
sichtbar angebracht werden,
damit Sie nicht von Dritten
unbeabsichtigt gequetscht
werden.

5
english deutsch magyar
9
10
11
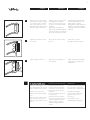
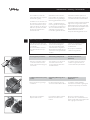
Elektromos csatlakoztatás:
Lazítsa meg a ventilátor fedlapot
tartó csavart csavarhúzó segítségével.
Tolja hátra a fedlapot.
Az elektromos kapcsolást a
lenti ábra szerint hajtsa végre.
Levegő kivezetés, eltávolítás:
A ventilátor által elszívott szennyezett
levegőt a szbad térbe kell vezetni,
lehetőleg egy tetőátvezető idomon
keresztül.
- A ventilátor közelében jelölje ki a tetőn
a megfelelő helyet.
-
-
Noir
Vert / jaune
Bleu
Phase (1)
Terre
Neutre (N)
M
Air discharge:
The fan discharge must be
connected to the exterior with
a special mechanical ventilation
roof outlet:
- Shape the lead sheet to match
the irregularities of the roof;
keep away from the crimping.
- On a tile roof, it is best to block
up in the direction of the lintels
in order to support the lead
sheet.
- The waterproof covering must
be installed in such a way that
the air ow is perpendicular to
the slope of the roof.
Electrical connection:
Release the ap using a
screwdriver.
Slide it back to get to the
terminal block, then make
the connections as shown by
the diagram below, using the
bushings and the baes of
the sheath provided for this
purpose.
Black
Green/yellow
Blue
Phase (1)
Earth
Neutral (N)
M
Klappe verschieben, um zur
Anschlussleiste zu gelangen.
Nehmen Sie nun die in der
Abbildung beschriebenen
Anschlüsse vor, folgen Sie dabei
den vorgesehenen Lenkblechen
und Kanälen.
Elektroanschluss:
Die Klappe aufschrauben.
Ablüftung:
Die Ablüftung muss über einen
speziellen, für mechanische
Lüftung geeigneten
Dachauslass nach Draußen
erfolgen:
- Falten Sie das Bleiblech auf die
Dachform auf, vermeiden Sie
dabei Crimpränder.
- Bei einem Ziegeldach sollten
zuerst in Sturzrichtung
Keilstützen für das Bleiblech
angebracht werden.
- Der Regenschutz muss so
angebracht werden, dass die
Luft senkrecht zur Dachneige
ausströmt.
Schwarz
Grüne / Gelb
Blau
Phase (1)
Erde
Null (N)
M
Építse be a tetőátvezető idomot.
Ügyeljen arra, hogy megfelelően
építse be a tetőátvezetőt, tömítse jól
a réseket.

6
english deutsch magyar
A ventilátor telepítése :
- Telepítse a ventilátort
egy központi helyre, ahol a
csatlakozó vezetékek nagyjából
azonos hosszúságúak.
A ventilátor helyének kiválasz-
tásánál, ügyeljen hogy ne
lakószobába kerüljön a ventilátor.
A ventilátort ne tegye beépített
szekrénybe, vagy egy kisebb zárt
helyre, mert a ventilátor által keltett
zaj bosszantó lehet.
A ventilátort függesztve szerelheti,
vagy csavarokkal is rögzítheti, ám
ebben az esetben gondoskodni
kell a kellemetlen vibrációk
-
-
-
Függesztett ventilátor
Függessze a ventilátorhoz
csomagolt kötélen keresztül
egy ponton
Fúrja fel és tiplikkel rögzítse 4 ponton
a mennyezetre a ventilátort.
Oldalfali rögzítésnél elegendő
két csavarral a falhoz rögzíteni.
x4
x2
Attachment of the fan:
- Install the fan in a central loca-
tion in order to distribute the
lengths of sheath.
- Place it above a technical room
and never above a habitable
room.
- Avoid installing in the house
itself (closet, false ceiling:
the noise it makes might be
annoying.
- Suspend the fan from the pre-
tted cord or fasten using the
screws of the attachment kit to
limit vibrations.
Suspended fan
Pay out the cord to attach it to
the front of the fan and suspend
it from one point.
Ceiling-mounted fan
Attach the fan with screws at 4
points in accordance with the
drilling centre distances marked
on the fan.
Wall-mounted fan
Attach the fan with screws at 2
points.
Befestigung des Ventilators:
- Der Ventilator sollte möglichst
zentral angebracht werden, um
die Leitungslängen gleich-
mäßig zu verteilen.
- Er sollte immer über einem
Feuchtraum, nicht über einem
Wohnraum angebracht werden.
- Man sollte auch eine Installation
innerhalb der Wohnung (Schrank,
Zwischendecke usw.) vermeiden,
weil die Geräuschentwicklung
störend sein könnte.
- Um Schwingungen zu vermei-
den, kann man den Ventilator
entweder mit dem fabrikseitig
vorgesehenen Seil aufhängen
oder mit dem Wandmontage-
bausatz anbringen.
Hängendes Ventilator
Das Seil abrollen, vorne be-
festigen und dann an 1 Punkt
aufhängen.
Deckenmontiertes Ventilator
Den Ventilator an 4 Punkten
festschrauben (Bohrabstände
am Gerät ablesen).
Wandmontiertes Ventilator
Den Ventilator an 2 Punkten
festschrauben.
Possibilities
Möglichkeiten Lehetőségek
Mennyezetre szerelt ventilátor
Oldalfalra szerelt ventilátor

7
Nagy karbantartás
(kétévente):
A ventilátor oldalán található
három fület csavarhúzó segítségével
nyomja ki, majd emelje le a fedelet.
Nyissa ki a ventilátort, majd a
járókerékről, ill. a ventilátorház belső
feléről a lerakodótt szennyeződéseket
kefe segítségével távolítsa el.
Időszakos karbantartás
(félévente)
- A ventilátor tetején lévő lukon,
sürített levegővel távolítsa el
a lerakodótt szennyeződéseket.
A szellőzési rendszer folyamatos és
hatékony működéséhez, szükség van
a rendszer időszakos karbantartására.
A szellőzési rendszer részeként beépített
légbevezető és légelvezető elemek
karbantartása is fontos, melyet az adott
típusok karbantartási utasításaiban talál
meg. A VPH2 típusú veentilátor
karbantartásánál a következő
szempontokat kell gyelembe venni:
maintenance - wartung - karbantartás
- Válassza le a hálózatról a venti-
látort, mielött elkezdeni a
munkálatokat.
Ne nyúljon a ventilátorba,
amikor az még üzemel.
-
A karbantartási munka: des
Complete maintenance (every
2 years):
Release the three lugs using a
screwdriver.
Servicing (every 6 months):
- Raise the removable stopper
on the front of the fan and
blow compressed air (dry gas)
into the fan.
The ventilation system will
remain fully eective only if it is
maintained regularly.
In addition to the air inlets and
the extraction registers, which
must be maintained as explai-
ned in the directions delivered
with these products, the VPH2
fan must be maintained as
described below:
- Cut o power and make sure
that the fan cannot be started
accidentally.
- Do not handle the electrical
box when the fan is in ope-
ration.
Before doing any work:
Open the fan and dust the
impeller with a brush.
Vollständige Wartung (alle 2
Jahre):
Die drei Verankerungen mit
einem Schraubendreher önen.
Kurzwartung (halbjährlich):
- Den Stopfen vorne am Gerät
anheben und mit einem
Trockengasspray Luft in den
Ventilator blasen.
Wirksamkeit und technische
Eigenschaften des Ventilators
können nur bei regelmäßiger
Wartung gewährleistet werden.
Zuluft- - und Abluftelemente
müssen gemäß den mitgeliefer-
ten Anleitungen gewartet wer-
den. Das Ventilator VPH2 muss
außerdem nach folgenden
Vorschriften gewartet werden:
- Die Stromversorgung unter-
brechen und sichergehen,
dass keine unbeabsichtigte
Inbetriebnahme möglich ist.
- Bei Gerätebetrieb darf die Ans-
chlussleiste nicht gehandhabt
werden.
Vor Wartungsarbeiten:des
Den Ventilator önen und das
Rad mit einem Pinsel abs-
tauben.

8
TF3827_HU
AERECO Légtechnika Kft.
1139 Budapest, Fáy u. 12/a.
Magyarország
tel.: (+36-1) 214 4421, 214 4377
fax: (+36-1) 225 0373
e-mail: [email protected]
web: www.aereco.hu
Gyártva: Franciaországban
forgalmazza:
1139 Budapest, Fáy u. 20.
-
 1
1
-
 2
2
-
 3
3
-
 4
4
-
 5
5
-
 6
6
-
 7
7
-
 8
8


Aereco VPH2 Installation Instructions Manual
- Typ
- Installation Instructions Manual
in anderen Sprachen
- English: Aereco VPH2
Verwandte Artikel
-
Aereco V4A Installation Instructions Manual
-
-
-
-
-
-
-
Andere Dokumente
-
Maico ECA 11 E Mounting And Operating Instructions
-
-
ECG FS 40 N Benutzerhandbuch
-
-
Master CDX 20 E2019R0 Bedienungsanleitung
-
-
Bionaire PEDESTAL BT05RC Benutzerhandbuch
-
ECG TV 25 Benutzerhandbuch