Aereco V4A Premium Installation Instructions Manual
- Typ
- Installation Instructions Manual

1
TF4496_C
installation instructions - Montageanleitung - 取り扱い説明書
english
Acoustic fan for 4 wet rooms
The V4A Premium fan is a silent fan being able
to be installed directly inside dwelling in the
inhabited space.
It is possible to connect up to 4 mechanical
extract units with variable section (humidity
sensitive, motion sensor, etc.)
Field of application:
Ventilation in technical rooms (kitchen,
bathrooms and toilets) in private dwelling and
business environment.
- Works: new or refurbishment.
- Place of installation: in cupboards, loft places
or on walls, in bathrooms, toilets, corridors or
any other inner rooms.
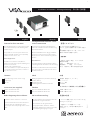
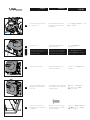
Contents
b ca e
a
b
c
Bag of fastening screws + bolts + rings
Stopper (x3)
Fan case
Before beginning the installation :
- Install the extract units to be connected.
- Position the fan where it must be fixed, and
locate the place by estimating the space
necessary for ducts and passage of the electric
cable.
deutsch
Schallgedämmter Ventilator 4 Tech-
nische Sanitärräume
Die akustischen Werte des V4A Premium er-
lauben die Installation direkt in der Wohnung,
im beheizten Raum.
Maximal 4 Abluftelemente (Hygro, mit Bewe-
gungsensor usw.) mit verschiedenen Durch-
messer können an den Ventilator angebracht
werden.
Einsatzbereich:
Technikraum (Küchen, Bad und WC) in Wohn-
oder Bürogebäude. Im Neubau oder Sanierung.
Installation im Abstellraum, im Keller, Dachbo-
den oder im Flur, an der Wand, Decke oder in
der Zwischendecke.
Inhalt
a
b
c
Befestigungsmaterial ( Schrauben, Unterlegs-
cheiben, Dübel )
Abdeckungen (x3)
Ventilatorgehäuse mit Revisionsdeckel
Vor Installationsanfang:
日本語
低音V4Aファン
V4A Premium は低騒音のファン
なので、室内に直接取り付ける事が可能で
す。
湿度調整や人感センサー等、アエレコの
排気口4個まで接続できます。
設置場所:
一般住宅(台所、浴室、トイレ)及び
事務所に設置。
工事 : 新築及びリフォーム
設置場所 : 浴室、トイレなどの
天井、戸棚の中、廊下及び壁等の室内
内容
付属品 (固定ビス、アンカー、
ワッシャー)
カバー 3個
V4A本体
a
b
c
設置前の注意 :
- ダクトに接続できるようにアダプターを
はめ込んでください。
- 電源のコードや配管スペースを
考慮しながら、取り付け場所を決めて
ください。
- Vor der Installation des Ventilators sollen die
Abluftlemente eingebaut werden.
- Den Ventilator an den gewünschten
Montageplatz halten, markieren, und die
notwendige Plätze für die Schläuche und den
Anschlußleitungdurchgang vorsorgen.
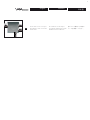
d
アクセサリー(本体キットとは別扱い)
d
e
Adaptor for Ø 100 mm duct
Adaptor for Ø 125 mm duct
d
e
Rohr -Anschlußstutze Ø 100 mm
Rohr -Anschlußstutze Ø 120 mm
100mm ø用アダプター
125mm ø用アダプター
d
e
Accessories (not supplied) Zubehör

2
WARNINGS
- A qualified technician must carry out the
installation of this product.
- Manufacturer and distributors decline respon-
sibility in the event of non conformity use of
the product
- If the product is used in a way not specified
in this document, the product warranty can be
compromised.
Technical details
Maximum airflow:
Maximum pressure:
Sound level @ 20m3/h:
Power:
Supply:
Frequency:
Use:
Storage temperature:
Working temperature:
Pollution degree:
Fan fully protected by a double insulation.
210 m
3
/h
118 Pa
33 dB(A)
12-27 W
230 VAC +/- 10%
50 Hz or 60 Hz
indoor
from -20°C to + 55 °C
from +5°C to +40°C.
2
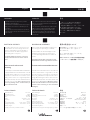
ELECTRICAL SECURITY
This symbol placed on the connection access
panel indicates an electric danger due to the
presence of 230 VAC (in version 230 VAC). It
is thus essential to cut off the supply before
dismounting the access panel.
The V4A Premium fan must be connected
directly in the low-tension electric control
panel.
Thermoswitch with manual
restarting
In conformity to standard IEC 60335-2-80 V4A fan
is equipped with a thermoswitch which cuts off
automatically the supply as soon as the internal
temperature of the motor exceeds 70°C (over
heating of the motor or too high temperature
of the exhausted air). Once the default has been
detected and corrected, wait 10 mn then start
the fan by pushing on the circuit breaker (or
fuse) on the fuse board.
english
警告
- V4Aファンの取り付けは代理店の
認定する専門家が行ってください。
- 規定外の使用については、アエレコ社
及び代理店は責任を取りかねます。
- 説明書に明記されていない使用に
ついては、保障が出来ない場合が
あります。
VORWORT
- Der elektrische Anschluss dieses Ventilators
darf nur von einem Fachmann nach VDE 0100
ausgeführt werden.
- Der Hersteller und der Vertreter lehnen jede
Haftung durch nicht sachgemäße Handha-
bung und Verwendung des Ventilators ab.
- Im Falle einer nicht in diesem Dokument
erwähnten Verwendung erlischt der Garan-
tieanspruch.
deutsch
日本語
Technische details
特性
Max. Luftmenge:
Max. Druck:
Akustischer Wert bei 20 m
3
/h:
E-Leistung:
Anschluß:
Frequenz:
Anwendungsbereich:
Lagerungstemperatur:
Verwendungstemperatur:
Verschmutzungsklasse:
Gerät durch eine Doppelisolierung komplet geschützt.
最大換気量
最大気圧差
騒音値
最高消費電力
定格電圧 (日本仕様)
周波数
使用場所
保管条件
作動温度
環境レベル
ファンは2重の絶縁で保護されています。
210 m
3
/h
118 Pa
33 dB(A)
12-27 W
230 VAC +/- 10%
50 Hz oder 60 Hz
innen
von -20°C bis + 55 °C
von +5°C bis +40°C.
2
210 m
3
/h
118 Pa
33 dB(A)
12 ~ 27 W
100 VAC +/- 10%
50 Hz または 60 Hz
室内
-20°C ~ + 55°C
+5°C ~ +40°C
2
電気の安全性について
電気接続カバーにあるこのマークは
100Vが来ていることを示して
おりますので、
カバーを取り外す前にブレーカーを
OFFにしてください。
V4A Premium ファンは必ず低電圧操作盤
(ブレーカー)に直接接続して下さい。
ELEKTRISCHE SICHERHEIT
Dieses auf der Anschlussklappe sichtbare Zei-
chen besagt eine Spannung von 230 VAC.
Vor dem öffnen der Anschlussklappe ist der
Ventilator Spannungsfrei zu schalten und
vor unbeabsichtigtem Wiedereinschalten zu
sichern.
Der V4A Premium Lüfter soll direkt an dem
Niederdruck-Schrank angeschlossen werden.
Thermoswitch mit manuellem Neustart
Gemäß Norm CEI 60335-2-80 ist der V4A mit
einem Thermoswitch ausgestattet, der die
Stromversorgung automatisch unterbricht,
wenn die geräteinterne Temperatur 70°C über-
steigt (Überhitzung des Motors bzw. zu hohe
Ablufttemperatur). Wenn der Fehler erfasst und
beigelegt ist, muss man 10 Minuten warten,
bevor man den Ventilator neu startet (Schutz-
schalter oder Sicherung an der Schalttafel
betätigen).

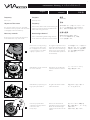
3
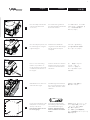
Place the adaptors Ø 100 mm
or Ø 125 mm (delivered as
accessories).
Fix the 4 provided plugs on the
wall (the fan can also be put
directly on the floor).
Note: the base of the case can
be used as gauge.
Once the adaptors placed, close
the remaining holes using the
supplied stoppers.
1
2
3
4
Note : in case of mounting
mistake, it is possible to re-
tire the stopper by using a flat
screwdriver, from the base of
the stopper.
Zum Befestigen des Ventilators
den Sockel des Gehäuses abne-
hmen, dabei die 4 Ecken zuerst
abklicken.
本体の土台を4隅から
順に外して下さい。
english
deutsch
日本語
付属のプラグ(ワッシャー、ボ
ルト)を壁に固定して下さい。
(ファンは、床にも直接
置く事ができます)
注:本体の土台は設置場所、
サイズを確認するゲージとしても
使用できます。
注: 設置ミスをした
ときは、フラット
ドライバーを使って
カバーをはずすことが
出来ます。
アダプターをはめたら、
その他の開口部に付属の
カバーをしてください。
100mm ø又は 125mm
øのアダプター(別注文)を
ファン本体の開口部に
はめてください。
Withdraw the base of the case:
start from the 4 angles.
Die als Zuberhöre gelieferten
Anschluß Stutze Ø 100 mm bzw.
Ø 125 mm einbauen.
Einmal die Anschlußstutze
eingebaut sind, die Mündungen
mit den gelieferten Stöpsel
verstopfen.
Vermerk : Im falle eines falschen
Einbauen kann man eine Stöp-
sel mit einem Shraubenzieher
abnehmen.
Die 4 gelierten Dübeln auf die
Mauer festlegen (Der Lüfter kann
auch auf dem Boden legen).
Vermerk : die Gehäusesockel
kann als Schablone verwendet
werden.

4
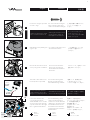
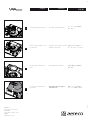
Fix the base using the provided
4 screws + rings.
Withdraw the lid by drawing the
2 green clips.
Thread the cable-shifter on the
feeder (feeder not provided).
Connect the feeder to the
corresponding terminals.
12VAC OUTPUT can be used for
electrical extract units through
a specific transformer. Use rigid
wire or galvanized multi-wire.
6
7
8
9
Do not connect the electrical
supply network as long as the
fitting is not completely finished.
Tighten moderately (be careful
not to crush the silent block).
Unscrew the lid of the electrical
case by using a PH1 screwdriver.
english
deutsch
日本語
Den Sockel mit den 4 mitgelie-
ferten Schrauben, Unterlegs-
cheiben und Dübeln befestigen.
土台を付属の4個のビスと
ワッシャーで固定して
下さい。
Achtung: die Schrauben nicht
zu fest anziehen, damit die
Grundplatte nicht ausbricht.
ゆっくりとビスをしめて
下さい(サイレント
ブロックをつぶさない様に
注意して下さい)
Die 2 grünen Clips ziehen und
den Deckel abnehmen.
二つの緑色のクリップを
引っ張って蓋を外して
ください。
Den Deckel des Anschluss-
kastens mit einem kleinen
Kreuzschlitzschraubendreher
abnehmen.
ドライバーで、電気ケースの
蓋をはずして下さい。
Die Anschlussleitung (wird
Bauseits gestellt) durch die
Kabeldurchführung einfädeln.
電源コード(付属されて
いません)をケーブル
シフターに通してください。
An Elektriknetz nicht anschlies-
sen bevor die Montage fertig ist.
注:組立て作業中に電源を
入れないで下さい。
Die Anschlußleitung an die
entsprechenden Klemmen
anschliessen und die Kabeldur-
chführung in den Gehäusedec-
kel einfädeln.Verwenden Sie
das Netzanschluss. Benützen
Sie Starrkabel oder verzinntes
MehrfachKabel.
電源コードを対応する
ターミナルにつないで下さい。
12VAC電源は特定の
変圧器を通して
引き出しユニットに
使われます。
固定ワイヤー又はメッキ
ワイヤーをお使い下さい。
230 VAC
INPUT
100 VAC
(Japan)
100 VAC
(Japan)
12 VAC
OUTPUT
5
L Phase
Ground
N Neutral
L Phase
Masse
N Neutral
L 電源
アース
N ニュートラル
12 VAC
OUTPUT
L N
230 VAC
INPUT

5
10
Close the lid.
Clip the box on its base.
Check the installation of the
fixing clips in the middle on
each side.
Close and screw up the lid of
the electric case.
11
12
13
14
Fix the case on its base (4
provided screws) using a PZ2
screwdriver.
x4
Den Deckel des Anschlusskas-
ten wieder verschrauben und
verschließen.
コードを巻き上げ電気ケースを
閉めてください。
Den Deckel des Ventilators
wieder zumachen.
ファンの蓋を閉めて
ください。
Das Ventilatorgehäuse auf
seinen Sockel klicken.
土台にファン本体をはめて
ください。
Darauf achten, dass der Ventila-
tor auf dem Sockel in der Mitte
richtig einrastet.
固定クリップが各4辺の
中心になっている事を
確認して下さい。
Das Gehäuse mit den mitge-
lieferten Schrauben auf dem
Sockel befestigen.
ドライバーを使い4個のビス
(付属品)でファン本体を
固定して下さい。
english
deutsch
日本語
The lid must be perfectly closed
in order to ensure the airti-
ghtness of the fan.
Der Deckel soll vervollständig
geschlossen sein, um die Ab-
dichtung des Lüften zu sichern.
注:機密性を保つ為に
完全に蓋を閉めてください。
« click »

6
Fix the ducts on the correspon-
ding adaptors, and connect the
extract units.
english
deutsch
日本語
各ダクトの排気口と外側の
フードを接続して下さい。
15
Die Schläuche an die entspre-
chende Orte festzulegen und die
Abluftelemente anschliessen.

7
Frequency
Once a year.
Objective of the action
The objective of this action is to avoid dust
accumulation in the propeller of the fan, which
could slightly reduce this efficiency.
Necessary materials
No special tools are needed. The propeller is
cleaned with water, soap and a brush.
頻度
1年に1回。
目的
埃が付着することで起こりうるファンの
タービンの性能低下をできるだけ防ぐ
為に、付着した埃を取り除いて下さい。
必要な道具
特殊な道具は必要ありません。
タービンのお掃除には水、石鹸、
ブラシを使用します。
Frequenz
Einmal pro Jahr.
Frequency
Das Ziel dieser Aktion ist die Verschmutzung der
Turbine zu vermeiden, welche die Effizienz des
Lüfter leicht verringern könnte.
Notwendiges Material
Kein Sonderwerkzeug wird benötigt. Waschen
Sie die Turbine im Seifenwasser mit einer Bürste.
english
deutsch
日本語
Withdraw the yellow collar from
the volute of the fan.
2
ファンのスクロールから
黄色い輪を外します。
Entnehmen Sie den Ring des
schwarzen Gehäuses des Ven-
tilators.
maintenance - Wartung - メンテナンスについて
Withdraw the propeller by pul-
ling up the yellow button.
3
黄色のボタンを引っ張って
タービンを外します。
Die gelbe Taste ziehen und die
Turbine abnehmen.
Remove the cover by pressing
on the two green clips. As the
fan is equipped of a contact, it
is not necessary to cut off the
supply to open the cover.
1
2つの緑色のクリップを押して
蓋を外します(ファンは自動
で停止しますので、蓋を開け
るときに電源を切る必要は
ありません)。
Die 2 grünen Clips ziehen und
den Deckel abnehmen (da der
Lüfter mit einem Schütz ausge-
rüstet ist, ist es nicht nötig ihn
bei Deckelabnahme Spannuns-
frei zuschalten).
Clean the propeller with a
soft brush and soapy water to
remove the dust.
Finally, dry it.
4
柔らかいブラシと石鹸水を
使って埃を落とし、タービンを
清掃します。
清掃した後、乾かします。
Waschen Sie die Turbine im
Seifenwasser mit einer weichen
Bürste, um den Staub wegzu-
nehmen. Dann trocknen Sie die
Turbine.

8
TF4496_C
AERECO S.A
9, allée du Clos des charmes
COLLEGIEN
77 615 Marne-la-Vallée cedex 3
FRANCE
www.aereco.com
english
deutsch
日本語
Push the yellow button to lock
the propeller.
6
黄色のボタンを押して、
タービンをロックします。
Die gelbe Taste schieben um die
Turbine zu verriegeln.
7
Den Ring wiedereinsetzen.
黄色い輪を元の場所に
戻します。
Put the yellow collar back in
place.
Close the cover with the two
green clips.
8
蓋をして2つの緑色の
クリップで閉めて下さい。
Den Deckel mit den 2 grünen
Clips zumachen.
Put the propeller back in place.
5
タービンを元の場所に
戻します。
Die Turbine wiedereinsetzen.
-
 1
1
-
 2
2
-
 3
3
-
 4
4
-
 5
5
-
 6
6
-
 7
7
-
 8
8


Aereco V4A Premium Installation Instructions Manual
- Typ
- Installation Instructions Manual
in anderen Sprachen
- English: Aereco V4A Premium
- 日本語: Aereco V4A Premium
Verwandte Artikel
-
Aereco V4A Premium Installationsanleitung
-
-
-
-
-
-
-
-
-