
IAN
292900
VIBRATION
VIBRATIONVIBRATION
VIBRATION
BOARD
BOARDBOARD
BOARD
GB
GBGB
GB
IE
IEIE
IE
VIBRATION
VIBRATIONVIBRATION
VIBRATION
BOARD
BOARDBOARD
BOARD
Instructions
GB
GBGB
GB
TRILPLAAT
TRILPLAATTRILPLAAT
TRILPLAAT
Gebruiksaanwijzing
NL
NLNL
NL
FR
FRFR
FR
NIE
NIENIE
NIE
IE
IEIE
IE
N
NN
N
IE
IEIE
IE
PLAQUE VIBRANTE
PLAQUE VIBRANTEPLAQUE VIBRANTE
PLAQUE VIBRANTE
Mode d'emploi
VIBRATIONSBOARD
VIBRATIONSBOARDVIBRATIONSBOARD
VIBRATIONSBOARD
Nutzungs- und Sicherheitshinweise
DE
DEDE
DE
FR
FRFR
FR
NL
NLNL
NL
DE
DEDE
DE

I
II
I
NDEX
NDEXNDEX
NDEX
1
(GB) Instruction manual _______________________________________________________________ 4
2
Important safety information ___________________________________________________________ 4
3
List of parts _________________________________________________________________________ 5
4
Instructions for use ___________________________________________________________________ 5
4.1
General instructions ____________________________________________________________ 5
4.2
Computer _____________________________________________________________________ 5
4.3
Remote control _________________________________________________________________ 6
4.4
Programs _____________________________________________________________________ 6
5
Training notes _______________________________________________________________________ 6
5.1 General Training Notes _________________________________________________________ 6
5.2 Exercise instructions ____________________________________________________________ 7
6
Maintenance and care ________________________________________________________________ 8
7
Product information __________________________________________________________________ 8
7.1 Batteries ______________________________________________________________________ 8
7.2 Declaration of conformity ________________________________________________________ 9
7.3 Disposal ______________________________________________________________________ 9
8
Warranty ___________________________________________________________________________ 9
9
Service _____________________________________________________________________________ 9
T
TT
T
ABLE DES MATIERES
ABLE DES MATIERESABLE DES MATIERES
ABLE DES MATIERES
10
(FR) Manuel dÂutilisation _____________________________________________________________ 10
11
Informations importantes pour la sécurité _______________________________________________ 10
12
Liste des pièces ____________________________________________________________________ 11
13
Notice d'utilisation _________________________________________________________________ 11
13.1 Consignes générales __________________________________________________________ 11
13.2 Ordinateur __________________________________________________________________ 12
13.3 Télécommande _______________________________________________________________ 12
13.4 Programmes _________________________________________________________________ 12
14
Instructions dÂentraînement___________________________________________________________ 12
14.1 Instructions d'entraînement _____________________________________________________ 13
14.2 Consignes générales d'exercice _________________________________________________ 13
14.3 Exercices ___________________________________________________________________ 13
15
Maintenance et entretien ____________________________________________________________ 14
16
Informations produit ________________________________________________________________ 15
16.1 Piles _______________________________________________________________________ 15
16.2 Déclaration de conformité _____________________________________________________ 15
16.3 Élimination __________________________________________________________________ 15
17
Garantie _________________________________________________________________________ 16
18
Service ___________________________________________________________________________ 16

I
II
I
NHOUD
NHOUDNHOUD
NHOUD
19
(NL) Gebruiksaanwijzing ____________________________________________________________ 17
20
Belangrijke veiligheidsinformatie ______________________________________________________ 17
21
Onderdelenlijst ____________________________________________________________________ 18
22
Gebruiksinstructies _________________________________________________________________ 18
22.1 Algemene opmerkingen _______________________________________________________ 18
22.2 Computer ___________________________________________________________________ 18
22.3 Afstandsbediening ____________________________________________________________ 19
22.4 Programma's ________________________________________________________________ 19
23
Trainingsaanwijzingen ______________________________________________________________ 19
23.1 Algemene trainingsaanwijzingen ________________________________________________ 19
23.2 Instructies voor oefeningen _____________________________________________________ 20
24
Onderhoud en verzorging ___________________________________________________________ 21
25
Opmerkingen over het product _______________________________________________________ 21
25.1 Accu's ______________________________________________________________________ 22
25.2 Conformiteitsverklaring ________________________________________________________ 22
25.3 Afvalverwerking _____________________________________________________________ 22
26
Garantie _________________________________________________________________________ 22
27
Service ___________________________________________________________________________ 22
I
II
I
NHALTSVERZEICHNIS
NHALTSVERZEICHNISNHALTSVERZEICHNIS
NHALTSVERZEICHNIS
28
(D) Nutzungsanleitung ______________________________________________________________ 23
29
Achtung: Wichtige Sicherheitsinformationen ____________________________________________ 23
30
Liste der Teile _____________________________________________________________________ 24
31
Nutzungsanleitung _________________________________________________________________ 25
31.1 Allgemeine Hinweise __________________________________________________________ 25
31.2 Computer ___________________________________________________________________ 25
31.3 Fernbedienung _______________________________________________________________ 25
31.4 Programme _________________________________________________________________ 25
32
Trainingsanleitung _________________________________________________________________ 26
32.1 Allgemeine Hinweise __________________________________________________________ 26
32.2 Übungshinweise______________________________________________________________ 26
33
Wartung und Pflege ________________________________________________________________ 27
34
Produkthinweise ___________________________________________________________________ 27
34.1 Batterien ____________________________________________________________________ 28
34.2 Konformitätserklärung _________________________________________________________ 28
34.3 Entsorgung __________________________________________________________________ 28
35
Garantie _________________________________________________________________________ 28
36
Service ___________________________________________________________________________ 29

GB
/IE/NIE
4
1
11
1 (GB)
(GB)(GB)
(GB)
I
II
I
NSTRUCTION MANUAL
NSTRUCTION MANUALNSTRUCTION MANUAL
NSTRUCTION MANUAL
Congratulations!
With your purchase you have decided on a high-
quality product. Get to know the product before you
start to use it. Carefully read the following assembly
instructions. Use the product only as described and
only for the given areas of application. Keep these
instructions safe. When passing the product on to a
third party, always make sure that the documentation is
included.
Included in the package is your new training unit itself,
its instructions for use, the power cable, the remote
control and the stretch tubes with handles.
Please note that this equipment is intended for normal
home use only. It is not designed for commercial use.
Please follow the instructions on how to use and care
for the equipment to enjoy using for a long time.
2
22
2 I
II
I
MPORTANT SAFETY INFO
MPORTANT SAFETY INFOMPORTANT SAFETY INFO
MPORTANT SAFETY INFORMATION
RMATIONRMATION
RMATION
a) Please carefully read this manual and keep it for
future use!
b) Read and follow the instructions
before using the product. Safe use
of the device can only be reached
when it is properly used. It is your
responsibility to ensure that all users of this device
are informed regarding the warnings and precau-
tionary measures.
c) Check possible health risks with your doctor be-
fore starting any exercise program. The advice of
your physician regarding your heart rate, your
blood pressure or your cholesterol levels needs to
be followed.
d) Observe your body's signals. Incorrect or exces-
sive exercise can pose a risk to your health. If at
any time during the workout you feel pain, tight-
ness in the chest, irregular heartbeat, extreme
shortness of breath, dizziness or light-headedness,
stop your workout immediately and consult your
doctor.
e) Keep children and pets away from the product.
This item is intended for use only by adults.
f) Use the device on a stable, level and horizontal
surface with a protective cover for your floor or
carpet. The safety distance to other objects and/or
walls should be at least 2.1 m in length and 1 m
in width. Compensate for uneven floors.
Please note that in addition to the exercise area
you must keep a safety area of 60 cm into every
direction free of any other objects. In case two or
more multipurpose fitness items are set up next to
each other, they can share one safety area. Please
compare for the following drawing to illustrate the
exercise and safety area.
g) Check that all the screws and nuts are properly
tightened every time before using it. The safety of
the equipment can only be maintained
if it is checked regularly. Pay attention
to potential shearing points marked
with the symbol shown on the right.
h) The item should be checked every time for exam-
ple for cracks before use. The safety of the device
can only be maintained if it is checked on a regu-
lar basis.
i) Always wear appropriate clothing during training.
Wear appropriate footwear with non-slip soles.
j) Use the equipment only as directed. If you find a
defective part when you assemble or test the
equipment or if you hear strange noises when us-
ing it, stop using it until the problem is eliminated.
k) Keep a sufficiently large distance from other peo-
ple and / or objects. Be careful when using the
product to not hurt yourself or others.
l) The equipment is particularly suitable for training
the legs, upper body, arm and torso muscles and
to improve overall endurance and burn fat.
m) The equipment has been tested, Standard EN ISO
20957-1, Class H. It is intended for domestic use
only. The equipment is designed to carry a maxi-
mum user weight of 100 kg.
n) The device is not suitable for therapeutic use.
o) Do not pull the plug out by the cord.
p) Do not jump on the plate as this can damage the
unit.
q) Never try to repair the unit yourself, but contact
the salesperson or customer service centre.
r) Switch off and unplug the equipment after every
use.
s) Turn off the machine and disconnect the power
supply before cleaning it.

GB
/IE/NIE
5
t) If you are using the unit on a carpet, make sure
that the air supply to the ventilation holes is suffi-
cient.
u) Only one person may use the unit at a time.
v) Protect the vibration plate against moisture and
water, and ensure that the electrical components
do not come into contact with water.
w) This device is not suitable for pregnant women
and persons with reduced physical, sensory or
mental abilities. Persons who do not have any ex-
perience with equipment such as these need an
explanation on how the machine operates and
how to use before using it for the first time.
x) It is dangerous to reach into the inside area of the
foot plate with your hand.
y) Always make sure that weight is evenly distributed
to avoid damage to the unit and the development
of noise.
3
33
3 L
LL
L
IST OF PAR
IST OF PARIST OF PAR
IST OF PARTS
TSTS
TS
No.
No.No.
No.
Description
DescriptionDescription
Description
#
##
#
1
Remote control
1
2
Display cover
1
3
Display
1
4
Transparent panel
1
5
Upper housing cover
1
6
Centre section of housing
1
7
Phillips screw ST4 x 12
18
8
Base plate
1
9
Plastic connector
2
10
Motor
1
11
Motor mounting
bracket
1
12
Main frame
1
13
Bottom plate
1
14
Transport roller
1
15
R clamp
2
16
Cable connection
3
17
Magnetic ring
1
18
Stretch tube with handle (
L
60 cm)
2
19
Lower housing cover
1
20
Base supports
4
21
Power cable with power plug
1
22
Power switch
1
23
Fitting for power switch
1
24
Fuse
1
25
Rubber mat
1
26
Hexagonal head bolt M8 x 25
2
27
Motor mounting bracket
1
28
Hook
2
29
Phillips screw ST3 x 10
4
No.
No.No.
No.
Description
DescriptionDescription
Description
#
##
#
30
Connecting pin
2
31
Ball bearing sleeve
2
32
Screw M5 x 30
8
33
Nut
with nylon insert M8
4
34
Cover for axle mounting bracket
2
35
Axle mounting bracket
2
36
Ball bearing 6201
2
37
Flywheel
1
38
Spring washer ±8
6
39
Hex bolt M8 x 20
2
40
Bushing
1
41
Axle
1
42
V
-
belt
1
43
Washer ±4
1
44
Insulation
2
Figure A shows the exploded assembly drawing of
your new equipment. Please note that the unit is al-
ready pre-assembled.
4
44
4 I
II
I
NSTRUCTIONS FOR USE
NSTRUCTIONS FOR USENSTRUCTIONS FOR USE
NSTRUCTIONS FOR USE
4.1
4.14.1
4.1 General instructions
General instructionsGeneral instructions
General instructions
The equipment is already fully assembled. Check that
your new equipment is complete with no parts missing
before using it for the first time. Make sure that you
have emptied the box completely. If, despite our quality
controls, a part or two are missing, please contact our
service centre using the contact details at the end.
4.2
4.24.2
4.2 Computer
ComputerComputer
Computer
The figure above shows the Touch Screen Control Panel
on the vibration board. The LED display shows, among
other things, the time. A possibly selected training pro-
gram („Program Mode Indicator‰) is displayed below
it.

GB
/IE/NIE
6
Switch on/off
Press the POWER button to start the equipment and
press this button again to turn it off.
Setting the speed
Press the MODE/SPEED button to increase the
speed in manual mode.
4.3
4.34.3
4.3 Remote control
Remote controlRemote control
Remote control
The remote control uses infrared to transmit the data to
the vibration unit and has a range of approximately
2.5 m. Therefore, point the remote control at the vibra-
tion board.
Switch on/off
Press the ON/OFF button to start the equipment
and press this button again to turn off.
Setting the speed
Press the S (+) button to increase the speed and S (-)
to decrease it.
Setting the time
Press the T (+) button to increase the time and T (-)
to decrease it.
Setting the program
The vibration board has five programs designed for
efficient and varied training. Please note that you
cannot adjust the speed and time in the program
mode.
Use the quick selection keys P1, P3 or P5 to directly
select one of these training programs described be-
low. Press the P button to select the next program,
which means pressing once starts program 1, while
pressing twice starts program 2 and so forth.
4.4
4.44.4
4.4 Programs
ProgramsPrograms
Programs
Each preset training program lasts 10 minutes. The
respective set speed is held for an interval of 30 sec-
onds before the next speed is set.
You can manually control the speed and the training
time at all times in the manual program.
Figure (B) shows the sequences of programs P1 to P5.
The X axis describes the time sequence („TIME‰) at
intervals of 30 seconds each. The Y-axis describes the
speed („SPEED‰).
5
55
5 T
TT
T
RAINING NOTES
RAINING NOTESRAINING NOTES
RAINING NOTES
With your interest in strength training you have taken
an important step towards mobility and health - be-
cause strength training strengthens the muscles.
Strength training not only prevents the loss of muscle
mass and strength, but improves on this even. The mo-
bility of the joints is increased - reducing the risk of
injury.
Your blood pressure, your cholesterol, your blood sug-
ar, your motivation and even your mood can be great-
ly improved by a little sport. You can change your
character in moderation. In conjunction with proper
diet will reduce your body fat and improve your silhou-
ette.
5.1
5.15.1
5.1 General Training Notes
General Training NotesGeneral Training Notes
General Training Notes
Each exercise should consist of the following three
parts:
1. Warm Up
2. Cardio or weight exercise
3. Cool Down & stretching
Warm Up
This stage helps get the blood flowing around the body
and the muscles working properly. It will also reduce
the risk of cramp and muscle injury. It is advisable to
do a few stretching exercises. Each stretch should be
held for approximately 30 seconds, do not force or jerk
your muscles into a stretch - if it hurts, STOP.
The Training
The start of endurance (often also called cardiovascular
or cardio training because of the positive effects on the
cardiovascular system) or a force or muscle training is
the first step in the fight against civilization infectious
On/off
Quick selection keys
Speed +
Time +
Manual quick selec-
tion keys
Speed –
Time –
Program
selection

GB
/IE/NIE
7
diseases and physical symptoms, especially with ad-
vancing age.
Cool Down
Just as a warm-up should be performed before each
training session, a cool-down should take place after a
unit. A Cool Down starts the relaxation phase; the op-
erating temperature of the body will come back down
and shows the transition of stress relaxation.
The cool-down should last at least 10 minutes (as the
Warm Up) and is controlled slowly dropping down to
the lowest level. The pulse rate should drop as low as
possible.
Stretching
As already mentioned, you can stretch before/during
the warm-up your muscles easily. After the training you
should definitely stretch your muscles. A stretching
afterwards returns the muscle to its original length, thus
preventing muscle shortening. The more strenuous the
training has been, the more important is the stretching
afterwards.
Particularly important is the stretching for the exercised
muscle groups. Stretching should be noticeable for the
muscle addressed, but it should never hurt. Stretching
should take 20 to 30 seconds per muscle.
Start your training with about 7 - 8 reps per exercise
set. Increase the number of repetitions according to
your individual preferences slowly to 11 - 12 reps per
set. If you notice that your muscles are tired, reduce the
scope of your training. Ideally train 3 - 4 times a week.
However, be sure that between individual exercises one
day of rest is inserted so that the muscles and the body
are able to recover sufficiently.
Also, perform all exercises with a stable body centre.
The spine (particularly the lumbar spine) must be kept
straight, so that the individual vertebrae are held in the
biomechanically correct position, e.g. to protect the
disc against faulty loads.
Do not train with momentum and / or jerkily. Perform
all exercises in a smooth and controlled manner. Note
that in case of improper or excessive training negative
effects on your health are possible.
5.2
5.25.2
5.2 Exercise instructions
Exercise instructionsExercise instructions
Exercise instructions
First of all, you should practice standing on the unit
when it is switched off. First stand on both legs with
your body up straight. Then lift a leg and stretch your
arms out. Change legs. Do this to get the feeling of
standing on the unit.
Body tension will always be in the core when you are
in the normal standing position on the vibration plate.
For this, keep your back straight and bend your knees
slightly. The leg muscles are now also slightly tightened.
Never train with straight arms or legs, always keep
them bent.
(C) Squats
Stand in a normal position on the unit with your feet
about shoulder-width apart. Go into the squat position
by bending your legs and move your buttocks back-
wards and downwards in the same movement. To sta-
bilise yourself, raise your arms upwards in front of your
body. Hold the squat position and then return to the
standing position.
(D) Biceps
Stand in a normal position on the unit with your feet
about shoulder-width apart. Take one handle of the
stretch tube in each hand at about waist height. Now
bend your arms and lift your hands upwards. Make
sure that the elbows remain stable against the sides of
your body throughout the movement. Hold this position
briefly and then return to the initial position.
(E) Dips
Sit upright in front of the unit. With your thumbs point-
ing inwards, place both hands on the training plate
and straighten your arms to lift your body into the air.
Bend your arms back and lower your body. Now lift it
again. You can perform this exercise with bent legs or
– as a variation – with stretched legs.
(F) Sit-ups
Lie with your back on the training plate and place your
feet on a chair or similar, place your feet in front of
your body on the floor with bent knees for more stabil-
ity or lift your feet for a more strenuous variation. Now
hold your arms to the side of your head or chest and
lift your upper body towards your knees. Hold this
position briefly and then return to the initial position.
(G) Push-ups
Support yourself with both hands as shown on the
training plate. Keep your body straight and stiff and
bend your arms now. Then straighten your arms again.
You can vary this exercise by doing it either with bent
legs on the knees (see figure) or with straight legs and
straight back on the feet.

GB
/IE/NIE
8
(H) Core exercise
Lie with tightened legs on the training plate and support
the upper body on bent arms in front of the plate. Hold
your body and back straight while keeping the posi-
tion.
(I) Back
Lie in front of the training plate with your back on the
floor and place your feet on the training plate. Stabilise
yourself with your arms on the sides. Now raise your
hips. Hold this position and then return to the initial
position.
(J) Lunge
Place one foot in the middle of the training plate. Move
the other leg slightly to the side and to the back. Now
lower your body keeping the centre of your body
straight. Be careful not to let your front knee bend over
the tip of your toes. Hold this position and then return
to the initial position. Change sides.
6
66
6 M
MM
M
AINTENANCE AND CARE
AINTENANCE AND CAREAINTENANCE AND CARE
AINTENANCE AND CARE
After training, treat you new equipment as follows so
that you can enjoy it for a long time:
1. Store the equipment as far as possible, where it
is not in anyoneÊs way.
2. Wipe the equipment and the handles with a dry
cloth. Do this to clean the components and pre-
venting sweat from drying on the equipment.
The unit is maintenance-free under normal conditions
and use. Nevertheless, the user is responsible to regu-
larly check that all parts fit tightly and that wear is not
impairing the performance of the equipment. In ac-
cordance with EN ISO 20957-1: 2013 Point 5.15, pay
special attention to the condition of particularly stressed
parts such as the hand grips or the shock absorber.
Do not use aggressive cleaning agents on the equip-
ment, but remove any dirt and dust with a soft or slight-
ly damp cloth.
Any modification to the original parts, materials or the
construction of the multipurpose fitness equipment can
significantly reduce its performance. The same applies
in the case of severe soiling, misuse or incorrect appli-
cation.
7
77
7 P
PP
P
RODUCT INFORMATION
RODUCT INFORMATIONRODUCT INFORMATION
RODUCT INFORMATION
Weight without packaging: approximately 13.2
kg
Dimensions when assembled: approximately
(L) 69.5 x (W) 39 x (H) 13.5 cm
220-240V AC
200 W
The extension of the training band is indicated in a
closed (i.e. circular) state with a tolerance of +/- 20%.
Lengthening training band
Strength (N)
80 cm
ca. 22 N
100 cm
ca. 33 N
120 cm
ca. 48 N
150 cm
ca. 48 N
Do not stretch the band over a length of 150 cm!
The item you have purchased has been manufactured
between 01 July 2017 and 30 November 2017. It is
made of the following materials:
Housing, display, remote control & stretch tube
bracket: ABS & PVC
Screws: steel
Training surface: TPR
Shock absorber & feet: rubber
Motor & motor cover: steel
Main adapter housing: ABS
Stretch tube with handle: Polyester, ABS & nylon
7.1
7.17.1
7.1 Batteries
BatteriesBatteries
Batteries
The remote control operates with the two supplied type
AAA LR03 1,5V batteries.
Make sure that the polarity is correct when insert-
ing the battery.
Remove the battery if you do not use the unit for
an extended period of time to prevent damage
from leakage. Leaking or damaged batteries can
cause acid burns when coming into contact with
the skin. Wear protective gloves when handling
damaged batteries.
Keep batteries out of the reach of children. Do not
leave batteries lying around, as they could be
swallowed by children or pets.
Do not short-circuit or take the battery apart, or
throw it into the fire.
Never try to charge non-rechargeable batteries.
Risk of explosion!

GB
/IE/NIE
9
7.2
7.27.2
7.2 Declaration of conformity
Declaration of conformityDeclaration of conformity
Declaration of conformity
The EU Declaration of Conformity can be obtained
from the address given on the enclosed warranty card.
7.3
7.37.3
7.3 Disposal
DisposalDisposal
Disposal
Disposing of the packaging
This product is delivered in packaging to
prevent transport damage. The packaging
materials are produced from recyclable raw
materials. Dispose of the packaging as single variety
waste. Dispose of the cardboard as waste paper and
plastic film as recyclable material.
Disposing of the product
Recyclable material collection. Dispose of the
product according to the laws and regula-
tions applicable in your country. Information
can be obtained from the local authorities.
This product may not be disposed of as normal house-
hold waste when it has reached the end of its service
life, but must be disposed of at a collection point for the
recycling of electrical and electronic equipment. Re-
move all batteries/rechargeable batteries and dispose
of them separately from the product.
Disposing of batteries
End users are legally obliged (according to
the battery ordinance) to return all used bat-
teries/rechargeable batteries. Disposal in the
household waste is prohibited.
Batteries/rechargeable batteries containing harmful
substances are marked with the adjacent symbol, which
indicates the prohibition of disposal in the household
waste. The designations for the determining heavy
metal are: Cd (cadmium), Hg (mercury) & Pb (lead).
The designation is on the batteries/rechargeable bat-
teries below the depicted garbage bin symbol.
You can dispose of your used batteries/rechargeable
batteries free of charge at municipal collection points
or wherever batteries/rechargeable batteries are sold.
This way you comply with the statutory obligations and
contribute to environmental protection.
8
88
8 W
WW
W
ARRANTY
ARRANTYARRANTY
ARRANTY
The product was produced with great care and under
constant supervision. You receive a three-year warran-
ty for this product from the date of purchase. Please
retain your receipt. The warranty applies only to mate-
rial and workmanship and does not apply to misuse or
improper handling. Your statutory rights, especially the
warranty rights, are not affected by this warranty.
With regard to complaints, please contact the following
service hotline or contact us by e-mail. Our service
employees will advise as to the subsequent procedure
as quickly as possible. We will be personally available
to discuss the situation with you.
Any repairs under the warranty, statutory guarantees
or through goodwill do not extend the warranty period.
This also applies to replaced and repaired parts. Re-
pairs after the warranty are subject to a charge.
9
99
9 S
SS
S
ERVICE
ERVICEERVICE
ERVICE
Name: ISM Service Center
E-Mail: service@la-sports.de
Tel:° ++800 52776787 (free of charge)
Corporate Address:
I.S.M. GmbH, Rathenaustr. 4,
D-51427 Berg. Gladbach, Germany

FR
10
10
1010
10 (FR
(FR(FR
(FR)
))
)
M
MM
M
ANUEL D
ANUEL DANUEL D
ANUEL D
Â
ÂÂ
Â
UTILISATION
UTILISATIONUTILISATION
UTILISATION
Sincères félicitations ! Avec cet achat, vous avez porté
votre choix sur un produit de haute qualité. Familiari-
sez-vous avec le produit avant de procéder à la pre-
mière mise en service. ¤ cet effet, lisez attentivement la
notice de montage suivante ainsi que les consignes de
sécurité. Utilisez le produit uniquement de la manière
décrite et pour les domaines d'utilisation indiqués.
Conservez soigneusement ce mode d'emploi. En cas de
transmission du produit à des tiers, veuillez leur re-
mettre également tous les documents.
Sont inclus dans le contenu de livraison de votre nouvel
appareil d'entraînement, l'appareil lui-même, cette
notice d'utilisation, le câble électrique, la télécom-
mande ainsi que les sangles d'entraînement munies de
poignées.
Veuillez noter que vous avez acheté un appareil conçu
pour un usage domestique normal. Cet appareil n'est
pas destiné à l'usage professionnel. Afin de profiter
longtemps de ce produit, veuillez respecter les con-
signes d'utilisation et informations d'entretien suivantes.
11
1111
11 I
II
I
NFORMATIONS IMPORTAN
NFORMATIONS IMPORTANNFORMATIONS IMPORTAN
NFORMATIONS IMPORTANTES POUR LA
TES POUR LA TES POUR LA
TES POUR LA
SÉC
SÉCSÉC
SÉCU
UU
URITÉ
RITÉRITÉ
RITÉ
a) Veuillez respecter ce manuel d'utilisation et le
conserver !
b) Lisez et respectez le mode d'em-
ploi et toutes les autres informa-
tions avant d'utiliser l'appareil.
Une utilisation sûre de l'appareil
ne peut être garantie que s'il a été monté correc-
tement et s'il est utilisé correctement. Il est de votre
responsabilité que tous les utilisateurs de l'appa-
reil soient bien informés sur les mises en garde et
règles de prudence.
c) Avant de commencer un quelconque programme
d'entraînement, consultez impérativement un mé-
decin pour détecter et prévenir les risques éven-
tuels pour la santé. Les conseils de votre médecin
sont déterminants en ce qui concerne votre fré-
quence cardiaque, votre tension ou votre taux de
cholestérol.
d) Soyez attentifs aux signaux de votre corps. Un
entraînement incorrect ou excessif peut compro-
mettre votre santé. Si à un moment quelconque de
votre entraînement, vous ressentez des douleurs,
une oppression dans la poitrine, des battements
de cflur irréguliers, des difficultés respiratoires
extrêmes, des vertiges ou des engourdissements,
interrompez immédiatement votre entraînement et
consultez votre médecin.
e) Tenez l'appareil hors de portée des enfants et des
animaux. Cet appareil est destiné à être utilisé
uniquement par des adultes.
f) Utilisez l'appareil sur une surface solide, plate et
horizontale avec une protection pour votre sol ou
votre tapis. Une distance de sécurité de 2 m mini-
mum doit toujours être respectée tout autour de
l'appareil.
g) Vérifiez avant utilisation, que les vis et
les écrous sont bien serrés. La sécurité
de l'appareil ne peut être assurée que
si ce contrôle est effectué régulière-
ment.
h) Portez toujours des vêtements adaptés pendant
l'entraînement. Évitez les vêtements larges suscep-
tibles de rester accrochés à votre appareil d'en-
traînement. Portez des chaussures appropriées
avec des semelles antidérapantes
i) Pendant l'utilisation, tenez-vous à une distance
suffisante des autres personnes et/ou objets. Veil-
lez lors de l'utilisation à ne pas vous blesser vous-
mêmes ou à ne pas blesser d'autres personnes.
j) N'utilisez l'appareil que de la façon indiquée. Si
vous trouvez au montage ou pendant un contrôle
une pièce défectueuse ou si vous entendez un
bruit inhabituel pendant son utilisation, ne vous en
servez plus jusqu'à ce que le problème soit réglé.
k) L'appareil ne convient pas pour un usage théra-
peutique.
l) L'appareil est particulièrement adapté à l'entraî-
nement des muscles des jambes, du torse, des
bras et de la ceinture abdominale tout en favori-
sant endurance et la combustion des graisses.
m) La norme EN ISO 20957-1:2013 section 5.15
s'applique en particulier à l'état des pièces parti-
culièrement sollicitées.
n) LÊappareil a été contrôlé selon les exigences de la
norme EN ISO 20957-1 :2013, Classe H. Il n'est
destiné qu'à l'usage domestique. L'appareil n'est

FR
11
pas conçu pour des personnes pesant plus de 100
kg.
o) Débranchez en tirant sur la fiche et non sur le
câble.
p) Ne sautez pas sur le plateau, cela pourrait en-
dommager l'appareil.
q) N'essayez jamais de réparer vous-même l'appa-
reil, mais adressez-vous au vendeur ou au centre
de services à la clientèle.
r) Éteignez l'appareil après chaque utilisation et
débranchez-le.
s) Éteignez la machine et coupez l'alimentation élec-
trique avant de la nettoyer.
t) Si vous utilisez l'appareil sur un tapis, assurez-
vous que les trous de ventilation reçoivent suffi-
samment d'air.
u) L'appareil ne doit être utilisé que par une seule
personne à la fois.
v) Protégez la plate-forme vibrante de l'humidité et
de l'eau et veillez à ce que les composants élec-
triques n'entrent pas en contact avec de l'eau.
w) L'appareil ne convient pas pour les femmes en-
ceintes et les personnes ayant des capacités phy-
siques, sensorielles ou mentales réduites. Les per-
sonnes qui n'ont aucune expérience avec de tels
appareils ont besoin d'explications sur le mode de
fonctionnement et l'utilisation de la machine avant
le premier usage.
x) Il est dangereux d'introduire la main à l'intérieur
du plateau pour les pieds.
y) Afin d'éviter des endommagements de l'appareil
et l'apparition de bruit, veillez toujours à une ré-
partition régulière du poids.
12
1212
12 L
LL
L
ISTE DES PI˚CES
ISTE DES PI˚CESISTE DES PI˚CES
ISTE DES PI˚CES
n°
n°n°
n°
Description
DescriptionDescription
Description
#
##
#
1
Télécommande
1
2
Protection
écran dÊaffichage
1
3
Écran dÊaffichage
1
4
Panneau transparent
1
5
Protection boîtier supérieure
1
6
Partie centrale du boîtier
1
7
Vis cruciforme ST4 x 12
18
8
Plaque de base
1
9
Connecteur plastique
2
10
Moteur
1
11
Support de moteur
1
12
Cadre principal
1
13
Plateforme inférieure
1
14
Roue de transport
1
15
Pince de serrage pour fil
2
n°
n°n°
n°
Description
DescriptionDescription
Description
#
##
#
16
Connexion câble
3
17
Anneau magnétique
1
18
Sangle dÊentraînement avec poignée
(L 60 cm)
2
19
Protection boîtier inférieure
1
20
Pieds
4
21
Câble
dÊalimentation avec fiche se
c-
teur
1
22
Interrupteur marche/arrêt
1
23
Prise femelle pour lÊinterrupteur
marche/arrêt
1
24
Coupe
-
circuit
1
25
Tapis caoutchouc
1
26
Vis hexagonale M8 x 25
2
27
Support de moteur
1
28
Crochet
2
29
Vis cruciforme ST3 x
10
4
30
Axe de liaison
2
31
Enveloppe roulement à billes
2
32
Vis M5 x 30
8
33
Écrou avec bague dÊarrêt en nylon
M8
4
34
Recouvrement de lÊaxe de rotation
2
35
Axe de rotation
2
36
Roulement à billes 6201
2
37
Volant dÊinertie
1
38
Rondelle
-
ressort Grower ±8
6
39
Boulon à tête hexagonale M8 x 20
2
40
Prise
1
41
Axe
1
42
Courroie trapézoïdale
1
43
Rondelle ±4
1
44
Isolation
2
La figure A montre le schéma éclaté de votre nouvel
appareil. Veuillez noter que celui-ci est déjà prémonté.
13
1313
13 N
NN
N
OTICE D
OTICE DOTICE D
OTICE D
'
''
'
UTILISATION
UTILISATIONUTILISATION
UTILISATION
13.1
13.113.1
13.1 Consignes générales
Consignes généralesConsignes générales
Consignes générales
L'appareil est livré déjà complètement monté. Veuillez
contrôler l'intégrité et l'exhaustivité de votre nouvel
appareil avant de l'utiliser pour la première fois. Pour
ce faire, videz complètement le carton. Si, malgré les
contrôles de qualité effectués, certaines pièces venaient
à manquer, veuillez contacter notre Service Client aux
coordonnées indiquées ci-dessous.

FR
12
13.2
13.213.2
13.2 Ordinateur
OrdinateurOrdinateur
Ordinateur
LÊillustration ci-dessus présente lÊécran dÊaffichage à
commande tactile (ÿ panneau de commande à écran
tactile Ÿ) de la plate-forme vibrante. LÊécran
dÊaffichage à LED indique entre autre lÊheure.
LÊaffichage inférieur permet de sélectionner un pro-
gramme dÊentraînement (ÿ Indicateur Mode Pro-
gramme Ÿ).
Marche/Arrêt
Appuyez sur le bouton POWER pour allumer
lÊappareil et appuyez de nouveau sur cette même
touche pour éteindre lÊappareil.
Réglage de la vitesse
Appuyez sur la touche MODE/VITESSE, pour aug-
menter la vitesse en mode réglage manuel.
13.3
13.313.3
13.3 Télécommande
TélécommandeTélécommande
Télécommande
La transmission des données de la télécommande vers
la plate-forme vibrante fonctionne par signal infra-
rouge et a une portée de 2,5 m environ. Pour cette
raison, veuillez placer la télécommande sur la plate-
forme vibrante pour une utilisation correcte.
Marche/Arrêt
Appuyez sur le bouton ON/OFF pour allumer
lÊappareil et appuyez de nouveau sur cette même
touche pour éteindre lÊappareil.
Réglage de la vitesse
En mode manuel, appuyez sur la touche S (+), pour
augmenter la vitesse et sur la touche S (-), pour la
réduire.
Réglage de la durée/temps
En mode manuel, appuyez sur la touche T (+), pour
augmenter la durée et sur la touche T (-), pour la
diminuer.
Réglage du programme dÊentraînement
La plate-forme vibrante propose cinq programmes
dÊentraînement pour vous offrir des séances
dÊentraînement variées et efficaces. Veuillez noter
que le Mode Programme ne vous permet de régler
ni la vitesse ni la durée.
¤ lÊaide des touches de sélection rapide (raccourcis)
P1, P3 ou P5, vous pouvez sélectionner directement
un des programmes dÊentraînement proposés. En
appuyant sur la touche P, vous pouvez sélectionner
le programme dÊentraînement suivant, cÊest-à-dire si
vous appuyez 1 x sur la touche, vous accédez au
Programme 1, si vous appuyez 2 x sur la touche au
Programme 2 etc...
13.4
13.413.4
13.4 Programmes
ProgrammesProgrammes
Programmes
Chaque programme dÊentraînement défini par défaut
dure 10 minutes. La vitesse définie pour chaque pro-
gramme est maintenue pendant 30 secondes, avant de
pouvoir régler la vitesse supérieure.
Le mode de programmation manuel vous permet à tout
moment de régler manuellement la vitesse et la durée
dÊentraînement.
Les courbes des programmes P1 à P5 sont représentées
sur la Figure (B). LÊaxe X indique la durée (ÿ TIME Ÿ)
avec des intervalles individuels de 30 secondes. LÊaxe Y
indique la vitesse (ÿ SPEED Ÿ).
14
1414
14 I
II
I
NSTRUCTIONS D
NSTRUCTIONS DNSTRUCTIONS D
NSTRUCTIONS D
Â
ÂÂ
Â
ENTRA˝NEMENT
ENTRA˝NEMENTENTRA˝NEMENT
ENTRA˝NEMENT
Votre intérêt pour l'entraînement de la force vous fait
franchir une étape importante vers une plus grande
mobilité et une bonne santé, car l'entraînement fortifie
vos muscles. L'entraînement de la force ne vous évite
pas seulement une perte de masse musculaire et de la
force, mais vous permet au contraire de les améliorer.
On/Off
Clé confort
Vitesse +
Temps +
Clés conforts
manuelle
Vitesse –
Temps –
Sélection
du
programme

FR
13
La mobilité des articulations est augmentée – le risque
de blessures est réduit.
Votre tension artérielle, votre taux de cholestérol, votre
taux de sucre dans le sang, votre motivation et même
votre humeur peuvent être énormément améliorés en
pratiquant un peu de sport. Vous pouvez changer votre
ligne de manière modérée. En accompagnement d'une
alimentation adaptée, vous réduirez votre taux de
graisse corporelle et vous améliorerez votre silhouette.
14.1
14.114.1
14.1 Instructions
Instructions Instructions
Instructions d'entraînement
d'entraînementd'entraînement
d'entraînement
Chaque unité d'entraînement doit se composer des trois
parties suivantes :
1. Échauffement (ÿ Warm Up Ÿ)
2. Entraînement de l'endurance/cardiotraining
et/ou entraînement de la force
3. Cool Down & post-étirement
L'échauffement (ÿWarm UpŸ)
Votre entraînement doit toujours commencer par un
échauffement. Plus l'unité d'entraînement qui va suivre
sera fatigante, plus l'échauffement est important.
Un échauffement prépare le corps à l'effort, stimule le
système cardio-vasculaire et préserve de lésions des
ligaments, des tendons et des articulations. Il aide éga-
lement à réduire le risque de crampes et de blessures
musculaires. Vous devriez assouplir un peu vos articu-
lations avant de commencer l'entraînement.
L'entraînement
Le début d'un entraînement d'endurance (appelé aussi
fréquemment entraînement cardio-vasculaire ou cardio
en raison des effets positifs sur le système cardio-
vasculaire) ou encore un entraînement de la force ou
un entraînement musculaire est le premier pas dans la
lutte contre les maladies de civilisation et les troubles
physiques en particulier à un âge avancé.
Le Cool Down
De même que vous devez faire un échauffement avant
chaque entraînement, il est également recommandé de
terminer l'unité par un Cool Down. Un Cool Down
introduit la phase de détente, fait baisser la tempéra-
ture du corps et constitue une transition entre l'effort et
la détente.
Le Cool Down devrait durer au moins 10 minutes
comme l'échauffement et être amené lentement
jusquÊau niveau le plus bas. La fréquence cardiaque
doit baisser le plus possible.
Vous éviterez ainsi les courbatures, car les déchets
métaboliques éventuellement produits peuvent être
mieux évacués.
Le post-étirement
Comme déjà évoqué, vous pouvez légèrement pré-
étirer vos muscles pendant l'échauffement. Après l'en-
traînement, vous devriez impérativement post-étirer vos
muscles. Le post-étirement redonne aux muscles leur
longueur de départ et évite les raccourcissements mus-
culaires. Plus l'entraînement a été intense, plus le post-
étirement est important.
Le post-étirement est particulièrement important pour
les principaux groupes musculaires sollicités au cours
de l'entraînement. L'étirement doit être ressenti, mais ne
doit pas être douloureux. La durée de l'étirement est
d'environ 20 secondes pour chaque muscle.
14.2
14.214.2
14.2 Consignes générales d'exercice
Consignes générales d'exerciceConsignes générales d'exercice
Consignes générales d'exercice
Commencez votre entraînement en répétant environ 7
ou 8 fois chaque série d'exercices. Augmenter lente-
ment le nombre des répétitions à votre gré jusqu'à
environ 11 ou 12 répétitions par série. Si vous sentez
que vos muscles fatiguent, réduisez votre volume d'en-
traînement.
L'idéal est de vous entraîner 3 à 4 fois par semaine.
Veillez toutefois à aménager un jour de repos entre les
différentes unités d'entraînement afin de permettre à la
musculature et au corps de récupérer suffisamment.
Veillez en outre à exécuter tous les exercices à partir
dÊun point central stable du buste. La colonne verté-
brale (en particulier la colonne lombaire) doit être
tenue droite afin que les vertèbres soient maintenues
dans une position correcte du point de vue bioméca-
nique, pour protéger par ex. les disques interverté-
braux de sollicitations néfastes.
Ne vous entraînez pas avec de l'élan et/ou par à-
coups, mais exécutez tous les exercices de manière
régulière et contrôlée. Notez qu'un entraînement ina-
dapté ou excessif peut avoir des effets nocifs sur la
santé.
14.3
14.314.3
14.3 Exercices
ExercicesExercices
Exercices
Exercez-vous d'abord à garder une position debout
stable sur l'appareil à l'arrêt. Tenez-vous d'abord de-
bout sur les deux jambes avec un axe du corps très
droit. Levez ensuite une jambe et écartez les bras.

FR
14
Changez de jambe d'appui. Développez ainsi la sen-
sation d'une bonne station debout sur l'appareil.
Dans la position de base sur la plate-forme vibrante, il
doit y avoir toujours une tension du corps au milieu du
tronc. ¤ cet effet, gardez le dos droit et fléchissez légè-
rement les genoux. Les muscles des jambes sont main-
tenant également légèrement contractés. Ne vous en-
traînez jamais avec les bras ou les jambes tendus, mais
gardez-les toujours fléchis.
(C) Flexion des genoux
Placez-vous dans la position de base sur l'appareil, les
pieds écartés environ de la largeur des épaules. Des-
cendez encore plus dans la position accroupie ou de
fléchissement des genoux tout en poussant le fessier
vers l'arrière et vers le bas. Pour stabilliser la position,
levez les bras vers l'avant et vers le haut. Gardez la
position accroupie, puis revenez à la position de dé-
part.
(D) Biceps
Placez-vous dans la position de base sur l'appareil, les
pieds écartés environ de la largeur des épaules. Envi-
ron à hauteur des hanches, saisissez dans chaque
main la poignée d'une sangle d'entraînement. Fléchis-
sez maintenant les bras et montez les mains vers le
haut. Veillez à ce que les coudes restent collés aux
côtés du corps pendant tout le mouvement. Gardez
brièvement cette position et revenez à la position de
départ.
(E) Dips
Asseyez-vous à la verticale devant l'appareil. Posez
maintenant les deux mains sur le plateau d'entraîne-
ment avec les pouces tournés vers l'intérieur et tendez
les bras pour soulever ainsi votre corps. Fléchissez à
nouveau les bras et abaissez le corps. Puis soulevez-le
à nouveau. Autre variante : vous pouvez effectuer cet
exercice avec les jambes soit fléchies soit tendues.
(F) Sit-Ups
Couchez-vous avec le dos sur le plateau d'entraîne-
ment et posez les pieds sur une chaise ou un support
similaire, placez ensuite les pieds devant le corps, les
genoux fléchis pour une meilleure stabilité au sol, ou
levez-les pour une variante plus difficile de l'exercice.
Mettez ensuite vos bras de chaque côté de la tête ou
devant la poitrine et soulevez le haut du corps en direc-
tion des genoux. Gardez brièvement cette position et
revenez à la position de départ.
(G) Pompes
Prenez appui avec les deux mains sur le plateau d'en-
traînement comme indiqué sur l'illustration. Maintenez
la tension du corps et fléchissez les bras. Tendez en-
suite à nouveau les bras. Variante : Vous pouvez exé-
cuter cet exercice soit avec les jambes fléchies au ni-
veau des genoux (voir illustration), soit sur vos pieds,
jambes tendues et dos droit.
(H) Milieu du tronc
Placez-vous en position couchée, jambes tendues, sur
le plateau d'entraînement et soutenez le haut du corps
sur les bras fléchis devant le plateau. Gardez la posi-
tion en maintenant le tronc et le dos stables.
(I) Dos
Couchez-vous avec le dos sur le sol devant le plateau
d'entraînement et placez les pieds sur le plateau d'en-
traînement. Stabilisez-vous avec les bras sur les côtés.
Soulevez maintenant les hanches vers le haut. Gardez
brièvement cette position et revenez à la position de
départ.
(J) Fente en avant (ÿ Poumon Ÿ)
Placez un pied au milieu du plateau d'entraînement.
Placez l'autre jambe de manière légèrement décalée
vers l'arrière. Abaissez maintenant le milieu du tronc
vers le bas. Veillez à ce que le genou avant ne dé-
passe pas la pointe du pied. Gardez brièvement cette
position, puis revenez à la position de départ. Chan-
gez de côté.
15
1515
15 M
MM
M
AINTENANCE ET ENTRET
AINTENANCE ET ENTRETAINTENANCE ET ENTRET
AINTENANCE ET ENTRETIEN
IENIEN
IEN
Prenez soin de votre appareil après chaque entraîne-
ment, vous en profiterez ainsi longtemps :
1. Rangez l'appareil de façon à ce qu'il ne gêne
personne.
2. Nettoyez l'appareil et ses poignées avec un chif-
fon sec. Cela empêchera la sueur séchée de salir
les composants.
Dans des conditions et une utilisation normales, votre
produit ne nécessite pas de maintenance. Cependant, il
incombe à l'utilisateur de contrôler régulièrement toutes
les pièces pour vérifier leur fixation et l'usure éventuelle
pouvant diminuer les performances. Conformément à
la norme EN ISO 20957-1:2013 point 5.15, surveillez
en particulier l'état des pièces soumises à des sollicita-
tions particulières comme par exemple les poignées ou
les amortisseurs.

FR
15
N'utilisez pas de détergent agressif. Retirez salissures
et poussière avec un chiffon doux éventuellement légè-
rement humide.
Une modification des pièces d'origine, des matériaux
ou de la construction de l'appareil de fitness multifonc-
tionnel pourra réduire ses performances de façon signi-
ficative. Il en sera de même s'il est très sale ou mal
utilisé.
16
1616
16 I
II
I
NFORMATIONS PRODUIT
NFORMATIONS PRODUITNFORMATIONS PRODUIT
NFORMATIONS PRODUIT
Poids sans emballage env. 13,2 kg
Dimensions à l'état monté : env.
(L) 69,5 x (l) 39 x (H) 13,5 cm
220-240 V AC
200 W
Toutes les indications ci-après mentionnées relatives à
la la force de traction (exprimée en N) de la sangle
dÊentraînement ou ÿ Tube Ÿ en fonction de lÊextension,
sÊentendent avec une tolérance de +/- 20%
Extension sangle
dÊentraînement
Force de tension (N)
80 cm
env. 22 N
100 cm
Env. 33 N
120 cm
env. 48 N
150 cm
env. 96 N
Veuillez respecter une longueur dÊextension maximale
de 150 cm (la longueur dÊextension est limitée, éviter
un allongement excessif de la sangle) !
L'article que vous avez acheté a été fabriqué pendant
la période du 1er au 30 novembre 2017. Les compo-
sants sont les suivants :
Écran, télécommande et support de sangle : ABS
& PVC
Vis : Acier
Surface d'entraînement TPR
Amortisseur : Caoutchouc
Moteur et cache du moteur : Acier
Pieds de support : Caoutchouc
Boîtier de l'adaptateur réseau : ABS
Sangle d'entraînement avec poignée : polyester,
ABS et nylon
16.1
16.116.1
16.1 Piles
PilesPiles
Piles
La télécommande fonction avec les deux piles fournies
1,5 V type AAA LR03.
Lors de l'insertion des piles, veillez à respecter la
bonne polarité.
Si vous n'utilisez pas l'appareil pendant une
longue période, enlevez les piles pour éviter des
dommages causés par une fuite éventuelle. Des
piles qui fuient ou qui sont endommagées peuvent
provoquer des brûlures d'acide au contact de la
peau. C'est pourquoi vous devez porter des gants
de protection pour manipuler les piles endomma-
gées.
Conservez les piles hors de portée des enfants. Ne
laissez pas traîner les piles sans surveillance, car
elles pourraient être avalées par les enfants ou les
animaux de compagnie.
Ne démontez pas les piles, ne cherchez pas à les
court-circuiter et ne les jetez pas dans le feu.
N'essayez jamais de charger les piles non re-
chargeables. Il existe un risque d'explosion !
16.2
16.216.2
16.2 Déclaration de conformité
Déclaration de conformitéDéclaration de conformité
Déclaration de conformité
Vous pouvez demander la déclaration de conformité
UE à l'adresse qui figure sur la carte de garantie jointe.
16.3
16.316.3
16.3 Élimination
ÉliminationÉlimination
Élimination
Éliminer l'emballage
Ce produit est livré dans un emballage des-
tiné à le protéger des dommages pendant le
transport. Les matériaux d'emballage sont
fabriqués à partir de matières premières recyclables.
Éliminez lÊemballage selon la pratique du tri sélectif.
Les papiers et cartons sont jetés avec les vieux papiers,
les films plastiques avec les déchets recyclables.
Éliminer le produit
Collecte de matières recyclables. Éliminez le
produit de manière conforme aux lois et
réglementations en vigueur dans votre pays.
Renseignez-vous auprès du service commu-
nal.
En fin de vie, ce produit ne doit pas être éliminé avec
les ordures ménagères, mais être déposé au point de
collecte pour le recyclage des appareils électriques et
électroniques. Enlevez éventuellement les piles/batteries
et éliminez les séparément du produit.

FR
16
Éliminer les piles
Les consommateurs finaux sont légalement
tenus (conformément à l'Ordonnance relative
à l'élimination des piles usagées) de restituer
toutes les piles/batteries ; une élimination
avec les ordures ménagères est interdite.
Les piles/batteries à teneur en polluants sont signalées
par le symbole ci-contre qui attire lÊattention sur
lÊinterdiction dÊélimination avec les ordures ménagères
Les indications pour les métaux lourds déterminants
sont : Cd (cadmium), Hg (mercure) et Pb (plomb).
L'indication figure sur les piles/batteries sous le sym-
bole des poubelles.
Vous pouvez déposer sans frais vos piles/batteries
usées dans les centres de collecte communaux ou par-
tout où l'on vend des piles/batteries. Vous respectez
ainsi les obligations légales et contribuez aussi à la
protection de l'environnement.
17
1717
17 G
GG
G
ARANTIE
ARANTIEARANTIE
ARANTIE
Chère cliente, cher client,
Vous recevez sur cet appareil une garantie de 3 ans à
compter de la date d'achat. En de défauts de ce pro-
duit, vous disposez de droits légaux à l'encontre du
vendeur du produit. Ces droits légaux ne sont pas limi-
tés par notre garantie présentée ci-après.
Conditions de garantie
La période de garantie prend effet à la date d'achat.
Veuillez conserver soigneusement l'original du ticket de
caisse. Ce document est requis en tant que preuve de
l'achat.
Si un défaut de fabrication ou de matériau survient
dans un délai de deux ans à compter de la date
d'achat de ce produit, celui-ci sera réparé ou remplacé
- à notre choix - gratuitement par nos soins Cette pres-
tation de garantie présuppose que l'appareil défec-
tueux et le justificatif d'achat (ticket de caisse) soit pré-
senté dans le délai imparti et que soit brièvement décrit
par écrit la nature du défaut et la date à laquelle il est
survenu.
Si le défaut est couvert par notre garantie, vous rece-
vrez en retour le produit réparé ou un produit neuf. La
réparation ou le remplacement du produit ne donne
pas lieu à une nouvelle période de garantie.
Étendue de la garantie
L'appareil a été produit avec soin conformément à des
directives qualité strictes et a été consciencieusement
vérifié avant la livraison.
La garantie est applicable en cas de vice de matériau
ou de fabrication. La garantie ne s'étend pas aux
pièces du produit qui sont soumises à une usure nor-
male et peuvent être de ce fait considérées comme
pièces d'usure.
Cette garantie est annulée si le produit a été endom-
magé, n'a pas été utilisé de manière correcte ou n'a
pas été entretenu. Pour utiliser le produit de manière
conforme, il est nécessaire de respecter strictement
toutes les consignes figurant dans le mode d'emploi. Il
convient d'éviter impérativement les utilisations et ma-
niements que le mode d'emploi déconseille ou qui font
l'objet d'avertissements.
Processus en cas dÊintervention de la garantie
Aux fins de garantir un traitement rapide de votre de-
mande, veuillez suivre les indications suivantes :
Pour toutes les demandes, veuillez fournir le ticket
de caisse et le numéro d'article à titre de preuve
d'achat.
Vous trouverez le numéro de l'article sur la page
de garde de votre mode d'emploi (en bas à
gauche) ou le numéro sur lÊemballage.
Si des défauts de fonctionnement ou autres vices
devaient se manifester, veuillez d'abord contacter
le département SAV mentionné ci-après par télé-
phone ou par e-mail.
Vous pouvez renvoyer sans frais de port pour
vous un produit considéré comme défectueux en
joignant la preuve dÊachat (ticket de caisse) et en
indiquant en quoi consiste le défaut et la date à
laquelle il est apparu à lÊadresse du service après-
vente qui vous a été communiquée.
Vous pouvez télécharger ces manuels et beaucoup
d'autres ainsi que des vidéos de produit et logi-
ciels sur www.lidl-service.com
18
1818
18
S
SS
S
ERVICE
ERVICEERVICE
ERVICE
Nom: ISM Service Center
E-Mail: SERVICE@LA-SPORTS.DE
Téléphone :° ++800 52776787 (gratuitement)
Siège : I.S.M. GmbH, Rathenaustr. 4,
D-51427 Berg. Gladbach
Allemagne

NL
17
19
1919
19 (NL
(NL(NL
(NL)
))
)
G
GG
G
EBRUIKSAANWIJZING
EBRUIKSAANWIJZINGEBRUIKSAANWIJZING
EBRUIKSAANWIJZING
Hartelijk gelukgewenst!
Met uw aankoop koos u voor een hoogwaardig
product dat 100% uit latex bestaat. Maak u vertrouwd
met het product voordat u het gebruikt. Lees hiervoor
aandachtig de volgende handleiding. Gebruik het
product uitsluitend zoals beschreven en voor de
aangegeven doeleinden. Bewaar deze handleiding
goed. Overhandig alle documenten als u het product
eventueel verder verkoopt.
De levering van uw nieuwe fitnesstoestel bestaat uit het
toestel zelf, deze gebruiksaanwijzing, het netsnoer, de
afstandsbediening en de trainingsbanden met
handgrepen.
Let er a.u.b. op dat u een toestel voor normaal
thuisgebruik aangeschaft hebt. Dit toestel is niet
geschikt voor commercieel gebruik. Leef de volgende
gebruiksaanwijzingen en onderhoudsinformatie na om
lang te kunnen blijven genieten van dit product.
20
2020
20 B
BB
B
ELANGRIJKE VEILIGHEI
ELANGRIJKE VEILIGHEIELANGRIJKE VEILIGHEI
ELANGRIJKE VEILIGHEIDSINFORMATIE
DSINFORMATIEDSINFORMATIE
DSINFORMATIE
a) Hou a.u.b. rekening met deze handleiding en
bewaar haar!
b) Lees en leef deze handleiding en
alle andere informatie na voordat
u het artikel in gebruik neemt. Het
artikel is slechts veilig als het juist
in elkaar gezet en juist gebruikt wordt. Het is uw
verantwoordelijkheid dat alle gebruikers van het
artikel over de waarschuwingsaanwijzingen en
voorzichtigheidsaanwijzingen geïnformeerd zijn.
c) Zoek steeds uw huisarts op om eventuele
gezondheidsrisico´s vast te stellen of te voorkomen
vooraleer u met een trainingsprogramma begint.
De raad van uw arts is doorslaggevend met
betrekking tot uw polsslag, uw bloeddruk en
cholesterolspiegel.
d) Let op uw lichaamssignalen. Oncorrect of
overmatig trainen kan uw gezondheid in gevaar
brengen. Als u tijdens de training pijn,
beklemming in de borstkas, een onregelmatige
hartslag, extreme ademnood, duizeligheid of
bevangenheid merkt, onderbreek dan meteen uw
training en zoek uw huisarts op.
e) Houd kinderen en dieren ver van het toestel. Dit
toestel is gemaakt voor gebruik door volwassenen.
f) Gebruik het toestel op een vaste, vlakke bodem
met een beschermende bedekking voor uw vloer
of tapijt. De veiligheidsafstand errond moet
minstens 2 m zijn.
g) Voor gebruik moet elke keer worden
gecontroleerd of alle schroeven en
moeren goed zijn vastgedraaid. De
veiligheid van het toestel kan slechts
behouden blijven als het regelmatig gecontroleerd
wordt.
h) Draag tijdens de training steeds passende kleding.
Vermijd wijde kleding, die aan uw trainingstoestel
kan blijven hangen. Draag passende schoenen
met zolen die niet glijden.
i) Houd tijdens het gebruik van het toestel voldoende
afstand t.o.v. andere personen en/of voorwerpen.
Let er bij het gebruik op dat u zichzelf of een
ander niet verwondt.
j) Gebruik het toestel alleen zoals aangegeven. Als
u tijdens de montage of de controle een defect
onderdeel vindt of als u vreemde geluiden hoort
tijdens het gebruik van het toestel, gebruik het dan
niet langer totdat het probleem is opgelost.
k) Het toestel is niet voor therapeutisch gebruik
geschikt.
l) Het toestel is met name geschikt voor het trainen
van de spieren in benen, bovenlichaam, armen en
romp en ter verbetering van de algehele conditie
en de vetverbranding.
m) Let conform EN ISO 20957-1:2013 par. 5.15 in
het bijzonder op de toestand van zwaar belaste
onderdelen.
n) Het toestel is getest volgens de norm EN ISO
20957-1, klasse H. Het is alleen bedoeld voor
huishoudelijk gebruik. Het apparaat is ontworpen
voor een maximaal gewicht van de gebruiker van
100 kg.
o) Trek de stekker niet aan het snoer uit het
stopcontact.
p) Spring niet op de plaat, omdat dit schade aan het
toestel kan veroorzaken.
q) Probeer nooit het toestel zelf te repareren; wend u
tot de verkoper of het Customer Service Center.

NL
18
r) Schakel het toestel na elk gebruik uit trek de
stekker uit.
s) Schakel het toestel uit en onderbreek ook de
stroomtoevoer voordat u het reinigt.
t) Als u het toestel op een tapijt gebruikt, let er dan
op dat de ventilatieopeningen nog voldoende
lucht krijgen.
u) Slechts één persoon tegelijk mag het toestel
gebruiken.
v) Bescherm de trilplaat tegen vocht en water en
zorg ervoor dat de elektrische componenten niet
met water in contact komen.
w) Dit toestel is niet geschikt voor zwangere vrouwen
en personen met verminderde lichamelijke,
zintuiglijke of geestelijke vermogens. Personen die
totaal geen ervaring hebben met dergelijke
toestellen, hebben voorafgaand aan het eerste
gebruik uitleg nodig over de werking en het
gebruik van het toestel.
x) Het is gevaarlijk een hand in het binnenbereik van
de voetplaat te steken.
y) Om schade aan het toestel en lawaai te
vermijden, dient u altijd te letten op een
gelijkmatige gewichtsverdeling.
21
2121
21 O
OO
O
NDERDELENLIJST
NDERDELENLIJSTNDERDELENLIJST
NDERDELENLIJST
Nr.
Nr.Nr.
Nr.
Omschrijving
OmschrijvingOmschrijving
Omschrijving
#
##
#
1
Afstandsbediening
1
2
Display
-
afdekking
1
3
Scherm
1
4
Transparant paneel
1
5
Bovenafdekking behuizing
1
6
Middendeel behuizing
1
7
Kruiskopschroef ST4 x 12
18
8
Basisplaat
1
9
Kunststof stekker
2
10
Motor
1
11
Motorsteun
1
12
Hoofdframe
1
13
Onderste printplaat
1
14
Transportrol
1
15
R
-
klem
2
16
Kabelverbinding
3
17
Magnetische ring
1
18
Trainingsband met greep (L 60 cm)
2
19
Onderafdekking behuizing
1
20
Voeten
4
21
Netsnoer met stekker
1
22
Stroomschakelaar
1
23
Houder voor stroomschakelaar
1
Nr.
Nr.Nr.
Nr.
Omschrijving
OmschrijvingOmschrijving
Omschrijving
#
##
#
24
Zekering
1
25
Rubbermat
1
26
Zeskantschroef M8 x 25
2
27
Motorsteun
1
28
Haak
2
29
Kruiskopschroef ST3 x 10
4
30
Verbindingspen
2
31
Kogellagerhuls
2
32
Schroef M5 x 30
8
33
Moer met nylon
-
voering M8
4
34
Afdekking voor ashouder
2
35
Ashouder
2
36
Kogellagers 6201
2
37
Vliegwiel
1
38
Veerring ±8
6
39
Zeskantschroef M8 x 20
2
40
Bus
1
41
As
1
42
V
-
snaar
1
43
Ring ±4
1
44
Isolatie
2
Afbeelding A is een explosietekening van uw nieuwe
toestel. Let op: het toestel is reeds voorgemonteerd.
22
2222
22 G
GG
G
EBRUIKSINSTRUCTIES
EBRUIKSINSTRUCTIESEBRUIKSINSTRUCTIES
EBRUIKSINSTRUCTIES
22.1
22.122.1
22.1 Algemene opmerkingen
Algemene opmerkingenAlgemene opmerkingen
Algemene opmerkingen
Het toestel is al volledig gemonteerd. Controleer voor
het eerste gebruik van uw nieuwe toestel of het volledig
is en ongeschonden. Haal hiervoor alles uit de doos.
Mochten er ondanks onze kwaliteitscontroles
onderdelen ontbreken, neem dan contact op met ons
service center via de onderstaande contactgegevens.
22.2
22.222.2
22.2 Computer
ComputerComputer
Computer
Op de afbeelding hierboven ziet u het aanraakscherm
("Touch Screen Control Panel") van de trilplaat. Op het
LED-scherm wordt onder andere de tijd weergegeven.
Daaronder wordt de weergave van een eventueel

NL
19
gekozen trainingsprogramma ("Program Mode
Indicator") getoond.
Aan-/uitschakelen
Druk op de knop POWER om het toestel te starten
en druk nogmaals op de knop om het uit te
schakelen.
De snelheid instellen
Druk op de knop MODE/SPEED om de snelheid in
de manuele modus te verhogen.
22.3
22.322.3
22.3 Afstandsbediening
AfstandsbedieningAfstandsbediening
Afstandsbediening
De gegevensoverdracht van de afstandsbediening naar
de trilplaat werkt met infrarood en heeft een bereik van
ca. 2,5 meter. Richt de afstandsbediening daarom op
de trilplaat om deze te bedienen.
Aan-/uitschakelen
Druk op de knop ON/OFF om het toestel te starten
en druk nogmaals op de knop om het uit te
schakelen.
De snelheid instellen
Druk in de manuele modus op de toets S (+) om de
snelheid te verhogen en op S (-) om deze te
verlagen.
De tijd instellen
Druk in de manuele modus op de toets T (+) om de
tijd te verhogen en op T (-) om deze te verlagen.
Het programma instellen
Uw trilplaat beschikt over vijf programma's, die zijn
ontworpen voor een efficiënte en diverse training.
Houd er rekening mee dat u in de
programmamodus de snelheid en de tijd niet kunt
aanpassen.
Met de sneltoetsen P1, P3 of P5 kunt u één van de
hieronder beschreven trainingsprogramma's
rechtstreeks selecteren. Door op de toets P te
drukken kunt u het volgende programma selecteren,
als volgt: 1 x drukken start Programma 1, 2 x
drukken start Programma 2, enzovoort.
22.4
22.422.4
22.4 Programm
ProgrammProgramm
Programma's
a'sa's
a's
Elk vooraf ingesteld trainingsprogramma duurt 10
minuten. De ingestelde snelheid wordt telkens
aangehouden gedurende een interval van 30 seconden
voordat de volgende snelheid wordt ingesteld.
In het manuele programma kunt u de snelheid en de
trainingstijd op elk moment handmatig instellen.
Het verloop van de programma's P1 tot P5 wordt
voorgesteld in afbeelding (B). De X-as beschrijft het
tijdsverloop ("TIME") met intervallen van telkens 30
seconden. De Y-as beschrijft de snelheid ("SPEED").
23
2323
23 T
TT
T
RAININGSAANW
RAININGSAANWRAININGSAANW
RAININGSAANWIJZINGEN
IJZINGENIJZINGEN
IJZINGEN
Met uw belangstelling voor krachttraining hebt u een
belangrijke stap in de richting van mobiliteit en
gezondheid gezet – want krachttraining versterkt het
spierstelsel. Krachttraining gaat niet alleen het verlies
van spiermassa en kracht tegen, maar verbetert die
zelfs. De beweeglijkheid van de gewrichten neemt toe –
waardoor het gevaar op kwetsuren vermindert.
Uw bloeddruk, uw cholesterolwaarden, uw
bloedsuiker, uw motivatie en zelfs uw humeur kunnen
door een beetje sport enorm verbeterd worden. Uw lijn
kunt u eveneens met mate veranderen. In combinatie
met passende voeding reduceert u uw lichaamsvet en
verbetert u uw figuur.
23.1
23.123.1
23.1 Algemene trainingsaanwijzingen
Algemene trainingsaanwijzingenAlgemene trainingsaanwijzingen
Algemene trainingsaanwijzingen
Elke trainingseenheid moet uit de volgende onderdelen
bestaan:
1. Opwarmen (ʽwarm upʼ)
2. Duur-/cardiotraining en / of krachttraining
3. Cool down & uitstrekken
Het opwarmen (ʽwarm upʼ)
Uw training moet altijd met een ʽwarm upʼ beginnen.
Hoe vermoeiender de aansluitende trainingseenheid is,
hoe belangrijker het opwarmen is.
Een ʽwarm upʼ bereidt het lichaam voor op de
belasting, stimuleert hart en bloedvaten en beschermt
banden, pezen en gewrichten tegen kwetsuren. Ook
het risico op krampen en spierkwetsuren wordt kleiner.
On/off
Sneltoets
Snelheid +
Tijd +
Sneltoets
handmatig
Snelheid –
Tijd –
Programma-
keuze

NL
20
U moet uw gewrichten een weinig losmaken voordat u
met de training begint.
De training
Het begin van een duurtraining (wegens de positieve
effecten voor het hart- en bloedvatensysteem vaak ook
hart-bloedvatentraining of cardiotraining genoemd) of
ook van een kracht- of spiertraining is de eerste stap in
de strijd tegen beschavingsziektes en lichamelijke
klachten die vooral op gevorderde leeftijd optreden.
De ʽcool downʼ
Net zoals voor elke trainingseenheid een ʽwarm upʼ
moet uitgevoerd worden, moet na elke eenheid een
ʽcool downʼ volgen. Een ʽcool downʼ leidt de
ontspanningsfase in, doet de lichaamstemperatuur
weer dalen en verduidelijkt de wisseling van belasting
naar ontspanning.
De ʽcool downʼ moet net als de ʽwarm upʼ minstens 10
minuten duren en langzaam tot op het laagste niveau
aangestuurd worden. Het aantal polsslagen moet zo
diep als mogelijk zakken.
Zo voorkomt u onder andere spierpijn, omdat
mogelijkerwijs ontstane stofwisselingseindproducten
kunnen worden afgevoerd.
Het uistrekken
Zoals al vermeld, kunt u tijdens de ʽwarm upʼ uw
spieren licht uitstrekken. Na de training moet u uw
spieren absoluut uitstrekken. Door dit te doen, brengt u
de spieren weer in de uitgangslengte en verhindert u
spierverkortingen. Hoe vermoeiender de training, hoe
belangrijker het uitstrekken.
Bijzonder belangrijk is het uitstrekken voor de
hoofdspiergroepen die tijdens de training belast
werden. De uitstrekking moet gevoeld worden, maar
mag geen pijn doen. De duur van het uitstrekken is
ongeveer 20 seconden voor elke spier.
Begin uw training met ongeveer 7 – 8 herhalingen per
oefeningenset. Drijf het aantal herhalingen dan volgens
uw persoonlijke voorkeur langzaam op tot 11 – 12 per
set. Als u merkt dat uw spierstelsel moe wordt, reduceer
dan de omvang van uw training.
Train idealiter ongeveer 3 – 4 keren per week. Let er in
elk geval op dat u tussen afzonderlijke
trainingseenheden een rustdag inlast, zodat uw
spierstelsel en lichaam voldoende kunnen herstellen.
Let er bovendien bij alle oefeningen op dat u ze met
een stabiel rompmidden (stabiele taille) uitvoert. De
ruggengraat (in het bijzonder de lenderuggengraat)
moet recht gehouden worden, zodat de afzonderlijke
wervellichamen in de biomechanisch juiste positie
worden gehouden en zo bv. de tussenwervelschijf
beschermd wordt tegen verkeerde belasting.
Train niet met zwier en/of met rukken, maar voer alle
oefeningen gelijkmatig en beheerst uit. Let erop dat
onvakkundig of overmatig trainen uw gezondheid kan
schaden.
23.2
23.223.2
23.2 Instructies voor oefeningen
Instructies voor oefeningenInstructies voor oefeningen
Instructies voor oefeningen
Oefen eerst stabiel rechtop staan op het uitgeschakelde
toestel. Ga eerst op beide benen staan met een rechte
lichaamsas. Til vervolgens één been op en spreid de
armen. Wissel van steunbeen. Zo krijgt u een gevoel
voor rechtop staan op het toestel.
In de basishouding op de trilplaat heeft het lichaam
altijd wat spanning in het midden van de romp. Recht
hierbij de rug en buig lichtjes door de knieën. De
beenspieren zijn nu eveneens licht gespannen. Train
nooit met gestrekte armen of benen, maar houd deze
altijd gebogen.
(C) Kniebuigingen
Ga in de basishouding op het toestel staan met de
voeten ongeveer op schouderbreedte uit elkaar. Ga
dieper in hurkzit of kniebuiging door door de benen te
buigen en het zitvlak naar achter en naar beneden te
bewegen. Steek voor de stabiliteit de armen omhoog
naar voren toe. Houd deze hurkpositie kort aan en
keer dan terug naar de uitgangspositie.
(D) Biceps
Ga in de basishouding op het toestel staan met de
voeten ongeveer op schouderbreedte uit elkaar. Neem
in elke hand de greep van een trainingsband ongeveer
op heuphoogte. Buig nu de armen en breng de handen
naar boven. Let erop dat de ellebogen tijdens de hele
beweging stabiel aan uw lichaamszijden blijven. Houd
deze positie kort aan en keer dan terug naar de
uitgangspositie.
(E) Dips
Ga loodrecht voor het toestel zitten. Leg nu beide
handen met naar binnen wijzende duimen op de
trainingsplaat en strek de armen om zo uw lichaam in
de lucht te tillen. Buig de armen weer en laat het
lichaam neer. Til het nu weer op. U kunt deze oefening
Seite wird geladen ...
Seite wird geladen ...
Seite wird geladen ...
Seite wird geladen ...
Seite wird geladen ...
Seite wird geladen ...
Seite wird geladen ...
Seite wird geladen ...
Seite wird geladen ...
Seite wird geladen ...
Seite wird geladen ...
Seite wird geladen ...
Seite wird geladen ...
Seite wird geladen ...
-
 1
1
-
 2
2
-
 3
3
-
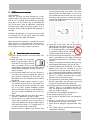 4
4
-
 5
5
-
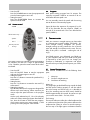 6
6
-
 7
7
-
 8
8
-
 9
9
-
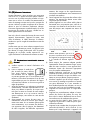 10
10
-
 11
11
-
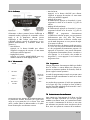 12
12
-
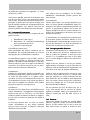 13
13
-
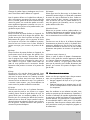 14
14
-
 15
15
-
 16
16
-
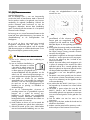 17
17
-
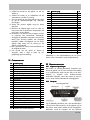 18
18
-
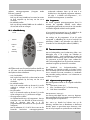 19
19
-
 20
20
-
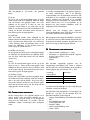 21
21
-
 22
22
-
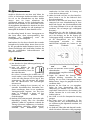 23
23
-
 24
24
-
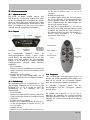 25
25
-
 26
26
-
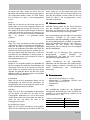 27
27
-
 28
28
-
 29
29
-
 30
30
-
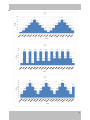 31
31
-
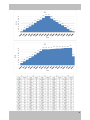 32
32
-
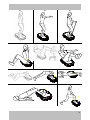 33
33
-
 34
34


in anderen Sprachen
- English: Crivit 292900
- français: Crivit 292900
- Nederlands: Crivit 292900
Verwandte Artikel
-
Crivit 289543 Instructions Manual
-
-
-
-
-
-
-
-