Korg KP2 Bedienungsanleitung
- Kategorie
- Digitale Klaviere
- Typ
- Bedienungsanleitung

OWNER’S MANUAL
MANUEL D’UTILISATION
BEDIENUNGSANLEITUNG

Precautions
Location
Using the unit in the following locations can result in a
malfunction.
•In direct sunlight
•Locations of extreme temperature or humidity
•Excessively dusty or dirty locations
•Locations of excessive vibration
•Close to magnetic fields
Power supply
Please connect the designated AC adapter to an AC out-
let of the correct voltage. Do not connect it to an AC out-
let of voltage other than that for which your unit is in-
tended.
Interference with other electrical devices
Radios and televisions placed nearby may experience re-
ception interference. Operate this unit at a suitable dis-
tance from radios and televisions.
Handling
To avoid breakage, do not apply excessive force to the
switches or controls.
Care
If the exterior becomes dirty, wipe it with a clean, dry
cloth. Do not use liquid cleaners such as benzene or thin-
ner, or cleaning compounds or flammable polishes.
Keep this manual
After reading this manual, please keep it for later refer-
ence.
Keeping foreign matter out of your
equipment
Never set any container with liquid in it near this equip-
ment. If liquid gets into the equipment, it could cause a
breakdown, fire, or electrical shock.
Be careful not to let metal objects get into the equipment.
If something does slip into the equipment, unplug the
AC adapter from the wall outlet. Then contact your
nearest Korg dealer or the store where the equipment
was purchased.
THE FCC REGULATION WARNING (for
U.S.A.)
This equipment has been tested and found to comply
with the limits for a Class B digital device, pursuant to
Part 15 of the FCC Rules. These limits are designed to
provide reasonable protection against harmful interfer-
ence in a residential installation. This equipment gener-
ates, uses, and can radiate radio frequency energy and, if
not installed and used in accordance with the instruc-
tions, may cause harmful interference to radio commu-
nications. However, there is no guarantee that interfer-
ence will not occur in a particular installation. If this
equipment does cause harmful interference to radio or
television reception, which can be determined by turn-
ing the equipment off and on, the user is encouraged to
try to correct the interference by one or more of the fol-
lowing measures:
Reorient or relocate the receiving antenna.
Increase the separation between the equipment and re-
ceiver.
Connect the equipment into an outlet on a circuit differ-
ent from that to which the receiver is connected.
Consult the dealer or an experienced radio/TV techni-
cian for help.
Unauthorized changes or modification to this system
can void the user’s authority to operate this equipment.
CE mark for European Harmonized Standards
CE mark which is attached to our company’s products of
AC mains operated apparatus until December 31, 1996
means it conforms to EMC Directive (89/336/EEC) and
CE mark Directive (93/68/EEC).
And, CE mark which is attached after January 1, 1997
means it conforms to EMC Directive (89/336/EEC), CE
mark Directive (93/68/EEC) and Low Voltage Directive
(73/23/EEC).
Also, CE mark which is attached to our company’s prod-
ucts of Battery operated apparatus means it conforms to
EMC Directive (89/336/EEC) and CE mark Directive
(93/68/EEC).
IMPORTANT NOTICE TO CONSUMERS
This product has been manufactured according to strict
specifications and voltage requirements that are appli-
cable in the country in which it is intended that this
product should be used. If you have purchased this
product via the internet, through mail order, and/or via
a telephone sale, you must verify that this product is in-
tended to be used in the country in which you reside.
WARNING: Use of this product in any country other
than that for which it is intended could be dangerous
and could invalidate the manufacturer’s or distributor's
warranty.
Please also retain your receipt as proof of purchase oth-
erwise your product may be disqualified from the
manufacturer’s or distributor's warranty.

1
2
1
3
4
12
13
5
6
7
8
9
10
11
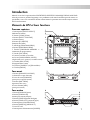
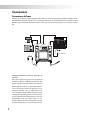
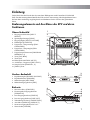
Introduction
Thank you for purchasing the KP2 KAOSS PAD dynamic effect/controller. For trouble-free en-
joyment of the KP2’s fullest potential, please read this manual carefully and use the product
correctly.
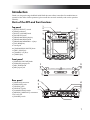
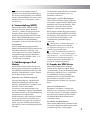
Top panel
1. [INPUT SELECT] switch
2. [PEAK] indicator
3. [INPUT VOLUME] knob
4. [FX DEPTH] knob
5. [PROGRAM/BPM] display
6. [PROGRAM/BPM] knob
7. [PROGRAM MEMORY 1–8] keys
8. [TAP/BPM] key
9. Touch pad
10. [PAD MOTION/MUTE] lever
11. [REC/STOP] key
12. [SAMPLE 1, 2] keys
13. [HOLD] key
Front panel
1. [PHONES VOLUME] knob
2. [PHONES] output jack
3. [MIC TRIM] knob
4. [MIC] input jack
Rear panel
1. [GROUND] connector
2. [PHONO IN] jacks
3. [LINE IN] jacks
4. [LINE OUT] jacks
5. [CONNECTION] switch
6. [MIDI IN], [MIDI OUT] connectors
7. DC 12V jack
8. [POWER] switch
Parts of the KP2 and their functions
2
1
3
4
4
3
2
1
5
7
8
6

2
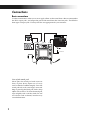
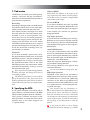
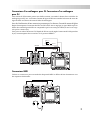
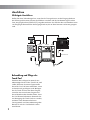
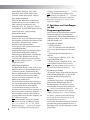
Connections
Basic connections
Use these connections when you want to apply effects to the sound from a device connected to
the KP2’s input jacks, and output the processed sound from the Line Out jacks. The KP2 has
three types of input jacks. Use the jacks that are appropriate for your situation.
PHONO IN
LINE IN
LINE OUT DC12V
MIXER, DJ MIXER
AC
MIC
1
BAL
OR
UNBAL
LINE IN 1
LOW CUT
75Hz
18dB/OCT
TRIM
+
10dB
-40dB
10
60
U
-
1
0
d
B
V
M
I
C
G
A
I
N
LINE IN 7-8
L
R
BAL
OR
UNBAL
MONO
+4
-10
LEVEL
LINE IN 9-10
L
R
BAL
OR
UNBAL
MONO
+4
-10
LEVEL
LINE IN 11-12
L
R
BAL
OR
UNBAL
MONO
+4
-10
LEVEL
LINE IN 13-14
L
R
BAL
OR
UNBAL
MONO
+4
-10
LEVEL
STEREO AUX RETURNS
1
2
1
2
AUX SEND
LEFT
(1/MONO)
RIGHT
ALL BAL/UNBAL
L
R
TAPE
INPUT
TAPE
OUTPUT
MAIN OUTS
L
R
BAL/UNBAL
PHONES
MICRO SERIES 1402-VLZ
14-CHANNEL MIC/LINE MIXER
MIC
2
BAL
OR
UNBAL
LINE IN 2
LOW CUT
75Hz
18dB/OCT
TRIM
+
10dB
-40dB
10
60
U
-
1
0
d
B
V
M
I
C
G
A
I
N
MIC
3
BAL
OR
UNBAL
LINE IN 3
LOW CUT
75Hz
18dB/OCT
TRIM
+
10dB
-40dB
10
60
U
-
1
0
d
B
V
M
I
C
G
A
I
N
MIC
4
BAL
OR
UNBAL
LINE IN 4
LOW CUT
75Hz
18dB/OCT
TRIM
+
10dB
-40dB
10
60
U
-
1
0
d
B
V
M
I
C
G
A
I
N
MIC
5
BAL
OR
UNBAL
LINE IN 5
LOW CUT
75Hz
18dB/OCT
TRIM
+
10dB
-40dB
10
60
U
-
1
0
d
B
V
M
I
C
G
A
I
N
MIC
6
BAL
OR
UNBAL
LINE IN 6
LOW CUT
75Hz
18dB/OCT
TRIM
+
10dB
-40dB
10
60
U
-
1
0
d
B
V
M
I
C
G
A
I
N
60
U
+15
U
+15
AUX
1
MON/
EFX
2
EFX
U
+15
U
+12
-15
-12
U
+15
-15
PAN
SOLO
1
MUTE
ALT 3–4
EQ
HI
12kHz
MID
2.5kHz
LOW
80Hz
L
R
dB
10
5
U
5
10
20
30
40
50
60
U
+15
U
+15
AUX
1
MON/
EFX
2
EFX
U
+15
U
+12
-15
-12
U
+15
-15
PAN
SOLO
2
MUTE
ALT 3–4
EQ
HI
12kHz
MID
2.5kHz
LOW
80Hz
L
R
dB
10
5
U
5
10
20
30
40
50
60
U
+15
U
+15
AUX
1
MON/
EFX
2
EFX
U
+15
U
+12
-15
-12
U
+15
-15
PAN
SOLO
3
MUTE
ALT 3–4
EQ
HI
12kHz
MID
2.5kHz
LOW
80Hz
L
R
dB
10
5
U
5
10
20
30
40
50
60
U
+15
U
+15
AUX
1
MON/
EFX
2
EFX
U
+15
U
+12
-15
-12
U
+15
-15
PAN
SOLO
4
MUTE
ALT 3–4
EQ
HI
12kHz
MID
2.5kHz
LOW
80Hz
L
R
dB
10
5
U
5
10
20
30
40
50
60
U
+15
U
+15
AUX
1
MON/
EFX
2
EFX
U
+15
U
+12
-15
-12
U
+15
-15
PAN
SOLO
5
MUTE
ALT 3–4
EQ
HI
12kHz
MID
2.5kHz
LOW
80Hz
L
R
dB
10
5
U
5
10
20
30
40
50
60
U
+15
U
+15
AUX
1
MON/
EFX
2
EFX
U
+15
U
+12
-15
-12
U
+15
-15
PAN
SOLO
6
MUTE
ALT 3–4
EQ
HI
12kHz
MID
2.5kHz
LOW
80Hz
L
R
dB
10
5
U
5
10
20
30
40
50
60
U
+15
U
+15
AUX
1
MON/
EFX
2
EFX
U
+15
U
+12
-15
-12
U
+15
-15
PAN
SOLO
7–8
MUTE
ALT 3–4
EQ
HI
12kHz
MID
2.5kHz
LOW
80Hz
L
R
dB
10
5
U
5
10
20
30
40
50
60
U
+15
U
+15
AUX
1
MON/
EFX
2
EFX
U
+15
U
+12
-15
-12
U
+15
-15
PAN
SOLO
9–10
MUTE
ALT 3–4
EQ
HI
12kHz
MID
2.5kHz
LOW
80Hz
L
R
dB
10
5
U
5
10
20
30
40
50
60
U
+15
U
+15
AUX
1
MON/
EFX
2
EFX
U
+15
U
+12
-15
-12
U
+15
-15
PAN
SOLO
11–12
MUTE
ALT 3–4
EQ
HI
12kHz
MID
2.5kHz
LOW
80Hz
L
R
dB
10
5
U
5
10
20
30
40
50
60
U
+15
U
+15
AUX
1
MON/
EFX
2
EFX
U
+15
U
+12
-15
-12
U
+15
-15
PAN
SOLO
13–14
MUTE
ALT 3–4
EQ
HI
12kHz
MID
2.5kHz
LOW
80Hz
L
R
dB
10
5
U
5
10
20
30
40
50
60
dB
10
5
U
5
10
20
30
40
50
60
dB
10
5
U
5
10
20
30
40
50
U
+10
U
+20
U
+20
1
2
AUX 1 MASTER
PRE
POST
NORMALLED
AUX 1
SELECT
EFX TO
MONITOR
AUX
RETURNS
SOURCE
MAIN
MIX
LEFT RIGHT
CLIP+28
+10
+7
+4
+2
0
-2
-4
-7
-10
-20
-30
0dB
=
0dBu
RUDE SOLO LIGHT
ALT
3-4
TAPE
ASSIGN
TO MAIN MIX
NORMAL(AFL)
LEVEL SET(PFL)
SOLO
MODE
PHANTOM
POWER
CONTROL
ROOM
/ PHONES
MAIN MIX
TURNTABLE
CD PLAYER
AC ADAPTER
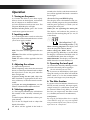
Care of the touch pad
Never press the touch pad with excessive
force, or place heavy objects on it. It may
crack or break if handled roughly. Press the
touch pad only with your finger, since rub-
bing or pressing the touch pad with a sharp
object will scratch it. To clean the touch pad,
wipe it lightly with a soft dry cloth. Do not
use solvents such as thinner, since this may
cause deformation.

3
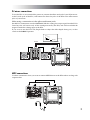
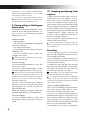
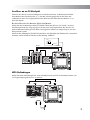
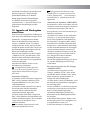
DJ mixer connections
To use the KP2 as an external effect processor, connect the effect send jack of your DJ mixer etc.
to the Line In jacks of the KP2, and connect the Line Out jacks of the KP2 to the effect return
jacks of your mixer.
When using a connection via the effect send/return jacks
Set theKP2’s Connection switch to FX LOOP. With this setting, the output signal from the KP2’s
Line Out jacks will consist only of the sound processed by the KP2, and will not include the
original sound that is being input to the KP2.
If you want to use the KP2’s FX/Depth knob to adjust the effect depth during use, set this
switch to the DIRECT position.
LINE IN
LINE OUT
CONNECTION LINE OUT
DIRECT
FX LOOP
TURNTABLE
TURNTABLEDJ MIXER
SEND
RETURN
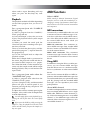
MIDI connections
Use these connections when you want to connect MIDI devices to the KP2 and use it along with
sequence data.
LINE IN MIDI INMIDI OUTOUTPUT
KORG EM-1

4
Operation
1. Turning on the power
(1) Connect the KP2 to your other equip-
ment as shown in the diagram, and connect
the AC adapter to an electrical outlet.
(2) Press the Power switch to turn it on. The
Program/BPM display will light.
To turn off the power, press the Power
switch once again to turn it off.
2. Inputting audio
(1) Use the Input Select switch to select the
input jacks of the connected device to which
you want to apply an effect.
MIC: The effect will be applied to the mic
input.
PHONO: The effect will be applied to the
phono inputs.
LINE: The effect will be applied to the line
inputs.
3. Adjusting the volume
(1) Adjust the input level.
While outputting audio from the connected
device, use the Input Volume knob to adjust
the input level so that the peak indicator
does not light red.
If you are using the mic jack, adjust the
MIC Trim knob as appropriate for the sensi-
tivity of the mic, so that the sound is not dis-
torted.
(2) If you are using headphones, use the
Phones Volume knob to adjust the level.
4. Selecting a program
(1) The Program/BPM display will indicate
the number of the currently selected pro-
gram.
Use the Program/BPM knob to select a pro-
gram (00–99).
(2) Use the FX/Depth knob to adjust the
depth of the effect.
No effect will be applied if the knob is
turned to the far left, and the maximum ef-
fect will be applied if the knob is turned to
the far right.
About the Program/BPM display
This display shows the number of the cur-
rently selected program, the specified BPM,
and the point (position) at which you are
touching the touch pad.
While you are operating the touch pad:
The display will indicate the position at
which you are touching the pad (1.1–9.9; 5.5
is the center).
Horizontal position (1–9)
Vertical position (1–9)
When selecting programs: The display will
show the program number (00–99).
When setting the BPM: When you are
pressing the Tap/BPM key to set the BPM,
the display will indicate the BPM value. In
Auto BPM mode, three dots will light.
MIDI Edit mode: The display will show the
MIDI channel or control number, etc.
5. Operating the touch pad
(1) Control the sound by rubbing your fin-
ger across the touch pad or tapping it.
Use the included protective sheet.
(2) If you turn on the Hold key while oper-
ating the touch pad, the KP2 will hold the
effect sound as it was the moment before
you took your finger away from the pad.
6. The Mute function
If you move the Pad Motion/Mute lever to
MUTE (toward yourself), the input signal,
sample sound, or synth/drum sound will
be silenced. When using delay or reverb,
this lets you output only the effect sound
(i.e., the delayed sound or reverberation).
transformer
By using the Pad Motion/Mute lever to rapidly
switch MUTE on/off, you can create rhythms
using a sustained input sound. This is a DJ tech-
nique known as “transformer.”

5
7. Pad motion
The KP2 lets you record your touch pad op-
erations, and move the the Pad Motion/
Mute lever to the PAD MOTION position to
play back these operations.
Recording
Recording will begin when you hold the the
Pad Motion/Mute lever in the PAD MO-
TION position and touch the touch pad.
Even when you take your finger away from
the touch pad, this state will continue to be
recorded as part of your operation. This
means that you can also record operations
that include tapping on the touch pad. Re-
cording will end when you move thethe
Pad Motion/Mute lever back to its original
position. Recording will also end when you
reach the maximum recording time (ap-
proximately 3.2 seconds).
Playback
If you have recorded a pad motion, move
the the Pad Motion/Mute lever to the PAD
MOTION position, and the recorded mo-
tion will play back. As long as you leave the
the Pad Motion/Mute lever in the PAD
MOTION position, the same motion will be
played back repeatedly as long as you do
not touch the touch pad.
If you touch the touch pad during playback,
recording will begin. Recording will be reset if
you change programs.
The Hold key on/off state is not recorded as
part of the pad motion. Also, if you turn on the
Hold key and play back a pad motion, the motion
will be held at the point where you stopped play-
back.
8. Specifying the BPM
If you specify the BPM, you will be able to
apply effects in synchronization to the BPM
when an effect program from the “BPM FX/
PTN” group is selected. For details on the
effect parameter to which this effect will be
applied, refer to the effect program list
(
☞
separate sheet).
What is BPM?
BPM (Beats Per Minute) is the tempo of the
song expressed as the number of beats (quarter
notes) that occur in one minute. A higher BPM
value means a faster tempo.
To set the BPM
If you know the BPM, press the Tap/BPM
key and use the Program/BPM knob to set
the value. The normal display will reappear
if ten seconds pass without any operation
being performed.
Tap Tempo function
If you do not know the BPM, press the Tap/
BPM key twice or more in rhythm with the
beat of the song. The beat will be detected,
and the BPM will appear in the Program/
BPM display.
Auto BPM function
If you press and hold down the Tap/BPM
key for an extended time, three dots will ap-
pear in the Program/BPM display, and the
beat of the audio input will be detected au-
tomatically. (Auto BPM mode)
While the Program/BPM display is blink-
ing, the BPM is being detected.
Press the Tap/BPM key once again to end
automatic detection.
You can set the BPM in a range of 80–160.
MIDI Sync function
The BPM of the KP2 can be specified by
MIDI Timing Clock messages from an exter-
nal MIDI device. Connect the [MIDI IN]
connector of the KP2 to the [MIDI OUT]
connector of the external MIDI device (such
as a sequencer) that is transmitting the tim-
ing clock messages.
This function does not synchronize se-
quence data with the KP2's rhythm pattern pro-
grams. If you want to synchronize to sequence
data, you will either have to insert a Touch Pad
On message into the beginning of each measure
of your sequence data, or touch the touch pad at
the beginning of each KP2 phrase to start the
pattern.
If you want the KP2 to receive Timing
Clock and Touch Pad On messages, go to MIDI

6
Edit mode (☞ p.8), and make “MIDI message
transmission/reception settings” (☞ p.8) so that
these messages will be received.
You can not use the Tap Tempo or Auto
BPM functions while the KP2 is receiving Tim-
ing Clock from an external MIDI device
9. Storing settings in the Program
Memory key
The current state of the KAOSS PAD can be
stored in one of the Program Memory 1–8
keys, so that it can be instantly recalled
whenever you want.
Stored contents
— Effect program
— On/off state of the Hold key and the held
position (coordinates)
— FX/Depth knob setting
— For the “BPM FX/PTN” group, the speci-
fied BPM value
— For the “SAMPLE/PLAY” group, the
Sample 1, 2 key used
Effect programs 60 and 90–99 do not store
the state of the Hold key.
To store settings
(1) Press the Program Memory 1–8 key that
you want to assign.
(2) Use the Program/BPM knob to select
the effect program that you want to assign.
If you want to store the setting of the Hold
key, select the program and then turn on the
Hold key and touch the touch pad to specify the
position. If you want to store other settings,
make them at this time.
(3) Press and hold down the Program
Memory 1–8 key you selected in step (1) for
approximately two seconds, and the set-
tings will be stored.
When the settings have been stored, the
Program/BPM display will stop blinking.
To recall settings
(1) Press a Program Memory 1–8 key, and
the settings stored in that key will be re-
called.
10. Sampling and playing back
a phrase
A phrase from the audio input can be re-
corded into one of the Sample 1, 2 keys.
Then when you have selected a program
from the “SAMPLE/PLAY” group (pro-
grams 90–99), you can play back the sample
while using the touch pad to control the
playback speed or reverse-playback. If you
have selected a program from other than the
“SAMPLE/PLAY” group, pressing the
Sample 1, 2 keys will play back the phrase
that was recorded in that key.
You can record for approximately six sec-
onds in each of the two keys.
The recorded phrases will be lost when the
power is turned off. It is not possible to save the
recorded phrases.
Recording
(1) Press the Rec/Stop key, and the Rec/
Stop key LED will blink to indicate that you
are in record-ready mode.
(2) Press the Sample 1, 2 key into which you
want to record. At this time, you will not
hear the playback sound.
(3) When you press the Rec/Stop key, the
Rec/Stop key LED will light, and recording
will begin. Recording will stop when you
press the Rec/Stop key once again.
Recording will stop automatically when
you reach the maximum recording time.
For programs of other than the “SAMPLE/
PLAY” group, you can operate the touch pad
while you record, and the sound processed by the
effect will be recorded.
Auto recording (AUTO REC)
You can cause recording to begin automati-
cally when audio is input. This is conve-
nient when recording voice from a mic.
(1) In step (2) of the Recording procedure,
hold down the Sample 1, 2 key to which you
want to record, and press the Rec/Stop key.
The Rec/Stop key and Sample 1, 2 key
LEDs will blink simultaneously, indicating
that you are in record-ready mode.
(2) Recording will begin automatically

7
when audio is input. Recording will stop
when you press the Rec/Stop key once
again.
Playback
The playback method will differ depending
on the effect program that you have se-
lected.
For a program from the “SAMPLE/
PLAY” group
(1) Select a program from the “SAMPLE/
PLAY” group (90–99).
(2) Press the Sample 1, 2 key that you want
to play. The playback will not yet be output
at this time.
(3) When you touch the touch pad, the
sound will play back according to the posi-
tion that you touch.
The way in which the phrase plays will de-
pend on the program. (
☞
separate sheet: Ef-
fect program list)
(4) Use the FX Depth knob to adjust the
playback volume.
When the FX Depth knob is positioned in
the center, the playback sound and the in-
put sound will be output in a 1:1 propor-
tion. When the knob is at the maximum po-
sition, only the sample sound will be output
during playback, and you will not hear the
input sound.
For a program from other than the
“SAMPLE/PLAY” group
(1) Select a program from other than the
“SAMPLE/PLAY” group.
(2) Press a Sample 1, 2 key, and the recorded
phrase will play at normal speed. If you
continue pressing the key, the phrase will
play back as a loop.
To adjust the volume, continue pressing the
Sample 1, 2 key and use the FX Depth knob
to make adjustments.
You can apply effects to the playback by op-
erating the touch pad while the sound plays
back.
If you press the Hold key while pressing the
Sample 1, 2 key, the playback will be held. Hold
will be cancelled when you press the Sample 1, 2
key once again.
MIDI functions
What is MIDI?
MIDI stands for Musical Instrument Digital
Interface, and is a world-wide standard for ex-
changing a variety of performance-related infor-
mation between electronic musical instruments
and computers.
MIDI connections
Commercially available MIDI cables are used
to transmit and receive MIDI messages. Con-
nect these cables between the MIDI connec-
tors of the KP2 and the MIDI connectors of
the external MIDI device with which you
want to transfer data.
MIDI IN connector: This connector re-
ceives MIDI messages from another MIDI
device. Connect it to the MIDI OUT connec-
tor of the external device.
MIDI OUT connector: This connector
transmits messages from the KP2. Connect
it to the MIDI IN connector of the external
device.
Using MIDI
In addition to using the KP2 as an effect pro-
cessor, you can transmit MIDI messages
from the KP2 to use it as a realtime control-
ler for a synthesizer or other external MIDI
device.
You can also connect the KP2 to a MIDI se-
quencer, and record the MIDI messages that
are transmitted when you operate the touch
pad. By playing back the recorded MIDI
messages you can reproduce your touch
pad operations.
About MIDI channels
In order to independently transmit informa-
tion to multiple MIDI devices over a single
MIDI cable, MIDI uses sixteen channels (1–
16). If the transmitting device is set to MIDI
channel “1,” the MIDI messages will not be
received unless the receiving device is also
set to MIDI channel “1.”

8
About the MIDI implementation chart
The owner’s manual of each MIDI device in-
cludes a “MIDI implementation chart.” This
chart lets you check the types of MIDI mes-
sage that can be transmitted or received.
When you use two (or more) MIDI devices to-
gether, compare their MIDI implementation
charts to see which types of MIDI message
they are able to transmit and receive between
themselves.
* Details on the MIDI functionality are provided
in the separate MIDI implementation. To obtain
the MIDI implementation, please contact Korg
distributor.
MIDI Edit mode
Hold down the Tap/BPM key and press the
Rec/Stop key. After approximately one sec-
ond, you will enter MIDI Edit mode, and
the MIDI channel will be displayed blinking
in the Program/BPM display.
Setting the MIDI channel
In MIDI Edit mode, the Program/BPM dis-
play will show the MIDI channel. At this
time you can use the Program/BPM knob to
change the MIDI channel.
MIDI message transmission/
reception settings
Transmission and reception of each type of
MIDI message can be turned on/off by
pressing one of the keys listed below. Trans-
mission and reception are enabled when the
corresponding LED is lit. Transmission and
reception are disabled when the LED is
dark.
(☞p.9: Messages that can be transmitted
and received)
Some parameters can only be transmitted,
and others can only be received.
Changing the control number
By holding down one of the Program
Memory 3–8 keys and turning the Pro-
gram/BPM knob, you can change the con-
trol number setting. Although it is possible
to select a control number that is already in
use, it is not possible to simultaneously turn
on transmission and reception for MIDI
messages of the same control number.
The MIDI messages transmitted and received
by the KP2 can be changed in the range of CC#1–
CC#31 and CC#64–CC#95.
To store the settings you modified
In MIDI Edit mode, press and hold the Rec/
Stop key for one second or longer, and the
MIDI settings you modified will be stored.
If you turn off the power without storing
the modified settings, they will revert to
their previous state.
To exit MIDI Edit mode
You will return to the normal state if you
touch the touch pad or leave the KP2 for ten
seconds without performing any operation.
Saving your settings
You can save the contents of program
memory and the control number settings of
MIDI edit mode by transmitting them as ex-
clusive messages, and saving them on an
external MIDI device.
For details on the exclusive messages that
the KP2 can transmit and receive, refer to
the separate MIDI implementation.

9
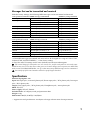
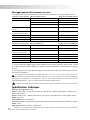
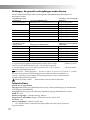
Messages that can be transmitted and received
With the factory settings, the following MIDI messages can be transmitted and received.
Data operations transmitted
MIDI messages transmitted
ON/OFF key settings transmitted
Touch pad X-axis Effect control 1 (CC#12) *1, *2 Program Memory 4
Touch pad Y-axis Modulation depth 1 (CC#1) Y=5–9 Program Memory 1
Modulation depth 2 (CC#2) Y=5–1 Program Memory 2
Effect control 2 (CC#13) *1, *2 Program Memory 5
Touch pad X+Y-axis Effect depth 3 (CC#93) *1 Program Memory 3
Touch pad on/off Effect depth 2 (CC#92) *1, *2 Program Memory 6
FX DEPTH Effect depth 4 (CC# 94) *1, *2 Program Memory 7
MUTE Effect depth 5 (CC# 95) *1, *2 Program Memory 8
Program change Program change (00–99) *2 Hold
Data operations received
MIDI messages received
ON/OFF key settings received
Touch pad X-axis Effect control 1 (CC#12) *1, *2 Program Memory 4
Touch pad Y-axis Effect control 2 (CC#13) *1, *2 Program Memory 5
Touch pad on/off Effect depth 2 (CC#92) *1, *2 Program Memory 6
FX DEPTH Effect depth 4 (CC# 94) *1, *2 Program Memory 7
MUTE Effect depth 5 (CC# 95) *1, *2 Program Memory 8
Program change Program change (00–99) *2 Hold
BPM Timing clock Sample 1
*1: The MIDI messages transmitted and received can be changed in a range of CC#1–CC#31,
CC#64–CC#95, and PITCH BEND. ( ) is the factory setting.
*2: Ena/Dis and CC# settings are the same for both transmission and reception.
The control changes for touch pad Y-axis Y-5–9 and Y-5–1, and for touch pad X+Y axis can be trans-
mitted but not received. For this reason when you record control changes into a sequencer, use MIDI Edit
mode to turn PROGRAM MEMORY 1–3 off, so that unnecessary MIDI messages are not transmitted.
Previously-specified control numbers cannot be specified again elsewhere.
Specifications
Number of programs: 100
Input: Mic input jack / monaural phone jack, Phono input jacks / RCA phono jacks, Line input
jacks / RCA phono jacks
Output: Line output jacks / RCA phono jacks, Headphone jack / stereo phone jack
MIDI: IN, OUT
Power supply: DC 12V, 700 mA
Included items: AC adapter, touch pad protection sheet
Weight: 1.1kg
Dimensions: 204(W) X 207(D) X 48(H)mm
— Appearance and specifications are subject to change without notice for improvement.

Marque CE pour les normes européennes
harmonisées
La marque CE apposée sur tous les produits de notre
firme fonctionnant sur secteur jusqu'au 31 décembre
1996 signifie que ces appareils répondent à la Directive
EMC (89/336/EEC) et à la Directive concernant la mar-
que CE (93/68/EEC).
La marque CE apposée après le 1 janvier 1997 signifie
que ces appareils sont conformes à la Directive EMC
(89/336/EEC), à la Directive concernant la marque CE
(93/68/EEC) ainsi qu'à la Directive Basse Tension (73/
23/EEC).
La marque CE apposée sur tous les produits de notre
firme fonctionnant sur piles signifie que ces appareils ré-
pondent à la Directive EMC (89/336/EEC) et à la Direc-
tive concernant la marque CE (93/68/EEC).
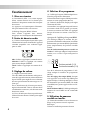
Précautions
Emplacement
L’utilisation de cet instrument dans les endroits suivants
peut en entraîner le mauvais fonctionnement.
• En plein soleil
• Endroits très chauds ou très humides
• Endroits sales ou fort poussiéreux
• Endroits soumis à de fortes vibrations
• A proximité de champs magnétiques
Alimentation
Branchez l’adaptateur secteur fourni à une prise secteur
de tension appropriée. Evitez de brancher l’adaptateur à
une prise de courant dont la tension ne correspond pas à
celle pour laquelle l'appareil est conçu.
Interférences avec d’autres appareils
électriques
Les postes de radio et de télévision situés à proximité
peuvent par conséquent souffrir d’interférences à la ré-
ception. Veuillez dès lors faire fonctionner cet appareil à
une distance raisonnable de postes de radio et de télévi-
sion.
Maniement
Pour éviter de les endommager, manipulez les comman-
des et les boutons de cet instrument avec soin.
Entretien
Lorsque l’instrument se salit, nettoyez-le avec un chiffon
propre et sec. Ne vous servez pas d’agents de nettoyage
liquides tels que du benzène ou du diluant, voire des
produits inflammables.
Conservez ce manuel
Après avoir lu ce manuel, veuillez le conserver soigneu-
sement pour toute référence ultérieure.
Evitez toute intrusion d’objets ou de li-
quide
Ne placez jamais de récipient contenant du liquide près
de l’instrument. Si le liquide se renverse ou coule, il ris-
que de provoquer des dommages, un court-circuit ou
une électrocution.
Veillez à ne pas laisser tomber des objets métalliques
dans le boîtier (trombones, par ex.). Si cela se produit,
débranchez l’alimentation de la prise de courant et con-
tactez votre revendeur korg le plus proche ou la surface
où vous avez acheté l’instrument.
REMARQUE IMPORTANTE POUR LES
CLIENTS
Ce produit a été fabriqué suivant des spécifications sévè-
res et des besoins en tension applicables dans le pays où
ce produit doit être utilisé. Si vous avez acheté ce produit
via l’internet, par vente par correspondance ou/et vente
par téléphone, vous devez vérifier que ce produit est
bien utilisable dans le pays où vous résidez.
ATTENTION: L’utilisation de ce produit dans un pays
autre que celui pour lequel il a été conçu peut être dan-
gereuse et annulera la garantie du fabricant ou du distri-
buteur. Conservez bien votre récépissé qui est la preuve
de votre achat, faute de quoi votre produit ne risque de
ne plus être couvert par la garantie du fabricant ou du
distributeur.

1
2
1
3
4
12
13
5
6
7
8
9
10
11
Introduction
Merci d’avoir fait l’acquisition du CONTRÔLEUR D’EFFETS DYNAMIQUE KP2 KAOSS PAD.
Afin de pouvoir en profiter longtemps sans problèmes et de tirer le meilleur parti de toutes ses
possibilités, nous vous conseillons de lire attentivement la présente notice et de toujours utiliser
le KP2 correctement.
2
1
3
4
4
3
2
1
5
7
8
6
Eléments du KP2 et leurs fonctions
Panneau supérieur
1. Interrupteur [INPUT SELECT]
(Sélecteur d’entrée)
2. Témoin [PEAK] (Crête)
3. Bouton [INPUT VOLUME]
(volume entrant)
4. Bouton [FX DEPTH]
(Intensité de l’effet)
5. Affichage [PROGRAM/BPM]
6. Bouton [PROGRAM/BPM]
7. Touches [PROGRAM MEMORY 1 ~ 8]
(mémoires de programmes)
8. Touche [TAP/BPM]
9. Panneau sensible au toucher
10. Levier [PAD MOTION/MUTE]
(
déplacement sur le panneau/assourdissement
)
11. Touche [REC/STOP]
(Enregistrement/arrêt)
12. Touches [SAMPLE 1, 2](Echantillons)
13. Touche [HOLD]
Face avant
1. Bouton [PHONES VOLUME]
(volume du casque d’écoute)
2. Prise de sortie [PHONES]
(prise pour casque d’écoute)
3. Bouton [MIC TRIM]
(épuration des sons)
4. Prise d’entrée [MIC]
(prise pour micro)
Face arrière
1. Borne [GROUND] (terre)
2. Bornes [PHONO IN]
(entrée pour tourne-disque)
3. Bornes [LINE IN](entrée de ligne)
4. Bornes [LINE OUT] (sortie de ligne)
5. Interrupteur [CONNECTION]
6. Bornes [MIDI IN], [MIDI OUT]
7. Prise DC 12V
8. Interrupteur d’alimentation [POWER]

2
Connexions
Connexions de base
Utiliser ces connexions pour appliquer des effets au son d’un appareil raccordé aux bornes d’en-
trée du KP2 et diffuser ainsi le son avec effet par les bornes de sortie [LINE OUT]. Le KP2 est doté
de trois types de bornes d’entrée. Utiliser celles qui conviennent le mieux à la situation souhai-
tée.
PHONO IN
LINE IN
LINE OUT DC12V
MIXER, DJ MIXER
AC
MIC
1
BAL
OR
UNBAL
LINE IN 1
LOW CUT
75Hz
18dB/OCT
TRIM
+
10dB
-40dB
10
60
U
-
1
0
d
B
V
M
I
C
G
A
I
N
LINE IN 7-8
L
R
BAL
OR
UNBAL
MONO
+4
-10
LEVEL
LINE IN 9-10
L
R
BAL
OR
UNBAL
MONO
+4
-10
LEVEL
LINE IN 11-12
L
R
BAL
OR
UNBAL
MONO
+4
-10
LEVEL
LINE IN 13-14
L
R
BAL
OR
UNBAL
MONO
+4
-10
LEVEL
STEREO AUX RETURNS
1
2
1
2
AUX SEND
LEFT
(1/MONO)
RIGHT
ALL BAL/UNBAL
L
R
TAPE
INPUT
TAPE
OUTPUT
MAIN OUTS
L
R
BAL/UNBAL
PHONES
MICRO SERIES 1402-VLZ
14-CHANNEL MIC/LINE MIXER
MIC
2
BAL
OR
UNBAL
LINE IN 2
LOW CUT
75Hz
18dB/OCT
TRIM
+
10dB
-40dB
10
60
U
-
1
0
d
B
V
M
I
C
G
A
I
N
MIC
3
BAL
OR
UNBAL
LINE IN 3
LOW CUT
75Hz
18dB/OCT
TRIM
+
10dB
-40dB
10
60
U
-
1
0
d
B
V
M
I
C
G
A
I
N
MIC
4
BAL
OR
UNBAL
LINE IN 4
LOW CUT
75Hz
18dB/OCT
TRIM
+
10dB
-40dB
10
60
U
-
1
0
d
B
V
M
I
C
G
A
I
N
MIC
5
BAL
OR
UNBAL
LINE IN 5
LOW CUT
75Hz
18dB/OCT
TRIM
+
10dB
-40dB
10
60
U
-
1
0
d
B
V
M
I
C
G
A
I
N
MIC
6
BAL
OR
UNBAL
LINE IN 6
LOW CUT
75Hz
18dB/OCT
TRIM
+
10dB
-40dB
10
60
U
-
1
0
d
B
V
M
I
C
G
A
I
N
60
U
+
15
U
+
15
AUX
1
MON/
EFX
2
EFX
U
+15
U
+12
-15
-12
U
+15
-15
PAN
SOLO
1
MUTE
ALT 3–4
EQ
HI
12kHz
MID
2.5kHz
LOW
80Hz
L
R
dB
10
5
U
5
10
20
30
40
50
60
U
+
15
U
+15
AUX
1
MON/
EFX
2
EFX
U
+15
U
+12
-15
-12
U
+15
-15
PAN
SOLO
2
MUTE
ALT 3–4
EQ
HI
12kHz
MID
2.5kHz
LOW
80Hz
L
R
dB
10
5
U
5
10
20
30
40
50
60
U
+
15
U
+
15
AUX
1
MON/
EFX
2
EFX
U
+15
U
+12
-15
-12
U
+15
-15
PAN
SOLO
3
MUTE
ALT 3–4
EQ
HI
12kHz
MID
2.5kHz
LOW
80Hz
L
R
dB
10
5
U
5
10
20
30
40
50
60
U
+
15
U
+
15
AUX
1
MON/
EFX
2
EFX
U
+15
U
+12
-15
-12
U
+15
-15
PAN
SOLO
4
MUTE
ALT 3–4
EQ
HI
12kHz
MID
2.5kHz
LOW
80Hz
L
R
dB
10
5
U
5
10
20
30
40
50
60
U
+
15
U
+
15
AUX
1
MON/
EFX
2
EFX
U
+15
U
+12
-15
-12
U
+15
-15
PAN
SOLO
5
MUTE
ALT 3–4
EQ
HI
12kHz
MID
2.5kHz
LOW
80Hz
L
R
dB
10
5
U
5
10
20
30
40
50
60
U
+15
U
+
15
AUX
1
MON/
EFX
2
EFX
U
+15
U
+12
-15
-12
U
+15
-15
PAN
SOLO
6
MUTE
ALT 3–4
EQ
HI
12kHz
MID
2.5kHz
LOW
80Hz
L
R
dB
10
5
U
5
10
20
30
40
50
60
U
+
15
U
+
15
AUX
1
MON/
EFX
2
EFX
U
+15
U
+12
-15
-12
U
+15
-15
PAN
SOLO
7–8
MUTE
ALT 3–4
EQ
HI
12kHz
MID
2.5kHz
LOW
80Hz
L
R
dB
10
5
U
5
10
20
30
40
50
60
U
+
15
U
+
15
AUX
1
MON/
EFX
2
EFX
U
+15
U
+12
-15
-12
U
+15
-15
PAN
SOLO
9–10
MUTE
ALT 3–4
EQ
HI
12kHz
MID
2.5kHz
LOW
80Hz
L
R
dB
10
5
U
5
10
20
30
40
50
60
U
+
15
U
+
15
AUX
1
MON/
EFX
2
EFX
U
+15
U
+12
-15
-12
U
+15
-15
PAN
SOLO
11–12
MUTE
ALT 3–4
EQ
HI
12kHz
MID
2.5kHz
LOW
80Hz
L
R
dB
10
5
U
5
10
20
30
40
50
60
U
+15
U
+15
AUX
1
MON/
EFX
2
EFX
U
+15
U
+12
-15
-12
U
+15
-15
PAN
SOLO
13–14
MUTE
ALT 3–4
EQ
HI
12kHz
MID
2.5kHz
LOW
80Hz
L
R
dB
10
5
U
5
10
20
30
40
50
60
dB
10
5
U
5
10
20
30
40
50
60
dB
10
5
U
5
10
20
30
40
50
U
+10
U
+
20
U
+
20
1
2
AUX 1 MASTER
PRE
POST
NORMALLED
AUX 1
SELECT
EFX TO
MONITOR
AUX
RETURNS
SOURCE
MAIN
MIX
LEFT RIGHT
CLIP+28
+10
+7
+4
+2
0
-2
-4
-7
-10
-20
-30
0dB
=
0dBu
RUDE SOLO LIGHT
ALT
3-4
TAPE
ASSIGN
TO MAIN MIX
NORMAL(AFL)
LEVEL SET(PFL)
SOLO
MODE
PHANTOM
POWER
CONTROL
ROOM
/ PHONES
MAIN MIX
TOURNE-DISQUE
LECTEUR CD
ADAPTATEUR SECTEUR
Manipulations du panneau sensible au
toucher
Ne jamais appuyer trop fort sur le panneau
sensible ni placer d’objet lourd dessus. Des
gestes trop brutaux pourraient en effet en-
dommager le panneau ou provoquer des fis-
sures. Ne jamais frotter ou appuyer sur le
panneau sensible avec un objet pointu car
vous risqueriez de le griffer: toujours utiliser
son doigt uniquement pour le faire fonction-
ner. Si le panneau doit être nettoyé, l’essuyer
simplement avec un chiffon doux et sec.
L’utilisation de solvants ou de diluants risque
en effet de déformer la surface du panneau.

3
Connexions d’un mélangeur pour DJ Connexions d’un mélangeur
pour DJ
Pour utiliser le KP2 comme processeur d’effets externe, raccorder la borne d’envoi d’effets du
mélangeur pour DJ, etc. aux bornes d’entrée de ligne du KP2 et raccorder les bornes de sortie de
ligne du KP2 aux bornes de retour d’effets du mélangeur.
Lors de l’utilisation d’une connexion passant par les bornes d’envoi/de retour d’effets
Régler l’interrupteur Connection du KP2 sur FX LOOP. Avec ce réglage, le signal diffusé par les
bornes de sortie de ligne du KP2 ne comprendra que le son traité par le KP2 (et non le son origi-
nal qui lui a été envoyé).
Pour pouvoir utiliser le bouton FX/Depth du KP2 en vue de régler l’intensité de l’effet pendant
le jeu, cet interrupteur doit se trouver sur la position DIRECT.
Connexions MIDI
Utiliser ces connexions pour raccorder des dispositifs MIDI au KP2 et le faire fonctionner avec
des séquences de données.
LINE IN MIDI INMIDI OUTOUTPUT
KORG EM-1
LINE IN
LINE OUT
CONNECTION LINE OUT
DIRECT
FX LOOP
TOURNE-DISQUE
TOURNE-DISQUEMELANGEUR POUR DJ
ENVOI
RETOUR

4
4. Sélection d’un programme
(1) L’affichage Program/BPM indique le nu-
méro du programme sélectionné.
Utilisez le bouton Program/BPM pour sélec-
tionner un autre programme (00~99).
(2) Utilisez le bouton FX/Depth pour régler
l’intensité de l’effet.
Aucun effet n’est appliqué lorsque le bouton
est tourné à fond vers la gauche; par contre,
le niveau maximum de l’effet est appliqué
lorsque le bouton est tourné à fond vers la
droite.
A propos de l’affichage Program/BPM
Cet affichage indique le numéro du pro-
gramme actuellement sélectionné, le nombre
de battements par minute (BPM) spécifié et le
point (emplacement) du panneau sensible
touché.
Lors de l’utilisation du panneau sensible au
toucher: L’affichage indique l’emplacement
touché (1.1 à 9.9 avec 5.5 qui correspond au
centre).
Position horizontale (1~9)
Position verticale (1~9)
Lors de la sélection de programmes: L’affi-
chage indique le numéro du programme
(00~99).
Lors du réglage du tempo (BPM): Lorsque
vous appuyez sur la touche Tap/BPM pour
régler le tempo, l’affichage indique la valeur
des battements par minute (BPM). En mode
Auto BPM, trois points apparaissent sur l'af-
fichage.
Mode d’édition MIDI: L’affichage indique le
numéro du canal MIDI ou de commande
MIDI, etc.
5. Utilisation du panneau
sensible au toucher
(1) Permet de contrôler le son en frottant son
doigt sur le panneau ou en le tapotant.
Remarque
Utiliser la feuille de protection fournie.
Fonctionnement
1. Mise sous tension
(1) Raccordez le KP2 à vos autres équipe-
ments comme illustré sur le schéma puis
branchez l’adaptateur secteur dans une prise
de courant.
(2) Appuyez sur l’interrupteur d’alimenta-
tion pour mettre la KP2 sous tension.
L’affichage Program/BPM s’allume.
Pour mettre l’appareil hors tension,
réappuyez sur l’interrupteur d’alimentation.
2. Entrée de données audio
(1) Utilisez l’interrupteur Input Select pour
sélectionner les bornes d’entrée de l’appareil
raccordé auxquelles vous souhaitez appli-
quer un effet.
MIC: L’effet est appliqué à l’entrée du micro.
PHONO: L’effet est appliqué aux entrées
pour tourne-disque PHONO.
LINE: L’effet est appliqué aux entrées de li-
gne.
3. Réglage du volume
(1) Réglez le niveau d’entrée.
Lors de la diffusion de données audio prove-
nant de l’appareil connecté, utilisez le bouton
Input Volume pour régler le niveau d’entrée
de sorte que le témoin de crête rouge ne s’al-
lume pas.
En cas d’utilisation de la borne pour micro,
réglez le bouton MIC Trim en fonction de la
sensibilité de votre micro, afin d’éviter toute
distorsion sonore.
(2) En cas d’utilisation d’un casque d’écoute,
utilisez le bouton Phones Volume pour régler
le niveau.

5
(2) Si vous activez la touche Hold pendant
l’utilisation du panneau sensible au toucher,
le KP2 conservera le son de l’effet tel qu’il
était juste avant que vous ne retiriez votre
doigt du panneau.
6. Fonction d’assourdissement
(Mute)
Si vous déplacez le levier Pad Motion/Mute
vers la fonction MUTE (vers vous), le signal
d’entrée, le son de l'échantillon ou le son de
synthé/de batterie sera assourdi (coupé).
Lors de l‘utilisation du retard ou de la réver-
bération, cela permet de ne diffuser que le
son de l’effet (c’est-à-dire le son retardé ou la
réverbération).
Transformer
En utilisant le levier Pad Motion/Mute pour
activer/désactiver rapidement l’interrupteur
MUTE, vous pouvez créer des rythmes qui
font appel à un son d’entrée soutenu. Il s’agit
là d’une technique de DJ connue sous le nom
de “transformer.”
7. Dé-placements sur le
panneau sensible
Le KP2 permet d’enregistrer les opérations
effectuées sur le panneau sensible au toucher
puis de déplacer le levier Pad Motion/Mute
vers la position PAD MOTION pour repro-
duire ces opérations.
Enregistrement
L’enregistrement commence lorsque vous
maintenez le levier Pad Motion/Mute sur la
position PAD MOTION et que vous touchez
le panneau sensible.
Même lorsque vous retirez votre doigt du
panneau sensible, l’enregistrement continue
et fait partie de l’opération.
Cela signifie que vous pouvez également
enregistrer des opérations qui comprennent
des tapotements du panneau sensible. L’en-
registrement s’arrête lorsque vous remettez
le levier Pad Motion/Mute sur sa position
d’origine ou lorsque vous atteignez le temps
d’enregistrement maximum (environ 3,2 se-
condes).
Reproduction
Si vous avez enregistré un mouvement sur le
panneau sensible, déplacez le levier Pad
Motion/Mute sur la position PAD MOTION
pour reproduire le mouvement enregistré. Si
vous laissez le levier Pad Motion/Mute sur
la position PAD MOTION, le même mouve-
ment jouera de manière répétitive jusqu’à ce
que vous touchiez le panneau sensible.
Si vous touchez le panneau sensible pen-
dant la reproduction, l’enregistrement démarre.
L’enregistrement s’efface en cas de changement
de programme.
L’état activé/désactivé de la touche Hold
n’est pas enregistré comme faisant partie du
mouvement sur le panneau. De même, si vous
activez la touche Hold et que vous reproduisez
un mouvement sur le panneau, le mouvement
sera conservé au point où vous avez arrêté la re-
production.
8. Spécification des BPM
(battements par minute)
La définition des BPM vous permet d’appli-
quer des effets synchronisés sur les BPM lors
de la sélection d’un programme d’effets du
groupe “BPM FX/PTN”. Pour plus de détails
sur le paramètre d’effet auquel cet effet s’ap-
plique, voir la liste des programmes d’effets
(feuillet séparé).
Qu’est-ce que les BPM?
Les BPM (Battements Par Minute) représen-
tent le tempo d’un morceau exprimé en nom-
bre de battements (noires) produits en une
minute. Une valeur de BPM plus élevée si-
gnifie un tempo plus rapide.
Réglage des BPM
Si vous connaissez le nombre de BPM, ap-
puyez sur la touche Tap/BPM et utilisez le
bouton Program/BPM pour définir la valeur.
L’affichage normal réapparaîtra dix secondes
plus tard si vous n’effectuez aucune opéra-
tion.

6
Fonction Tap Tempo
Si vous ne connaissez pas le nombre de BPM,
appuyez deux fois ou plus en rythme au
temps du morceau sur la touche Tap/BPM.
Le KP2 identifiera le nombre de battements
et les BPM apparaîtront sur l’affichage
Program/BPM.
Fonction Auto BPM
Si vous appuyez sur la touche Tap/BPM et
que vous la maintenez enfoncée pendant un
certain temps, trois points apparaîtront sur
l’affichage Program/BPM et l’appareil détec-
tera automatiquement le rythme (battement)
de l’entrée audio. (Mode Auto BPM)
La détection des BPM a lieu tant que l’affi-
chage Program/BPM clignote.
Réappuyez sur la touche Tap/BPM pour
mettre fin à la détection automatique.
Il est possible de régler les BPM sur une
plage allant de 80 à 160.
Fonction de synchronisation MIDI
(MIDI Sync)
Il est possible de spécifier les BPM du KP2
par l’envoi de messages d’horloge de syn-
chronisation MIDI provenant d’un dispositif
MIDI externe. Branchez la borne [MIDI IN]
du KP2 dans la borne [MIDI OUT] du dispo-
sitif MIDI externe (comme un séquenceur)
qui transmet des messages d'horloge pour la
synchronisation.
Cette fonction ne synchronise pas des sé-
quences de données avec les programmes de mo-
tifs rythmiques du KP2. Pour une synchronisa-
tion sur des séquences de données, vous devrez
soit insérer un message d’activation du panneau
sensible au toucher (Touch Pad On) au début de
chacune des mesures de vos séquences de don-
nées, soit toucher le panneau sensible au début
de chacune des phrases du KP2 pour démarrer le
motif.
Pour que le KP2 puisse recevoir des messa-
ges de synchronisation et d’activation du pan-
neau sensible au toucher, accédez au mode d’édi-
tion MIDI (☞p.9) et effectuez les “Réglages de
transmission/réception de messages MIDI”
(☞p.9) de sorte qu’il puisse recevoir ces messa-
ges.
Vous ne pouvez pas utiliser les fonctions
Tap Tempo ou Auto BPM lorsque le KP2 reçoit
des messages de synchronisation d'un appareil
MIDI externe.
9. Sauvegarde des réglages
dans le programme Touche
Mémoire
Il est possible de sauvegarder l’état actuel du
KP2 sous une des touches Program Memory
(mémoires de programmes) 1 à 8 afin de pou-
voir les rappeler instantanément chaque fois
que vous le souhaitez.
Contenus mémorisés
— Programme d’effet
— Etat activé/désactivé de la touche Hold et
la position conservée (coordonnées)
— Réglage du bouton FX/Depth
— Pour le groupe “BPM FX/PTN”, la valeur
BPM spécifiée
— Pour le groupe “SAMPLE/PLAY” , la tou-
che utilisée pour l’échantillon 1, 2
Les programmes d’effets 60 et 90~99 ne mé-
morisent pas l'état de la touche [HOLD].
Pour mémoriser les réglages
(1) Appuyez sur la touche Program Memory
1–8 à laquelle vous voulez attribuer les don-
nées.
(2) Utilisez le bouton Program/BPM pour
sélectionner le programme d’effets à attri-
buer.
Pour mémoriser le réglage de la touche
Hold, sélectionnez le programme puis activez la
touche Hold et touchez le panneau sensible pour
préciser la position. Si vous souhaitez mémoriser
d’autres réglages, vous devez les définir à ce
stade.
(3) Appuyez sur la touche Program Memory
1–8 sélectionnée au point (1) et maintenez-la
enfoncée pendant environ deux secondes
pour mémoriser les réglages.
Lorsque les réglages sont sauvegardés, l’affi-
chage Program/BPM arrête de clignoter.

7
Pour rappeler les réglages
(1) Appuyez sur une touche Program
Memory 1~8 pour rappeler les réglages mé-
morisés sous cette touche.
10. Echantillonnage et
reproduction d’une phrase
Il est possible d’enregistrer une phrase de
l’entrée audio sous une des touches Sample
1, 2.
Ensuite, lorsque vous aurez sélectionné un
programme dans le groupe “SAMPLE/
PLAY” (programmes 90~99), vous pourrez
reproduire l’échantillon en utilisant le pan-
neau sensible au toucher pour contrôler la
vitesse de reproduction ou la reproduction
inversée.
Si vous avez sélectionné un programme d'un
autre groupe que “SAMPLE/PLAY”, le fait
d’appuyer sur les touches Sample 1, 2 per-
mettra de reproduire la phrase enregistrée
sous cette touche.
Vous pouvez ainsi enregistrer des phrases
d’environ six secondes sous chacune des
deux touches.
Les phrases enregistrées s’effacent à la mise
hors tension et il n’est pas possible de les sauve-
garder.
Enregistrement
(1) Appuyez sur la touche Rec/Stop. Le té-
moin de la touche clignote afin d’indiquer
que vous avez accédé au mode d'attente
d’enregistrement.
(2) Appuyez sur la touche Sample 1, 2 sous
laquelle vous souhaitez enregistrer les don-
nées. A ce stade, vous n’entendrez pas le son
reproduit.
(3) Lorsque vous appuyez sur la touche Rec/
Stop, le témoin de la touche s’allume et l’en-
registrement commence. L’enregistrement
s’arrête lorsque vous réappuyez sur la touche
Rec/Stop.
L’enregistrement s’arrête automatiquement
lorsque vous atteignez le temps d'enregistre-
ment maximum.
Pour les programmes ne faisant pas partie
du groupe “SAMPLE/PLAY”, vous pouvez uti-
liser le panneau sensible au toucher pendant
l’enregistrement; le son traité avec l’effet sera en-
registré.
Enregistrement automatique (AUTO
REC)
Vous pouvez programmer le démarrage de
l’enregistrement dès l’entrée de données
audio. Cette fonction s’avère particulière-
ment pratique en cas d’enregistrement de
voix provenant d’un micro.
(1) Au point (2) de la procédure d’enregistre-
ment, maintenez enfoncée la touche Sample
1, 2 sous laquelle vous souhaitez enregistrer
puis appuyez sur la touche Rec/Stop.
Les témoins des touches Rec/Stop et Sample
1, 2 clignoteront simultanément pour indi-
quer que vous avez accédé au mode d'attente
d'enregistrement.
(2) L’enregistrement commencera automati-
quement dès l’entrée de données audio. Il
s’arrêtera lorsque vous réappuierez sur la
touche Rec/Stop.
Reproduction
La méthode de reproduction diffère en fonc-
tion du programme d'effets sélectionné.
Pour un programme du groupe
“SAMPLE/PLAY”
(1) Sélectionnez un programme du groupe
“SAMPLE/PLAY” (90~99).
(2) Appuyez sur la touche Sample 1, 2 dont
vous voulez lire les données. La reproduction
ne commencera pas encore.
(3) Lorsque vous toucherez le panneau sen-
sible, le son sera reproduit en fonction de la
position touchée.
La manière de jouer de la phrase dépendra
du programme. (feuillet séparé: Liste des
programmes d’effets)
(4) Utilisez le bouton FX Depth pour régler le
volume de reproduction.
Lorsque ce bouton FX Depth est positionné
au centre, le son de la reproduction et le son
entrant sont diffusés selon un rapport 1:1.
Lorsque le bouton est placé sur la position

8
maximum, seul le son de l’échantillon est
audible pendant la reproduction et vous
n’entendez pas le son entrant.
Pour un programme n’appartenant pas
au groupe“SAMPLE/PLAY”
(1) Sélectionnez un programme d’un groupe
autre que “SAMPLE/PLAY”.
(2) Appuyez sur une des touches Sample 1,
2 pour que la phrase enregistrée soit repro-
duite à la vitesse normale.
Si vous continuez d’appuyer sur la touche, la
phrase est reproduite en boucle.
Pour régler le volume, continuez d’appuyer
sur la touche Sample 1, 2 et utilisez le bouton
FX Depth pour effectuer les réglages.
Vous pouvez appliquer des effets à la repro-
duction en touchant le panneau sensible pendant
la reproduction du son.
Si vous appuyez sur la touche Hold pen-
dant que vous appuyez sur la touche Sample 1,
2, la reproduction sera conservée. La fonction
Hold s'annule lorsque vous appuyez à nouveau
sur la touche Sample 1, 2.
Fonctions MIDI
Qu’est-ce que le système MIDI?
Le terme MIDI vient de l’anglais Musical Ins-
trument Digital Interface (interface numéri-
que pour instruments de musique) et il s'agit
d’une norme internationale permettant
l’échange d’informations liées aux interpré-
tations entre des instruments de musique
électroniques et des ordinateurs.
Connexions MIDI
Des câbles MIDI disponibles dans le com-
merce sont utilisés pour transmettre et rece-
voir des messages MIDI Raccordez ces câbles
entre les bornes MIDI du KP2 et les bornes
MIDI du dispositif MIDI externe avec lequel
vous souhaitez échanger des données.
Borne MIDI IN : Cette borne permet de re-
cevoir des messages MIDI provenant d'un
autre dispositif MIDI. Pour ce faire, raccor-
dez-la à la borne MIDI OUT du dispositif
externe.
Borne MIDI OUT : Cette borne permet de
transmettre des messages provenant du KP2.
Pour ce faire, raccordez-la à la borne MIDI IN
du dispositif externe.
Utilisation du système MIDI
Le KP2 n’est pas qu’un simple processeur
d’effets: il permet également de transmettre
des messages MIDI pour l’utiliser comme
contrôleur en temps réel d’un synthétiseur
ou d’un autre appareil MIDI externe.
Vous pouvez également raccorder le KP2 à
un séquenceur MIDI et enregistrer les messa-
ges MIDI transmis lors du toucher du pan-
neau sensible. La reproduction des messages
MIDI enregistrés permet ainsi de reproduire
les opérations effectuées sur le panneau sen-
sible.
A propos des canaux MIDI
Afin de pouvoir transmettre indépendam-
ment des informations aux différents appa-
reils MIDI, par le biais d'un seul câble MIDI,
le système MIDI utilise seize canaux (1~16).
Si l'appareil de transmission est réglé sur le
canal MIDI “1,” les messages MIDI ne seront
reçus que si l’appareil récepteur est égale-
ment réglé sur le canal MIDI “1.”
A propos du tableau d'implémentation
MIDI
Le manuel d’utilisation de chaque appareil
MIDI comprend un “Tableau d’implémenta-
tion MIDI.”
Ce tableau permet de vérifier les types de
messages MIDI pouvant être transmis ou
reçus.
Lorsque vous raccordez deux ou davantage
d’appareils MIDI, comparez leurs tableaux
d’implémentation MIDI pour voir quels ty-
pes de messages MIDI ils peuvent transmet-
tre et recevoir entre eux.
* Vous trouverez de plus amples détails sur
les fonctions MIDI dans la brochure d'implé-
mentation MIDI. Pour obtenir ce document,
veuillez prendre contact avec votre reven-
deur Korg.
Seite wird geladen ...
Seite wird geladen ...
Seite wird geladen ...
Seite wird geladen ...
Seite wird geladen ...
Seite wird geladen ...
Seite wird geladen ...
Seite wird geladen ...
Seite wird geladen ...
Seite wird geladen ...
Seite wird geladen ...
Seite wird geladen ...
Seite wird geladen ...
Seite wird geladen ...
Seite wird geladen ...
-
 1
1
-
 2
2
-
 3
3
-
 4
4
-
 5
5
-
 6
6
-
 7
7
-
 8
8
-
 9
9
-
 10
10
-
 11
11
-
 12
12
-
 13
13
-
 14
14
-
 15
15
-
 16
16
-
 17
17
-
 18
18
-
 19
19
-
 20
20
-
 21
21
-
 22
22
-
 23
23
-
 24
24
-
 25
25
-
 26
26
-
 27
27
-
 28
28
-
 29
29
-
 30
30
-
 31
31
-
 32
32
-
 33
33
-
 34
34
-
 35
35


Korg KP2 Bedienungsanleitung
- Kategorie
- Digitale Klaviere
- Typ
- Bedienungsanleitung
in anderen Sprachen
- English: Korg KP2 Owner's manual
- français: Korg KP2 Le manuel du propriétaire
Verwandte Artikel
-
Korg KAOSS PAD entrancer Bedienungsanleitung
-
-
-
Korg KAOSS PAD KP3+ Bedienungsanleitung
-
Korg VOX Continental Bedienungsanleitung
-
Korg SDD-3000 PEDAL Bedienungsanleitung
-
-
-
Korg KRONOS SE Bedienungsanleitung
-