Toro 53cm Super Bagger Lawn Mower Benutzerhandbuch
- Kategorie
- Rasenmäher
- Typ
- Benutzerhandbuch

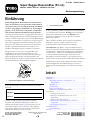
FormNo.3409-241RevA
53cmSuperBaggerLawn
Mower
20899
SuperBagger-Rasenmäher(53
cm)
20899
TondeuseSuperBaggerde53
cm
20899
SuperBaggergazonmaaier
van53cm
20899
www.T oro.com.
*3409-241*A


CV
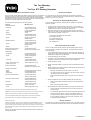
FormNo.3392-411RevA
53cmSuperBaggerLawnMower
ModelNo.20899—SerialNo.315000001andUp
Operator'sManual
Introduction
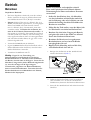
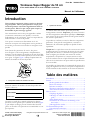
Thisrotary-blade,walk-behindlawnmowerisintended
tobeusedbyresidentialhomeowners.Itisdesigned
primarilyforcuttinggrassonwell-maintainedlawns
onresidentialproperties.Itisnotdesignedforcutting
brushorforagriculturaluses.
Readthisinformationcarefullytolearnhowtooperateand
maintainyourproductproperlyandtoavoidinjuryand
productdamage.Youareresponsibleforoperatingthe
productproperlyandsafely.
YoumaycontactTorodirectlyatwww .Toro.comforproduct
andaccessoryinformation,helpndingadealer,ortoregister
yourproduct.
Wheneveryouneedservice,genuineToroparts,oradditional
information,contactanAuthorizedServiceDealerorToro
CustomerServiceandhavethemodelandserialnumbersof
yourproductready.Figure1identiesthelocationofthe
modelandserialnumbersontheproduct.
Figure1
1.Modelandserialnumberplate
Writetheproductmodelandserialnumbersinthespace
below:
ModelNo.
SerialNo.
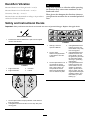
Thismanualidentiespotentialhazardsandhassafety
messagesidentiedbythesafetyalertsymbol(Figure2),
whichsignalsahazardthatmaycauseseriousinjuryordeath
ifyoudonotfollowtherecommendedprecautions.
Figure2
1.Safetyalertsymbol
Thismanualuses2wordstohighlightinformation.
Importantcallsattentiontospecialmechanicalinformation
andNoteemphasizesgeneralinformationworthyofspecial
attention.
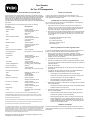
ThisproductcomplieswithallrelevantEuropeandirectives.
Fordetails,seetheseparateproduct-specicDeclarationof
Conformity(DOC)sheet.
NetTorque:Thegrossornettorqueofthisenginewas
laboratoryratedbytheenginemanufacturerinaccordance
withtheSocietyofAutomotiveEngineers(SAE)J1940.
Asconguredtomeetsafety,emission,andoperating
requirements,theactualenginetorqueonthisclassofmower
willbesignicantlylower.Gotowww.Toro.comtoview
specicationsonyourmowermodel.
Donottamperwiththeenginecontrolsoralterthegovernor
speed;doingsomaycreateanunsafeconditionresultingin
personalinjury.
Contents
Introduction..................................................................1
Safety...........................................................................2
GeneralLawnMowerSafety.....................................2
SoundPressure......................................................3
SoundPower..........................................................3
Hand/ArmVibration..............................................4
SafetyandInstructionalDecals.................................4
Setup............................................................................5
1UnfoldingtheHandle............................................5
2InstallingtheRecoil-StarterRopeintheRope
Guide.................................................................5
3FillingtheEnginewithOil......................................6
4InstallingtheMulchPlugortheGrass
Bag....................................................................6
5AssemblingtheGrassBag......................................8
ProductOverview..........................................................9
Specications.........................................................9
Operation.....................................................................9
FillingtheFuelTank................................................9
CheckingtheEngine-OilLevel.................................10
AdjustingtheCuttingHeight....................................10
©2014—TheToro®Company
8111LyndaleAvenueSouth
Bloomington,MN55420
Registeratwww.T oro.com.
OriginalInstructions(EN)
PrintedintheUSA
AllRightsReserved
*3392-411*A

AdjustingtheUpperHandleHeight..........................11
StartingtheEngine.................................................11
UsingtheSelf-PropelDrive.....................................12
StoppingtheEngine...............................................12
MulchingtheClippings...........................................12
BaggingtheClippings.............................................12
Side-DischargingtheClippings.................................14
OperatingTips......................................................15
Maintenance.................................................................16
RecommendedMaintenanceSchedule(s)......................16
PreparingforMaintenance.......................................16
ServicingtheAirFilter............................................16
ChangingtheEngineOil.........................................17
LubricatingtheUpperHandle..................................18
AdjustingtheSelf-PropelDrive................................18
ReplacingtheBlade................................................19
CleaningundertheMachineHousing........................20
Storage........................................................................20
PreparingtheMachineforStorage............................20
FoldingtheHandle.................................................20
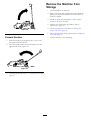
RemovetheMachinefromStorage............................21
Safety
ThismachinehasbeendesignedinaccordancewithENISO
5395:2013.
Improperlyusingormaintainingthismowercanresult
ininjury.Toreducethepotentialforinjury,complywith
thesesafetyinstructions.
Torodesignedandtestedthismachineforreasonablysafe
service;however,failuretocomplywiththefollowing
instructionsmayresultinpersonalinjury.
Toensuremaximumsafetyandbestperformance,
andtogainknowledgeoftheproduct,itisessential
thatyouandanyotheroperatorofthemowerread
andunderstandthecontentsofthismanualbeforethe
engineiseverstarted.Payparticularattentiontothe
safetyalertsymbol(Figure2),whichmeansCaution,
Warning,orDanger—“personalsafetyinstruction.”
Readandunderstandtheinstructionbecauseithasto
dowithsafety.Failuretocomplywiththeinstruction
mayresultinpersonalinjury.
GeneralLawnMowerSafety
Thiscuttingmachineiscapableofamputatinghandsandfeet
andofthrowingobjects.Failuretoobservethefollowing
safetyinstructionscouldresultinseriousinjuryordeath.
Training
•Readtheinstructionscarefully.Befamiliarwiththe
controlsandtheproperuseoftheequipment.
•Neverallowchildrenorpeopleunfamiliarwiththese
instructionstousethemachine.Localregulationscan
restricttheageoftheoperator.
•Keepinmindthattheoperatororuserisresponsiblefor
accidentsorhazardsoccurringtootherpeopleortheir
property.
•Understandexplanationsforallpictogramsusedonthe
machineorintheinstructions.
Gasoline
WARNING-Gasolineishighlyammable.Takethe
followingprecautions.
•Storefuelincontainersspecicallydesignedforthis
purpose.
•Refueloutdoorsonlyanddonotsmokewhilerefueling.
•Addfuelbeforestartingtheengine.Neverremovethe
capofthefueltankoraddgasolinewhiletheengineis
runningorwhentheengineishot.
•Ifgasolineisspilled,donotattempttostarttheengine
butmovethemachineawayfromtheareaofspillageand
avoidcreatinganysourceofignitionuntilgasolinevapors
havedissipated.
•Replaceallfueltankandcontainercapssecurely.
Preparation
•Whilemowing,alwayswearsubstantial,slip-resistant
footwearandlongtrousers.Donotoperatethe
equipmentwhenbarefootorwearingopensandals.
•Thoroughlyinspecttheareawheretheequipmentisto
beusedandremoveallstones,sticks,wires,bonesand
otherforeignobjects.
•Beforeusing,alwaysvisuallyinspecttoseethatguardsand
safetydevices,suchasdeectorsand/orgrasscatchers,
areinplaceandworkingcorrectly.
•Beforeusing,alwaysvisuallyinspecttoseethattheblades,
bladeboltsandcutterassemblyarenotwornordamaged.
Replacewornordamagedbladesandboltsinsetsto
preservebalance.
Starting
•Donottiltthemachinewhenstartingtheengineunless
themachinemustbetiltedforstarting.Inthiscase,do
nottiltitmorethanabsolutelynecessaryandliftonlythe
partwhichisawayfromtheoperator.
•Starttheenginecarefullyaccordingtoinstructionsand
withfeetwellawayfromtheblade(s)andnotinfrontof
thedischargechute.
Operation
•Nevermowwhilepeople,especiallychildren,orpetsare
nearby.
•Mowonlyindaylightoringoodarticiallight.
•Stayalertforholesintheterrainandotherhiddenhazards.
2

•Donotputhandsorfeetnearorunderrotatingparts.
Keepclearofthedischargeopeningatalltimes.
•Neverpickuporcarryalawnmowerwhiletheengineis
running.
•Useextremecautionwhenreversingorpullinga
pedestrian-controlledmowertowardyou.
•Walk,neverrun.
•Slopes:
–Donotmowexcessivelysteepslopes.
–Exerciseextremecautionwhenonslopes.
–Mowacrossthefaceofslopes,neverupanddown,
andexerciseextremecautionwhenchangingdirection
onslopes.
–Alwaysbesureofyourfootingonslopes.
•Reducespeedonslopesandinsharpturnstoprevent
overturningorlossofcontrol.
•Stopthebladeifthemachinemustbetiltedfor
transportationwhencrossingsurfacesotherthangrass
andwhentransportingthemachinetoandfromthearea
tobemowed.
•Donotoperatetheengineinaconnedspacewhere
dangerouscarbonmonoxideandotherexhaustgasses
cancollect.
•Stoptheengine
–wheneveryouleavethemachine.
–beforerefueling.
–beforeremovingthegrasscatcher.
–beforemakingheightadjustmentunlessadjustment
canbemadefromtheoperatingposition.
•Stoptheengineanddisconnectthespark-plugwire.
–beforeclearingblockagesoruncloggingchute.
–beforechecking,cleaningorworkingonthemachine.
–afterstrikingaforeignobject,inspectthemachine
fordamageandmakerepairsbeforerestartingand
operatingthemachine.
–ifthemachinestartstovibrateabnormally(check
immediately).
•Lightningcancausesevereinjuryordeath.Ifyousee
lightningorhearthunderinthearea,donotoperatethe
machine;seekshelter.
•Watchoutfortrafcwhencrossingornearroadways.
MaintenanceandStorage
•Keepallnuts,bolts,andscrewstighttobesurethatthe
equipmentisinsafeworkingcondition.
•Donotusepressure-cleaningequipmentonthemachine.
•Neverstoretheequipmentwithgasolineinthetankand
insideabuildingwherefumescanreachanopename
orspark.
•Allowtheenginetocoolbeforestoringinanyenclosure.
•Toreducetherehazard,keeptheengine,silencer,
batterycompartmentandgasolinestorageareafreeof
grass,leaves,orexcessivegrease.
•Checkgrasscatchercomponentsandthedischargeguard
frequentlyandreplacewithmanufacturer'srecommended
parts,whennecessary.
•Replacewornordamagedpartsforsafety.
•Replacefaultysilencers.
•Ifthefueltankhastobedrained,dothisoutdoors.
•Donotchangetheenginegovernorsettingsoroverspeed
theengine.Operatinganengineatexcessivespeedcan
increasethehazardofpersonalinjury.
•Becarefulwhileadjustingthemachinetoprevent
entrapmentofthengersbetweenmovingbladesand
xedpartsofthemachine.
•Toensurethebestperformanceandsafety,
purchaseonlygenuineTororeplacementpartsand
accessories.Donotuse
will t
partsandaccessories;
theymaycauseasafetyhazard.
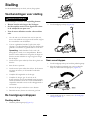
Hauling
•Usecarewhenloadingorunloadingthemachineintoa
traileroratruck.
•Usefull-widthrampsforloadingthemachineintoa
traileroratruck.
•Tiethemachinedownsecurelyusingstraps,chains,cable,
orropes.Boththefrontandtherearstrapsshouldbe
directeddownandoutwardfromthemachine.
SoundPressure
Thisunithasasoundpressurelevelattheoperator’searof89
dBA,whichincludesanUncertaintyValue(K)of1dBA.
Thesoundpressurelevelwasdeterminedaccordingtothe
proceduresoutlinedinENISO5395:2013.
SoundPower
Thisunithasaguaranteedsoundpowerlevelof98dBA,
whichincludesanUncertaintyValue(K)of1dBA.
Thesoundpowerlevelwasdeterminedaccordingtothe
proceduresoutlinedinISO11094.
CAUTION
Long-termexposuretonoisewhileoperatingthe
machinemaycausesomehearingloss.
Wearadequatehearingprotectionwheneveryou
operatethemachineforanextendedperiodoftime.
3

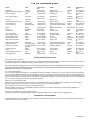
Hand/ArmVibration
Measuredvibrationlevelforrighthand=3.8m/s
2
Measuredvibrationlevelforlefthand=4.1m/s
2
UncertaintyValue(K)=2.1m/s
2
Measuredvaluesweredeterminedaccordingtotheprocedures
outlinedinENISO5395:2013.
CAUTION
Long-termexposuretovibrationwhileoperating
themachinemaycausesomenumbnessinthe
handsandwrists.
Wearglovesthatdampenthevibrationwhenever
youoperatethemachineforanextendedperiodof
time.
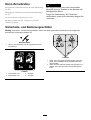
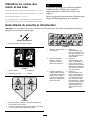
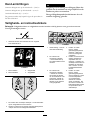
SafetyandInstructionalDecals
Important:Safetyandinstructiondecalsarelocatednearareasofpotentialdanger.Replacedamageddecals.
Manufacturer'sMark
1.Indicatesthebladeisidentiedasapartfromtheoriginal
machinemanufacturer.
110-9457
1.EngineswitchOff
3.Unlocked
2.EngineswitchOn
4.Locked
112-8760
1.Thrownobjecthazard—keepbystandersasafedistance
fromthemachine.
2.Cutting/dismembermentofhandorfoot—stayawayfrom
movingparts.
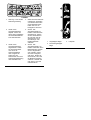
114-2820
1.Warning—readthe
Operator'sManual.
4.Cutting/dismemberment
hazardofhandorfoot,
mowerblade—stayaway
frommovingparts.
2.Thrownobject
hazard—keepbystanders
asafedistancefromthe
machine.
5.Cutting/dismemberment
hazardofhandorfoot,
mowerblade—remove
theignitionkeyandread
theinstructionsbefore
servicingorperforming
maintenance.
3.Thrownobjecthazard—do
notoperatethemower
withoutthereardischarge
plugorbaginplace;do
notoperatethemower
withoutthesidedischarge
coverordeectorinplace.
6.Cutting/dismemberment
hazardofhandorfoot,
mowerblade—donot
operateupanddown
slopes;operatesideto
sideonslopes;stopthe
enginebeforeleavingthe
operatingposition;and
lookbehindyouwhen
backingup.
4

121–2370
1.Handleinraisedposition3.Footpedallocation
2.Handleinloweredposition
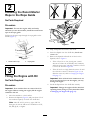
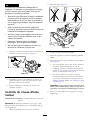
Setup
Important:Removeanddiscardtheprotectiveplastic
sheetthatcoverstheengine.
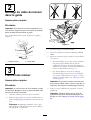
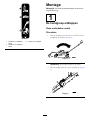
1
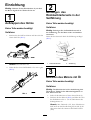
UnfoldingtheHandle
NoPartsRequired
Procedure
1.Movethehandlerearwardandholdtheupperhandle
inplace(Figure3).
Figure3
Note:Thehandlewillclickintoposition.
2.Tightentheupperhandleknobastightasyoucan
(Figure4).
G020803
Figure4
5

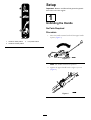
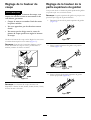
2
InstallingtheRecoil-Starter
RopeintheRopeGuide
NoPartsRequired
Procedure
Important:Tostarttheenginesafelyandeasily
wheneveryouusethemachine,installtherecoil-starter
ropeintheropeguide.
Pulltherecoil-starterropethroughtheropeguideonthe
handle(Figure5).
Figure5
1.Recoil-starterrope2.Ropeguide
3
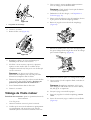
FillingtheEnginewithOil
NoPartsRequired
Procedure
Important:Yourmachinedoesnotcomewithoilin
theengine.Beforestartingtheengine,lltheengine
crankcasewithoil.
1.Movethemachinetoalevelsurface.
2.Removethedipstick(Figure6)andpourabout3/4of
thecrankcasecapacityofoilintotheoil-lltube.
Note:Maxll:0.55L(18.6oz),type:SAE30
detergentoilwithanAPIserviceclassicationofSF ,
SG,SH,SJ,SL,orhigher.
Figure6
3.Wipethedipstickcleanwithacleancloth.
4.Insertthedipstickintotheoil-lltube,butdonot
screwitin.
5.Removethedipstickandreadtheoillevelonthe
dipstick;refertoFigure6.
•Iftheoillevelistoolow,slowlypourasmall
amountofoilintotheoil-lltube,wait3minutes,
andthenrepeatsteps3through5untiltheoillevel
iscorrectasshowninFigure16.
•Iftheoillevelistoohigh,draintheexcessoiluntil
theoilleveliscorrectasshowninFigure16.To
draintheexcessoil,refertoChangingtheEngine
Oil(page17).
Important:Iftheoillevelinthecrankcaseistoo
lowortoohighandyouruntheengine,youmay
damagetheengine.
6.Installthedipstickintotheoil-lltubesecurely.
Important:
Change the engine oil after the r st 5
operating hour s
;changeityearlythereafter.Refer
toChangingtheEngineOil(page17).
6

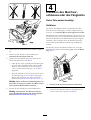
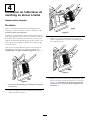
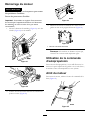
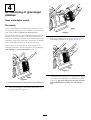
4
InstallingtheMulchPlugor
theGrassBag
NoPartsRequired
Procedure
Youmustcorrectlyinstalleitherthemulchplug(forrecycling
orside-dischargingthegrassclippings)orthegrassbag;
otherwise,theenginewillnotstart.
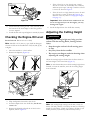
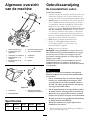
Themachinehasasafetyswitch(locatedatthebottomofthe
channelontheupperrightrearofthemachine)thatprevents
themachinefromoperatingwithoutamulchplugoragrass
baginplace.Thispreventsthemachinefromthrowingdebris
attheoperatorthroughtherearopening.
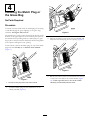
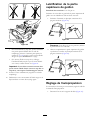
Fortheswitchtodetectthemulchplug,thetopofthemulch
pluglevermustliefullyinthebottomofthechannel
(Figure7).
Figure7
1.Thetopofmulchplugleverintheswitchchannel
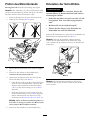
1.Insertthemulchplugintothemachineifitisnot
alreadyinstalled(Figure8).
Figure8
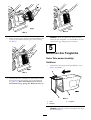
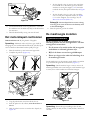
2.Squeezethebuttonontheleverwithyourthumb,and
fullyinsertthemulchplugintotheopening(Figure9).
Figure9
3.Releasethebuttonontheleverandensurethatthetop
oftheleverisliesfullyintheswitchchannel(Figure
10).Ifthetopoftheleverisnotintheswitch
channel,yourmachinewillnotstart!
7

Figure10
Note:Iftheleverdoesnotlatchproperly,disconnect
thewirefromthesparkplugandcheckforandremove
anydebrisbuildupinthetunnel.
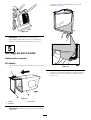
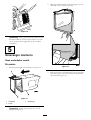
5
AssemblingtheGrassBag
NoPartsRequired
Procedure
1.SlipthegrassbagovertheframeasshowninFigure11.
1
2
3
g027156
Figure11
1.Handle
3.Grassbag
2.Frame
Note:Donotslipthebagoverthehandle(Figure11).
2.Hookthebottomchannelofthebagontothebottom
oftheframe(Figure12).
g027157
Figure12
3.Hookthetopandsidechannelsofthebagontothetop
andsidesoftheframe,respectively(Figure12).
8

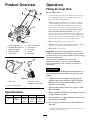
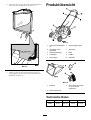
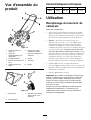
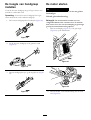
ProductOverview
G012244
1
2
3
4
5
6
7
8
9
10
Figure13
1.Cutting-heightlever(4)
6.Upper-handleknob
2.Oilll/dipstick(notshown)
7.Fuel-tankcap
3.Recoil-starthandle8.Footpedal
4.Blade-controlbar
9.Airlter
5.Upperhandle
10.Sparkplug
Figure14
1.Grassbag3.Mulchplug(comes
installedonthemachine)
2.Side-dischargechute
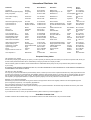
Specications
ModelWeightLengthWidthHeight
2089736kg
(80lb)
159cm
(63
inches)
56cm
(22
inches)
110cm
(43
inches)
Operation
FillingtheFuelTank
RecommendedFuel:
•Forbestresults,useonlyclean,fresh(lessthan30days
old),unleadedgasolinewithanoctaneratingof87or
higher((R+M)/2ratingmethod).
•Ethanol:Gasolinewithupto10%ethanol(gasohol)
or15%MTBE(methyltertiarybutylether)byvolume
isacceptable.EthanolandMTBEarenotthesame.
Gasolinewith15%ethanol(E15)byvolumeisnot
approvedforuse.Neverusegasolinethatcontains
morethan10%ethanolbyvolume,suchasE15
(contains15%ethanol),E20(contains20%ethanol),or
E85(containsupto85%ethanol).Usingunapproved
gasolinemaycauseperformanceproblemsand/orengine
damagewhichmaynotbecoveredunderwarranty.
•Donotusegasolinecontainingmethanol.
•Donotstorefueleitherinthefueltankorfuelcontainers
overthewinterunlessafuelstabilizerisused.
•Donotaddoiltogasoline.
Important:Toreducestartingproblems,addfuel
stabilizertothefuelallseason,mixingitwithgasoline
lessthan30daysold;runthemachinedrybeforestoring
itformorethan30days.
Donotusefueladditivesotherthanafuel
stabilizer/conditioner.Donotusefuelstabilizers
withanalcoholbasesuchasethanol,methanol,or
isopropanol.
DANGER
Gasolineisextremelyammableandexplosive.A
reorexplosionfromgasolinecanburnyouand
others.
•Topreventastaticchargefromignitingthe
gasoline,placethecontainerand/ormachine
directlyonthegroundbeforelling,notina
vehicleoronanobject.
•Fillthetankoutdoorswhentheengineiscold.
Wipeupspills.
•Donothandlegasolinewhensmokingoraround
anopenameorsparks.
•Storegasolineinanapprovedfuelcontainer,out
ofthereachofchildren.
•Donottipthemachineonitssidewithfuelin
thetank.
1.Cleanaroundthefuel-tankcap,andremovethecap
fromthetank(Figure15).
9

1 cm (1/2 inch)
g02821 1
Figure15
2.Fillthefueltank,leavingatleast1cm(1/2inch)from
thebottomoftheneckemptytoallowthegasoline
roomtoexpand.
3.Installthefueltankcapandtightenitsecurelybyhand.
CheckingtheEngine-OilLevel
ServiceInterval:Beforeeachuseordaily
Note:Maxll:0.55L(18.6oz),type:SAE30detergent
oilwithanAPIserviceclassicationofSF,SG,SH,SJ,SL,
orhigher.
1.Movethemachinetoalevelsurface.
2.Removethedipstick(Figure16).
Figure16
3.Wipethedipstickcleanwithacleancloth.
4.Insertthedipstickintotheoil-lltube,butdonot
screwitin.
5.Removethedipstickandreadtheoillevelonthe
dipstick;refertoFigure16.
•Iftheoillevelistoolow,slowlypourasmall
amountofoilintotheoil-lltube,wait3minutes,
andthenrepeatsteps3through5untiltheoillevel
iscorrectasshowninFigure6.
•Iftheoillevelistoohigh,draintheexcessoiluntil
theoilleveliscorrectasshowninFigure6.To
draintheexcessoil,refertoChangingtheEngine
Oil(page17).
Important:Iftheoillevelinthecrankcaseistoo
lowortoohighandyouruntheengine,youmay
damagetheengine.
6.Installthedipstickintotheoil-lltubesecurely.
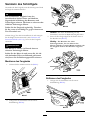
AdjustingtheCuttingHeight
WARNING
Adjustingthecuttingheightmaybringyouinto
contactwiththemovingblade,causingserious
injury.
•Stoptheengineandwaitforallmovingparts
tostop.
•Stayawayfromthehotmufer.
•Donotputyourngersunderthehousingwhen
adjustingthecuttingheight.
Adjustthecuttingheightasdesired.Setthefrontwheelsto
thesameheightastherearwheels(Figure17).
Note:Toraisethemachine,moveallthecutting-heightlevers
forward;tolowerthemachine,moveallthecutting-height
leversrearward.
Figure17
Note:Thecutting-heightsettingsare25mm(1inch);35
mm(1-3/8inch);44mm(1-3/4inch);54mm(2-1/8inches);
64mm(2-1/2inches);73mm(2-7/8inches);83mm(3-1/4
inches);92mm(3-5/8inches);and102mm(4inches).
10

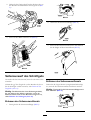
AdjustingtheUpperHandle
Height
Youmayraiseorlowertheupperhandletoaposition
comfortableforyou.
Note:Youcannotraisetheupperhandlehigherthanthe
angleofthelowerhandle.
1.Loosentheupper-handleknob(Figure18).
Figure18
2.Movetheupperhandletothedesiredposition(Figure
19).
Figure19
3.Tightentheupperhandleknobastightasyoucan
(Figure20).
Figure20
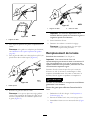
StartingtheEngine
WARNING
Themachineisloudandcoulddamageyour
hearing.
Wearhearingprotection.
Important:Themachinehasasafetyswitchthat
preventsyoufromstartingthemachineunlessyourst
installthemulchplugorthegrassbagsecurelyonthe
machine.
1.Installthemulchplug(Figure21)orthegrassbag
(Figure22)onthemachine.
Figure21
Figure22
2.TurnthefuelvalvelevertotheOnposition(Figure23).
11

Figure23
3.Holdtheblade-controlbaragainstthehandleandpull
therecoil-starthandle(Figure24).
Figure24
1.Blade-controlbar
Note:Ifthemachinestilldoesnotstart,contactan
AuthorizedServiceDealer.
UsingtheSelf-PropelDrive
Tooperatetheself-propeldrive,simplywalkwithyourhands
ontheupperhandleandyourelbowsatyoursides,andthe
machinewillautomaticallykeeppacewithyou.
StoppingtheEngine
Tostoptheengine,releasethebladecontrolbar(Figure25).
Figure25
CAUTION
Whenyoureleasetheblade-controlbar,boththe
engineandbladeshouldstopwithin3seconds.If
theydonotstopproperly,stopusingyourmachine
immediatelyandcontactanAuthorizedService
Dealer.
MulchingtheClippings
Yourmachinecomesfromthefactoryreadytomulchthe
grassandleafclippingsbackintothelawn.
Ifthegrassbagisonthemachine,removeit;referto
RemovingtheGrassBag(page13)beforemulchingthe
clippings.Iftheside-dischargechuteisonthemachine,
removeitandlocktheside-dischargedoor;refertoRemoving
theSide-DischargeChute(page14)beforemulchingthe
clippings.
Important:Themachinehasasafetyswitchthat
preventsyoufromstartingthemachineunlessyourst
installthemulchplugsecurelyonthemachine(Figure
26).
InstallthemulchplugasillustratedinFigure26.
Figure26
1.Topofmulchplugleverinswitchchannel
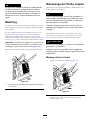
BaggingtheClippings
Usethegrassbagwhenyouwanttocollectgrassandleaf
clippingsfromthelawn.
WARNING
Aworngrassbagcouldallowsmallstonesandother
similardebristobethrownatyouorbystanders,
resultinginseriouspersonalinjuryordeath.
Checkthegrassbagfrequently.Ifitisdamaged,
installanewTororeplacementbag.
12

Iftheside-dischargechuteisonthemachine,removeit
andlocktheside-dischargedoor;refertoRemovingthe
Side-DischargeChute(page14)beforebaggingtheclippings.
WARNING
Thebladeissharp;contactingthebladecanresult
inseriouspersonalinjury.
Stoptheengineandwaitforallmovingpartstostop
beforeleavingtheoperatingposition.
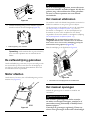
InstallingtheGrassBag
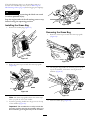
1.Removethemulchplug(Figure27).
Figure27
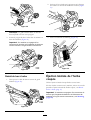
2.Routethestarterropearoundthelower-ropeguide
(Figure28).
Figure28
Note:Thelowerropeguidereleasesthestarterrope
whenyoupulltherecoil-starthandle.
3.Insertthegrass-baghandleintothegroovesatthetop
ofthemachine(Figure29).
Important:Themachinehasasafetyswitchthat
preventsyoufromstartingthemachineunlessyou
rstinstallthegrassbagsecurelyonthemachine.
Figure29
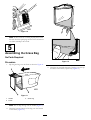
RemovingtheGrassBag
1.Routethestarterropearoundthelower-ropeguide
(Figure30).
Figure30
2.Liftthegrass-baghandleoutfromthegroovesatthe
topofthemachine,andremovethebagfromthe
machine(Figure31).
G010270
Figure31
3.Insertthemulchplug(Figure32).
13

Figure32
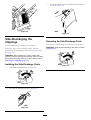
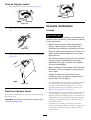
Side-Dischargingthe
Clippings
Usethesidedischargeforcuttingverytallgrass.
Ifthegrassbagisonthemachine,removeitbefore
side-dischargingtheclippings;refertoRemovingtheGrass
Bag(page13).
Important:Themachinehasasafetyswitchthat
preventsyoufromstartingthemachineunlessyourst
installthemulchplugsecurelyonthemachine;referto
MulchingtheClippings(page12).
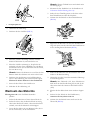
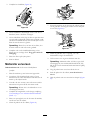
InstallingtheSide-DischargeChute
1.Unlocktheside-dischargedoor(Figure33).
Figure33
2.Liftopentheside-dischargedoor(Figure34).
Figure34
3.Installthesidedischargechuteandclosethedooronto
thechute(Figure35).
Figure35
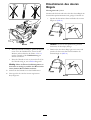
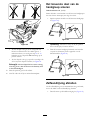
RemovingtheSide-DischargeChute
Toremovetheside-dischargechute,reversethestepsabove.
Important:Locktheside-dischargedoorafteryouclose
it(Figure36).
Figure36
14

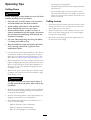
OperatingTips
CuttingGrass
WARNING
Abent,damaged,orloosebladecancomeoffofthe
machineinjuringyouorbystanders.
•Cleartheareaofsticks,stones,wire,branches,
andotherdebristhatthebladecouldhit.
•Avoidstrikingsolidobjectswiththeblade.
Neverdeliberatelymowoveranyobject.
•Ifthemachinestrikesanobjectorstartsto
vibrate,immediatelystoptheengine,disconnect
thewirefromthesparkplug,andexaminethe
machinefordamage.
•Usecarewheninspecting/servicingtheblade;
itissharpandcouldcutyou.
•Keepthebladebolttightandreplacetheblade
everymowingseasonwithagenuineToro
replacementblade.
•Cutonlyaboutathirdofthegrassbladeatatime.Donot
cutbelowthe51mm(2inch)settingunlessthegrassis
sparseoritislatefallwhengrassgrowthbeginstoslow
down.RefertoAdjustingtheCuttingHeight(page10).
•Whencuttinggrassover15cm(6inches)tall,mowatthe
highestcuttingheightsettingandwalkslower;thenmow
againatalowersettingforthebestlawnappearance.If
thegrassistoolong,themachinemayplugandcause
theenginetostall.
•Mowonlydrygrassorleaves.Wetgrassandleavestend
toclumpontheyardandcancausethemachinetoplug
ortheenginetostall.
WARNING
Wetgrassorleavescancauseseriousinjuryif
youslipandcontacttheblade.Mowonlyindry
conditions.
•Beawareofapotentialrehazardinverydryconditions,
followalllocalrewarnings,andkeepthemachinefree
ofdrygrassandleafdebris.
•Alternatethemowingdirection.Thishelpsdispersethe
clippingsoverthelawnforevenfertilization.
•Ifthenishedlawnappearanceisunsatisfactory,try1
ormoreofthefollowing:
–Replacethebladeorhaveitsharpened.
–Walkataslowerpacewhilemowing.
–Raisethecuttingheightonyourmachine.
–Cutthegrassmorefrequently.
–Overlapcuttingswathsinsteadofcuttingafullswath
witheachpass.
–Setthecuttingheightonthefrontwheelsanotch
lowerthantherearwheels.Forexample,setthefront
wheelsat51mm(2inches)andtherearwheelsat64
mm(2-1/2inches).
CuttingLeaves
•Aftercuttingthelawn,ensurethathalfofthelawnshows
throughthecutleafcover.Youmayneedtomakemore
thanasinglepassovertheleaves.
•Iftherearemorethan13cm(5inches)ofleavesonthe
lawn,setthefrontcuttingheight1or2notcheshigher
thantherearcuttingheight.
•Slowdownyourmowingspeedifthemachinedoesnot
cuttheleavesnelyenough.
15

Maintenance
Note:Determinetheleftandrightsidesofthemachinefromthenormaloperatingposition.
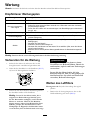
RecommendedMaintenanceSchedule(s)
MaintenanceService
Interval
MaintenanceProcedure
Aftertherst5hours
•Changetheengineoil.
Beforeeachuseordaily
•Checktheengine-oillevel.
•Ensurethattheenginestopswithin3secondsafterreleasingtheblade-controlbar.
•Checktheaircleanerfordirtanddamageandcleanorreplaceitifnecessary.
Aftereachuse
•Cleangrassclippingsanddirtfromunderthemachinehousing.
Beforestorage
•Emptythefueltankbeforerepairsasdirectedandbeforeannualstorage.
Yearly
•Cleanorreplacetheairlter(morefrequentlyindustyoperatingconditions).
•Changetheengineoil.
•Lubricatetheupperhandle.
•Replacethebladeorhaveitsharpened(morefrequentlyiftheedgedullsquickly).
•Refertoyourengineoperator'smanualforanyadditionalyearlymaintenance
procedures.
Important:Refertoyourengineowner'smanualforadditionalmaintenanceprocedures.
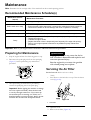
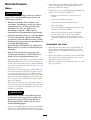
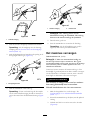
PreparingforMaintenance
1.Stoptheengineandwaitforallmovingpartstostop.
2.Disconnectthespark-plugwirefromthesparkplug
(Figure37)beforeperforminganymaintenance
procedure.
Figure37
3.Afterperformingthemaintenanceprocedure(s),
connectthespark-plugwiretothesparkplug.
Important:Beforetippingthemachinetochange
theoilorreplacetheblade,allowthefueltank
torundrythroughnormaluse.Ifyoumusttip
themachinepriortorunningoutoffuel,usea
handfuelpumptoremovethefuel.Alwaystipthe
machineontoitssidewiththedipstickdown.
WARNING
Tippingthemachinemaycausethefuelto
leak.Gasolineisammableandexplosiveand
cancausepersonalinjury.
Runtheenginedryorremovethegasoline
withahandpump;neversiphon.
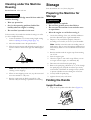
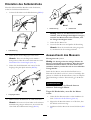
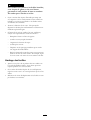
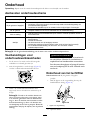
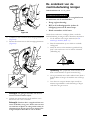
ServicingtheAirFilter
ServiceInterval:Beforeeachuseordaily
Yearly
1.Pressdownonthelatchtabsontopoftheair-cleaner
cover(Figure38).
Figure38
1.Latchtabs
2.Openthecover.
3.Removetheairlter(Figure39).
16

Figure39
4.Iftheairlterisdamagedoriswetwithoilorfuel,
replaceit.
5.Iftheairlterisdirty,tapitonahardsurfaceseveral
timesorblowcompressedairlessthan207kPa(30psi)
throughthesideofthelterthatfacestheengine.
Note:Donotbrushthedirtoffthelter;brushing
forcesdirtintothebers.
6.Removedirtfromtheaircleanerbodyandcoverusing
amoistrag.Donotwipedirtintotheairduct.
7.Installthelterintotheaircleaner.
8.Closethecover.
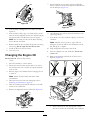
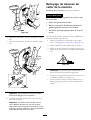
ChangingtheEngineOil
ServiceInterval:Aftertherst5hours
Yearly
1.Movethemachinetoalevelsurface.
2.Ensurethatthefueltankcontainslittleornofuelso
thatfueldoesnotleakoutwhenyoutipthemachine
ontoitsside.
3.Runtheengineafewminutesbeforechangingtheoil
towarmit.
Note:Warmoilowsbetterandcarriesmore
contaminants.
4.Disconnectthewirefromthesparkplug;referto
PreparingforMaintenance(page16).
5.Placeanoildrainpanbesidethemachineontheside
nearesttotheoil-lltube.
6.Removethedipstickfromtheoil-lltube(Figure40).
Figure40
7.Tipthemachineontoitsside,withtheoil-lltube
down,todraintheusedoilthroughtheoil-lltubeinto
theoil-drainpan(Figure41).
Figure41
8.Afterdrainingtheusedoil,returnthemachinetothe
operatingposition.
9.Pourabout3/4ofthecrankcasecapacityofoilinthe
crankcase.
Note:Maxll:0.55L(18.6oz),type:SAE30
detergentoilwithanAPIserviceclassicationofSF ,
SG,SH,SJ,SL,orhigher.
10.Wipethedipstickcleanwithacleancloth.
11.Insertthedipstickintotheoil-lltube,butdonot
screwitin.
12.Removethedipstickandreadtheoillevelonthe
dipstick(Figure42).
Figure42
•Iftheoillevelistoolow,slowlypourasmall
amountofoilintotheoil-lltube,wait3minutes,
17

andthenrepeatsteps10through12untiltheoil
levelisattheFullmarkonthedipstick.
•Iftheoillevelistoohigh,draintheexcessoiluntil
theoilleveliscorrectasshowninFigure42.
Important:Iftheoillevelinthecrankcaseistoo
lowortoohighandyouruntheengine,youmay
damagetheengine.
13.Installthedipstickintotheoil-lltubesecurely.
14.Disposeoftheusedoilproperlyatalocalrecycling
center.
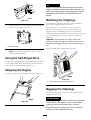
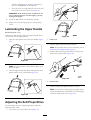
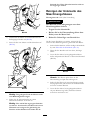
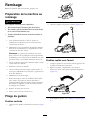
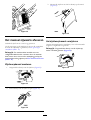
LubricatingtheUpperHandle
ServiceInterval:Yearly
Lubricatetheleftandrightsidesoftheupperhandlewitha
low-viscositysiliconespraylubricant.
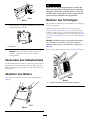
1.Spraytheouterplasticendoftheinnerhandle(Figure
43).
Figure43
Note:Usethestrawthatcomeswiththespraycanto
directthespray.
2.Pushtheupperhandlefullydownandspraytheinner
plasticsurfaceoftheouterhandle(Figure44).
Figure44
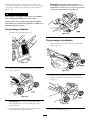
AdjustingtheSelf-PropelDrive
Ifyourmachinedoesnotself-propelproperly,adjustthe
self-propel-drivecable.
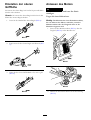
1.Loosenthenutonthecablemount(Figure45).
Figure45
1.Cablemount
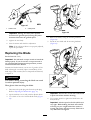
2.Pulltheupperhandlebackfullyrearward.
Note:Ifthehandledoesnotmovesmoothly,referto
LubricatingtheUpperHandle(page18).
3.Pullthecablejacketdownwarduntilyouremovethe
slackintheexposedcable(Figure46).
Figure46
1.Exposedcable
4.Pushthecablejacketupward3mm(1/8inch).
Note:Youcanplacearuleragainsttheuppersideof
theblackcablemountandmeasurehowfartheupper
endofthecablejacketmoves(Figure47).
18
Seite wird geladen ...
Seite wird geladen ...
Seite wird geladen ...
Seite wird geladen ...
Seite wird geladen ...
Seite wird geladen ...
Seite wird geladen ...
Seite wird geladen ...
Seite wird geladen ...
Seite wird geladen ...
Seite wird geladen ...
Seite wird geladen ...
Seite wird geladen ...
Seite wird geladen ...
Seite wird geladen ...
Seite wird geladen ...
Seite wird geladen ...
Seite wird geladen ...
Seite wird geladen ...
Seite wird geladen ...
Seite wird geladen ...
Seite wird geladen ...
Seite wird geladen ...
Seite wird geladen ...
Seite wird geladen ...
Seite wird geladen ...
Seite wird geladen ...
Seite wird geladen ...
Seite wird geladen ...
Seite wird geladen ...
Seite wird geladen ...
Seite wird geladen ...
Seite wird geladen ...
Seite wird geladen ...
Seite wird geladen ...
Seite wird geladen ...
Seite wird geladen ...
Seite wird geladen ...
Seite wird geladen ...
Seite wird geladen ...
Seite wird geladen ...
Seite wird geladen ...
Seite wird geladen ...
Seite wird geladen ...
Seite wird geladen ...
Seite wird geladen ...
Seite wird geladen ...
Seite wird geladen ...
Seite wird geladen ...
Seite wird geladen ...
Seite wird geladen ...
Seite wird geladen ...
Seite wird geladen ...
Seite wird geladen ...
Seite wird geladen ...
Seite wird geladen ...
Seite wird geladen ...
Seite wird geladen ...
Seite wird geladen ...
Seite wird geladen ...
Seite wird geladen ...
Seite wird geladen ...
Seite wird geladen ...
Seite wird geladen ...
Seite wird geladen ...
Seite wird geladen ...
Seite wird geladen ...
Seite wird geladen ...
Seite wird geladen ...
Seite wird geladen ...
Seite wird geladen ...
Seite wird geladen ...
Seite wird geladen ...
Seite wird geladen ...
Seite wird geladen ...
Seite wird geladen ...
Seite wird geladen ...
Seite wird geladen ...
Seite wird geladen ...
Seite wird geladen ...
Seite wird geladen ...
Seite wird geladen ...
Seite wird geladen ...
Seite wird geladen ...
Seite wird geladen ...
Seite wird geladen ...
Seite wird geladen ...
Seite wird geladen ...
-
 1
1
-
 2
2
-
 3
3
-
 4
4
-
 5
5
-
 6
6
-
 7
7
-
 8
8
-
 9
9
-
 10
10
-
 11
11
-
 12
12
-
 13
13
-
 14
14
-
 15
15
-
 16
16
-
 17
17
-
 18
18
-
 19
19
-
 20
20
-
 21
21
-
 22
22
-
 23
23
-
 24
24
-
 25
25
-
 26
26
-
 27
27
-
 28
28
-
 29
29
-
 30
30
-
 31
31
-
 32
32
-
 33
33
-
 34
34
-
 35
35
-
 36
36
-
 37
37
-
 38
38
-
 39
39
-
 40
40
-
 41
41
-
 42
42
-
 43
43
-
 44
44
-
 45
45
-
 46
46
-
 47
47
-
 48
48
-
 49
49
-
 50
50
-
 51
51
-
 52
52
-
 53
53
-
 54
54
-
 55
55
-
 56
56
-
 57
57
-
 58
58
-
 59
59
-
 60
60
-
 61
61
-
 62
62
-
 63
63
-
 64
64
-
 65
65
-
 66
66
-
 67
67
-
 68
68
-
 69
69
-
 70
70
-
 71
71
-
 72
72
-
 73
73
-
 74
74
-
 75
75
-
 76
76
-
 77
77
-
 78
78
-
 79
79
-
 80
80
-
 81
81
-
 82
82
-
 83
83
-
 84
84
-
 85
85
-
 86
86
-
 87
87
-
 88
88
-
 89
89
-
 90
90
-
 91
91
-
 92
92
-
 93
93
-
 94
94
-
 95
95
-
 96
96
-
 97
97
-
 98
98
-
 99
99
-
 100
100
-
 101
101
-
 102
102
-
 103
103
-
 104
104
-
 105
105
-
 106
106
-
 107
107
-
 108
108


Toro 53cm Super Bagger Lawn Mower Benutzerhandbuch
- Kategorie
- Rasenmäher
- Typ
- Benutzerhandbuch
in anderen Sprachen
Verwandte Artikel
-
Toro 53cm Recycler Lawn Mower Benutzerhandbuch
-
Toro TimeMaster 76cm Lawn Mower Benutzerhandbuch
-
-
-
-
Toro 48cm Super Recycler Lawn Mower Benutzerhandbuch
-
Toro 48cm Super Bagger Lawn Mower Benutzerhandbuch
-
Toro 53cm Super Recycler Lawn Mower Benutzerhandbuch
-
-