Sony MV-650STR Bedienungsanleitung
- Kategorie
- DVD Spieler
- Typ
- Bedienungsanleitung

2-586-562-11(2)
Portable DVD Player
© 2005 Sony Corporation
Portable DVD
Player
Operating Instructions
Bedienungsanleitung
Mode d’emploi
Istruzioni per l’uso
Gebruiksaanwijzing
GB
DE
IT
FR
NL
Wichtig!
Bitte nehmen Sie sich etwas Zeit, um den Geräte-Pass
vollständig auszufüllen. Dieser befindet sich auf der
hinteren Umschlagseite dieser Bedienungsanleitung.
For installation and connections, refer to “Connection” on page 9.
Informationen zur Installation und zum Anschluss finden Sie unter „Anschlüsse“
auf Seite 9.
En ce qui concerne l’installation et les raccordements, reportez-vous à la section
« Raccordements », page 9.
Per l’installazione e i collegamenti, consultare la sezione “Collegamenti” a pagina
9.
Zie “Aansluiting” op pagina 9 voor meer informatie over installatie en
aansluitingen.
MV-650STR

2
Warning
You are cautioned that any changes or
modifications not expressly approved in this
manual could void your authority to operate
this equipment.
This label is located on the bottom of the
chassis.
CAUTION
:CLASS 1M VISIBLE/INVISIBLE LASER
RADIATION WHEN OPEN AND INTERLOCKS DEFEATED.
DO NOT VIEW DIRECTLY WITH OPTICAL INSTRUMENTS.
This label is located on the drive unit’s internal
chassis.
CAUTION
•When installation, be sure to fix certainly.
•While operating, be sure to fasten seatbelts to
avoid injury in the event of a sudden
movement of the vehicle.

3
Table of Contents
Welcome ! .............................................................. 4
Enjoying DivX
®
videos ........................................ 4
Precautions ............................................................ 5
About this manual ............................................... 6
About the discs this player can play ................. 6
Connection ............................................................ 9
Resetting the player ........................................... 11
Location of controls ........................................... 12
Various Playback
Playing a disc ...................................................... 14
Searching a chapter/title/track directly .......... 15
Resume playback ................................................. 16
Using MP3/JPG/DivX
®
menu ........................... 16
Playing repeatedly (Repeat Playback) ............ 19
Creating your own program (Program
Playback) ........................................................ 20
Displaying elapsed time ................................... 21
Changing the subtitle language ....................... 22
Using a DVD menu ............................................ 23
Using the TOP MENU button ............................ 23
Using the MENU button ..................................... 23
Changing the audio language .......................... 24
Changing angles ................................................. 24
Changing the audio output .............................. 25
Using the PBC (playback control) function .... 25
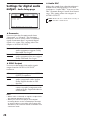
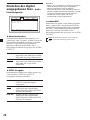
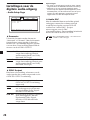
Changing Setup
Setting for DVD player
- General Setup Page .................................... 27
Settings for digital audio output - Audio Setup
Page................................................................. 28
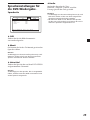
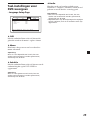
Language settings for DVD playback -
Language Page .............................................. 29
Settings for the Parental Control - Parental
Setup Page ..................................................... 30
Selecting the Parental Control mode on and off -
Parental Control ............................................. 30
Setting the password - Password ...................... 30
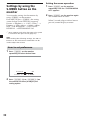
Preparing for the initial parental setting
- Level ..............................................................31
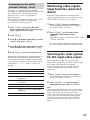
Monitoring video signals input from the
connected device ........................................... 31
Selecting the color system for the input video
signal ............................................................... 31
Settings by using the
S-MENU button on the monitor ................. 32
How to set preference ......................................... 32
Turning the image upside down...................... 34
Setting the reference volume ............................ 34
Additional information
Maintenance ........................................................ 35
Notes on discs ..................................................... 36
About MP3 files .................................................. 37
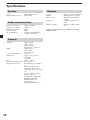
Specifications ...................................................... 38
Troubleshooting.................................................. 39
Error display ....................................................... 40
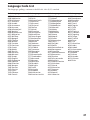
Language Code List ........................................... 41

4
Thank you for purchasing this Sony Portable
DVD Player. You can enjoy its various features
even more with:
•DVD/Video CD/Audio CD playback.
•Support DTS/Dolby Digital through optical
digital output terminal.
•MP3/JPG/DivX file playback (recorded on
CD-ROMs/CD-Rs/CD-RWs).
•Supplied controller accessory
Card remote commander
RM-X708
Before operating the player, please read these
operating instructions thoroughly and retain
them for future reference.
Copyrights
This product incorporates copyright protection
technology that is protected by method claims
of certain U.S. patents, other intellectual
property rights owned by Macrovision
Corporation, and other rights owners. Use of
this copyright protection technology must be
authorized by Macrovision Corporation, and is
intended for home and other limited viewing
uses only unless otherwise authorized by
Macrovision Corporation. Reverse engineering
or disassembly is prohibited.
Manufactured under license from Dolby
Laboratories. “Dolby”, “Pro Logic”, and the
double-D symbol are trademarks of Dolby
Laboratories.
“DTS,” “DTS Digital Surround” and “DTS
Digital Out” are trademarks of Digital Theater
Systems, Inc.
DivX is a registered trademark of
DivXNetworks, Inc.
Welcome ! Enjoying DivX
®
videos
About DivX Video Files
DivX
®
is a video file compression technology,
developed by DivXNetworks, Inc. This
product is an official DivX
®
Certified product
and can play DivX
®
5, DivX
®
4, DivX
®
3 and
DivX
®
VOD video content.
You can play DATA CDs and DATA DVDs
that contain DivX video files.
DivX video files of format conforming to ISO
9660 Level 1/Level 2, or its extended format,
Joliet
— DivX video files of format conforming to
UDF.
DATA CDs and DATA DVDs that the
player can play
Playback of DATA CDs (CD-ROMs/CD-Rs/
CD-RWs) and DATA DVDs (DVD-Rs/DVD-
RWs/DVD+Rs/DVD+RWs) on this player is
subject to certain conditions;
— With DATA CDs that contain DivX video
files in addition to MP3 audio tracks or
JPEG image files, you can select the file and
play.
How to play the DivX files, see page 16 for
details.

5
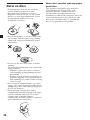
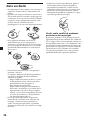
•While operating
— Do not insert your hands, fingers or
foreign objects into the player. It may
cause injury or damage to the player.
— Take extra care not to wind the wire of the
headphones around your neck avoiding
injury or suffocation in the event of a
sudden movement of the vehicle.
— Keep small articles out of the reach of
children.
•If the player does not work, check the
connections first. If everything is in order,
check the fuse.
•If your car was parked in direct sunlight,
allow the player to cool off before operating
it.
•Avoid installing the player in places:
— subject to temperature below 0 °C or
above 45 °C
— subject to direct sunlight
— near heat sources (such as heaters)
— exposed to rain or moisture
— exposed to excessive dust or dirt
— subject to excessive vibration
— subject to heat:
Keep the player away from nearby hot
vehicle components that heat up over
time such as hoses, high current wires,
and braking systems components. Make
sure to leave enough room for ventilation
on openings and slots to protect from over
heating.
If you have any questions or problems
concerning the player, please consult your
nearest Sony dealer.
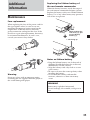
Moisture condensation
On a rainy day or in a very damp area,
moisture condensation may occur inside the
lenses. Should this occur, the player will not
operate properly. In such a case, remove the
disc and wait for about an hour until the
moisture has evaporated.
To maintain high sound quality
Be careful not to splash a drink such as juice or
other soft drinks onto the player or discs.
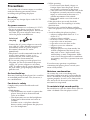
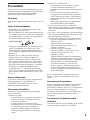
Precautions
To avoid the risk of serious injury or accident,
read the following precautions before
installing and operating the player.
On safety
Do not put any foreign objects in the DC IN
12 V jack.
On power sources
•Use house current or a car battery (12 V DC).
•For use in your house, use the AC power
adaptor supplied with the player. Do not use
any other AC power adaptor since it may
cause the player to malfunction.
•Connect the AC power adaptor to an easily
accessible AC outlet. Should you notice an
abnormality in the AC power adaptor,
disconnect it from the AC outlet
immediately.
•The player is not disconnected from the AC
power source (mains) as long as it is
connected to the wall outlet, even if the
player itself has been turned off.
•If you are not going to use the player for a
long time, be sure to disconnect the power
supply (AC power adapter or car battery
cord). To remove the AC power adaptor from
the wall outlet, grasp the plug itself; never
pull the cord.
On heat build-up
Heat may build up in the player if it is used for
an extended period of time. This, however, is
not a malfunction.
For driver‘s safety
Comply with your local traffic rules and
regulations.
•While driving
— The driver must not watch or operate the
player. It may lead to distraction and
cause an accident.
— The driver must not use the headphones.
It may lead to distraction and cause an
accident.
Park the car in a safe place when the
driver watches and operates the player or
uses the headphones.
Polarity of
the plug

6
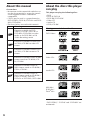
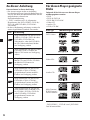
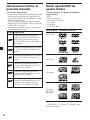
About the discs this player
can play
This player can play the following discs:
•DVD
•DVD-R/DVD+R
•DVD-RW/DVD+RW
•Video CD
•Audio CD
•CD-R/CD-RW
Disc type Label on the disc
DVD Videos
Video CDs
Audio CDs
MP3 files/
JPEG files/
DivX
®
files
“DVD VIDEO,” “DVD-R” and “DVD-RW” are
trademarks.
About this manual
Conventions
•Instructions in this manual describe how to
use the player mainly by using the controls
on the supplied wireless card remote
commander.
•”DVD” may be used as a general term for
DVD VIDEOs, DVD-Rs/DVD+Rs and DVD-
RWs/DVD+RWs.
•The icons below are used in this manual:
Icon Meaning
Function available for DVD
VIDEOs, DVD-Rs/DVD+Rs or
DVD-RWs/DVD+RWs in video
mode, or for DVD-RWs in VR
(Video Recording) mode
Functions available for Video CDs
or CD-Rs/CD-RWs in video CD
format
Functions available for music CDs
or CD-Rs/CD-RWs in music CD
format
Functions available for files in MP3
format stored on CD-ROMs/CD-
Rs/CD-RWs
Functions available for files in
JPEG format stored on CD-ROMs/
CD-Rs/CD-RWs
Functions available for files in
DivX format stored on CD-ROMs/
CD-Rs/CD-RWs, DVD-Rs/
DVD+Rs or DVD-RWs/DVD+RWs

7
Notes on CD-Rs (recordable CDs)/
CD-RWs (rewritable CDs)/DVD-Rs
(recordable DVDs)/DVD+Rs/DVD-
RWs (rewritable DVDs)/DVD+RWs
•Some CD-Rs/CD-RWs/DVD-Rs/DVD+Rs/
DVD-RWs/DVD+RWs (depending on the
equipment used for its recording or the
condition of the disc) may not play on this
player.
•You cannot play a CD-R/CD-RW that is not
finalized*.
•You cannot play a CD-R/CD-RW that is
recorded in Multi Session.
•You can play MP3/JPEG/DivX files recorded
on CD-ROMs, CD-Rs, CD-RWs, DVD-Rs,
DVD+Rs, DVD-RWs and DVD+Rs.
* A process necessary for a recorded CD-R/CD-RW
disc to be played on the audio CD player.
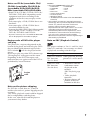
Region code of DVDs this player
can play
This player has a region code printed on the
bottom of the player and will only play DVDs
that are labeled with identical region codes.
DVDs labeled
ALL
will also be played on this
player.
If you try to play any other DVD, the message
“Wrong Region” will appear on the screen.
Depending on the DVD, the region code
indication may not appear even if the DVD is
prohibited by area restrictions.
Note on the picture skipping
If a DVD has a crack, dirt, etc., it may be
unable to be read or a picture skipping may be
occurred.
Very rarely, playback sound could be skipped
due to compatibility with the player.
In this case, take the disk and the player to
your nearest Sony dealer.
Region
code
Cautions
• This player CANNOT play these discs.
— DVD-Audio — DVD-RAM
— DVD-ROM — CD-G
— SVCD — CD-I
— Photo-CD — VSD
— Active-Audio (Data)
— CD-Extra (Data)
— Mixed CD (Data)
— CD-ROM (the data other than the MP3/JPEG/
DivX file)
• This product incorporates copyright protection
technology that is protected by method claims of
certain U.S. patents and other intellectual
property rights owned by Macrovision
Corporation and other rights owners. Use of this
copyright protection technology must be
authorized by Macrovision Corporation, and is
intended for home and other limited viewing
uses only unless otherwise authorized by
Macrovision Corporation. Reverse engineering or
disassembly is prohibited.
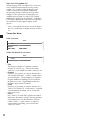
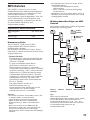
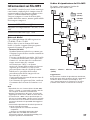
Note on PBC (Playback Control)
This player conforms to Ver. 1.1 and Ver. 2.0 of
Video CD standards. You can enjoy two kinds
of playback according to the disc type.
Disc type
Video CDs without
PBC functions
(Ver. 1.1 discs)
Video CDs with
PBC functions
(Ver. 2.0 discs)
You can
Video playback (moving
pictures) as well as music.
• Interactive software
with menu screens
displayed on the
monitor
(PBC Playback, page
25).
• Video playback
functions.
• High-resolution still
pictures if they are
included on the disc.

8
Note on DTS-encoded CDs
When playing DTS*-encoded CDs, excessive
noise will be heard from the analog stereo
outputs. To avoid possible damage to the
audio system, the consumer should take
proper precautions when the analog stereo
outputs of this player are connected to an
amplification system. To enjoy DTS Digital
Surround™ playback, an external 5.1-channel
DTS Digital Surround™ decoder system must
be connected to the digital output of this
player.
* “DTS,” “DTS Digital Surround” and “DTS Digital
Out” are trademarks of Digital Theater Systems,
Inc.
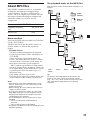
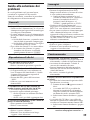
Terms for discs
DVD structure
Video CD/Audio CD structure
• Title
The longest section of a picture or music
feature on a DVD, e.g., a movie for video
software, or an album for audio software, etc.
• Chapter
Sections of a picture or a music feature that
are smaller than titles. A title is composed of
several chapters. Each chapter is assigned a
chapter number enabling you to locate the
chapter you want. Depending on the disc,
chapters may not be recorded.
• Track
Sections of a picture or a music feature on a
Video CD/Audio CD. Each track is assigned
a track number enabling you to locate the
track you want.
• Scene
On a Video CD with PBC (playback control)
functions, the menu screens, moving pictures
and still pictures are divided into sections
called “scenes.” Each scene is assigned a
scene number enabling you to locate the
scene you want.
Disc
Title
Chapter
Track
Disc

9
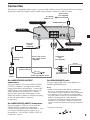
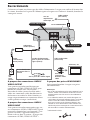
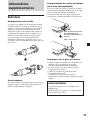
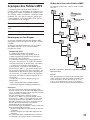
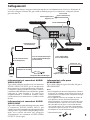
Connection
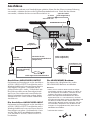
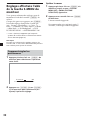
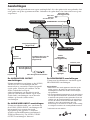
On AUDIO/VIDEO OUTPUT
connectors
You can connect a TV to the AUDIO/VIDEO
OUTPUT connectors to output the contents
being played back on the player. Connect the
yellow plugs of the audio/video cable to the
video connectors on both the TV and the
player, and connect the white plugs to the
white (left audio) connectors and the red plugs
to the red (right audio) connectors
respectively.
On AUDIO/VIDEO INPUT connectors
You can connect a VTR, etc. to the AUDIO/
VIDEO INPUT connectors to input the
contents being played back on the device. You
can connect the device in the same way as
described on “On AUDIO/VIDEO OUTPUT
connectors” above.
Optical cable
(not supplied)
To a digital
amplifier, etc.
AUDIO/VIDEO INPUT
OPTICAL OUTPUT
DC IN 12V
AUDIO/VIDEO OUTPUT
AC power
adaptor
(supplied)
Audio/video
cable
(not supplied)
Power cord for the
cigar lighter socket
(supplied)
TV, etc.
To audio/video
input connectors
To the cigar lighter socket
When using the
player in the car
To a
wall
outlet
On HEADPHONES jacks
You can connect the 2 sets of headphones to
the HEADPHONES jacks.
Notes
• When connecting another device to the player,
be sure to connect the player to the power
source after all other connections are completed.
• If an obstacle such as cigar ash is caught inside
the cigar lighter socket, the contact between the
power cord plug and the socket becomes
incomplete and the plug may get extremely hot
during use. To avoid this, check the socket and
clean it if necessary before connecting the power
cord.
* Polarity of the plug
This player is supplied with two types of power cable. When you use the player in the car, connect
the player to the cigar lighter socket; when using at home, connect it to the AC outlet.
*
AC power cord
(supplied)
HEADPHONES jacks

10
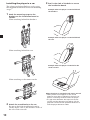
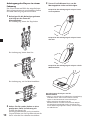
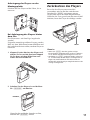
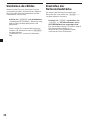
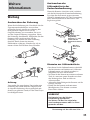
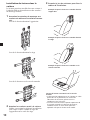
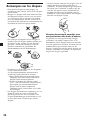
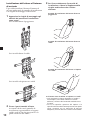
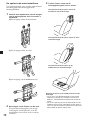
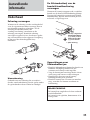
Installing the player in a car
The player can be installed in a car by using
the supplied installation board and mounting
straps.
1 Hook the mounting straps to the
brackets on the installation board as
follows.
When attaching behind the headrest
When attaching behind the seat
When attaching to the center console
2 Attach the round hooks to the car.
Be sure to hook the installation board to
steady objects such as the headrest shafts of
the seat or the seat rails.
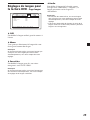
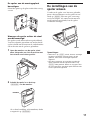
3 Reel in the slack of the belts to secure
the installation board.
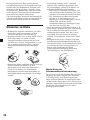
Example when the player is attached behind
the headrest
Example when the player is attached behind
the seat
Example when the player is attached to the
center console
When the player is attached to the center console
• When picture noise appears or the sound
dropouts occur due to vibrations from the car,
place a cushioning material under the player.
• If a gap exists between the top of the center
console and the bottom of the player, fill the
gap with a material with optimum thickness so
that the player becomes stable.

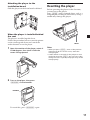
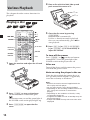
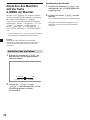
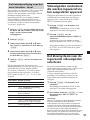
11
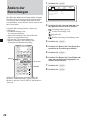
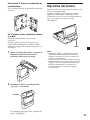
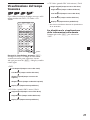
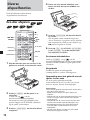
Resetting the player
Before operating the player for the first time,
you must reset the player.
Press (RESET) with a pointed object, such as a
ballpoint pen. Pushing it with force by using a
needle may damage the player.
Notes
• When you press (RESET), some of the previous
settings may be lost. If this occurs, make the
settings again.
• It takes about 10 seconds for the player to reset
itself after pressing (RESET). Do not insert a disc
during this time. If you do, the player may not be
reset properly.
RESET
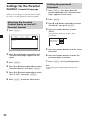
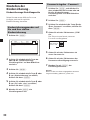
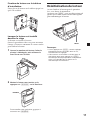
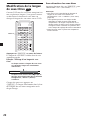
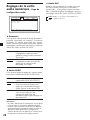
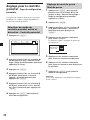
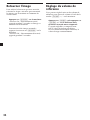
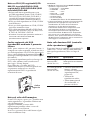
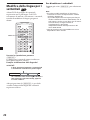
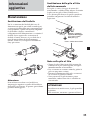
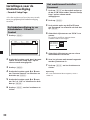
Attaching the player to the
installation board
Slide the player on the board until stabilized.
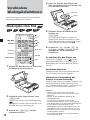
When the player is installed behind
the seat
The player is installed upside down.
Follow the procedure below to turn the picture
on the screen upside down and switch the
audio channels to use the player.
1 Open the monitor of the player, rotate it
in 180 degrees, then close it with the
screen facing upward.
2 Turn on the player, then press
(REVERSE) on the monitor.
To cancel this, press (REVERSE) again.
REVERSE

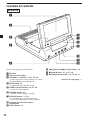
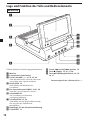
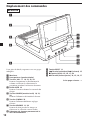
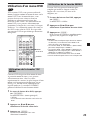
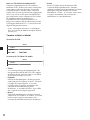
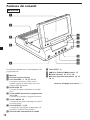
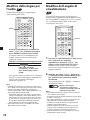
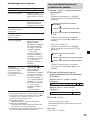
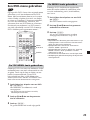
12
MV-650STR
1
3
2
4
5
8
7
qs
qa
0
9
6
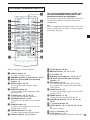
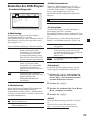
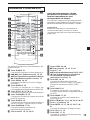
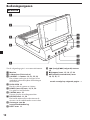
Refer to the pages listed for details.
1 Monitor
2 Speakers (left/right)
3 VOLUME –/+ buttons 14, 31, 32, 34
To turn up or down the volume or to select
the item during menu operation.
4 PUSH OPEN 14
To open and close the disc cover.
5 POWER (on/off) button 14, 31, 34
To turn on/off the player.
6 S-MENU button 32
To make various display settings.
7 REVERSE button 11, 34
To switch images upside down and
reverse the output of the audio channels.
8 Receptor for the card remote
commander
9 RESET button 11
0 . (previous)/> (next) buttons 15
qa x (stop) button 15, 16, 17, 20
qs u (play/pause) button 14, 15, 16, 17
continue to next page t
Location of controls

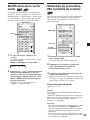
13
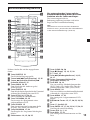
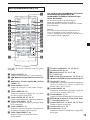
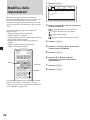
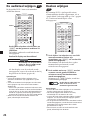
Card remote commander RM-X708
SOURCE
AUD IO
`/1
VOL
1
4
7
2
5
8
0
3
6
9
ENTER
SUBTITLE
SETUP MENU
TOP MENU
SEARCH
O
PROGRAM
ANGLE
CLEAR DSPL
REP
ux>.
y
y
Mm
1
4
0
qa
5
2
3
6
qf
ws
w;
7
8
9
wd
qh
wa
qj
qk
ql
qg
qd
qs
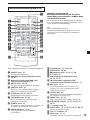
Refer to the pages listed for details.
1 SOURCE button 31
To select the input source.
2 ./> (previous/next) buttons 15, 25
3 m (fast reverse)/M (fast forward)
buttons 15
4 AUDIO button 24, 25
To change the audio output/audio
language.
5 SUBTITLE button 22
To change the subtitle language while
playing a DVD.
6 SETUP button 26, 27, 30, 31
Used to perform menu operations.
7 TOP MENU button 23, 25
To display the top menu of a recorded
DVD.
8 SEARCH button 15
To specify a desired point on a disc by
chapter, title or track.
9 PROGRAM button 17, 20
To enter the program Playback Mode.
0 Number buttons 14, 15, 20, 25
qa CLEAR button 20, 30
qs x (stop) button 15, 16, 17, 20
qd [/1 button 14
qf u (play/pause) button 14, 15, 16, 17
qg t (slow reverse)/T (slow forward)
buttons 15
qh REP button 18, 19
To select the repeat mode (DVD/Video
CD/Audio CD), or playback mode (MP3/
JPEG/DivX).
qj ANGLE button 24
To select the multiple angles of view while
paying a DVD.
qk MENU button 17, 23
To display the recorded DVD menu.
ql M/m/</, buttons 15, 17, 20, 23, 26,
30, 31
w; O (return) button 25
wa ENTER button 15, 17, 20, 23, 26, 27, 30,
31
To enter a setting.
ws VOL (+/–) buttons 14
wd DSPL button 17, 21
To display the time information of the disc.
The corresponding buttons of the card
remote commander control the same
functions as those on the player.
Instructions in this manual describe how to use
the player by mainly using the card remote
commander.
Tip
Refer to “Replacing the lithium battery of the card
remote commander” for details on how to replace
the battery (page 35).

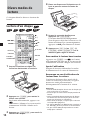
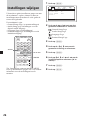
14
Various Playback
This chapter describes various functions for
playback.
Playing a disc
SOURCE
AUD IO
`/1
VOL
1
4
7
2
5
8
0
3
6
9
ENTER
SUBTITLE
SETUP MENU
TOP MENU
SEARCH
O
PROGRAM
ANGLE
CLEAR DSPL
REP
ux>.
y
y
Mm
./>
u
x
`/1
VOL
/y
m/M
SEARCH
REP
V/v/B/b
ENTER
PROGRAM
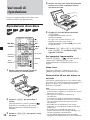
1 Open the monitor and adjust the tilt and
swivel.
2 Press (POWER) to turn on the player.
On the card remote commander, press
.
The monitor turns on and the green light of
the POWER switch on the player lights up.
3 Press (PUSH OPEN) to open the disc
cover.
Number
buttons
4 Place a disc with the label side up and
push around the center of it.
5 Close the disc cover by pressing
(PUSH OPEN).
Playback starts automatically.
If a disc is already inserted or playback
does not start automatically, press u to
start playback.
6 Press (VOL) (+) or (VOL) (–) ((VOLUME)
(+) or (VOLUME) (–) on the monitor) to
adjust the volume.
To turn off the power
Press (POWER) (or on the card remote
commander) so that the green light of the
POWER switch on the player turns off.
After use
Turn off the player and disconnect the power
cord from the power source.
Note on using the player in the car
Using the player while the ignition key is in
ACC position and the engine is stopped may
cause the car battery to run down.
Notes
• Read the instruction manual supplied with the
disc to play with this player.
• Do not open the disc cover during playback.
• Depending on the recording method used on the
disc, it may take a minute or more before
playing.
• Depending on the condition of the disc, it may
not play back (page 37).
•A high-bit rate MP3 file such as 320 kbps may not
play back properly.
•A large-sized JPEG file may take some time to be
displayed.

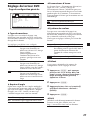
15
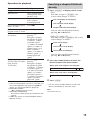
Operation for playback
To Do this
Stop playback Press x*
1
Eject the disc Press PUSH OPEN
on the player after
the disc stops.
Pause Press u *
2
.
Press again to
resume playback.
Go to the next chapter, Press >
track, or scene
Go back to the preceding Press .
chapter, track, or scene
Fast forward/ Press M/m while
fast reverse playing*
3
*
4
Each press changes
the playback speed
as follows: 2 times
of normal speed
t 4 times of normal
speed t 8 times of
normal speed t 16
times of normal
speed t 32 times of
normal speed t
normal playback
speed.
Slow forward Press y/ while
(DVD/Video CD only)/ playing
*
4
Slow reverse Each press changes
(DVD only) the playback speed
as follows: 1/2 times
of normal speed t
1/4 times of normal
speedt 1/8 times
of normal speedt
1/16 times of normal
speedt normal
playback speed.
*
1
If the resume playback function is activated, you
can resume playback later by pressing u. For
details, see “Resume playback” (page 16).
*
2
DVD/Video CD/JPEG
“X” is displayed on the screen.
*
3
DVD/Video CD/JPEG/DivX
No sound is output during fast forward or fast
reverse.
*
4
A MP3 disc returns to normal playback when a
MP3 file finishes.
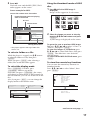
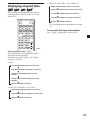
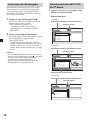
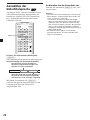
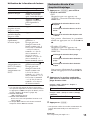
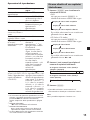
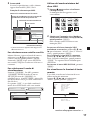
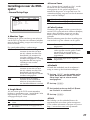
Searching a chapter/title/track
directly
1 Press (SEARCH) to display search screen.
•DVD
Each time you press (SEARCH), the
search screen changes as follows:
Title and Chapter search display
Title and Time search display
Chapter and Time search display
You can select the displayed items by
pressing < or , button.
•Video CD/Audio CD*
Each time you press(SEARCH), the search
screen changes as follows:
Track search display
Time of track search display
Time of disk search display
You can select the displayed items by
pressing < or , button.
2 Press the number buttons to enter the
desired chapter/title/track number.
When “Title” and “Chapter” are displayed
Title 01/01 Chapter /01- -
When “Title” and “Time” are displayed
Title 01/01 Time -:--:--
3 Press (ENTER).
* You can use the number buttons on the card
remote commander to select the track.
Note
You cannot set “0.”

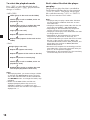
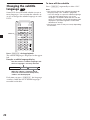
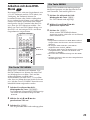
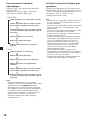
16
Resume playback
You can resume playback from the point
where the playback has been stopped. The
player memorizes the point even after the
power is turned off.
1 During playback, press x to stop.
The player memorizes the point where
playback is stopped.
•DVD/Video CD/Audio CD
“Press Play Key To Continue” appears on
the screen.
2 Press u to start playback.
Playback starts from the point where
playback has been stopped.
•MP3/JPEG/DivX
When resume playback is activated,
playback starts from the beginning of the
MP3/JPEG/DivX file (track) which you
have stopped playback.
Notes
• To deactivate the resume function, press x again
while playback is stopped. “Press Play Key To
Continue” appears on the screen at this time.
• The resume function will be deactivated when
the disc is ejected.
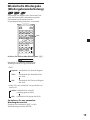
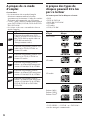
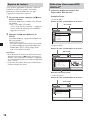
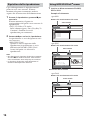
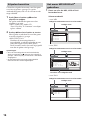
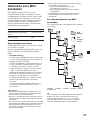
Using MP3/JPG/DivX
®
menu
1 Insert a disc containing MP3, JPEG or
DivX files.
Screen Example:
•for MP3
00:00
001/016
\Album1
00:00
Track01
Track02
Track03
Track04
Track05
Track06
•for JPEG
00:00
001/016
\Album1
00:00
01 Flower
02 Tree
03 mountain
04 Car
05 Bycicle
06 My Friend
Resolution 1152 X 765
•for DivX
00:00
001/004
\Album1
00:00
Scene 01
Scene 02
Scene 03
Scene 04
AVI
AVI
AVI
AVI
Current file number/Total file number
Current status
Current file number/Total file number
Current status
Resolution of current file
Current file number/Total file number
Current status

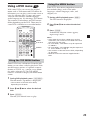
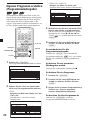
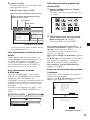
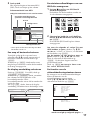
17
2 Press u.
Playback starts and the MP3/JPEG/DivX
menu appears on the screen.
Screen example for MP3:
00:05
001/016
\Album1
03:56 128k
Track01
Track01
Various
Best Selection
Track02
Track03
Track04
Track05
Track06
* This player supports ID3 tag of MP3 files
version 1.0.
To select a folder or a file
While the player is stopped, use M/m buttons
to select the folder or a file, then press
(ENTER).
When you press (ENTER) after selecting a
folder, files inside the folder appear.
To select the display mode
Press (PROGRAM). For MP3, press
(PROGRAM) while in stop mode.
Each time you press (PROGRAM), the screen
will change to folder mode or file list mode. In
the file list mode, you can see all the files in the
disc.
Also if you press (DSPL), you can change the
display mode to the current status.
00:00
001/016
\Album1
00:00
Track01
Track02
00:00
001/016
00:00
Folder
Folder
00:00
001/016
00:00
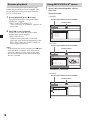
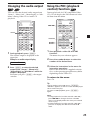
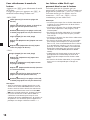
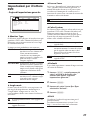
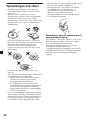
Using the thumbnail mode of JPEG
disc
1 Press x while the JPEG image is
displayed.
Images of files appear in 12 subscreens.
Slide Show Menu Prev Next
2 Select the image you want to view by
pressing M/m/</, buttons and press
(ENTER).
A JPEG image is displayed on the screen.
To go to the next or previous JPEG image
list, press M/m/</, to select “g Prev” or
“Next G”, then press (ENTER).
To view the images as a slideshow, press
M/m/</, to select Slide Show, then press
(ENTER). The slideshow starts from the
selected image.
To return to the MP3/JPG/DivX menu, press
(MENU).
To view the remote key functions
You can view the remote key functions in
thumbnail mode.
Press M/m/</, to select “Menu”, then
press (ENTER).
Key Function
Program Transition Effect
Stop Thumbnail Mode
Next Picture
Previous Picture
Play Picture Mode
Invert
Mirror
Continue
Key Function
Contrarolate
Rotate Clockwise
Exit Help
Current file number/Total file number
Elapsed playing time/Total playing
time of current file
Bit rate
Current status
ID3 tag information*
continue to next page t

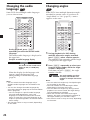
18
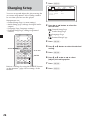
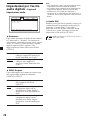
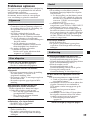
To select the playback mode
Press (REP) to select the playback mode.
Each time you press (REP), playback mode
changes as follows:
•MP3/JPEG
Folder (plays all the tracks on the folder)
Shuffle (plays tracks at random; tracks are
played only once)
Random (plays tracks at random; the same
track may be played more than once)
Single (plays one track)
Repeat One (repeats one track)
Repeat Folder (repeats all the tracks on the
folder)
•DivX
Single (plays one track)
Repeat One (repeats one track)
Repeat All (repeats all the tracks on the disc)
Repeat Off (returns to normal play)
Shuffle (plays tracks at random; tracks are
played only once)
Random (plays tracks at random; the same
track may be played more than once)
Notes
• While playing back, you cannot change a folder
or file with the MP3/JPG/DivX menu. Only the
files in the selected folder can be selected with
the ./> button. To change the folder, stop
playback.
• Names for the MP3 folders and files are
displayed properly when they consist of
alphabets, numbers, or symbols only. The
characters which this unit does not support are
displayed as “-”.
DivX
®
video files that the player
can play
The player can play data that is recorded in
DivX format, and data that has the extension
“.AVI” or “.DIVX”. The player will not play
files with the extension “.AVI” or “.DIVX” if
they do not contain a DivX video.
Notes
• The player may not play a DivX video file when
the file has been combined from two or more
DivX video files.
• The player cannot play a DivX video file of a size
more than 720 (width)
×
576 (height)/2GB.
• Depending on the DivX video file, the picture
may be unclear or the sound may skip.
• The player cannot play some DivX video files that
are longer than 3 hours.
• Depending on the DivX video file, the picture
may pause or be unclear. In that case, it is
recommended that you create the file at a lower
bit rate. If the sound is still noisy, MP3 is the
recommended audio format. Note, however, this
player does not conform to WMA (Windows
Media Audio) format.
• Because of the compression technology used for
DivX video files, it may take some time after you
press H for the picture to appear.
• Depending on the DivX video file, the sound may
not match the picture on the screen.

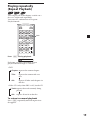
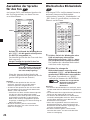
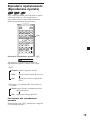
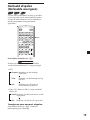
19
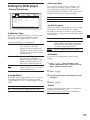
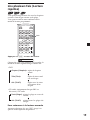
Playing repeatedly
(Repeat Playback)
You can play all of the chapters or titles on a
disc or a single track repeatedly.
You can use a combination of Program
Playback mode.
SOURCE
AUD IO
`/1
VOL
1
4
7
2
5
8
0
3
6
9
ENTER
SUBTITLE
SETUP MENU
TOP MENU
SEARCH
O
PROGRAM
ANGLE
CLEAR DSPL
REP
ux>.
y
y
Mm
REP
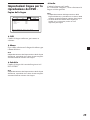
Press (REP) during playback.
Chapter
Each time you press the button, repeat
playback mode changes as follows:
•DVD
Chapter: repeats the current chapter.
Title: repeats the current title on a
disc.
ALL: repeats all titles and chapters in
the disc.
•Video CD (only when PBC is off)/Audio CD
Track: repeats the track currently being
played.
ALL: repeats all tracks in the disc.
To return to normal playback
Press (REP) repeatedly until the repeat icon
disappears.

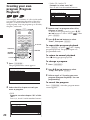
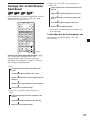
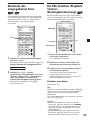
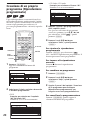
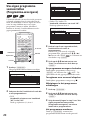
20
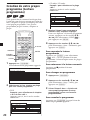
Creating your own
program (Program
Playback)
You can play the contents of a disc in the order
you want by arranging the order of the titles,
chapters, or tracks on the disc to create your
own program. You can program up to 20 titles,
chapters, and tracks.
SOURCE
AUD IO
`/1
VOL
1
4
7
2
5
8
0
3
6
9
ENTER
SUBTITLE
SETUP MENU
TOP MENU
SEARCH
O
PROGRAM
ANGLE
CLEAR DSPL
REP
ux>.
y
y
Mm
V/v/B/b
PROGRAM
CLEAR
ENTER
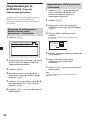
1 Press (PROGRAM).
The program menu screen appears.
Program:T(05)/C(--)
01 T: C:
02 T: C:
03 T: C:
04 T: C:
05 T: C:
06 T: C:
07 T: C:
08 T: C:
09 T: C:
10 T: C:
Exit NEXT
2 Select the title, chapter or track you
want to program.
•DVD
Example: to select chapter “03” of title
“02”.
Press 0, 2, 0 and 3 on the number buttons.
Program:T(02)/C(01)
01 T:03 C:02
02 T: C:
03 T: C:
04 T: C:
05 T: C:
06 T: C:
07 T: C:
08 T: C:
09 T: C:
10 T: C:
Exit Start NEXT
•Video CD/Audio CD
Example: to select track “02”.
Press 0 and 2 on the number buttons.
Program:Track(01-10)
01 T02
02 __
03 __
04 __
05 __
06 __
07 __
08 __
09 __
10 __
Exit Start NEXT
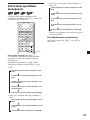
3 Repeat step 2 to program other titles,
chapters or tracks.
To move to next program list, press M/m/
</, buttons to select “NEXT ”, then
press (ENTER).
4 Press M/m/</, buttons to select
“Start”, then press (ENTER).
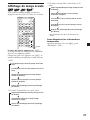
To repeat the program playback
Press (REPEAT) to select “ ALL” during
program playback. The player repeats all
programmed tracks.
To return to normal playback
Press x during program playback.
To change a program
1 Press (PROGRAM).
2 Press M/m/</, buttons to select
“Stop”, then press (ENTER).
3 Follow step 2 of “Creating your own
program (Program Playback)” for new
programming.
To cancel the program
Press (PROGRAM) when the program menu
screen appears.
Number
buttons
Seite laden ...
Seite laden ...
Seite laden ...
Seite laden ...
Seite laden ...
Seite laden ...
Seite laden ...
Seite laden ...
Seite laden ...
Seite laden ...
Seite laden ...
Seite laden ...
Seite laden ...
Seite laden ...
Seite laden ...
Seite laden ...
Seite laden ...
Seite laden ...
Seite laden ...
Seite laden ...
Seite laden ...
Seite laden ...
Seite laden ...
Seite laden ...
Seite laden ...
Seite laden ...
Seite laden ...
Seite laden ...
Seite laden ...
Seite laden ...
Seite laden ...
Seite laden ...
Seite laden ...
Seite laden ...
Seite laden ...
Seite laden ...
Seite laden ...
Seite laden ...
Seite laden ...
Seite laden ...
Seite laden ...
Seite laden ...
Seite laden ...
Seite laden ...
Seite laden ...
Seite laden ...
Seite laden ...
Seite laden ...
Seite laden ...
Seite laden ...
Seite laden ...
Seite laden ...
Seite laden ...
Seite laden ...
Seite laden ...
Seite laden ...
Seite laden ...
Seite laden ...
Seite laden ...
Seite laden ...
Seite laden ...
Seite laden ...
Seite laden ...
Seite laden ...
Seite laden ...
Seite laden ...
Seite laden ...
Seite laden ...
Seite laden ...
Seite laden ...
Seite laden ...
Seite laden ...
Seite laden ...
Seite laden ...
Seite laden ...
Seite laden ...
Seite laden ...
Seite laden ...
Seite laden ...
Seite laden ...
Seite laden ...
Seite laden ...
Seite laden ...
Seite laden ...
Seite laden ...
Seite laden ...
Seite laden ...
Seite laden ...
Seite laden ...
Seite laden ...
Seite laden ...
Seite laden ...
Seite laden ...
Seite laden ...
Seite laden ...
Seite laden ...
Seite laden ...
Seite laden ...
Seite laden ...
Seite laden ...
Seite laden ...
Seite laden ...
Seite laden ...
Seite laden ...
Seite laden ...
Seite laden ...
Seite laden ...
Seite laden ...
Seite laden ...
Seite laden ...
Seite laden ...
Seite laden ...
Seite laden ...
Seite laden ...
Seite laden ...
Seite laden ...
Seite laden ...
Seite laden ...
Seite laden ...
Seite laden ...
Seite laden ...
Seite laden ...
Seite laden ...
Seite laden ...
Seite laden ...
Seite laden ...
Seite laden ...
Seite laden ...
Seite laden ...
Seite laden ...
Seite laden ...
Seite laden ...
Seite laden ...
Seite laden ...
Seite laden ...
Seite laden ...
Seite laden ...
Seite laden ...
Seite laden ...
Seite laden ...
Seite laden ...
Seite laden ...
Seite laden ...
Seite laden ...
Seite laden ...
Seite laden ...
Seite laden ...
Seite laden ...
Seite laden ...
Seite laden ...
Seite laden ...
Seite laden ...
Seite laden ...
Seite laden ...
Seite laden ...
Seite laden ...
Seite laden ...
Seite laden ...
Seite laden ...
Seite laden ...
Seite laden ...
Seite laden ...
Seite laden ...
Seite laden ...
Seite laden ...
Seite laden ...
Seite laden ...
Seite laden ...
Seite laden ...
Seite laden ...
Seite laden ...
Seite laden ...
Seite laden ...
Seite laden ...
Seite laden ...
Seite laden ...
Seite laden ...
Seite laden ...
Seite laden ...
Seite laden ...
Seite laden ...
Seite laden ...
Seite laden ...
Seite laden ...
-
 1
1
-
 2
2
-
 3
3
-
 4
4
-
 5
5
-
 6
6
-
 7
7
-
 8
8
-
 9
9
-
 10
10
-
 11
11
-
 12
12
-
 13
13
-
 14
14
-
 15
15
-
 16
16
-
 17
17
-
 18
18
-
 19
19
-
 20
20
-
 21
21
-
 22
22
-
 23
23
-
 24
24
-
 25
25
-
 26
26
-
 27
27
-
 28
28
-
 29
29
-
 30
30
-
 31
31
-
 32
32
-
 33
33
-
 34
34
-
 35
35
-
 36
36
-
 37
37
-
 38
38
-
 39
39
-
 40
40
-
 41
41
-
 42
42
-
 43
43
-
 44
44
-
 45
45
-
 46
46
-
 47
47
-
 48
48
-
 49
49
-
 50
50
-
 51
51
-
 52
52
-
 53
53
-
 54
54
-
 55
55
-
 56
56
-
 57
57
-
 58
58
-
 59
59
-
 60
60
-
 61
61
-
 62
62
-
 63
63
-
 64
64
-
 65
65
-
 66
66
-
 67
67
-
 68
68
-
 69
69
-
 70
70
-
 71
71
-
 72
72
-
 73
73
-
 74
74
-
 75
75
-
 76
76
-
 77
77
-
 78
78
-
 79
79
-
 80
80
-
 81
81
-
 82
82
-
 83
83
-
 84
84
-
 85
85
-
 86
86
-
 87
87
-
 88
88
-
 89
89
-
 90
90
-
 91
91
-
 92
92
-
 93
93
-
 94
94
-
 95
95
-
 96
96
-
 97
97
-
 98
98
-
 99
99
-
 100
100
-
 101
101
-
 102
102
-
 103
103
-
 104
104
-
 105
105
-
 106
106
-
 107
107
-
 108
108
-
 109
109
-
 110
110
-
 111
111
-
 112
112
-
 113
113
-
 114
114
-
 115
115
-
 116
116
-
 117
117
-
 118
118
-
 119
119
-
 120
120
-
 121
121
-
 122
122
-
 123
123
-
 124
124
-
 125
125
-
 126
126
-
 127
127
-
 128
128
-
 129
129
-
 130
130
-
 131
131
-
 132
132
-
 133
133
-
 134
134
-
 135
135
-
 136
136
-
 137
137
-
 138
138
-
 139
139
-
 140
140
-
 141
141
-
 142
142
-
 143
143
-
 144
144
-
 145
145
-
 146
146
-
 147
147
-
 148
148
-
 149
149
-
 150
150
-
 151
151
-
 152
152
-
 153
153
-
 154
154
-
 155
155
-
 156
156
-
 157
157
-
 158
158
-
 159
159
-
 160
160
-
 161
161
-
 162
162
-
 163
163
-
 164
164
-
 165
165
-
 166
166
-
 167
167
-
 168
168
-
 169
169
-
 170
170
-
 171
171
-
 172
172
-
 173
173
-
 174
174
-
 175
175
-
 176
176
-
 177
177
-
 178
178
-
 179
179
-
 180
180
-
 181
181
-
 182
182
-
 183
183
-
 184
184
-
 185
185
-
 186
186
-
 187
187
-
 188
188
-
 189
189
-
 190
190
-
 191
191
-
 192
192
-
 193
193
-
 194
194
-
 195
195
-
 196
196
-
 197
197
-
 198
198
-
 199
199
-
 200
200
-
 201
201
-
 202
202
-
 203
203
-
 204
204


Sony MV-650STR Bedienungsanleitung
- Kategorie
- DVD Spieler
- Typ
- Bedienungsanleitung
in anderen Sprachen
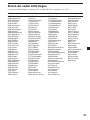
- français: Sony MV-650STR Le manuel du propriétaire
- italiano: Sony MV-650STR Manuale del proprietario
- Nederlands: Sony MV-650STR de handleiding
Verwandte Papiere
-
Sony MV700HRB Bedienungsanleitung
-
Sony MV-101 Bedienungsanleitung
-
-
Sony dvp fx875b Bedienungsanleitung
-
Sony DVP-FX870 Bedienungsanleitung
-
-
-
Sony MEX-DV1000 Benutzerhandbuch
-
Sony D-VE7000S Bedienungsanleitung
-
Sony XVM-F65 Bedienungsanleitung