Dometic CK2000 Bedienungsanleitung
- Kategorie
- Dunstabzugshauben
- Typ
- Bedienungsanleitung

CK2000
Recirculation extractor hood
Installation and Operating Manual. . . . . . . .8
Umluft-Dunstabzugshaube
Montage- und Bedienungsanleitung . . . . . 17
Hotte à circulation d'air
Instructions de montage
et de service . . . . . . . . . . . . . . . . . . . . . . . . .26
Extractor de humos con circulación
de aire
Instrucciones de montaje y de uso . . . . . . .35
Exaustor de circulação
Instruções de montagem e manual de
instruções . . . . . . . . . . . . . . . . . . . . . . . . . . .44
Cappa a ricircolo d’aria
Istruzioni di montaggio e d’uso . . . . . . . . .53
Recirculatieafzuigkap
Montagehandleiding en
gebruiksaanwijzing . . . . . . . . . . . . . . . . . . .62
Cirkulationsluft-emhætte
Monterings- og betjeningsvejledning . . . . 71
Spisfläkt med
luftcirkulationssystem
Monterings- och bruksanvisning . . . . . . . . 80
Omluft-avtrekkshette
Monterings- og bruksanvisning. . . . . . . . . 89
Kiertoilmaliesituuletin
Asennus- ja käyttöohje . . . . . . . . . . . . . . . . 98
Циркуляционная вытяжка
Инструкция по монтажу и эксплуатации 107
Okap kuchenny z obiegiem
powietrza
Instrukcja montażu i obsługi. . . . . . . . . . . 116
Cirkulačný odsávač pár
Návod na montáž a uvedenie
do prevádzky. . . . . . . . . . . . . . . . . . . . . . . 125
Odsavač par s cirkulací vzduchu
Návod k montáži a obsluze . . . . . . . . . . . 134
Légcirkulációs páraelszívó
Szerelési és használati útmutató . . . . . . . 143
EN
DE
FR
ES
PT
IT
NL
DA
SV
NO
FI
RU
PL
SK
CS
HU
COOKING
COOKER HOODS
DometicCK2000_IOM__EMEA.book Seite 1 Donnerstag, 28. November 2019 3:00 15

DometicCK2000_IOM__EMEA.book Seite 2 Donnerstag, 28. November 2019 3:00 15

CK2000
3
1
2
3
4
5
1
DometicCK2000_IOM__EMEA.book Seite 3 Donnerstag, 28. November 2019 3:00 15

CK2000
4
1
2
2
1.
1
2
3
3
DometicCK2000_IOM__EMEA.book Seite 4 Donnerstag, 28. November 2019 3:00 15

CK2000
5
1
4
CK2000
12 V
rd
bk
1
2
5
DometicCK2000_IOM__EMEA.book Seite 5 Donnerstag, 28. November 2019 3:00 15

CK2000
6
6
1
2
7
DometicCK2000_IOM__EMEA.book Seite 6 Donnerstag, 28. November 2019 3:00 15

CK2000
7
8
9
DometicCK2000_IOM__EMEA.book Seite 7 Donnerstag, 28. November 2019 3:00 15

EN
Explanation of symbols CK2000
8
Please read this instruction manual carefully before installation and first
use, and store it in a safe place. If you pass on the product to another
person, hand over this instruction manual along with it.
Contents
1 Explanation of symbols. . . . . . . . . . . . . . . . . . . . . . . . . . . . . . . . . . . . . . . . . . .9
2 Safety instructions . . . . . . . . . . . . . . . . . . . . . . . . . . . . . . . . . . . . . . . . . . . . . . .9
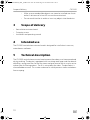
3 Scope of delivery . . . . . . . . . . . . . . . . . . . . . . . . . . . . . . . . . . . . . . . . . . . . . . 11
4 Intended use . . . . . . . . . . . . . . . . . . . . . . . . . . . . . . . . . . . . . . . . . . . . . . . . . . 11
5 Technical description . . . . . . . . . . . . . . . . . . . . . . . . . . . . . . . . . . . . . . . . . . . 11
6 Installing and connecting the extractor hood . . . . . . . . . . . . . . . . . . . . . . . .12
7 Using the extractor hood . . . . . . . . . . . . . . . . . . . . . . . . . . . . . . . . . . . . . . . .13
8 Cleaning . . . . . . . . . . . . . . . . . . . . . . . . . . . . . . . . . . . . . . . . . . . . . . . . . . . . .15
9 Disposal . . . . . . . . . . . . . . . . . . . . . . . . . . . . . . . . . . . . . . . . . . . . . . . . . . . . . .15
10 Warranty . . . . . . . . . . . . . . . . . . . . . . . . . . . . . . . . . . . . . . . . . . . . . . . . . . . . .15
11 Technical data . . . . . . . . . . . . . . . . . . . . . . . . . . . . . . . . . . . . . . . . . . . . . . . . .16
1 Explanation of symbols
!
!
A
I
WARNING!
Safety instruction: Indicates a hazardous situation that, if not avoided,
could result in death or serious injury.
CAUTION!
Safety instruction: Indicates a hazardous situation that, if not avoided,
could result in minor or moderate injury.
NOTICE!
Indicates a situation that, if not avoided, can result in property damage.
NOTE
Supplementary information for operating the product.
DometicCK2000_IOM__EMEA.book Seite 8 Donnerstag, 28. November 2019 3:00 15

EN
CK2000 Safety instructions
9
2 Safety instructions
Please observe the safety instructions and stipulations issued by the
vehicle manufacturer and service workshops.
The manufacturer accepts no liability for damage in the following cases:
•
Faulty assembly or connection
•
Damage to the product resulting from mechanical influences and incorrect
connection voltage
•
Alterations to the product without express permission from the manufacturer
•
Use for purposes other than those described in the operating manual
Note the following basic safety information when using electrical devices to protect
against:
•
Electric shock
•
Fire hazards
•
Injury
!
WARNING!
•
Installation and repair of the extractor hood may only be carried out
by qualified specialists who are familiar with the risks involved and the
relevant regulations.
•
Inadequate repairs may cause serious hazards. For repair service,
please contact the service centre in your country (addresses on the
back page).
•
People (including children) whose physical, sensory or mental capac-
ities or whose lack of experience or knowledge prevent them from
using this product safely should not use it without the supervision or
instruction of a responsible person.
•
When drilling into a wall or ceiling, make sure that no electrical cables
or concealed devices are damaged.
•
The distance between the gas hob flame and the extractor hood must
be at least 65 cm.
•
Never flambé food under the extractor hood.
!
CAUTION!
•
The extractor hood must be installed securely so that it cannot fall
down.
•
Only operate the extractor hood if you are certain that the housing and
the cables are not damaged.
DometicCK2000_IOM__EMEA.book Seite 9 Donnerstag, 28. November 2019 3:00 15

EN
Scope of delivery CK2000
10
•
Make sure no combustible objects are stored or installed near the air
outlet. A distance of at least 65 cm must be maintained.
•
Do not reach into the air outlet or insert any objects into the device.
3Scope of delivery
•
Recirculation extractor hood
•
Fastening screws
•
Installation and operating manual
4 Intended use
The CK2000 recirculation extractor hood is designed for installation in caravans,
motorhomes and boats.
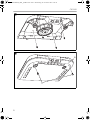
5 Technical description
The CK2000 recirculation extractor hood removes the odours and steam produced
during cooking. The device is equipped with two integrated lamps and two detach-
able filters: one grease filter for filtering steam and grease out of the air, and an active
carbon filter for filtering odours. The air is extracted at the sides. The purified air is
channelled downwards. This creates a dome of air which prevents steam and odours
from escaping.
DometicCK2000_IOM__EMEA.book Seite 10 Donnerstag, 28. November 2019 3:00 15

EN
CK2000 Installing and connecting the extractor hood
11
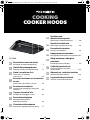
5.1 Control elements
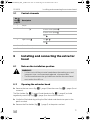
6 Installing and connecting the extractor
hood
6.1 Note on the installation position
!
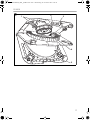
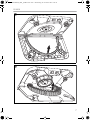
6.2 Opening the extractor hood
➤ Remove the two screws (fig. 2 1, page 4) from the cover (fig. 2 2, page 4) and
remove it.
The filter holder (fig. 3 2, page 4) and the device (fig. 3 1, page 4) are held
together by metal clips (fig. 3 3, page 4) on the two front corners.
➤ Unclip the filter holder by pulling the filter holder and the device apart at the
points marked.
➤ Remove the filter holder (fig. 4 1, page 5) at the points marked.
No. in
fig. 1,
page 3
Description
1Lamps
2
Fan switch
Blower at half speed
Blower at full speed
Off
3
Light switch
On /
Off
4 Grease filter
5 Active carbon filter
WARNING!
•
It is best to install the extractor hood above the cooking area and
integrate it into a wall-mounted cupboard, where possible.
•
The distance between the gas hob flame and the extractor hood
must total at least 65 cm.
DometicCK2000_IOM__EMEA.book Seite 11 Donnerstag, 28. November 2019 3:00 15

EN
Using the extractor hood CK2000
12
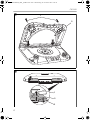
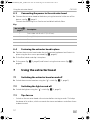
6.3 Connecting the power to the extractor hood
➤ Connect the extractor hood to the battery using the terminal at the rear of the
device; see fig. 5, page 5.
Connect the following wires: Red to red and black to black/blue.
Key
6.4 Fastening the extractor hood in place
➤ Position the extractor hood under the wall-mounted cupboard and fasten it in
place using the four screws provided (fig. 6, page 6).
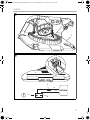
➤ Fit the filter holder and clip it into place.
➤ Fit the cover (fig. 7 2, page 6) and fasten it using the two screws (fig. 7 1,
page 6).
7 Using the extractor hood
7.1 Switching the extractor hood on and off
➤ Switch the extractor hood on using the “ ” switch (fig. 1 2, page 3).
7.2 Switching the light on and off
➤ Switch the light on using the “ ” switch (fig. 1 3, page 3).
7.3 Tips for use
•
Switch on the extractor hood a few minutes before starting to cook. This helps
the dome of air to form, which surrounds the steam and odours and allows them
to be extracted.
No. in fig. 5,
page 5
Description
1 Fuse holder with fuse 4 A T (5 x 20 mm)
2 Battery (12 Vg)
bk Black
rd Red
DometicCK2000_IOM__EMEA.book Seite 12 Donnerstag, 28. November 2019 3:00 15

EN
CK2000 Using the extractor hood
13
•
Leave the extractor hood running for a few minutes after you have finished cook-
ing to ensure that any odours which are still in the air can be neutralised.
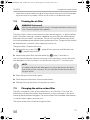
7.4 Cleaning the air filter
!
The grease filter in the extractor hood must be cleaned regularly, as grease collects
there. How often cleaning is necessary depends on how often you cook and how
often the extractor hood is switched on. Do not wait until the performance of the
extractor hood deteriorates before cleaning the grease filter. The grease filter should
be cleaned every six months when subject to normal use.
The grease filter is fitted on the cover.
➤ Remove the two screws (fig. 7 1, page 6) from the cover and fold the cover
(fig. 7 1, page 6) downwards.
➤ Remove the grease filter from the holder (fig. 8, page 7) and clean it.
You can clean the grease filter by hand using a soft nylon brush, warm water and a
little detergent, or you can clean it in a dishwasher using a 65 °C washing cycle.
I
➤ Allow the grease filter to dry gently.
➤ Place the grease filter back in the extractor hood.
➤ Fold the cover up and fasten it using the two screws.
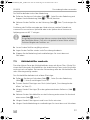
7.5 Changing the active carbon filter
The many small pores in the active carbon form a very fine filter. Over time, the
effectiveness of the active carbon filter decreases, as the small pores in the active
carbon gradually become clogged. The active carbon filter should be cleaned every
six months when subject to normal use.
The active carbon filter is fitted on the grease filter.
WARNING! Fire hazard!
An oversaturated grease filter which is no longer absorbent could cause
a fire. Clean the grease filter regularly.
NOTE
A number of dishwasher detergents may cause permanent discolour-
ation of the surface. However, this has no effect on the functionality of
the grease filter.
DometicCK2000_IOM__EMEA.book Seite 13 Donnerstag, 28. November 2019 3:00 15

EN
Cleaning CK2000
14
➤ Remove the two screws (fig. 2 1, page 4) on the cover (fig. 2 2, page 4) and
remove it.
➤ Remove the filter holder from the device (see chapter “Opening the extractor
hood” on page 12).
➤ Unclip the filter holder (1) at the points marked (fig. 4, page 5).
➤ Remove the active carbon filter from the holder and replace it with a new one
(fig. 9, page 7).
➤ Fit the filter holder and clip it into place.
➤ Fit the cover back into place and fasten it using the two screws.
7.6 Replacing the lamps
➤ Remove the two screws (fig. 2 1, page 4) on the cover (fig. 2 2, page 4) and
remove it.
➤ Remove the filter holder from the device (see chapter “Opening the extractor
hood” on page 12).
➤ Unclip the filter holder (1) at the points marked (fig. 4, page 5).
➤ Carefully pull the lamps out of the socket.
➤ Replace the lamps with lamps with the same designation.
➤ Fit the filter holder and clip it into place.
➤ Fit the cover back into place and fasten it using the two screws.
8Cleaning
A
➤ Occasionally clean the product with a damp cloth.
➤ Clean the grease filter regularly (see chapter “Cleaning the air filter” on page 13).
NOTICE! Damage hazard
Do not use sharp or hard objects or cleaning agents for cleaning as these
may damage the product.
DometicCK2000_IOM__EMEA.book Seite 14 Donnerstag, 28. November 2019 3:00 15

EN
CK2000 Disposal
15
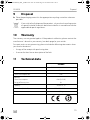
9Disposal
➤ Place the packaging material in the appropriate recycling waste bins wherever
possible.
M
If you wish to finally dispose of the product, ask your local recycling centre
or specialist dealer for details about how to do this in accordance with the
applicable disposal regulations.
10 Warranty
The statutory warranty period applies. If the product is defective, please contact the
manufacturer's branch in your country (see back page) or your retailer.
For repair and warranty processing, please include the following documents when
you send in the device:
•
A copy of the receipt with purchasing date
•
A reason for the claim or description of the fault
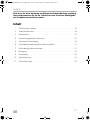
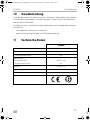
11 Technical data
CK2000
Ref. no.: 9103303090, 9103303094
Connection voltage: 12 Vg
Power consumption fan: 5 W
Lighting
Power consumption:
Energy efficiency class:
4W (2x 2W)
A+
Capacity:
38/45 m
3
/h
Dimensions (WxHxD): 400 x 56 x 280 mm
Weight: 2,2 kg
Test mark:
DometicCK2000_IOM__EMEA.book Seite 15 Donnerstag, 28. November 2019 3:00 15

DE
CK2000
17
Bitte lesen Sie diese Anleitung vor Einbau und Inbetriebnahme sorgfältig
durch und bewahren Sie sie auf. Geben Sie sie im Falle einer Weitergabe
des Produktes an den Nutzer weiter.
Inhalt
1 Erklärung der Symbole . . . . . . . . . . . . . . . . . . . . . . . . . . . . . . . . . . . . . . . . . .18
2 Sicherheitshinweise . . . . . . . . . . . . . . . . . . . . . . . . . . . . . . . . . . . . . . . . . . . .18
3 Lieferumfang . . . . . . . . . . . . . . . . . . . . . . . . . . . . . . . . . . . . . . . . . . . . . . . . . 20
4 Bestimmungsgemäßer Gebrauch . . . . . . . . . . . . . . . . . . . . . . . . . . . . . . . . 20
5 Technische Beschreibung . . . . . . . . . . . . . . . . . . . . . . . . . . . . . . . . . . . . . . 20
6 Dunstabzugshaube montieren und anschließen. . . . . . . . . . . . . . . . . . . . . .21
7 Dunstabzugshaube verwenden . . . . . . . . . . . . . . . . . . . . . . . . . . . . . . . . . . 22
8 Reinigung . . . . . . . . . . . . . . . . . . . . . . . . . . . . . . . . . . . . . . . . . . . . . . . . . . . 24
9 Entsorgung . . . . . . . . . . . . . . . . . . . . . . . . . . . . . . . . . . . . . . . . . . . . . . . . . . 24
10 Gewährleistung. . . . . . . . . . . . . . . . . . . . . . . . . . . . . . . . . . . . . . . . . . . . . . . 25
11 Technische Daten . . . . . . . . . . . . . . . . . . . . . . . . . . . . . . . . . . . . . . . . . . . . . 25
DometicCK2000_IOM__EMEA.book Seite 17 Donnerstag, 28. November 2019 3:00 15

DE
Erklärung der Symbole CK2000
18
1 Erklärung der Symbole
!
!
A
I
2 Sicherheitshinweise
Beachten Sie die vom Fahrzeughersteller und vom Kfz-Handwerk
vorgeschriebenen Sicherheitshinweise und Auflagen!
Der Hersteller übernimmt in folgenden Fällen keine Haftung für Schäden:
•
Montage- oder Anschlussfehler
•
Beschädigungen am Produkt durch mechanische Einflüsse und falsche
Anschlussspannung
•
Veränderungen am Produkt ohne ausdrückliche Genehmigung vom Hersteller
•
Verwendung für andere als die in der Anleitung beschriebenen Zwecke
Beachten Sie folgende grundsätzliche Sicherheitsmaßnahmen beim Gebrauch von
elektrischen Geräten zum Schutz vor:
•
elektrischem Schlag
•
Brandgefahr
•
Verletzungen
WARNUNG!
Sicherheitshinweis auf eine Gefahrensituation, die zum Tod oder zu
schwerer Verletzung führen kann, wenn sie nicht vermieden wird.
VORSICHT!
Sicherheitshinweis auf eine Gefahrensituation, die zu einer leichten
oder mittelschweren Verletzung führen kann, wenn sie nicht vermieden
wird.
ACHTUNG!
Hinweis auf eine Situation, die zu Sachschäden führen kann, wenn sie
nicht vermieden wird.
HINWEIS
Ergänzende Informationen zur Bedienung des Produktes.
DometicCK2000_IOM__EMEA.book Seite 18 Donnerstag, 28. November 2019 3:00 15

DE
CK2000 Sicherheitshinweise
19
!
WARNUNG!
•
Die Montage und Reparaturen der Dunstabzugshaube dürfen nur von
qualifizierten Fachhandwerkern durchgeführt werden, die mit den
verbundenen Gefahren bzw. den gültigen Vorschriften und Normen
vertraut sind.
•
Durch unsachgemäße Reparaturen können erhebliche Gefahren ent-
stehen. Wenden Sie sich im Reparaturfall an den Service-Stützpunkt in
Ihrem Land (Adressen auf der Rückseite).
•
Personen (einschließlich Kinder), die aufgrund ihrer physischen, sen-
sorischen oder geistigen Fähigkeiten oder ihrer Unerfahrenheit oder
Unkenntnis nicht in der Lage sind, das Produkt sicher zu benutzen,
sollten dieses Produkt nicht ohne Aufsicht oder Anweisung durch eine
verantwortliche Person nutzen.
•
Achten Sie beim Bohren in Wand oder Decke darauf, dass keine
elektrischen Leitungen oder nicht sichtbare Geräte beschädigt
werden.
•
Der Abstand zwischen Gaskocherflamme und Dunstabzugshaube
muss mindestens 65 cm betragen.
•
Flambieren Sie niemals unter der Dunstabzugshaube.
!
VORSICHT!
•
Die Dunstabzugshaube muss so sicher installiert werden, dass sie
nicht herabfallen kann.
•
Betreiben Sie die Dunstabzugshaube nur, wenn das Gehäuse und die
Leitungen unbeschädigt sind.
•
Achten Sie darauf, dass keine brennbaren Gegenstände im Bereich
des Luftaustritts gelagert bzw. montiert sind. Der Abstand muss
mindestens 65 cm betragen.
•
Greifen Sie nicht in den Lüftungsauslass und führen Sie keine Gegen-
stande in das Gerät ein.
DometicCK2000_IOM__EMEA.book Seite 19 Donnerstag, 28. November 2019 3:00 15

DE
Lieferumfang CK2000
20
3 Lieferumfang
•
Umluft-Dunstabzugshaube
•
Befestigungsschrauben
•
Montage- und Bedienungsanleitung
4 Bestimmungsgemäßer Gebrauch
Die Umluft-Dunstabzugshaube CK2000 ist für den Einbau in Wohnwagen,
Wohnmobilen und Booten vorgesehen.
5 Technische Beschreibung
Die Umluft-Dunstabzugshaube CK2000 entfernt beim Kochen entstehende
Gerüche und Dampf. Das Gerät ist ausgestattet mit zwei eingebauten Lampen und
zwei abnehmbaren Filtern: ein Fettfilter zur Filterung von Dampf und Fett aus der Luft
und ein Aktivkohlefilter zur Filterung von Gerüchen. Die Luft wird seitlich abgesaugt.
Die gereinigte Luft wird nach unten geleitet. So entsteht eine Art Kuppel aus Luft, die
das Entweichen von Dampf und Gerüchen verhindert.
5.1 Bedienelemente
Pos. in
Abb. 1,
Seite 3
Beschreibung
1 Lampen
2
Schalter Lüfter
Halbe Leistung des Gebläses
Volle Leistung des Gebläses
Aus
3
Schalter Licht
An /
Aus
4 Fettfilter
5 Aktivkohlefilter
DometicCK2000_IOM__EMEA.book Seite 20 Donnerstag, 28. November 2019 3:00 15

DE
CK2000 Dunstabzugshaube montieren und anschließen
21
6 Dunstabzugshaube montieren und
anschließen
6.1 Hinweise zum Montageort
!
6.2 Dunstabzugshaube öffnen
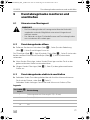
➤ Entfernen Sie die zwei Schrauben (Abb. 2 1, Seite 4) an der Abdeckung
(Abb. 2 2, Seite 4) und hängen Sie sie aus.
Der Filterträger (Abb. 3 2, Seite 4) und das Gerät (Abb. 3 1, Seite 4) sind an den
beiden vorderen Ecken durch Metallclips (Abb. 3 3, Seite 4) miteinander
verbunden.
➤ Lösen Sie den Filterträger, indem Sie den Filterträger und das Gerät an den
gekennzeichneten Stellen auseinanderziehen.
➤ Hängen Sie den Filterträger (Abb. 4 1, Seite 5) an den gekennzeichneten
Stellen aus.
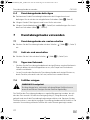
6.3 Dunstabzugshaube elektrisch anschließen
➤ Verbinden Sie die Dunstabzugshaube über die Anschlussklemme hinten am
Gerät mit der Batterie, siehe Abb. 5, Seite 5.
Verbinden Sie die Leitungen: Rot mit Rot und Schwarz mit Schwarz/Blau.
Legende
WARNUNG!
•
Die Dunstabzugshaube soll vorzugsweise über der Kochstelle
angebracht und nach Möglichkeit unter einen Hängeschrank
montiert werden.
•
Der Abstand zwischen Gaskocherflamme und Dunstabzugshaube
muss mindestens 65 cm betragen.
Pos. in Abb. 5,
Seite 5
Beschreibung
1 Sicherungshalter mit Sicherung 4 A T (5 x 20 mm)
2 Batterie (12 Vg)
bk Schwarz
rd Rot
DometicCK2000_IOM__EMEA.book Seite 21 Donnerstag, 28. November 2019 3:00 15
Seite wird geladen ...
Seite wird geladen ...
Seite wird geladen ...
Seite wird geladen ...
Seite wird geladen ...
-
 1
1
-
 2
2
-
 3
3
-
 4
4
-
 5
5
-
 6
6
-
 7
7
-
 8
8
-
 9
9
-
 10
10
-
 11
11
-
 12
12
-
 13
13
-
 14
14
-
 15
15
-
 16
16
-
 17
17
-
 18
18
-
 19
19
-
 20
20
-
 21
21
-
 22
22
-
 23
23
-
 24
24
-
 25
25


Dometic CK2000 Bedienungsanleitung
- Kategorie
- Dunstabzugshauben
- Typ
- Bedienungsanleitung
in anderen Sprachen
Verwandte Artikel
-
Dometic CK2000 Bedienungsanleitung
-
-
-
-
-
-
-
-
-