ENCELIUM DALI LS PD LI Benutzerhandbuch

Typ
Benutzerhandbuch
Sensors | Installation Instructions | Installationsanleitung | Instructions d'installation | Instrucciones de Instalación
OVERVIEW
ÜBERBLICK
APERÇU
VISIÓN GENERAL
The DALI LS PD LI is a compact light and presence sensor that
is easily attached to a luminaire. The sensor communicates
to the Encelium Wired Manager — DALI via directly connect
DALI bus. For more information on product specifications and
design tools visit encelium.com.
Der DALI LS PD LI ist ein kompakter Licht- und Präsenzsensor, der
einfach an einer Leuchte befestigt werden kann. Der Sensor
kommuniziert mit dem Encelium Wired Manager – DALI über den
direkt angeschlossenen DALI-Bus.Weitere Informationen zu
Produktspezifikationen und Designtools Besuchen Sie encelium.com.
Le DALI LS PD LI est un capteur de lumière et de présence compact
qui se fixe facilement à un luminaire. Le capteur communique avec
Encelium Wired Manager — DALI via un bus DALI à connexion
directe.Pour plus d'informations sur les spécifications des produits et
les outils de conception visitez encelium.com.
El DALI LS PD LI es un sensor de luz y presencia compacto que se
acopla fácilmente a una luminaria. El sensor se comunica con
Encelium Wired Manager — DALI a través del bus DALI de conexión
directa.Para obtener más información sobre las especificaciones del
producto y las herramientas de diseño visite encelium.com.
DALI LS PD LI
DALI LS PD Luminaire Integration | DALI LS PD Leuchtenintegration |
Intégration de Luminaires DALI LS PD | Integración de Luminarias DALI LS PD
GETTING STARTED | EINSTIEG |
COMMENCER | EMPEZANDO
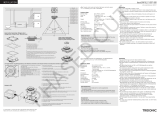
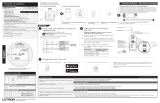
2DALI LS PD LI Installation Instructions | Installationsanleitung | Instructions d'installation | Instrucciones de Instalación
DALI LS PD LI
PRODUCT SAFETY | PRODUKTSICHERHEIT | SÉCURITÉ DES PRODUITS | SEGURIDAD DEL PRODUCTO
When using electrical equipment, basic safety
precautions should always be followed, including the
following:
Do not mount near gas or electric heaters or let power
supply cords touch hot surfaces.
Equipment should be mounted in locations and at
heights where it will not readily be subjected to
tampering by unauthorized personnel.
The use of accessory equipment is not recommended
by Encelium as it may cause an unsafe condition.
All DALI channels are internally connected
together to the control unit. Make sure to consider
this when installing.
Do not use this equipment for other than the
intended use.
Bei der Verwendung elektrischer Geräte sollten
immer grundlegende Sicherheitsvorkehrungen getroffen
werden, einschließlich der folgenden:
Montieren Sie das Gerät nicht in der Nähe von
Gas- oder Elektroheizungen und lassen Sie die
Netzkabel keine heißen Oberflächen berühren.
Die Ausrüstung sollte an Orten und in Höhen montiert
werden, an denen sie nicht leicht von unbefugtem
Personal manipuliert werden können.
Die Verwendung von Zubehörgeräten wird von
Encelium nicht empfohlen, da dies zu einem
unsicheren Zustand führen kann.
Alle DALI-Kanäle sind intern verbunden zusammen
mit dem Steuergerät. Berücksichtigen Sie dies
unbedingt bei der Installation.
Verwenden Sie dieses Gerät nicht für andere als die
bestimmungsgemäße Verwendung.
Lors de l'utilisation d'équipements électriques, des
précautions de sécurité de base doivent toujours être
suivies, notamment les suivantes:
Ne pas monter près de radiateurs à gaz ou électriques
ou laisser les cordons d'alimentation toucher des
surfaces chaudes.
L'équipement doit être monté à des emplacements et à
des hauteurs où il ne sera pas facilement soumis à des
manipulations par du personnel non autorisé.
L'utilisation d'équipements accessoires n'est pas
recommandée par Encelium car cela peut entraîner
une situation dangereuse.
Tous les canaux DALI sont connectés en interne
ensemble à l'unité de commande. Assurez-vous d'en
tenir compte lors de l'installation.
N'utilisez pas cet équipement à d'autres fins que
l'usage prévu.
Al usar equipo eléctrico, siempre se deben seguir las
precauciones básicas de seguridad, incluidas las siguientes:
No lo monte cerca de calentadores de gas o eléctricos
ni permita que los cables de alimentación toquen
superficies calientes.
El equipo debe montarse en lugares y en alturas donde
no pueda ser fácilmente manipulado por personal no
autorizado.
Encelium no recomienda el uso de equipos accesorios,
ya que puede causar una condición peligrosa.
Todos los canales DALI están conectados
internamente juntos a la unidad de control. Asegúrese
de tener esto en cuenta al instalar.
No utilice este equipo para otro uso que no sea
el indicado.
SAVE THESE INSTRUCTIONS. | ANLEITUNG AUFBEWAHREN.
CONSERVEZ CES INSTRUCTIONS. | GUARDA ESTAS INSTRUCCIONES.
READ THESE INSTRUCTIONS BEFORE USING THE PRODUCT
LESEN SIE DIESE ANWEISUNGEN BEVOR SIE DIESES PRODUKT VERWENDEN
LIRE CES INSTRUCTIONS AVANT D'UTILISER CE PRODUIT
LEA ESTAS INSTRUCCIONES ANTES DE USAR ESTE PRODUCTO
3
DALI LS PD LI Installation Instructions | Installationsanleitung | Instructions d'installation | Instrucciones de Instalación
DALI LS PD LI
Wired Manager — DALI
Ethernet
DALI
Wire Key
SSU
DALI-Controlled Luminaire
with a DALI LS PD LI
User Interface
User Interface
WIRED SYSTEM OVERVIEW | VERKABELTE SYSTEMÜBERSICHT |
APERÇU DU SYSTÈME CÂBLÉ | DESCRIPCIÓN GENERAL DEL SISTEMA ALÁMBRICO
Encelium X enables you to control DALI devices. With any Encelium wired design, you get a reliable, lighting control
system that can be installed quickly and easily.
Mit Encelium X können Sie DALI-Geräte steuern. Mit jedem kabelgebundenen Encelium-Design erhalten Sie ein zuverlässiges
Lichtsteuerungssystem, das schnell und einfach installiert werden kann.
Encelium X vous permet de contrôler les appareils DALI. Avec n'importe quelle conception câblée Encelium, vous obtenez un système
de contrôle d'éclairage fiable qui peut être installé rapidement et facilement.
Encelium X le permite controlar dispositivos DALI. Con cualquier diseño cableado de Encelium, obtiene un sistema de control de
iluminación confiable que se puede instalar rápida y fácilmente.
4DALI LS PD LI Installation Instructions | Installationsanleitung | Instructions d'installation | Instrucciones de Instalación
DALI LS PD LI
55.4 mm
(2.2 inches)
15.4 mm
(0.6 inch)
Luminaire Opening
Leuchtenöffnung
Ouverture du Luminaire
Apertura Luminaria
Mounting Clips
Befestigungsclips
Clips de Montage
Clips de Montaje
Cover 1
Abdeckung 1
Couverture 1
Portada 1
STEP 1 | SCHRITT 1 | ÉTAPE 1 | PASO 1
A 15.4 x 55.4 mm (0.6 x 2.2 inches) hole must be cut prior to installing the DALI LS PD LI. Install Cover 1 on the
DALI LS PD LI and connect the sensor cable to the DALI Line. Then place the DALI LS PD LI into the luminaire hole.
Secure the DALI LS PD LI by snapping the cover mounting clips into the luminaire. The raised surface of the cover sits
outside the luminaire opening.
Note: The DALI LS PD LI is supplied from DALI Voltage as per DALI standard EN 62386. Power consumption
approximately 6 mA.
Vor der Installation des DALI LS PD LI muss ein 15.4 x 55.4 mm (0.6 x 2.2 inches) großes Loch geschnitten werden. Installieren Sie
Abdeckung 1 auf der DALI LS PD LI und verbinden Sie das Sensorkabel mit der DALI-Leitung. Setzen Sie dann das DALI LS PD LI in
das Leuchtenloch ein. Befestigen Sie das DALI LS PD LI, indem Sie die Befestigungsclips der Abdeckung in die Leuchte einrasten. Die
erhabene Oberfläche der Abdeckung sitzt außerhalb der Leuchtenöffnung.
Hinweis: Das DALI LS PD LI wird aus DALI-Spannung gemäß DALI-Standard EN 62386 versorgt. Stromverbrauch ca. 6 mA.
Un trou de 15.4 x 55.4 mm (0.6 x 2.2 inches) doit être percé avant d'installer le DALI LS PD LI. Installez le capot 1 sur DALI LS PD LI
et connectez le câble du capteur à la ligne DALI. Placez ensuite le DALI LS PD LI dans le trou du luminaire. Fixez le DALI LS PD LI en
encliquetant les clips de montage du couvercle dans le luminaire. La surface surélevée du couvercle se trouve à l'extérieur de
l'ouverture du luminaire.
Remarque: Le DALI LS PD LI est alimenté par la tension DALI conformément à la norme DALI EN 62386. Consommation électrique
d'environ 6 mA.
Se debe cortar un orificio de 15.4 x 55.4 mm (0.6 x 2.2 inches) antes de instalar el DALI LS PD LI. Instale la cubierta 1 en el
DALI LS PD LI y conecte el cable del sensor a la Línea DALI. A continuación, coloque el DALI LS PD LI en el orificio de la luminaria.
Asegure el DALI LS PD LI encajando los clips de montaje de la cubierta en la luminaria. La superficie elevada de la cubierta se asienta
fuera de la abertura de la luminaria.
Nota: El DALI LS PD LI se alimenta de DALI Voltage según el estándar DALI EN 62386. Consumo de energía de aproximadamente 6 mA.
LUMINAIRE INTEGRATION OPTION 1
LEUCHTEINTEGRATION OPTION 1
OPTION D'INTÉGRATION DU LUMINAIRE 1
OPCIÓN DE INTEGRACIÓN DE LUMINARIAS 1
Proceed to Luminaire Integraiton option 2 if not using option 1.
Fahren Sie mit Option 2 der Leuchtenintegration fort, wenn Option 1 nicht verwendet wird.
Passez à l'option 2 d'intégration du luminaire si vous n'utilisez pas l'option 1.
Continúe con la opción 2 de Luminaire Integraiton si no usa la opción 1.
5
DALI LS PD LI Installation Instructions | Installationsanleitung | Instructions d'installation | Instrucciones de Instalación
DALI LS PD LI
41 mm
(1.6 inches)
14 mm
(0.5 inch)
R 1.8 mm
(0.07 inch)
± 0.2
Luminaire Opening
Leuchtenöffnung
Ouverture du Luminaire
Apertura Luminaria
Cover 2
Abdeckung 2
Couverture 2
Portada 2
STEP 1 (cont.) | SCHRITT 1 (fort.) | ÉTAPE 1 (suite) | PASO 1 (continuación)
A 14 x 41 mm (0.5 x 1.6 inches) hole must be cut prior to installing the DALI LS PD LI. Install Cover 2 on the DALI LS PD LI
and connect the sensor cable to the DALI Line. Then place the DALI LS PD LI into the luminaire hole. Secure the DALI LS
PD LI by snapping the cover mounting clips into the luminaire. The raised surface of the cover sits flush within the
luminaire opening.
Note: The DALI LS PD LI is supplied from DALI Voltage as per DALI standard EN 62386. Power consumption
approximately 6 mA.
Vor der Installation des DALI LS PD LI muss ein 14 x 41 mm (0.5 x 1.6 inches) großes Loch geschnitten werden. Installieren Sie
Abdeckung 2 auf dem DALI LS PD LI und verbinden Sie das Sensorkabel mit der DALI-Leitung. Setzen Sie dann das DALI LS PD LI in
das Leuchtenloch ein. Befestigen Sie das DALI LS PD LI, indem Sie die Befestigungsclips der Abdeckung in die Leuchte einrasten. Die
erhabene Oberfläche der Abdeckung sitzt bündig in der Leuchtenöffnung.
Hinweis: Das DALI LS PD LI wird aus DALI-Spannung gemäß DALI-Standard EN 62386 versorgt. Stromverbrauch ca. 6 mA.
Un trou de 14 x 41 mm (0.5 x 1.6 inches) doit être percé avant d'installer le DALI LS PD LI. Installez le capot 2 sur DALI LS PD LI et connec-
tez le câble du capteur à la ligne DALI. Placez ensuite le DALI LS PD LI dans le trou du luminaire. Fixez le DALI LS PD LI en encliquetant les
clips de montage du couvercle dans le luminaire. La surface surélevée du couvercle est affleurante dans l'ouverture du luminaire.
Remarque: Le DALI LS PD LI est alimenté par la tension DALI conformément à la norme DALI EN 62386. Consommation électrique
d'environ 6 mA.
Se debe cortar un orificio de 14 x 41 mm (0.5 x 1.6 inches) antes de instalar el DALI LS PD LI. Instale la cubierta 2 en el DALI LS PD LI y
conecte el cable del sensor a la Línea DALI. A continuación, coloque el DALI LS PD LI en el orificio de la luminaria. Asegure el DALI LS PD LI
encajando los clips de montaje de la cubierta en la luminaria. La superficie elevada de la cubierta se asienta al ras dentro de la abertura de
la luminaria.
Nota: El DALI LS PD LI se alimenta de DALI Voltage según el estándar DALI EN 62386. Consumo de energía de aproximadamente 6 mA.
Proceed to Luminaire Integraiton option 3 if not using option 2.
Fahren Sie mit Option 3 der Leuchtenintegration fort, wenn Option 2 nicht verwendet wird.
Passez à l'option 3 d'intégration du luminaire si vous n'utilisez pas l'option 2.
Continúe con la opción 3 de Luminaire Integraiton si no usa la opción 2.
LUMINAIRE INTEGRATION OPTION 2
LEUCHTEINTEGRATION OPTION 2
OPTION D'INTÉGRATION DU LUMINAIRE 2
OPCIÓN DE INTEGRACIÓN DE LUMINARIAS 2
6DALI LS PD LI Installation Instructions | Installationsanleitung | Instructions d'installation | Instrucciones de Instalación
DALI LS PD LI
Luminaire Opening
Leuchtenöffnung
Ouverture du Luminaire
Apertura Luminaria
10.8 mm (0.04 inch) ± 0.1
Ø 14 mm
(0.55 inch)
± 0.2
10.8 mm (0.04 inch) ± 0.1
17.3 mm
(0.7 inch)
Ø 3.1 mm
(0.12 inch)
± 0.2
Ø 6.7 mm
(0.26 inch)
± 0.2
Ø 6.7 mm
(0.26 inch)
± 0.2
STEP 1 (cont.) | SCHRITT 1 (fort.) | ÉTAPE 1 (suite) | PASO 1 (continuación)
Holes must be cut prior to installing the DALI LS PD LI. Connect the DALI LS PD LI sensor cable to the DALI Line. Then
place the DALI LS PD LI into the luminaire holes. If the sensor is in the correct mounting position, the raised surface of
the sensor sits flush within the luminaire opening.
Note: The DALI LS PD LI is supplied from DALI Voltage as per DALI standard EN 62386. Power consumption
approximately 6 mA.
Vor der Installation des DALI LS PD LI müssen Löcher geschnitten werden. Verbinden Sie das Sensorkabel DALI LS PD LI mit der
DALI-Leitung. Setzen Sie dann das DALI LS PD LI in die Leuchtenlöcher ein. Bei richtiger Einbaulage des Sensors sitzt die erhabene
Fläche des Sensors bündig in der Leuchtenöffnung.
Hinweis: Das DALI LS PD LI wird aus DALI-Spannung gemäß DALI-Standard EN 62386 versorgt. Stromverbrauch ca. 6 mA.
Les trous doivent être coupés avant d'installer le DALI LS PD LI. Connectez le câble du capteur DALI LS PD LI à la ligne DALI. Placez
ensuite le DALI LS PD LI dans les trous du luminaire. Si le capteur est dans la bonne position de montage, la surface surélevée du
capteur est affleurante dans l'ouverture du luminaire.
Remarque: Le DALI LS PD LI est alimenté par la tension DALI conformément à la norme DALI EN 62386. Consommation électrique
d'environ 6 mA.
Los agujeros deben cortarse antes de instalar el DALI LS PD LI. Conecte el cable del sensor DALI LS PD LI a la Línea DALI. A
continuación, coloque el DALI LS PD LI en los orificios de la luminaria. Si el sensor está en la posición de montaje correcta, la
superficie elevada del sensor queda al ras dentro de la abertura de la luminaria.
Nota: El DALI LS PD LI se alimenta de DALI Voltage según el estándar DALI EN 62386. Consumo de energía de aproximadamente 6 mA.
Proceed to Step 2 if you are not using Luminaire Integration option 3.
Fahren Sie mit Schritt 2 fort, wenn Sie Option 3 der Leuchtenintegration nicht verwenden.
Passez à l'étape 2 si vous n'utilisez pas l'option 3 d'intégration de luminaire.
Continúe con el paso 2 si no está utilizando la opción 3 de integración de luminarias.
LUMINAIRE INTEGRATION OPTION 3
LEUCHTEINTEGRATION OPTION 3
OPTION D'INTÉGRATION DU LUMINAIRE 3
OPCIÓN DE INTEGRACIÓN DE LUMINARIAS 3
7
DALI LS PD LI Installation Instructions | Installationsanleitung | Instructions d'installation | Instrucciones de Instalación
DALI LS PD LI
STEP 2 | SCHRITT 2 | ÉTAPE 2 | PASO 2
The Surface Mount LS PD AP KIT (purchased separately)
is used to install the DALI LS PD LI onto a concrete ceiling.
Screw the LS PD AP KIT base into the concrete ceiling.
Place Cover 1 (included with sensor) onto the DALI LS PD
LI Sensor, connect the sensor wires, and snap into the LS
PD AP KIT cover opening. Snap the LS PD AP KIT cover
into the base.
Das Surface Mount LS PD AP KIT (separat erhältlich) wird
verwendet, um das DALI LS PD LI an einer Betondecke zu
installieren. Schrauben Sie den Sockel des LS PD AP KIT in die
Betondecke. Setzen Sie die Abdeckung 1 (im Lieferumfang des
Sensors enthalten) auf den DALI LS PD LI Sensor, schließen Sie
die Sensordrähte an und lassen Sie sie in die Abdeckungsöffnung
des LS PD AP KIT einrasten. Lassen Sie die
LS PD AP KIT-Abdeckung in die Basis einrasten.
Le KIT de montage en surface LS PD AP (acheté séparément) est
utilisé pour installer le DALI LS PD LI sur un plafond en béton.
Visser la base LS PD AP KIT dans le plafond en béton. Placez le
couvercle 1 (inclus avec le capteur) sur le capteur DALI LS PD LI,
connectez les fils du capteur et enclenchez-le dans l'ouverture
du couvercle du KIT LS PD AP. Enclenchez le couvercle du
LS PD AP KIT dans la base.
El KIT AP LS PD de montaje en superficie (se compra por
separado) se utiliza para instalar el DALI LS PD LI en un techo
de hormigón. Atornille la base del KIT LS PD AP al techo de
hormigón. Coloque la cubierta 1 (incluida con el sensor) en el
sensor DALI LS PD LI, conecte los cables del sensor y encaje en la
abertura de la cubierta del KIT LS PD AP. Encaje la tapa del
KIT LS PD AP en la base.
CONCRETE CEILING INTEGRATION (Optional)
BETONDECKENINTEGRATION (Optional)
INTÉGRATION AU PLAFOND EN BÉTON (Optionnel)
INTEGRACIÓN DE TECHOS DE HORMIGÓN (Opcional)
Proceed to Step 3 if you are not using Concrete Ceiling Integration.
Fahren Sie mit Schritt 3 fort, wenn Sie die Betondeckenintegration nicht verwenden.
Passez à l'étape 3 si vous n'utilisez pas l'intégration du plafond en béton.
Continúe con el paso 3 si no está utilizando la integración de techo de hormigón.
8DALI LS PD LI Installation Instructions | Installationsanleitung | Instructions d'installation | Instrucciones de Instalación
DALI LS PD LI
Wired Manager — DALI
DALI Wires
DALI Leitungen
DALI Fils
DALI Alambres
STEP 3 | SCHRITT 3 | ÉTAPE 3 | PASO 3
If multiple DALI LS PD LIs are used see how to connect them to the Wired Manager — DALI above.
Wenn mehrere DALI LS PD LIs verwendet werden, siehe oben, wie sie mit dem Wired Manager — DALI verbunden werden.
Si plusieurs LI LS PD DALI sont utilisés, voir comment les connecter au Wired Manager — DALI ci-dessus.
Si se utilizan varios DALI LS PD LI, vea cómo conectarlos al administrador cableado: DALI arriba.
WIRING MULTIPLE DALI LS PD LIs | VERDRAHTUNG MEHRERER DALI LS PD LIs |
CÂBLAGE DE PLUSIEURS LI DALI LS PD | CABLEADO MÚLTIPLES DALI LS PD LI
9
DALI LS PD LI Installation Instructions | Installationsanleitung | Instructions d'installation | Instrucciones de Instalación
DALI LS PD LI
Light Sensor
Lichtsensor
Capteur de lumière
Sensor de luz
SELECT Button
Auswahlknopf
Bouton SÉLECTIONNER
Botón SELECCIONAR
LED Indicator
LED-Anzeige
Indicateur LED
Indicador LED
Occupancy Sensor
Anwesenheitssensor
Capteur d'occupation
Sensor de Ocupación
FEATURES | MERKMALE | CARACTÉRISTIQUES | CARACTERISTICAS
DALI LS PD LI features an Occupancy and Light Sensors, SELECT Button , and LED Indicator. The SELECT Button
enables you to identify a device and reset to factory default settings. The LED Indicator displays green or red lights
(see the DALI LS PD LI LED Indicator details below).
DALI LS PD LI verfügt über Anwesenheit und Licht Sensoren, SELECT-Taste und LED-Anzeige. Mit der AUSWAHL-Taste können Sie
ein Gerät identifizieren und auf die Werkseinstellungen zurücksetzen. Die LED-Anzeige leuchtet grün oder rot (siehe Details zur
LED-Anzeige des DALI LS PD LI-Kopplers unten).
DALI LS PD LI dispose d'un Occupancy and Light Capteurs, bouton SELECT et indicateur LED. Le bouton SELECT vous permet
d'identifier un appareil et de réinitialiser les paramètres d'usine par défaut. L'indicateur LED affiche des lumières vertes ou rouges
(voir les détails de l'indicateur LED du coupleur DALI LS PD LI ci-dessous).
DALI LS PD LI cuenta con una Ocupación y Luz Sensores, botón SELECT e indicador LED. El botón SELECCIONAR le permite
identificar un dispositivo y restablecer la configuración predeterminada de fábrica. El indicador LED muestra luces verdes o rojas
(consulte los detalles del indicador LED del acoplador DALI LS PD LI a continuación).
DALI LS PD LI LED Indicator Lights
Green LED Indicator Flashes: Motion is detected.
Green LED Indicator Illuminates Continuously: Motion detection is temporarily deactivated.
Red LED Indicator Flashes 3 Times: IR Signal of remote control has been received.
Red LED Indicator Flashes 1 Time: Vibration has been detected.
Red LED Indicator Illuminates Continuously: 100h burn-in is active.
DALI LS PD LI LED-Anzeigeleuchten
Grüne LED-Anzeige blinkt: Bewegung wurde erkannt.
Grüne LED-Anzeige leuchtet dauerhaft: Die Bewegungserkennung ist vorübergehend deaktiviert.
Rote LED-Anzeige blinkt 3 Mal: IR-Signal der Fernbedienung wurde empfangen.
Rote LED-Anzeige blinkt 1 Mal: Vibration wurde erkannt.
Rote LED-Anzeige leuchtet kontinuierlich: 100-Stunden-Einbrennen ist aktiv.
Voyants LED DALI LS PD LI
Le voyant LED vert clignote : un mouvement est détecté.
Le voyant LED vert s'allume en continu : la détection de mouvement est temporairement désactivée.
Le voyant LED rouge clignote 3 fois : le signal IR de la télécommande a été reçu.
Le voyant LED rouge clignote 1 fois : une vibration a été détectée.
Le voyant LED rouge s'allume en continu : le rodage de 100 h est actif.
Luces indicadoras LED DALI LS PD LI
El indicador LED verde parpadea: se detecta movimiento.
El indicador LED verde se ilumina continuamente: la detección de movimiento se desactiva temporalmente.
El indicador LED rojo parpadea 3 veces: se ha recibido la señal IR del control remoto.
El indicador LED rojo parpadea 1 vez: se ha detectado vibración.
El indicador LED rojo se ilumina de forma continua: el período de prueba de 100 horas está activo.
10 DALI LS PD LI Installation Instructions | Installationsanleitung | Instructions d'installation | Instrucciones de Instalación
DALI LS PD LI
SELECT Button
Auswahlknopf
Bouton SÉLECTIONNER
Botón SELECCIONAR
The SELECT Button executes different functions depending on the duration of activation.
Press the SELECT Button to test the DALI connection — 1 press LED ON, another press LED OFF.
Press and hold the SELECT Button to start the reset. The LED flashes for approximately 10 seconds.
The DALI LS PD LI is set back to the factory settings and all addresses are deleted.
Die SELECT-Taste führt je nach Dauer der Aktivierung unterschiedliche Funktionen aus.
Drücken Sie die SELECT-Taste, um die DALI-Verbindung zu testen – 1 drücken Sie LED ON, ein weiteres Mal LED OFF.
Halten Sie die AUSWAHL-Taste gedrückt, um das Zurücksetzen zu starten. Die LED blinkt etwa 10 Sekunden lang. Das
DALI LS PD LI wird auf die Werkseinstellungen zurückgesetzt und alle Adressen werden gelöscht.
Le bouton SELECT exécute différentes fonctions en fonction de la durée d'activation.
Appuyez sur le bouton SELECT pour tester la connexion DALI — 1 appuyez sur LED ON, une autre appuyez sur LED OFF.
Appuyez sur le bouton SELECT et maintenez-le enfoncé pour lancer la réinitialisation. La LED clignote pendant environ
10 secondes. Le DALI LS PD LI est remis aux réglages d'usine et toutes les adresses sont supprimées.
El botón SELECT ejecuta diferentes funciones dependiendo de la duración de la activación.
Presione el botón SELECCIONAR para probar la conexión DALI: 1 presione LED ENCENDIDO, otro presione LED APAGADO.
Mantenga presionado el botón SELECCIONAR para iniciar el reinicio. El LED parpadea durante aproximadamente 10 segundos. El
DALI LS PD LI se restablece a la configuración de fábrica y se borran todas las direcciones.
SENSOR SETTINGS | SENSOREINSTELLUNGEN |
RÉGLAGES DU CAPTEUR | AJUSTES DE SENSORES
11
DALI LS PD LI Installation Instructions | Installationsanleitung | Instructions d'installation | Instrucciones de Instalación
DALI LS PD LI
Insert flat head screwdriver
Schlitzschraubendreher einsetzen
Insérer un tournevis à tête plate
Inserte un destornillador de cabeza plana
(2X)
Pull Up
Hochziehen
Remonter
Levantar Rotate
Drehen
Tourner
Girar
Using a small screwdriver pull up on the shutter sides. Remove, insert, or rotate one or both
shutters where necessary.
Ziehen Sie mit einem kleinen Schraubendreher die Rollladenseiten nach oben. Bei Bedarf einen oder beide
Rollläden entfernen, einsetzen oder drehen.
À l'aide d'un petit tournevis, tirez sur les côtés du volet. Retirez, insérez ou faites pivoter un volet ou les deux
si nécessaire.
Con un destornillador pequeño, tire hacia arriba de los lados del obturador. Retire, inserte o gire una o ambas
contraventanas cuando sea necesario.
ADJUSTING THE SENSOR SHUTTER | EINSTELLEN DES SENSORVERSCHLUSSES |
RÉGLAGE DE L'OBTURATEUR DU CAPTEUR | AJUSTE DEL OBTURADOR DEL SENSOR
Without Shutters
Ohne Fensterläden
Sans Volets
Sin Persianas
Maximum/Maximal
Maximum/Máximo 90º
With Both Shutters
Mit beiden Fensterläden
Avec les deux Volets
Con ambas Persianas
Minimum/Mindestens/
Mimimum/Mínimo 40º
With One Shutter
Mit einem Verschluss
Avec un Seul Volet
Con un Obturador
The detection range of the DALI LS PD LI
sensor is determined by the shutter position.
Der Erfassungsbereich des Sensors DALI LS PD LI
wird durch die Jalousieposition bestimmt.
La plage de détection du capteur DALI LS PD LI est
déterminée par la position de l'obturateur.
El rango de detección del sensor DALI LS PD LI está
determinado por la posición de la persiana.
SENSOR DETECTION RANGE | SENSORERFASSUNGSREICHWEITE |
PLAGE DE DÉTECTION DU CAPTEUR | ALCANCE DE DETECCIÓN DEL SENSOR
12 DALI LS PD LI Installation Instructions | Installationsanleitung | Instructions d'installation | Instrucciones de Instalación
DALI LS PD LI
By changing the shutter position, you can influence the detection range of the sensor directionally and avoid
undesired presence detection.
Durch Veränderung der Rollladenposition können Sie dies beeinflussen Erfassungsbereich des Sensors gerichtet und ausweichen
unerwünschte Anwesenheitserkennung.
En changeant la position de l'obturateur, vous pouvez influencer la plage de détection du capteur directionnellement et éviter
détection de présence indésirable.
Al cambiar la posición del obturador, puede influir en la rango de detección del sensor direccionalmente y evitar Detección de
presencia no deseada.
SENSOR DETECTION RANGE (cont.) | SENSORERFASSUNGSREICHWEITE (fort.) |
PLAGE DE DÉTECTION DU CAPTEUR (suite) | ALCANCE DE DETECCIÓN DEL SENSOR (continuación)
13
DALI LS PD LI Installation Instructions | Installationsanleitung | Instructions d'installation | Instrucciones de Instalación
DALI LS PD LI
VISIT OUR HELP CENTER | BESUCHEN SIE UNSER HILFSZENTRUM |
VISITEZ NOTRE CENTRE D'AIDE | VISITE NUESTRO CENTRO DE AYUDA
For instructions to install, configure, test, or use Encelium products or systems, or to contact an
Encelium Technical Support Specialist, please scan the QR code or visit help.encelium.com.
Für Anweisungen zum Installieren, Konfigurieren, Testen oder Verwenden von Encelium-Produkten oder
-Systemen oder zum Kontaktieren eines Spezialisten des technischen Supports von Encelium scannen Sie bitte
den QR-Code oder besuchen Sie help.encelium.com.
Pour obtenir des instructions sur l'installation, la configuration, le test ou l'utilisation des produits ou systèmes
Encelium, ou pour contacter un spécialiste du support technique Encelium, veuillez scanner le code QR ou
visiter help.encelium.com.
Para obtener instrucciones para instalar, configurar, probar o utilizar productos o sistemas de Encelium, o para
ponerse en contacto con un especialista de soporte técnico de Encelium, escanee el código QR o
visite help.encelium.com.
14 DALI LS PD LI Installation Instructions | Installationsanleitung | Instructions d'installation | Instrucciones de Instalación
DALI LS PD LI
THIS PAGE IS INTENTIONALLY LEFT BLANK
DIESE SEITE WIRD ABSICHTLICH LEER GELASSEN
CETTE PAGE A ÉTÉ LAISSÉE BLANCHE INTENTIONNELLEMENT
ESTA PÁGINA SE HA DEJADO EN BLANCO INTENCIONALMENTE
15
DALI LS PD LI Installation Instructions | Installationsanleitung | Instructions d'installation | Instrucciones de Instalación
DALI LS PD LI
THIS PAGE IS INTENTIONALLY LEFT BLANK
DIESE SEITE WIRD ABSICHTLICH LEER GELASSEN
CETTE PAGE A ÉTÉ LAISSÉE BLANCHE INTENTIONNELLEMENT
ESTA PÁGINA SE HA DEJADO EN BLANCO INTENCIONALMENTE
Copyright © 2022 Digital Lumens, Incorporated. All rights reserved. Digital Lumens, the
Digital Lumens logo, We Generate Facility Wellness, SiteWorx, LightRules, Lightelligence,
Encelium, the Encelium logo, Polaris, GreenBus and any other trademark, service mark, or
tradename (collectively “the Marks”) are either trademarks or registered trademarks of
Digital Lumens, Inc. in the United States and/or other countries, or remain the property of
their respective owners that have granted Digital Lumens, Inc. the right and license to use
such Marks and/or are used herein as nominative fair use. Due to continuous improvements
and innovations, specifications may change without notice.
DOC-000458-00 Rev A 11-22
encelium.com
  • Page 1 1
  • Page 2 2
  • Page 3 3
  • Page 4 4
  • Page 5 5
  • Page 6 6
  • Page 7 7
  • Page 8 8
  • Page 9 9
  • Page 10 10
  • Page 11 11
  • Page 12 12
  • Page 13 13
  • Page 14 14
  • Page 15 15
  • Page 16 16

ENCELIUM DALI LS PD LI Benutzerhandbuch

Typ
Benutzerhandbuch