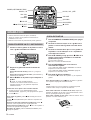
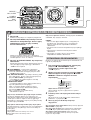
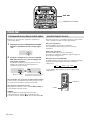
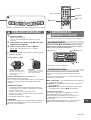
Aiwa CA-DW257 EZS Benutzerhandbuch
- Kategorie
- CD-Spieler
- Typ
- Benutzerhandbuch
Dieses Handbuch eignet sich auch für

EZ
8A-CT9-906-01
000205ACK-I-FM
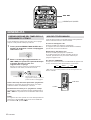
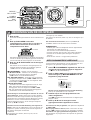
CA-DW257
COMPACT DISC CARRY COMPONENT SYSTEM
OPERATING INSTRUCTIONS
See page 2.
BEDIENUNGSANLEITUNG
Siehe Seite 26.
ISTRUZIONI PER L’USO
Vedere a pagina 34.
I
(Italiano)
D
(Deutsch)
En
(English)
MANUAL DE INSTRUCCIONES
Ver la página 10.
MODE D’EMPLOI
Voir page 18.
F
(Français)
E
(Español)
NL
(Nederlands)
Pol
(Polski)
Hu
(Magyar)
GEBRUIKSAANWIJZING
Zie blz 42.
KEZELÉSI UTASÍTÁS
Lásd 58. oldal
CZ
(Cesky)
˘
NÁVOD K POUZITÍ
Viz straha 66.
˘
INSTRUKCJA OBSLUGI
Patrz strona 50.

2 ENGLISH
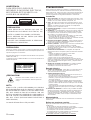
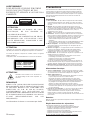
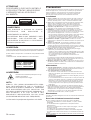
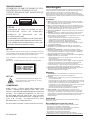
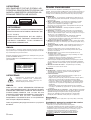
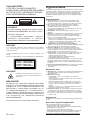
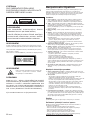
WARNING
TO REDUCE THE RISK OF FIRE OR
ELECTRIC SHOCK, DO NOT EXPOSE THIS
APPLIANCE TO RAIN OR MOISTURE.
CAUTION
Use of controls or adjustments or performance of procedures other
than those specified herein may result in hazardous radiation
exposure.
This compact disc player is classified as a CLASS 1 LASER product.
The CLASS 1 LASER PRODUCT label is located on the exterior.
CLASS 1
KLASSE 1
LUOKAN 1
KLASS 1
LASER
LASER
LASER
LASER
PRODUCT
PRODUKT
LAITE
APPARAT
CAUTION!
Invisible laser radiation when open and inter-
locks defeated. Avoid exposure to beam.
ADVARSEL!
Usynlig laserståling ved åbning, når sikkerhedsafbrydereer ude
af funktion. Undgå udsættelse for stråling.
VAROITUS!
Laitteen käyttäminen muulla kuin tässä käyttöohjeessa mainitulla
tavalla saattaa antistaa käyttäjän turvallisuusluokan 1 ylittävälle
näkymättömälle lasersäteilylle.
VARNING!
Om apparaten används på annat sätt än i denna bruksanvisning
specificerats, kan användaren utsätta för osynlig laser-strålning,
som överskrider gränsen för laserklass 1.
NOTE
AIWA CO. LTD. - JAPAN - DECLARES UNDER ITS OWN
RESPONSIBILITY THAT THE PRODUCT DESCRIBED IN THIS
MANUAL IS IN COMPLIANCE WITH THE DIRECTIVES OF D.M
28.8.95 No. 548, ACCORDING TO THE STIPULATIONS OF
PARAGRAPH 3 OF ATTACHMENT A OF D.M. 25.6.85 AND
PARAGRAPH 3 OF ATTACHMENT 1 OF D.M. 27.8.87 (REGULATIONS
REGARDING FREQUENCIES).
The above information is only for Italy.
CAUTION
TO REDUCE THE RISK OF ELECTRIC SHOCK,
DO NOT REMOVE COVER (OR BACK).
NO USER-SERVICEABLE PARTS INSIDE.
REFER SERVICING TO QUALIFIED SERVICE
PERSONNEL.
CAUTION
RISK OF ELECTRIC SHOCK
DO NOT OPEN
Precautions
Read the Operating Instructions carefully and completely before
operating the unit. Be sure to keep the Operating Instructions for
future reference. All warnings and cautions in the Operating
Instructions and on the unit should be strictly followed, as well
as the safety suggestions below.
Installation
1 Water and moisture - Do not use this unit near water, such
as near a bathtub, washbowl, kitchen sink, laundry tub, in a
wet basement, swimming pool, or the like.
2 Heat - Do not use this unit near sources of heat, including
heating vents, stoves, or other appliances that generate heat.
It also should not be placed in temperatures less than 5°C
(41°F) or greater than 35°C (95°F).
3 Mounting surface - Place the unit on a flat, even surface.
4 Ventilation - The unit should be situated with adequate
space around it so that proper heat ventilation is assured.
Allow 10 cm (4 in.) clearance from the rear and the top of the
unit and 5 cm (2 in.) from each side.
- Do not place the unit on a bed, rug, or similar surface that
may block the ventilation openings.
- Do not install the unit in a bookcase, cabinet, or airtight
rack where ventilation may be impeded.
5 Objects and liquid entry - Take care that objects or liquids
do not get inside the unit through the ventilation openings.
6 Carts and stands - When placed or mounted on a stand or
cart, the unit should be moved with care.
Quick stops, excessive force, and uneven surfaces may
cause the unit or cart to overturn or fall.
7 Condensation - Moisture may form on the CD pickup lens
when:
- The unit is moved from a cold spot to a warm spot
- The heating system has just been turned on
- The unit is used in a very humid room
- The unit is cooled by an air conditioner
When this unit has condensation inside, it may not function
normally. Should this occur, leave the unit for a few hours,
then try to operate again.
8 Wall or ceiling mounting - The unit should not be mounted
on a wall or ceiling, unless specified in the Operating
Instructions.
Electric Power
1 Power sources - Use on batteries or AC house current, as
specified in the Operating Instructions and marked on the
unit.
2 AC power cord
- When disconnecting the AC power cord, pull it out by the
AC power plug. Do not pull the cord itself.
- Never handle the AC power plug with wet hands, as this
could result in fire or shock.
- Power cords should be firmly secured to avoid being bent,
pinched, or walked upon. Pay particular attention to the
cord from the unit to the power socket.
- Avoid overloading AC power sockets and extension cords
beyond their capacity, as this could result in fire or shock.
3 When not in use - Unplug the AC power cord from the AC
power socket or remove all the batteries if the unit will not be
used for several months or more. When the cord is plugged
in, a small amount of current continues to flow to the unit,
even when the power is turned off.
Maintenance
Clean the unit only as recommended in the Operating
Instructions.
Damage Requiring Service
Have the units serviced by a qualified service technician if:
- The AC power cord or plug has been damaged
- Foreign objects or liquid have got inside the unit
- The unit has been exposed to rain or water
- The unit does not seem to operate normally
- The unit exhibits a marked change in performance
- The unit has been dropped, or the cabinet has been damaged
DO NOT ATTEMPT TO SERVICE THE UNIT YOURSELF.

I
D
En
F
E
NL
Pol
Hu
CZ
ENGLISH 3
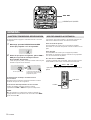
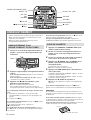
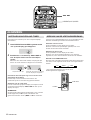
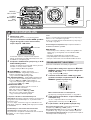
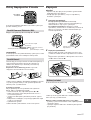
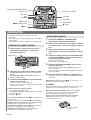
Power Supply
The 6 STANDBY OPE/BATT indicator lights up while electric
current flows to the unit.
Using on AC House Current
Connect the AC cord as illustrated below.
CAUTION
Use only the supplied AC cord. Use with other cords may
result in the risk of fire.
Using on Batteries
Open the lid of the battery compartment on the rear and
insert eight R20 (size D) batteries, not supplied, as illustrated
below. Then close the lid.
To switch from AC power supply to battery supply,
disconnect the AC cord from the AC inlet.
When the 6 STANDBY OPE/BATT indicator becomes dim,
the tape speed slows down, volume decreases, or sound is
distorted during operation, replace the batteries.
Notes on batteries
To avoid damage from leakage or explosion, observe the
following:
• Insert the batteries with the 0 and 9 marks correctly
aligned.
• Do not mix different types of batteries or old batteries with
new ones.
• When the unit is not to be used for a long period, remove
the batteries.
• Never recharge the batteries, apply heat to them or take
them apart.
• Remove dead batteries.
If liquid leaks from the batteries, wipe thoroughly to remove.
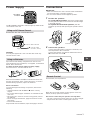
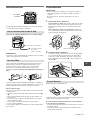
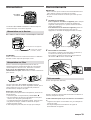
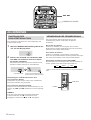
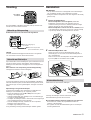
Connections
IMPORTANT
• Make sure that the AC cord is disconnected and batteries
are removed before connecting speakers.
• Do not connect other than the supplied speakers.
1 Position the speakers.
To couple with the speakers, slide each speaker down
into the guide brackets on the center unit until the height
is level with the unit.
To separate the unit from the speakers, slide the
speakers up and off, while pressing the speaker release
knob.
2 Connect the speakers.
Connect the right speaker cord to the R terminals, and
the left speaker to the L terminals.
Connect the speaker cord with the white broken line to
0 and the other cord to 9.
Remote Control
Insert two R6 (size AA) batteries.
When the reach of the remote control signal is less than 5
meters (16 feet), replace the batteries.
The remote control may not operate correctly when:
- The unit is exposed to intense light, such as direct sunlight
- Objects block the remote control signal to the unit
6STANDBY
OPE/BATT
R20 (D)
SPEAKERSS
R L
R6 (AA)
to the AC inlet of the unit
to an AC outlet
(AC 230 V, 50 Hz)
supplied AC cord
1
2
Release knob

After listening, press POWER/6 STANDBY to turn the
power off.
NOTE
• Do not use irregular shape CDs (example: heart-shaped,
octagonal ones).
It may result in malfunctions.
• Do not place more than one disc in the disc
compartment.
• Do not try to open the disc compartment during play.
• Do not touch the lens. Doing so may cause malfunctions.
PROGRAMMED PLAY
Up to 30 tracks can be programmed from the disc.
1 In stop mode, keep *s STOP/MEMORY
pressed until “M” flashes in the display.
* or s on the remote control
2 Press r or t to select a track, then press
s STOP/MEMORY to store it.
To select a track with the remote control
Press the numbered buttons 0-9 and +10.
3 Repeat step 2 to program other tracks.
To return to stop mode in steps 1 to 3, keep s pressed.
4 Press A to start play.
To check the program, press r or t in stop mode.
To clear the program, press s once in stop mode so that
“M” disappears in the display.
To change the programmed tracks, clear the program and
repeat all the steps again.
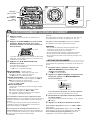
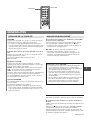
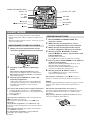
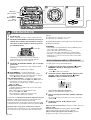
4 ENGLISH
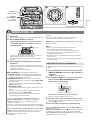
1 Press CD.
The power is turned on and the CD indicator lights up.
2 Press PUSH OPEN to open the disc
compartment. Place a disc with the printed
side up and close the disc compartment.
Total number of tracks and total playing time are
displayed. It will take about 15 seconds when loading a
CD-RW disc.
3 Press *A PLAY/PAUSE to start play.
The number of the track being played and elapsed
playing time are displayed.
* or c PLAY on the remote control
s STOP/MEMORY – Stops play.
*A PLAY/PAUSE – Pauses play. To resume play,
press again.
* or a PAUSE on the remote control
r,t SKIP/SEARCH – Searches for a particular point
during playback. Keep r or t pressed and then
release it.
– Skips to the beginning of a track. Press r or t
repeatedly.
*REPEAT/OSC/SLEEP
– Repeats a single track or all tracks. Select as follows.
[ 1: A single track is played repeatedly.
Select a track with r or t.
[: All tracks are played repeatedly.
* or REPEAT on the remote control
To start play when the power is off, press CD. The
power is turned on and play of the loaded disc begins
(Direct Play Function).
If you load a disc while the CD indicator flashes in step 2,
play starts without pressing A.
To select a track directly with the remote control, press
the numbered buttons 0-9 and +10. CD play starts from the
selected track and continues to the last track.
Example:
To select number 25, press +10, +10 and 5.
To select number 10, press +10 and 0.
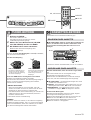
CD OPERATION
A
PUSH OPEN
REPEAT/
OSC/SLEEP
POWER/
6STANDBY/
TAPE,
RADIO, CD
AB
TUNING
PLAY/PAUSE
SKIP/SEARCH
STOP/MEMORY
LW
FM STEREO
FM MONO
MW
BAND
Track number
Programmed number

I
D
En
F
E
NL
Pol
Hu
CZ
ENGLISH 5
1 Press RADIO.
The power is turned on.
The RADIO indicator lights up and the volume level is
displayed.
2 Select a band (LW, MW or FM STEREO) with
BAND.
3 Tune to a station with TUNING.
During FM stereo reception, STEREO is displayed.
After listening, press POWER/6 STANDBY to turn the
power off.
For better reception
If an FM stereo broadcast contains noise
Select FM MONO with BAND.
Noise is reduced although reception is monaural.
To restore stereo reception, select FM STEREO.
*REPEAT/OSC/SLEEP
- If a high-pitched sound is heard during MW or LW
recording, press the button repeatedly until the noise is
reduced.
- If a high-pitched sound is heard when listening to a radio
broadcast, press the button repeatedly until the noise is
reduced.
* or MODE on the remote control
NOTE
If the unit picks up noise from other electrical appliances
nearby, like a TV or fluorescent lights, move the unit.
B
TUNER OPERATION
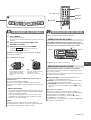
Use Type I (normal) tapes only.
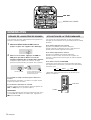
INSERTING A TAPE
Press Z STOP/EJECT to open the cassette holder
and insert a tape with the exposed side down and the
side to be played facing out.
Push the cassette holder to close.
PLAYING A TAPE
Press c PLAY while the power is off.
The power is turned on and play of the inserted tape
begins.
During tape operation, the TAPE indicator lights up and
the volume level is displayed.
Z STOP/EJECT – Stops play. The power will be
automatically turned off.
a PAUSE – Pauses play. To resume play, press again.
fREW/gFF – Rewinds/fast forwards. To stop the
winding, press Z STOP/EJECT.
Continuous play
After play on deck 2 finishes, play on deck 1 will start
without interruption.
During play on deck 2, press a PAUSE then press
c PLAY on deck 1.
a PAUSE on deck 1 will be released at the end of play on
deck 2.
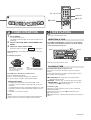
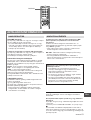
TAPE PLAYING
C
0-9, +10
a PAUSE
REPEAT
MODE
c PLAY
C
PAUSE
STOP/EJECT
FF
REWPLAY
PAUSE
STOP/EJECT
FF
REWPLAY
REC
Deck 1
Deck 2
2
1
3
Z
FM
Extend the rod antenna and
orient it for the best reception.
MW, LW
The antenna is inside the
unit. Position the unit for
the best reception.

6 ENGLISH
• Use Type I (normal) tapes only.
• Note that recording is done on only one side of the tape.
• Wind the tape to the point where recording starts.
RECORDING FROM A CD OR THE TUNER
1 Insert a tape to be recorded on into deck 1
with the side to be recorded facing out.
2 Get ready to record from the source.
To record from a CD, press CD and load the disc.
To record from a radio broadcast, press RADIO and
tune to a station.
3 Press w REC on deck 1 to start recording.
c PLAY is pressed simultaneously.
When the selected function is CD, CD play and
recording starts simultaneously.
To record only the selected tracks of a CD
1 Follow steps 1 to 3 of PROGRAMMED PLAY on page 4
to program tracks.
2 Press w REC.
To stop recording, press Z STOP/EJECT on deck 1.
To stop CD play, press s STOP/MEMORY.
To pause recording, press a PAUSE. To resume
recording, press again.
To erase recording, press w REC on deck 1 while the
power is off.
After recording, press POWER/6 STANDBY to turn the
power off.
DUBBING A TAPE
1 Press POWER/6 STANDBY/TAPE to turn the
power off.
2 Insert a tape to be recorded on into deck 1 with
the side to be recorded facing out.
3 Insert a tape to be played into deck 2 with the
side to be played facing out.
4 Press a PAUSE then press w REC on deck 1
to enter recording pause mode.
The power is turned on.
c PLAY is pressed simultaneously.
5 Press DUB SPEED to select a dubbing speed.
The HIGH-SPEED DUBBING indicator lights up: Dubs at
high speed.
The HIGH-SPEED DUBBING indicator disappears: Dubs
at normal speed.
6 Press c PLAY on deck 2.
a PAUSE on deck 1 is released and recording starts.
To stop recording, press Z on deck 1 and deck 2. The
power will be automatically turned off.
NOTE
When recording near a television, noise may be recorded.
Move the unit away from the television.
To prevent accidental erasure, break off the plastic tabs on
the cassette tape with a screwdriver or other pointed tool
after recording.
To record on the tape again, cover the tab openings with
adhesive tape, etc.
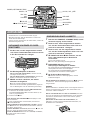
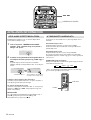
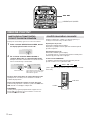
RECORDING
w REC
Z STOP/EJECT
a PAUSE
PHONES
MIC
MIC VOL
POWER/6STANDBY/TAPE,
RADIO, CD
VOLUME
QSOUND
DUB SPEED
c PLAY
ROCK, POP, JAZZ
Deck 1
2
3
1
Z
Tab for side A
Side A

I
D
En
F
E
NL
Pol
Hu
CZ
ENGLISH 7
To listen with the headphones
Connect headphones with a stereo mini plug to the PHONES
jack.
If an erroneous display or malfunction occurs
Make sure that none of the deck operation buttons is
pressed.
Press s while pressing POWER/6 STANDBY.
If the unit cannot be reset in the way above, disconnect the
AC cord and remove all the batteries to turn off the display.
Leave the unit for a while and turn the power back on.
GENERAL
SOUND ADJUSTMENT
VOLUME
Press VOLUME N or M. The volume level is displayed
as a number from 0 to MAX (25).
• The volume level is automatically set to 14 if the power is
turned off when the volume level is set to 15 or more.
(except when turning the power back on within 4
seconds)
To display the volume level when CD function is
selected
Press VOLUME N or M. The volume level is displayed
for 4 seconds.
DISPLAY on the remote control is also available.
3-mode equalizer
Press one of the 3-mode equalizer buttons and the
indicator of the selected setting lights up. To cancel, press
the selected setting.
ROCK - Emphasizes the high and low range of music.
POP - Emphasizes voice and midrange of music.
JAZZ - Emphasizes the low range of music.
When using the remote control, press EQ repeatedly until
the desired mode is selected.
The equalizer mode changes to ROCK, POP, JAZZ or no
equalization, cyclically.
QSOUND system
This system provides a rich, three dimensional sound area
for stereo sources.
You can enjoy more enhanced sound.
Press QSOUND and the QSOUND indicator lights up.
• At higher volumes, turning QSOUND on may cause
sound distortion. In this case, make the volume down.
MICROPHONE MIXING
Connect a microphone with a mini plug to the MIC jack
and play a source to be mixed.
To record the microphone mixing sound, insert a tape in
deck 1 and press w REC.
• During dubbing at high speed, the microphone mixing
sound is not recorded.
MIC VOL – Adjusts the microphone volume. If a howling
sound is produced, turn the volume down.
• To prevent howling, hold the microphone away from the
speakers. The use of unidirectional type microphones is
also recommended.
DISPLAY
EQ
Notes on CD-R/RW discs
• The unit may not play a CD-R/RW disc that is
recorded on personal computers or some kinds of
CD-R/RW recorders because of differences in
recording platforms.
• Do not attach any seal or label to either side (the
recordable side or the labeled side) of a CD-R/RW
disc. It may cause malfunction.
• Do not load an unrecorded CD-R/RW disc. It will take
over 30 seconds to read the disc. The disc may be
damaged if you try to open the disc compartment while
reading the disc.

8 ENGLISH
GENERAL
SETTING THE SLEEP TIMER
The unit can be turned off automatically at a specified time.
1 Keep REPEAT/OSC/SLEEP pressed until “10”
flashes in the display.
2 Within 4 seconds, press r or t to
specify the time until the power is turned off.
Each time it is pressed, the time changes between 10
and 90 minutes in 10-minute steps.
To check the time remaining until the power is turned
off
Repeat step 1 shown above. The remaining time is
displayed for 4 seconds.
To cancel the sleep timer
Display the remaining time and press r or t
repeatedly until OFF is displayed.
NOTE
If the unit is turned off during tape playback, c on the
deck will not be released. Press Z to release c.
r, t
REPEAT/OSC/SLEEP
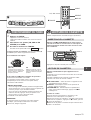
USING THE REMOTE CONTROL
Buttons on the remote control and the main unit with identical
indications have the same functions.
To turn the power on
Press POWER to turn on the display.
When using the unit on the batteries, this button will not turn
the power on.
To turn the power off
Press POWER to turn off the display.
When one of the deck operation buttons is pressed, this
button will not turn the power off.
To use the FUNCTION button
Each time FUNCTION is pressed while the power is on, the
function is selected cyclically.
* applicable when one of the deck operation buttons is
pressed
POWER
FUNCTION
CD RADIO *TAPE
Specified time While the sleep timer works,
the dot keeps flashing.

I
D
En
F
E
NL
Pol
Hu
CZ
ENGLISH 9
Maintenance
To clean the cabinet
Use a soft cloth lightly moistened with mild detergent
solution. Do not use strong solvents such as alcohol,
benzine or thinner.
To clean the heads
When the tape heads are dirty;
- high frequency sound is not emitted
- the sound is not adequately high
- the sound is off-balance
- the tape cannot be erased
- the tape cannot be recorded on
After every 10 hours of use, clean the tape heads with a
head cleaning cassette.
Use separately sold dry-type or wet-type cleaning
cassette.
Refer to the instructions of the cleaning cassette for
details.
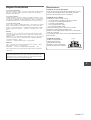
To clean the lens
Use a cotton swab slightly
moistened with cleaning fluid.
Wipe gently from the center to
the edge.
Specifications
Tuner section
Frequency range, antenna — FM: 87.5 - 108.0 MHz Rod antenna,
MW: 530 - 1,605 kHz Ferrite bar antenna, LW: 150 - 285 kHz Ferrite bar
antenna
Deck section
Track format — 4 tracks, 2 channels / Frequency range — Normal tape:
50 - 12,000 Hz (EIAJ) / Recording system — AC bias / Erasing system
— Magnet erase / Heads — Deck 1: Recording/playback head (1),
Erasure head (1); Deck 2: Playback head (1)
CD player section
Disc — Compact disc / Scanning method — Non-contact optical scanner
(semiconductor laser) / Rotation speed — Approx. 500 - 200 rpm/CLV /
Error correction — Cross interleave, Reed, Solomon code / Number of
channels — 2 channels / D/A conversion — 1 bit DAC
General
Power requirements — DC 12 V using eight size D (R20) batteries, AC
230 V, 50 Hz / Dimensions (W × H × D) — 260 × 247 × 260 mm / Weight
— 3.3 kg (excluding batteries)
Power output — 5 W + 5 W (DIN MUSIC POWER), 4.5 W + 4.5 W (EIAJ
3.2 ohms, THD 10 %), 3.3 W + 3.3 W (DIN 1% Rated Power) / Power
consumption — 24 W
Accessories — AC cord (1), Remote control (1)
Speaker
Type — 120 mm cone type / Dimensions (W × H × D) — 184 × 235 × 240
mm / Weight — Approx. 1.3 kg × 2
Impedance — 3.2 ohms / Allowable max. input — 7 W
Specifications and external appearance are subject to change without
notice.
COPYRIGHT
Please check the copyright laws relating to recordings from disc,
radio or external tape for the country in which the machine is being
used.
Lens

10 ESPAÑOL
Precauciones
Antes de utilizar la unidad, lea cuidadosa y completamente este
manual de instrucciones. Guarde el manual de instrucciones para
futuras referencias. Todos los avisos y precauciones del manual de
instrucciones y de la unidad deberán seguirse estrictamente, así
como las sugerencias de seguridad indicadas a continuación.
Instalación
1 Agua y humedad - No utilice esta unidad cerca del agua, como
al lado de una bañera, un lavabo, el fregadero de la cocina, una
lavadora, ni en un sótano húmedo, una piscina, etc.
2 Calor - No utilice esta unidad cerca de fuentes térmicas, como
salidas de calefacción, estufas, ni demás aparatos que generen
calor.
Además, no deberá colocarse en lugares con temperaturas
inferiores a 5°C ni superiores a 35°C.
3 Superficie de montaje - Coloque la unidad sobre una superficie
plana y nivelada.
4 Ventilación - La unidad deberá colocarse con espacio suficiente
a su alrededor para asegurar una ventilación adecuada. Deje
una separación de 10 cm desde las partes posterior y superior
de la unidad, y 5 cm desde cada lado.
- No la coloque sobre una cama, una alfombra, ni nada similar
que pueda bloquear las aberturas de ventilación.
- No la instale en una librería, un armario, ni un bastidor cerrado,
donde la ventilación pudiera ser deficiente.
5 Introducción de objetos y líquidos - Tenga cuidado de que en
el interior de la unidad no entre objetos pequeños ni líquidos a
través de las aberturas de ventilación.
6 Carritos y estantes - Cuando la haya colocado o montado sobre
un estante o un carrito, deberá moverla con cuidado.
Las paradas repentinas, la fuerza excesiva, o las superficies
desiguales podrían causar el vuelco o la caída de la combinación
de la unidad y el carrito.
7 Condensación de humedad - En el objetivo del captor del
reproductor de discos compactos puede condensarse humedad
cuando:
- Traslade la unidad de un lugar frío a otro cálido.
- Conecte el sistema de calefacción.
- Utilice la unidad en una sala muy húmeda.
- Enfríe la sala con un acondicionador de aire.
Cuando se haya condensado humedad en el interior de esta
unidad, es posible que no funcione normalmente. Cuando ocurra
esto, deje la unidad durante algunas horas, y después trate de
volver a utilizarla.
8 Montaje en una pared o en un techo - La unidad no deberá
montarse en una pared ni en un techo a menos que se
especifique en el manual de instrucciones.
Energía eléctrica
1 Fuentes de alimentación - Utilice pilas o la corriente de la red
de CA, como se especifica en el manual de instrucciones, y
como está marcado en la unidad.
2 Cable de alimentación de CA
- Para desconectar el cable de alimentación de CA, tire de su
enchufe. No tire nunca del propio cable.
- No tome nunca el cable de alimentación de CA con las manos
húmedas, ya que esto podría resultar en incendios o
descargas eléctricas.
- Los cables de alimentación deberán asegurarse firmemente
para evitar que se doblen, queden pillados, o alguien pueda
pisarlos. Preste especial atención al cable que va de la unidad
al tomacorriente.
- Evite sobrecargar el enchufe de alimentación y los cables de
extensión porque esto puede provocar incendios o descargas
eléctricas.
3 Períodos sin utilización - Cuando no vaya a utilizar la unidad
durante varios meses, desenchufe el cable de alimentación de
CA del tomacorriente o extráigale todas las pilas. Cuando el
cable de alimentación esté enchufado, circulará una pequeña
corriente por la unidad, incluso aunque su alimentación esté
desconectada.
Mantenimiento
Limpie la unidad solamente como se recomienda en el manual de
instrucciones.
Daños que requieren servicio
Haga que la unidad sea revisada por un técnico de servicio
cualificado si:
- Se ha dañado el cable de alimentación o el enchufe.
- En el interior de la unidad han entrado objetos extraños o líquidos.
- La unidad ha estado expuesta a la lluvia o al agua.
- La unidad parece no funcionar normalmente.
- La unidad presenta un cambio notable en su rendimiento.
- La unidad ha caído o se ha dañado su caja.
NO INTENTE REPARAR USTED MISMO LA UNIDAD.
ADVERTENCIA
PARA REDUCIR EL RIESGO DE
INCENDIOS O SACUDIDAS ELECTRICAS,
NO EXPONGA ESTE APARATO A LA
LLUVIA NI A LA HUMEDAD.
PRECAUCION
Utilizar los controles, hacer ajustes o realizar procedimientos de una
forma diferente a la especificada en este manual puede producir una
exposición peligrosa a la radiación.
Este reproductor de discos compactos está clasificado como producto
LASER de CLASE 1.
La etiqueta CLASS 1 LASER PRODUCT se encuentra situada en el
exterior del aparato.
CLASS 1
KLASSE 1
LUOKAN 1
KLASS 1
LASER
LASER
LASER
LASER
PRODUCT
PRODUKT
LAITE
APPARAT
¡PRECAUCION!
Radiación láser invisible cuando se abra o se
anulen los enclavamientos. Evite la exposición
al rayo.
PRECAUCION
PARA REDUCIR EL RIESGO DE QUE SE
PRODUZCAN SACUDIDAS ELECTRICAS, NO
QUITE LA CUBIERTA (O PANEL POSTERIOR).
EN EL INTERIOR NO HAY PIEZAS QUE DEBA
REPARAR EL USUARIO.
SOLICITE LAS REPARACIONES AL PERSONAL
DE SERVICIO CAPACITADO.
CAUTION
RISK OF ELECTRIC SHOCK
DO NOT OPEN
NOTA
AIWA CO.LTD. - JAPÓN - DECLARA BAJO SU PROPIA
RESPONSABILIDAD QUE EL PRODUCTO DESCRITO
EN ESTE MANUAL CUMPLE CON LAS DIRECTIVAS
DEL D.M. 28.8.95 Nº 548, DE ACUERDO CON LAS
ESTIPULACIONES DEL PARÁGRAFO 3 DEL ANEXO A
DEL D.M. 25.6.85 Y DEL PARÁGRAFO 3 DEL ANEXO 1
DEL D.M. 27.8.87 (REGULACIONES RELATIVAS A
FRECUENCIAS).
La anterior información es sólo para Italia.

I
D
En
F
E
NL
Pol
Hu
CZ
ESPAÑOL 11
Conexiones
IMPORTANTE
• Antes de conectar los altavoces, asegurarse de que el
cable de alimentación está desconectado y las pilas
sacadas.
• No conectar unos altavoces diferentes a los que se
incluyen.
1 Instalación de los altavoces.
Para acoplar los altavoces, deslizar cada uno de ellos
dentro de las guías del aparato principal hasta que su
parte superior quede al ras con la parte superior del
aparato.
Para separar los altavoces del aparato, deslícelos
hacia arriba por las guías hasta sacarlos al tiempo que
oprime el botón de liberación.
2 Conexión de los altavoces.
Conectar el cable del altavoz derecho en los terminales
R, y el cable del altavoz izquierdo en los terminales L.
Conectar el cable del altavoz marcado con una línea
blanca punteada en el terminal 0 y el otro cable en el
terminal 9.
Control Remoto
Insertar dos pilas R6 (tamaño AA).
Cambiar las pilas cuando la distancia de funcionamiento del
control remoto sea inferior a 5 metros.
El control remoto pudiera no funcionar correctamente
en las situaciones siguientes:
- Cuando el aparato está expuesto a una fuerte luz, como la
luz directa del sol.
- Cuando hay objetos que obstruyen la señal del control
remoto hasta el aparato.
Alimentación
El indicador 6 STANDBY OPE/BATT se enciende mientras
se alimenta energía eléctrica al aparato.
Uso a Corriente Alterna de la Red
Conectar el cable de alimentación con se ilustra abajo.
PRECAUCIÓN
Usar sólo el cable de alimentación facilitado. El uso de otros
cables puede provocar un incendio.
Uso con Pilas
Abrir la tapa del compartimiento de las pilas situada en la
parte trasera e insertar ocho pilas R20 (tamaño D), no
incluidas, como se ilustra abajo. Luego cerrar la tapa.
Desconectar el cable de alimentación de la toma de
alimentación para conmutar entre alimentación de CA y a
pilas.
Cuando el indicador 6 STANDBY OPE/BATT se debilite, la
cinta pierda velocidad, el volumen disminuya, o el sonido se
distorsione durante la operación, reemplace las pilas.
Notas sobre las pilas
Observar lo siguiente para evitar daños causados por fugas
o explosiones:
• Insertar las pilas alineando correctamente las marcas 0 y
9.
• No mezclar diferentes tipos de pilas ni pilas usadas con
pilas nuevas.
• Cuando no vaya a utilizar la unidad durante un período
largo, extraiga las pilas.
• No recargar, calentar ni desarmar nunca las pilas.
• Sacar las pilas gastadas.
Si se producen fugas de electrólito en las pilas, limpiar bien
los residuos.
6STANDBY
OPE/BATT
R20 (D)
SPEAKERSS
R L
R6 (AA)
a la toma de CA del aparato
a un tomacorrientes
de la pared
(230 V CA, 50 Hz)
cable de alimentación facilitado
1
2
Botón de liberación

Ejemplo:
Para seleccionar el número 25, pulsar +10, +10 y 5.
Para seleccionar el número 10, pulsar +10 y 0.
Después de la escucha, pulsar POWER/6 STANDBY para
apagar el aparato.
NOTA
• No usar discos de formas irregulares (ejemplo:
octogonales, en forma de corazón, etc.).
Su uso puede producir errores de funcionamiento.
• No colocar más de un disco compacto dentro del
compartimiento del disco.
• No intentar abrir el compartimiento del disco durante la
reproducción.
• No tocar la lente. De hacerlo el aparato puede funcionar
incorrectamente.
REPRODUCCIÓN PROGRAMADA
Se puede programar la reproducción de hasta 30 pistas de
un disco.
1 En la modalidad de parada, mantener pulsado
*s STOP/MEMORY hasta que “M” parpadee en
la pantalla.
* o s en el control remoto
2 Pulsar r o t para seleccionar una pista y
pulsar después s STOP/MEMORY para
almacenarla en la memoria.
Selección de una pista con el control remoto
Pulsar los botones numéricos 0-9 y +10.
3 Repetir el paso 2 para programas otras pistas.
Para volver a la modalidad de parada en los pasos 1 a 3,
mantenga s oprimido.
4 Pulsar A para empezar la reproducción.
Para comprobar el programa, presionar r o t en la
modalidad de parada.
Para borrar el programa, pulsar s una vez en la modalidad
de parada de modo que “M” desaparezca de la pantalla.
Para cambiar las pistas programadas, borrar el programa
y repetir todos los pasos de nuevo.
1 Pulsar CD.
Se enciende el aparato y se enciende el indicador CD.
2 Pulsar PUSH OPEN para abrir el
compartimiento del disco. Colocar un disco
con el lado impreso hacia arriba y cerrar el
compartimiento.
Se indica en la pantalla el número total de pistas y el
tiempo total de reproducción. Se tardan
aproximadamente 15 segundos en grabar un disco
CD-RW.
3 Pulsar *A PLAY/PAUSE para empezar a
reproducir.
Se indica en la pantalla el número de la pista que se
está reproduciendo y el tiempo de reproducción desde
el principio de la pista.
* o c PLAY en el control remoto
s STOP/MEMORY – Interrumpe la reproducción.
*A PLAY/PAUSE – Pausa durante la reproducción.
Pulsarlo de nuevo para seguir reproduciendo el disco.
* o a PAUSE en el control remoto
r,t SKIP/SEARCH – Busca un punto particular
durante la reproducción. Mantener pulsado r o t
y soltarlo luego.
– Para saltar al principio de una pista, pulsar r o
t repetidamente.
*REPEAT/OSC/SLEEP
– Repite una pista o todas las pistas. Seleccionar como
sigue.
[ 1: Se repite la reproducción de una sola pista.
Seleccionar la pista con r o t.
[: Se repite la reproducción de todas las pistas.
* o REPEAT en el control remoto
Pulsar CD para empezar a reproducir cuando el
aparato está apagado. El aparato se enciende y se
empieza a reproducir el disco cargado (función de
reproducción directa).
Cuando se carga un disco mientras parpadea el indicador
CD en el paso 2, la reproducción empieza sin pulsar A.
Para seleccionar directamente una pista con el control
remoto, pulsar los botones numéricos 0-9 y +10. El CD
empieza a reproducirse desde la pista seleccionada y
continúa hasta el final del disco.
12 ESPAÑOL
PUSH OPEN
MANEJO DEL CD
A
REPEAT/
OSC/SLEEP
POWER/
6STANDBY/
TAPE,
RADIO, CD
AB
TUNING
PLAY/PAUSE
SKIP/SEARCH
STOP/MEMORY
LW
FM STEREO
FM MONO
MW
BAND
Número de la pista
Número de programación

I
D
En
F
E
NL
Pol
Hu
CZ
Utilizar solamente cintas de tipo I (normales).
INSERCIÓN DE UNA CINTA
Pulsar Z STOP/EJECT para abrir el portacasete e
insertar una cinta con el lado expuesto hacia abajo y el
lado que se va a reproducir encarado hacia afuera.
Empujar el portacasete para cerrarlo.
REPRODUCCIÓN DE CINTAS
Pulsar c PLAY mientras el aparato está apagado.
El aparato se enciende y empieza a reproducirse la cinta
que se ha insertado.
Durante el uso de la cinta se enciende el indicador TAPE y
se indica el nivel de volumen.
Z STOP/EJECT – Interrumpe la reproducción. El
aparato se apaga automáticamente.
a PAUSE – Hace una pausa en la reproducción. Pulsar
de nuevo para seguir reproduciendo.
f REW/g FF – Rebobina y avanza rápidamente la
cinta. Para cancelar la modalidad, pulsar Z STOP/
EJECT.
Reproducción continua
Después de finalizar la reproducción en la platina 2,
comenzará la reproducción en la platina 1 sin interrupción.
Para reproducir en la platina 1, cuando esté
reproduciéndose en la platina 2, presione a PAUSE y
luego c PLAY en la platina 1.
Cuando finalice la reproducción en la platina 2, a PAUSE
de la platina 1 quedará libre.
1 Pulsar RADIO.
Se enciende el aparato.
Se enciende el indicador RADIO y se indica el nivel de
volumen.
2 Seleccionar una banda (LW, MW o FM
STEREO) con BAND.
3 Sintonizar una emisora con TUNING.
Se indica STEREO durante la recepción de
programas de FM en estéreo.
Después de la escucha, pulsar POWER/6 STANDBY
para apagar el aparato.
Para mejorar la recepción
Cuando el programa de FM estéreo tenga ruidos o
interferencias
Seleccione FM MONO con BAND.
El ruido se reduce pero la recepción será monoaural.
Seleccione FM STEREO para restablecer la recepción en
estéreo.
*REPEAT/OSC/SLEEP
- Si se escucha un pitido agudo durante la grabación de
programas de MW o LW, pulsar repetidamente el botón
hasta que se atenúe el pitido.
- Si se oye un pitido agudo al escuchar la radio, pulsar
repetidamente el botón hasta que se reduzca el ruido.
* o MODE en el control remoto
NOTA
Cuando el aparato capte ruidos de otros aparatos
electrodomésticos situados cerca de él, como un televisor
o una lámpara fluorescente, aléjelo de ellos.
ESPAÑOL 13
0-9, +10
a PAUSE
REPEAT
MODE
c PLAY
B
F
UNCIONAMIENTO DEL SINTONIZADOR
C
REPRODUCCIÓN DE CINTAS
C
PAUSE
STOP/EJECT
FF
REWPLAY
PAUSE
STOP/EJECT
FF
REWPLAY
REC
2
1
3
Z
Platina 1
Platina 2
FM
Para una recepción óptima,
extienda la antena
telescópica y oriéntela.
MW, LW
La antena está dentro de la
unidad, oriente la unidad
para obtener una recepción
óptima.

• Utilizar solamente cintas de tipo I (normales).
• Tenga en cuenta que la grabación solamente se
realizará en una cara.
• Bobine la cinta hasta el punto donde puede grabarse.
GRABACIÓN DESDE UN CD O SINTONIZADOR
1 Inserte la cinta a grabar en la platina 1 con la
cara a grabar mirando hacia afuera.
2 Preparar la grabación desde la fuente de
sonido.
Para grabar desde un CD, pulsar CD y cargar un
disco.
Para grabar un programa de radio, pulsar RADIO y
sintonizar una emisora.
3 Pulsar w REC en la platina 1 para empezar a
grabar.
c PLAY se activa simultáneamente.
Cuando se ha seleccionado la función CD, la
reproducción del CD y la grabación empiezan
simultáneamente.
Grabación de las pistas seleccionadas del CD
1 Seguir los pasos 1 a 3 de REPRODUCCIÓN
PROGRAMADA, página 12, para programar las pistas.
2 Pulsar w REC.
Para dejar de grabar, pulsar Z STOP/EJECT de la
platina 1.
Pulsar s STOP/MEMORY para detener la reproducción
del CD.
Para hacer una pausa durante la grabación, pulsar a
PAUSE. Volver a pulsarlo para seguir grabando.
Para borrar una grabación, pulsar w REC de la platina 1
mientras el aparato está apagado.
Después de grabar, pulsar POWER/6 STANDBY para
apagar el aparato.
COPIA DE CINTAS
1 Pulsar POWER/6 STANDBY/TAPE para apagar
el aparato.
2 Insertar la cinta en la que se va a grabar en la
platina 1 con en lado a grabar encarado hacia
afuera.
3 Insertar la cinta desde la que se va a grabar en
la platina 2 con el lado que se va a reproducir
encarado hacia afuera.
4 Pulsar a PAUSE y luego presione w REC en la
platina 1 para poner la unidad en el modo de
grabación en pausa.
Se enciende el aparato.
c PLAY se activa simultáneamente.
5 Pulsar DUB SPEED para seleccionar la
velocidad de copiado.
Con el indicador HIGH-SPEED DUBBING encendido:
Duplicación a alta velocidad.
Con el indicador HIGH-SPEED DUBBING apagado:
Duplicación a velocidad normal.
6 Pulsar c PLAY en la platina 2.
Se desactiva a PAUSE de la platina 1 y se empieza a
grabar.
Para dejar de grabar, pulsar Z de la platina 1 y platina
2. El aparato se apagará automáticamente.
NOTA
Cuando grabe cerca de un televisor, la grabación podrá
contener ruidos. Alejar el aparato del televisor.
Para evitar el borrado accidental de la cinta, romper las
pestañas de plástico de la cinta con un destornillador u otro
artículo puntiagudo después de grabar.
Para volver a grabar en una cinta, cubrir los orificios de las
pestañas con cinta adhesiva, etc.
14 ESPAÑOL
GRABACIÓN
w REC
Z STOP/EJECT
a PAUSE
PHONES
MIC
MIC VOL
POWER/6STANDBY/TAPE,
RADIO, CD
VOLUME
QSOUND
DUB SPEED
c PLAY
ROCK, POP, JAZZ
Pestaña del
lado A
Lado A
2
3
1
Z
Platina 1

I
D
En
F
E
NL
Pol
Hu
CZ
ESPAÑOL 15
GENERAL
AJUSTE DEL SONIDO
VOLUME (volumen)
Pulsar VOLUME N o M. El nivel de volumen se indica
en la pantalla en forma numérica desde 0 hasta MAX (25).
• Cuando se apaga el aparato el nivel del volumen se
ajusta automáticamente en 14 si se ajustó en 15 ó más.
(excepto cuando se vuelve a encender el aparato
después de 4 segundos)
Presentación del nivel de volumen al seleccionar la
función CD
Pulsar VOLUME N o M. Se indica el nivel de volumen
durante 4 segundos.
También puede usarse DISPLAY en el control remoto.
Ecualizador de 3 modalidades
Oprima uno de los botones del ecualizador de 3
modalidades y se encenderá el indicador del ajuste
seleccionado. Oprima el ajuste seleccionado para cancelar
el ecualizador.
ROCK - Acentúa los tonos altos y bajos de la música.
POP - Acentúa los vocales y los tonos medios.
JAZZ - Acentúa los tonos bajos.
Cuando se utilice el mando a distancia, pulsar
repetidamente EQ hasta que se seleccione la modalidad
deseada.
La modalidad del ecualizador cambia a ROCK, POP, JAZZ
y sin ecualización cíclicamente.
Sistema QSOUND
Este sistema ofrece una rica área de sonido tridimensional
para fuentes estereofónicas.
Se disfrutará de un sonido más marcado.
Pulsar el botón QSOUND de modo que se encienda el
indicador QSOUND.
• QSOUND puede distorsionar el sonido a un volumen
alto. Reducir el volumen cuando ocurra esto.
MEZCLA MICROFONICA
Conecte un micrófono con miniclavija a la toma MIC y
reproduzca la música a mezclar.
Para grabar el sonido mezclado con el micrófono, inserte
una cinta en la platina 1 y presione w REC.
• Durante el copiado a alta velocidad, no podrá grabarse el
sonido de mezcla con micrófono.
MIC VOL – Ajusta el volumen del micrófono. Si se produce
un sonido de aullido, baje el volumen.
• Para evitar los aullidos, aleje el micrófono de los
altavoces. También se recomienda usar un micrófono de
tipo unidireccional.
Escucha con auriculares
Conectar unos auriculares con miniclavija estereofónica en
la toma PHONES.
Cuando se produzcan errores de indicación o
funcionamiento
Asegurarse de que no hay oprimido ningún botón de la
platina.
Pulsar s y POWER/6 STANDBY simultáneamente.
Si el aparato no se repusiera de la manera indicada,
desconectar el cable de alimentación y sacar todas las pilas
de modo que se apague la pantalla. Dejarlo en este estado
durante un rato y volver a conectar la energía eléctrica.
DISPLAY
EQ
Notas sobre discos CD-R/RW
• El aparato pudiera no reproducir un disco CD-R/RW
grabado en ordenadores personales o ciertos tipos de
grabadoras de CD-R/RW debido a diferencias en las
plataformas de grabación.
• No colocar sellos ni etiquetas en los lados (lado de
grabación y lado de la etiqueta) de los discos
reescribibles CD-R/RW. Hacerlo puede provocar
errores de funcionamiento.
• No cargue un disco CD-R/RW sin grabar. Se tardarán
aproximadamente 30 segundos en leer el disco. El
disco puede dañarse si se intenta abrir el
compartimiento del disco mientras éste se está
leyendo.

AJUSTE DEL TEMPORIZADOR DE DESCONEXIÓN
El aparato puede apagarse automáticamente a una hora
designada.
1 Mantenga oprimido REPEAT/OSC/SLEEP
hasta que parpadee “10” en la pantalla.
2 Antes de que pasen 4 segundos, pulsar r o
t para especificar el tiempo hasta la
desconexión del aparato.
Cada vez que se pulsa, el tiempo cambia entre 10 y 90
minutos en pasos de 10 minutos.
Comprobación del tiempo restante hasta la
desconexión
Repetir el paso 1 anterior. El tiempo restante se indica
durante un espacio de 4 segundos.
Cancelación del temporizador de desconexión
Indicar el pantalla el tiempo restante y pulsar
repetidamente r o t hasta que se indique OFF.
NOTA
c de la platina no se desactiva cuando el aparato se
apaga durante la reproducción de una cinta. Pulsar Z
para desactivar c.
GENERAL
USO DEL MANDO A DISTANCIA
Los botones del control remoto y del aparato principal con
indicaciones idénticas tienen las mismas funciones.
Para encender el aparato
Pulsar POWER de modo que se encienda la pantalla.
Este botón no enciende el aparato cuando se utiliza con las
pilas.
Para apagarlo
Pulsar POWER de modo que se apague la pantalla.
Este botón no apagará el aparato cuando se haya pulsado
uno de los botones de la platina.
Uso del selector FUNCTION
Cuando el aparato está encendido, cada vez que se pulsa
FUNCTION se seleccionan cíclicamente las funciones.
* aplicable cuando se ha pulsado uno de los botones de la
platina
16 ESPAÑOL
r, t
REPEAT/OSC/SLEEP
POWER
FUNCTION
CD RADIO *TAPE
Hora especificada Cuando el temporizador de
desconexión está activado,
parpadea el punto.

I
D
En
F
E
NL
Pol
Hu
CZ
ESPAÑOL 17
Mantenimiento
Limpieza del cuerpo del aparato
Usar un paño suave ligeramente humedecido con una
solución de detergente suave. No utilizar solventes
fuertes como alcohol, bencina o diluyente.
Limpieza de las cabezas
Cuando las cabezas están sucias,
- no se reproducen sonidos de altas frecuencias
- el sonido no es adecuadamente alto
- el sonido se desequilibra
- no se pueden borrar cintas
- no se pueden grabar cintas
Limpiar las cabezas de la cinta con una casete
limpiadora cada 10 horas de utilización.
Utilizar casetes limpiadoras de tipo seco o húmedo de
venta en comercios.
Consultar las instrucciones de la casete limpiadora para
más detalles.
Limpieza de la lente
Utilizar un bastoncillo de
algodón ligeramente
humedecido con fluido
limpiador. Frotar suavemente
desde el centro hacia el borde.
Especificaciones
Sección del sintonizador
Gama de frecuencias, antena – FM: 87,5 - 108,0 MHz, antena de varilla,
MW: 530 - 1.605 kHz, antena de barra de ferrita, LW: 150 - 285 kHz,
antena de barra de ferrita
Sección de la platina
Formato de pistas – 4 pistas, 2 canales / Gama de frecuencias – Cinta
normal: 50 - 12.000 Hz (EIAJ) / Sistema de grabación – Polarización de
CA / Sistema de borrado – Borrado magnético / Cabezas — Platina 1: 1
de grabación/reproducción, 1 de borrado; Platina 2: 1 de reproducción
Sección del lector de CD
Disco – Disco compacto / Método de lectura – Lector óptico sin contacto
(láser de semiconductor) / Velocidad de rotación — Aprox. 500 - 200
rpm/CLV / Corrección de error — Interpolación cruzada, Reed, Código
Solomon / Número de canales — 2 canales / Conversión D/A — 1 bit
DAC
General
Alimentación – 12 V CC usando ocho pilas de tamaño D (R20), 230 V
CA, 50 Hz / Dimensiones (an × al × pr) — 260 × 247 × 260 mm / Peso —
3,3 kg (sin pilas)
Potencia — 5 W + 5 W (potencia musical DIN), 4,5 W + 4,5 W (EIAJ 3,2
ohmios, DAT 10%), 3,3 W + 3,3 W (DIN 1% de la potencia nominal) /
Consumo de energía — 24 W
Accesorios – 1 cable de alimentación, 1 control remoto
Altavoces
Tipo — Tipo cónico de 120 mm / Dimensiones (an × al × pr) — 184 ×
235 × 240 mm / Peso — 1,3 kg × 2 aprox.
Impedancia — 3,2 ohms / Capacidad máxima permitida — 7 W
Las especificaciones y el aspecto externo están sujetos a cambio sin
previo aviso.
COPYRIGHT
Rogamos compruebe las leyes sobre “copyright” relacionadas con la
grabación de discos, programas de radio o cintas externas vigentes
en el país en el que se va a utilizar este aparato.
Lente

18 FRANÇAIS
Precautions
Lire attentivement et entièrement toutes les instructions d’emploi
avant d’utiliser cet appareil. Garder le Mode d’emploi à portée de
main pour future référence. Toutes les mises en garde et tous les
avertissements se trouvant dans le Mode d’emploi ou sur l’appareil
doivent être strictement observées tout comme les conseils de
sécurité suivants.
Installation
1 Eau et humidité - Ne pas utiliser cet appareil en milieu humide,
à proximité d’une baignoire, d’un lavabo, d’un évier de cuisine,
d’un bac à lessive, dans un sous-sol humide, près d’une piscine
ou autre.
2 Chaleur - Ne pas utiliser cet appareil près d’une source de
chaleur, à proximité d’une bouche de chauffage, d’un radiateur
ou de tout autre système producteur de chaleur. Ne pas exposer
l’appareil à des températures inférieures à 5°C (41°F) ou
supérieures à 35°C (95°F).
3 Surface - Placer l’appareil sur une surface plane et uniforme.
4 Ventilation - Prévoir un espace suffisant autour de cet appareil
pour en assurer la bonne ventilation. Prévoir un espace de 10 cm
à l’arrière et en haut de l’appareil et de 5 cm de chaque côté.
- Ne pas poser l’appareil sur un lit, un tapis ou toute autres
surface similaire risquant d’en obturer les ouvertures
d’aération.
- Ne pas installer l’appareil dans un meuble bibliothèque ou dans
un rangement clos où l’aération risque d’être insuffisante.
5 Objets et liquides - Prendre toutes les précautions nécessaires
pour éviter l’entrée de corps étrangers ou de liquides par les
ouvertures d’aération.
6 Chariots et étagères - Si l’appareil est monté ou installé sur un
chariot ou une étagère, attention pendant les déplacements.
L’appareil peut tomber ou le chariot peut se renverser en cas
d’arrêt brusque, de force excessive ou de surface inégale.
7 Condensation - De la condensation risque de se produire sur la
lentille de lecture du CD quand:
- l’appareil est transporté d’un lieu froid dans un lieu chaud.
- le chauffage vient d’être mis en service.
- l’appareil se trouve dans une pièce très humide.
- l’appareil est à proximité d’un climatiseur.
En cas de condensation d’humidité à l’intérieur de l’appareil, le
fonctionnement risque de ne pas s’opérer normalement. Le cas
échéant, attendre quelques heures avant d’essayer à nouveau.
8 Montage mural ou au plafond - Ne pas monter cet appareil sur
un mur ou un plafond sauf spécification dans le Mode d’emploi.
Alimentation électrique
1 Sources d’alimentation - Faites fonctionner l’appareil sur piles
ou sur le courant secteur, comme spécifié dans le mode d’emploi
et conformément aux instructions indiquées sur l’appareil.
2 Câble d’alimentation ca
- Pour débrancher le câble d’alimentation électrique ca, tirer sur
la prise. Ne jamais tirer sur le câble lui-même.
- Ne jamais manipuler un câble électrique avec des mains
humides sous peine de risque d’incendie ou d’électrocution.
- Fixer soigneusement les câbles d’alimentation électrique pour
les protéger de tout dégât éventuel. Faire particulièrement
attention au câble reliant l’appareil à la prise secteur.
- Eviter de surcharger la prise secteur et les cordons de rallonge
au-delà de leur capacité car cela pourrait provoquer un feu ou
un choc électrique.
3 Périodes de non utilisation - Si vous ne prévoyez pas d’utillser
l’appareil pendant au moins plusieurs mois, débranchez le
cordon d’alimentation secteur de la prise secteur ou enlevez
toutes les piles. Lorsque le cordon est branché, l’appareil
continue de recevoir une petite quantité de courant, même s’il est
hors tension.
Entretien
Nettoyer l’appareil en procédant uniquement comme indiqué dans le
Mode d’emploi.
Dégâts demandant des réparations
Faire réparer l’appareil par un technicien qualifié si:
- Le câble ou la prise d’alimentation électrique est détérioré.
- Un objet ou du liquide a pénétré à l’intérieur de l’appareil.
- L’appareil a été exposé à la pluie ou à l’eau.
- L’appareil ne fonctionne pas normalement.
- L’appareil fait montre d’un changement radical de performance.
- L’appareil est tombé ou le coffret est détérioré.
NE PAS TENTER DE REPARER L’APPAREIL SOI-MEME.
ATTENTION
L’utilisation de commandes, réglages ou procédures autres que ceux
spécifiés peut entraîner une dangereuse exposition aux radiations.
Ce lecteur de disques compacts est classifié comme un appareil
LASER CLASSE 1.
L’étiquette CLASS 1 LASER PRODUCT se trouve sur l’extérieur.
CLASS 1
KLASSE 1
LUOKAN 1
KLASS 1
LASER
LASER
LASER
LASER
PRODUCT
PRODUKT
LAITE
APPARAT
ATTENTION!
Radiation laser invisible en cas d’ouverture et
de déverrouillage. Eviter toute exposition au
faisceau.
AVERTISSEMENT
POUR REDUIRE LE RISQUE D’INCENDIE
OU DE CHOC ELECTRIQUE, NE PAS
EXPOSER CET APPAREIL A LA PLUIE OU A
L’HUMIDITE.
REMARQUE
AIWA CO. LTD. - JAPON - DECLARE SOUS SA PROPRE
RESPONSABILITE QUE LE PRODUIT DECRIT DANS
LE PRESENT MANUEL EST CONFORME AUX
DIRECTIVES DU D.M. Nº 548 DU 28.08.95,
CONFORMEMENT AUX DISPOSITIONS DU
PARAGRAPHE 3 DE L’ANNEXE A DU D.M. DU 25.06.85
ET AU PARAGRAPHE 3 DE L’ANNEXE 1 DU D.M. DU
27.08.87 (REGLEMENTATIONS SUR LES
FREQUENCES).
Les informations ci-dessus ne concernent que l’Italie.
ATTENTION
POUR REDUIRE LE RISQUE DE CHOC
ELECTRIQUE, NE PAS ENLEVER LE
COUVERCLE (NI LE DOS).
CET APPAREIL NE CONTIENT PAS DE PIECES
REPARABLES PAR L’UTILISATEUR. POUR
TOUTE REPARATION, S’ADRESSER A UNE
PERSONNE QUALIFIEE.
CAUTION
RISK OF ELECTRIC SHOCK
DO NOT OPEN

I
D
En
F
E
NL
Pol
Hu
CZ
Raccordements
IMPORTANT
• Bien s’assurer que le cordon secteur est débranché et les
piles retirées avant de raccorder les enceintes.
• Ne pas raccorder d’autres enceintes que celles qui sont
fournies.
1 Installer les enceintes.
Pour coupler les enceintes à l’appareil, glisser chaque
enceinte vers le bas dans les étriers de guidage de
l’appareil central jusqu’à ce qu’elles arrivent au même
niveau que l’appareil.
Pour détacher les enceintes de l’appareil, glisser les
enceintes vers le haut jusqu’à les sortir, tout en
appuyant sur le bouton de dégagement des enceintes.
2 Raccorder les enceintes.
Raccorder le cordon de l’enceinte droite aux bornes R,
et celui de l’enceinte gauche aux bornes L.
Raccorder le cordon d’enceinte avec la ligne blanche
discontinue à 0 et l’autre cordon à 9.
Télécommande
Insérer deux piles R6 (taille AA).
Quand la portée du signal de télécommande est inférieure à
5 mètres, remplacer les piles.
La télécommande peut ne pas fonctionner correctement
si :
- L’appareil est exposé à une lumière vive, par exemple les
rayons du soleil.
- Des objets bloquent la transmission du signal de
télécommande à l’appareil.
Alimentation
L’indicateur 6 STANDBY OPE/BATT s’allume lorsque le
courant électrique circule dans l’appareil.
Alimentation sur le Secteur
Raccorder le cordon secteur comme indiqué ci-dessous.
ATTENTION
Utiliser exclusivement le cordon secteur fourni. L’utilisation
d’autres cordons risque de provoquer un feu.
Alimentation sur Piles
Ouvrir le couvercle du logement des piles au dos de
l’appareil et insérer huit piles R20 (taille D), non fournies,
comme indiqué ci-dessous. Puis, refermer le couvercle.
Pour passer de l’alimentation sur secteur à
l’alimentation sur piles, débrancher le cordon secteur de la
prise secteur.
Lorsque l’indicateur 6 STANDBY OPE/BATT devient
sombre, que la vitesse du ruban magnétique ralentit, que le
volume diminue ou que le son est déformé pendant le
fonctionnement, remplacer les piles.
Remarques sur les piles
Pour éviter tout risque de fuite ou d’explosion, observer les
points suivants :
• Insérer les piles en respectant les polarités 0 et 9.
• Ne pas mélanger des piles de type différent ni des piles
neuves avec des piles ayant déjà servi.
• Si l’appareil doit rester longtemps inutilisé, sortir les piles.
• Ne jamais recharger, chauffer ni démonter les piles.
• Retirer les piles mortes.
Si l’électrolyte des piles fuit, bien essuyer pour nettoyer.
FRANÇAIS 19
6STANDBY
OPE/BATT
R20 (D)
SPEAKERSS
R L
FRANÇAIS 19
R6 (AA)
Bouton de dégagement
1
2
vers la prise AC de l’appareil
vers la prise secteur
(CA 230 V, 50 Hz)
Cordon secteur fourni

Exemple :
Pour sélectionner le numéro 25, appuyer sur +10, +10 et 5.
Pour sélectionner le numéro 10, appuyer sur +10 et 0.
Lorsque l’écoute est terminée, appuyer sur POWER/
6 STANDBY pour mettre l’appareil hors tension.
REMARQUE
• Ne pas utiliser de disques de forme irrégulière (par
exemple en forme de coeur, octogonale, etc.).
Cela risque de provoquer une anomalie.
• Ne pas mettre plus d’un disque compact dans le tiroir.
• Ne pas ouvrir le tiroir du disque pendant la lecture.
• Ne pas toucher la lentille. Cela risque de provoquer une
anomalie.
LECTURE PROGRAMMÉE
Il est possible de programmer un maximum de 30 plages du
disque.
1 En mode d’arrêt, continuer à appuyer sur
*s STOP/MEMORY jusqu’à ce que “M”
clignote sur l’affichage.
* ou s sur la télécommande
2 Appuyer sur r ou t pour sélectionner une
plage, puis appuyer sur s STOP/MEMORY
pour la mémoriser.
Pour sélectionner une plage avec la télécommande
Appuyer sur les touches numériques 0-9 et +10.
3 Recommencer l’opération 2 pour programmer
les autres plages.
Pour revenir au mode d’arrêt aux étapes 1 à 3, maintenir
s enfoncé.
4 Appuyer sur A pour démarrer la lecture.
Pour vérifier le programme, appuyer sur r ou t en
mode d’arrêt.
Pour effacer le programme, appuyer une fois sur s en
mode d’arrêt de façon que “M” disparaisse de l’afficheur.
Pour modifier les plages programmées, effacer le
programme et recommencer depuis le début.
1 Appuyer sur CD.
L’appareil se met sous tension et l’indicateur CD
s’allume.
2 Appuyer sur PUSH OPEN pour ouvrir le tiroir
du disque. Mettre un disque avec la face
imprimée orientée vers le haut et refermer le
tiroir du disque.
Le nombre total de plages et la durée de lecture totale
s’affichent. Cela prendra environ 15 secondes lors du
chargement d’un CD-RW.
3 Appuyer sur *A PLAY/PAUSE pour
démarrer la lecture.
Le numéro de la plage en cours de lecture et le temps
de lecture écoulé s’affichent.
* ou c PLAY sur la télécommande
s STOP/MEMORY – Arrête la lecture.
*A PLAY/PAUSE – Interrompt la lecture. Pour
reprendre la lecture, appuyer à nouveau.
* ou a PAUSE sur la télécommande
r,t SKIP/SEARCH – Pour rechercher un passage
particulier au cours de la lecture. Appuyer sur r ou
t puis la relâcher le moment venu.
– Saute au début d’une plage. Appuyer de façon
répétée sur r ou t.
*REPEAT/OSC/SLEEP
– Répète une seule plage ou toutes les plages. Régler
comme suit:
[ 1: Une seule plage est lue de façon répétée.
Sélectionner la plage avec r ou t.
[: Toutes les plages sont lues de façon répétée.
* ou REPEAT sur la télécommande
Pour démarrer la lecture lorsque l’appareil est hors
tension, appuyer sur CD. L’appareil se met sous tension et
la lecture du disque chargé démarre (fonction de lecture
directe).
Si l’on charge un disque pendant que l’indicateur CD
clignote au point 2, la lecture démarre sans qu’il soit
nécessaire d’appuyer sur A.
Pour sélectionner une plage directement avec la
télécommande, appuyer sur les touches numériques 0-9
et +10. La lecture du CD démarre à la plage sélectionnée
et elle se poursuit jusqu’à la dernière plage.
FONCTIONNEMENT DU DISQUE COMPACT
A
REPEAT/
OSC/SLEEP
POWER/
6STANDBY/
TAPE,
RADIO, CD
AB
TUNING
PLAY/PAUSE
SKIP/SEARCH
STOP/MEMORY
LW
FM STEREO
FM MONO
MW
BAND
PUSH OPEN
20 FRANÇAIS
Numéro de plage
Numéro programmé
Seite wird geladen ...
Seite wird geladen ...
Seite wird geladen ...
Seite wird geladen ...
Seite wird geladen ...
Seite wird geladen ...
Seite wird geladen ...
Seite wird geladen ...
Seite wird geladen ...
Seite wird geladen ...
Seite wird geladen ...
Seite wird geladen ...
Seite wird geladen ...
Seite wird geladen ...
Seite wird geladen ...
Seite wird geladen ...
Seite wird geladen ...
Seite wird geladen ...
Seite wird geladen ...
Seite wird geladen ...
Seite wird geladen ...
Seite wird geladen ...
Seite wird geladen ...
Seite wird geladen ...
Seite wird geladen ...
Seite wird geladen ...
Seite wird geladen ...
Seite wird geladen ...
Seite wird geladen ...
Seite wird geladen ...
Seite wird geladen ...
Seite wird geladen ...
Seite wird geladen ...
Seite wird geladen ...
Seite wird geladen ...
Seite wird geladen ...
Seite wird geladen ...
Seite wird geladen ...
Seite wird geladen ...
Seite wird geladen ...
Seite wird geladen ...
Seite wird geladen ...
Seite wird geladen ...
Seite wird geladen ...
Seite wird geladen ...
Seite wird geladen ...
Seite wird geladen ...
Seite wird geladen ...
Seite wird geladen ...
Seite wird geladen ...
Seite wird geladen ...
Seite wird geladen ...
Seite wird geladen ...
Seite wird geladen ...
-
 1
1
-
 2
2
-
 3
3
-
 4
4
-
 5
5
-
 6
6
-
 7
7
-
 8
8
-
 9
9
-
 10
10
-
 11
11
-
 12
12
-
 13
13
-
 14
14
-
 15
15
-
 16
16
-
 17
17
-
 18
18
-
 19
19
-
 20
20
-
 21
21
-
 22
22
-
 23
23
-
 24
24
-
 25
25
-
 26
26
-
 27
27
-
 28
28
-
 29
29
-
 30
30
-
 31
31
-
 32
32
-
 33
33
-
 34
34
-
 35
35
-
 36
36
-
 37
37
-
 38
38
-
 39
39
-
 40
40
-
 41
41
-
 42
42
-
 43
43
-
 44
44
-
 45
45
-
 46
46
-
 47
47
-
 48
48
-
 49
49
-
 50
50
-
 51
51
-
 52
52
-
 53
53
-
 54
54
-
 55
55
-
 56
56
-
 57
57
-
 58
58
-
 59
59
-
 60
60
-
 61
61
-
 62
62
-
 63
63
-
 64
64
-
 65
65
-
 66
66
-
 67
67
-
 68
68
-
 69
69
-
 70
70
-
 71
71
-
 72
72
-
 73
73
-
 74
74


Aiwa CA-DW257 EZS Benutzerhandbuch
- Kategorie
- CD-Spieler
- Typ
- Benutzerhandbuch
- Dieses Handbuch eignet sich auch für
in anderen Sprachen
- English: Aiwa CA-DW257 EZS User manual
- français: Aiwa CA-DW257 EZS Manuel utilisateur
- español: Aiwa CA-DW257 EZS Manual de usuario
- italiano: Aiwa CA-DW257 EZS Manuale utente
- Nederlands: Aiwa CA-DW257 EZS Handleiding
- polski: Aiwa CA-DW257 EZS Instrukcja obsługi
- čeština: Aiwa CA-DW257 EZS Uživatelský manuál
Verwandte Artikel
Andere Dokumente
-
Yamaha CC-50 Benutzerhandbuch
-
-
JVC RC-ST1BK Benutzerhandbuch
-
-
-
-
-
-
Panasonic RXM40DE Bedienungsanleitung
-
Sony TCM-323 Benutzerhandbuch