
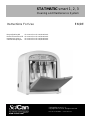
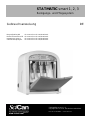
STATMATIC smart 1, 2, 3
Cleaning and Maintenance System
www.scican.com
STATMATIC smart 1, 2, 3
Copyright 2017 SciCan. All rights reserved.
Doc. No. 2.001.8462 – Rev. 2017-11
Instructions For Use EN/DE
Brugsvejledning DK via: www.scican.uk.com/downloads
Manuel d'instructions FR via: www.scican.uk.com/downloads
Istruzioni per l’uso IT via: www.scican.uk.com/downloads
Gebruiksaanwijzing NL via: www.scican.uk.com/downloads

Table of Contents
Page 2
STATMATIC smart 1,2,3 EN
1 Important Information .................................................. 3
Type description .......................................................... 3
Scope of delivery ........................................................ 3
General ....................................................................... 3
Intended use ............................................................... 4
Disposal ...................................................................... 4
Qualifications of the operator ...................................... 5
Safety Notes SciCan "Dental Oil" and SciCan
"Cleaner" ..................................................................... 5
Used symbols ............................................................. 5
Disclaimer ................................................................... 6
Device overview .......................................................... 7
2 Commissioning ........................................................... 9
Environmental conditions ............................................ 9
Electrical Requirements .............................................. 9
Media connections ...................................................... 9
Filling the media system ............................................10
Setting the language ..................................................10
Setting the date/time ..................................................11
Assemble and check the adapter ...............................11
Functional testing of flow rate using the testing
adapter .......................................................................11
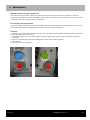
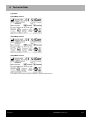
3 Operation ...................................................................12
Manual pre-cleaning of instruments ...........................12
"Cleaning + Maintenance" program - for regular and
contra-angle handpieces and turbines .......................12
"Collet care" program .................................................12
"Maintenance only" program - for regular and
contra-angle handpieces and turbines .......................13
"Clean only" program - for regular and contra-angle
handpieces and turbines ............................................13
"Special instrument" program .................................... 15
4 Maintenance .............................................................. 16
Checking adapter fixation .......................................... 16
Checking the O-rings ................................................. 16
Functional testing of flow rate using the testing
adapter ...................................................................... 16
Changing the adapter ................................................ 16
Refilling of the media containers ............................... 17
Replacing the absorption pads .................................. 18
Empty the collecting tray ........................................... 18
Inside cleaning and disinfection of the maintenance
area ........................................................................... 18
Outside cleaning and outside disinfection of the
device ........................................................................ 18
Recommendation ...................................................... 18
Note for users in countries with a legal validation
requirement ............................................................... 18
Data backup of the log file ......................................... 19
Deletion of the log file on the STATMATIC smart ...... 19
Emptying the media system ...................................... 19
Warning message: Servicing required soon .............. 20
Error message: Servicing required ............................ 20
Transport ................................................................... 20
5 Troubleshooting ......................................................... 21
Replacing fuses ......................................................... 22
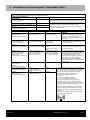
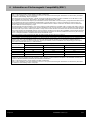
6 Information on Electromagnetic Compatibility (EMC) 23
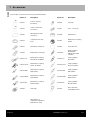
7 Accessories ............................................................... 25
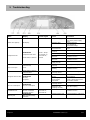
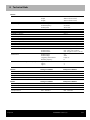
8 Technical Data .......................................................... 26
Type plate .................................................................. 27
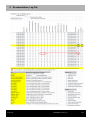
9 Documentation, Log File............................................ 28
10 Guarantee ................................................................. 29
STATMATIC PLUS is a trademark; OPTIM and STATIM are registered
trademarks of SciCan Ltd. All other trademarks referred to in this manual are the
property of their respective owners.
SciCan GmbH
Wangener Strasse 78
88299 Leutkirch, GERMANY
Phone:
+49-7561-98343-0
Fax:
+49-7561-98343-699
SciCan Ltd.
1440 Don Mills Road
Toronto, ON M3B 3P9, CANADA
Phone:
+1-416-445-1600
Fax:
+1-416-445-2727
Toll free:
+1-800-667-7733
E-mail:
SciCan Medtech AG
Manufactured by:
Alpenstrasse 14
6300 Zug, SWITZERLAND
SycoTec GmbH & Co. KG
Phone:
+41-41-727-70-27
Wangener Strasse 78
Fax:
+41-41-727-70-29
88299 Leutkirch
SciCan Inc.
GERMANY
701 Technology Drive
Phone:
+49 7561 86-0
Canonsburg, PA 15317, USA
Fax:
+49 7561 86-266
Phone:
+1-724-820-1600
Fax:
+1-724-820-1479

1 Important Information
Page 3
STATMATIC smart 1,2,3 EN
1 Important Information
Congratulations on purchasing a STATMATIC smart. We are convinced that you have acquired the best product of its
kind. The STATMATIC smart is a compact cleaning and maintenance system that can satisfy all your needs and
expectations regarding the cleaning and maintenance of instruments thanks to its diverse programs and capabilities.
This instruction manual contains all details on the installation, operation and maintenance of your STATMATIC smart
system. In order to guarantee many years of safe and problem-free operation, you should read the instructions prior to
commissioning the device and store them for future reference.
The instructions for the operation, maintenance and replacement of replacement parts must be followed so that the
device can function properly. The content of this instruction manual may change without notice in order to reflect
changes and improvements to the STATMATIC smart system.
Type description
The STATMATIC smart is manufactured in 3 different versions.
STATMATIC smart Type 1 is equipped with a DIN EN ISO 3964 coupling, which is operated by a motor as well as
2 neutral couplings that can be individually equipped with the required turbine adapters (see "Accessories" section).
STATMATIC smart Type 2 is equipped with two DIN EN ISO 3964 couplings, which are operated by a motor as well as
1 neutral coupling that can be individually equipped with the required turbine adapter (see "Accessories" section).
STATMATIC smart Type 3 is equipped with three DIN EN ISO 3964 couplings, which are operated by a motor.
Scope of delivery
Base STATMATIC smart unit
Power supply connection cable
Instructions for use
Absorption pad (set)
Compressed air hose
SciCan "Dental Oil" (250 ml)
SciCan "Cleaner" (500 ml)
O-Ring Set
2 seal plugs (red) for media container
USB stick (2 GB)
General
The STATMATIC smart has been developed and manufactured in accordance with the most recent quality and safety
standards.
However, some precautions should be taken during installation and operation.
• Disconnect the STATMATIC smart system from the power supply when leaving the practice for a longer period of time.
• Protect the STATMATIC smart from temperatures above 50°C.
• Any changes or modifications made by a third party will invalidate the warranty as well as operating certification.
• Only use original replacement parts for operation or repair, as these have been tested extensively for safety, function
and specific suitability. SciCan therefore also assumes any product responsibility for these parts and components.
• Observe all warnings on the device and in the instructions for use.
• The device may only be supplied with the voltage indicated on the type plate.
• The power cable must not be replaced by a weak or underpowered power cable.
• Operators are not allowed to perform maintenance on the unit in other respects than those stated in the instruction
manual.
• Medical gloves have to be worn during commissioning, operation and maintenance of the device.
• The device may only be operated with original SciCan "Cleaner", SciCan "Dental Oil" and accessories.
• Prior to transport or before prolonged periods of standstill (> 30 days), the containers for cleaner and dental oil must be
emptied.
• The operator must make sure that the device is in the proper operating condition prior to using the device as well as
confirm its functional safety.
• A damaged device or a device with a damaged power cable has to be disconnected from the mains immediately.
Operating the device is not permitted in this case.
• The device may only be operated inside buildings and areas that are not subject to explosive hazards.
• Never open the protective housing of the device or insert objects through the openings of the protective housing.

1 Important Information
Page 4
STATMATIC smart 1,2,3 EN
Intended use
• The STATMATIC smart is a cleaning and maintenance system used for the machine-based treatment (internal cleaning
and maintenance) of dental turbines as well as regular and contra-angle handpieces.
• Refer to the manufacturer instructions for further information on the suitability of certain instruments for cleaning and
maintenance purposes.
The STATMATIC smart treatment is restricted to the internal cleaning of the instruments. The outer surfaces of the
instruments have to be cleaned manually or using machines prior to any internal cleaning. Following treatment with the
cleaning and maintenance system, continue treating the instrument immediately afterwards and in accordance with the
manufacturer's instructions.
NOTE: For all preceding and subsequent processing steps, the RKI guidelines as well as the Medical Products Law must
be observed (applicable only for Germany).
Misuse
All applications not listed as part of the intend use constitute a case of misuse and may lead to damage to the device and
the medical products to be reprocessed and/or a potential danger to the operator himself. SciCan shall accept no liability
in such an event.
Disposal
Consumables
Any waste resulting from use of the device have to be disposed of or recycled without presenting a danger to human
beings or the environment while existing national regulations must also be observed in this regard.
Devices and accessories after use
Based on EU Directive (WEEE 2012/19/EU) on waste electrical and electronic equipment we hereby inform you that this
product is subject to the aforementioned directive and must be disposed of through special channels.
Contact the manufacturer or dental supply shop for further information.
This product must be disposed of or recycled without presenting a danger to human beings or the environment while
existing national regulations must also be observed in this regard.

1 Important Information
Page 5
STATMATIC smart 1,2,3 EN
Qualifications of the operator
The STATMATIC smart system may only be used by trained personnel, including dentists and their assistants who have
been instructed in the use of this product.
Safety Notes SciCan "Dental Oil" and SciCan "Cleaner"
First-Aid-Measures - Dental oil
General information
Never give any oral medication to unconscious persons or persons suffering from
cramps. Move the person to safety
When inhaled
Bring the person to the fresh air and provide unobstructed breathing
Contact with skin
Wash with plenty of water. Immediately changed out of contaminated clothes. Medical
treatment required
Contact with eyes
Immediately, carefully and thoroughly rinse with eye-bath or water. Consult an eye
specialist in case of eye irritation.
When swallowed
Vomiting may pose a danger of aspiration. Immediately rinse the mouth and drink
plenty of water. Induce vomiting if the person is conscious. Medical treatment
required.
Fire-fighting measures
The product is not flammable.
First-Aid-Measures - Cleaner
General information
Never give any oral medication to unconscious persons or persons suffering from
cramps. Move the person to safety
When inhaled
Provide fresh air.
Contact with skin
Wash with plenty of water. Change out of contaminated clothing.
Contact with eyes
Immediately, carefully and thoroughly rinse with eye-bath or water.
When swallowed
Immediately rinse the mouth and drink plenty of water.
Fire-fighting measures
The product is not flammable.
Used symbols
In the manual:
On the device:
A potential danger to the operator
LED ready to operate
CE marking
A situation that may lead to a
mechanical defect
LED error
Fuse
Important information
Manufacturer
Follow instruction
manual
Instructions for disposal
VDE certification mark
MET certification
mark
Wear medical gloves
Program selection /
selection up
Menu / select / save
Start program /
selection down
Collet care /
back
USB port

1 Important Information
Page 6
STATMATIC smart 1,2,3 EN
Disclaimer
The installation of replacement parts, maintenance and upkeep may only be carried out by authorized personnel.
SciCan assumes no liability whatsoever for coincidental, special or consequential damage resulting from upkeep or
maintenance of the STATMATIC smart carried out by third parties or for the use of equipment or individual parts
manufactured by third parties, including loss of profits, commercial losses of any kind, financial losses or losses due to
the injury of persons.
Never remove the rear panel of the device and never insert any objects through the holes or openings on the housing.
Noncompliance may result in damage to the device and/or danger to the operator.

1 Important Information
Page 7
STATMATIC smart 1,2,3 EN
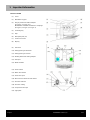
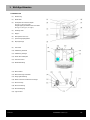
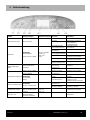
Device overview
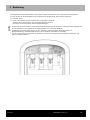
(1) Cover
(2) Membrane keypad
(3) Plug-in position for turbine adapter
(2x Type 1 / 1x Type 2) or
INTRAmatic ISO 3964 maintenance couplings
(3x Type 3 / 2x Type 2 / 1x Type 1)
(4) Collecting tray
(5) Flap
(6) Absorption pad (2x)
(7) Collet care nozzle
(8) Display
(9) USB stick
(10) Filling opening for dental oil
(11) Filling opening for cleaner
(12) Holding bracket for testing adapter
(21) USB port
(22) Media aeration
(13) Power switch
(14) Mains fuse drawer
(15) Power line input
(16) Drain hose for dental oil and cleaner
(17) Pressure indicator
(18) Pressure setting
(19) Compressed air input
(20) Type plate

1 Important Information
Page 8
STATMATIC smart 1,2,3 EN
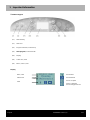
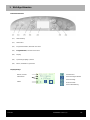
Membrane keypad
(L1)
LED stand-by
(L2)
LED error
(S1)
Program selection / selection up
(S2)
Start program / selection down
(D1)
Display
(S3)
Collet care / back
(S4)
Menu / select / save
Display
Date / Time Slot number
Status lines Slot is finished
Slot is occupied
Slots
Frame is flashing:
Slot is being processed

2 Commissioning
Page 9
STATMATIC smart 1,2,3 EN
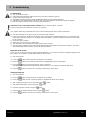
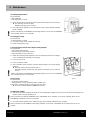
2 Commissioning
Environmental conditions
There are a number of factors that can influence the performance of your STATMATIC smart system. Please
consider these factors carefully and choose a suitable location for installing the device.
• Temperature and air humidity
Do not set up your STATMATIC smart system at a location where it is exposed to direct sunlight or a heat source
(for example a heater). The recommended operating temperature lies between 5 and 35°C with air humidity
between 25 and 85%.
• Environment
The STATMATIC smart should be operated in a clean, dust-free and well-ventilated environment.
• Work surface
The STATMATIC smart should be installed on a flat, level and water-resistant as well as oil-resistant surface. Do
not install or operate your unit on a sloped surface.
• Electromagnetic environment
The STATMATIC smart has been tested for electromagnetic emissions and meets the decisive standards. While
the product itself emits no radiation, it can be influenced by other radiating devices. We therefore recommend that
you keep the device away from potential sources of interference.
Electrical Requirements
DANGER! Mortal danger with improper handling of power sources! Danger of electrical shock
• For connection to the mains, use a properly grounded and secure socket providing the stated voltage (see type
plate on the back of the STATMATIC smart).
• Avoid using multiple sockets. When using power bars with surge protection, always connect only a single device.
• The mains input connector on the back of the device is to be used as a separator from the power supply.
Media connections
Plug the mains plug into the socket.
Attach the compressed air hose to the coupling and tighten.
The set pressure should be between 4.5 bar and 4.3 bar!
In the event of a deviating display, pull out the grip for regulating pressure and turn it to the right or the left until
the manometer shows 4.5 bar.
Push the grip back into the pressure regulator and fixate it.
In order to ensure a safe and trouble-free operation, only use compressed air in accordance with the information
in the "Technical Data" section.

2 Commissioning
Page 10
STATMATIC smart 1,2,3 EN
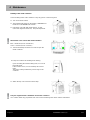
Commissioning
Turn on the mains switch.
Select the desired language with the arrow keys next to the display (Page 10).
Set the date and time (Page 11).
"WARNING Fill with dental oil" and/or "WARNING Fill with cleaner" will be displayed.
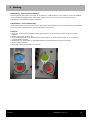
Pull off top cover with both hands approx. 15 mm (overcome magnetic resistance) and pull off upwards.
Refill the media containers (also see chapter 4 "Maintenance").
Observe the color code on the media container! Blue = dental oil / green = cleaner
Only use original SciCan "Dental Oil" and SciCan "Cleaner".
Use of other media may put patients and users at risk and damage the device and the instruments.
Turn the metal flaps to the back in order to open the media container.
Fill up the container to the filling level marking. Upon exceeding the minimum filling level, a 1-second beep will
sound. If the container is full, a 2-second beep will sound 2 times. The beep is always followed by a visual sign
on the container.
Close the media container.
Attach the top cover and close until it stops.
Turn the device off using the power switch and then back on again.
The message "Fill media system" will be displayed after filling the dental oil and cleaner containers. The device
will automatically start this function and run for about 3 minutes.
Filling the media system
This is only necessary if the function did not start automatically or if a container has been completely empty for more
than 3 days. The containers must be filled already for this function.
Turn on the device
Press the button. "Export log data" will appear on the display.
Press the button once until "Fill media system" is highlighted in black on the display.
Using the button, the "Fill media system" menu is selected.
The media system will be filled automatically. During this time, a clock will run backwards until 00:00.
Press the button to return to the "Cleaning + Maintenance" main menu
Setting the language
Turn on the device
Press the button. "Export log data" will appear on the display.
Press the button 4x until "Language setting" is highlighted in black on the display.
The "Language setting" menu is selected using the button.
The desired language is selected using the button.
Save the language selection using the button.
Return to the "Language setting" menu using the button.
Press the button to return to the "Cleaning + Maintenance" main menu.

2 Commissioning
Page 11
STATMATIC smart 1,2,3 EN
Setting the date/time
Turn on the device
Press the button. "Export log data" will appear on the display.
Press the button 3x until "Date/time" is highlighted in black on the display.
The "Date/time" menu is selected using the button.
Set the desired value using the and buttons
Using the button, the cursor is moved to the next possible setting. The values are set in the following order: Year,
month, day, hour, minute.
After final actuation using the , the program jumps back again.
Press the button to return to the "Cleaning + Maintenance" main menu.
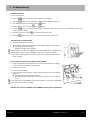
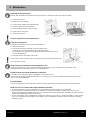
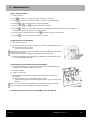
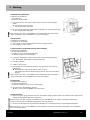
Assemble and check the adapter
Assemble the adapter, if required
Check the MULTIflex receptacle (and/or other turbine adapter) for firm seating.
The clamping nut must be tight.
Retighten clamping nut, if required.
Please note that only white STATMATIC smart / STATMATIC PLUS adapters can be
used. Adapters (black) of the STATMATIC maintenance unit are not suitable.
Check the output quantity on all cleaning slots using a testing adapter intended
for the coupling.
Functional testing of flow rate using the testing adapter
Attach the matching testing adapter to the corresponding instrument couplings
(such as INTRAmatic, DIN ISO EN coupling).
Close the front cover.
Press the START button.
After completion of the program, check the filling quantity in each of the testing
adapters.
The fluid must be above the mark ("Min.") !
If the filling quantity is below the mark, please consult the SciCan customer
service.
Please note that only STATMATIC smart testing adapters can be used. STATMATIC
PLUS testing devices are not suitable.
After this process has completed, the STATMATIC smart system is operational.

3 Operation
Page 12
STATMATIC smart 1,2,3 EN
3 Operation
Manual pre-cleaning of instruments
• Clean the instrument primarily in the head area with a medium-hard toothbrush for 20 sec. under running water (non
strong water jet) until the instrument looks fully clean. (drinking water, temperature 30 °C 5 °C).
• Leave the instrument for 5 minutes.
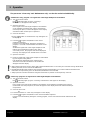
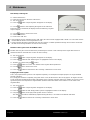
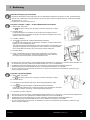
"Cleaning + Maintenance" program - for regular and contra-angle handpieces and turbines
Turn on the mains switch.
LED (Stand-by) lights up green. "Cleaning + Maintenance" will appear on the
display.
Open the front door.
Place regular and contra-angle handpieces and turbines on the adapters provided
for this purpose (instruments must snap into place). A frame will appear on the
display around the station number per occupied slot.
Close the front cover.
Push the (Program Start) button on the control membrane keyboard.
Program runs automatically. During the "Cleaning + Maintenance" program,
a clock will count backwards until 00:00 on the display.
All attached regular and contra-angle handpieces and turbines are cleaned and
maintained for inside in turn. After a successful process, the program slots will be
displayed inversely. The display shows: "Cleaning + Maintenance successful".
Open the front door.
Remove regular and contra-angle handpieces and turbines by pressing the
locking button (A). Pull off turbines downwards (press support lever down).
The frame around the slot number will disappear from the display.
Wipe off the instruments using a damp cloth soaked with disinfectant. For Germany we recommend using disinfectants
listed by the VAH (such as SciCan OPTIM BLUE).
• Immediately following this treatment, the instrument must be treated further in accordance with the manufacturer's
instructions on reprocessing (such as disinfection/sterilization in the STATIM).
• Always perform a function test before using the instruments on patients. Some liquid may come out.
"Collet care" program
Turn on the mains switch.
LED (Stand-by) lights up green. "Cleaning + Maintenance" will appear on the
display.
Open the front door.
Push instrument with chuck opening into the collet care nozzle.
Activate (Collet care) key on the control membrane keyboard.
Program runs automatically. A clock on the display runs backwards until 00:00
The following is then shown on the display: " Collet care measure successful".
Remove instrument from the nozzle.
• Wipe off the instruments using a damp cloth soaked with disinfectant. For Germany we recommend using disinfectants
listed by the VAH (such as SciCan OPTIM BLUE).
• Immediately following this treatment, the instrument must be treated further in accordance with the manufacturer's
instructions on reprocessing (such as disinfection/sterilization in the STATIM).
• Always perform a function test before using the instruments on patients. Some liquid may come out.

3 Operation
Page 13
STATMATIC smart 1,2,3 EN
The processes "Clean only" and "Maintenance only" can also be carried out individually.
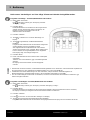
"Maintenance only" program - for regular and contra-angle handpieces and turbines
Turn on the mains switch.
LED (Stand-by) lights up green. "Cleaning +
Maintenance" will appear on the display.
Open the front door.
Place regular and contra-angle handpieces and turbines
on the adapters provided for this purpose (instruments
must snap into place). A frame will appear on the display
around the station number per occupied slot.
Close the front door.
Press the button 1x. "Maintenance only" will appear on
the display.
Push the (Program Start) button on the control
membrane keyboard.
Program runs automatically. During the maintenance
program, a clock will count backwards until 00:00 on the
display.
All attached regular and contra-angle handpieces and
turbines are maintained for inside in turn. After a
successful process, the program slots will be displayed
inversely. The display shows: "Maintenance successful".
Open the front door.
Remove regular and contra-angle handpieces and turbines
by pressing the locking button.
Pull off turbines downwards (press support lever).
The frame around the maintenance slot number will
disappear from the display.
• Wipe off the instruments using a damp cloth soaked with disinfectant. For Germany we recommend using disinfectants
listed by the VAH (such as SciCan OPTIM BLUE).
• Immediately following this treatment, the instrument must be treated further in accordance with the manufacturer's
instructions on reprocessing (such as disinfection/sterilization in the STATIM).
• Always perform a function test before using the instruments on patients. Some liquid may come out.
"Clean only" program - for regular and contra-angle handpieces and turbines
Turn on the mains switch.
LED (Stand-by) lights up green. "Cleaning + Maintenance" will appear on the display.
Open the front door.
Place regular and contra-angle handpieces and turbines on the adapters provided for this purpose
(instruments must snap into place). A frame will appear on the display around the station number per
occupied slot.
Close the front cover.
Press the button 2x. "Clean only" will appear on the display.
Push the (Program Start) button on the control membrane keyboard.
Program runs automatically. During the cleaning program, a clock will count backwards until 00:00 on the
display

3 Operation
Page 14
STATMATIC smart 1,2,3 EN
All attached regular and contra-angle handpieces and turbines are cleaned inside in turn. After a successful process, the
program slots will be displayed inversely. The display shows: "Cleaning successful".
Open the front door.
Remove regular and contra-angle handpieces by pressing the locking button.
Pull off turbines downwards (press support lever).
The frame around the maintenance slot number will disappear from the display.
• Wipe off the instruments using a damp cloth soaked with disinfectant. For Germany we recommend using
disinfectants listed by the VAH (such as SciCan OPTIM BLUE).
• Immediately following this treatment, the instrument must be treated further in accordance with the manufacturer's
instructions on reprocessing (such as disinfection/sterilization in the STATIM).
• Always perform a function test before using the instruments on patients. Some liquid may come out.

3 Operation
Page 15
STATMATIC smart 1,2,3 EN
"Special instrument" program
Special instruments can be maintained and cleaned using this program (such as prophylaxis). The times require for
maintenance and cleaning can be individually adjusted by a service technician.
Turn on the mains switch.
LED (Stand-by) lights up green. "Cleaning + Maintenance" will appear on the display
Open the front door.
Place the instruments on the adapters provided for this purpose (instruments must snap into place). A frame will
appear on the display around the station number per occupied slot.
Close the front cover.
Press the button 3x. "Special instrument" will appear on the display.
Push the (Program Start) button on the control membrane keyboard.
Program runs automatically. During the "Cleaning" program, a clock will count backwards until 00:00 on the display
All attached instruments are cleaned and maintained for inside in turn. After a successful process, the program slots
will be displayed inversely. The display shows: "Special instrument successful".
Open the front door.
Remove regular and contra-angle handpieces by pressing the locking button.
Pull off turbines downwards (press support lever).
The frame around the slot number will disappear from the display.
• Wipe off the instruments using a damp cloth soaked with disinfectant. For Germany we recommend using
disinfectants listed by the VAH (such as SciCan OPTIM BLUE).
• Immediately following this treatment, the instrument must be treated further in accordance with the manufacturer's
instructions on reprocessing (such as disinfection/sterilization in the STATIM).
• Always perform a function test before using the instruments on patients. Some liquid may come out.

4 Maintenance
Page 16
STATMATIC smart 1,2,3 EN
4 Maintenance
Checking adapter fixation
Recommended:
- After installation
- During operation: 1x week
Check the MULTIflex receptacle (and/or other turbine adapter) for firm seating..
The clamping nut must be tight.
Retighten clamping nut, if required.
Check the output quantity on all cleaning slots using a testing adapter intended
for the coupling.
Please note that only STATMATIC smart testing adapters can be used. STATMATIC
PLUS testing devices are not suitable.
Type: 2
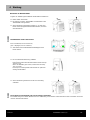
Checking the O-rings
Recommended:
- During operation: 1x week
Check all O-rings on the adapters for damage
Replace damaged O-rings
Functional testing of flow rate using the testing adapter
Recommended:
- Upon initial commissioning
- After changing an instrument coupling
- During operation: 1x day before use
Attach the matching testing adapter to the corresponding instrument couplings
(such as INTRAmatic, DIN ISO EN Coupling).
Close the front cover.
Press the START button.
After completion of the program, check the filling quantity in each of the testing
adapters.
The fluid must be above the mark ("Min.") !
If the filling quantity is below the mark, please consult the SciCan customer
service.
Please note that only STATMATIC smart testing adapters can be used. STATMATIC
PLUS testing devices are not suitable.
Pressure test:
Recommended:
- Upon initial commissioning
- during operation: 1x day, preferably before starting work
Read off the "operating pressure" using the pressure gage.
Pressure should be between 4.5 bar and 4.3 bar!
Type: 3
Changing the adapter
The loosening of the clamping nut allows for the exchangeable adapter to be removed. Insert the desired adapter and
tighten it again using the clamping nut.
Please note that only white STATMATIC smart / STATMATIC PLUS adapters can be used. Adapters (black) of the
STATMATIC maintenance unit are not suitable.
Check the output quantity on the adapter using a testing adapter intended for the coupling.
Please note that only STATMATIC smart testing adapters can be used. STATMATIC PLUS testing devices are not
suitable.

4 Maintenance
Page 17
STATMATIC smart 1,2,3 EN
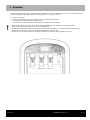
Refilling of the media containers
Check the filling levels of the containers every day prior to commencing work
Turn on the mains switch
The following will appear on the display: "WARNING Fill
Dental oil" or "WARNING Fill Cleaner"
Pull off top cover with both hands approx. 15 mm
(overcome magnetic resistance) and pull off upwards.
Observe the color code on the media container!
Blue = dental oil (SciCan "Dental Oil")
Green = cleaner (SciCan "Cleaner")
Turn the metal flaps to the back in order to open the
media container.
Fill up the container to the filling level marking.
Upon exceeding the minimum filling level, a 1-second
beep will sound.
If the container is full, a 2-second beep will sound 2
times.
The beep is always followed by a visual sign on the
container.
Attach the top cover and close until it stops.
Only use original SciCan "Dental Oil" and SciCan "Cleaner"!
Use of other media may put patients and users at risk and damage the device and the instruments.

4 Maintenance
Page 18
STATMATIC smart 1,2,3 EN
Replacing the absorption pads
Replace both pads after 35 instrument cleaning processes or at least 1x week (more often if needed).
Close the front door.
Pull the pads from the pins.
Remove pads upwards from fastening clips.
Dispose of pads in household waste.
Hook new fleeces into the fastening clips.
Fixate fleeces on the pins.
Close the front cover.
Only use original SciCan absorption fleeces.
Empty the collecting tray
Empty the collecting tray every day and clean/disinfect it
Open the front door.
Pull out tray forwards (horizontal) (overcome slight catch).
Empty the tray and clean/disinfect it with a disinfectant wipe.
For Germany we recommend using disinfectants listed by the VAH (such as
SciCan OPTIM BLUE).
Push tray into the side guides until it locks.
The rear fleece must not be pinched in, but rather has to hang loosely inside the tray.
Close the front cover.
Inside cleaning and disinfection of the maintenance area
Clean the maintenance area and door with disinfectant wipes every day. For Germany we recommend using
disinfectants listed by the VAH (such as SciCan OPTIM BLUE).
Outside cleaning and outside disinfection of the device
The surface and control panel of the STATMATIC smart system can be
cleaned and disinfected using disinfectant wipes. For Germany we recommend using disinfectants listed by the VAH
(such as SciCan OPTIM BLUE).
Recommendation
SciCan recommends an annual maintenance measure to be performed by an authorized dealer or the manufacturer.
NOTE: For users in countries with a legal validation requirement
• An annual maintenance by the manufacturer or an authorized specialist company is recommended.
• Please observe the national specifications for validation. An authorized specialist company must carry out a first
validation with performance qualification (PQ) in accordance with the legal requirements if validation is required. Please
observe the validation instructions for the device.
• SciCan recommends that a revalidation be carried out at intervals of one year (acc. to EN ISO 15883-1), unless shorter
cycles are required by local authorities or the validator. These revalidations should be carried out during or following
maintenance work.

4 Maintenance
Page 19
STATMATIC smart 1,2,3 EN
Data backup of the log file
Switch off the device
Insert the USB stick on the back of the device
Turn on the device
Press the button. "Export log data" will appear on the display.
Use the button to start exporting the log files to the USB stick.
When the process is finished, the display shows the following: Log data
export complete.
Use the button to return to the menu.
Switch off the device
Remove the USB stick.
• If the USB port is to be extended using a USB cable, this cable must be equipped with a ferrite core. The cable must be
inserted with the ferrite core facing the device side.
• Please note that the data on the USB stick must be copied to a suitable permanent storage device. Please check that
the data on the storage medium can also be read correctly.
Deletion of the log file on the STATMATIC smart
Deletion of the log file causes the data to be permanently lost. Please create a backup of the log file first and check
whether the data on the USB stick can also be read correctly.
Turn on the device
Press the button. "Export log data" will appear on the display.
Press the button 6x until "Delete log file" is highlighted in black on the display.
"Deletion" is selected using the button.
Press the button once more. The deletion of the log data will be performed.
Use the button to return to the menu.
Press the button to return back to the "Cleaning + Maintenance" main menu
Emptying the media system
This is only required if the system is to be emptied completely - for example for transport purposes or longer standstill
periods (>30 days).
First, empty the containers completely using drain hoses. Then, tilt the device to the rear by approx. 45 degrees in order
to also empty the residual liquids located at the bottom of the container using the drain hoses. Media can only be re-used
again if they have been kept in their original bottles (mind the best before dates on the bottom or on the sides of the
original bottles).
Turn on the device
Press the button. "Export log data" will appear on the display.
Press the button 2x until "Empty media system" is highlighted in black on the display.
Using the button, the "Empty media system" menu is selected.
The media system will be automatically emptied. During this time, a clock will run backwards until 00:00.
Press the button to return to the "Cleaning + Maintenance" main menu
USB connection
(rear panel of the device)

4 Maintenance
Page 20
STATMATIC smart 1,2,3 EN
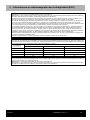
Warning message: Servicing required soon
This warning message appears if more than 25,000 regular and contra-angle handpieces and turbines have been
cleaned and maintained for with the STATMATIC smart. Please contact the service department. You can clean a further
3,300 regular and contra-angle handpieces and turbines.
Error message: Servicing required
This error message appears if more than 28,300 regular and contra-angle handpieces and turbines have been cleaned
and maintained for with the STATMATIC smart. Please contact the service department.
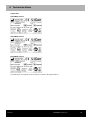
Transport
• If the device was already filled with dental oil and cleaner, the media must be emptied out fully through the drain hoses.
• Empty the media system (see p. 20)
• Unscrew the safety screw of the media aeration and blow compressed air into the valve several times. Tighten the
screw again.
• Place the accompanying seal plugs in the filling funnel of the media container (see fig.)
• Close the flaps.
• If possible, send in the original box.
Seite wird geladen ...
Seite wird geladen ...
Seite wird geladen ...
Seite wird geladen ...
Seite wird geladen ...
Seite wird geladen ...
Seite wird geladen ...
Seite wird geladen ...
Seite wird geladen ...
Seite wird geladen ...
Seite wird geladen ...
Seite wird geladen ...
Seite wird geladen ...
Seite wird geladen ...
Seite wird geladen ...
Seite wird geladen ...
Seite wird geladen ...
Seite wird geladen ...
Seite wird geladen ...
Seite wird geladen ...
Seite wird geladen ...
Seite wird geladen ...
Seite wird geladen ...
Seite wird geladen ...
Seite wird geladen ...
Seite wird geladen ...
Seite wird geladen ...
Seite wird geladen ...
Seite wird geladen ...
Seite wird geladen ...
Seite wird geladen ...
Seite wird geladen ...
Seite wird geladen ...
Seite wird geladen ...
Seite wird geladen ...
Seite wird geladen ...
Seite wird geladen ...
Seite wird geladen ...
Seite wird geladen ...
Seite wird geladen ...
-
 1
1
-
 2
2
-
 3
3
-
 4
4
-
 5
5
-
 6
6
-
 7
7
-
 8
8
-
 9
9
-
 10
10
-
 11
11
-
 12
12
-
 13
13
-
 14
14
-
 15
15
-
 16
16
-
 17
17
-
 18
18
-
 19
19
-
 20
20
-
 21
21
-
 22
22
-
 23
23
-
 24
24
-
 25
25
-
 26
26
-
 27
27
-
 28
28
-
 29
29
-
 30
30
-
 31
31
-
 32
32
-
 33
33
-
 34
34
-
 35
35
-
 36
36
-
 37
37
-
 38
38
-
 39
39
-
 40
40
-
 41
41
-
 42
42
-
 43
43
-
 44
44
-
 45
45
-
 46
46
-
 47
47
-
 48
48
-
 49
49
-
 50
50
-
 51
51
-
 52
52
-
 53
53
-
 54
54
-
 55
55
-
 56
56
-
 57
57
-
 58
58
-
 59
59
-
 60
60


SciCan STATMATIC smart 1 Instructions For Use Manual
- Typ
- Instructions For Use Manual
- Dieses Handbuch eignet sich auch für
in anderen Sprachen
- English: SciCan STATMATIC smart 1
Verwandte Artikel
-
SciCan SANAO 10 Instructions For Use Manual
-
SciCan STATIS 1.1 ST Operating Instructions Manual
-
-
-
-
-
-
-
Andere Dokumente
-
Kerbl 81512 Rubin Benutzerhandbuch
-
Hama 00095884 Benutzerhandbuch
-
GMC G-PRO-TYP1 Bedienungsanleitung
-
-
Gima 33532 Bedienungsanleitung
-
Getinge 170520A0 / TEGRIS BASE SOFTWARE (SW2) Bedienungsanleitung
-
 Ansorg Navo NSK DF Series Bedienungsanleitung
-
EMS Piezon Operation Instructions Manual
-
-
Hill-Rom Green Series 900 Procedure Light Bedienungsanleitung
